1
Commercial Series
CM160
User Guide
6866545D04 - O
Issue: October 2003
3
1
5
6
2
P1
P2
7
P3
P4
CHAN 34
4
10
10
9
8
11
11
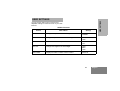
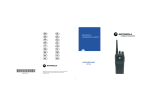
Radio Overview . . . . . . . . . . . . . . . . . . . . 3
Radio Controls . . . . . . . . . . . . . . . . . . . . . . 3
Microphone Controls . . . . . . . . . . . . . . . . . 3
Programmable Buttons . . . . . . . . . . . . . . . 4
Keypad Keys . . . . . . . . . . . . . . . . . . . . . . . 7
Menu Keys . . . . . . . . . . . . . . . . . . . . . . . . . 8
Menu Navigation Chart . . . . . . . . . . . . . . . 9
LCD Display and Icons. . . . . . . . . . . . . . . 10
Audio Signal Tones . . . . . . . . . . . . . . . . . 11
LED Indicators . . . . . . . . . . . . . . . . . . . . . 12
Getting Started . . . . . . . . . . . . . . . . . . . . 13
Turning the Radio On-Off. . . . . . . . . . . . .
Adjusting the Radio’s Volume . . . . . . . . .
Radio On Message . . . . . . . . . . . . . . . . .
Selecting a Radio Channel. . . . . . . . . . . .
Home Revert Memory Channels. . . . .
Store Memory Channels . . . . . . . . . . .
Using the Microphone Keypad . . . . . .
Set Local Distance Mode . . . . . . . . . . . . .
Receive . . . . . . . . . . . . . . . . . . . . . . . . . .
Monitor . . . . . . . . . . . . . . . . . . . . . . . . . . .
Silent Monitor . . . . . . . . . . . . . . . . . . .
Open Squelch Monitor . . . . . . . . . . . .
13
13
13
14
14
14
14
14
15
15
15
15
Transmit. . . . . . . . . . . . . . . . . . . . . . . . . . .16
Cancelling a Call. . . . . . . . . . . . . . . . . .16
Ending a Call . . . . . . . . . . . . . . . . . . . .16
Repeater or Talkaround Mode. . . . . . . . . .17
VOX Operation . . . . . . . . . . . . . . . . . . . . .18
Radio Calls . . . . . . . . . . . . . . . . . . . . . . . .19
Selective Calls . . . . . . . . . . . . . . . . . . . . . .19
Making a Selective Call . . . . . . . . . . . .19
Receiving a Selective Call . . . . . . . . . .19
Sending a Call Alert Page . . . . . . . . . . . . .20
Receiving a Call Alert Page . . . . . . . . . . . .21
Repeater Access . . . . . . . . . . . . . . . . . . . .21
Emergency Alerts . . . . . . . . . . . . . . . . . . .22
Sending an Emergency Alert . . . . . . . .22
Clearing an Emergency Alert . . . . . . . .22
Scan . . . . . . . . . . . . . . . . . . . . . . . . . . . . .23
Start System Scan . . . . . . . . . . . . . . . . . . .23
Stop System Scan . . . . . . . . . . . . . . . . . . .24
Start Auto Scan . . . . . . . . . . . . . . . . . . . . .24
Stop Auto Scan . . . . . . . . . . . . . . . . . . . . .24
Talkback . . . . . . . . . . . . . . . . . . . . . . . . . .25
Delete a Nuisance Channel . . . . . . . . . . . .26
Restore Channel on Scan List . . . . . . .26
Edit a Scan List . . . . . . . . . . . . . . . . . . . . .27
Add or Delete Channels in a Scan List . . .27
1
English
CONTENTS
CONTENTS
Prioritise a Channel in a Scan List . . . . . . 28
Set Priority Channels . . . . . . . . . . . . . 28
CONTENTS
Phone . . . . . . . . . . . . . . . . . . . . . . . . . . . 29
Receiving a Phone Call . . . . . . . . . . . . . .
Making a Phone Call . . . . . . . . . . . . . . . .
Edit the Phone List . . . . . . . . . . . . . . . . . .
Delete an Entry . . . . . . . . . . . . . . . . . . . .
Edit an Entry. . . . . . . . . . . . . . . . . . . . . . .
Edit Access/De-access Codes . . . . . . . . .
30
31
33
34
35
36
Tone Preferences . . . . . . . . . . . . . . . . . . 37
Tone Settings . . . . . . . . . . . . . . . . . . . . . .
Tones On/Off . . . . . . . . . . . . . . . . . . . . . .
Keypad Tones On/Off . . . . . . . . . . . . . . .
Call Tone Tagging . . . . . . . . . . . . . . . . . .
Escalert . . . . . . . . . . . . . . . . . . . . . . . . . .
37
38
38
39
40
User Settings . . . . . . . . . . . . . . . . . . . . . 41
Utilities Features . . . . . . . . . . . . . . . . . . .
Set Squelch Level . . . . . . . . . . . . . . . . . .
Set Power Level . . . . . . . . . . . . . . . . . . . .
Option Board On/Off . . . . . . . . . . . . . . . .
Set Backlight Intensity . . . . . . . . . . . . . . .
Display the Software version . . . . . . . . . .
English
2
41
42
42
43
43
44
Computer Software Copyright
The
products described in this manual may include copyrighted
computer programmes stored in semiconductor memories or other
media. Laws in the United States of America and other countries
preserve for Motorola Europe and Motorola Inc. certain exclusive
rights for copyrighted computer programmes, including the right to
copy or reproduce in any form the copyrighted computer
programme. Accordingly, any copyrighted computer programmes
contained in the products described in this manual may not be
copied or reproduced in any manner without the express written
permission of the holders of the rights. Furthermore, the purchase
of these products shall not be deemed to grant either directly or by
implication, estoppel, or otherwise, any licence under the
copyrights, patents, or patent applications of the holders of the
rights, except for the normal non-exclusive royalty free licence to
use that arises by operation of the law in the sale of the product.
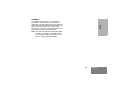
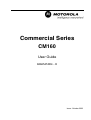
This user guide covers the operation of the CM160
Mobile Radio.
LCD Display
An 8 character single line display with up to 9
radio status icons.
5.
Before using this product, read the
operating instructions for safe usage
contained in the Product Safety and
RF Exposure booklet 6866537D37_
C a u t i o n enclosed with your radio.
Navigation up or down
Used for channel scrolling, menu
navigation and scrolling menu lists.
6.
!
7.
ATTENTION!
This radio is restricted to occupational use only to
satisfy ICNIRP RF energy exposure requirements.
Before using this product, read the RF energy
awareness information and operating instructions in
the Product Safety and RF Exposure booklet
(Motorola Publication part number 6866537D37_) to
ensure compliance with RF energy exposure limits.
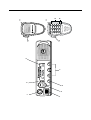
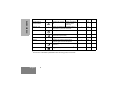
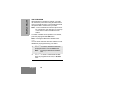
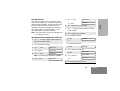
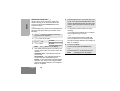
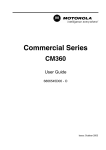
RADIO CONTROLS
The numbers below refer to the illustrations on the
inside front cover.
1. On-Off / Volume Knob
Used to turn the radio on or off, and to adjust
the radio’s volume.
2.
LED Indicators
Indicates channel, scan, and monitor status, as
well as receipt of a selective call.
3.
Mic Jack
Menu Button D
Used to access and select the menu options.
Programmable Buttons C D E F
Dual function programmable buttons. Short
press selects function 1; long press selects
function 2.
MICROPHONE CONTROLS
(Keypad Microphone)
Hold the microphone 2.5 to 5 cm (1-2 inches) from
your mouth, and speak clearly into it.
8. Keypad
9.
Programmable Keys { } |
Dual function programmable buttons. Short
press selects function 1; long press selects
function 2.
10. Push-to-talk (PTT)
Press and hold down this button to talk;
release it to listen.
11. Microphone
3
English
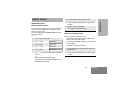
RADIO OVERVIEW
4.
RADIO OVERVIEW
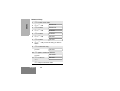
PROGRAMMABLE BUTTONS
RADIO OVERVIEW
Several of your radio’s keys and buttons can be
programmed, by Customer Programming Software
(CPS), as short-cut buttons for many of the radio’s
features. Programmable buttons include:
CM160 C
DEF
Keypad microphone { } |
Check with your dealer for a complete list of
functions your radio supports.
Some buttons can access up to two features,
depending on the type of button press:
•
short press—quickly pressing and releasing the
programmable buttons
•
long press—pressing and holding the
programmable buttons for a period of time (at
least 1 1/2 seconds)
•
hold down—pressing and holding down the
programmable buttons while checking status or
making adjustments
English
4
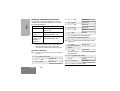
The following table is a summary of programmable
radio features and corresponding page references.
In the “Button” column, have your dealer record the
name of the programmable button next to the
feature that has been programmed to it.
The dealer can use the abbreviations
(P1, P2, P3, P4) shown in the radio illustration on
the inside cover.
Also, where appropriate, have your dealer indicate
whether the button press requires a short press, a
long press, or needs to be held down.
Menu Mode
Indicator
—
Short Press
Long Press
D button enters Menu mode and
selects menu options. C button is
Hold Down
Page Button
—
8
—
Sound a tone
for adjusting
your radio’s
volume level.
13
—
—
14
Stores current
channel.
—
14
—
14
—
15
D
automatically re-assigned to exit Menu
Mode.†
Volume Set
—
Home Revert Memory
Channel (1 & 2)
—
Store Memory
Channel (1 & 2)
—
Local/Distance
—
Provides direct
channel access.
—
Toggles between local mode and distance
mode. †
Turn on open
squelch monitor.
Monitor
Toggle silent monitor
operation (also turn
off open squelch
monitor when it has
been activated).
Repeater/Talkaround
Toggle between using a repeater or
transmitting directly to another radio. †
—
17
Voice Operated
Transmission (VOX)
—
Toggle VOX On and Off.
—
18
Radio Call
—
Directly accesses the radio call menu.†
—
19
5
English
RADIO OVERVIEW
Function
Function
Indicator
RADIO OVERVIEW
Long Press
Hold Down
Delete a nuisance
channel while
scanning.
—
23
Directly accesses the Scan Edit menu to
add, delete or prioritise channels.
—
27
Phone
Directly accesses Phone mode.†
—
29
Speed Dial
Directly accesses Phone mode to access
phone list for speed dial.†
—
31
Scan/Nuisance
Channel Delete
Edit Scan List
Short Press
Toggle scan on and
off .
—
Page Button
Escalert On/Off
—
Toggles escalert on and off.†
—
40
Squelch
—
Toggles your radio’s squelch level
between tight and normal squelch.
—
42
Power Level
Toggle transmit power level between High
and Low. †
—
42
Option board
Toggles the option board on and off.†
—
43
†
This function is activated by EITHER a short OR a long press, but not both.
English
6
(Keypad Microphone)
Each key can generate several different characters,
e.g. to enter ‘C’ press the 2 button three times.
Refer to the table below for entering characters
using the microphone keypad.
1
2
3
4
5
6
7
8
9
Button
1
*
0
#
0
0
{
}
|
1
Number of Times Button is Pressed
2
3
1
/
\
2
A
B
C
2
Your radio may be operated with a DTMF (DualTone Multi-Frequency) microphone that has a direct
entry keypad.
The keypad is used for:
• Dialling a phone number and making a call.
3
D
E
F
3
4
G
H
I
4
5
J
K
L
5
•
Entering information when programming phone
lists.
6
M
N
O
6
•
Directly accessing pre-programmed features.
7
P
Q
R
S
8
T
U
V
8
9
W
X
Y
Z
*
*
<
>
#
#
+
-
The keypad microphone has three programmable
buttons ({, }, and |) below the keypad that
can be programmed to conveniently activate
selected radio features. Each button is dual
function; a short press may select one function, a
long press may select the second.
The # button can be programmed to send a call.
4
5
7
9
_
7
English
RADIO OVERVIEW
KEYPAD KEYS
MENU KEYS
RADIO OVERVIEW
Menu Select Button D
Up /Down Navigation Keys G/H
The D button is dedicated to Menu access and
menu option selections. It can be pre-programmed
by your dealer to either a long or short press.
Used to scroll when in Menu Mode.
Increment/decrement channel number or scroll
through menu list options. If you scroll past the last
option the selection wraps around and starts again.
On reaching the required option, a short press of
D selects the option.
Refer to the menu navigation chart for menu
selectable features.
Menu Exit Button C
In Menu Mode, this button is automatically assigned
to exit the menu. A long press exits the menu
immediately, while short presses are used to move
up to the next higher Menu level. When the top level
menu is selected, a short press will exit the Menu
Mode.
The radio also exits the Menu Mode after an
“Inactivity Time” timeout
Once the menu mode is exited, both C and D
buttons return to their normal programmable
condition.
English
8
(Refer to Menu Navigation guidelines—
lower, left-hand corner of this page)
Radio
Calls
Repeater/
Talkround
System
Scan
Reptr mode /
Talkrnd mode
On/Off
D
Program
Lists
Phone
Alert
On/Off
Selective
Call
Call Alert
Select/enter
ID
Select/enter
ID
Phone List
add/
delete/edit
edit code entry
D to enter Menu Mode.
Normal/Tight
Keypad
On/Off
On/Off
Backlight
Tone Tag
Menu Navigation Guidelines
Squelch
Power Level
Scan List
add/
delete entry
Set prority
Utilities
Tones
Standard/alert
1-6
Hi/Med/Lo
Option Bd
On/Off
Escalert
or
to scroll through the list.
D to select Menu item
D return to previous menu level or
Hold down C to exit Menu Mode
On/Off
or
S/ware Ver
to scroll through the
Menu sub-list.
D to select sub-menu item.
9
English
RADIO OVERVIEW
MENU NAVIGATION CHART
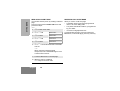
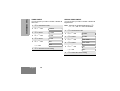
LCD DISPLAY AND ICONS
RADIO OVERVIEW
CHAN 34
Displays radio Status, Addresses or Channel, on
one line of 8 characters. The top line of the display
shows radio status icons, explained in the table
below:
Symbol
Name and Description
Option Board Indicator
Indicates that an option board is
activated in the radio.
Signal Strength Indicator
The more bars, the stronger the signal
being received by your radio.
Power Level Indicator
“L” lights when your radio is configured
to transmit in Low Power. “H” lights
when your radio is configured to
transmit in High Power.
Monitor Indicator
The selected channel is being
monitored.
English
10
Symbol
Name and Description
Scan Indicator
Indicates that the scan feature is
activated.
Priority Scan Indicator
Indicates that the scan feature is
activated. The dot is flashing during
priority scan mode when scan has
landed on a Priority 1 channel.
The dot is steady during priority scan
mode when scan has landed on a
Priority 2 channel.
Phone Indicator
Phone mode is selected.
Call Received Indicator
A Selective Call or Call Alert has been
received.
Talkaround Indicator
You are transmitting directly to another
radio, not via a repeater.
Emergency Indicator
An Emergency Alarm is being sent.
High pitched tone
Signal
Positive
Indicator Tone
Negative
Indicator Tone
Scan
Start
Stop
Power Level
High
Low
Self Test Pass Tone.
Squelch
Tight
Normal
Repeater/
Talkaround
Does not use
repeater
Uses repeater
Self Test Fail Tone.
Enabled
Disabled
Local/Distance
Local
Distance
Negative Indicator Tone.
Sticky Monitor/
Open Squelch
—
Enabled
Good key press.
Home Revert
Memory
Channel (1&2)
—
Enabled
Store Memory
Channel (1&2)
—
Stored
Menu Mode D
—
Accessed
Radio Call
—
Enabled
Scan List Edit
—
Enabled
Speed Dial
—
Enabled
Phone Mode
—
Enabled
Option Board
Enabled
Disabled
Escalert
Enabled
Disabled
Low pitched tone
Description
Programmable
Buttons
VOX
Positive Indicator Tone.
Bad key press.
Some programmable buttons use tones to indicate
one of two modes as detailed in the following table:
11
English
RADIO OVERVIEW
AUDIO SIGNAL TONES
LED INDICATORS
RADIO OVERVIEW
Three LEDs show radio status as follows:
LED
State
Indication
LED
Red
Solid
Radio transmitting
Red
Flashing
Channel busy - when
receiving
Flashing
Radio is scanning
Yellow
Solid
Radio sending a Call
Alert
Yellow
Flashing
Radio receiving a Call
Alert
Scan
Green
Call Alert
Selective Call
Yellow
Solid
Radio sending a
Selective Call
Yellow
Flashing
Radio receiving a
Selective Call
English
12
Indication
Sticky Monitor/Open Sqelch
Yellow
Radio Call
State
Solid
Radio monitoring
channel
Turn the On/Off/Volume Control knob clockwise to
increase the volume, or counterclockwise to
decrease the volume.
– or– use the pre-programmed Volume Set button:
TURNING THE RADIO ON / OFF
Volume Control Knob
ON
1
Hold down the Volume Set button. You will
hear a continuous tone.
2
Turn the On/Off/Volume Control knob to the
desired volume level.
OFF
CHAN 3
Release the Volume Set button.
Radio On Message
P1
P2
ON
OFF
Rotate the On/Off/
Volume Control knob
clockwise until you
hear a click.
Rotate the On/Off/
Volume Control knob
counterclockwise until
you hear a click. The
display clears and the
LED indicators turn off .
At power up the radio may display a message
customised by your dealer, e.g.:
RADIO ON
After this text has been displayed, the radio
performs a self test routine. During the routine the
Green LED lights. On completion of a successful
self test the radio produces the Self-Test pass Tone,
the Green LED indicator goes out and the display
shows the screen that was in use at power down,
typically:
CHAN 35
This may be a number or an alias and will be the
current channel.
13
English
GETTING STARTED
Adjusting the Volume
GETTING STARTED
GETTING STARTED
Note: If your radio fails the self test routine the
display will show the failure number. Record
the number and consult your dealer
SELECTING A RADIO CHANNEL
Your radio offers up to 64 channels, however some
may not be programmed. Check with your dealer for
more information.
Press G to increment the Channel number
or H to decrement it.
Your radio will power up on a pre-programmed
designated channel or the channel that it was on
when it was powered down.
Home Revert Memory Channels (1&2)
Up to two programmable buttons can be
programmed as Home Revert Memory Channel
buttons which allow you quick access to frequently
used channels. The buttons may be preprogrammed by your dealer or are programmable
by yourself.
If pre-programmed by your dealer, an appropriate
press of the button will take you to the assigned
channel.
English
14
Store Memory Channels (1&2)
To program a Memory Channel button yourself,
select the desired channel in the normal way and
long press the button. The button is then
programmed to the selected channel; a short press
on the button will take you to that channel.
Note: The programming is retained when you turn
off the radio.
Using the Microphone Keypad (If programmed)
Enter the desired channel number on the keypad.
Press # on the keypad to select the channel.
Note: The keypad microphone cannot be used to
enter the channel number during a call or
whilst the radio is in a scan.
Set Local or Distance Mode
Distance is the standard mode of operation, and
maximises receive radio range.
Local reduces interference from other radios in
close proximity and is typically used for base station
configurations.
Press the preprogrammed Local/Distance button to
toggle between Local and Distance mode.
Silent Monitor
1
Turn your radio on.
2
Adjust the radio’s volume, if necessary.
A short press of the preprogrammed Monitor
button places the radio in Silent Monitor
mode.
3
G or H to select the desired channel.
•
•
4
5
Make sure the PTT button is released.
Listen for voice activity.
•
1
2
The red LED indicator flashes while your
radio is receiving.
To respond, hold the microphone vertically 2.5
to 5 cm from your mouth. Press the PTT button
to talk; release it to listen.
A short press of the Monitor button cancels
Silent Monitor mode and returns the radio to
normal operation.
Open Squelch Monitor
1
MONITOR
It is important to monitor traffic before transmitting to
ensure that you do not “talk over” someone who is
already transmitting.
You hear a high-pitched tone, then any
communications on channel. Wait until the
channel is quiet before sending a call..
To place the radio in Open Squelch mode,
press and hold the preprogrammed Monitor
button until you hear a high-pitched tone.
•
2
If no activity is present, you will hear “white
noise.”
Momentarily press the Monitor button to
return to normal operation.
Note: Depending on how your radio has been
programmed, per channel for transmit and
receive conditions, when the microphone has
been taken off-hook, the radio will go into Open
Squelch mode.
15
English
GETTING STARTED
RECEIVE
TRANSMIT
Cancelling a Call
GETTING STARTED
1
Turn your radio on.
2
G or H to select the desired channel.
3
Hold the microphone vertically 2.5 to 5 cm
from your mouth. Press the PTT button to talk.
•
4
The red LED indicator lights steady while
the call is being sent.
Release the PTT button to listen.
Your radio may be configured for ‘Busy Channel
Lockout’ under certain conditions (e.g. when the
channel is in use by others) in which case, the
negative tone indicator will sound when you press
the PTT or call button to indicate that transmission is
inhibited.
English
16
At any time while setting up a call, it may be cancelled
by pressing the Monitor button, or replacing the
microphone in its holder (referred to as going “on
hook”) .
The call timer can also cancel a call.
Ending a Call
A call should always be ended by pressing the
Monitor button, or replacing the microphone in its
holder.
Talkaround Mode enables you to communicate with
another radio when either:
• The repeater is not operating.
– or –
• Your radio is out of the repeater’s range but
within communicating distance of another radio.
Note: The J symbol appears on the display when
Talkaround Mode is selected.
Select either Repeater Mode or Talkaround
Mode
Press the preprogrammed Repeater/Talkaround
button to toggle between Repeater Mode and
Talkaround Mode.
– or –
1
D to enter menu mode.
2
G or H until
3
D to select the current setting.
4
G or H until
TALKARND
– or – until
REPEATER
5
TALKARND
D to select the current setting.
17
English
GETTING STARTED
REPEATER OR TALKAROUND MODE
VOX OPERATION
GETTING STARTED
When hands-free operation is desired, your radio
can transmit by voice alone using the VOX feature
when you speak through a voice activated external
microphone that is connected to your radio.
Note: A voice activated external microphone must
be connected to your radio prior to power-up
of the radio in order to activate the VOX
feature.
To enable or disable VOX operation on a channel,
press the preprogrammed VOX button.
Note: Pressing the PTT button disables VOX.
– or –
You can select channels with VOX enabled or VOX
disabled as preprogrammed by your dealer.
1
G or H to select a channel that has been
preprogrammed for VOX to enable VOX.
Note:
2
Pressing the PTT button disables
VOX.
G or H to select a channel that has not
been pre-programmed for VOX, to disable
VOX.
English
18
SELECTIVE CALLS
Making a Selective Call
You can make a selective call to a particular radio,
known as an individual call, or a group of radios,
known as a group call.
Press the preprogrammed Radio Call button and
proceed to step 4.
– or –
1
D to enter menu mode
2
G or H until
RAD CALL
3
D to select
RAD CALL
4
G or H until
SEL CALL
5
D to select
SEL CALL
6
G or H to locate the desired ID in the Radio
Call List.
- or When using the enhanced keypad
microphone, enter a valid DTMF digit to move
to that location in the list.
7
Press the PTT button to send the call.
8
Press and hold the PTT button to talk; release
to listen.
9
When the call is completed,
C until you exit menu mode.
Receiving a Selective Call
When you receive a Selective Call:
• The display shows F and the preprogrammed
name or ID of the calling radio.
•
The yellow LED indicator flashes, if programmed
by your dealer.
•
You hear two high-pitched tones.
1
To acknowledge the call, press and release the
PTT button.
2
Press and hold the PTT button to talk; release
to listen.
19
English
RADIO CALLS
RADIO CALLS
RADIO CALLS
SEND A CALL ALERT PAGE
RECEIVE A CALL ALERT™ PAGE
You can alert another person by sending a Call Alert
page.
Press the preprogrammed Radio Call button and
proceed to step 4.
– or –
When you receive a Call Alert page:
• The display shows F and the preprogrammed
name or ID of the calling radio.
•
The yellow LED indicator flashes, if programmed
by your dealer.
You hear four high-pitched tones.
1
D to enter menu mode
•
2
G or H until
RAD CALL
To acknowledge the page, press and release the
PTT button; to cancel the page, press any other key.
3
D to select
RAD CALL
4
G or H until
CALL ALT
5
D to select
CALL ALT
6
G or H to locate the desired ID in the Radio
Call List.
- or When using the enhanced keypad
microphone, enter a valid DTMF digit to move
to that location in the list.
7
Press the PTT button to send the page.
8
When the page is completed,
C until you exit menu mode.
English
20
REPEATER ACCESS
RADIO CALLS
Use with Keypad Microphone (RMN5029)
To send DTMF repeater access tones :
1
Press and hold the microphone PTT button.
2
Enter the repeater access code on the
microphone keypad.
3
Release the microphone PTT button.
21
English
RADIO CALLS
EMERGENCY ALERTS E
Sending an Emergency Alert E
Your radio offers choices for initiating and
responding to Emergency Alert communications. An
Emergency Alert can be programmed for:
• Standard operation - shows E and sounds a
tone
–or–
• Silent operation - shows the normal display
–or–
• Silent with voice operation - activates the
microphone so that all activity can be transmitted
(for a predetermined amount of time). An
appropriate ‘hot microphone’ must be fitted, e.g.
MDRMN5029.
A priority Emergency Alert can be sent to a specific
radio or dispatch centre by pressing either a foot
switch or a push button accessory.
All emergency features are preprogrammed. See
your dealer for further information on the emergency
features that are available.
English
22
•
The display shows:
EMER IN
Note: Emergency alerts have priority over all other
calls.
Clearing an Emergency Alert
An Emergency Alert can be cleared by long
pressing either a foot switch or a push button
accessory.
Your radio is equipped with the Scan feature, which
allows you to search for, lock onto, and monitor
voice activity on channels. Scan lists are assigned
per channel, by your dealer. Your radio
automatically switches to a channel, within that scan
list, when it detects activity. You can also edit these
lists through the radio menu.
•
The green LED indicator flashes during scan
mode; it stops flashing when the radio switches
to an active channel.
•
The Gsymbol appears on the display while in
scan mode.
•
Your dealer can preprogram your radio where, if
the microphone is taken off-hook while in Scan
mode, the scanning activity becomes suspended
until the microphone is replaced.
START SYSTEM SCAN G
Press the preprogrammed Scan button to start
System Scan.
– or –
1
G or H to select a channel that contains a
Scan list.
2
D to enter menu mode.
3
G or H until
SYS SCAN
4
D to select
SYS SCAN
The display shows the current scan status.
5
G or H until
6
D to select the current setting.
SCAN ON
There are two types of Scan available in your radio:
• System Scan
•
Auto Scan
23
English
SCAN
SCAN
SCAN
STOP SYSTEM SCAN
START AUTO SCAN G
Press the preprogrammed Scan button to stop
System Scan.
– or –
Auto Scan automatically starts scanning once the
channel with Auto Scan enabled is selected.
1
D to enter menu mode.
2
G or H until
SYS SCAN
3
D to select
SYS SCAN
The display shows the current scan status.
4
G or H until
5
D to select the current setting.
•
SCAN OFF
The Gsymbol disappears from the
display.
Note: Your dealer can preprogram your radio when
exiting System Scan to automatically revert
to the last scan channel that had activity on it
or to automatically revert to the channel
where scan was initiated.
English
24
G or H to select a channel that has been
preprogrammed for Auto Scan by your dealer.
STOP AUTO SCAN
G or H to select a channel that has not been
preprogrammed for Auto Scan by your dealer.
• The Gsymbol disappears from the display.
TALKBACK
SCAN
The Talkback feature allows you to respond to a
transmission while scanning. If transmission is
detected on a channel while scanning, the radio will
stop and land on that channel for a preprogrammed
period of time after activity has ceased. This is
referred to as “hangtime”. During this hangtime you
may respond by pressing the PTT button.
Note: The LED scan indicator stops flashing while
the radio is in hangtime. If the PTT button is
not pressed, the radio reverts back to scan
after the preprogrammed hangtime.
25
English
DELETE A NUISANCE CHANNEL
Note: Your dealer must preprogram a button to
Nuisance Delete to access this feature.
SCAN
If a channel continually generates unwanted calls or
noise (a “nuisance” channel), you can temporarily
remove it from the scan list:
Restore Channels to the Scan List
1 Power off the radio. Once the radio is powered
on again, the deleted nuisance channels are
restored to the scan list.
– or–
1
While the radio is on the Nuisance Channel,
press the preprogrammed Nuisance Channel
Delete button until you hear a tone.
2 Press the preprogrammed Scan button to stop
the scan.
2
Release the Nuisance Channel Delete
button. The nuisance channel is deleted.
3 Press the preprogrammed Scan button again
to start scanning again. The Deleted Nuisance
Channels are restored to the scan list.
Note: You cannot temporarily delete the channel
that has been preprogrammed by your dealer
as your designated scan channel, a priority
channel, or the last remaining channel in the
scan list.
English
26
– or –
4
G or H to change channel. Once you return
to the original channel, the deleted nuisance
channels are restored to the scan list.
7
G or H until
ADD ITEM
– or – until
DELETE
Your radio can support up to 16 Scan lists. Each
Scan list can contain up to 16 channels. The same
channel can be included in several Scan lists, and
the same Scan list can be assigned to several
channels. Scan lists are assigned per channel, by
your dealer. When you edit a Scan list, you can
either add, delete, or prioritize channels.
8
D to select the current setting.
9
G or H until you see the channel you want
to add or delete.
Note: Your radio cannot receive any calls while you
are editing a Scan list.
10
D to confirm your selection.
ADD OR DELETE CHANNELS IN A SCAN LIST
1
11 If you added a channel,
you see:
– or –
G or H to select a channel that contains a
Scan list you want to edit.
2
D to enter menu mode.
If you delete a channel,
3
G or H until
PROG LST
you see:
4
D to select
PROG LST
5
G or H until
SCAN LST
Note: One Scan list per channel is available.
6
D to select
12
13
SCAN LST
14
ADDED
DELETE
D to confirm the deletion.
you see:
DELETED
C to return to
ADD ITEM
– or –
DELETE
C until you exit menu mode.
27
English
SCAN
EDIT A SCAN LIST
PRIORITIZE A CHANNEL IN A SCAN LIST
SCAN
You may want to check the activity on one or two
channels more frequently than others. You can do
this by prioritizing them:
Priority Channel
None specified
Scanning Sequence
Ch1➠Ch2➠Ch3➠
Ch4➠…Ch1
Channel 2
(Priority 1)
Ch2➠Ch1➠Ch2➠Ch3➠
Ch2➠Ch4➠Ch2➠…Ch1
Channel 2
(Priority 1) and
Channel 8
(Priority 2)
Ch2➠Ch1➠Ch8➠Ch3➠
Ch2➠Ch4➠Ch8➠…Ch1
4
5
6
7
8
9
10
Set Priority Channels
You cannot have the same priority on two different
channels.
Note:
1
2
3
D to enter menu mode.
PROG LST
G or H until
PROG LST
D to select
11
28
– or – until
PRI #2
SCAN LST
EDIT PRI
EDIT PRI
PRI #1
D to select the current priority level.
G or H until you see the channel you want
to prioritize.
– or – until
to select the current
channel
SELECTED
– or – until
to de-prioritise the
current channel
DISABLED
D to prioritize that channel.
you see:
12
13
English
SCAN LST
You see the current priority channel.
If you are receiving on a non-priority channel and
traffic becomes active on a priority channel, your
radio will automatically switch to that priority
channel and indicate the activity with a short tone.
Note:
G or H until
D to select
G or H until
D to select
G or H until
SAVED
EDIT PRI
C to return to
C until you exit menu mode.
PHONE
•
PHONE
Your radio allows you to place and receive
telephone calls through a repeater (depending on
phone line availability). You can edit the phone list
through your radio’s menu.
D appears on the display when you are in
Phone mode.
Your dealer can preprogram your radio in one of
three ways to enter your access/de-access code to
the repeater.
Immediate Auto – your radio will transmit the
access/deaccess code automatically upon entering
phone mode or disconnecting a phone call. You will
hear a series of tones, and see your access/
deaccess code on the display, indicating that an
access/deaccess code is being sent automatically.
Delayed Auto – your radio will transmit the access
code upon a PTT button press. The de-access code
is sent automatically when you exit phone mode.
Manual - Press and hold the microphone PTT and
enter your access/deaccess code using the DTMF
microphone keypad. Release the microphone PTT
on completion.
29
English
RECEIVE A PHONE CALL D
PHONE
When a phone call is received, a ringing tone
sounds, alerting you to answer the phone call.
Press the preprogrammed Phone button and
proceed to step 6.
– or –
Press the PTT button, and if the Hot Keypad feature
has been preprogrammed by your dealer, do the
following:
1
2
3
4
Hold microphone 2.5 to 5 cm away from your
mouth. Press and hold the PTT button to talk.
Release the PTT button when the other party
wants to talk, both parties will need to speak
in turn.
7
To disconnect a phone call, do one of the
following:
If your radio has Immediate Auto or Delayed
Auto programmed, go to step 8.
– or –
Press and hold the microphone PTT and
enter your deaccess code using the DTMF
microphone keypad. Release the microphone
PTT on completion.
8
To exit Phone Mode:
Press the preprogrammed Phone button
– or –
Press and hold C to disconnect the call.
Note: D disappears from the display.
G or H to select a channel that has been
programmed for telephone.
D to enter menu mode.
PHONE
G or H until
PHONE
D to select
Note:
5
6
The D appears on the display.
Your dealer can preprogram your radio in one
of three ways to enter your access code to the
repeater.
Immediate Auto – automatically sends the
access code.
Delayed Auto – your radio will transmit the
access code upon a PTT button press.
Manual - Press and hold the microphone PTT
and enter your access code using the DTMF
microphone keypad. Release the microphone
PTT on completion.
English
30
6
Press the preprogrammed Phone button and
proceed to step 6.
– or –
Press the PTT button, and if the Hot Keypad feature
has been preprogrammed by your dealer, do the
following:
1
G or H to select a channel that has been
programmed for telephone.
2
D to enter menu mode.
3
G or H until
PHONE
4
D to select
PHONE
5
Your dealer can preprogram your radio in one
of three ways to enter your access code to the
repeater.
Immediate Auto – automatically sends the
access code.
Delayed Auto – your radio will transmit the
access code upon a PTT button press.
Manual - Press and hold the microphone PTT
and enter your access code using the DTMF
microphone keypad. Release the microphone
PTT on completion.
7
When you hear a dial tone:
Enter the phone
number using the
DTMF microphone
keypad.
The number will scroll
to the left,
– or –
XXXXXXX
G or H to select a
number from the
phone list. (Only the
first 8 digits are
displayed.)
– or –
XXXXXXXX
PHONE
MAKE A PHONE CALL D
a.
Press and release the preprogrammed
Speed Dial button.
b.
Press the key (0 to 9) corresponding to
the number you want to call.
To redial the last number dialed (if not using
Speed Dial), press and release the PTT
button immediately after the access code is
sent. The radio sends the last number dialed.
– or –
31
English
PHONE
If you entered your access code using the
DTMF keypad, press G once to access the
last number dialed; then press and release
the PTT button.
8
Press and release the PTT button, if required
for your radio.
9
Hold the microphone 2.5 to 5 cm away from
your mouth. Press and hold the PTT button to
talk. Release the PTT button when the other
party wants to talk, both parties will need to
speak in turn.
10 To disconnect a phone call, do one of the
following:
If your radio has Immediate Auto or Delayed
Auto programmed, go to step 10.
– or –
Press and hold the microphone PTT and
enter your deaccess code using the DTMF
microphone keypad. Release the microphone
PTT on completion.
English
32
11 To exit Phone Mode:
Press the preprogrammed Phone button
– or –
Press and hold C to disconnect the call.
Note: D disappears from the display.
9
Your radio contains a Phone list that holds up to 25
phone numbers. You can edit the Phone list in three
ways through your radio’s menu:
• Add an entry
•
Delete an entry
•
Edit an existing entry
Add an Entry
D to enter menu mode.
2
G or H until
PROG LST
3
D to select
PROG LST
4
G or H until
PHN LST
5
D to select
PHN LST
6
G or H until
ADD ITEM
7
D to select,
ADD ITEM
you see:
NAME
8
you see:
NUMBER
10 Use the DTMF microphone keypad to enter the
phone number. You can also add a Pause
Indicator (press # three times until the #
character on the display changes to a “-”).
11
1
D to store the name,
D to store the phone number.
you see:
LOC XX
12
G or H until you see the location in the list
where you want to store the phone number.
13
D to store the location.
14
you see:
SAVED
C to return to
ADD ITEM
– or –
C until you exit menu mode.
Use the DTMF microphone keypad to enter
the name (see Entering Characters using the
DTMF Microphone Keypad).
33
English
PHONE
EDIT THE PHONE LIST
Delete an Entry
PHONE
1
D to enter menu mode.
2
G or H until
PROG LST
3
D to select
PROG LST
4
G or H until
PHN LST
5
D to select
PHN LST
6
G or H until
DELETE
7
D to select
DELETE
8
G or H until you see the entry you want to
delete.
9
D to select the entry,
DELETE
you see:
10
11
D again to confirm the deletion,
you see:
DELETED
C to return to
DELETE
– or –
C until you exit menu mode.
English
34
11
D to confirm your selection.
1
D to enter menu mode.
2
G or H until
PROG LST
3
D to select
12 Use the DTMF microphone keypad to edit the
entry
– or –
PROG LST
G or H until you see the location where you
4
G or H until
PHN LST
want to store the phone number.
5
D to select
PHN LST
6
G or H until
EDIT
7
D to select
EDIT
8
G or H until you see the entry you want to
edit.
9
D to select the entry.
10
G or H until
(to edit the name),
– or – until
(to edit the phone
number),
– or – until
(to edit the location in
the phone list).
13
14
D to store the information.
you see:
SAVED
C to return to
EDIT
– or –
C until you exit menu mode.
NAME
NUMBER
LOC
35
English
PHONE
Edit an Entry
Edit Access/Deaccess Codes
11
You can edit the access/de-access codes that are
used to connect or disconnect you from a repeater.
D to select the entry.
PHONE
you see:
SAVED
1
D to enter menu mode.
12
G or H to edit another code.
2
G or H until
PROG LST
13
C until you exit menu mode.
3
D to select
PROG LST
4
G or H until
PHN LST
5
D to select
PHN LST
6
G or H until
EDT CODE
7
D to select
EDT CODE
8
G or H until
ACCESS
– or – until
DEACCESS
9
D to select the current setting.
10 Enter the number using the DTMF keypad
microphone.
English
36
TONE PREFERENCES
TONE PREFERENCES
You can use the radio’s menu to access useradjustable settings to customize the tones on your
radio:
Tone Settings
Feature
What it Does
Settings
TONE
Turns all alert tones on or off.
ON
OFF
KPD TONE
Turns the keypad tones on or off.
ON
OFF
TONE TAG
Assigns a specific tone when receiving a specific type of
radio call.
STANDARD
ALERT 1-6
ESCALERT
Increases the volume of the alarm tones when a radio
call is not answered.
ON
OFF
37
English
TONE PREFERENCES
TONES ON/OFF
KEYPAD TONES ON/OFF
You can program your radio to enable or disable all
alert tones.
You can program your radio to enable or disable all
keypad tones.
1
D to enter Menu mode.
2
G or H until
TONES
3
D to select
TONES
4
G or H until
TONE
5
D to select
TONE
6
G or H until
ON
– or – until
OFF
7
Note: Tones for the programmable buttons C,
D, E, and F cannot be disabled.
1
D to enter Menu mode.
2
G or H until
TONES
3
D to select
TONES
4
G or H until
KPD TONE
5
D to select
KPD TONE
6
G or H until
ON
– or – until
OFF
D to select the current setting.
7
English
38
D to select the current setting.
You can program your radio to sound a particular
alert tone when receiving a Selective Call or Call
Alert (call tone tagging).
10
C to return to
11
C until you exit the menu mode.
TONE PREFERENCES
CALL TONE TAGGING
TONE TAG
Note: Seven alert tones are available to select from
in the list.
1
D to enter menu mode.
2
G or H until
TONES
3
D to select
TONES
4
G or H until
TONE TAG
5
D to select
TONE TAG
6
G or H until
CALL ALT
– or – until
SEL CALL
7
D to select the current setting.
8
G or H until you see and hear the tone you
want to use for this type of call.
9
D to select the current setting,
you see:
TONE SET
39
English
TONE PREFERENCES
ESCALERT
You can program your radio to increase the volume
of the alarm tones when a radio call is not
answered.
Press the preprogrammed Escalert button and
proceed to step 6.
– or –
1
D to enter menu mode.
2
G or H until
TONES
3
D to select
TONES
4
G or H until
ESCALERT
5
D to select
ESCALERT
6
G or H until
ON
– or – until
OFF
7
D to select the current setting.
English
40
USER SETTINGS
USER SETTINGS
You can use the radio’s menu to access useradjustable settings to customize some of your radio
features:
Utilities Features
Feature
What it Does
Settings
SQUELCH
Changes the squelch of the radio to tight or normal.
TIGHT
NORMAL
PWR LVL
Changes the power level of the radio to high or low.
HIGH
LOW
OPT BRD
Enables or disables an option board.
ON
OFF
BKLT INT
Changes the brightness of the backlight.
HIGH
MED
LOW
SOFTWARE
Displays the radio’s software version number.
XX’XX’XX
41
English
USER SETTINGS
SET SQUELCH LEVEL
SET POWER LEVEL B
Use this feature to filter out nuisance (unwanted)
calls and/or background noise. However, tightening
squelch could cause calls from remote locations to
be filtered out as well. In this case, normal squelch
may be more desirable.
Press the preprogrammed Squelch button to toggle
between tight and normal squelch.
– or –
Each channel in your radio has a predefined
transmit power level that can be changed.
• High power (S) allows you to reach a radio that is
further away.
1
D to enter menu mode.
2
G or H until
UTILITY
3
D to select
UTILITY
4
G or H until
SQUELCH
5
D to select
SQUELCH
6
G or H until
-or - until
7
• Low power (R) to reach a radio within close proximity.
Note: The R or S symbol appears on the display
when High/Low Power Level is selected.
To set the power level, press the preprogrammed
Power Level button to toggle between low and high
power.
– or –
1
D to enter menu mode.
2
G or H until
UTILITY
3
D to select
UTILITY
NORMAL
4
G or H until
PWR LVL
TIGHT
5
D to select
PWR LVL
6
G or H until
HIGH
-or - until
LOW
D to select the current setting.
7
English
42
D to select the current setting.
SET THE BACKLIGHT INTENSITY
Use this feature to enable or disable an option
board.
Use this feature to change the brightness of the
backlight.
The A symbol appears on the display when
the option board feature is On.
•
Press the preprogrammed Option Board button to
toggle the option board on or off.
– or –
1
D to enter menu mode.
2
G or H until
UTILITY
3
D to select
UTILITY
1
D to enter menu mode.
4
G or H until
BKLT INT
2
G or H until
UTILITY
5
D to select
BKLT INT
3
D to select
UTILITY
6
G or H until
HIGH
4
G or H until
OPT BRD
-or- until
MED
5
D to select
OPT BRD
-or- until
LOW
6
G or H until
ON
-or- until
OFF
7
7
D to select the current setting.
D to select the current setting.
43
English
USER SETTINGS
OPTION BOARD ON/OFF A
DISPLAY THE SOFTWARE VERSION
USER SETTINGS
Use this feature to view the current software version
of your radio.
1
D to enter menu mode.
2
G or H until
UTILITY
3
D to select
UTILITY
4
G or H until
SOFTWARE
5
D to view the software version.
6
C until you exit menu mode.
English
44