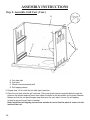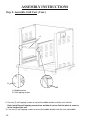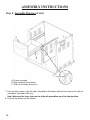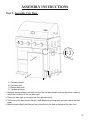
1
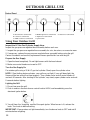
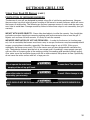
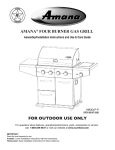
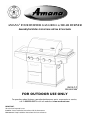
AMANA® FOUR BURNER GAS GRILL w/ REAR BURNER
Assembly/Installation Instructions and Use & Care Guide
AM33LP-P
DPCI 009 07 0293
FOR OUTDOOR USE ONLY
For questions about features, operation/performance, parts, accessories or service,
call: 1-800-229-5647 or visit our website at www.sureheat.com
IMPORTANT:
Save for local inspector's use.
Installer: Leave installation instructions with the homeowner.
Homeowner: Keep installation instructions for future reference.
TABLE OF CONTENTS
OUTDOOR GRILL SAFETY............................................................................................................3-4
UNPACKING INSTRUCTIONS..........................................................................................................5
ASSEMBLY REQUIREMENTS.......................................................................................................5-6
Parts Supplied...........................................................................................................................6
Tools Needed............................................................................................................................6
Assembled Grill View................................................................................................................7
ASSEMBLY INSTRUCTIONS.......................................................................................................8-24
Step 1: Assemble Wheel Channels...........................................................................................8
Step 2: Assemble Grill Cart..................................................................................................9-12
Step 3: Assemble Grill Head....................................................................................................13
Step 4: Assemble Drawers.................................................................................................14-16
Step 5: Assemble Cart Door....................................................................................................17
Step 6: Assemble Side Shelf Left............................................................................................18
Step 7: Assemble Side Burner Cover & Igniter Module..........................................................19
Step 8: Assemble Side Burner Shelf Right..............................................................................20
Step 9: Assemble the Side Burner Valve.................................................................................21
Step 10: Assemble the Side Burner Casting......................................................................22-23
Step 11: Assemble the Igniter Wires.......................................................................................24
Step 12: Assemble the Side Burner Accessories....................................................................25
Step 13: Assemble the Drip Pan.............................................................................................26
Step 14: Complete the grill assembly......................................................................................27
INSTALLATION REQUIREMENTS.............................................................................................28-30
Location Requirements............................................................................................................28
Product Dimensions.................................................................................................................29
Gas Supply Requirements.......................................................................................................29
Gas Pressure Regulator..........................................................................................................29
Burner Requirements for High Altitude....................................................................................29
Gas Supply Line Pressure Testing..........................................................................................30
INSTALLATION INSTRUCTIONS...............................................................................................30-32
20 lb LP Gas Fuel Cylinder......................................................................................................30
Make Gas Connection.............................................................................................................30
Check and Adjust the Burners.................................................................................................31
Burner Flame Characteristics..................................................................................................31
OUTDOOR GRILL USE...............................................................................................................32-35
Using Your Outdoor Grill....................................................................................................32-33
Using Your Side Burner...........................................................................................................33
Using Your Rotisserie Burner.............................................................................................34-35
TIPS FOR OUTDOOR GRILLING....................................................................................................36
Cooking Methods.....................................................................................................................36
OUTDOOR GRILL CARE.................................................................................................................37
Replacing the Igniter Battery...................................................................................................37
General Cleaning................................................................................................................37-39
TROUBLESHOOTING......................................................................................................................40
ASSISTANCE...................................................................................................................................40
REPLACEMENT PARTS.............................................................................................................41-43
WARRANTY.....................................................................................................................................44
2
OUTDOOR GRILL SAFETY
Your safety and the safety of others are very important.
We have provided many important safety messages in this manual and on your appliance. Always read and obey all safety
messages.
This is the safety alert symbol.
This symbol alerts you to potential hazards that can kill or hurt you and others.
All safety messages will follow the safety alert symbol and either the word “DANGER” or “WARNING.”
These words mean:
You can be killed or seriously injured if you don’t immediately
follow instructions.
You can be killed or seriously injured if you don’t follow
instructions.
All safety messages will tell you what the potential hazard is, tell you how to reduce the chance of injury, and tell you what can
happen if the instructions are not followed.
DANGER
If you smell gas:
1. Shut off gas to the appliance.
2. Extinguish any open flame.
3. Open lid.
4. If odor continues, keep away from the
appliance and immediately call your
gas supplier or your fire department.
WARNING
1. Do not store or use gasoline or other
flammable liquids or vapors in the
vicinity of this or any other appliance.
2. An LP cylinder not connected for use
shall not be stored in the vicinity of
this or any other appliance.
The California Safe Drinking Water and Toxic Enforcement Act requires the Governor of California to publish a list of substances
known to the State of California to cause cancer, birth defects, or other reproductive harm, and requires businesses to warn of
potential exposure to such substances.
WARNING: This product contains a chemical known to the State of California to cause cancer, birth defects, or other
reproductive harm.
This appliance can cause low-level exposure to some of the substances listed, including benzene, formaldehyde, carbon
monoxide, toluene, and soot.
In the State of Massachusetts, the following installation instructions apply:
■ Installations and repairs must be performed by a qualified or licensed contractor, plumber, or gas fitter qualified or licensed by the
State of Massachusetts.
■ If using a ball valve, it shall be a T-handle type.
■ A flexible gas connector, when used, must not exceed 3 feet.
3
IMPORTANT: This grill is manufactured for outdoor use only. For grills that are to be used at
elevations above 2000 ft (609.6 m) orifice conversion is required. See “Gas Supply Requirements”
section. It is the responsibility of the installer to comply with the minimum installation clearances
specified on the model/serial rating plate. The model/serial rating plate for freestanding models can
be found on inside of the right cart door.
IMPORTANT SAFETY INSTRUCTIONS
WARNING: To reduce the risk of fire, electrical shock,
injury to persons, or damage when using the outdoor
cooking gas appliance, follow basic precautions, including
the following:
■ Do not install portable or built-in outdoor cooking gas
appliances in or on a recreational vehicle, portable
trailer, boat or in any other moving installation.
■ Always maintain minimum clearances from combustible
construction, see “Location Requirements” section.
■ The outdoor cooking gas appliance shall not be located
under overhead unprotected combustible construction.
■ This outdoor cooking gas appliance shall be used only
outdoors and shall not be used in a building, garage, or
any other enclosed area.
■ Keep any electrical supply cord and fuel supply hose
away from any heated surfaces.
■ Keep outdoor cooking gas appliance area clear and free
from combustible materials, gasoline and other
flammable vapors and liquids.
■ Do not obstruct the flow of combustion and ventilation
air. Keep the ventilation openings of the cylinder
enclosure free and clear from debris.
■ Inspect the gas cylinder supply hose before each use of
the outdoor cooking gas appliance. If the hose shows
excessive abrasion or wear, or is cut, it MUST be
replaced before using the outdoor cooking gas
appliance. Contact your dealer and use only
replacement hoses specified for use with the outdoor
cooking gas appliance.
■ Visually check the burner flames. They should be blue.
Slight yellow tipping is normal for LP gas.
■ Check and clean burner/venturi tube for insects and
insect nest. A clogged tube can lead to fire under the
outdoor cooking gas appliance.
■ The LP gas supply cylinder to be used must be:
- constructed and marked in accordance with the
Specification for LP Gas Cylinders of the U.S.
Department of Transportation (DOT) or the National
Standard of Canada, CAN/CSA-B339, Cylinders,
Spheres, and Tubes for Transportation of Dangerous
Goods; and Commission.
- provided with a listed overfilling prevention device.
- provided with a cylinder connection device compatible
with the connection for outdoor cooking gas
appliances.
■ Always check connections for leaks each time you
connect and disconnect the LP gas supply cylinder.
See “Installation Instructions” section.
■ When the outdoor cooking gas appliance is not in use,
the gas must be turned off at the supply cylinder.
■ Storage of an outdoor cooking gas appliance indoors is
permissible only if the cylinder is disconnected and
removed from the outdoor cooking gas appliance.
■ Cylinders must be stored outdoors and out of the reach
of children and must not be stored in a building, garage,
or any other enclosed area.
■ The pressure regulator and hose assembly supplied
with the outdoor cooking gas appliance must be used. A
replacement pressure regulator and hose assembly
specific to your model is available from your outdoor
cooking gas appliance dealer.
■ Gas cylinder must include a collar to protect the cylinder
valve.
■ For appliances designed to use a CGA791 Connection:
Place a dust cap on cylinder valve outlet whenever the
cylinder is not in use. Only install the type of dust cap on
the cylinder valve outlet that is provided with the cylinder
valve. Other types of caps or plugs may result in
leakage of propane.
If the following information is not followed exactly, a fire
causing death or serious injury may occur.
■ Do not store a spare LP gas cylinder under or near this
outdoor cooking gas appliance.
■ Never fill the cylinder beyond 80 percent full.
SAVE THESE INSTRUCTIONS
4
UNPACKING INSTRUCTIONS
6. Using a utility knife, vertically cut at the side corners of
the carton, lay the box sides flat.
1. Using a utility knife, cut the tape to open top flaps of
carton.
7. Remove foam packaging and plastic wrap from top of
grill.
2. Remove Assembly/Installation Instructions and Use and
Care Guide.
8. Remov ethe two hood locking bolts, then open hood and
remove parts carton and interior packaging.
3. Remove the large cardboard panels on the top and each
side of the inside of the carton.
9. Remove warming shelf and set aside.
4. Remove the cart base on the top of the inside of the
carton.
10. Using 2 or more people, remove grill head assembly
and set aside.
5. Remove the cart side panels located in front of the grill
head assembly.
11. Dispose of/recycle all packaging materials.
ASSEMBLY REQUIREMENTS
H
G
F
E
A
D
B
C
J
I
O
Q
N
K
R
L
A. Main cooking grates
B. Bread warming rack
C. Flavor grids
D. Drip pan
E. Side burner griddle
F. Drawer slide rail brackets
G. Wheel channel right
H. Wheel channel left
I. Side shelf left
M
J. Side burner shelf right
K. Cart back
L. Cart side left
M. Cart side right
N. Drawer assemblies
O. Grill head assembly
P. Cart base
Q. Cart middle
R. Cart door right
P
Not Shown but included in the box:
Small components package
Tank securing ring
Middle bracket
5
ASSEMBLY REQUIREMENTS
Assembly Hardware Supplied
■ 40 - self-tapping screws
■ 4 - sunken head self-tapping screws
■ 1 - Side burner knob with bezel
■ 1 - “AA” battery
NOTE: Other hardware required is attached to the grill where needed.
Tools Needed
■ #2 Phillips screwdriver
■ Tape measure
■ ½" wrench or socket
■ Non-corrosive leak detection
solution
■ Adjustable wrench
■ ¼" nut driver or socket
Parts Supplied
■ Level
■ Gas pressure regulator/hose assembly set for 11" WCP LP gas (attached to manifold).
Parts Needed
■ 20 lb LP gas fuel cylinder
6
ASSEMBLED GRILL VIEW
D
C
B
E
F
G
H
A
J
I
K
L
A. Control knob: main burners
B. Control knob: back IR burner
C. Side shelf
D. Grilling/cooking surface
E. Bread warming rack
F. Roll top grill hood
I. Electronic igniter: main burners,
back IR burner and side burner
J. Control knob: side burner
K. Drawers
L. Cart door
G. Hood handle
H. Side burner with griddle
7
ASSEMBLY INSTRUCTIONS
Step 1: Assemble Wheel Channels
A
B
C
A. Cart base
B. Wheel channel left
C. Wheel channel right
1. Remove the four (4) caster assembly nuts and two (2) bolts from the wheel channel assemblies.
Note: The nuts and bolts are hand tightened to the wheel channels.
2. Set the cart base on the floor and then lay the wheel channel left on the left side and the wheel
channel right on the right side of the cart base. (The large hole in the cart base should be on the
right side.)
3. Pick up the left side of the cart base and set the wheel channel left in place by inserting the
attached bolts through the two (2) holes in the cart base.
4. Pick up the right side of the cart base and set the wheel channel right in place by inserting the
attached bolts through the two (2) holes in the cart base.
8
ASSEMBLY INSTRUCTIONS
Step 2: Assemble Grill Cart
E
C
B
D
A
A. Cart base
B. Cart side left
C. Drawer rail brackets
D. Wheel channel assembly bolt
E. Wheel channel assembly nut
1. Place the cart side left onto the two (2) outer caster assembly bolts, make sure the large
flange is toward the front of the cart base.
2. Secure the cart side left in place by tightening the caster assembly nuts onto the caster
assembly bolts.
3. Use six (6) self-tapping screws to secure the two drawer slide rail brackets onto the cart
side left as shown.
Note: Install the self-tapping screws from outside of cart so that the point of screw
is in the inside of the cart.
9
ASSEMBLY INSTRUCTIONS
Step 2: Assemble Grill Cart (Cont.)
C
A. Cart side right
B. Cart back
C. Wheel channel assembly bolt
D. Self-tapping screws
A
B
D
4. Repeat step 1-2 to install the cart side right in position.
5. Place the cart back onto the grill cart base. Place two wheel channel assembly bolts through the
holes on the bracket and cart base, then tighten the bolts to the thread hole on the wheel channel.
Make sure that the cart back flanges wrap and cover the cart sides. Use six (6) self-tapping
screws to secure the cart back in position.
Note: Install the self-tapping screws from outside of cart so that the point of screw is in the
inside of the cart.
10
ASSEMBLY INSTRUCTIONS
Step 2: Assemble Grill Cart (Cont.)
A
B
A. Cart middle
B. Self-tapping screws
6. Place the cart middle shelf onto the cart base.
7. Use three (3) self-tapping screws to secure the cart middle on the cart base.
8. Use three (3) self-tapping screws to secure the cart middle to the cart back. The screws should
go from outside to the inside.
Note: Install the self-tapping screws from outside of cart so that the point of screw is in the
inside of the cart.
11
ASSEMBLY INSTRUCTIONS
Step 2: Assemble Grill Cart (Cont.)
A
B
A. Middle bracket
B. Self-tapping screws
B
9. Use two (2) self-tapping screws to secure the middle bracket onto the cart side left.
Note: Install the self-tapping screws from outside of cart so that the point of screw is
in the inside of the cart.
10. Use two (2) self-tapping screws to secure the middle bracket onto the cart side middle.
12
ASSEMBLY INSTRUCTIONS
Step 3: Assemble Grill Head
A
B
B
C
A. Grill head assembly
B. Grill head mounting bolts
C. Self-tapping screws
1. Take the side burner package out from inside the grill head.
2. Tilt the grill head on its back and loosen the four (4) grill mounting bolts so that there is approximately 1/4” between the bolt head and grill bottom.
Note: The bolts are already attached to the grill head bottom.
3. Unpack the side burner valve and regulator assembly from the bottom of the grill. Then have
someone help you pick up the grill and set it squarely on top of the cart.
Note: Be careful not to damage the side burner, valve and regulator.
4. Make sure the four (4) bolts fall through the large opening on the “key hole” slots in the cart sides.
5. Slide the grill forward in the “key hole” slots until the back of the grill head matches the cart back.
Check on the inside of the cart to make sure that both sides of the grill are flush with the cart.
6. Install four (4) self-tapping screws into the top front and side cart flanges.
Note: Install the self-tapping screws from outside of cart so that the point of screw is in the
inside of the cart.
7. Tighten the four (4) grill head mounting bolts underneath the grill to secure the grill to the cart.
13
ASSEMBLY INSTRUCTIONS
Step 4: Assemble Drawers
C
A
D
B
E
A. Handle
B. Drawer front face
C. Phillips head screws
D. Drawer tray
E. Self-tapping screws
1. With a Phillips head screwdriver, remove the two phillips pan head screws from the handle,
then attach the handle to the drawer front face by these screws.
2. Carefully insert the drawer tray bottom into the gap at the bottom of the drawer front face.
3. Use four (4) self-tapping screws to secure the drawer tray onto the drawer front face.
4. Repeat to setup the other drawer.
Note: Please follow the drawing to install the drawer tray, use the four holes on the right
side.
14
ASSEMBLY INSTRUCTIONS
Step 4: Assemble Drawers (Cont.)
A
B
A. Drawer assembly
B. Slide attached to the drawer
C. Slide rail assembly on the cart
C
5. Align the slides (attached to the drawer) with the front ends of the slide rail assemblies (attached
to the cart).
Note: Make sure the inner slides on the slide rail assemblies are at the front position. It
will help you to install the drawer smoothly.
6. Push the lower drawer into the cabinet.
15
ASSEMBLY INSTRUCTIONS
Step 4: Assemble Drawers (Cont.)
A
B
A. Drawer assembly
B. Slide attached to the drawer
C. Slide rail assembly on the cart
C
7. Take the other drawer, align the slides (attached to the drawer) with the front ends of the slide rail
assemblies (attached to the cart).
Note: Make sure the inner slides on the slide rail assemblies are at the front position.
8. Push the top drawer into the cabinet.
16
ASSEMBLY INSTRUCTIONS
Step 5: Assemble Cart Door
D
A
B
C
A. Cart door handle
B. Cart door right
C. Bottom door pivot
D. Top door pivot pin
1. Remove the two phillips pan head screw on the cart door handle and use these two screws to
install the handle on to the cart door right.
2. Place cart door right on an angle over the right door pivot.
3. Tilt the top of the door toward the grill, while depressing the top door pivot pin above the door
edge.
4. Move the door slightly until the pin locks into place in the hole on bottom of the front face.
17
ASSEMBLY INSTRUCTIONS
Step 6: Assemble Side Shelf Left
B
A
B
C
A. Side shelf left assembly
B. 5/16 - 24 hex head screws
C. Self-Tapping Screw
C
1. Loosen the Four (4) 5/16-24 hex head screws located on the left grill side.
2. Attach the left side shelf by inserting the four (4) screws on the side of the grill head into the four
(4) keyhole slots on the left side shelf.
Note: Be careful NOT to break the granite insert.
3. Then tighten all four (4) screws to secure the left side shelf.
4. Install one (1) self-tapping screw into the bottom front slotted hole of the side shelf.
18
ASSEMBLY INSTRUCTIONS
Step 7: Assemble Side Burner Cover & Igniter Module
A
B
C
D
E
E
D
G
I
H
A. Side burner door
B. Side burner door handle
C. Phillips pan head screw
D. Hinges
E. Phillips sunken head screws
F
F. 6 poles igniter module
G. Plastic nut
H. AA battery
I. Push button cap
1. Remove the brass burner cap attached with tape along with side burner grate and set aside.
2. Remove the two (2) phillips pan head screws from the handle and use these screws to attach
the handle on the side burner door.
3. Use the supplied four (4) phillips sunken head screws to secure the two (2) hinges on the side
burner tray as shown.
4. Unscrew the igniter button cap and the plastic nut from the igniter module. Insert the neck of the
igniter module to the round hole on the shelf front face. Then use the plastic nut to secure the
igniter module in position. Install battery into battery compartment, negative (-) end in first. Screw
igniter push button cap on.
19
ASSEMBLY INSTRUCTIONS
Step 8: Assemble Side Burner Shelf Right
B
A
C
A. Side burner shelf right assembly
B. 5/16-24 hex head screws
C. Self-tapping screw
C
1. Loosen the four (4) 5/16-24 hex head screws.
2. Attach the side burner shelf by inserting the four (4) screws on the side of the grill head into
the four (4) keyhole slots on the side burner shelf.
3. Tighten all four (4) screws to secure the side burner shelf.
4. Install one (1) self-tapping screw into the bottom front slotted hole of the side burner shelf.
20
ASSEMBLY INSTRUCTIONS
Step 9: Assemble the Side Valve
G
F
H
E
A. Side burner valve assembly
B. Large bezel
C. Phillips pan head screw
D. Control knob
1. Using a Phillips screwdriver, remove the 2 screws from the side burner valve assembly.
2. Push the valve stem out through the opening in the front of the side burner shelf, lining up the
threaded holes in the side burner valve assembly with the openings on the side burner shelf.
3. Position the side burner bezel (C) into place, with the OFF position pointing up, making sure
to line up the holes.
4. Attach side burner bezel to side burner assembly face with screws removed in step 2.
5. Press knob onto valve assembly stem with OFF position pointing up.
21
ASSEMBLY INSTRUCTIONS
Step 10: Assemble the Side Burner Casting
B
A
B
A
A. Side burner casting
B. Side burner valve orifice
1. Remove the two phillips pan head screws from the side burner casting.
2. Angle the side burner casting and insert it into the center hole on the side burner tray.
3. Slide the side burner casting back in position to get the side burner valve orifice go into the
side burner casting.
22
ASSEMBLY INSTRUCTIONS
Step 10: Assemble the Side Burner Casting (Cont.)
C
B
A
A. Phillips pan head screw
B. Small bracket
C. Self tapping screws
1. Use the two (2) screws removed in step 1 on page 22 to secure the head of side burner casting
on the rear bracket.
2. Use the two (2) self-tapping screws to attach the small bracket to the front bracket under the side
burner tray.
23
ASSEMBLY INSTRUCTIONS
Step 11: Assemble Igniter Module
B
A
C
D
A. Igniter module
B. Side burner igniter wire
C. Main burner igniter wires
D. Back IR burner igniter wire
1. Connect loose igniter wires from the grill to the open terminals of the igniter.
Note: The igniter is designed in such a way that it does not matter which terminal tab
is used when connecting igniter wires.
24
ASSEMBLY INSTRUCTIONS
Step 12: Assemble the Side Burner Accessories
C
B
A
A. Brass burner cap
B. Side burner grate
C. Side burner griddle
1. Center the brass burner cap on top of the side burner head.
2. Place the side burner grate onto the side burner tray. Position the 3 longer legs of the grate
into the holes around the side burner.
3. Place the side burner griddle on the side burner tray. Make sure the four legs of the griddle
rest into the holes on the front and rear brackets.
25
ASSEMBLY INSTRUCTIONS
Step 13: Assemble the Drip Pan
A
B
A. Drip pan
B. Drip pan guides
1. Pull out the top drawer.
2. Open the right cart door.
3. Slide the drip pan onto the drip pan guides underneath the grill head assembly.
26
ASSEMBLY INSTRUCTIONS
Step 14: Complete the grill assembly
C
D
B
A
A. Flavor grids
B. Main cooking grates
C. Bread warming rack
D. Back Ir burner wind sheild
1. Insert the flavor grids into the cutouts with triangle ridges facing up.
2. Install main cooking grates on the ledges provided on the grill to create the cooking surface.
3. Use two self-tapping screws to install the back IR burner wind shield in position as shown.
4. Rest bread warming rack on the two brackets through the cutouts on the hood support sides.
27
INSTALLATION REQUIREMENTS
Location Requirements
24”
24”
Select a location that provides minimum exposure to wind and traffic paths. The location
should be away from strong draft areas.
Do not obstruct flow of combustion and ventilation air.
Clearance to combustible construction:
■ A minimum of 24” (61 cm) from grill hood sides and grill back must be maintained from any
combustible construction.
28
INSTALLATION REQUIREMENTS
Product Dimensions
32”
(81.3cm)
13.125”
(33.4cm)
53.625”
(136.3cm)
45”
(114.4cm)
33.875”
(86.1cm)
Gas Supply Requirements
21”
(53.3cm)
20.2”
(51.3cm)
A. Model/serial number plate
A
Observe all governing codes and ordinances.
IMPORTANT: This installation must conform with all local codes and ordinances. In the absence of local codes,
installation must conform with American National Standards Institute, National Fuel Gas Code ANSI Z223.1 latest edition or CAN/CGA B149.1 - latest edition.
IMPORTANT: Grill must be connected to a regulated gas supply. Refer to the model/serial rating plate for information on the type of gas that can be used. If this information does not agree with the type of gas available,
check with your local gas supplier.
The model/serial number rating plate is located inside the right door of the grill cabinet. See the top illustration.
Gas Pressure Regulator
The gas pressure regulator supplied with this grill must be used. The inlet (supply) pressure to the
regulator should be as follows for proper operation:
LP Gas:
Operating pressure: 11" (27.9 cm) WCP
Inlet (supply) pressure: 11" to 14" (27.9 cm to 35.5 cm) WCP Contact local gas supplier if you are
not sure about the inlet (supply) pressure.
Burner Requirements for High Altitude
Input ratings shown on the model/serial rating plate are for elevations up to 2,000 ft (609.6 m).
For elevations above 2,000 ft (609.6 m), ratings are reduced at a rate of 4% for each 1,000 ft (304.8
m) above sea level. Orifice conversion is required. See “Assistance or Service” section to order.
29
INSTALLATION REQUIREMENTS
Gas Supply Line Pressure Testing
Testing above ½ psi (3.5 kPa) or 14" (35.5 cm) WCP (gauge):
The grill and its individual shutoff valve must be disconnected from the gas supply piping system
during any pressure testing of that system at test pressures greater than ½ psig (3.5 kPa).
Testing below ½ psi (3.5 kPa) or 14" (35.5 cm) WCP (gauge) or lower:
The grill must be isolated from the gas supply piping system by closing its individual manual shutoff
valve during any pressure testing of the gas supply piping system at test pressures equal to or less
than ½ psig (3.5 kPa).
INSTALLATION INSTRUCTIONS
20 lb LP Gas Fuel Cylinder
This grill is equipped for use with a 20 lb LP gas fuel cylinder (fuel cylinder not supplied). A gas
pressure regulator/hose assembly is supplied.
It is also design-certified by CSA International for local LP gas supply. The 20 lb LP gas fuel cylinder
must be mounted and secured.
Set 20 lb LP gas fuel cylinder in hole in the cart base. Use the cylinder secure ring to secure the
cylinder in position.
Make Gas Connection
LP Gas:
IMPORTANT: A 20 lb LP gas fuel cylinder must be purchased separately.
IMPORTANT: The gas pressure regulator/hose assembly supplied with the grill must be used.
Replacement gas pressure regulator/hose assembly specific to your model, is available from your
outdoor grill dealer.
To Install the 20 lb LP Gas Fuel Cylinder:
1. Set cylinder in hole in the cart base.
2. Screw the gas pressure regulator/hose assembly on to the 20 lb LP gas fuel cylinder as shown.
3. Place the cylinder secure ring over the cylinder collar as shown.
4. Turn on the gas supply. Wait a few minutes for gas to move through the gas line.
5. Test all connections by brushing on an approved non-corrosive leak-detection solution. Bubbles
will show a leak. Correct any leak found.
30
Cylinder
connection
Regulator Inlet
Connector
INSTALLATION INSTRUCTIONS
Check the burners
The burners are tested and factory-set for most efficient operation. However, variations in gas supply
and other conditions may make minor adjustments to air shutter or low flame setting necessary.
It is recommended that a qualified person make burner adjustments.
Checking the grill burner flames requires removing the grate and flavor grids.
Burner Flame Characteristics
The flames of the grill burners and side burner should be blue and stable with no excessive noise or
lifting (LP gas flames will have a slightly yellow tip). A yellow flame indicates not enough air. If flame
is noisy or lifts away from the burner, there is too much air. Some yellow tips on flames when the
burner is set to HI setting are acceptable as long as no carbon or soot deposits appear.
Check that burners are not blocked by dirt, debris, insect nests, etc. and clean as necessary.
Normal: soft blue flame
Out of Adjustment: Hard
blue flames- too much air
Poor Combustion: Wavy,
yellow flames-too little air.
31
OUTDOOR GRILL USE
Control Panel
OFF
OFF
L
C
A. Back IR burner control knob
B. Left burner control knob
C. Middle Left burner control knob
Using Your Outdoor Grill
M
L
D
H
M
D. Middle right burner control knob
E. Right burner control knob
F. Igniter button
H
M
L
E
F
G. Side burner control knob
Inspect the LP Gas Fuel Cylinder Supply Hose
Inspect the gas pressure regulator/hose assembly before each use.
1. Inspect the gas pressure regulator/hose assembly for cuts, abrasions, or excessive wear.
2. If necessary, replace the gas pressure regulator/hose assembly before using the grill.
Contact the dealer and use only replacement hoses specified for use with the grill.
Prepare the Gas Supply
1. Open the hood completely. Do not light burners with the hood closed.
2. Make sure control knobs are turned to OFF.
Turn the Gas Supply On
For outdoor grills using a 20 lb LP gas fuel cylinder: Slowly open the cylinder valve.
NOTE: If flow limiting device activates, your grill may not light. If your grill does light, the
flames will be low and will not heat properly. Turn cylinder valve and all control knobs off
and wait 30 seconds. After shutting off the cylinder, very slowly open cylinder valve and wait
5 seconds before lighting.
Lighting the Grill
1. Do not lean over the grill.
2. Push in and turn the main burner control knob to HIGH, and immediately press the
electronic igniter button.
3. You will hear the “snapping” sound of the spark igniter. When burner is lit, release the
knob. Turn knob to desired setting.
IMPORTANT: If burner does not light immediately, turn the burner knob to OFF and wait 5
minutes before relighting.
32
& TURN
SH
PU
B
M
H
OFF
& TURN
SH
PU
A
L
H
& TURN
SH
PU
M
& TURN
SH
PU
& TURN
SH
PU
H
OFF
OFF
L
G
OUTDOOR GRILL USE
Using Your Outdoor Grill (cont.)
Manually Lighting Grill
1. Do not lean over the grill.
2. Remove the manual lighting extension and attach a match to the split ring.
3. Strike the match to light it.
4. Guide the lit match between the grill grate and one of the slots in the flavor grid.
5. Push in and turn the main burner knob to HIGH. The burner will light immediately. When burner is
lit, turn knob to desired setting.
6. Remove match and replace manual lighting extension.
IMPORTANT: If burner does not light immediately, turn the burner knob to OFF and wait 5 minutes
before relighting.
If any burners do not light after attempting to light them manually, contact customer service. See the
“Assistance or Service” section.
Using Your Side Burner
Lighting the Side Burner
1. Open the side burner cover. Do not light burners with the cover on.
2. Do not lean over the grill.
3. Push in and turn the control knob to HIGH and immediately press the electronic igniter button.
4. You will hear the “snapping” sound of the spark igniter. When burner is lit, release the knob. Turn
knob to desired setting.
IMPORTANT:
If burner does not light immediately, turn the burner knob to OFF and wait 5 minutes before
relighting.
Manually Lighting the Side Burner
1. Do not lean over the grill.
2. Remove the manual lighting extension and attach a match to the split ring.
3. Strike the match to light it.
4. Guide the match to the burner.
5. Push in and turn the burner knob to HIGH. The burner will light immediately. When burner is lit,
turn knob to desired setting.
6. Remove match and replace manual lighting extension.
IMPORTANT:
If burner does not light immediately, turn the burner knob to OFF and wait 5 minutes before
relighting.
If any burners do not light after attempting to light them manually, contact customer service.
See the “Assistance or Service” section.
Always leave side burner cover open when using. Never cook with cover closed or damage to your
grill will occur.
33
OUTDOOR GRILL USE
Using Your Outdoor Grill (cont.)
Using Your Rotisserie Burner
The grill rotisserie burner is designed to cook items from the back using infrared heat. The rotisserie
burner is an infrared type which provides intense searing radiant heat. Preferred by chefs over other
cooking methods, this intense heat sears in the natural juices and nutrients found in quality cuts of
meats.
Remove the warming rack from the grill when using the rotisserie to prevent warping from the intense heat of the infrared unit.
NOTE: The rotisserie spit rod is centered between the grill hood and the burners. It may be
necessary to remove the grates and flavor grids when cooking larger portions of meat on the
rotisserie. This is by design, since this configuration gives you the most possible room
above and below the rod for larger pieces of meat.
Once lit, the rotisserie burner will reach cooking temperature in 1 minute. The orange/red glow will
even out in about 5 minutes. The rotisserie motor is equipped with metal gears and is capable of
turning up to 12 lbs. of food. The motor is mounted on a bracket on the left side of the grill by sliding
the motor over the bracket with the cord facing the back of the grill. Make sure the rotisserie motor is
completely seated on the bracket prior to operating. Make sure the rotisserie cord is away from any
hot surfaces.
Note: The rotisserie kit is not included and sell seperately.
Lighting the Rotisserie Burner
1. Open the hood completely. Do not light burners with the hood closed.
2. Remove the warming rack from the grill when using the rotisserie to prevent warping from the
intense heat of the
infrared unit.
3. Do not lean over the grill.
4. Push in and turn the control knob to ON and immediately press the electronic igniter button.
5. You will hear the “snapping” sound of the spark igniter. When burner is lit, release the knob.
IMPORTANT:
If burner does not light immediately, turn the burner knob to OFF and wait 5 minutes before
relighting.
Manually Lighting the Rotisserie Burner
1. Do not lean over the grill.
2. Remove the manual lighting extension and attach a match to the split ring.
3. Strike the match to light it.
4. Guide the match to the burner.
5. Push in and turn the burner knob to ON. The burner will light immediately.
6. Remove match and replace manual lighting extension.
IMPORTANT:
If burner does not light immediately, turn the burner knob to OFF and wait 5 minutes before
relighting.
If any burners do not light after attempting to light them manually, contact customer service.
See the “Assistance or Service” section.
34
OUTDOOR GRILL USE
Using Your Back IR Burner (cont.)
PROTECTION OF INFRARED BURNERS
The burners of your grill are designed to provide a long life of satisfactory performance. However,
there are steps you must take to prevent cracking of the burner's ceramic surfaces, which will cause
the burners to malfunction. The following are the most common causes of cracks and the steps you
must take to avoid them. Damage caused by failure to follow these steps is not covered by your grill
warranty.
IMPACT WITH HARD OBJECTS - Never allow hard objects to strike the ceramic. You should take
particular care when inserting or removing cooking grids and accessories into or from the grill. If
objects such as these fall onto ceramic, it is likely to crack the ceramic.
IMPAIRED VENTILATION OF HOT AIR FROM GRILL - In order for the burners to function properly, hot air created by the burners must have a way to escape, the burners may become deprived of
oxygen, causing them to backfire, especially if the burner output is set at HIGH. If this occurs
repeatedly, the burners may crack. This is the reason your grill was designed with ventilation louvers. These design features give the hot air an escape route. Accordingly, never operate your grill
with very little or no open space at the cooking surface (the cooking grids provide sufficient space).
Also, never cover the ventilation louvers with foil or other materials that prevent air flow. Specifically,
do not cover the entire surface with foil, a large pan, etc.
Do not operate the main burners and infrared back burner at the same time. This can cause
warping of the roll top grill hood.
Never allow water to contact the infrared burner as damage will result. Water damage is not
covered by your warranty.
HOOD SHOULD NOT BE CLOSED FOR LONG PERIODS WHEN INFRARED BURNER IS IN
USE.
35
TIPS FOR OUTDOOR GRILLING
Before Grilling
■ Thaw food items before grilling.
■ Lightly oil the grill grates or the food when cooking low-fat cuts of meat, fish or poultry, such as
lean hamburger patties, shrimp or skinless chicken breasts.
■ Using too much oil can cause gray ash to deposit on food.
■ Trim excess fat from meats prior to cooking to reduce flare-ups.
■ Make vertical cuts at 2" (5 cm) intervals around the fat edge of meat to avoid curling.
■ Add seasoning or salt only after the cooking is finished.
During Grilling
■ Turn foods only once. Juices are lost when meat is turned several times.
■ Turn meat just when juices begin to appear on the surface.
■ Avoid puncturing or cutting the meats to test doneness. This allows juices to escape.
■ It may be necessary to lower the heat setting for foods that cook a long time or are marinated or
basted in a sugary sauce.
■ If using a high flame, add barbecue sauce only during the last 10 minutes of cooking to avoid
burning the sauce.
■ The degree of doneness is influenced by the type of meat, cut of meat (size, shape and thickness),
heat setting selected, and length of time on the grill.
■ Preheat grill on high (use all grill burners) 10 minutes. The hood must be closed during preheating.
Preheating provides the high heat needed to brown and seal the juices.
■ Shorten the preheat time when grilling high-fat cuts of meat or poultry, such as chicken thighs.
This will help reduce flare-ups.
■ Cooking time will be longer with an open grill cover.
Cooking Methods
Direct Heat
Cooking by direct heat means the food is placed on grill grates directly above lighted burners. Hood
position can be up or down. If hood is in the “up” position, total cooking times may be longer.
Direct heat sears the food. Searing is a process that seals natural juices in food by cooking with
intense heat for a short period of time. While juices stay inside, the outside is browned with a
flavorful grilled coating.
Indirect Heat
For best results, do not select the indirect heat cooking method when it is windy.
Cooking by indirect heat means the food is placed on the grill grate above an unheated burner,
allowing heat from lighted burner(s) on either side to cook the food.
If possible, turn on 2 burners. Cook with the hood down. This will shorten the cooking time.
36
OUTDOOR GRILL CARE
Replacing the Igniter Battery
If igniters stop sparking, the battery should be replaced.
1. Unscrew igniter button cap counter clockwise to remove.
2. Remove battery from the battery compartment.
3. Replace with a new alkaline “AA” size battery. Install battery with negative end in first.
4. Screw igniter push button cap clockwise into place.
General Cleaning
IMPORTANT: Before cleaning, make sure all controls are off and the grill is cool. Always follow label
instructions on cleaning products.
For routine cleaning, wash with soap and water using a soft cloth or sponge. Rinse with clean water
and dry at once with a soft, lint-free cloth to avoid spots and streaks.
To avoid scratching the surface, do not use steel wool to clean the grill.
Use vinyl grill cover, available from your local dealer, to protect finish from weather.
STAINLESS STEEL
IMPORTANT: To avoid damage to the stainless steel surface, do not use soap-filled scouring pads,
abrasive cleaners, cooktop polishing creme, steel wool, gritty wash cloths, paper towels or cleaners
that contain chlorine.
Food spills should be cleaned as soon as entire grill is cool. Spills may cause permanent
discoloration.
Cleaning Method:
■ Rub in direction of grain to avoid scratching or damaging the surface.
■ Stainless Steel Cleaner.
■ Liquid detergent or all-purpose cleaner:
■ Rinse with clean water and dry with soft, lint-free cloth.
■ Vinegar to remove hard water spots.
■ Glass cleaner to remove fingerprints.
PORCELAIN-COATED PARTS
To avoid chipping, do not bang porcelain covered parts with solid objects or drop them.
Cleaning Method:
■ Non-abrasive plastic scrubbing pad and mildly abrasive cleanser:
GRILL GRATES
IMPORTANT: Do not use a steel or fiber scraper on grill grates. Immediately after you are finished
cooking, loosen food soil with a brass bristle brush. Turn all burners to HI for 10-15 minutes with the
hood closed to burn off food soil. Turn off all burners, raise the hood and let grates cool. Use the
brass bristle brush to remove ash from the grill grates.
When completely cool, grill racks can be removed for thorough cleaning. Clean them with a mild
detergent and warm water. For baked-on soil, prepare a solution of 1 cup (250 mL) ammonia to 1
gal. (3.75 L) water. Soak grates for 20 minutes, then rinse with water and dry completely.
37
OUTDOOR GRILL CARE (Cont.)
General Cleaning (Cont.)
WARMING SHELF
Cleaning Method:
■ Liquid detergent or an all-purpose cleaner.
■ Rinse with clean water and dry with soft, lint-free cloth.
■ For tough spots or baked-on grease, use a commercial degreaser designed for stainless steel.
EXTERIOR
IMPORTANT: Make sure gas supply is off and all control knobs are in the OFF position. Make sure
the side burner is cool. The quality of this material resists most stains and pitting, providing that the
surface is kept clean, covered, and polished.
■ Apply stainless steel polish to all brushed stainless steel noncooking surface before first use.
Reapply after each cleaning to avoid permanent damage to surface.
■ For tough spots or baked-on grease, use a commercial degreaser designed for stainless steel.
■ Cleaning should always be followed by rinsing with clean warm water.
■ Wipe the surface completely dry with a soft cloth.
■ Liquid detergent or all purpose cleaner for all powder coated surfaces.
INTERIOR
Discoloration of these parts is to be expected, due to intense heat from the
burners. Always rub
in the direction of the grain. Cleaning should always be followed by rinsing with clean, warm water.
Cleaning Method:
■ Liquid detergent or all-purpose cleaner; or for small, difficult to clean areas, use a commercial
degreaser designed for such use.
■ A heavy-duty scrub sponge can be used with mild cleaning products.
■ Rinse with clean water and dry completely with a soft, lint-free cloth.
SIDE BURNER CAPS AND GRATE
Cleaning Method:
■ Clean with a brass bristle brush.
■ Wash grate using mild detergent, warm water and degreaser.
■ Rinse with clean water and dry with soft, lint-free cloth.
BURNERS
Cleaning Method:
■ Clean the exterior of the burner with a wire brush.
■ Clear any clogged burner ports with a straightened paper clip. Do not use a toothpick as it may
break off and clog the port.
■ Check and clean burner/venturi tubes.
38
OUTDOOR GRILL CARE (Cont.)
General Cleaning (Cont.)
DRIP PAN AND SHELF
IMPORTANT: The drip pan should only be removed when grill is completely cool.
The drip pan collects grease that runs out through the grill. Clean often to avoid grease buildup.
The drip pan shelf collects grease and food particles that fall through the grill.
Cleaning Method:
■ Remove drip pan. Wipe excess grease with paper towels.
■ Clean with mild detergent and warm water. Rinse and dry thoroughly.
■ Clean drip pan shelf periodically to avoid heavy buildup of debris.
KNOBS AND FLANGE AREA AROUND KNOBS
IMPORTANT: Do not use steel wool, abrasive cleaners, or oven cleaner.
Do not soak knobs.
Cleaning Method:
■ Mild detergent, a soft cloth and warm water.
■ Rinse and dry.
CONTROL PANEL GRAPHICS
IMPORTANT: Do not use steel wool, abrasive cleaners, or oven cleaner.
Do not spray cleaner directly onto panel.
Cleaning Method:
■ Clean around the burner labels gently; scrubbing may remove printing.
■ Clean with mild detergent, soft cloth and warm water.
■ Rinse and dry.
39
Grill will not light
TROUBLE SHOOTING
■ Is the 20 lb LP gas fuel cylinder valve turned off?
Turn the 20 lb LP gas fuel cylinder on.
■ Is the grill properly connected to the gas supply?
Contact a trained repair specialist or see Installation Instructions.
■ Is there gas in the 20 lb LP gas fuel cylinder?
Check the gas level.
■ Is the igniter working?
Check that the igniter battery is properly installed or check to see if the battery needs to be
replaced. See the “Replacing the Igniter Battery” section.
Check for loose wire connections to the igniter or electrodes.
Flame is low or erratic
■ Is the gas supply fully turned on?
Check that the 20 lb LP gas fuel cylinder valve is fully open.
■ Is the gas supply in the 20 lb LP fuel gas cylinder low?
Check the gas level.
■ Does only one burner appear low?
Check and clean the burner ports if clogged or dirty. See “General Cleaning” section.
■ Is the burner flame mostly yellow or orange?
Grill may be in an area that is too windy. Check the burner air inlets for obstructions.
ASSISTANCE
Before calling for assistance, please check “Troubleshooting.” If you still need help, follow the
instructions below.
When calling, please know the purchase date and the complete model and serial number of your
appliance. This information will help us to better respond to your request.
If you need replacement parts
If you have questions or need replacement parts, contact Customer Service Hotline at 1-800-2295647 or visit our website at www.sureheat.com.
Sure Heat Manufacturing
1861 West Oak Parkway
Marietta GA 30062
40
REPLACEMENT PARTS
Hood Assembly
Front Face Overlay
1 set
1 set
FCTG3308001
FCTG3308006
Hood Handle
Amana Logo
1 pcs
1 pcs
FCTG3308002
FCTG2608008
Temp Guage
Front Face Heat Shield
1 pcs
1 pcs
FCCS0007030
FCTG3308007
Hood Support Assy.
Manifold & Valve Assy.
1 set
1 pcs
FCTG3308003
FCTG3308008
Bread Warmer Rack
Main Cooking Grates (3 pcs)
1 pcs
1 set
FCTG3308004
FCTG3308009
Regulator & Hose Assy.
Flavor Grid (4 pcs)
1 pcs
1 set
FCTG2608005
FCTG2908026
Front Face Assy.
Main Burner Tube
1 set
4 pcs
FCTG3308005
FCTG2608013
41
REPLACEMENT PARTS
Side Burner Griddle
Cart side right
1 set
1 set
FCTG3308025
Cart back
Wheel channel left
1 set
1 set
FCTG3308010
FCTG2908017
Cart door right assy.
Wheel channel right
1 set
1 set
FCTG3308011
FCTG2908018
Drawer front face assy.
Drawer slide rail bracket
2 set
2 set
FCTG3308012
FCTG2908019
Drawer tray assy.
Drip Pan
2 set
1 pcs
FCTG2908013
FCCS0007037
Drawer Handle
Cart Middle
2 pcs
1 pcs
FCTG2908014
Cart side left
FCTG2908015
1 set
42
FCTG29080016
FCTG2908020
Side Shelf Left Assy.
FCTG3308021
1 set
REPLACEMENT PARTS
Side Burner Right Assy.
Side burner igniter
1 set
1 pcs
FCTG3308022
FCTG2608030
Igniter Module 6 poles
Side Burner Valve
1 pcs
1 pcs
FCCS3308012
FCTG2608032
Side Burner Grate
Side Burner Cover
1 pcs
1 set
FCTG2707026
FCTG3308023
Side Burner Casting
Side Burner Cover Hinge
1 pcs
1 set
FCTG2608029
Side Burner Cap - Brass
FCTG3007023
1 pcs
Large Control Knob
FCTG3308024
Not Shown
FCBJ3308028
FCBJ3308029
FCBJ3308027
FCTG2908023
FCBJ3308031
FCTG2608037
FCTG3308026
FCTG2908024
Main Igniter with Wire 740
Main Igniter with Wire 540
Main Igniter with Wire 920
Main Igniter with Wire 400
Back IR Igniter Wire
Flex Line
Small Hardware Pkg
Cart Door magnet
1 pcs
1 pcs
1 pcs
1 pcs
1 pcs
1 pcs
1 set
1 pcs
FCCS0007032
4 pcs
Large Bezel
FCCS0007033
4 pcs
43
LIMITED WARRANTY
Sure Heat Mfg warrants that for 2 years from the date of purchase, the stainless steel panels will not break
due to defects in material or workmanship. All other components of this grill are warranted free from defects in
material and workmanship for one year from the date of purchase. Sure Heat Mfg. at its option, will repair or
replace this product or any component of the product found to be defective during the warranty period.
Replacement will be made with a new manufactured product or component. if the product is no longer
available, replacement may be made with a similar product of equal value. This warranty does not include
transportation or shipping costs of any kind. This is your exclusive warranty.
This warranty is valid for the original retail purchaser from the date of initial retail purchase and is not transferable. Keep the original sales receipt. Proof of purchase is required to obtain warranty parts.
This warranty does not cover normal wear of parts such as scratches and dents of the stainless steel components or damage resulting from any of the following:
-
-
-
-
negligent use or misuse of the product, including exposing the product to chemicals or
cleaning products not approved by Sure Heat Mfg.
corrosion, rust or discoloring of any kind.
use or installation contrary to specified instructions and applicable building codes, including
heating the product to temperatures above its rated specifications which can cause
considerable warping
disassembly, including removal of the product from a built-in installation
damage resulting from accident, alteration, misuse, abuse, hostile environments, or
improper installation
repair or alteration
acts of God, such as fire, flood hurricanes, and tornadoes
gas cylinders, propane tanks or other fuel delivery systems, including connections to a
household fuel supply
usage other than single-family household use such as commercial or industrial use
minor warping or discoloration of parts, which is normal and not a defect under this warranty
DO NOT RETURN THIS PRODUCT TO THE PLACE OF PURCHASE
If the Grill does not operate properly, first thoroughly carry out the instructions provided with the unit to ensure
that the appliance is installed correctly and check the trouble shooting section in the use and care manual.
We recommend you return the warranty registration card so that you can be contacted with any questions of
safety arise that could affect you. The return of the warranty registration card is not a condition for warranty
coverage.
Because of continuing product improvement these specifications are subject to change without notice.
If you have other questions or need replacement parts contact our
Customer Service Hotline at (800) 229-5647 or
visit our website at www.sureheat.com
Sure Heat Manufacturing 1861 West Oak Parkway Marietta, GA 30062
© 2008.
All rights reserved.
AMANA® is a registered trademark of Maytag Corporation or its related companies and is used under license to
Sure Heat Manufacturing
RACEZ00045A
11/07
Printed in China