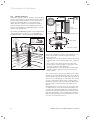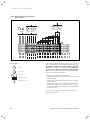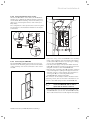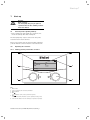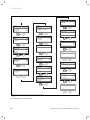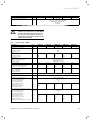
1
For the heating engineer
Installation instructions
geoTHERM
Heat pump
VWS/VWW
GB
Contents
Contents
1
1.1
1.2
1.3
1.4
1.5
Notes on the documentation........................... 3
Storage of the documents ...................................... 3
Symbols used ............................................................. 3
Applicability of the manual..................................... 4
CE label ........................................................................ 4
Intended use ............................................................... 4
2
2.1
2.2
2.3
2.3.1
2.3.2
2.4
Description of the appliance ........................... 5
Data badge.................................................................. 5
Functional principle .................................................. 6
Design of the heat pump ......................................... 7
Component groups - VWS....................................... 8
Component groups - VWW...................................... 9
General notes on operating modes
and functions ............................................................. 9
6.3
6.4
6.4.1
6.4.2
6.7.6
6.8
6.9
6.9.1
6.9.2
6.9.3
6.10
6.11
Electrical control box ............................................... 25
Connecting the power supply ................................ 25
Unblocked mains supply (Electroplan 1) .............. 26
Dual circuit feed, heat pump tariff
(Electroplan 2) ........................................................... 27
Dual circuit feed, special tariff
(Electroplan 3) ........................................................... 28
Connecting external components ......................... 29
Connecting the start-up current limiter
(accessory) ................................................................. 29
Controller PCB at a glance ..................................... 30
Wiring the controller PCB ....................................... 31
Connecting the VR 10 standard sensor ............... 31
Direct heating operation (Hydraulic plan 1) ....... 32
Mixer circuit with buffer cylinder
(Hydraulic plan 2)...................................................... 33
Direct heating operation and domestic
hot water cylinder (Hydraulic plan 3) .................. 34
Mixer circuit with buffer cylinder and
domestic hot water cylinder
(Hydraulic plan 4) ..................................................... 35
Cooling ......................................................................... 36
Connecting the DCF receiver ................................. 36
Connecting accessories ........................................... 36
Installing the VR 90 remote control unit............ 36
Connecting further mixer circuits ........................ 37
Connecting vrnetDIALOG ........................................ 37
Connecting an external boiler ............................... 38
Fitting the cladding and the operating panel .... 38
7
7.1
7.2
7.2.1
7.2.2
7.3
7.4
7.5
7.6
Start-up.............................................................. 41
General points regarding start-up ........................ 41
Operating the controller ......................................... 41
Finding your way around the controller ............. 41
Calling up the screens ............................................. 42
Carrying out the initial commissioning ............... 42
Bleeding the brine circuit (VWS only) ................ 43
Bleeding the heating circuit ................................... 43
Handing the system over to the operator .......... 43
8
8.1
8.2
8.3
8.3.1
8.3.2
8.3.3
8.4
8.4.1
8.4.2
8.4.3
8.4.4
8.4.5
8.5
8.6
8.7
8.8
8.9
Controller ........................................................... 44
Operating modes and functions ............................ 44
Automatic auxiliary functions................................ 44
Settable auxiliary functions.................................... 45
Auxiliary functions in the Operator Level: ......... 45
Auxiliary functions in the Code Level: ................. 45
Auxiliary functions via vrDIALOG: ........................ 46
Description of the controller .................................. 46
Possible system circuits .......................................... 46
Energy balance control ........................................... 46
Buffer cylinder charging principle ........................ 47
Resetting to factory settings ................................. 47
Controller organisation ........................................... 47
Operator level sequence diagram ........................ 48
Code level sequence diagram ................................ 49
Displays in the operator level ................................ 51
Displays in the code layer ....................................... 56
Installer Menu ............................................................ 64
6.4.3
6.4.4
6.5
6.6
6.7
6.7.1
6.7.2
6.7.3
6.7.4
6.7.5
3
3.1
3.2
3.2.1
Safety instructions and regulations .............. 10
Safety instructions ................................................... 10
Regulations, rules, guidelines ............................... 11
Preliminary remarks for room
sealed appliances ...................................................... 11
3.2.2 Related documents ................................................... 11
3.3
Coolant......................................................................... 11
4
4.1
4.2
4.3
4.4
4.5
4.6
4.7
4.8
Assembly and installation ............................... 12
Accessories ................................................................. 12
Requirements of the installation site .................. 12
Dimensions and clearances .................................... 13
Assembly/Installation at a glance ........................ 14
Preparatory work in the installation area .......... 14
Requirements of the heating circuit .................... 15
Scope of delivery ...................................................... 15
Unpacking the unit and checking
the delivery ................................................................. 16
4.9
Transporting the heat pump .................................. 16
4.10 Installing the heat pump ......................................... 17
4.11 Removing the cladding ............................................ 18
4.12 On-site installation .................................................... 19
4.12.1 Assembly of the heating system........................... 20
4.12.2 Assembly of the brine circuit (VWS only)........... 20
4.12.3 Assembly of the well system (VWW only) .......... 21
4.13 Fitting the VRC DCF outside
temperature sensor.................................................. 21
4.14 Fitting the VR 90 remote control unit................. 21
4.15 Installing the VR 60 mixer module ....................... 21
5
5.1
5.2
5.3
6
6.1
6.2
2
Filling the heating and heat
source systems ................................................. 21
Filling the heating circuit ........................................ 21
Filling the brine circuit (VWS only)....................... 22
Well system (VWW only) ......................................... 23
Electrical installation ....................................... 24
Safety and installation information...................... 24
Regulations pertaining to electrical
installations ................................................................ 24
Installation instructions geoTHERM VWS/VWW 0020057444_01
Contents
Notes on the documentation 1
8.10
Parameters that can be set with
1
Notes on the documentation
vrDIALOG 810/2 ......................................................................... 66
9
9.1
9.2
9.3
9.4
Inspection and maintenance ........................... 68
General notes ............................................................. 68
Inspection work to be performed ......................... 68
Servicing and repairs ............................................... 68
Test operation and restarting................................ 68
The following notes are intended as guidance throughout the entire documentation.
Further documents apply in combination with this installation manual.
We accept no liability for any damage caused by failure to observe these instructions.
10
10.1
10.2
10.3
10.4
10.5
10.6
Troubleshooting and diagnostics .................... 68
Error messages on the controller ......................... 68
Malfunctions of eBUS components ...................... 69
Displays in the error memory and
under "Warning message" ...................................... 69
Temporary shut-down ............................................. 70
Blocking error ............................................................ 72
Other errors/malfunctions ..................................... 74
Other applicable documents
Installation manual for the Start-up Current Limiter
VWZ 30/2 SV
No. 0020057445
Installation instructions for the VPA Multicylinder
No. 0020051599
Installation instructions for the VDH Double Wall Storage Tank
No. 0020051594
Installation manual for vrnetDIALOG No. 839189
11
11.1
11.2
11.3
Recycling and disposal ..................................... 75
Appliance..................................................................... 75
Packaging .................................................................... 75
Coolant......................................................................... 75
The manuals for any accessories and controllers used
also apply.
12
12.1
12.2
Customer service and guarantee.................... 75
Vaillant warranty....................................................... 75
Vaillant Service.......................................................... 75
1.1
Storage of the documents
Please pass this installation manual and all other valid
documents on to the owner of the installation in order
for him or her to store it so that it is available whenever
it is required.
13
13.1
13.2
Technical data ................................................... 76
Technical data - VWS ............................................... 76
Technical data - VWW .............................................. 77
1.2
Symbols used
Please observe the safety instructions in this installation
manual for the installation of the appliance.
14
Start-up checklist............................................. 79
15
Reference ........................................................... 81
d
e
H
a
h
Appendix ....................................................................... 84
Sensor characteristics.......................................................... 84
VRC-DCF outside temperature sensor ............................. 85
Heat pump schematic - VWS .............................................. 86
Heat pump schematic - VWW ............................................. 87
Electrical circuit diagram - VWS ........................................ 88
Electrical circuit diagram - VWW ....................................... 89
Danger!
Immediate risk of serious injury or death
Danger!
Danger of death by electric shock!
Danger!
Danger of burning and scalding!
Caution!
Potentially dangerous situation for the
product and environment.
Note!
Useful information and instructions
• Symbol for a necessary task
Installation instructions geoTHERM VWS/VWW 0020057444_01
3
1 Notes on the documentation
1.3
Applicability of the manual
These installation instructions apply exclusively to appliances with the following part numbers:
Type name
Brine/Water Heat Pumps
VWS 61/2
VWS 81/2
VWS 101/2
VWS 141/2
VWS 171/2
Water/Water Heat Pumps
VWW 61/2
VWW 81/2
VWW 101/2
VWW 141/2
VWW 171/2
Article number
0010002778
0010002779
0010002780
0010002781
0010002782
0010002789
0010002790
0010002791
0010002792
0010002793
Table 1.1 Type designations and article numbers
The part number of the equipment can be taken from
the identification plate.
1.4
CE label
With the CE mark, we confirm as equipment manufacturers that the appliances in the geoTHERM range satisfy the basic requirements of the following Directives:
– Electromagnetic Compatibility Directive (Council
Directive 89/336/EEC)
– Low voltage directive (73/23/EEC)
– EN 14511 (heat pumps with electrically-driven compressors for heating, specifications for appliances for
space heating and for warming drinking water)
– EN 378 (safety and environmentally related specifications for refrigerating systems and heat pumps)
The units are intended as heat generators for closed
hot-water central heating installations, for cooling operation and for hot water generation. Any other use or extended use is considered to be improper. The manufacturer or supplier is not liable for any resulting damage.
The user alone bears the risk.
The appliances are intended for operation on a power
supply network with a system impedance Zmax at the
transfer point (house connection) of 0.16 ohms maximum. With larger system impedances, the VWZ 30/2
SV start-up current limiter (Part No. 0020025744) must
be fitted to the heat pump.
Intended use includes the observance of the installation
manual.
a
Caution!
Any improper use is forbidden.
The appliances must be installed by a heating engineer,
who is responsible for adhering to the existing regulations, rules and guidelines.
1.5
Intended use
Valliant geoTHERM heat pumps are state-of-the-art appliances which are designed in accordance with recognised safety regulations. Nevertheless, there is still a
risk of death or serious injury to the user or others or of
damage to the device and other property in the event of
improper use or use for which it is not intended.
This unit is not intended for use by persons (including
children) having limited physical, sensory or mental capacities or who have inadequate experience and/or
knowledge, unless they are supervised by a person responsible for their safety or have been given instructions by him regarding the operation of the unit.
Children must be supervised to ensure that they do not
play with the unit.
4
Installation instructions geoTHERM VWS/VWW 0020057444_01
Description of the device 2
2
Description of the device
Explanation of the symbols on the identification plate
2.1
Data badge
An identification plate is attached to the baseplate on
the inside of the geoTHERM heat pump. The type designation is located at the top of the grey pillar frame.
Rated voltage - compressor
Rated voltage - pumps + controller
Rated voltage - auxiliary heating
Vaillant GmbH Remscheid / Germany
Serial-No. 21054500100028300006000001N1
Rated maximum power
VWS 61/2
DE AT CH
Rated power - compressor, pumps
and controller
IP 20
3/N/PE 400V 50Hz
Rated power - auxiliary heating
1/N/PE 230V 50Hz
3/N/PE 400V 50Hz
9,1
kW
3,1
kW
Start-up current without start-up
current limiter
Start-up current with start-up current limiter
16 A
6
kW
26
A
<16
A
--
I
--
MPa (bar)
R407 C
1,9
2,9 (29)
kg
MPa (bar)
Service water tank capacity
Permissible rated overpressure
16 A
COP B0/W35
COP B5/W55
4,3
B0/W35
B5/W55
5,9
kW
6,4
kW
Coolant type
Filling quantity
Permissible rated overpressure
COP
B0/W35
COP
B5/W55
2,9
B0/W35
B5/W55
21054500100028300006000001N4
Performance figure at a brine temperature of 0 °C and a heating flow
temperature of 35 °C
Performance figure at a brine temperature of 5 °C and a heating flow
temperature of 55 °C
Heating output at a brine temperature of 0 °C and a heating flow
temperature of 35 °C
Heating output at a brine temperature of 5 °C and a heating flow
temperature of 55 °C
CE mark
Fig. 2.1 Example of an identification plate
VDE/GS mark
Read the Operating and Installation
Manual!
Humidity protection class
Ensure proper disposal at the end
of its useful life (not household
waste)
Serial Number
21054500100028300006000001N4
Table 2.1 Explanation of symbols
Installation instructions geoTHERM VWS/VWW 0020057444_01
5
2 Description of the device
2.2
Functional principle
Heat pump systems consist of separate circuits in which
liquids or gases transport the heat from the heat source
to the heating system. As these circuits operate with
differing media (brine/water, coolant and heating
water), they are coupled to one another by means of
heat exchangers. In these heat exchangers the heat
passes from a medium at a high temperature to a medium at a lower temperature.
The Vaillant geoTHERM heat pump can be supplied from
different heat sources such as, e.g. geothermal heat
(geoTHERM VWS) or ground water (geoTHERM VWW).
1/4 Electrical energy
Cold water
Hot water
Heating system
Additional
heating
Domestic
hot water cylinder
Switching valve
Heating water circuit
Heating water pump
3
Condenser
2
Expansion valve
Compressor
Evaporator
4
Coolant circuit
1
3/4 Environmental energy 4/4 Heating energy
Brine pump
Heat source circuit
Heat source
Fig. 2.3 Principle of operation of the heat pump
Fig. 2.2 Using geothermal heat as a heat source
The system consists of separate circuits which are coupled to one another by means of heat exchangers.
These circuits are:
- The heat source circuit, by means of which the energy
from the heat source is transported to the coolant circuit.
- The coolant circuit, which releases its heat to the
heating water circuit by means of evaporation, compression, liquefaction and expansion.
- The heating water circuit, which supplies the heating
and the hot water generation for the domestic hot
water cylinder.
The coolant circuit is connected by means of the evaporator (1) to the environmental heat source, from which it
extracts thermal energy. At the same time, the physical
state of the coolant changes; it evaporates. The coolant
circuit is connected by means of the condenser (3) to
the heating system, to which it releases the heat again.
In so doing, the coolant becomes liquid again; it condenses.
As thermal energy can only pass from a body at a higher temperature to a body at a lower temperature, the
coolant in the evaporator must have a lower temperature than the environmental heat source. On the other
hand, the temperature of the coolant in the condenser
must be higher than that of the heating water in order
to be able to release the heat to it.
6
Installation instructions geoTHERM VWS/VWW 0020057444_01
Description of the device 2
These different temperatures are produced in the coolant circuit by means of a compressor (2) and an expansion valve (4), which are situated between the evaporator and the condenser. The coolant flows in vapour form
from the evaporator into the compressor, where it is
compressed. This causes the pressure and temperature
of the coolant vapour to rise sharply. After this process
it flows through the condenser, where it releases its
heat to the heating water by condensation. It flows as a
liquid to the expansion valve, where it expands significantly and in so doing loses much of its pressure and
temperature. This temperature is now lower than that
of the brine which flows through the evaporator. The
coolant can thus take up more heat in the evaporator,
turning into vapour in the process and flowing to the
compressor. The cycle starts again.
If required, the electric auxiliary heating can be
switched in by means of the integrated controller.
To prevent the formation of condensate in the interior
of the unit, the pipes of the heat source circuit and the
coolant circuit are insulated. Should condensate appear,
however, it is collected in a pan inside the unit (see
Fig. 2.7) and fed away underneath it. Drop formation
under the unit is thus possible.
2.3
Design of the heat pump
The Vaillant geoTHERM heat pump is available in the
versions listed below. The versions differ principally in
their output.
Type name
Heating output (kW)
Brine/Water Heat Pumps (B0/W35)
VWS 61/2
5.9
VWS 81/2
8.0
VWS 101/2
10.4
VWS 141/2
13.8
VWS 171/2
17.3
Water/Water Heat Pumps (W10/W35)
VWW 61/2
8.2
VWW 81/2
11.6
VWW 101/2
13.9
VWW 141/2
19.6
VWW 171/2
24.3
1
2
3
Fig. 2.4 Front view VWS/VWW
Key to Fig. 2.4
1 Label with heat pump type designation
2 Operating panel
3 vrnetDIALOG mounting plate (behind the pillar cladding)
Table 2.2 Type summary
You can read the type designation of the heat pump
from the sticker (see Fig. 2.4, Item 1) on the pillar frame.
The heat pump is designed to implement all current
electrical supply tariffs.
Installation instructions geoTHERM VWS/VWW 0020057444_01
7
2 Description of the device
7
6
1
2
3
2.3.1
Component groups - VWS
16
1
5
2
4
3
4
5
6
15
7
14
8
9
Fig. 2.5 Rear view VWS/VWW
13
10
12
Key to Fig. 2.5
1 Return to domestic hot water cylinder
2 Heat source to the heat pump
3 Heat source from the heat pump
4 Transportation handles
5 Cable feedthrough for electrical connections
6 Heating return
7 Heating feed
8
11
Fig. 2.6 VWS - Front view, covers removed
Key to Fig. 2.6
1 Electrical connections
2 Controller PCB (under cover plate)
3 Contactors
4 Safety thermostat STL for the auxiliary heating
5 Electric auxiliary heating
6 Condenser
7 CH pump
8 Fill/drain valve for heating circuit
9 Identification plate
10 Compressor
11 Condensate pan
12 Expansion Valve
13 Fill/drain valve for brine circuit
14 Brine pump
15 Evaporator
16 3-way valve
Installation instructions geoTHERM VWS/VWW 0020057444_01
Description of the device 2
2.3.2
Component groups - VWW
16
2.4
1
2
3
4
5
6
15
7
General notes on operating modes
and functions
There are five operating modes available for the heating
circuit and these can be used for time and temperature
control of the heat pump (see Chap. 8 "Control system").
There are a further three operating modes available for
the integrated domestic hot water cylinder.
During start-up, you will tell the heat pump which of the
connection configurations listed in the appendix corresponds to your installation by entering the number of
the corresponding hydraulic plan into the controller.
Thus all the operating parameters will be set to predetermined values, so that the heat pump can work optimally. However, you can individually set and adapt the
operating modes and functions afterwards.
You will find all the information on operating modes,
auxiliary and special functions in Chapter 8, "Control
system".
14
8
The heat pump is equipped with numerous automatic
auxiliary functions to ensure trouble-free operation
(see also Chap. 8.2 "Automatic auxiliary functions"):
9
13
10
12
11
Fig. 2.7 VWW - Front view, covers removed
Key to Fig. 2.7
1 Electrical connections
2 Controller PCB (under cover plate)
3 Contactors
4 Safety thermostat STL for the auxiliary heating
5 Electric auxiliary heating
6 Condenser
7 CH pump
8 Fill/drain valve for heating circuit
9 Data badge
10 Compressor
11 Condensate pan
12 Expansion Valve
13 Fill/drain valve for coolant circuit
14 Flow switch for coolant circuit
15 Evaporator
16 3-way valve
Installation instructions geoTHERM VWS/VWW 0020057444_01
– Frost protection
Prevents the heating system from freezing
– Tank frost protection
Prevents the connected tanks from freezing
– Checking the external sensors
Checking the connected sensors during initial commissioning using the basic hydraulic circuit that was entered previously
– Protection against loss of heating water
Shuts down when there is a loss of heating water and
switches on again when there is sufficient water pressure
– Pump blocking protection
Prevents seizing of pumps in the system
– Protection against loss of brine
Shuts down if the brine pressure is too low and
switches on again when the pressure is sufficient
– Floor protection circuit
Overheating protection for the floor (important for
wooden floors)
– Phase monitoring
Compressor shut-down if 400 V supply faulty
– Freeze protection function
Shuts down the compressor if the temperature of the
heat source falls below a predetermined value
9
2 Description of the device
3 Safety instructions and regulations
Additionally, there are further settable auxiliary functions available (see also Chap. 8.3 "Settable auxiliary
functions"):
– Timer programmes
To set the heating times for each heating circuit
– Holiday programming
Programming of two holiday periods with date entry
and set-back temperature
– Party function
Carries the heating and hot water times forward to
the next shut-off point
– Energy saving function
Lowers the flow setpoint temperature for a presettable period
– Cooling mode
The cooling mode allows you to use the heat pumps
for cooling.
Cooling mode is only possible when using the
VWZ NC 14/17 accessory, and only for VWS 14 and
VWS 17 heat pumps.
– Screed floor drying
For drying out screed floors
– Anti-Legionella function
Kills germs in the tank and in the pipes
– Fixed value control
To set a fixed flow temperature via vrDIALOG
– Remote maintenance
Diagnostics and setting via vrDIALOG or
vrnetDIALOG
3
Safety instructions and regulations
3.1
Safety instructions
The heat pump must be installed by an approved technician, who will be responsible for adhering to the existing
standards and regulations. We accept no liability for any
damage caused by failure to observe these instructions.
Find out the transport and operating weights of the heat
pump from the Technical Data and take heed of them
during transportation and installation. Pay particular attention to Chap. 4.2, "Requirements of the installation
site", before assembly.
d
Danger!
The coolant circuit is pressurised. Furthermore, high temperatures can arise.
The appliance may only be opened and
serviced by Vaillant factory customer
service or by a qualified specialist technician. Work on the coolant circuit may
only be carried out by a qualified refrigeration engineer.
e
Danger!
Risk of electric shock!
Always switch off all power supplies before carrying out any electrical installation or servicing work. Make sure that
they are secured against inadvertent
switching on again.
a
Caution!
Risk of damage!
Do not add any antifreeze or corrosion
protection agents to the heating water,
as seals and other components can be
damaged as a result and this can lead to
water leaks.
Soften the heating water if the hardness is 3.0 mmol/l
(21,05 °e) or greater. You can use the Vaillant Ion Exchanger (Part. No. 990 349) for this. Observe the enclosed instructions for use.
a
10
Caution! For VWW only:
Risk of damage to the heat pump.
The incoming ground water must be
checked for quality to ensure that no
damage occurs to the suction well, pipes
or evaporator.
Installation instructions geoTHERM VWS/VWW 0020057444_01
Safety instructions and regulations 3
3.2
Regulations, rules, guidelines
3.2.1
Preliminary remarks for room
sealed appliances
This appliance should only be installed in conjunction
with either a Vaillant flue system or an alternative approved system (details of flue approval categories can
be found in the technical section of the installation manual). Install the flue system as detailed in the separate
flue installation instructions supplied with this boiler.
3.2.2 Related documents
The installation of the boiler must be in accordance with
the relevant requirements of Gas Safety (Installation
and Use) Regulations 1998, Health and Safety Document
No. 635 (The Electricity at Work Regulations 1989),
BS7671 (IEE Wiring Regulations) and the Water Supply
(Water Fitting) Regulations 1999, or The Water Bylaws
2000 (Scotland). It should also be in accordance with
the relevant requirements of the Local Authority, Building Regulations, The Building Regulations (Scotland),
The Building Regulations (Northern Ireland) and the relevant recommendations of the following British Standards:
BS 6700: Services supplying water for domestic use
within buildings and their curtilages.
BS 6798: Specification for installation of gas fired boilers not exceeding 60 kW input.
BS 6891: Specification for installation of low pressure
gas pipework up to 28 mm (R1) in domestic premises
(2nd family gas).
BS 7593: Treatment of water in domestic hot water central heating systems. Institute of Gas Engineers Publication IGE/UP/7/1998: "Guide for gas installations in timber framed housing"
BS. 5482 Pt. 1 Domestic butane and propane gas burning installations.
IGE/UP1 Soundness testing and purging of industrial and
commercial gas installation.
IGE/UP2 Gas installation pipework, boosters and compressors on industrial and commercial premises.
IGE/UP10 Installation of gas appliances in industrial and
commercial premises.
BS. 6644 Installation of gas fired hot water boilers of
rated inputs between 60 kW and 2 MW (2nd and 3rd
family gases).
BS. 5449 Forced circulation hot water central heating
systems for domestic premises. Note: only up to 45 kW.
BS. 6880 Low temperature hot water heating systems
of output greater than 45 kW.
Part 1 Fundamental and design considerations.
Part 2 Selection of equipment.
Part 3 Installation, commissioning and maintenance.
BS. 4814 Specification for: Expansion vessels using an
internal diaphragm, for sealed hot water heating systems.
BS. 5440 Installation and maintenance of flues and ventilation for gas appliances of rated input not exceeding
70 kW net (1st, 2nd and 3rd family gases).
Installation instructions geoTHERM VWS/VWW 0020057444_01
Part 1 Specification for installation of flues.
Part 2 Specification for installation and maintenance of
ventilation for gas appliances.
3.3
Coolant
The heat pump is delivered with an operational filling of
R 407 C coolant. This is a chlorine-free coolant which
does not affect the Earth's ozone layer. R 407 C is neither a fire hazard nor an explosion risk.
However, maintenance work and interventions into the
coolant circuit may only be undertaken by an expert
technician with appropriate protective equipment.
d
Danger!
R 407 C coolant!
Do not inhale gases or vapours emanating from leaks in the coolant circuit.
Risk to health! Avoid contact with the
skin and eyes. Escaping coolant can
cause freezing if the exit point is
touched! R 407 C coolant presents no
danger in normal use and under normal
conditions. With improper use, however,
it can cause injury and damage.
a
Caution!
This appliance contains the coolant,
R 407 C. The coolant must not be allowed to escape into the atmosphere.
R 407 C is a fluorinated greenhouse gas
covered by the Kyoto Protocol, with a
GWP of 1653 (GWP = Global Warming
Potential).
Before the appliance is disposed of, the
coolant it contains must be completely
drained into a suitable vessel so that it
can then be recycled or disposed of in
accordance with the regulations.
The relevant work in connection with the
coolant may only be carried out by officially certified specialists.
Draining or filling with new coolant (see
identification plate for quantity) may
only be carried out via the service
valves. All warranties become void if any
approved replacement coolant other
than the R 407 C recommended by Vaillant is used.
11
4 Assembly and installation
4
4.1
Assembly and installation
Accessories
h
Note!
Please see current price lists for information on possible necessary accessories.
You can fit the following accessories to expand the heat
pump system. You can find more detailed information
on the installation of accessories in Chap. 6.9.
Mixer module VR 60
With the mixer module, you can expand the control system of the heating installation by two mixer circuits.
You can connect a maximum of six mixer modules.
VR 90 remote control unit
A separate remote control device can be connected
for the first eight heating circuits (heat zone 1 heat zone 8).
VR 10 standard sensor
Additional sensors may be required, e.g. as flow, return,
collector or cylinder sensors, depending on the configuration of the system.
vrDIALOG 810/2
vrDialog is a communications unit with software and
connecting cable which enables you to carry out diagnosis, monitoring and parameter setting on the heat pump
from a computer.
vrnetDIALOG 840/2, 860/2
The vrnetDIALOG communications unit enables you to
carry out remote diagnosis, monitoring and parameter
setting on the heat pump from a computer over a telephone connection or via an integrated GSM modem.
VPA combination cylinder
The Vaillant VPA combination cylinder can be fed from
various energy sources and is used for heating both
heating water and DHW.
VWZ compact collector
The VWZ ground collector system is used as a heat
source with a small space requirement and simple, fast
installation. It can only be combined with heat pump
types VWS 81/2 and 101/2.
External cooling VWZ NC 14/17
With the VWZ external cooling accessory, you can also
use the VWS 14 and VWS 17 heat pumps for cooling.
Other accessories
- Heat transfer fluid
- Filling pump
- Safety assembly and tundish
- Expansion vessel for the heating circuit
4.2
Requirements of the installation site
– Choose a dry room that is generally frost-proof.
– The floor must be level and sufficiently stable to be
able to bear the weight of the heat pump, together
with the DHW and possibly a buffer tank.
– It must be possible to install suitable pipe conduits
(for heat source, DHW and heating).
– When choosing the installation site, bear in mind that
when operating, the heat pump can transmit vibrations to the floor or nearby walls.
– In accordance with DIN EN 378 T1, the minimum size
of the installation space for heat pumps, (Vmin), is calculated as follows:
Vmin = G/c
G = coolant fill quantity in kg
c = practical limit in kg/m3
(for R 407C c = 0.31 kg/m3)
This yields the following minimum installation space:
Heat pump type
Start-up current limiter VWZ 30/2 SV
The VWZ 30/2 SV is used to limit the short-term very
high current consumption which occurs when the compressor starts up. This is recommended or stipulated by
some power companies.
VPS heating water buffer cylinder
The VPS buffer cylinder is used as an intermediate cylinder for heating water and can be installed between
the heat pump and the heating circuit. It provides the
necessary to bridge over the power company blocking
periods.
Coolant fill
quantity [kg]
Minimum installation
space [m3]
VWS 61/2
VWW 61/2
1.9
6.1
VWS 81/2
VWW 81/2
2.2
7.1
VWS 101/2
VWW 101/2
2.05
6.6
VWS 141/2
VWW 141/2
2.9
9.4
VWS 171/2
VWW 171/2
3.05
9.8
Table 4.1 Minimum installation space
VIH and VDH domestic hot water cylinder
The Vaillant VIH coiled tube tank and the Vaillant VDH
double wall tank are specially designed to be combined
with heat pumps and are used for heating and storing
hot water.
12
Installation instructions geoTHERM VWS/VWW 0020057444_01
Assembly and installation 4
4.3
Dimensions and clearances
1200
600
0-10 1)
650
835
140 140
75
100 75
600
Fig. 4.1 Dimensions and clearances
1)
Adjustable feet adjustable in height by 10 mm
Installation instructions geoTHERM VWS/VWW 0020057444_01
13
4 Assembly and installation
4.5
Preparatory work in the installation area
300 mm
10 mm
1
3
300 mm
2
300 mm
1
3
Fig. 4.3 Preparatory work in the installation area
600 mm
Fig. 4.2 Minimum clearances for installing the heat pump
4.4
Assembly/Installation at a glance
– Remove packing material.
– Remove transportation safety devices.
– Transport the heat pump to the installation area.
– Position and align the heat pump in the intended assembly location.
– Remove the upper cladding.
– Remove the front cladding.
– Connect the on-site piping.
– Carry out the electrical installation.
– Fill the heating circuit.
– Fill the heat source circuit.
– Fit the cladding.
– Fit the operating console.
– Carry out the initial commissioning.
– Fill out the start-up checklist.
– Hand over system to the user and familiarise him with
it.
14
• Make sure that the substrate is sufficiently stable (see
Chap. 4.2 "Requirements for the installation site").
• Make at least two bore holes, bearing in mind the dimensions of the unit and its connections (1).
• Each pipe from the heat source requires its own bore
hole.
• Special pipe feedthroughs must be used if there is a
risk of ground water penetration (follow the manufacturer's instructions).
• Take account of the distances to the core barrels for
the rest of the installation.
• Pass the heat source pipes (2) from the outside into
the installation area.
• Lay the heat source pipes (2) centrally in the bore
holes (1) to facilitate all-round thermal insulation.
• Seal the annular gap (1) as shown with foam insulation
(e.g. PE foam) (3).
• Insulate the heat source pipes in cellar areas against
vapour diffusion, as condensation will otherwise accumulate (pipe temperature can be as low as - 15 °C).
Installation instructions geoTHERM VWS/VWW 0020057444_01
Assembly and installation 4
4.6
Requirements of the heating circuit
The heat pump is only suitable for connection to a
closed central heating installation. To ensure troublefree operation, the central heating installation must
have been installed by authorised specialists in compliance with the applicable regulations.
A heat pump is suited to low temperature heating systems. The system must therefore be designed for low
flow temperatures (ideally around 30 to 35 °C). Furthermore, it must be ensured that power company outages
are bridged over.
EN 12828 requires the following the heating system installation:
– a filling valve, in order to fill the heating system with
water or be able to drain the water,
– a diaphragm expansion vessel in the return line of the
heating circuit,
– an overpressure safety valve (opening pressure 3 bar)
with pressure gauge (safety group) in the flow line of
the heating circuit, immediately after the appliance,
– an air/dirt separator in the return line of the heating
circuit.
4.7
Scope of delivery
1
2
3
4
To avoid energy losses in accordance with the Energy
Saving Order (EnEV) and to protect against freezing, all
connection lines must be provided with thermal insulation.
The pipes must be dirt free - if necessary, flush them
thoroughly before filling.
a
Caution!
Risk of damage!
Do not add any antifreeze or corrosion
protection agents to the heating water,
as seals and other components can be
damaged as a result and this can lead to
water leaks.
In hydraulic installations that are predominantly
equipped with thermostatically or electrically controlled
valves, it is necessary to ensure a constant, adequate
flow through the heat pump. Regardless of the choice of
heating system, the nominal flow rate of heating water
must be ensured. This is guaranteed by a professionally
installed buffer cylinder.
Installation instructions geoTHERM VWS/VWW 0020057444_01
14
5
13
6
7
8
12
9
11
10
Fig. 4.4 Checking the supplied material
For key, see Table 4.2.
The heat pump is delivered on a pallet in two packing
units.
• Check the heat pump and the separately packaged operating console for any transport damage.
15
4 Assembly and installation
Pos.
Amount
1
2
3
1
1
3
2
3
2
4
1
5
6
7
8
9
1
4
1
5
1
10
1
11
12
1
1
13
14
5
2
Description
Heat pump
Operating console, pillar cover
Gaskets (yellow/green) for heating circuit elbow
unions
M6 flat-headed screws for fitting the operating
console to the frame (plus one spare screw)
Self-tapping screws for the operating console
frame (incl. one spare screw)
Self-tapping screws for fastening the vrnetDIALOG unit
6 Litre brine expansion tank incl. brass adapter,
max. 3 bar
VRC-DCF outside temperature sensor
VR 10 sensors
Control cable for vrnetDIALOG
45° connection elbow with cap nuts
Expansion relief valve for brine circuit, 1/2",
3 bar
Bag of small parts for fastening the brine expansion tank
Clamp for fastening the brine expansion tank
Insulation matting for heat source connection
on the rear wall
Installation instructions, operating manual
Seals with metal support rings for heat source
circuit connection elbows
4.9
Transporting the heat pump
The handles on the rear side of the unit are provided as
transportation aids (see Fig. 2.5, Item. 4).
d
Danger!
Risk of injury!
Depending on type, the heat pump
weighs 140 - 195 kg in the unfilled state.
To avoid injury, use several people to lift
it.
a
Caution!
Risk of damage!
Regardless of the mode of transport, the
heat pump must never be tilted by more
than 45°. Otherwise it can cause malfunctions in the coolant circuit during
later operation, which in the worst case
can lead to a failure of the whole system.
Table 4.2 Scope of delivery
The frame for the operating console is already fastened
to the heat pump casing on delivery.
4.8
< 45°
Unpacking the unit and checking the delivery
2x
Fig. 4.6 Transporting the complete unit (carrying)
Fig. 4.5 Removing the transport securing device
• Carefully remove the packaging and padding, taking
care not to damage any parts of the unit.
• Unfasten the transport securing devices (brackets)
with which the heat pump is fixed to the pallet.
The brackets are no longer required.
16
Installation instructions geoTHERM VWS/VWW 0020057444_01
Assembly and installation 4
We recommend that the heat pump be transported with
the aid of a suitable barrow.
4.10
Installing the heat pump
< 45°
0-10 mm
Fig. 4.8 Adjusting the feet
• Pay attention to the minimum wall clearances when
installing the heat pump (see Fig. 4.2).
• Align the heat pump horizontally by adjusting the feet.
Fig. 4.7 Transporting the complete unit (barrow)
a
Caution!
Risk of damage!
Find out the weight of the heat pump
from the Technical Data and make sure
that the transportation method you select is appropriately constructed.
When using a barrow, take note:
• Only use the barrow on the rear side of the heat
pump, as the weight distribution is then the most favourable.
• Fasten the heat pump with a restraining strap.
• Use a ramp when pushing the barrow from the pallet,
e.g. a batten and a sturdy board.
Installation instructions geoTHERM VWS/VWW 0020057444_01
17
4 Assembly and installation
4.11
Removing the cladding
The cladding panels are screwed on and additionally
provided with retaining clips.
Fig. 4.10 Removing the front lower cladding
• Unfasten the two screws on the console frame and
pull it, together with the front lower cladding, away
from the casing.
Fig. 4.9 Removing the upper cover
• Remove the pipe access cover, which is fastened with
retaining clips, by pulling it gently upwards.
• Unfasten the screws for the upper cover which are
concealed beneath it.
• Remove the upper cover in an upwards direction.
Fig. 4.11 Removing the front upper cladding
• Unfasten the two screws on the front of the front
upper cladding and remove the cladding.
18
Installation instructions geoTHERM VWS/VWW 0020057444_01
Assembly and installation 4
4.12
On-site installation
a
Caution!
Flush the heating system thoroughly before connecting the appliance!
By doing that, residue such as welds,
cinder, hemp, putty, rust, rough dust and
similar substances are removed from the
pipes. Otherwise such substances can be
deposited in the appliance and cause
damage.
a
Caution!
To prevent leaks, take care that no mechanical stresses are created on the
connection lines!
1
2
3
4
5
7
6
Fig. 4.12 Fitting the connection elbows
- The pipework installation must be carried out in accordance with the dimensional and connection drawings in Fig. 4.1.
- The installation must be performed by a specialist fitter.
- The applicable regulations must be observed during
the installation.
h
Note!
Air in the heating system leads to impaired operation and reduces the heating
output. Fit bleed valves as required.
Key to Fig. 4.12
1 Heating feed
2 Heating return
3 Return to domestic hot water cylinder
4 Heat source to the heat pump
5 Heat source from the heat pump
6 Insulating pad
7 Blanking plugs
a
Caution!
To avoid leaks, take care that the correct seals are used on the connecting elbows!
Leaks can result if the seals with the
metal support ring are not used in the
heat source circuit!
• Remove the blanking plugs from the appliance connections (7). They are no longer needed and can be
disposed of.
• Fit the three connecting elbows (1 to 3) with the yellow/green gaskets supplied with the accessories.
• Fit the two connecting elbows (4 and 5) with the seals
with the metal support ring supplied with the accessories.
• The accessory kit contains an insulating pad for insulating the connection plate. Fit this insulating pad to
the two right hand screwed connections (6).
Installation instructions geoTHERM VWS/VWW 0020057444_01
19
4 Assembly and installation
4.12.1 Assembly of the heating system
42a
a
Caution!
Risk of damage!
In order to be able to clear any possible
overpressure, the heat pump must be
connected to an expansion vessel and an
expansion relief valve, at least DN 20
with a maximum opening pressure of
3 bar (not supplied).
H
Danger!
Risk of scalding!
The blow-off line on the expansion relief
valve must be the size of the valve's
outlet aperture and be installed in a
frost-free environment. It must remain
constantly open. It must be fitted in
such a way that persons are not endangered by hot water or steam when it
blows off.
We recommend the installation of a Vaillant safety assembly and tundish.
• Fit the heating flow and return lines with all components.
• Insulate all the pipes.
4.12.2 Assembly of the brine circuit (VWS only)
• Install the heat source pipes and all their associated
components.
57
65
1
Fig. 4.14 Fitting the brine expansion tank
h
Note!
The brine expansion tank has a capacity
of approx. 6 litres and is thus adequate
for brine circuits up to a maximum of
1900 litres.
a
Caution!
Material damage resulting from escaping
brine!
The screw couplings on the
brine expansion tank must be sealed
with hemp. Sealing with, e.g., teflon tape
can lead to leaks in the brine circuit.
42a
57
65
58
58
Collector
49
58
49
61
61
Fig. 4.13 VWS heat source circuit
Key
33
42a
49
57
58
61
65
20
to Fig. 4.13
Air separator/Dirt filter
Expansion relief valve
Flow rate adjuster
Brine expansion tank
Filling and drainage tap
Brine circuit
Brine collecting tank
33
• Fit the bracket for the brine expansion tank to the
wall using the wall plug and the screw.
• Unfasten the pre-assembled connection pieces from
the brine expansion tank (57).
• Wind hemp into the outer threads of the connection
pieces.
• Fit the first connection piece to the 3 bar expansion
relief valve (42a) enclosed with the heat pump.
• Using the second connection piece, fit the brine expansion tank (57) from the accessory kit to the pipe
(1) running from the heat source to the heat pump.
• Fix the brine expansion tank with the bracket.
• Fit the connection piece with the expansion relief
valve to the brine expansion tank.
• Fit the brine collecting tank (65) to the expansion relief valve (42a) at zero pressure.
The brine collecting tank must not be completely
closed, as otherwise the functioning of the expansion
relief valve is not guaranteed.
• Provide all the pipes with vapour-proof thermal insulation. The accessory kit contains the insulating mat
provided for the thermal insulation of the connection
plate.
Installation instructions geoTHERM VWS/VWW 0020057444_01
Assembly and installation 4
Filling the heating and heat source systems 5
4.12.3 Assembly of the well system (VWW only)
a
Caution!
Risk of damage!
Make sure that no negative pressure can
arise in the lines during operation and
after the well pump has been switched
off. The flexible hoses within the heat
pump can be damaged as a result of negative pressure in the lines.
With water as the heat source, the well system is in
most cases implemented with a suction and injection
well. The customer-side well pump (immersion pump)
should be fitted in the suction well. Follow the well pump
installation and assembly instructions in this respect.
See Chap. 6.4.4. for the electrical connections to the
well pump
When using ground water as a heat source, the quality
of the water must be investigated before installation. To
this end, a water sample must be examined in the laboratory and, using the aids provided by Vaillant for assessing ground water quality (tables, calculation software), a decision made as to whether the ground water
can be used as a heat source. In the event of poor
ground water quality, it may be necessary to use a
VWS heat pump with a customer-side intermediate heat
exchanger (for more details, see Vaillant PLI geoTHERM,
No. 877959).
• Install the heat source pipes and all their associated
components.
• Provide all the pipes with vapour-proof thermal insulation. The accessory kit contains an insulation mat for
insulating the connection plate.
4.13
Fitting the VRC DCF outside temperature
sensor
Fit the sensor in accordance with the enclosed installation instructions.
4.14
Fitting the VR 90 remote control unit
If you install several heating circuits, you can connect a
separate VR 90 remote control unit for each of the first
eight of them. It allows the operating mode and target
room temperature to be set, and takes into account the
actual room temperature measured by the built-in room
sensor, if necessary.
It is also possible to adjust the parameters for the associated heating circuit (timer programme, heating curve
etc.) and to select the special functions (party, etc.).
In addition, it is possible to query the heating circuit and
to display service and fault messages.
For assembly of the VR 90 remote control unit, see its
enclosed installation instructions. Regarding installation
see Chapter 6.9.1.
Installation instructions geoTHERM VWS/VWW 0020057444_01
4.15
Installing the VR 60 mixer module
With the mixer module, you can expand the control system of the heating installation by two mixer circuits.
You can connect a maximum of six mixer modules.
A unique bus address is set on the mixer module by
means of a rotary switch. The setting of the heating
programme and all the required parameters is carried
out from the operating console. All heating circuit connections (sensors and pumps) are made directly on the
mixer module using a ProE plug.
For assembly of the VR 60 mixer module, see its enclosed installation instructions. Regarding installation
see Chapter 6.9.2.
5
Filling the heating and heat source
systems
The heating circuit and the brine circuit (VWS only)
must be filled before the heat pump can be put into operation.
h
5.1
Note!
The heat pump cladding sections are
only fitted after the filling and subsequent bleeding of the heating circuit.
Filling the heating circuit
a
Caution!
Malfunction!
Fill the heating circuit via the integrated
filling and draining valve, so that the
heating circuit is completely bled.
If there is a DHW cylinder connected,
make sure that the 3-way valve is in the
centre position.
• If there is a DHW cylinder connected, set the 3-way
valve (see Fig. 2.6, Item 16) to the centre position.
• Open all the thermostatic valves in the heating system.
• Connect a filling hose to a water tap.
• Attach the free end of the filling hose to the filling
valve (see Fig. 2.6, Item 8).
• Open the filling valve.
• Turn the water tap on slowly and fill with water until
the pressure gauge indicates a system pressure of approx. 1.5 bar.
• Close the filling valve and detach the hose.
• Bleed the system again at the points provided.
• Re-check the water pressure in the system (repeat the
filling process if necessary).
21
5 Filling the heating and heat source systems
5.2
Filling the brine circuit (VWS only)
The brine fluid consists of water mixed with a heat
transfer fluid concentrate. As an additive we recommend propylene glycol (alternative: ethylene glycol)
with corrosion-inhibiting additives. A DN 40 collector
hose has a capacity of approx. 1 litre per continuous
metre.
The brine fluids that may be used differ greatly from region to region. Please find out about this from the authorities responsible.
Vaillant only approves of operating the heat pump with
the following brine media:
– max. 30 % ethylene glycol/water
– max. 33 % propylene glycol/water
– potassium carbonate/water
– max. 60 % ethanol/water
60
Heat source
to the heat pump
59
67
61
Heat source
from the heat pump
57
62
64
58
65
29
66
Fig. 5.1 Brine circuit
Key
29
57
58
59
60
61
62
64
65
66
67
22
to Fig. 5.1
Brine pump
Stop valve
Bleed valve
Brine expansion tank
Expansion relief valve
Stop valve
Stop valve
Stop valve
Brine collecting tank
Brine reservoir
Filling pump
a
Caution!
Environmental hazard!
Leakage of brine media must not result
in any contamination of the ground
water or the soil. Substances must be
selected that are non-toxic and biologically degradable.
h
Note!
Only fit the heat pump cladding sections
after the filling and subsequent bleeding
of the heating circuit.
Installation instructions geoTHERM VWS/VWW 0020057444_01
Filling the heating and heat source systems 5
To fill the brine circuit, proceed as follows:
• Mix the antifreeze used by Vaillant in Germany, Austria and Switzerland, 1.2 % propylene glycol, with
water in the proportion 1 : 2.
This offers frost protection down to -15 °C.
• Mix water and antifreeze to the specified concentration in an external container (e.g. plastic canister, see
Fig. 6.1, Item. 66). Every batch of the mixture must be
carefully blended.
• Check the mixing proportions of the brine fluid.
Vaillant recommends the use of a refractometer for
this purpose.
• Then fill the brine mixture from the container (66)
into the heat source system. This will require a filling
pump (67) that simultaneously bleeds the collector
circuit as it fills it. Vaillant recommends the Vaillant
filling pump (Art.No. 307 093). Connect the pressure
line on the pump to stop valve (62).
• Close stop valve (57).
• Open stop valves (62) and (64).
• Open stop valve (61) and connect a hose to it, with the
other end of the hose draining into the glycol mixture.
• Start the filling pump (67) in order to fill the collector
hose.
• Allow the filling pump (67) to run until fluid free of air
emerges from the hose connected to stop valve (61).
• Now open valve (57)
so that the air between valves (61) and (62) can escape.
• Close valve (61) and pressurise the brine circuit using
the filling pump (67). Take care that the pressure
does not exceed 3 bar.
• Now close valve (62) as well.
• Switch off the filling pump (67) and remove the filling
hose.
• Open the expansion relief valve (60) to allow any possible overpressure to discharge. The brine expansion
tank must be 2/3 full of fluid. Make sure that valve
(61) is closed.
• Fill any remaining brine fluid into a suitable container
(e.g. plastic canister) for topping up later and hand it
over to the user for safekeeping.
Further bleeding is carried out after the cladding sections have been fitted and the heat pump has been
started (see Chap. 7.4).
Installation instructions geoTHERM VWS/VWW 0020057444_01
Check the filling level of the brine fluid
a
Caution!
Risk of damage!
The filling level is correct when the brine
expansion tank is 2/3 full. The installation can be damaged if the filling level is
too high.
• Top up the brine fluid when the filling level has fallen
so low that it is no longer visible in the expansion
tank.
1
2
Fig. 5.2 Filling level of the brine expansion tank
Key to Fig. 5.2
1 Filling level too low
2 Filling level correct
The filling level of the brine fluid can fall a little in the
first month following commissioning of the system; this
is quite normal. The filling level can also vary depending
on the temperature of the heat source, but under no circumstances should it fall so far that it is no longer visible in the expansion tank.
5.3
Well system (VWW only)
When using water as the heat source, it is not necessary
to fill the heat source system as it is an open system.
23
6 Electrical installation
6
6.1
Electrical installation
Safety and installation information
e
Danger!
Risk of electric shock!
Always switch off the power supply before carrying out any electrical installation work. Make sure that it is secured
against inadvertent switching on again.
a
Caution!
Risk of damage!
The electrical connection must be
equipped with a customer-supplied isolation device having a contact separation
of at least 3 mm on all lines (e.g. a line
protection switch).
It makes sense to fit this isolation device in the immediate vicinity of the heat pump.
a
Caution!
Risk of damage!
The electrical installation may only be
undertaken by an authorised engineer.
a
Caution!
Risk of short circuits!
When connecting conductors carrying
230 V to the ProE plug, do not strip the
insulation back by more than 30 mm
for safety reasons.
If you strip back by more than this,
there is a risk of short circuits to the
PCB if the conductors are not correctly
attached in the plug.
a
Caution!
Risk of malfunction!
The lines for the outside temperature
sensor and the room thermostat carry
small, weak currents. Interference from
the environment can have an effect on
the sensor lines and transmit incorrect
information to the heat pump controller,
and for this reason the sensor lines
must be run absolutely correctly.
Low current lines must be run at an adequate distance from high current lines. If
low and high current lines are run in parallel, a minimum distance of 25 cm applies for lengths greater than 10 m.
Furthermore, take note:
– For power, connect the heat pump to a 400 V threephase mains supply with one neutral and one earth
conductor. Fuse this connection as specified in the
technical data.
– Install the heat pump with a fixed mains connection.
– The required conductor cross sections must be determined by a qualified technician, using the values specified in the technical data for the maximum rated output. In any case, take into account the on-site installation conditions.
– If the local power company stipulates that the heat
pump should be controlled by a blocking signal, fit an
appropriate contact switch, as specified by the power
company, and connect it to the heat pump with a twocore cable.
6.2
Regulations pertaining to electrical
installations
The maximum sensor cable length of 50 m may not be
exceeded.
Where lengths are greater than 10m, route the connection cables carrying 230 V/400 V separately from the
sensor or bus cables.
Do not use free terminals on the appliance as support
terminals for other wiring.
At start-up, the controller automatically checks for the
correct phase sequence. Switch two phases over if there
is an error message.
24
Installation instructions geoTHERM VWS/VWW 0020057444_01
Electrical installation 6
6.3
Electrical control box
1
6
2
5
3
4
Fig. 6.1 Electrical control box
Key to Fig. 6.1
1 Controller PCB (under the cover plate) with connection strip for
sensors and external components
2 Cable clamps
3 Start-up current limiter PCB (accessory), lower level of control
box
4 Safety thermostat (STL) for the auxiliary heating
5 Contactors for the auxiliary heating element and compressor,
for the VWW only: Well pump contactor with motor protection
switch
6 Power supply connection terminals
The exact allocation of the connection terminals (6) can
be found in Chap. 6.4.
Additionally, there are two coiled cables hanging inside
the control box (not shown here):
– small two-way plug:
connecting cable for the operating console
– large three-way plug:
power supply for vrnetDIALOG
A control cable for the vrnetDIALOG is also supplied (accessories).
Installation instructions geoTHERM VWS/VWW 0020057444_01
6.4
Connecting the power supply
Different types of power supply are provided for heat
pumps by the power companies. The heat pump can be
operated with various types of mains feed. Three types
of connection are described on the following pages.
• Pass the power supply cable(s) through the elongated
hole in the rear of the unit.
• Pass the cables through the unit, through the appropriate strain relief clamps and on to the connection
terminals on the connector strip.
• Carry out the wiring of the connection as illustrated in
the following wiring diagrams.
a
Caution!
The appliance covers must be fitted
after completion of the installation work.
25
6 Electrical installation
6.4.1
Unblocked mains supply (Electroplan 1)
1
+
+
+
(VWW)
PE N L3 L2 L1
400 V / 50 Hz
PE
N
L3 L2 L1
N L3 L2 L1
PE N N L3 L3 L2 L1
PE N L3
S S A Z N PE
Fig. 6.2 Unblocked mains feed (supplied configuration)
Key to Fig. 6.2
Pump
Compressor
Controller
Auxiliary heater
Heat source circuit
This is how the heat pump is wired when delivered.
The heat pump is connected to the mains on a single
tariff (one consumer meter) (1). The power company reserves the right to switch off the compressor and the
auxiliary heating as required by means of a ripple control signal. The duration and frequency of the shutdowns is determined by the company, or should be clarified with them.
• Connect the power supply to the principal mains
feed (1).
• Connect the ripple control signal relay to terminal 13,
"EVU" (see Fig 6.6), if required by the power company. The heat pump is blocked with this signal when the
contact is closed.
You will find an overview of the complete wiring diagram in the appendix.
26
Installation instructions geoTHERM VWS/VWW 0020057444_01
Electrical installation 6
6.4.2 Dual circuit feed, heat pump tariff
(Electroplan 2)
2
1
+
+
400 V / 50 Hz
(VWW)
400 V / 50 Hz
3
PE N L3 L2 L1
PE
N
L3 L2 L1
N L3 L2 L1
PE N N L3 L3 L2 L1
PE N L3
S S A Z N PE
Fig. 6.3 Dual circuit feed, heat pump tariff
Key to Fig. 6.3
Pump
Compressor
Controller
Auxiliary heater
Heat source circuit
In this instance the heat pump is operated on two tariffs
(two consumer meters). A permanent supply (2) for the
secondary consumers (auxiliary heating, circulation
pumps, controller, etc.) must be ensured via a meter.
The low tariff supply (1) for the compressor is effected
via a second meter and can be interrupted by the power
company at peak times.
• Remove the jumpers (dashed lines, 3).
• Connect the permanent power supply to the high tariff mains feed (2).
• Connect the low tariff power supply to the low tariff
mains feed (1).
• Connect the ripple control signal relay to terminal 13,
"EVU" (see Fig 6.6), if required by the power company. The heat pump is blocked with this signal when the
contact is closed.
You will find an overview of the complete wiring diagram in the appendix.
Installation instructions geoTHERM VWS/VWW 0020057444_01
27
6 Electrical installation
6.4.3
Dual circuit feed, special tariff
(Electroplan 3)
2
1
+
+
(VWW)
230 V / 50 Hz
400 V / 50 Hz
3
PE N L3 L2 L1
PE
N
L3 L2 L1
N L3 L2 L1
PE N N L3 L3 L2 L1
PE N L3
S S A Z N PE
Fig. 6.4 Dual circuit feed, special tariff
Key to Fig. 6.4
Pump
Compressor
Controller
Auxiliary heater
Heat source circuit
In this instance the heat pump is operated on two tariffs
(two consumer meters). A permanent supply (2) for the
secondary consumers (circulation pumps, controller,
etc.) must be ensured via a meter. The low tariff supply (1) for the compressor and the auxiliary heating is
effected via a second meter and can be interrupted by
the power company at peak times.
• Remove the jumpers (dashed lines, 3).
• Connect the permanent power supply to the controller
mains feed (2).
• Connect the low tariff power supply to the low tariff
mains feed (1).
• Connect the ripple control signal relay to terminal 13,
"EVU" (see Fig 6.6), if required by the power company. The heat pump is blocked with this signal when the
contact is closed.
You will find an overview of the complete wiring diagram in the appendix.
28
Installation instructions geoTHERM VWS/VWW 0020057444_01
Electrical installation 6
6.4.4 Connecting external components
1
2
3
p
(VWW)
PE N L3 L2 L1
(VWS)
PE
N
L3 L2 L1
N L3 L2 L1
PE N N L3 L3 L2 L1
PE N L3
S S A Z N PE
Fig. 6.5 Connecting external components
Key to Fig. 6.5
Pump
Heat source circuit
p
Brine Switch
3-way valve with solenoid
Only if the VPA Multi-cylinder or some other multicylinder is installed
• Connect the external 3-way valve for the multi-cylinder to the terminals (3).
h
Note!
When using an external 3-way valve, the
proper functioning of the heat pump is
only assured if the valve supplied with
the VPA Multi-cylinder is used.
Installation instructions geoTHERM VWS/VWW 0020057444_01
VWW only:
• Connect the customer-side well pump to the
terminals (1).
The well pump is connected to the 400 V three-phase
supply via the well pump contactor.
A motor protection switch in the heat pump (see Fig. 6.1,
Item 5) protects the well pump from overload. The
switch should be set to the well pump's rated current
(0.8 – 2.7 A).
a
Caution!
Risk of damage!
The well pump will not be protected from
overload unless the motor protection
switch is properly set.
VWS only:
Should you wish to connect an external brine pressure
switch to the heat pump, use the terminals (2) for this.
6.5
Connecting the start-up current limiter
(accessory)
Some power companies demand the installation of a
start-up current limiter (Art. No. 0020025744) for the
heat pump.
• Fit the start-up current limiter PCB beneath the controller PCB as described in its manual (see Fig. 6.1).
• Connect the start-up current limiter in accordance
with its manual.
29
6 Electrical installation
Controller PCB at a glance
1
2
L N
ZH
Zu Auf N
LP/UV 1
3
L N
ZP
4
L N
SK2-P
5
L N
HK2-P
6
Zu Auf N
HK2
7
1 2
VF2
8
1 2
RF1
1 2
VF1
9
1 2
SP
10
11
12
+ -
6.6
DCF OT AF
BUS
DCF/AF
1 2
EVU
13
14
1 2
1xZP
15
16
17
18
19
20
21
22
1
N L
2
N L
3
N L
4
N L
6
7
8 ASB
L N 2 1 L N 2 1
5
SCH
N L 2 1
23
33
32
31
30
29
28
27
26
25 24
Fig. 6.6 Controller PCB
Key to Fig. 6.6
Upper connection terminals
1 <ZH>
Electric auxiliary heating
2 LP / UV 1 3-port diverter valve for hot water generation
3 <ZP>
Circulation pump for hot water
4 <SK2-P> VWW only: Well pump contactor
5 <HK2-P> External (second) heating circuit pump
6 <HK2>
3-way mixer valve
7 VF2
External flow sensor
8 RF1
Buffer cylinder base temperature sensor
9 VF1
Buffer cylinder head temperature sensor
10 SP
DHW cylinder temperature sensor
11 BUS
eBUS
12 DCF / AF Outside temperature sensor + DCF signal
13 EVU
EVU contact (supply interruption, ripple control signal from power company)
open: compressor operation permitted
closed: compressor operation blocked
14 1xZP
Contact for non-recurring request for the
circulation pump, e. g. via pushbutton
PCB components
15 eBUS/vrDIALOG
16 eBUS address rotary switch, set to "1" (factory setting)
30
17
18
19
20
21
22
23
Fuse T 4A/250 V
Check LED for power supply (lights green if OK)
Fuse T 4A/250 V for brine pump
Monitoring of compressor phase sequence
Controller plug (User Interface)
Sensor connection plug 1
Sensor connection plug 2
Lower connection terminals
24 ASB Starting current limiter
25 8
Compressor contactor
26 7
Pressure switch
27 6
(not connected)
28 SCH Accessory - brine pressure switch (VWW: Flow switch)
29 5
Brine pump (VWS only)
30 4
Voltage supply
31 3
Internal heating circuit pump
32 2
unused
33 1
unused
The controller PCB has a protective cover plate which
has cut-outs for the eBUS/vrDIALOG (Item 15) connection, as well as for the power supply LED (Item 18).
The cover plate must be removed to change the fuses,
Items 17 and 19.
Installation instructions geoTHERM VWS/VWW 0020057444_01
Electrical installation 6
6.7
Wiring the controller PCB
The controller has an automatic sensor recognition
function. You must configure the connected heating circuits in accordance with the system combination. In the
following you will find various options for operating the
heat pump.
6.7.1 Connecting the VR 10 standard sensor
Additional sensors are required as flow, return, collector
or cylinder sensors, depending on the configuration of
the system. The VR 10 standard sensor is so designed
that it can be used as an immersion sensor, e.g. as a cylinder sensor in a cylinder sensor tube, or as a flow sensor in a hydraulic switch. Using the enclosed cable tie
you can also attach it as a contact sensor to the heating
flow or return pipes. We recommend that the pipe together with the sensor be insulated to ensure optimum
temperature measurement.
Fig. 6.7 VR 10 standard sensor
Installation instructions geoTHERM VWS/VWW 0020057444_01
31
6 Electrical installation
6.7.2 Direct heating operation (Hydraulic plan 1)
The heat pump is connected directly to the underfloor
heating circuit. Control is carried out using energy balance control by default (see Chap. 8.4.2). To do this, the
VF2 flow temperature sensor must be connected (floor
protection circuit).
16
AF
42a
VF2
30
30
31
31
WQ
30
VF2
32
31
27
33
39
400 V
400 V
42b
Fig. 6.8 Hydraulic plan 1
Key
16
30
31
32
33
42a
42b
43
VF2
WQ
to Fig. 6.8
External sensor (AF)
Non-return valve
Control valve with position indication
Cap valve
Air separator/Dirt filter
Expansion relief valve
Expansion vessel
Safety group for hot water pipe
Supply temperature sensor
Heat source circuit
optional for hydraulic decoupling:
27
Heating circuit pump with control line to the heat pump
39
Low loss header
32
h
Note!
Should hydraulic decoupling of the heating circuit be necessary, then fit a low
loss header and an external heating circuit pump as shown in Fig. 6.8.
h
Note!
If you have fitted a low loss header between the heat pump and the heating
system, then the VF2 temperature sensor must be mounted in the flow line
from the low loss header to the heating
system.
Installation instructions geoTHERM VWS/VWW 0020057444_01
Electrical installation 6
6.7.3
Mixer circuit with buffer cylinder
(Hydraulic plan 2)
The unregulated underfloor heating circuits are operated by the external heating circuit pump from the buffer
cylinder via a mixer. The flow temperature sensor sits
behind the external pump.
The heat pump responds to a demand for heat from the
buffer cylinder.
16
AF
42a
VF2
46
M
VF1
30
30
31
31
27
WQ
RF1
400 V
400 V
33
32
42b
Fig. 6.9 Hydraulic plan 2
Key to Fig. 6.9
16
External sensor (AF)
27
CH pump
30
Non-return valve
31
Control valve with position indication
32
Cap valve
33
Air separator/Dirt filter
42a
Expansion relief valve
42b
Expansion vessel
46
3-way mixer valve
VF1
Buffer cylinder head temperature sensor
VF2
Supply temperature sensor
RF1
Buffer cylinder base temperature sensor
WQ
Heat source circuit
Installation instructions geoTHERM VWS/VWW 0020057444_01
33
6 Electrical installation
6.7.4
Direct heating operation and domestic hot
water cylinder (Hydraulic plan 3)
The heat pump is connected directly to the underfloor
heating circuit. Control system is carried out using energy balance control by default (see Chap. 8.4.2). The VF2
flow temperature sensor must be connected (floor protection circuit).
The heat pump also supplies a domestic hot water cylinder.
16
AF
42a
30
30
31
31
VF2
WQ
33
30
27
42b
400 V
400 V
31
VF2
32
39
25
SP
43
KW
Fig. 6.10 Hydraulic plan 3
Key
16
25
30
31
32
33
42a
42b
43
VF2
SP
WQ
KW
to Fig. 6.10
External sensor (AF)
Circulation pump
Non-return valve
Control valve with position indication
Cap valve
Air separator/Dirt filter
Expansion relief valve
Expansion vessel
Safety group for hot water pipe
Supply temperature sensor
Cylinder temperature sensor
Heat source circuit
Cold water
h
Note!
Should hydraulic decoupling of the heating circuit be necessary, then fit a low
loss header and an external heating circuit pump as shown in Fig. 6.10.
h
Note!
If you have fitted a low loss header between the heat pump and the heating
system, then the VF2 temperature sensor must be mounted in the flow line
from the low loss header to the heating
system.
optional for hydraulic decoupling:
27
Heating circuit pump with control line to the heat pump
39
Low loss header
34
Installation instructions geoTHERM VWS/VWW 0020057444_01
Electrical installation 6
6.7.5
Mixer circuit with buffer cylinder and
domestic hot water cylinder
(Hydraulic plan 4)
The unregulated underfloor heating circuits are operated by the external heating circuit pump from the buffer
cylinder via a mixer. The flow temperature sensor sits
behind the external pump.
The heat pump responds to a demand for heat from the
buffer cylinder.
42a
46
27
30
30
31
31
VF2
M
VF1
AF
32
WQ
33
55
42b
RF1
400 V
400 V
30
SP
25
43
KW
Fig. 6.11 Hydraulic plan 4
Key to Fig. 6.11
16
External sensor (AF)
25
Circulation pump
27
CH pump
30
Non-return valve
31
Control valve with position indication
32
Cap valve
33
Air separator/Dirt filter
42a
Expansion relief valve
42b
Expansion vessel
43
Safety group for hot water pipe
46
3-way mixer valve
VF1
Buffer cylinder head temperature sensor
VF2
Supply temperature sensor
RF1
Buffer cylinder base temperature sensor
SP
Cylinder temperature sensor
WQ
Heat source circuit
KW
Cold water
Installation instructions geoTHERM VWS/VWW 0020057444_01
35
6 Electrical installation
6.7.6 Cooling
Cooling mode is only possible when using the
VWZ NC 14/17 accessory, and only for VWS 14 and
VWS 17 heat pumps. More detailed information about
this can be found in the installation manual for the
VWZ NC 14/17 accessory. Information regarding the hydraulic plans can be found in the installation manual for
the VWZ NC 14/17 accessory.
6.8
The structure of the Vaillant system allows you to run
the eBus from component to component (see Fig. 6.13).
Interchanging the cables does not lead to any impairment in communication.
Connecting the DCF receiver
AF
0
DCF
AF
0
DCF
Fig. 6.12 Connecting the VRC DCF receiver
• Wire the DCF receiver as shown in Fig. 6.12:
– left: enclosed external sensor (DCF receiver)
– right: alternative solution with separate external
sensor
A special solution with a separate VRC 693 outdoor sensor is necessary if, e.g., no radio reception is available at
the location of the outdoor sensor.
6.9
Connecting accessories
a
Caution!
Risk of damage!
Switch off the power before connecting
additional units to the eBUS.
You can connect the following accessories:
– Up to six VR 60 mixer modules to expand the system
by system circuits (factory pre-set as mixer circuits).
– Up to eight VR 90 remote control units to control the
first eight heating circuits.
– vrnetDIALOG 840/2 or 860/2
– Connection in each case to the eBUS terminal
(Fig. 6.6, Item 11), connected in parallel.
6.9.1 Installing the VR 90 remote control unit
The VR 90 remote control units communicate with the
heating controller via the eBus. You can connect them
to any interface in the system. You need only make sure
that the bus interfaces are connected to the heat pump
controller.
36
Fig. 6.13 Connecting remote control devices
All eBus connector plugs are designed to allow you to
wire at least 2 x 0.75 mm2 per pigtail.
The use of cable with a cross-section of 2 x 0.75 mm2 is
therefore recommended for eBUS cables.
Setting the bus address
In order to ensure perfect communication between all
components it is necessary to provide the remote control unit with an address that matches the heating circuit to be controlled.
• Set the bus address on the first additional VR 90 remote control unit to "2".
• Set different, sequential bus addresses for any further
remote control units. Take note of the VR 90 installation manual.
2
Fig. 6.14 Setting the bus address
Installation instructions geoTHERM VWS/VWW 0020057444_01
Electrical installation 6
6.9.2 Connecting further mixer circuits
Like the VR 90 remote control units, the VR 60 mixer
modules also communicate with the heating controller
via the eBUS. When installing, observe the same procedure as for connecting the remote control units (see
Chap. 6.9.1).
The configuration of the system can be seen in Fig. 6.15.
Pay attention to the installation manual for the expansion module.
6
1
5
4
2
3
Fig. 6.17 Connecting vrnetDIALOG
Fig. 6.15 Connecting further mixer circuits
6.9.3 Connecting vrnetDIALOG
The vrnetDIALOG communications unit (accessory) is
fastened to the mounting plate provided on the frame
of the operating console and connected to the controller PCB.
• Fasten the casing of the vrnetDIALOG to the mounting
panel of the operating console using the self-tapping
screws (1) and (2) from the accessory bag. For fixing,
see also the vrnetDIALOG manual.
• Pass the power supply cable present within the heat
pump (5) through the opening in the upper front cladding and connect it to the vrnetDIALOG unit.
• Next pass the connecting cable (6) from the operating
console through the opening in the upper front cladding and connect to it the adapter cable from the accessory pack (4) for connecting between the
vrnetDIALOG unit and the heat pump.
The connector on the adapter cable is intended for the
operating console; the second cable is intended for connection to the eBUS plug from the vrnetDIALOG unit.
h
Any other eBUS cables already present
on the vrnetDIALOG unit are not required and can thus be removed.
• Now connect the aerial or telephone cable (3) to the
vrnetDIALOG unit (see also the vrnetDIALOG manual).
These cables must not be fed through the heat pump.
Fig. 6.16 Fitting vrnetDIALOG
Installation instructions geoTHERM VWS/VWW 0020057444_01
37
6 Electrical installation
6.10
Connecting an external boiler
If your external boiler has a Vaillant eBUS interface, you
can connect it to the heat pump eBUS via the VR 32 accessory (see also the VR 32 manual regarding this).
In both cases, the heat pump switches in the external
boiler depending on the heat demand and the controller
setting. To do this, set the hydraulic connection in Menu
C8 "Auxiliary heater 1".
6.11
Fitting the cladding and the operating panel
1 2 1 2 - + DCF 0 AF
1x 2P Tel BUS DCF/AF
PE
N
ABB
L1
L2 L3
L3 N PE
L1 L2 L3 L3' N N PE
L1 L2 L3 N
L1 L2 L3
Zu Auf N
LP/UV 1
L N
ZP
L N
SK2-P
L N
HK2-P
Zu Auf N
HK2-M
1 2
VF2
1 2
RF1
1 2
VF1
1 2
SP
+ -
L N
ZH
PE N L3 L2 L1
DCF OT AF
BUS
DCF/AF
1 2
EVU
1 2
1xZP
L1 L2 L3 PE
A12-30-01
ABB
A12-30-01
ABB
A12-30-01
1
N L
2
N L
3
N L
4
N L
5
SCH
N L 2 1
6
7
8 ASB
L N 2 1 L N 2 1
VR
32
Fig. 6.20 Fitting the front upper cladding
Fig. 6.18 Connecting to a boiler with an eBUS interface
Boilers without eBUS interfaces are connected to the internal auxiliary heating contact (ZH, see Fig. 6.6) via an
isolating relay (accessory, Vaillant No. 306249).
L N
ZH
PE
N
ABB
L1
L2 L3
L3 N PE
L1 L2 L3 L3' N N PE
L1 L2 L3 N
L1 L2 L3
Zu Auf N
LP/UV 1
L N
ZP
L N
SK2-P
L N
HK2-P
Zu Auf N
HK2-M
1 2
VF2
1 2
RF1
1 2
VF1
1 2
SP
+ -
L N
ZH
PE N L3 L2 L1
DCF OT AF
BUS
DCF/AF
1 2
EVU
• Feed the console connector through the opening in
the front lower cladding panel and then press the
panel into the spring retainer on the casing frame.
• Screw the cladding panel to the casing with the two
screws, as shown in Fig. 6.3.
Zu Auf N
LP/UV 1
1 2
1xZP
L1 L2 L3 PE
A12-30-01
ABB
A12-30-01
ABB
A12-30-01
1
N L
2
N L
3
N L
4
N L
5
SCH
N L 2 1
6
7
8 ASB
L N 2 1 L N 2 1
1
Fig. 6.21 Fitting the operating console
Fig. 6.19 Connecting to a boiler without an eBUS interface
Key to Fig. 6.19
1 Isolating relay (Accessory No. 306249)
38
• If you have fitted the vrnetDIALOG communications
unit, plug in the connecting plug and the control cable
supplied in the heat pump accessory kit (see the
vrnetDIALOG manual and Chap. 6.9.3).
Installation instructions geoTHERM VWS/VWW 0020057444_01
Electrical installation 6
e
Danger!
Risk of electric shock!
If the vrnetDIALOG accessory is not
being used or does not receive its
power supply from the heat pump, the
vrnetDIALOG connecting plug (230 V
supply) must remain secured inside the
heat pump.
Fig. 6.23 Fitting the upper cover
Fig. 6.22 Fitting the front lower cladding
• Attach the upper cover and screw it down securely
with the two associated screws.
• Press the pipe access cover into the spring retainer.
• Press the lower cladding panel into the spring retainer
on the casing and securely screw the console frame to
the casing using the two screws, as shown in Fig. 6.5.
Installation instructions geoTHERM VWS/VWW 0020057444_01
39
6 Electrical installation
Fig. 6.24 Fitting and connecting the operating console
• Connect the connecting cable to the operating console.
Fig. 6.25 Fitting the front panel of the operating console
• Insert the front panel of the operating console into
the spring retainer on the console frame.
40
Installation instructions geoTHERM VWS/VWW 0020057444_01
Start-up 7
7
Start-up
d
Danger!
Risk of injury!
The heat pump may only be put into
operation after all the cladding sections
have been fitted.
7.1
General points regarding start-up
• Before putting the heat pump into operation, first
check the Start-up Checklist in Chap. 14.
The heat pump may only be started if all the points
noted there have been satisfied.
Before you actually start up the heat pump, familiarise
yourself with the controller interface described below.
7.2
Operating the controller
7.2.1
Finding your way around the controller
2
1
Basic data
6
Date
Day of week
Time
3
Set day
5
4
Fig. 7.1 Operating overview
Key
1 Menu name
2 Cursor indicating the selected parameter
3 Menu number
4 Dial ,
Set parameter (turn). Select parameter (press)
5 Dial ,
Select menu (turn). Activate special operating mode (press)
6 Line with information (in the example, an operation prompt)
Installation instructions geoTHERM VWS/VWW 0020057444_01
41
7 Start-up
7.2.2 Calling up the screens
The menus are identified by a number at the top right of
the display. You can access the next menu by turning
the dial. The numbers make it easier to find individual
menus during programming.
7.2.3
Typical operating sequence on the operator
level
Vaillant
Loading...
Fig. 7.2 Controller being initialised
• Turn the dial until the required menu is selected.
• Turn the dial until the parameter to be changed is selected.
• Press the dial to mark the
parameter to be changed. The
parameter will be highlighted
on a dark background.
After a short time the controller is ready for operation
and detects that this is an intial commissioning. During
the initial installation the controller always starts with
the Installation Assistant - Menu A1.
A1
Installation
Language selection
Language
>GB english
• Turn the dial to change the
set value of the parameter.
>Select
• Press the dial to accept the
new value.
• Repeat this sequence until all
the settings have been made.
Fig. 7.3 Menu A1: Language selection
Change the language setting if necessary and turn the
dial to the next menu.
Installation Assistant
7.3
Carrying out the initial commissioning
As soon as the heat pump is supplied with power during
the initial commissioning, an internal self-test starts automatically, whereby the heat pump checks itself and
any connected components for functional capability. At
the same, the sensor configuration is checked, the
phase sequence of the AC supply is determined and the
functioning of the sensors in use is checked.
If the self-test was not successful, an error message appears on the controller display (see Chap. 10, "Troubleshooting and diagnosis").
• Switch on the circuit breaker, so that the heat pump is
supplied with power.
The heat pump starts, the controller software is initialised:
A2
Hydraulic plan
0
Electroplan
0
Accept change
No
>Select
Fig. 7.4 Menu A2: Installation Assistant
h
The heat pump type has already been
set at the factory and may not be
changed!
Selecting the hydraulic plan
a
Caution!
Possible malfunctions.
Take care to select the correct hydraulic
plan, as otherwise malfunctions can
occur in the system.
• Turn the dial until the cursor > points to the number
that indicates Hydraulic plan No.
• Press the dial. The parameter will be activated and
displayed in inverse video.
42
Installation instructions geoTHERM VWS/VWW 0020057444_01
Start-up 7
• Turn the dial until the hydraulic plan matching your
system has been selected (see Table 7.1).
You will find the hydraulic diagram for your installation in Chap. 6.7.2 ff.
• Press the dial to confirm the selection.
Installation completed
1
2
X
X
AF, VF2
X
Fig. No.
Probe
DHW cylinder
CH circuit
X
3
4
>yes
Fig. 7.5 Menu A9: Ending the installation
Buffer tank
Hydraulic plan
No.
Exit mode?
>Values can be set
A9
6.8
AF, VF1, VF2, RF1
6.9
X
X
AF, SP, VF2
6.10
X
X
AF, SP, VF1, VF2, RF1
6.11
Table 7.1 Selecting the Hydraulic plan No.
Selecting the electroplan
• Turn the dial until the cursor > points to the number
of the electroplan.
• Press the dial. The parameter will be activated and
displayed in inverse video.
• Select
• Turn the dial until the electroplan, "1", "2" or "3",
matching your mains supply is selected (see
Chap. 6.4):
1 = Unblocked mains supply
2 = Dual circuit feed, heat pump tariff
3 = Dual circuit feed, special tariff
• Press the
dial to confirm the selection.
Adopting the settings
• Turn the dial until the cursor > on the right of the
"accept" menu entry points to NO.
• Press the dial. The parameter will be activated and
displayed in inverse video.
• Turn the dial until "YES" appears.
• Press the dial to confirm the selection.
h
• Only set "Exit mode?" to "YES" if you are sure that
everything has been set correctly.
Once you have confirmed with "YES", the controller
switches to the graphics display. The heat pump starts
under its autonomous control system.
7.4
Bleeding the brine circuit (VWS only)
To bleed the brine circuit, activate the "Brine bleeding"
menu point in Menu A7. The brine pump now alternates
between 50 minutes operation and 10 minutes standstill.
Check whether the fluid level in the brine expansion
tank has stabilised.
• Let the brine pump continue to run, so that the air
trapped in the system can be collected in the expansion tank. The level of the fluid in the expansion tank
falls as a result of the discharge of air and must be
topped up again as described in Chap. 5.2.
• Open the expansion relief valve to allow any possible
overpressure to discharge. The tank must be filled to
2/3 full with fluid.
7.5
Bleeding the heating circuit
• If manual switching of the heating circuit pump and
the 3-way valve is necessary to bleed the heating circuit, perform this via Menu A5/A6 (see Table 8.4).
7.6
Handing the system over to the operator
• Instruct the operator of the system in the handling
and function of all the equipment.
• Hand over all the instruction manuals and documents
for the appliance to the operator for safe keeping.
• Tell the operator to keep the manuals nearby the controller. Inform the owner of the need for regular inspection of the system.
Note!
A complete description of the displays
(Menus A1 to A9) for the initial commissioning can be found in Table 8.4
• Make all the necessary settings and continue with the
Installation Assistant to the end.
Installation instructions geoTHERM VWS/VWW 0020057444_01
43
8 Controller
8
Controller
To operate the heat pump economically, it is important
to match the control system to the customer's heating
system and to the pattern of use.
In the following chapter, all the functions of the weather-controlled energy balance controller will be explained.
8.1
Operating modes and functions
There are five operating modes available for the heating
circuit:
– Auto: the operation of the heating circuit alternates
between the "Heating" and "Energy saving" modes in
accordance with a preset timer programme.
– Eco: the operation of the heating circuit alternates
between the "Heating" and "Off" modes in accordance
with a preset timer programme. The
heating circuit is switched off during the set-back period provided the frost protection function (which depends on the outside
temperature) is not activated.
– Energy saving: the heating circuit is operated at the
set-back temperature independently of any preset
timer programme.
– Heating: the heating circuit is operated at the flow
temperature setpoint independently of any preset
timer programme.
– Off: the heating circuit is out of operation, provided
that the frost protection function (which depends on
the external temperature) is not activated.
The "Auto", "On and "Off" operating modes are available for connected domestic hot water cylinders:
– Auto: the commands for recharging the cylinder or
enabling the circulating pump are given according to a
preset timer programme.
– On: recharging is constantly enabled, i.e. the cylinder
is immediately re-heated when needed, and the circulating pump is constantly in operation.
– Off: the cylinder is not heated and the circulation
pump is not in
operation. Only when the storage tank temperature
falls below 10 °C is the storage tank reheated to 15 °C
for frost protection reasons.
8.2
Automatic auxiliary functions
Frost protection
The controller is equipped with a frost protection function. This function ensures that the heating system is
protected from frost in all operating modes.
The set-back temperature is pre-set automatically
for each heating circuit if the outside temperature
falls below 3 °C.
ed to 15 °C. This function is also active in the "Off" and
"Auto" operating modes, regardless of the timer programmes.
Checking the external sensors
The necessary sensors are configured using the basic
hydraulic circuit that you specified during the initial
commissioning. The heat pump constantly checks automatically that all sensors are installed and functioning.
Protection from loss of heating water
An analogue pressure sensor monitors for any potential
loss of water and switches the heat pump off if the
water pressure is below 0.5 bar gauge pressure, and on
again when the water pressure is above 0.7 bar gauge
pressure.
Pump blocking and valve blocking protection
To prevent the heating, circulation or brine pumps, or
the hot water diverter valve UV1, from seizing, those
pumps and the valve that have not been in operation for
the last 24 hours are turned on in sequence for approximately 20 seconds every day.
Protection against loss of brine (VWS only)
An analogue pressure sensor monitors for any loss of
brine and switches the brine pump off if the brine pressure falls even once below 0.2 bar gauge pressure and
Error 91 is displayed in the error memory.
The heat pump switches on again when the brine pressure rises above 0.4 bar gauge pressure.
A warning message appears in Menu 1 if the brine
pressure falls below 0.6 bar gauge pressure for longer
than one minute.
Floor protection switching for all hydraulic systems
without a buffer cylinder (e.g. for Hydraulic Plans
1 and 3)
If the heating flow temperature in the underfloor
heating circuit measured by sensor VF2 continuously
exceeds a value of (max. HK temp. + compressor
hysteresis + 2 K, default setting: 52 °C) for longer than
15 Minuten, the heat pump switches off with error message F.72 (see Chap. 10.6). The heat pump switches on
again when the flow temperature has fallen below this
value and the error has been reset.
The maximum heating flow temperature can be changed
via vrDIALOG with the "Maximum heating circuit temperature" parameter.
a
Caution!
Risk of damage to the floor.
Only set the value for the floor protection circuit high enough that heated
floors are not damaged by excessively
high temperatures.
Cylinder frost protection
This function starts automatically if the current DHW
temperature falls below 10 °C. The cylinder is then heat-
44
Installation instructions geoTHERM VWS/VWW 0020057444_01
Controller 8
Phase monitoring
The sequence and presence of the phases (clockwise rotating field) of the 400 V supply are checked at the initial commissioning and continuously checked during operation. If the sequence is not correct or if one phase
drops out, a fault-induced shutdown of the heat pump
takes place to prevent damage to the compressor.
Freezing protection function
The outlet temperature of the heat source is measured
continuously. If the heat source outlet temperature falls
below a defined value, the compressor switches off temporarily with error message 20 or 21 (see Chap. 10.4). If
these errors appear three times in succession, a fault-induced shutdown takes place (see Chap. 10.5).
You can set the value (default setting - 10 °C) for the
freezing protection for geoTHERM VWS heat pumps in
Installation Assistant A4.
A value of + 4 °C is factory set for geoTHERM VWW
heat pumps. This value cannot be changed.
8.3
Settable auxiliary functions
You can set the following auxiliary functions from the
controller yourself and thus adapt the system to local
circumstances or the operator's wishes.
h
8.3.1
Note:
Operation of the controller is sub-divided
into three levels:
- Operator level -> for the operator
- Code level -> for the expert technician
- vrDIALOG -> for the expert technician
Auxiliary functions in the Operator Level:
Time programme
You can set the heating times for each heating circuit.
You can store up to three heating periods per day or
per block (Block = Mon - Fri or Mon - Sun or Sat - Sun).
See Table 8.3, Menu 3 "Timer programs".
Holiday programming
You can programme two holiday periods with date
entry. You can additionally define the set-back temperature to which the system should be regulated during the
period of absence.
See Table 8.3, Menu 4 "Holiday programming".
Party function
The party function permits you to extend the current
heating and hot water periods beyond the next switchoff time, to the start of the next heating period.
See Chap. 8.9.
Installation instructions geoTHERM VWS/VWW 0020057444_01
Energy-saving function
This function allows you to set back the heating for an
adjustable period of time.
See Chap. 8.9.
Cooling
Cooling mode is only possible when using the
VWZ NC 14/17 accessory, and only for VWS 14 and
VWS 17 heat pumps. More detailed information about
this can be found in the installation manual for the
VWZ NC 14/17 accessory.
8.3.2
Auxiliary functions in the Code Level:
Floor drying
You can dry out a freshly laid screed floor using this
function in accordance with Table 8.1. The flow temperature corresponds to a routine stored in the controller
and is independent of the outside temperature. All the
selected operating modes are interrupted when this
function is activated. See Table 8.4, Menu C6.
Day after starting
the function
Starting temperature
1
2
3
4
5 – 12
13
14
15
16
17 – 23
24
25
26
27
28
29
Target flow temperature for this day
25 °C
25 °C
30 °C
35 °C
40 °C
45 °C
40 °C
35 °C
30 °C
25 °C
10 °C
(frost protection function,
pump in operation)
30 °C
35 °C
40 °C
45 °C
35 °C
25 °C
Table 8.1 Progress of the screed floor drying
The operating mode is displayed together with the current day and the target flow temperature. The current
day can be set manually.
If the brine circuit is not yet finished, the drying of the
screed floor can be accomplished by means of the auxiliary heating. In order that the drying of the screed floor
can take place by means of the auxiliary heating, select
the value "ZH only" for the "Heating mode" parameter
in Menu C7, "Auxiliary heating".
a
Caution!
Overloading of the heat source!
If too much energy is extracted from the
heat source while drying out a floor (e.g.
in the winter months), the source can be
overloaded and its
regeneration impaired.
45
8 Controller
When the function is started, the current time of the
start is saved. The day is changed exactly at this time.
After network-off/-on, the floor-drying begins as follows:
Last day before mains off
1 - 15
16
17 - 23
24 - 28
29
Start after mains on
1
16
17
24
29
Table 8.2 Progress of the screed floor drying following mains
off/on
If you do not wish to carry out the drying with the specified temperatures and/or times, you can specify variable flow temperature setpoints by means of fixed value
controlling (see following section). When doing this, take
note of the applicable compressor hysteresis (settable
via vrDIALOG, see Chap. 8.10).
Legionella protect
The purpose of the "Legionella protect" function is to
kill off germs in the DHW tank and in the pipes.
Once a week, the domestic hot water cylinder is raised
to a temperature of approx. 70 °C.
The expert technician activates the "Legionella protect"
function in the Code level and there can set a starting
time and a starting day (weekday) on which the heating
is to take place (see Table 8.4, Menu C9).
Remote parameter setting/alerting/diagnostics
It is possible to diagnose and adjust the heat pump by
remote commands via vrDIALOG 810/2 or vrnetDIALOG
840/2 or 860/2. You will find more detailed information
on this in the respective manuals.
8.3.3 Auxiliary functions via vrDIALOG:
Using its computer-supported graphics visualisation and
configuration, vrDIALOG 810/2 (eBUS) enables you to
optimise heating appliances and control systems and
thus make use of their energy saving potential. Both of
them enable you to create a visual impression of the
processes in your control system and influence them at
any time. The programmes enable you to record and
graphically prepare system data, to load device configurations and change and save them online and to save information in the form of reports.
Using vrDIALOG 810/2, you can make all the settings for
the heat pump as well as other settings for optimisation.
See Chap. 8.10.
Acceleration mode
This operating mode simplifies the diagnosis of heat
pump functions by speeding up the energy balancing in
hydraulic plan 1 or 3 by a factor of 60. It is used as a
test function.
See Chap. 8.10.
46
Fixed value controlling
Using this function you can set, via vrDIALOG, a fixed
flow temperature independently of the weather-controlled control system. See Chap. 8.10.
8.4
Description of the controller
8.4.1 Possible system circuits
The controller can control the following system circuits:
– one heating circuit,
– one indirectly heated hot water cylinder,
– one hot water circulation pump,
– one buffer circuit.
To expand the system, you can, with the aid of a buffer
circuit, connect up to six additional VR 60 mixer circuit
modules (accessories), each with two mixer circuits.
The mixer circuits are programmed via the controller in
the heat pump operating console.
For convenient operation, you can connect the VR 90
remote control unit for the first eight heating circuits
(see Chap. 4.13).
8.4.2 Energy balance control
Energy balance control is applicable only to hydraulic
systems without buffer cylinders (e.g. Hydraulic Plans 1
and 3).
For economical and fault-free operation of a heat pump,
it is important to regiment the starting of the compressor. The start-up of the compressor is the point at which
the highest loading occurs. Using the energy balance
controller it is possible to minimise the number of heat
pump start-ups without having to forgo the convenience
of a comfortable room environment.
As with other weather-controlled heating controllers,
the controller first measures the outside temperature
and then determines a flow temperature setpoint by
means of a heating curve. The energy balance calculation is made on the basis of this flow temperature setpoint and the current temperature in the heating circuit
- the difference per minute is measured and totalised:
1 degree minute [°min] = 1 K temperature difference in
the course of 1 minute
The heat pump starts up at a defined heat deficit (selectable on the controller, see Menu C4) and only
switches off again when the supplied heat is equal to
the heat deficit.
The larger the preset negative numerical value is, the
longer the periods for which the compressor is kept running or at standstill.
Installation instructions geoTHERM VWS/VWW 0020057444_01
Controller 8
8.4.3 Buffer cylinder charging principle
The buffer cylinder is controlled depending on the setpoint flow temperature. The heat pump heats when the
temperature measured by the sensor at the top of the
buffer cylinder, VF1, is lower than the setpoint temperature. It heats until the temperature measured by the
sensor at the base of the buffer cylinder, RF1, has
reached the setpoint temperature plus 2 K.
With reference to heating the DHW cylinder, the buffer
cylinder is likewise heated when the temperature of the
sensor at the top of the cylinder, VF1, is less than 2 K
above the setpoint temperature (early reheating):
VF1 < T VL setpoint + 2 K.
In Menus A1 to A9 you are guided through the installation menu during the initial commissioning of the heat
pump.
Furthermore it is possible to display and select special
functions, such as the energy saving function. To do
this, press the dial once , twice, or three times, starting
from the top-level display (see Fig. 8.1).
The third level contains functions for optimising the system and can only be set by a specialist using
vrDIALOG 810/2 (see Chap. 8.10).
8.4.4 Resetting to factory settings
a
Caution!
Inadvertent deletion of specific settings!
When you reset the control system to
the default settings, specific system
settings can be deleted and the system
can sut down. The system cannot be
damaged.
• Press both dials simultaneously for at least 5 seconds
in the top-level display of the graphics display.
After that you can select whether to reset only the
timer programs, or all values, to the default settings.
8.4.5 Controller organisation
The top level display is a graphics display. It is the
starting point for all the available screens. This display
reappears automatically if you do not actuate any of the
dials for a long time when setting values.
In the following illustrations you can see all the controller screens in an overview in the form of a flow chart.
You will find descriptions of the individual screens in the
sections that follow them.
Controller operation is subdivided into three levels:
The Operator level is intended for the operator.
The Code level (Menus C1 - C9, D1 - D5, I1 - I5 and
A1 - A9) is reserved for the specialist and is protected
against unintentional adjustments by means of a code
input.
The following parameters can be displayed in the individual menus, but the values cannot be changed if no
password is entered, i. e. access to the code level is disabled.
In Menus C1 to C9 you can set parameters for the various functions of the heat pump for the heating circuit.
In Menus D1 to D5 you can operate and test the heat
pump in diagnostic mode.
In Menus I1 to I5 you can obtain general information regarding the settings for the heat pump.
Installation instructions geoTHERM VWS/VWW 0020057444_01
47
8 Controller
8.5
Operator level sequence diagram
Reset to default
settings
Graphics display
We
16.02.08
9:35
Factory setting
Cancel
Time programme
Everything
> Select
> 5 sec.
NO/YES
NO/YES
NO/YES
Graphics display cooling*
Installer Menu
We
16.02.08
9:35
Sparen aktiviert for
> 12:00
> Select stop time
We
16.02.08
9:35
Party function enabled
Energy input display
We
16.02.08
9:35
One-time
DHW tank loading enabled
Mo 21.04.08
Flow Temp. CH
System pressure
Brine pressure
CH : Comp only
Warning message
Warning message
16:49
1
28ºC
1,2bar
1,4bar
Cooling settings *
We
16.02.08
9:35
Cooling function active for
>3days
> Set duration
HK2
Parameters
HK2mode
Heating
Parameter
>Auto
Betriebsart
Set value
day Heizen
>Auto
Night set
back temp.
Raumsolltemp.
>Select
operation mode
Night set back temp.
Domestic hot water
Parameters
Operation mode DHW
Max. DHW temp.
Min. DHW temp.
Current DHW temp.
>Select operation mode
2
2
Domestic hot water
Time programme
>Mo
1
06:00
2
:
3
:
>Select day of the week
20 ºC
15 ºC
20 ºC
15 ºC
5
22:00
:
:
Basic data
Date
Day of week
Time
> Set day of the week
4
Circulation pump
Time programme
>Mo
1
06:00
2
:
3
:
>Select day of the week
> Auto
60 ºC
44 ºC
51 ºC
HK2
5
Time HK2
programme
5
Time
programme
>Mo
HK2
1
00:00
24:00
Time
programme
>Mo
2 >Mo 1
: 00:00
: 24:00
3
2
: 00:00:
: 24:00
1 :
:
:
>Select day of 3the week
2
:
:
:
:
>Select day of 3the week
>Select day of the week
7
21.04.08
> Mo
09:35
5
Holiday programming
for cpl. System
Periods
1
>06.01.08
2
14.01.08
Room Temp. setpoint
>Set starting day
5
22:00
:
:
Code layer
8
Code-Nummer:
>0000
Standard code:
1000
>Adjust numeric character
6
08.01.08
31.01.08
12 ºC
Code level only for
expert technicians
*) Displays shown in grey are dependent on the hydraulic plan selected
Fig. 8.1 Displays in the Operator level
48
Installation instructions geoTHERM VWS/VWW 0020057444_01
Controller 8
8.6
Code level sequence diagram
Code layer
change
Code number:
HK2
Parameters
HK2
Switch-on
room temp.
Parameterss
HK2
NoneRaumaufschaltung
Parameterss
Keine
Raumaufschaltung
Remote control
Keine
>Values
can be set
Fernbedienung
C1
0000
Accept change?
>Adjust numeric character
No
>Values
can be set
Fernbedienung
>Values can be set
Special function
Floor drying
HK 2
Parameters
Type
Heating curve
Max limit outs.temp.
Comp. starts at
> Set heating curve
C2
Direct circuit
> 0,80
21 ºC
-120ºmin
HK 2
Parameters
HK 2
TypeParameters
2
Max Art
limitHK
outs.temp.
Parameters
AT-Abschaltgrenze
Art
AT-Abschaltgrenze
> Values can be set
C2
C2
Fixed value
21 ºCvalue C2
Fixed
21 ºC
Fixed value
21 ºC
HK2:
HK3:
HK4:
> Set starting day
C5
C5
C5
23 °C
YES
23 °C
JA
23 °C
JA
C6
Day
>1
Temp.
0 °C
> Values can be set
> Values can be set
Auxilary heater
Aux on during CH
Aux on during DHW
ZH Starts at
Buffer tank
Information
Setpoint flow temp.
T buffer top <VF1>
T buffer Bottom <RF1>
C7
no CH
comfort
-600°min
C3
> Values can be set
41 °C
30 °C
25 °C
Cooling
Parameters
Max Flow Setpoint.
C8
22 °C
> Select
HK2
Parameters
HK2
Setpoint
flow temp.
Parameterss
Current flow
HK2 temp.
Setpoint flow temp.
Status ofParameterss
pump
Current flow temp.
Status hydr.
mixerflow temp.
Setpoint
Pumpenstatus
Current flow temp.
Mischerstatus
Pumpenstatus
Mischerstatus
C4
C4
41 °C
29 °C
C4
41 °C
OFF
29 °C
OPEN 41 °C
OFF
29 °C
OPEN
OFF
OPEN
HK2
Information
Setpoint flow temp.
Flow Temp. VF2
Status of pump
°mins lag/gain
C4
41 ºC
30 ºC
OFF
-183ºmin
Legionella protect
C9
Legionella protect
Legionella start
OFF
4:00
> Select
*) Displays shown in grey are dependent on the hydraulic plan selected
Fig. 8.2 Displays in the Code level
Installation instructions geoTHERM VWS/VWW 0020057444_01
49
8 Controller
Installation assistent
Auxiliary heater
Integration of the
Auxiliary heater
Out T. aux htr on
A3
>intern
-5 °C
>Select
Diagnosis
Refrigerant circuit
Test
Comp High Pressure
T outlet compresor
Comp Low Pressure
T inlet compressor
D1
>no
11,9 bar
66 ºC
2,3 bar
0 ºC
Error History
I1
>1
96
Fault number
Fault code
16.02.05 07:18
Refrigerant pressure sensors fault
Installation assistent
Geothermal settings
Freeze protect Temp.
Statistics
Diagnosis
Refrigerant circuit
Overheat
Subcooling
Temp TEV inlet
D2
4K
10 K
10 ºC
I2
D3
27 ºC
24 ºC
OFF
1,2 bar
OFF
I/O card
User Interface
VR80
VR90
I3
1
1
Diagnosis
Direct circuit
Buffer VF1
Buffer RF1
T Flow Mix.Offset VF2
Current DHW temp.
UV1
D4
ON
10 ºC
9 ºC
1,5 bar
D5
45 ºC
36 ºC
38 ºC
52 ºC
Tool
Component Test 1
HK2-P
ZP
ZH
SK2-P
Tool
Component Test 2
Component
Actuators
Sensors
Reset ?
Code 1: 0000 Code 2:
Codes accepted ?
A5
ON
OFF
OFF
OFF
3.34
2.22
I5
Diagnosis
Heat Source
Brine pump
T Return Source
T outlet Evaporator
Brine pressure
>Select
7 Hr
33
2 Hr
21
Compr. Hours
Compressor starts
Aux heater Hours
Aux heater starts
Software release
Diagnosis
Central Heating
Current flow temp.
Current return temp
CH pump
System pressure
Auxiliary heater
A4
-10 °C
A6
VR60
OFF
VFa
Adr. 4
29ºC
>Select
>NO
FFFF
NO
>Select
Tool
Ventilation
Venting prog
Installation assistent
Language selection
Language
A7
OFF
A1
>GB english
>Select
>Select language
Installation assistent
Hydraulic Scheme No
Appliance Code
Electric Wiring Diagram
Accept change
>Select
A2
3
5
1
YES
Tool
Calibration
Outside temperature
T DHW Offset SP
T Flow Mix.Offset VF2
Buffer sensor RF1
>Select correction value
Install. Completed
Exit mode?
A8
0,0 K
0,0 K
0,0 K
0,0 K
A9
>Yes
> Values can be set
*) Displays shown in grey are dependent on the hydraulic plan selected
Fig. 8.3 Displays in the Code level (cont.)
50
Installation instructions geoTHERM VWS/VWW 0020057444_01
Controller 8
8.7
Displays in the operator level
Display shown
Description
Graphics display (Top-level display)
You can read off the instantaneous state of the system from this display. This will always be shown if you have not actuated either of the
dials for a long time while another display is showing.
Outside temperature (here 10 °C)
Source inlet temperature: temperature sensor T3;
9 °C in the example (see Figs. 1 and 2 in the appendix)
The output of the heat source is displayed under
the arrow (10 kW in the example).
The degree of darkening of the arrow provides a
graphical representation of the energy efficiency
of the pump under the specified operating conditions.
The output of the heat source should not be equated with the heating output.
The heating output corresponds approximately
with the output of the heat source + the compressor output
When the compressor or the electric auxiliary heating is switched on, the arrow is shown filled.
>>> Left and right flash when the compressor is
switched on and energy is consequently being
taken from the environment and fed to the heating
system.
>>> Right flashes when energy is being supplied to
the heating system (e.g. only from the electric auxiliary heating).
The heat pump is in the CH mode. The heating flow
temperature is also displayed (30 °C in the example).
The symbol indicates that the domestic hot water
cylinder is being heated or that the heat pump is in
the ready state. The temperature in the domestic
hot water cylinder is also displayed.
This symbol indicates that the heat pump is in cooling mode. The current heating flow temperature is
displayed below the symbol (20 °C in the example).
Note:
Cooling mode is only possible when using the VWZ
NC 14/17 accessory, and only for VWS 14 and
VWS 17 heat pumps.
Table 8.3 Parameters that can be set in the Operator level
Installation instructions geoTHERM VWS/VWW 0020057444_01
51
8 Controller
Display shown
Mo 21.04.08
Current flow temp.
Description
16:49
1
28 °C
CH pressure
1.2 bar
Brine pressure
1.4 bar
CH : comp. only.
Warning message
Warning message
Energy input display
Shows the energy extracted from the environment for each of the
12 months of the current year (black bar). White-filled bars represent
the future months of the year; the height of the bar corresponds to
the yield for the month in the previous year (to permit comparison).
On commissioning, the height of the bars is zero for all months, as no
information is available yet.
The scaling (in the example, 4000 kWh) adapts automatically to the
month's highest value.
The total amount of the environmental yield since start-up is displayed at top right (in the example: 13628 kWh).
The day of the week, the date, the time of day and also the flow temperature, the heating system pressure and the heat source pressure
are displayed.
Current flow temp.: Current flow temperature in the unit.
CH pressure: Heating circuit pressure sensor.
Brine pressure: Heat source pressure (Pressure sensor for heat
source circuit; brine pressure)
CH : comp. only: this status message gives information about the
current operating status. Possible messages are:
CH: comp. only.
CH: Comp+Aux
CH: aux only
CH: Comp&aux off
DHW: Comp&aux off
DHW: Comp only
DHW: aux only
Peak Rate: DHW
Peak Rate: Stand-by
Acceleration mode
Frost prot. Heating
Frost prot. Cylind.
Legionella protect.
Automatic pump spin
Floor drying
Venting mode
Lockout: Forced CH
Shutdown: Forced CH
Lockout: Forced DHW
Shutdown: Forced DHW
Malfunction
Blocking error
Operation interlock
CH Comp overrun
DHW Comp overrun
Cooling & DHW
CH return too high
In critical operating conditions, a warning message is displayed on the
two lower lines of the display. These lines are clear when the operating condition is normal.
Table 8.3 Parameters that can be set in the Operator level
(cont.)
52
Installation instructions geoTHERM VWS/VWW 0020057444_01
Controller 8
Display shown
<HK2>
Parameters
Heating mode
>Auto
Set value day
Night set back temp.
Description
The Set value day is the temperature at which the
heating is to regulate in the "Heating" mode or during the time window.
The set-back temperature is the temperature to
which the heating is regulated during the set-back
22 °C
period. Each heating circuit can be set to its own
15 °C
set-back temperature.
2
Factory setting
Set value day:
20 °C
Set-back temp.:
15 °C
>Select operation mode
The selected operating mode determines under what
conditions the assigned heating circuit or hot water
circuit is to be controlled.
The following operating modes are available for
heating circuits:
Auto: the operation of the heating circuit alternates
between the "Heating" and "Energy saving" modes
in accordance with a presettable timer programme.
Eco: the operation of the heating circuit alternates
between the "Heating" and "Off" modes in accordance with a presettable timer programme. The
heating circuit is switched off during the set-back
period provided the frost protection function (which
depends on the outside
temperature) is not activated.
Heating: the heating circuit is operated at the target
room temperature independently of any presettable
timer programme.
Energy Saving: the heating circuit is operated at
the set-back temperature independently of any presettable timer programme.
Off: the heating circuit is off when the frost protection function (dependent on the external temperature) is not activated.
Note:
Additional heating circuits are displayed, depending
on the system configuration.
Table 8.3 Parameters that can be set in the Operator level
(cont.)
Installation instructions geoTHERM VWS/VWW 0020057444_01
53
8 Controller
Display shown
4
DHW
Parameters
Hot water mode
>Auto
Max. DHW temp.
60 °C
Min. DHW temp.
44 °C
Current DHW temp.
Select flow temperature
<HK2>
Time programme
>Mo
1
00:00
24:00
2
:
:
3
:
:
Description
Factory setting
The auto, on, and off operating modes are possible
for the connected domestic hot water cylinders and
the circulation circuit:
Min. hot water
temp. 44 °C
The maximum DHW temperature determines the
temperature to which the domestic hot water cylin51 °C
der should be heated.
The minimum DHW temperature determines the
limit below which the domestic hot water cylinder is
heated.
Note: The maximum DHW temperature is only displayed when the auxiliary hot water heating is enabled (see Menu C7). Without electric auxiliary heating, the DHW temperature is limited by the pressure
sensor control shut-off in the cooling circuit and
cannot be adjusted!
Current DHW temp.: Current temperature in the domestic hot water cylinder
Mon – Fri 0:00 –
5 You can set the heating times for each heating cir24:00
cuit in the HK2 timer program menu.
Up to three heating times can be programmed per
day or block. The control system operates according
to the heating curve and the room setpoint temperature.
>Select day of the week
5
DHW loading
Time programme
>Mo
1
06:00
2
:
22:00
:
3
:
:
You can set the times at which the domestic hot
water cylinder is heated in the DHW timer program
menu.
Up to three times can be programmed per day or
block.
Mon – Fri 6:00 –
22:00
Sat
7:30 –
23:30
Su.
7:30 –
22:00
You can set the times at which the circulation pump
is to be operational in the Circulation pump timer
program menu.
Up to three times can be programmed per day or
block.
If the hot water mode (see Menu 3) is set to "ON",
the circulation pump runs constantly.
Mon – Fri 6:00 –
22:00
Sat
7:30 –
23:30
Su.
7:30 –
22:00
>Select day of the week
5
Circulation pump
Time programme
>Mo
1
06:00
2
:
22:00
:
3
:
:
>Select day of the week
Table 8.3 Parameters that can be set in the Operator level
(cont.)
54
Installation instructions geoTHERM VWS/VWW 0020057444_01
Controller 8
Display shown
Description
Periods
1
>06.01.08
08.01.08
2
14.01.08
30.01.08
Room Temp. setpoint
>Set starting day
Basic data
Date
Day of
week
Time
21.04.08
Mo
09:35
It is possible to program two holiday periods by
specifying the dates for the controller and all
system components connected to it. In addition, you
can set the desired target room temperature for holidays here, i.e.independently of the preset timer program. After the holiday time has elapsed, the con12 °C
troller automatically goes back to the previously selected operating mode. The holiday program can be
activated only in auto and eco operating mode.
Connected cylinder charging circuits or circulation
pump circuits are automatically switched to OFF operating mode during the holiday time program.
7 In the Basic data menu, you can set the current
date, the day of the week and, if no DCF radio reception is possible, the current time for the controller.
These settings apply to all connected system components.
6
Holiday programming
for cpl. System
Factory setting
Period 1:
01.01.2003 –
01.01.2003
Period 2:
01.01.2003 –
01.01.2003
Room Temp. setpoint 15 °C
>Values can be set
8
Code layer
Code number:
>0 0 0 0
Standard code:
1000
>Adjust numeric character
1000
To access the Code layer (Technician level), enter
the appropriate Code (standard code 1000) and
press the right hand dial .
To view set values without entering the code, you
must press the dial once. You can then view all parameters of the code level by turning
the dial but not change them.
Security function: Your code entry is reset again
15 minutes after your last change in the Code level
(actuation of one of the dials). To gain entry to the
Code level again after that, you will have to enter
the code once more.
Table 8.3 Parameters that can be set in the Operator level
(cont.)
Installation instructions geoTHERM VWS/VWW 0020057444_01
55
8 Controller
8.8
Displays in the code layer
The Code layer has different areas in which you can
change parameters or merely view them, depending on
the context. The context can always be recognised from
the menu name.
Menu C: Set parameters for the heating system
Menu D: Perform diagnostics
Menu I: Display general information
Menu A: Installation Assistant
Your code entry is reset again 15 minutes after your last
change in the Code level (actuation of one of the dials).
To gain entry to the Code level again after that, you will
have to enter the code once more.
Display shown
Description
Factory setting
Menu C: Set parameters for the heating
system
Code layer
change
Code number:
>0 0 0 0
Accept change?
In Menus C1 to C9 you can set the
parameters for the various functions of the heat
pump.
1000
Menu
for changing the code number.
C1
You can replace the standard code 1000 with a userdefined four-digit code here.
Note: If you change the code, make a note of the
new code, otherwise you will not be able to make
any more changes in the code level!
No
>Adjust numeric character
<HK2>
Parameters
Type
C2
direct circuit
Heating curve
0.80
Max limit outs.temp.
21 °C
Comp.start at
-120 °min
>Values can be set
<HK2>
Parameters
Type
Max limit outs.temp.
C2
Type: Direct circuit (for direct hydraulics),
Mixer circuit (for buffered hydraulics),
Fixed value (can only be set via vrDIALOG 810/2).
Heating curve: Adjustable heating curve (not with
fixed value).
Maximum limit outside temperatureTemperature
limit for switching off heating mode (summer function).
Comp.Start: Set the degree minutes until compressor start (only with direct hydraulics)
0.3
22 °C
This display appears if "Fixed value" has been set via
vrDIALOG 810/2.
Fixed value
21 °C
If a VR 60 is connected, this menu appears several
times (for each heating circuit).
>Values can be set
Buffer tank
Information
Setpoint flow temp.
T buffer top <VF1>
T Buff.Bot RF1
C3
This display is only shown when a buffer cylinder is
used (e.g. Hydraulic Plans 2 and 4).
41 °C
Setpoint flow temp.: Target flow temperature
T buffer top VF1: Temperature at the buffer cylin25 °C
der top sensor VF1
T buffer bottom RF1:Temperature at the buffer cylinder bottom sensor RF1
(see Section 8.4.3)
29 °C
Table 8.4 Parameters that can be set in the Code level
56
Installation instructions geoTHERM VWS/VWW 0020057444_01
Controller 8
Display shown
Description
C4
<HK2>
Information
Setpoint flow temp.
41 °C
Flow temp. VF2
30 °C
Status of pump
Off
Actual °mins lag/gain
-183 °min
C4
<HK2>
Parameters
Setpoint flow temp.
41 °C
Flow temp. VF2
29 °C
Status of pump
Off
Status hydr. mixer
Open
<HK2>
Parameters
Switch-on room temp.
None
Remote control:
Yes
>Values can be set
Special function
Floor drying
Day
HK2:
HK3:
HK4:
>Set starting day
>1
Factory setting
The lower menu is only displayed when a buffer cylinder is used (e.g. Hydraulic Plans 2 and 4, and possibly on more than one occasion when a VR 60 is
used).
In the direct heating mode (e.g. Hydraulic Plans 1 and
3), the upper display is shown.
Setpoint flow temp.: Setpoint flow temperature for
the heating circuit
Flow temp. VF2: Current flow temperature VF2.
Actual °mins lag/gain: The energy integral is the
cumulative difference between the VF2 flow temperature and the target flow temperature per minute.
The heat pump starts when the energy deficit is at a
defined level (see Energy balance control,
Chap. 8.4.2)
Status of pump: indicates whether the pump is
turned on or off (ON/OFF).
Status hydr. mixer:Caution!The OPEN/CLOSED indication describes the direction in which the control
system is driving the mixer. If the mixer is not activated, OFF appears.
If a VR 60 is connected, the lower menu appears
several times (for each heating circuit).
None
C5 Only when using the VR 90 / VR 80 remote control:
Switch-on room temperature:
None = Room temperature from the remote control
is not taken into account.
Switch on = In addition to the selected heating
curve, the heating flow temperature is also affected
23 °C by the difference between the setpoint and current
room temperatures.
Thermostat = The room temperature from the
VR 90 is used directly for controlling - i.e., the function of a room thermostat.
Remote control: Automatically indicates whether a
VR 90 remote control unit is connected (YES/NO). If
YES, the room temperature measured by the VR 90
is also displayed.
This menu occasionally appears on more than one
occasion (for each heating circuit).
0
C6 You can select the starting day for floor drying; the
flow temperature setpoint is automatically called up
in accordance with the floor drying function (daily
Temp.
values 25/30/35 °C), see Chap. 8.3 "Settable auxilia0 °C
ry functions".
It takes approx. 20 seconds for the actual value to
be displayed!
Deactivating the floor drying function: set to Day
"0".
Depending on the configuration of the heating system, the display will indicate for other heating circuits if required.
Table 8.4 Parameters that can be set in the Code level (cont.)
Installation instructions geoTHERM VWS/VWW 0020057444_01
57
8 Controller
Display shown
Auxiliary heater
Aux on during CH
Aux on during DHW
CH start at
>Values can be set
Description
Factory setting
Aux on during CH
no CH: CH blocked.
no CH comfort CH enabled, dependent on Out T. aux htr on no CH
no CH
and °mins lag/gain.
comfort
CH only: Heating mode by means of auxiliary heat-600 °min
ing only, e.g. in emergency operation
Hot water operation
no CH: CH blocked
comfort Auxiliary heating supplies the temperature
level that the compressor cannot provide
(approx. > 58 °C cylinder temperature)
CH only: DHW heating by means of auxiliary heating
only, e.g. in emergency operation (if "no CH" was
previously activated, a max. DHW temp. of approx.
58 °C applies; if "CH" was activated, the max. DHW
temp set in C6 applies
CH start at: Setting the degree minutes until the
auxiliary heating starts, added to the degree minutes
for compressor start.
Example: -600°min plus -120°min
=> start at -720°min.
C7
Out T. aux htr on: The auxiliary heating is only enabled for post-heating in heating mode below this
temperature (can be set in Menu A3).
Cooling
Max Flow Setpoint.
The menu is only displayed for hydraulics with cool- 20°C
ing mode.
Flow temperature: Display of target flow tempera22 °C
ture The value can be changed.
C8
Cooling mode is only possible when using the VWZ
NC 14/17 accessory, and only for VWS 14 and VWS 17
heat pumps.
>Select
Legionella protect
Parameters
Legionella protect
Legionella protect time
>Select
Legionella protect: OFF/Mo/Tu/We/Th/Fr/Sa/Su
Legionella protect time: The preset time of day determines when the anti-Legionella function will start. Off
Off
C9
04:00
04:00
The anti-Legionella function is carried out by the
auxiliary heating on the preset day of the week, at
the preset time, if the auxiliary heating has been activated.
For this purpose, the controller sets the flow setpoint to 76 °C/74 °C (2K hysteresis). The anti-Legionella function is terminated when the current
flow temperature at the cylinder has reached 73 °C
for a duration of at least 30 min, or after 90 minutes
if 73 °C is not reached (e.g., if hot water is drawn
during this period).
Table 8.4 Parameters that can be set in the Code level (cont.)
58
Installation instructions geoTHERM VWS/VWW 0020057444_01
Controller 8
Display shown
Description
Menu D: Perform diagnostics
In Menus D1 to D5 you can operate and test the heat
pump in diagnostic mode.
The diagnostic menus cannot be exited with any setting apart from "Test = no" (Menu D1). An auto reset
occurs 15 minutes after the last button is actuated.
In the diagnostic mode, the pre-, minimum and
run-on times of the compressor, pumps and other
components are not heeded!
Malfunctions can occur if the diagnostic mode is frequently turned on and off.
—
Test: no/off/heating/hot water/cooling1) *. Set the
operating mode for the heat pump in order to test
its behaviour.
Comp. high pressure: Display of coolant pressure
Compressor output.
T outlet compressor (compressor output, high pressure): Display of temperature sensor T1.*
Comp. low pressure:Display of coolant pressure
Compressor input.
T inlet compressor (compressor input, intake side):
Display of temperature sensor T2.*
Superheating of the coolant calculated from T2* and —
low pressure sensor. Only displayed when the compressor is operating.
Subcooling of the coolant calculated from T4* and
high pressure sensor. Only displayed when the compressor is operating.
Temp TEV inlet: Temperature at the inlet of the
thermal expansion valve*
diagnosis
refrigerant circuit
Test
Comp High Pressure
D1
>no
11.9 bar
T outlet compresor
66 °C
Comp. low pressure
2.3 bar
T inlet compressor
diagnosis
refrigerant circuit
overheat
Subcooling
Temp TEV inlet
diagnosis
Central Heating
Current flow temp.
Current return temp
CH pump
CH pressure
0 °C
D2
4K
10 K
10 °C
Current flow temperature T6.*
Current return temperature T5.*
Status of CH pump: ON/OFF
27 °C
CH pressure (heating circuit pressure sensor).
24 °C
Status of auxiliary heating: ON/OFF
D3
Off
Off
diagnosis
Heat Source
D4
T Return Source
T outlet Evaporator
Brine pressure
—
1.2 bar
Auxiliary heater
Brine pump
Factory setting
On
10 °C
9 °C
1.5 bar
—
Status of brine pump: ON/OFF
T return source: Temperature of the heat source,
T3.*
T outlet evaporator: Heat source temperature at
the outlet of the heat pump, T8.*
VWS only:
Brine pressure (Pressure sensor for heat source circuit; brine pressure)
Table 8.4 Parameters that can be set in the Code level (cont.)
1)
*
Cooling mode is only possible when using the VWZ NC 14/17 accessory, and only for VWS 14 and VWS 17 heat pumps.
see Figs. 1 and 2 in the appendix
Installation instructions geoTHERM VWS/VWW 0020057444_01
59
8 Controller
Display shown
Description
diagnosis
CH circuit
D5
Buffer VF1
45 °C
Buffer RF1
36 °C
Sensor VF2
38 °C
Current DHW temp.
52 °C
<UV1>
HK
Menu I: Display general information
Error History
Fault number
Fault code
16.02.08
07:18
Error
Error - sensor fault
Buffer VF1: Buffer cylinder top temperature sensor
Buffer RF1: Buffer cylinder base temperature sensor
Sensor VF2: Current CH flow temperature
Hot water SP: Temperature in the domestic hot
water cylinder.
UV1: = Status of 3-way valve (HK = heating circuit,
WW = hot water)
In Menus I1 to I4 you can obtain information regarding the settings for the heat pump.
Display
of the error memory, showing the last 10 er- —
I1
rors in the order they appeared.
The error number with error code, the date/time of
>1
the occurrence and a short description of the error
96
can all be read. The error number shows the order in
which the errors occurred. The error code identifies
the error. You will find a listing in Chap. 10.
Turning the dial shows the next error.
Compressor hours: Compressor operating hours to
date.
Compressor starts: Number of compressor starts.
Aux. heating hours: Auxiliary heating operating
hours to date.
Aux. heating starts: Number of auxiliary heating
starts.
—
Software release I/O card (PCB in the heat pump).
Software release of the User Interface (display in
3.34 the operating console).
2.22 VR 80: displays the software release when a VR 80
is connected.
VR 90: displays the software release when a VR 90
is connected.
—
I2
Statistics
Factory setting
Compressor hours
7 hours
Compressor starts
33
Aux. heating hours
2 hours
Aux. heating starts
21
I3
Software releases
I/O card
1
User Interface
1
VR 80
VR 90
I4
Reset: Reset of fault-induced shutdowns; all running
processes are immediately interrupted; the heat
No pump starts up again.
Reset?
Code 1:
0000
Code 2:
Codes accepted ?
FFFF
No
Code 1/Code 2: No function! Values must not be
changed!
0000; FFFF
No
Table 8.4 Parameters that can be set in the Code level (cont.)
*
see Figs. 1 and 2 in the appendix
60
Installation instructions geoTHERM VWS/VWW 0020057444_01
Controller 8
Display shown
Menu A: Installation Assistant
Installation
Language selection
Language
Description
Factory setting
You will be guided through the Installation Assistant,
Menus A1 and A2, during the initial commissioning of
the heat pump.
The Installation Assistant appears automatically during initial commissioning.
Language:
Set the local language
A1
>GB english
During the initial installation the controller always
starts with this menu (Installation Assistant).
>Select
Installation assistant
Hydraulic scheme
Heat pump type
Electroplan
Accept change
>Select
A2
The hydraulic and electro plans must be set by the
installer during initial commissioning.
3 The heat pump type has already been set at the fac5 tory and may not be changed!
1
Yes
Hydraulic plan:
1 = no buffer cylinder, no DHW cylinder
2 = with buffer cylinder, no DHW cylinder
3 = no buffer cylinder, with DHW cylinder
4 = with buffer cylinder, with DHW cylinder
See Figs. 6.8 to 6.11.
Note: Other hydraulic plans may only be set if the
VWZ NC 14/17 accessory is used. More detailed information regarding this can be found in the installation manual for the VWZ NC 14/17 accessory.
Heat pump type:
Type
Description
4
VWS 61/2
6
VWS 81/2
8
VWS 101/2
9
VWS 141/2
10
VWS 171/2
16
VWW 61/2
18
VWW 81/2
20
VWW 101/2
21
VWW 141/2
22
VWW 171/2
Electroplan:
1 = all on the high tariff (see Fig. 6.2).
2 = low tariff for the compressor (see Fig. 6.3).
3 = low tariff for the compressor and electric auxiliary heating (see Fig. 6.4).
Accept change:Yes/No;
"Yes" means that all the set values will be saved.
Table 8.4 Parameters that can be set in the Code level (cont.)
Installation instructions geoTHERM VWS/VWW 0020057444_01
61
8 Controller
Display shown
Installation assistant
Auxiliary heater
integration of the
Auxiliary heater
WW+HK
Out T. aux htr on
>Values can be set
Installation assistant
Geothermal settings
Freeze protect temp.
Description
Auxiliary heating: Determines whether, and where,
the auxiliary heating is hydraulically connected:
- internal (electric auxiliary heating in the heat
intern
- 5 °C
pump)
- WW + HK: external auxiliary heating available for
hot water and the heating circuit
- 5 °C
- no auxiliary heating (no frost protection during
emergency operation)
- DHW: external auxiliary heating available only for
hot water
The controller will only activate the auxiliary heating
if it is enabled in Menu C7 "Auxiliary heating" and
the following condition is satisfied:
Out T. aux htr on: The auxiliary heating is only enabled for post-heating in the heating mode if the outside temperature is below this value.
- 10 °C
A4 VWS only:
Freeze protect temp.: Minimum permissible heat
source outlet temperature.
- 10 °C
If the temperature falls below this value, error message 21/22 or 61/62 appears and the compressor
switches off.
A3
>Values can be set
Tool
Component Test 1
Factory setting
VWW: Freeze protect temp. = 4 ºC.
A5
<HK2-P>
On
<ZP>
Off
<ZH>
Off
<SK2-P>
Off
Off
You can check the heat pump actuators with the
component test. This intervention lasts for a maximum of 20 minutes and ignores current controller
inputs during this time. Afterwards, the heat pump
reverts to its previous operating condition.
Note: If the compressor is activated, the CH pump
and the brine pump or well pump will also be turned
on automatically.
UV1 = DHW: Changeover valve in "DHW loading" position.
UV1 = HK: Changeover valve in "CH mode" position.
Table 8.4 Parameters that can be set in the Code level (cont.)
62
Installation instructions geoTHERM VWS/VWW 0020057444_01
Controller 8
Display shown
Description
VR 60
Actuators
Sensors
Select
The display only appears is several heating circuits
and at least one VR 60 are installed.
Addr. 4 You can check the actuators for the connected accessories with the component test 2. This intervenOff
tion lasts for a maximum of 20 minutes and ignores
29 °C
current controller inputs during this time. Afterwards, the heat pump reverts to its previous operating condition.
A6
Tool
Component Test 2
Component
VF a
Tool
Ventilation
A7
Venting prog
Off
Tool
A8
Outside temperature
Factory setting
0.0 K
DHW sensor SP
0.0 K
T Flow Mix.OffsetVF2
0.0 K
Buffer sensor RF1
0.0 K
Venting prog.: The brine pump alternates between
50 minutes operating and 10 minutes off.
—
24 hours of intermittent operation of the brine pump
and the circulation pump, and also UV1 and the cooling UV/mixer if necessary.
Manual adjustment of the displayed temperatures.
Offset adjustment range
Outside temperature: +/- 5 K, step size 1.0 K.
all others: +/- 3 K, step size 0.5 K.
Flow sensor VF2 temp. is always displayed.
Internal sensors can only be changed via vrDIALOG;
buffer sensors and cylinder sensors only if the corresponding hydraulics are installed.
0K
0K
0K
0K
Turn the right hand dial to display more sensors.
Setting the display contrast (0 – 25).
16 (Display)
Installation completed
Exit mode?
>Values can be set
A9
>yes
Note regarding initial commissioning:
Do not set "Exit mode" to "YES" unless you are sure
that everything has been set correctly.
Once you have confirmed with "YES", the controller
switches to the graphics display. The heat pump
starts under its autonomous control system.
This menu will not appear again once YES has been
selected.
Table 8.4 Parameters that can be set in the Code level (cont.)
Installation instructions geoTHERM VWS/VWW 0020057444_01
63
8 Controller
8.9
Installer Menu
Special functions can be selected only from the basic
display. To do so, press the left hand dial .
To change the parameter, you must turn the dial. The
following special functions can be selected:
•
•
•
•
Energy saving function: Press dial once.
Party function: Press dial twice.
One-time charging: Press dial 3 x.
Cooling: Press dial 4 x
To activate one of the functions, you merely have to select it. In the energy saving function it is additionally
necessary to enter the time until which the energy saving function (regulation to set-back temperature) is to
apply.
The top-level display appears either after the function
has completed (time expires) or if the dial is pressed.
Display shown
We
16.02.08
Description
9:35
Energy saving enabled
Energy-saving function:
You can reduce the heating times for a presettable period using the
energy-saving function.
Enter the time for the end of the energy-saving function in the format
hh:mm (hours:minutes).
>Select stop time
We
16.02.08
9:35
Party function enabled
We
16.02.08
one-time
9:35
Party function:
With the party function you can set the heating and hot water times
beyond the next switch off time on to the next start of heating. You
can only use the party function with those heating circuits or hot
water circuits for which the "Auto" or "Eco" mode is set.
One-time DHW tank loading:
This function allows you to charge the hot water cylinder once, regardless of the current time program.
DHW tank loading enabled
Table 8.5 Special functions
64
Installation instructions geoTHERM VWS/VWW 0020057444_01
Controller 8
Display shown
We
16.02.08
Description
9:35
Cooling function active for
> 3 days
This menu is only displayed when the heating system is fitted with an
external cooling plant (accessory VWZ NC 14/17 ) and an appropriate
hydraulic plan has been set.
Cooling duration: OFF/1 to 99 days.
If the cooling mode is active,
a snowflake symbol appears in the graphics display.
Table 8.5 Special functions (cont.)
• Resetting to default settings: Keep the dial and the
dial pressed down simultaneously for longer than 5
seconds. After that you can select whether to reset
only the timer programs, or all values, to the default
settings.
Display shown
We
21.04.08
Description
The default settings will be reinstated.
9:35
Factory setting
cancel
Time programme
Everything
>Values can be set
Caution! Leave the resetting of the default settings to the specialist.
The system-specific settings will be reset. The system can stop operNO/YES
ating. The system cannot be damaged.
NO/YES
NO/YES
Press the two dials for at least 5 seconds to call up the default settings menu.
Table 8.6 Reinstating default settings
Installation instructions geoTHERM VWS/VWW 0020057444_01
65
8 Controller
8.10
Parameters that can be set with
vrDIALOG 810/2
Using its computer-supported graphics visualisation and
configuration, vrDIALOG 810/2 (eBUS) enables you to
optimise heating appliances and control systems and
thus make use of their energy saving potential. Both of
them enable you to create a visual impression of the
processes in your control system and influence them at
any time. The programmes enable you to record and
graphically prepare system data, to load device configurations and change and save them online and to save information in the form of reports.
Using vrDIALOG 810/2, you can make all the settings for
the heat pump as well as other settings for optimisation.
Settings via vrDIALOG may only be performed by an experienced specialist.
Parameters
Description
Calibration of temperature sensors
Internal sensors can only be calibrated via vrDIALOG 810/2.
A maximum of ten
letters are available per heating circuit for this purpose. A
maximum of ten letters are available per heating circuit
for this purpose. The selected names are saved automatically and displayed on the corresponding displays.
Depending on the system configuration, the names of additional heating circuits appear in the display.
The status provides information about the operating state
of the heat pump software.
Status of power interruption due to activation of the EVU
contact (blocking initiated by the power company):
"no" = no blocking, "yes" = blocking active, activation by
means of e.g. ripple control signal/receiver.
Phase status: displays whether all 3 phases are present
(OK/Error).
Phase sequence: displays whether the phase sequence is
correct (OK/Error).
Soft start status: ON/OFF
This display only appears if the setting Type "Fixed value"
has been selected via vrDIALOG.
Here the flow temperature is controlled around a fixed
setpoint, independently of the outside temperature.
Change name: CH circuit
Software version
Elec Tariff switch
Phase Status
Phase Sequence
Starting current limiter
Fixed value day
Fixed value night
Factory setting
Fixed value day: Flow setpoint temperature (e.g. for
manually set screed floor drying).
Fixed value night: Flow setpoint temperature at night.
Type HK2
HK2: <HK2>
—
—
—
—
—
35 °C
30 °C
Setting the heating circuit type:
direct circuit
– Direct circuit: (Hydraulic plan 3) Heating mode runs
with the setpoint flow temperature determined by the
weather-controlled energy balance controller.
– Mixer circuit: (Hydraulic plan 4) Heating mode runs
with the setpoint flow temperature determined by the
weather-controlled controller.
– Fixed value: Fixed settings for the setpoint flow temperatures for day and night; see Menu C5.
Table 8.7 Parameters that can be set with vrDIALOG 810/2
66
Installation instructions geoTHERM VWS/VWW 0020057444_01
Controller 8
Parameters
Description
Factory setting
Minimum flow temp.
Maximum flow temp.
Minimum/Maximum temperature:
Setting the limiting temperatures (min. and max.) that the
heating circuit can request.
Together with the maximum temperature, the value for
the floor protection switching is also calculated
(max. HK temp. + Compr. hysteresis + 2K).
Pre-loading time:
To take account of the inertia of the underfloor heating,
you can manually set a pre-heat before the start of the
programmed heating time.
Max. heating time = Maximum time after which the cylinder heating operation switches back on when there is still
a parallel demand present for the cylinder.
Max. DHW load time: = Time after which the operation
switches from cylinder loading to heating mode, when
there is a parallel demand for heating present.
Compressor hysteresis (only for hydraulic plans 1 and 3):
Forced switch-on of the compressor when:
Current flow temperature < Setpoint flow temperature Hysteresis
Forced switch-off of the compressor when:
Current flow temperature > Setpoint flow temperature +
Hysteresis
Comp. starts/h: max. allowable no. of compressor starts
per hour. (3-5).
Max. CH return temp. HK: Sets the return temperature
limits for compressor operation. This function should prevent unnecessary short-term operation of the compressor.
Delta T. T3-T7: Max. permissible difference between the
heat source inlet and outlet temperatures. An error message appears and the compressor switches off if it is exceeded.
The function is deactivated if 20 K is set.
Brine pump pre-run: Interval by which the brine pump
switches on ahead of the compressor.
Temp. fault detection: If the setpoint for the flow temperature of a heating circuit is not reached after the preset
time, a corresponding error message appears in the display and the error is stored in the error list (display of the
last ten errors).
This function can be switched on or off.
Quick test. With "Next service due" ON, the time intervals
for the energy balance integral are changed from 1 minute
to 1 second and the energy balancing is thus acclerated by
a factor of 60. The minimum run time of 4 minutes and
the minimum off time of 5 minutes for the compressor
are unchanged.
15 °C
43 °C
Pre-loading time
CH run in HW mode 20r.p.m.
Max DHW load time 40r.p.m.
Compressor hyster.
Compressor starts
Max. CH return temp. HK 46°C
Delta T. T3-T7
Brine pump pre-run
Temperature fault detection after
Next service due
0 hrs.
20 min
40 mins
7K
3
46 °C
20 K
1 min
Off
—
Table 8.7 Parameters that can be set with vrDIALOG 810/2
(cont.)
Installation instructions geoTHERM VWS/VWW 0020057444_01
67
9 Inspection and maintenance
10 Troubleshooting and diagnostics
9
Inspection and maintenance
9.1
General notes
In contrast to heaters based on fossil fuels, no expensive maintenance work is necessary for the Vaillant
geoTHERM heat pump. However an annual inspection
of the system by a specialist is a prerequisite for continuing operational safety, reliability and a long working
life.
d
Danger!
Inspection and repairs may be carried
out only by an approved heating installation company.
Inspections / Maintenance work not carried out can result in damage to property and personal injury.
e
Danger!
Risk of fatal electric shock from touching live connections! Before commencing
work on the heat pump, disconnect the
power supply (circuit breaker) and secure it against being switched on again
inadvertently.
Only genuine Vaillant replacement parts may be used
for maintenance work, to ensure the long-term working
order of all functions of your Vaillant appliance and to
prevent changes to the approved production standard.
Any spare parts which might be required are listed in
the relevant current spare parts catalogues.
Information can be obtained from Vaillant Customer
Service Centres.
9.2
Inspection work to be performed
The heat pump is engineered in such a way that only a
few inspection tasks need to be carried out:
VWS:
– Manually actuate the safety assemblies in the brine
and heating circuits at regular intervals.
– Check the dirt filter in the brine circuit regularly.
– Check the pressures in the brine and heating circuits
regularly.
VWW:
– Manually actuate the safety assemblies in the heating
circuit at regular intervals.
– Check the dirt filter in the water circuit regularly.
– Check the pressure in the heating circuit regularly.
• Remove the heat pump cladding sections in the reverse order to that described in Chap. 6.4.
9.4
Test operation and restarting
d
Danger!
Risk of injury!
The heat pump may only be put into operation again after all the cladding sections have been fitted.
• Fit all the heat pump cladding sections as described in
Chap. 6.4.
• Start up the heat pump.
• Check the heat pump for correct functioning.
10 Troubleshooting and diagnostics
d
Danger!
Troubleshooting and diagnostics measures may only be carried out by a recognised expert technician company.
e
Danger!
Risk of fatal electric shock from touching live connections! Before commencing
work on the heat pump, disconnect the
power supply (circuit breaker) and secure it against being switched on again
inadvertently.
10.1
Error messages on the controller
Error messages appear on the display approximately
20 seconds after the error has occurred and are written
to the controller's error memory if the error is present
for approximately 3 minutes. You can call up the error
memory in Menu I1. As long as the fault is present, you
can call up the fault display by turning the left hand dial
1 x to the left, starting from the graphics display.
Error History
I1
Fault number
>1
Fault code
41
16.02.08
07:18
Error CH circuit
Heat source inlet sensor T3
Fig. 10.1 Error message in error memory, Menu I1
9.3
Servicing and repairs
The Vaillant geoTHERM heat pump requires no servicing
work.
To carry out repairs to defective parts on the inside of
the heat pump:
68
The geoTHERM control system recognises three different types of malfunction:
– Malfunction of components that are connected via
the eBUS.
Installation instructions geoTHERM VWS/VWW 0020057444_01
Troubleshooting and diagnostics 10
– Temporary shut-down
The heat pump remains in operation. The error is displayed and disappears independently when the cause
of the fault is removed.
– Fault-induced shutdown
The heat pump is shut down. It can only be restarted
by resetting the error after removing the cause of the
fault (see Menu I 1).
– In addition,other errors/malfunctions can occur on
the unit or system.
10.2
Malfunctions of eBUS components
Fault code
Error text/description
Possible cause
Remedy
1
XXX address YY not accessible
Check the eBUS cable and plug.
Check that the address switch is correctly set.
4
XXX address YY sensor fault
ZZZ
5
XXXX setpoint not achieved
A component XXX connected via the
eBUS, e.g. VR 60 with the address YY
is not recognised.
A sensor ZZZ on one of the components XXX connected via the eBUS,
with the address YY, is defective.
XXXX setpoint not achieved.
Check the ProE plugs on the PCBs, check the sensor for correct functioning, replace sensor.
Check temperature setpoint.
Check position of temperature sensor.
Deactivate temperature error detection (C13).
Table 10.1 Malfunctions of eBUS components
10.3
Displays in the error memory and under
"Warning message"
The heat pump, including the compressor, remains in
operation. The following errors are displayed in the
error memory and in Menu 1 as warning messages.
Fault code
Error text/description
Possible cause
Remedy
26
Overheating on pressure side of
compressor
Excessively high output with a high
flow temperature.
Reduce the heating curve. Check the required
heating output (floor drying, building shells) and
reduce if necessary.
36
Brine pressure low
Pressure drop in the heat source sys- Check heat source system for leaks, top up brine,
tem as a result of leakage or air lock. bleed.
Pressure < 0.6 bar
Table 10.2 Display in error memory and under "Warning mes1, no shut-down
sage" in Menu
Installation instructions geoTHERM VWS/VWW 0020057444_01
69
10 Troubleshooting and diagnostics
10.4
Temporary shut-down
The compressor shuts down, the heat pump remains
in operation. The compressor can start again after
5 minutes at the soonest. (see below for exceptions).
Fault code
Error text/description
Possible cause
Remedy
20
Heat source outlet frost protection monitoring
Heat source pump defective, temperature sensor T8 or T3 defective.
Too low a volume flow in the heat
source circuit.
No/full dirt filter in source return line.
Air in brine circuit.
Check heat source flow rate.
Check the plug contact on the PCB and the cable
harness, check the sensor for correct position
and function (resistance measurement using
VR 11 characteristics, see Appendix), replace sensor.
Check the volume flow of the well pump/brine
pump (optimum temp. difference approx. 3-5 K).
Fit/clean dirt filter.
Bleed the brine circuit.
Temperature difference at the
heat source (T3 - T8) > preset
value "Delta T. T3-T7"
This error message is deactivated as standard and can only be
activated via vrDIALOG parameter "Delta T. T3-T7" (20 K difference means deactivated).
21
Heat source outlet frost protec(VWW only) tion monitoring
Source outlet temperature T8
too low (<4 ºC)
22
(VWS only)
Heat source outlet frost protection monitoring
Source outlet temperature T8
too low (< Freeze protect temp.
parameter in Menu A4)
23
No ground water flow
(VWW only)
Integral flow switch not detecting any volume flow
Temperature sensor T8 defective.
Check temperature level of the heat source.
No/full dirt filter in source return line. Check the plug contact on the PCB and the cable
harness, check the sensor for correct position
and function (resistance measurement using
VR 11 characteristics, see Appendix), replace sensor.
Check the volume flow of the well pump/brine
pump (optimum temp. difference approx. 3-5 K).
Fit/clean dirt filter.
Heat source pump defective, temper- Check heat source flow rate.
ature sensor T8 defective.
Check the plug contact on the PCB and the cable
Too low a volume flow in the heat
harness, check the sensor for correct position
source circuit.
and function (resistance measurement using
No/full dirt filter in source return line. VR 11 characteristics, see Appendix), replace senAir in brine circuit.
sor.
Check the volume flow of the well pump/brine
pump (optimum temp. difference approx. 3-5 K).
Clean the filter
Bleed the brine circuit.
Filter in heat source circuit blocked. Clean the filter Check the functioning of the well
Well pump defective.
pump, replace if necessary.
Motor protection switch on the well
Check for overloading, e.g. by blocking or a phase
pump has tripped.
missing.
Flow switch defective or not connect- Check the well pump, contactor and motor proed.
tection switch, replace if necessary.
Check the functioning of the flow switch.
Table 10.3 Temporary malfunctions
70
Installation instructions geoTHERM VWS/VWW 0020057444_01
Troubleshooting and diagnostics 10
Fault code
Error text/description
27
Coolant pressure too high
28
29
Possible cause
Remedy
Heat consuming side using too little heat. Possible causes:
Air in the heating system.
Bleed the heating system.
The integral high pressure switch
Defective heating pump or pump out- Check pump, replace if necessary.
has tripped at 30 bar (g).
put has reduced.
Radiator heating without low loss
Check the system.
The heat pump can start again
header or buffer cylinder.
after a 60 minute wait at the
Buffer cylinder, sensors VF1 and RF1 Check the sensor positions.
earliest.
interchanged.
Too low a volume flow as a result of Check the system.
closing individual room controllers in
an underfloor heating system. Brief
heating operation occurs after every
DHW charge if the outside temperature falls below the outside temp.
switch-off limit! The control system
checks if heating operation is required.
Domestic hot water cylinder with too Check power input.
low a power input installed.
Existing dirt strainers clogged or in- Clean dirt strainers.
correctly dimensioned.
Stop valves closed.
Open all stop valves.
Coolant flow rate too low (e.g. therCheck coolant circuit.
mal expansion valve TEV incorrectly
adjusted or defective).
Coolant pressure too low
Heat source providing too little heat. Possible causes:
(VWS only) Air in heat source circuit. Bleed the heat source circuit.
The integral low pressure switch
has tripped at 1,25 bar (g).
(VWS only) Brine pump defective or Check brine pump.
pump output has reduced.
(VWS only) Not all circuits are circu- Adjust the brine circuits.
lating equally. Recognisable by different degrees of icing on individual
brine circuits.
Coolant pressure outside specified range
Existing dirt strainers clogged or incorrectly dimensioned.
Not all the required stop valves are
open.
Coolant flow rate too low (e.g. thermal expansion valve TEV incorrectly
adjusted or defective).
Coolant pressure too high or too low,
all above-mentioned causes possible
Errors (27 and 28).
Clean dirt strainers.
Open all stop valves.
Check coolant circuit.
See Errors 27 and 28.
If the error occurs twice in succession, the heat pump can start
again after a 60 minute wait at
the earliest.
Table 10.3 Temporary malfunctions (cont.)
Installation instructions geoTHERM VWS/VWW 0020057444_01
71
10 Troubleshooting and diagnostics
10.5
Blocking error
The heat pump is shut down. It can only be restarted by
resetting the error after removing the cause of the fault
(see Menu I 1).
With the exception of Errors 90 and 91, these do not
need to be reset. The heat pump starts again when the
cause of the error has been removed.
Emergency mode
Depending on the nature of the malfunction, there are
settings that can be made to allow the heat pump to
continue operating in an emergency mode (by means of
the integrated electrical heating) until the fault is
cleared, either in heating operation (display: "CH priority"), hot water operation (display: "DHW priority") or
both (display: "CH priority/DHW priority"), see the following tables, "Emergency operation" column.
Fault
Error text/description
code
32
Error, heat source sensor T8
Short circuit in sensor
33
Emergency
Possible cause
mode
possible
The internal sensor for the source outlet
temperature is defective or not properly
plugged into the PCB.
Error, heating circuit pressure
sensor
40
Fault with brine pressure sensor
possible
Short circuit in pressure sensor
Error comp outlet sensorT1
possible
Short circuit in sensor
41
Error, heat source sensor T3
Check the plug contact on the PCB
and the cable harness, check the sensor for correct position and function
(resistance measurement using VR 11
characteristics, see Appendix), replace sensor.
The pressure sensor in the heating circuit
is defective or not properly plugged in.
Short circuit in pressure sensor
34
Remedy
possible
Short circuit in sensor
Check the plug contact on the PCB
and the cable harness, check pressure sensor for correct functioning,
The pressure sensor in the heat source cirreplace pressure sensor.
cuit is defective or not properly plugged
in.
The internal temperature sensor on the
high pressure side of the compressor is
defective or not properly plugged into the
PCB.
The internal sensor for the source inlet
Check the plug contact on the PCB
temperature is defective or not properly
and the cable harness, check the senplugged into the PCB.
sor for correct position and function
(resistance measurement using VR 11
The internal temperature sensor on the
characteristics, see Appendix), reheating return line is defective or not
place sensor.
properly plugged into the PCB.
The internal temperature sensor on the
heating flow line is defective or not properly plugged into the PCB.
42
Error HP return sensor T5
possible
43
Short circuit in sensor
Error HP flow sensor T6
possible
44
Error, external sensor AF
possible
45
Short circuit in sensor
Error DHW tank sensor SP
possible
46
Short circuit in sensor
Error HB flow sensor VF1
possible
The upper sensor in the buffer cylinder is
defective or it is not connected correctly.
47
Short circuit in sensor
Error HB return sensor RF1
possible
The lower sensor in the buffer cylinder is
defective or it is not connected correctly.
Check the ProE plug on the PCB,
check the sensor for correct function
(resistance measurement using VR 10
characteristics, see Appendix), replace sensor.
48
Short circuit in sensor
Error flow sensor VF2
DHW operation possible
_
The contact temperature sensor VF2 in
the heating circuit is defective or it is not
connected correctly.
Hydraulic plan not entered correctly, sensors not connected correctly.
Check the hydraulic plan and sensor
positions using the existing system.
Short circuit in sensor
52
Short circuit in sensor
Sensors do not match the hydraulic plan
The outside temperature sensor or its con- Check the ProE plug on the PCB,
necting cable is defective or it is not con- check the connecting cable, replace
nected correctly.
the sensor.
The cylinder temperature sensor is defective or it is not connected correctly.
Table 10.4 Fault-induced shutdown
72
Installation instructions geoTHERM VWS/VWW 0020057444_01
Troubleshooting and diagnostics 10
Fault code
Error text/description
60
Heat source outlet frost
protection monitoring
Emergency
Possible cause
mode
possible
Error 20 occurred three
times in succession
61
VWW only
Heat source outlet frost
protection monitoring
Heat source outlet frost
protection monitoring
No ground water flow
Flow temperature too high
for underfloor heating
_
Flow temperature is higher
than a preset value for
15 min (max. HK temp. +
compr.hysteresis + 2 K)
(see Chap. 8.10, default setting: 52 °C)
81
83
84
90
Coolant pressure too high
Error 27 occurred three
times in succession
Coolant pressure too low.
Check heat source
Error 28 occurred three
times in succession
Coolant pressure outside
specified range
Error 29 occurred three
times in succession
Heating system pressure
too low
See Error 21.
See Error 21.
See Error 22.
See Error 22.
See Error 23.
See Error 23.
Flow sensor VF2 fitted too close to
the heat pump.
Flow sensor VF2 is defective
Relocate flow sensor in accordance with
hydraulic plan.
Check flow sensor VF2, replace if necessary.
Test heating circulation pump, replace if
necessary.
Clean dirt strainers.
possible
Error 23 occurred three
times in succession
72
See Error 20.
possible
Error 22 occurred three
times in succession
63
VWW only
See Error 20.
possible
Error 21 occurred three
times in succession
62
VWS only
Remedy
Defective heating circulation pump
or pump output has reduced.
Existing dirt strainers clogged or incorrectly dimensioned.
Mixer behind buffer cylinder is defec- Test mixer, replace if necessary.
tive.
Max. HK temp. set too low.
Check "Max. HK temp." setting.
possible
See Error 27.
See Error 27.
See Error 28.
See Error 28.
See Error 29.
See Error 29.
Pressure drop in the heating system
as a result of leakage, air lock or defective expansion vessel.
Screw couplings at the rear of the
heat pump are not sealing correctly .
Compression fittings on 3-way valve
are leaking.
Check heating system for leaks, top up
water, bleed, check the expansion vessel.
possible
possible
_
Pressure < 0.5 bar
Heat pump shuts down and
goes into operation automatically when the pressure
rises above 0.7 bar
Retighten screw couplings.
Retighten compression fittings on 3-way
valve.
Table 10.4 Fault-induced shutdown (cont.)
Installation instructions geoTHERM VWS/VWW 0020057444_01
73
10 Troubleshooting and diagnostics
Fault code
Error text/description
91
Brine pressure too low
Pressure < 0.2 bar
Heat pump shuts down and
goes into operation automatically when the pressure
rises above 0.4 bar
94
Phase loss Check circuit
breaker
Emergency
Possible cause
mode
possible
Pressure drop in the heat source
system as a result of leakage or air
lock.
Brine pressure sensor defective.
possible
One or more phases dropped
out.
95
Wrong direction of rotation.
Change comp. phases
possible
Phase sequence not correct
96
Error - sensor fault
possible
Short circuit in pressure sensor
Remedy
Check heat source system for leaks, top
up brine, bleed.
Check the plug contact on the PCB and
the cable harness, check pressure sensor
for correct functioning, replace pressure
sensor.
L1 and N connections on the PCB in- Check L1 and N connections on the PCB
terchanged.
and connect correctly if necessary.
Loss of a phase or a circuit breaker Check circuit breakers and cable connechas tripped.
tions (power supply to the compressor).
Badly tightened electrical connecCheck electrical connections.
tions.
Mains voltage too low.
Measure voltage at heat pump terminal
box.
Power company block on incorrectly Check E-plan setting.
set E-plan (e.g. E–plan 1).
Start-up current limiter defective or Check start-up current limiter.
incorrectly connected.
Phases switched over.
Change the phase sequence by switching
over 2 phases at a time on the mains
feed.
Start-up current limiter defective or Check start-up current limiter.
incorrectly connected.
A pressure sensor in the cooling cir- Check the plug contact on the PCB and
cuit is defective or not properly
the cable harness, check pressure sensor
plugged in.
for correct functioning, replace pressure
sensor.
Table 10.4 Fault-induced shutdown (cont.)
10.6
Other errors/malfunctions
Fault indication
The auxiliary heating does not function,
even though it has been enabled by the controller (e.g. when the supply has been
blocked by the power supply company
(Power company blockage)); the heating or
the domestic hot water cylinder do not
reach the desired temperature.
Noises in the heating circuit.
Traces of water beneath or next to the appliance.
Possible cause
The auxiliary heating is tied to a low-rate
tariff which has been blocked by the power
company.
Remedy
Check whether the auxiliary heating is on a
low-rate tariff and a power company blockage is in effect.
The safety thermostat (STB) on the auxiliary
heating has tripped.
Possible causes if the thermostat trips again:
Air in the heating system. Blocked dirt filters
in the heating system return line.
The heating circulation pump has stopped or
is running too slowly.
Air in the heating circuit.
Dirt in the heating circuit.
"Out T. aux htr on" incorrectly set.
Pump defective.
Release the STB by pushing the button.
The condensate drain is blocked.
Leaks from the heating circuit.
Outside temperature indicates - 60 ºC.
Outside temperature sensor defective.
Temperatures in the heating circuit too cold Room target temp. not optimally set
or too warm.
Set-back temp. not optimally set
Heating curve not optimally set.
Bleed the heating circuit. Clean the blocked
dirt filters.
check the heating circulation pump and replace if necessary.
Bleed the heating circuit.
Flush the heating circuit.
Change "Out T. aux htr on" (Menu A3).
Check functioning of the pump; replace if
necessary.
Condensate in the interior of the unit is collected in the condensate pan and, if necessary, fed away under the unit (not a fault).
Check the insulation on the pipes in the interior of the unit and re-insulate, if necessary,
to reduce the accumulation of condensate.
Check the heating circuit components
(pump, auxiliary heating, pipes) for leaks.
If necessary, retighten the screw couplings
and replace the seals.
Check outside temperature sensor.
Change room target temp. (Menu 1).
Change set-back temp. (Menu 1).
Change heating curve (Menu C2).
Table 10.5 Other errors/malfunctions
74
Installation instructions geoTHERM VWS/VWW 0020057444_01
Recycling and disposal 11
Customer service and guarantee 12
11
Recycling and disposal
Both your Valliant geoTHERM heat pump and its associated packaging consist mainly of raw materials that can
be recycled.
11.1
Appliance
If your heat pump is identified with this symbol, it does not belong with your household
waste at the end of its useful life. In this case,
make sure that the Vaillant appliance and any
accessories present are properly disposed of
at the end of their useful life.
As this Vaillant appliance is not covered by the law regarding the marketing, return and environmentally
friendly disposal of electrical and electronic equipment
(ElektroG in Germany), free disposal at a municipal collection point is not provided.
11.2
Packaging
Make sure that the transport packaging is handed over
to a proper disposal organisation.
11.3
Coolant
The Vaillant heat pump is filled with R 407 C coolant.
d
Danger!
R 407 C coolant!
Disposal of the coolant must only be by
qualified specialists.
Do not inhale gases or vapours when disposing of the coolant.
Risk to health! Avoid contact with the
skin and eyes. Escaping coolant can
cause freezing if the exit point is
touched! R 407 C coolant presents no
danger in normal use and under normal
conditions. With improper use, however,
it can cause injury and damage.
a
Caution!
Environmental hazard!
Before disposal of the heat pump, the
coolant must be disposed of at special
facilities.
Installation instructions geoTHERM VWS/VWW 0020057444_01
12 Customer service and guarantee
12.1
Vaillant warranty
Vaillant provide a full parts and labour warranty for this
appliance. The appliance must be installed by a suitably
competent person in accordance with the Gas Safety
(Installation and Use) Regulations 1998, and the manufacturer’s instructions. In the UK ‘CORGI’ registered installers undertake the work in compliance with safe and
satisfactory standards.
All unvented domestic hot water cylinders must be installed by a competent person to the prevailing building
regulations at the time of installation (G3).
Terms and conditions apply to the warranty, details of
which can be found on the warranty registration card included with this appliance.
Failure to install and commission this appliance in compliance with the manufacturer’s instructions may invalidate the warranty (this does not affect the customer’s
statutory rights).
12.2
Vaillant Service
To ensure regular servicing, it is strongly recommended
that arrangements are made for a Maintenance Agreement. Please contact Vaillant Service Solutions
(0870 6060 777) for further details.
75
13 Technical data
13
13.1
Technical data
Technical data - VWS
Description
Article number
Height without connections
Width
Depth without pillars
Depth with pillars
Weight
- with packaging
- without packaging
- ready for operation
Rated voltage
- Heating circuit/Compressor
- Control circuit
- Auxiliary heating
Fuse, slow-blow
Start-up current
- without start-up current limiter
- with start-up current limiter
Electrical power consumption:
- min. for B-5W35
- max. for B20W60
- Auxiliary heating
EN 60529 level of protection
Hydraulic connections
- Heating circuit flow and return
- Heat source flow and return
Heat source circuit (brine circuit)
- Brine type
- max. operating pressure
- min. inlet temperature
- max. inlet temperature
- Nominal flow rate dT 3K
- Residual head dT 3K
- Nominal flow rate dT 4K
- Residual head dT 4K
- Electrical power consumption - pump
CH circuit
- max. operating pressure
- min. flow temperature
- max. flow temperature
- Nominal flow rate dT 5K
- Residual head dT 5K
- Nominal flow rate dT 10K
- Residual head dT 10K
- Electrical power consumption - pump
refrigerant circuit
- Coolant type
- Quantity
- Permissible operating overpressure
- Compressor type
- Oil
Heat pump performance data
B0W35 dT5
- Heating output
- Power consumption
- Performance figure/COP
B0W35 dT10
- Heating output
- Power consumption
- Performance figure/COP
B5W55
- Heating output
- Power consumption
- Performance figure/COP
Unit
mm
mm
mm
mm
VWS 61/2
0010002778
VWS 81/2
0010002779
VWS 101/2
0010002780
1200
600
650
840
VWS 141/2
0010002781
VWS 171/2
0010002782
kg
kg
kg
-
156
141
147
163
148
155
167
152
160
187
172
182
194
179
191
3/N/PE 400 V 50 Hz
1/N/PE 230 V 50 Hz
3/N/PE 400 V 50 Hz
3 x 16
3 x 25
A
3 x 16
3 x 16
A
A
26
< 16
40
< 16
46
< 16
64
< 25
74
< 25
kW
kW
kW
-
1.3
3.1
6
1.8
3.8
6
2.3
4.9
6
3.1
6.8
6
3.9
7.7
6
IP 20
mm
mm
G 1 1/4", diameter 28
G 1 1/4", diameter 28
MPa (bar)
°C
°C
l/h
mbar
l/h
mbar
W
Ethylene glycol 30 %
0.3 (3)
-10
20
2484
3334
272
252
1863
2501
386
428
132
205
MPa (bar)
°C
°C
l/h
mbar
l/h
mbar
W
3 x 25
1431
386
1073
464
132
1959
327
1469
426
132
3939
277
2954
487
210
0.3 (3)
25
62
1019
391
504
488
93
kg
1.9
MPa (bar)
-
1373
340
698
468
93
2.2
1787
258
902
442
93
R 407 C
2.05
2.9 (29)
Scroll
Ester
2371
345
1187
551
132
2973
313
1538
603
205
2.9
3.05
kW
kW
-
5.9
1.4
4.3
8.0
1.9
4.3
10.4
2.4
4.4
13.8
3.2
4.3
17.3
4.1
4.3
kW
kW
-
5.9
1.4
4.3
8,1
1.8
4,5
10.5
2.3
4.8
13.8
3.1
4,5
17.9
3.9
4.6
kW
kW
-
6.4
2.2
2.9
8.5
2.7
3.1
11.0
3.4
3.2
15.2
4.7
3.2
18.6
5.8
3.2
Table 13.1 Technical data - VWS
76
Installation instructions geoTHERM VWS/VWW 0020057444_01
Technical data 13
Description
Internal sound level
Conforms to safety regulations
Unit
dbA
-
VWS 61/2
46
VWS 81/2
48
VWS 101/2
VWS 141/2
50
52
CE mark
Low Voltage Directive 73/23/EWG
EMC Directive 89/336/EWG
EN 60335
ISO 5149
VWS 171/2
53
Table 13.1 Technical data - VWS (cont)
a
13.2
Caution!
R 407 C is a chlorine-free coolant which
does not affect the ozone layer. Nevertheless, any servicing work on the coolant circuit should only be carried out by
authorised specialists.
Technical data - VWW
Description
Article number
Height without connections
Width
Depth without pillars
Depth with pillars
Weight
- with packaging
- without packaging
- ready for operation
Rated voltage
- Heating circuit/Compressor
- Control circuit
- Auxiliary heating
Fuse, slow-blow
Start-up current
- without start-up current limiter
- with start-up current limiter
Electrical power consumption:
- min. for W10W35
- max. for W20W60
- Auxiliary heating
EN 60529 level of protection
Hydraulic connections
- Heating circuit flow and return
- Heat source flow and return
Heat source circuit
- max. operating pressure
- min. inlet temperature
- max. inlet temperature
- Nominal flow rate dT 3K
- Residual head dT 3K
- Nominal flow rate dT 4K
- Residual head dT 4K
- Electrical power consumption - pump
CH circuit
- max. operating pressure
- min. flow temperature
- max. flow temperature
- Nominal flow rate dT 5K
- Residual head dT 5K
- Nominal flow rate dT 10K
- Residual head dT 10K
- Electrical power consumption - pump
Unit
mm
mm
mm
mm
VWW 61/2
0010002789
VWW 81/2
0010002790
VWW 101/2
0010002791
1200
600
650
840
VWW 141/2
0010002792
VWW 171/2
0010002793
kg
kg
kg
-
154
139
145
161
146
153
164
149
157
182
174
186
189
174
186
3/N/PE 400 V 50 Hz
1/N/PE 230 V 50 Hz
3/N/PE 400 V 50 Hz
3 x 16
3 x 25
A
3 x 16
3 x 16
A
A
26
< 16
40
< 16
46
< 16
64
< 25
74
< 25
kW
kW
kW
-
1,5
3.1
6
2.1
3.8
6
2.5
4.9
6
3.5
6.8
6
4.3
7.7
6
IP 20
mm
mm
MPa (bar)
°C
°C
l/h
mbar
l/h
mbar
W
MPa (bar)
°C
°C
l/h
mbar
l/h
mbar
W
3 x 25
G 1 1/4", diameter 28
G 1 1/4", diameter 28
1816
1362
-
2604
1953
-
0.3 (3)
4
20
3045
2284
-
4267
3200
-
4983
3737
-
3370
92
1724
469
132
4173
0
2050
516
205
0.3 (3)
25
62
1404
297
728
450
93
1998
180
993
418
93
2371
97
1229
382
93
Table 13.2 Technical data - VWW
Installation instructions geoTHERM VWS/VWW 0020057444_01
77
13 Technical data
Description
refrigerant circuit
- Coolant type
- Quantity
Unit
VWW 61/2
VWW 81/2
VWW 101/2
VWW 141/2
VWW 171/2
kg
1.9
2.2
R 407 C
2.05
2.9
3.05
- Permissible operating overpressure
- Compressor type
- Oil
Heat pump performance data
W10W35 dT5
- Heating output
- Power consumption
- Performance figure/COP
W10W35 dT10
- Heating output
- Power consumption
- Performance figure/COP
W10W55
- Heating output
- Power consumption
- Performance figure/COP
MPa (bar)
-
Internal sound level
Conforms to safety regulations
2.9 (29)
Scroll
Ester
kW
kW
-
8.2
1.6
5.2
11.6
2.1
5.5
13.9
2.6
5.3
19.6
3.7
5.3
24.3
4.6
5.3
kW
kW
-
8.5
1,5
5.6
11.6
2.1
5.7
14.0
2.5
5.5
20.1
3.5
5.7
23.9
4.3
5.6
kW
kW
-
7.5
2.3
3.3
10,2
3.0
3.5
13.3
3.5
3.8
19.2
5.1
3.8
23.4
5.9
3.7
dbA
-
46
48
50
52
CE mark
Low Voltage Directive 73/23/EWG
EMC Directive 89/336/EWG
EN 60335
ISO 5149
53
Table 13.2 Technical data - VWW (cont)
78
Installation instructions geoTHERM VWS/VWW 0020057444_01
Start-up checklist 14
14 Start-up checklist
Check the following checklist before putting the heat
pump into service. Only operate the heat pump when all
points have been satisfied in essence.
Heating circuit checklist
During planning, was consideration given to parts of the building
that are to be heated at a later time?
Was the power for the hot water supply considered?
Were the heating circuits in the system hydraulically balanced?
Were leakage pressures determined by pipe network calculations?
If planning calculations showed that pressure losses were to be expected: Was a second pump incorporated to overcome the pressure losses?
Was the minimum mass flow of the heat pump considered?
Was a dirt filter incorporated in the return line?
Was the system provided with all the safety devices described in
this manual?
Were an overflow funnel and blow-out line incorporated?
Were the pipes insulated with thermal insulation?
Was the heating circuit flushed, filled and bled?
Was the heating circuit checked for leaks?
Were the pipes thermally insulated against vapour diffusion?
Brine circuit checklist (VWS only)
Was the brine circuit pressure tested with water and checked for
leaks?
Were the water/antifreeze mixing proportions
(2:1) adhered to?
Was the frost protection (- 15 °C) tested with a frost protection
tester?
Was a pressure switch incorporated in the brine circuit?
Was the pressure switch connected to the heat pump?
Was a dirt filter fitted at the brine side input to the heat pump?
Were stop valves incorporated into the brine circuit?
Were pressure regulating valves incorporated into the brine circuit?
Were the brine circuits hydraulically balanced?
Was the brine expansion tank fitted?
Was the brine source circuit filled to a pressure of 1.5 bar?
Was the brine expansion tank filled to 2/3 full?
Were isolating devices fitted ahead of the heat pump?
Were the pipes thermally insulated against vapour diffusion?
Table 14.1 Start-up checklist
Installation instructions geoTHERM VWS/VWW 0020057444_01
79
14 Start-up checklist
Water circuit checklist (VWW only)
Was the water or its composition examined?
Was a second heat exchanger used for decoupling?
Was a dirt filter fitted at the water side input to the heat pump?
Were isolating devices fitted ahead of the heat pump?
Were the pipes thermally insulated against vapour diffusion?
Electrical installation checklist
Is there an isolation device with at least 3 mm contact opening fitted on the customer side and was it appropriately labelled?
Were all electrical connections properly made and in accordance
with the specified electrical circuit diagrams?
Was the protective earth properly connected?
Do all conductors have the required cross-sections?
Were the required automatic safety devices used and labelled in
accordance with the conductor cross-sections and installation
methods used?
Were all cables fastened using strain relief clamps?
Was any available ripple control signal from the power company
connected to the heat pump?
Assembly checklist
Were all the cladding panels fitted?
Table 14.1 Start-up checklist (cont.)
80
Installation instructions geoTHERM VWS/VWW 0020057444_01
Reference 15
15 Reference
To the technician: Please fill in the following tables to
facilitate any servicing work that may arise.
Installation and commissioning were carried out by:
Heat source construction
Date:
Company:
Name:
Telephone:
Electrical installation
Date:
Company:
Name:
Telephone:
Start-up
Date:
Company:
Name:
Telephone:
Installation instructions geoTHERM VWS/VWW 0020057444_01
81
15 Reference
Planning the heat pump installation
Details
Details regarding heat demand
Heating load of the property
Hot water supply
Was a central DHW supply used?
Was the user's behaviour regarding hot water demand taken into
account?
During planning, was the increased hot water demand of Jacuzzis
and showers taken into account?
Equipment used in the heat pump system
Details
Unit designations of the installed heat pump
Details regarding the domestic hot water cylinder
Domestic hot water cylinder type
Domestic hot water cylinder capacity
Electric auxiliary heating? Yes/No
Details regarding room thermostats
VR 90/other/none
Details regarding the heat source system
Details
Ground probe (number, drilling depth, spacing between probes)
Number of probes
Spacing between probes
Drilling depth of the probes
Details regarding the ground collector
Details
Number of brine circuits
Distance of the installed pipes from one another
Pipe diameter
Installation depth of the collector in the ground
Length of the longest brine circuit
Table 15.1 Reference checklist
82
Installation instructions geoTHERM VWS/VWW 0020057444_01
Reference 15
Details for VWW
Details
Magnitude of the mass flow that can be extracted from the ground
water/well
Ground water pump type
Details regarding the heat consuming system
Details
If a second pump was incorporated to overcome the pressure losses: Manufacturer and type of the second pump
Heating load of the underfloor heating
Heating load of the wall heating
Heating load of the combination underfloor heating/radiators
Was a secondary return installed? (Yes/No)
Starting up the hear pump system
Details
Checks before handing over to the user
Pressure of the heating circuit in a cold state
Does the heating system get warm?
Does the water in the DHW cylinder get warm?
Controller settings
Were the basic settings made on the controller?
Was the anti-Legionella function programmed? (Interval and temperature)
Handover to the user
Details
Was the user instructed on the following points?
Basic function and operation of the controlller
Operation of the bleeding device
Maintenance intervals
Documentation handover
Details
Was the operating manual handed over to the user?
Was the installation manual handed over to the user?
Were the manuals for all the accessories handed over to the user?
Table 15.1 Reference checklist (cont.)
Installation instructions geoTHERM VWS/VWW 0020057444_01
83
Appendix
Appendix
Sensor characteristics
VR 10 external temperature sensors
VR 11 internal temperature sensors
Temperature (°C)
-40
-35
-30
-25
-20
-15
-10
-5
0
5
10
15
20
25
30
35
40
45
50
55
60
65
70
75
80
85
90
95
100
105
110
115
120
125
130
135
140
145
150
155
Temperature (°C)
-40
-35
-30
-25
-20
-15
-10
-5
0
5
10
15
20
25
30
35
40
45
50
55
60
65
70
75
80
85
90
95
100
105
110
115
120
125
130
135
140
145
150
155
Resistance (ohms)
87879
63774
46747
34599
25848
19484
14814
11358
8778
6836
5363
4238
3372
2700
2176
1764
1439
1180
973
807
672
562
473
400
339
289
247
212
183
158
137
120
104
92
81
71
63
56
50
44
Table 1, Appendix, VR 10 sensor characteristics
84
Resistance (ohms)
327344
237193
173657
128410
95862
72222
54892
42073
32510
25316
19862
15694
12486
10000
8060
6535
5330
4372
3605
2989
2490
2084
1753
1481
1256
1070
916
786
678
586
509
443
387
339
298
263
232
206
183
163
Table 2, Appendix, VR 11 sensor characteristics
Installation instructions geoTHERM VWS/VWW 0020057444_01
Appendix
VRC-DCF outside temperature sensor
Temperature (°C)
-25
-20
-15
-10
-5
0
5
10
15
20
25
30
35
40
Resistance (ohms)
2167
2067
1976
1862
1745
1619
1494
1387
1246
1128
1020
920
831
740
Table 3, Appendix, VRC DCF sensor characteristics
Installation instructions geoTHERM VWS/VWW 0020057444_01
85
Appendix
Heat pump schematic - VWS
14
13
15
M
T6
T5
1
2
T1
11
12
3
4
5
T4
T2
6
7
10
9
T8
T3
8
Fig. 1, Appendix, Heat pump schematic - VWS
Key to Fig. 1, Appendix
1 Heating circuit pressure sensor
2 Electric auxiliary heating
3 High pressure sensor
4 High pressure switch
5 Compressor
6 Low pressure sensor
7 Low pressure switch
8 Heat source circuit pressure sensor
9 Evaporator
10 Expansion Valve
11 Condenser
12 Filter drier
13 DHW return line
14 Heating return
15 Heating feed
86
Installation instructions geoTHERM VWS/VWW 0020057444_01
Appendix
Heat pump schematic - VWW
15
14
16
M
T6
T5
1
2
T1
12
13
3
4
5
T4
T2
6
7
11
9
10
T3
T8
8
Fig. 2, Appendix, Heat pump schematic - VWW
Key to Fig. 2, Appendix
1 Heating circuit pressure sensor
2 Electric auxiliary heating
3 High pressure sensor
4 High pressure switch
5 Compressor
6 Low pressure sensor
7 Low pressure switch
8 Heat source circuit pressure sensor
9 Evaporator
10 Flow Switch
11 Expansion Valve
12 Condenser
13 Filter drier
14 DHW return line
15 Heating return
16 Heating feed
Installation instructions geoTHERM VWS/VWW 0020057444_01
87
88
N
blue
yellow-green
grey
L2
brown
blue
T3
black
T2
yellow-green
grey
grey
T1
grey
brown
Safety
thermostat
(STB)
Links for
starting current limiter
A12-30-01
blue
L3 L2 L1 L3 L2 L1
N L3
S S A Z N
vrnetDIALOG
(optional)
L N
ZP
2
N L
3
N L
4
N L
L N
SK2-P
Fuse
T4A/250 V
Zu Auf N
LP/UV 1
Heating pump
1
N L
L N
ZH
1 2
RF1
Phase
monitoring
1 2
VF2
1 2
VF1
6
7
8 ASB
L N 2 1 N L 2 1
Fuse
T4A/250 V
Zu Auf N
HK2
5
SCH
N L 2 1
L N
HK2-P
red
red
1 2
SP
Brine pump
yellow
yellow
orange
yellow-green
grey
blue
Electric
auxiliary
heating
white
white
grey
T1
black
brown
L3
N N L3 L3 L2 L1
Heating switching valve
(Internal)
brown
L1
N L3 L2 L1
Heating/hot water
switching valve
(Customer side)
black
ABB
grey
blue
A1
black
A2
L3 L2 L1
PE N L3 L2 L1
Brine
pressure
switch
(Customer
side)
blue
black
brown
DCF/AF
BUS
1 2
EVU
1 2
1xZP
Low pressure
switch
High pressure
switch
Pressure sensors
Temperature sonsors
DCF OT AF
+ -
Main power inlet
3 x 400 V PE N
Appendix
Electrical circuit diagram - VWS
black
orange
orange
brown
yellow-green
brown
blue
yellow-green
brown
blue
black
orange
yellow-green
black
brown
grey
brown
black
Fig. 3, Appendix, Electrical circuit diagram - VWS
Installation instructions geoTHERM VWS/VWW 0020057444_01
grey
blue
Installation instructions geoTHERM VWS/VWW 0020057444_01
T3
T2
yellow-green
grey
brown
black
brown
Electric
auxiliary
heating
T1
grey
STB
Links for starting
current limiter
black
T2
T3
grey
T1
A Z N
1
N L
L N
ZH
2
N L
L N
ZP
L N
SK2-P
3
N L
Heating
pump
4
N L
Fuse
T4A/250 V
Zu Auf N
LP/UV 1
vrnetDIALOG
(optional)
white
white
brown
blue
E 16 DU
T3
N L3
1 2
RF1
1 2
VF1
Phase
monitoring
1 2
VF2
Flow monitor
yellow-green
yellow-green
6
7
8 ASB
L N 2 1 N L 2 1
Fuse
T4A/250 V
Zu Auf N
HK2
5
SCH
N L 2 1
L N
HK2-P
Diverter valve
Heating
(internal)
yellow-green
T1
T2
blue
A12-30-01
N N L3 L3 L2 L1
L3 L2 L1 L3 L2 L1
brown
ABB
L3
black
A9-30-01
grey
L2
brown
L1
yellow-green
T1
black
L3
A2
N L3 L2 L1
blue
ABB
L2
blue
A1
black
L1
A2
L3 L2 L1
blue
black
brown
orange
N
PE N L3 L2 L1
Diverter valve
Heating / Hot water
(customer side)
orange
A1
N L3 L2 L1
PE N L3 L2 L1
Main
power inlet
3 x 400 V PE N
orange
1 2
SP
DCF/AF
BUS
1 2
EVU
1 2
1xZP
Low pressure
switch
High pressure
switch
Pressure sensors
Temperature sensors
DCF OT AF
+ -
Well pump
(customer side)
Appendix
Electrical circuit diagram - VWW
black
rot
rot
brown
blue
grey
blue
yellow-green
blue
black
brown
grey
Fig. 4, Appendix, Electrical circuit diagram - VWW
89
0020057444_01 GB 072008