1
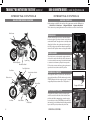
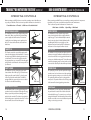
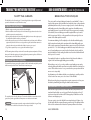
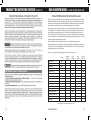
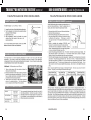
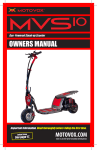
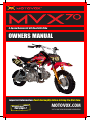
4-Speed Automatic Off Road Dirt Bike
OWNERS MANUAL
Important Information. Read thoroughly before driving the first time.
Attaching handlebars:
See page 7.
MOTOVOX.COM
VISIT US ON THE WEB FOR MORE INFORMATION
TROUBLE? DO NOT RETURN TO STORE contact us! product
s
i
h
t
h
t
i
w
problems
y
n
a
e
v
a
TORE
h
S
E
H
If you
T
O
TURN T right every time.
E
R
T
O
N
DO
ake it
m
l
l
i
w
e
w
d
an
contact us
686)
8
6
(
O
T
O
M
88-488
vox.com
oto
fo@m
n
i
l
i
a
m
or e
888-488-MOTO (6686) or email [email protected]
This operators manual contains important safety information
and maintenance information. Read it carefully before using this
vehicle. Failure to follow the warnings contained in this operators
manual could result in INJURY or DEATH.
Keep this manual in a safe place. It is very important that this owners
manual be reviewed by any rider and it should remain with the
vehicle when transferred to a new owner.
All information, images and specifications contained in this manual
are based on the latest product information available at the time
of publication. Due to improvements or production changes,
there could be discrepancies in this manual. Motovox reserves
the right to make product changes at any time, without notice
and without obligation to make the same or similar changes to
any vehicle previously built or sold.
Avoid operating this vehicle on paved surfaces including, but not
limited to highways, parking lots, sidewalks and driveways. Never
operate this or any designated off-road vehicle on a public street,
road or highway where it will be in violation of local traffic laws
and restrictions.
No part of this owners manual may be reproduced or copied
without express written permission from Motovox.
© Motovox, Inc. 2011
TROUBLE? DO NOT RETURN TO STORE contact us! CONTENTS
PRODUCT WARRANTY
PRODUCT WARRANTY
1
INTRODUCTION
2
IMPORTANT SAFETY INFORMATION
3-6
OPERATING CONTROLS
7 - 11
BEFORE RIDING
12 - 13
BASIC OPERATION AND RIDING TECHNIQUE
14 - 17
Starting and Stopping the Engine
14 - 15
Shifting Gears
16
Braking Technique
17
Parking & Post Ride Inspection
17
MAINTENANCE OF YOUR MVx70
888-488-MOTO (6686) or email [email protected]
18 - 33
Maintenance Schedule
19
Fuel & Engine Oil
21 - 23
Air & Fuel Filters
23
Throttle Free play Adjustment
24
Idle Speed Adjustment
24
Spark Plug
Clutch Adjustment
26
Brake Adjustment
26 - 27
Suspension Inspection
Wheels and Tires
29 - 30
Drive Chain
31 - 33
24 - 25
28
TROUBLESHOOTING
34 - 37
RESOLVING THE UNEXPECTED
38 - 39
EMISSION CONTROL SYSTEM WARRANTY
40 - 41
REGISTER YOUR MVx70
42 - 43
Please see page 41 for emissions control warranty
MotoVox warrants to the first buyer of the Product (“Buyer”) that on the date of purchase of the Product, as shown on Buyer’s
sales receipt (“Purchase Date”), the Product shall be free from defects in material or workmanship subject to and in accordance
with the terms and conditions set forth herein. The duration of this Limited Warranty is ninety (90) days from the Purchase Date
(the “Warranty Period”). MotoVox will correct, at its option, by repair or by furnishing replacement parts, any parts determined
in MotoVox’s sole discretion to have a defect in material or workmanship of the Product reported to MotoVox during the Warranty
Period, subject to the terms, conditions and limitations of this Limited Warranty. At its option, MotoVox may require the Buyer to
return to MotoVox, at its address set forth below, at Buyer’s expense, the part claimed to be defective for MotoVox’s inspection.
MotoVox’s sole obligation under this Limited Warranty is to repair and/or replace parts on the Product. If MotoVox determines
that any claimed defect or problem reported by Buyer is not covered by this Limited Warranty, Buyer shall pay MotoVox its then
existing charge for any repair or replacement made by MotoVox.
TO QUALIFY FOR WARRANTY SERVICE:
1. You must present a copy of the sales receipt.
2. This product can not be used for rental or commercial use.
3. This product can not be used for competition.
LIMITATIONS OF LIABILITY
• This Limited Warranty is non-transferable after the Product’s initial sale.
• No unapproved modifications can be made to the Product, its performance or otherwise, in order for this Limited Warranty
to remain in effect.
• No reimbursement is provided for towing, loss of time, loss of use, inconvenience, incidental or consequential damages.
• This Limited Warranty covers only parts and labor due to manufacturer defect. Damage due to misuse or neglect, use other
than as specified in the Owner’s Manual, or use under abnormal conditions are is not covered by this Limited Warranty.
• MotoVox makes no warranty with respect to products or trade accessories not made by MotoVox, including, but not limited to,
engines, tires, wheels, batteries and transmissions, such products or trade accessories, such items being subject to the
manufacturer’s warranty, if any.
• This Limited Warranty does not cover minor surface blemishes, rips, tears, or other cosmetic damages due to normal use, or
other intentional or unintentional damage to the Product.
• This Limited Warranty will not cover any damage which results from the application of improper cleaners, solvents or chemicals
to the Product, or from smoke or soot, or from exposure to saltwater, sea breeze or salt.
• This Limited Warranty will not cover any damage which results from aging, such as fading of paint, deterioration of plated
surfaces, deterioration of rubber or plastics, or rusting.
• This Limited Warranty does not cover improper repair or misdiagnosis of problem.
OWNER’S WARRANTY RESPONSIBILITIES
As the vehicle owner, you are responsible for the performance of the required maintenance. You should maintain a record of
all maintenance performed your vehicle and retail all receipts covering maintenance on yoru vehicle. You may not be denied a
warranty claim solely because of your failure to ensure the performance of all scheduled maintenance or lack of maintenance
records or receipts. As the vehicle owner, you should be aware that you may be denied your warranty coverage if your vehicle or
a part has failed due to abuse, neglect, improper maintenance, or unapproved modifications.
For any issue regarding your Motovox product, call toll free 1-888-488-MOTO (6686)
1
TROUBLE? DO NOT RETURN TO STORE contact us! INTRODUCTION
Congratulations on choosing your Motovox MVX70 dirt bike.
Your Motovox dirt bike was designed as a recreational motorcycle
for off-road use only and by a single rider only. This motorcycle is
ideal for younger riders with basic experience.
Before riding, please take your time to get acquainted with your
dirt bike and how it works. To protect your investment we urge you
to keep it well maintained. In addition to regular maintenance it is
important to observe and perform all pre ride and periodic checks
outlined in this manual. In this manual you will find helpful safety
information, instructions and helpful tips. To make it easier to use,
there is a table of contents at the beginning and an index at the end
of the manual.
As you read through this manual you will find information that
is noted with a NOTICE symbol. This is to point out key bits of
information that will help you avoid damage to your dirt bike
and property around you. This manual covers basic maintenance
procedures as well. For problems with your dirt bike that are not
covered in this manual, please refer to an authorized Motovox
Service Center, which can be located at Motovox.com.
Read the warranty page carefully so that you understand your
rights and responsibilities.
Whenever you ride, tread lightly by staying on established trails
and in approved areas. Protect the environment and keep off-road
riding areas open for future use.
Please be sure to register your Motovox product and notify us of
any address changes so we may contact you in the future with any
important product information.
888-488-MOTO (6686) or email [email protected]
IMPORTANT SAFETY INFORMATION
Your personal safety and the safety of those around you is our
primary concern. Operating this dirt bike safely is an important
responsibility and should not be taken lightly.
Motovox has provided you with safe operating procedures and
warning labels on your dirt bike and in this manual. This
information will alert you to potential hazards that could harm
you or others.
It is understood that it is not practical or possible to warn you
about all possible hazards associated with off-road riding and
maintaining your dirt bike. You must always use your own best
judgement.
Safety information is presented in a variety of forms, including:
• Safety labels and tags on the dirt bike
• Safety messages proceeded by a safety symbol
and one
of these three signal words: DANGER, WARNING and CAUTION.
Any of the above labels can indicate a danger where you or someone
around you can be KILLED or SERIOUSLY INJURED if the instructions
that it accompanies are not followed carefully.
• Safety Headings such as important safety reminders
and/or precautions.
• Safety Sections, such as Motorcycle Safety
• Instructions, such as Riding Techniques or Braking Techniques
This manual is filled with important safety information, please
read it carefully and be sure that you understand it.
Enjoy your Motovox dirt bike!
2
SAFETY MESSAGES
3
TROUBLE? DO NOT RETURN TO STORE contact us! 888-488-MOTO (6686) or email [email protected]
IMPORTANT SAFETY INFORMATION
IMPORTANT SAFETY INFORMATION
A motorcycle can provide many years of service and pleasure, provided
you take responsibility for safety, proper maintenance and understand the
challenges you may encounter while riding.
This motorcycle has been designed for younger riders. However, not all
young riders meet the physical and emotional needs for safe riding. Before
parents allow any children to ride this motorcycle, we strongly recommend
that they read this entire manual to be fully informed before making the
determination if their children are ready to ride. Listed below are some of
the most important safety measures one should take before and when
riding.
Never ride without a helmet. Helmets significantly reduce the
number and severity of head injuries. An approved DOT motorcycle helmet
is the most important part of your safety gear. Choose one that fits properly
and is snug on your head. Motorcycle dealers can help in selecting a good
quality helmet with proper fit.
Never carry a passenger. This dirt bike was designed for one
rider at a time only. There are no passenger foot pegs, foot rests, handles or
seat room for a passenger. Riding with a passenger can impair the driver’s
ability to operate the dirt bike which may result in serious injury or death.
Ride off-road only. This dirt bike has been designed and built
for off-road riding only. It is not equipped with a headlight, signals, brake
lights or horn which are all required for public road usage. The tires are not
designed for pavement and could become unstable. If you have to cross a
paved area or road, dismount and walk the bike across the pavement.
Ride within your limits. Never attempt to operate this dirt
bike in a manner that is beyond your skill level. It takes time to learn offroad riding skills. Learn to ride step-by-step. Start by riding on safe terrain
at slow speeds and gradually build your skills. Instruction from a more
experienced rider is strongly recommended.
Be alert for hazards. Any area you ride can present many
hazards. Always scan the terrain ahead of you continuously. Watch for
unexpected turns, drop-offs, ditches, rocks, low-hanging limbs and other
riders. Always maintain a low enough speed to stop under control and
react to hazards.
Never drink alcohol and ride. Even one drink can impair your
ability to ride safely and each additional drink worsens your ability to do so.
Remember, it is illegal to operate a motorcycle while intoxicated, including
off-road motorcycles.
As a parent, your child’s safety is your first priority. Riding a dirt bike is
very fun, but just like riding a bicycle, bad decisions can result in injury
or death. As a parent you can prevent accidents by making informed
decisions about if, when and how your child will ride. Always supervise
your child when he/she is riding.
Before you allow your child to ride you need to determine if he/she is
ready. Riding readiness can vary from one person to another. Age and
size are not the only factors that help to determine riding readiness.
There are three other factors that you should consider before deciding if
your child is ready to ride.
First, consider your child’s physical ability. A rider must be able to
hold the dirt bike up, get on and sit comfortably with both feet on the
ground. The rider must also be able to reach all of the controls on the
handlebars and work the brake lever.
Second, consider your child’s athletic ability. Your child should also be
good at riding a bicycle before riding a dirt bike, Determine if your child
is a good judge of speed and distance while riding a bicycle and that
they react with proper foot and hand actions. Any person who does not
have good coordination, balance and agility should not attempt to ride
this dirt bike.
Finally, determine your childs mental maturity. It is imperative that you
are honest with yourself when you answer the following questions: Does
your child think through problems and come to logical conclusions?
Does your child obey the rules when they ride their bicycle? If your child
makes bad judgements, takes unnecessary risks and ignores the rules,
they should not ride this dirt bike.
If you have determined that your child is ready to ride please remember
the following points:
• Never let your child ride without a helmet.
• Your child’s safety is your responsibility. Do not take it lightly.
• Never push you child to try things before they are ready.
• Always supervise your child when they are riding.
• Proper maintenance and upkeep of the dirt bike is key to safe riding.
Any modifications or improper accessories added to the
dirt bike with parts that are not manufactured by Motovox can make it
unsafe. Motovox strongly recommends that you do not remove any of the
original equipment or make any modifications that alter the design and/or
operation of the dirt bike.
4
SAFETY MESSAGES
5
TROUBLE? DO NOT RETURN TO STORE contact us! IMPORTANT SAFETY INFORMATION
This page will show you where to find safety labels on your dirt bike.
You will find that some labels warn you of potential hazards. Others will
provide important safety and maintenance information. Please read
them carefully and do not remove them. If your label wears off or
becomes hard to read, contact Motovox for a replacement.
888-488-MOTO (6686) or email [email protected]
OPERATING CONTROLS
When you operate a dirt bike you need to be able to operate the throttle,
brakes and other controls without stopping to look at them. Please study
the image below carefully to become familiar with the function and the
location of each control.
Engine Kill Switch
Front Brake Lever
Throttle
ATTACHING THE HANDLEBARS
Your MVX70 dirt bike is shipped with the handlebars NOT
bolted on. To attach the handlebars follow these steps:
1. After unpacking your dirt bike, stand it on the kick stand on a level surface.
2. Locate the handlebar mounting bolts at the
bottom of the handlebar assembly.
3. Remove the locking nuts and washers from the
handlebar mounting bolts and set aside.
3. Insert bolts into holes in upper triple clamp.
4. From underneath, put washers and locking
nuts onto bolts (pictured at right).
5. Tighten securely.
Mounting bolts and lock nuts.
6
SAFETY MESSAGES
7
TROUBLE? DO NOT RETURN TO STORE contact us! OPERATING CONTROLS
888-488-MOTO (6686) or email [email protected]
OPERATING CONTROLS
MAJOR COMPONENT LOCATION
BEFORE STARTING
Before starting your MVx70, be sure these four components are in the RUN position:
1. Fuel Valve 2. Choke Lever 3. Engine Kill Switch 4. Ignition Key Switch
The location and operating information for each of these controls is shown below:
Kick Starter
FUEL VALVE
Fuel Valve
The two-way fuel valve is used to control the flow of
fuel to the engine. The valve is located on the left side
under the fuel tank. Turing the lever to the ON position
allows fuel to flow to the carburetor and turning it to
the OFF position stops the flow. Always keep the fuel
valve in the OFF position when not using the dirt bike.
CHOKE LEVER
The choke lever is used to start the engine when it is
cold and is located on the left side of the carburetor. It
is used to restrict the amount of air in the fuel mixture
to start easier and warm up. Flip the lever up to the
FULL position to start, and then as the engine warms
up move the lever down to the OFF position.
Spark Plug
Oil Fill & Dipstick
Rear Brake Pedal
Fuel Valve
Fuel Cap & Vent
Key Ignition Switch
Choke Lever
Drive Chain
ENGINE KILL SWITCH
The engine kill switch is located next to the left hand
grip on the handlebars. The kill switch must be in the
START/RUN position for the engine to start. To stop the
engine, flip the button down to the STOP position.
Engine Kill Switch
IGNITION KEY SWITCH
Air Filter
8
Gear Shifter
Kick Stand
Choke Lever
Ignition Key Switch
The Ignition Key Switch is used to start the engine
and is located on the left side of the dirt bike, under
the fuel tank. Before attempting to start the engine,
be sure the key is in the START/RUN position which is
indicated by a red dot. When finished riding switch the
key to the OFF position, indicated by a blue dot.
OPERATING CONTROLS
9
TROUBLE? DO NOT RETURN TO STORE contact us! OPERATING CONTROLS
When operating your MVx70 there are several key operating controls that allow you
to operate your dirt bike. Their location and operation information is shown below.
1. Front Brake Lever 2. Throttle 3. Shift Lever 4. Rear Brake Pedal
FRONT BRAKE LEVER
Front Brake Lever
The Front Brake Lever is used to apply braking to the
front wheel. When you pull the lever back, braking
power is applied to the front wheel. The harder it
is pulled, the more braking power is applied to the
wheel. To release the front brake, release the front
brake lever.
OPERATING CONTROLS
When operating your MVx70 there are several key operating controls and components
that allow you to operate your dirt bike and perform routine maintenance.
Their location and operation information is shown below.
1. Kick Starter 2. Air Filter 3. Spark Plug 4. Kick Stand
KICKSTARTER
The kickstarter is used to start the engine and is
located on the right side of the engine behind the
right foot peg. To use the kickstarter flip it outward
from its stored position, hold the bike firmly while
straddling the bike. Place your right foot on the
kickstarter and push down quickly. The kickstarter
will return to its stored position when released.
THROTTLE
The Throttle controls the speed of the engine and is
located in the right grip on the handlebars. To increase
the engine speed, twist the throttle grip toward you,
or downward. To decrease the engine speed, twist
the grip away from you, or upward. The throttle grip is
spring loaded so it will return to the lowest position as
you release it.
888-488-MOTO (6686) or email [email protected]
AIR FILTER
Throttle
The air filter is used to keep dirt and debris out of the
carburetor air supply. Examine the air filter before each
ride to be sure that it is not clogged with dirt and dust
to keep your dirt bike running well. The air filter can be
removed and tapped gently on a hard surface to clean
out most of the dust. Replace the air filter periodically.
SHIFT LEVER
SPARK PLUG
The Shift Lever is used to change the gears and is
located ahead of the left foot peg. To select the next
higher gear, pull up until it clicks. To select the next
lower one, push down until it clicks. The MVx70 is
equipped with four gears and does not use a clutch.
Let off on the throttle when shifting.
Shift Lever
The spark plug is used to provide spark to the engine
to make it run. You should never touch the spark plug
when the engine is running as you could be shocked.
The spark plug will become worn or plugged after
many hours of operation. Refer to the servicing section
of this manual for cleaning/replacing instructions.
REAR BRAKE PEDAL
Kick Stand
The Rear Brake Pedal is used to apply braking to the
rear wheel and is located ahead of the right foot peg.
When you push the pedal down, braking power is
applied to the rear wheel. The harder it is pushed, the
more braking power is applied to the wheel. To release Rear
Brake Pedal
the rear brake, release the rear brake pedal.
The Kickstand is used to support the dirt bike when
it is parked and is located on the left side of the bike
below the left foot peg. To operate it, use your foot to
swing the kickstand to its downward position and lean
the bike onto it. Be sure to raise the kickstand up when
riding or serious injury can result.
10
Kickstarter
OPERATING CONTROLS
Air Filter
Spark Plug
Kickstand
11
TROUBLE? DO NOT RETURN TO STORE contact us! 888-488-MOTO (6686) or email [email protected]
BEFORE RIDING
Before you ride you must be certain that you and your dirt bike are ready to ride.
Below is your pre-ride checklist. Be sure to review all the topics and determine your
readiness to ride.
BEFORE RIDING
Before you ride you must be certain that you and your dirt bike are ready to ride.
Below is your pre-ride checklist. Be sure to review all the topics and determine your
readiness to ride.
PRE-RIDE CHECKLIST
PRE-RIDE INSPECTION
1. Have you completely read and do you thoroughly understand this
owners manual?
2. Have you found all the safety messages on your dirt bike and do
you understand them?
3. Do you understand the location of, and how all the operating
controls on your dirt bike work?
4. Are you in good mental and physical condition?
5. Are you drug and alcohol free?
6. Are you wearing a DOT-approved helmet that fits properly?
7. Are you wearing eye protection?
8. Are you wearing sturdy shoes and protective clothing?
1. Check tire pressure with a tire gauge. Recommended tire pressure is
32psi for the front tire and 36psi for the rear.
2. Check spokes and rims to make sure spokes are tight and rims are
not bent or damaged.
3. Inspect the engine for oil or fuel leaks.
4. Check engine oil level and add if needed.
5. Check the level of fuel in the gas tank.
6. Check the drive chain to see if it needs to be lubed or tightened.
7. Check the brakes to be sure they are working properly.
8. Look over the entire bike for loose nuts and bolts.
9. Check the throttle to be sure it rotates freely and returns to the
low position on its own when released.
10. Be sure that the handlebars turn freely.
Additional suggested protective clothing.
1. Gloves to protect your hands.
2. Sturdy riding boots that support your ankles.
3. Riding pants with knee and hip pads.
4. Riding jersey with elbow pads and chest/shoulder protection.
Failure to properly maintain your dirt bike can lead to a crash
in which you can be seriously injured or killed. Always perform a pre-ride
inspection on your dirt bike and keep it in good condition to get the most
out of your Motovox dirt bike.
As a reminder:
Never ride without a helmet. Helmets significantly reduce the
number and severity of head injuries. An approved DOT motorcycle helmet
is the most important part of your safety gear. Choose one that fits properly
and is snug on your head. Motorcycle dealers can help in selecting a good
quality helmet with proper fit.
12
BEFORE RIDING
13
TROUBLE? DO NOT RETURN TO STORE contact us! STARTING THE ENGINE
The following section of the manual provides some basic information on how to
begin riding your dirt bike. We will cover how to start and stop the engine, how to use
the throttle and brakes, shift gears and what you should do when you stop riding.
SAFE RIDING PRECAUTIONS
Before riding this dirt bike, be sure that you have read and understand this
entire owners manual up to this point, including the sections that are titled
Important Safety Information and Before You Ride. Even if you have ridden
other motorcycles in the past, take time to become familiar with how this
dirt bike runs and how it handles. Different bikes have different handling
characteristics. Always practice in a safe area until you feel comfortable with
how this dirt bike runs.
For your safety, always avoid running the engine in an enclosed space with poor ventilation, such as a garage. The dirt bike’s exhaust
contains poisonous carbon monoxide which can collect rapidly and cause
illness or death.
Not equipped with lights. Do not ride after dark.
STARTING THE ENGINE
1. Turn the Key Ignition to the ON position.
2. Move the engine kill switch to the ON position.
3. Make sure the engine is in neutral.
4. Turn the fuel valve to the ON position.
5. If the engine is cold, flip the choke lever up into the FULL position.
If the engine is warm, you may not need to use the choke at all.
6. Stand over the dirt bike, flip the kick starter out and hold the handlebars.
7. Twist the throttle down some, to give it a little gas.
8. Using your right foot push the kickstarter down swiftly. It may take a
few tries.
888-488-MOTO (6686) or email [email protected]
BASIC OPERATION
9. Once the engine starts to run, let it warm up by operating the throttle up
and down for about 20 seconds, then move the choke lever down to the
OFF position.
10. Be patient and let it warm up a little. Once the engine is warm, the idle
will smooth out and it will be ready to ride.
NOTE: Extended running with the choke fully on will cause the engine to run
poorly and can cause damage to the spark plug and cylinder wall.
A FLOODED ENGINE
If the engine fails to start after repeated attempts, it may mean that it is
flooded with excess fuel. A common indication of a flooded engine is a
strong smell of fuel around the dirt bike. Follow the steps below to clear a
flooded engine.
1. Move the engine kill switch to the OFF position.
2. Switch the choke lever to the off position.
3. Twist the throttle all the way down to the full open position.
4. Using the kickstarter, crank the engine over 10 or 15 times.
5. Move the kill switch back to the ON position.
6. Start the dirt bike using the kickstarter and NO CHOKE.
STOPPING THE ENGINE
To stop the engine, move the kill switch located on the left hand grip to the
OFF position. The engine will stop.
NOTE: Be sure to switch the Key Ignition off, close the Fuel Valve and lean the bike
over onto the kickstand when done riding.
NOTE: To avoid damage to the side case of the motor, don’t let the kickstarter flip back
into its neutral position from the bottom of the stroke.
14
BASIC OPERATION
15
TROUBLE? DO NOT RETURN TO STORE contact us! SHIFTING GEARS
This dirt bike has four forward gears. To start riding, after the engine is fully warmed
up and the kickstand is raised, follow these steps.
STARTING AND UPSHIFTING
1. With the engine running, squeeze the front brake tightly.
2. Push the shift lever down until you feel it click into first gear, then release the lever
and let it return to its neutral position.
3. Release the front brake and open the throttle slightly to increase the engine speed.
You will feel the dirt bike start to ease forward.
4. As the bike speed increases, let off on the throttle and push down on the shift lever
again until you feel it click into second gear. Once again, let the shifter return to its
neutral position and open the throttle a little to increase your speed.
5. To go faster, repeat this process to get to third and fourth gears.
NOTE: Learning when to shift up or down will come with experience and practice. Shift up
when you feel that the engine speed is getting high and you want to go faster. Shift down
when you want to slow the dirt bike down.
DOWNSHIFTING AND STOPPING
To downshift to a lower gear and slow down, let off on the throttle and pull up on the
shift lever until you feel it click. This will be the next lower gear.
Downshift
888-488-MOTO (6686) or email [email protected]
BRAKING TECHNIQUE
This section will cover basic braking technique for your dirt bike. To slow or
stop the bike, squeeze the front brake lever and push down on the rear brake
pedal firmly and smoothly. You can use engine speed to slow the bike along
with braking power by downshifting at the same time. Gradually increase
your braking pressure as you feel it is needed. The more pressure you apply
to the brakes, the more braking power will be applied. When you come to
a full stop, put your left foot on the ground first so that your right foot can
remain on the brake pedal as needed.
For maximum braking, let off completely on the throttle and firmly apply
both front and rear brakes at the same time while downshifting with your
left foot at the same time. Remember that on any motorcycle, the front brake
provides 60% - 70% of the braking power while the rear provides the rest, so
most of your braking power comes from the front brake. Just be careful to
apply it carefully to avoid sending the bike into a front wheel skid which will
cause you to lose control.
If you apply the brakes too quickly and start to skid, release the brakes to
regain control and then apply braking power carefully.
When riding on wet, or loose rocky conditions your braking power can be
reduced greatly and it will be much easier to put the bike into a skid and lose
control. If the surface is wet or loose, you must reduce your speed and allow
more room to stop safely.
Avoid jamming on the brakes suddenly or accelerating too quickly as either
of these actions can cause you to lose control of the dirt bike.
When descending a long, steep grade use engine compression to slow your
dirt bike by downshifting and using the brakes at the same time.
PARKING AND POST-RIDE INSPECTION
Upshift
The neutral position is before first gear. To return the dirt bike to neutral when it is in
gear, click up on the gear shifter as many times as needed to reach neutral.
Never attempt to start the engine when the dirt bike is in gear. Doing
so could cause a crash that could result in serious injury or death.
16
With the bike stopped, switch it off with the kill switch, flip down the kickstand and lean the bike over on it to park. Turn the Key Ignition to the off
position and turn the fuel valve to OFF. Always park your dirt bike on a flat
surface to avoid tipping over.
If you are going to store the dirt bike for an extended period of time, close
the fuel valve with the engine still running until it stops. This will burn all the
fuel out of the carburetor and reduce fuel system problems in the future.
BASIC OPERATION
17
TROUBLE? DO NOT RETURN TO STORE contact us! MAINTAINING YOUR MVx70
888-488-MOTO (6686) or email [email protected]
MAINTENANCE SCHEDULE
To keep your motorcycle safe and reliable when you ride, regular inspections and service is required. Below you will find a
maintenance schedule that describes when components need to be inspected or serviced. The maintenance schedule lists
items that can be performed with basic mechanical skills and hand tools. In addition, the maintenance schedule will list
items that involve more extensive procedures and could require special training, tools, and/or equipment.
Because this motorcycle does not have an odometer, service intervals in the maintenance schedule are expressed in
terms of riding days. To avoid missing required maintenace, we suggest that you develop a good way to record the
amount of the time you spend riding your motorcycle. If you do not feel capable of performance any of the procedures described in this manual or if you need assistance, please contact your nearest Motovox dealer. If you decide to
do your own maintenance, use on ly replacement parts that you have purchased directly from Motovox, Inc. This will
ensure the best quality and reliability for your motorcycle.
Always perform the pre-ride inspection described on page 13 at each scheduled maintenance inverval.
Each item on the maintenance schedule requires some mechanical knowledge. You will find that some items in the
table (marked * and **) may require a higher level of mechanical skill and special tools. If you do not feel capable of
performing any procedure, please consult Motovox.
Note: Service your motorcycle more frequently when you ride in wet or dusty conditions.
Every Use
IMPORTANT SAFETY PRECAUTIONS
Check engine oil
Change engine oil*
Check air filter
Clean air filter*
Change air filter*
Clean carburetor sediment cup*
Clean and adjust spark plug*
Replace spark plug*
Clean & lubricate drive chain
Check/adjust valve clearance**
Clean fuel tank and filter*
Check fuel tube
Tighten all nuts and bolts
Check/adjust chain tension
Check brakes
Check throttle
x
x
First Month
(20 Hours)
Every
3 Months
x
Every Year
(200 Hours)
x
x
x
x
x
x
x
Every
6 Months
x
x
x
x
x
x
x
* Can be performed by owner with proper tools and knowledge, otherwise consult with a service center.
** Recommended to be performed by authorized service center.
18
MAINTENANCE
19
TROUBLE? DO NOT RETURN TO STORE contact us! COMPONENT LOCATIONS
888-488-MOTO (6686) or email [email protected]
MAINTENANCE PROCEDURES
FUEL
REFUELING PROCEDURE
ENGINE OIL RECOMMENDATION
20
MAINTENANCE
21
TROUBLE? DO NOT RETURN TO STORE contact us! MAINTENANCE PROCEDURES
ENGINE OIL RECOMMENDATIONS (continued)
888-488-MOTO (6686) or email [email protected]
MAINTENANCE PROCEDURES
CHANGING ENGINE OIL
AIR & FUEL FILTERS
CHECKING AND ADDING OIL
22
MAINTENANCE
23
TROUBLE? DO NOT RETURN TO STORE contact us! MAINTENANCE PROCEDURES
THROTTLE FREEPLAY
888-488-MOTO (6686) or email [email protected]
MAINTENANCE PROCEDURES
SPARK PLUG MAINTENANCE (continued)
ENGINE IDLE SPEED ADJUSTMENT
SPARK PLUG MAINTENANCE
24
MAINTENANCE
25
TROUBLE? DO NOT RETURN TO STORE contact us! MAINTENANCE PROCEDURES
888-488-MOTO (6686) or email [email protected]
MAINTENANCE PROCEDURES
CLUTCH ADJUSTMENT
FRONT BRAKE ADJUSTMENT (continued)
FRONT BRAKE ADJUSTMENT
REAR BRAKE ADJUSTMENT
26
MAINTENANCE
27
TROUBLE? DO NOT RETURN TO STORE contact us! MAINTENANCE PROCEDURES
FRONT SUSPENSION INSPECTION
888-488-MOTO (6686) or email [email protected]
MAINTENANCE PROCEDURES
WHEEL RIMS & SPOKES
REAR SUSPENSION INSPECTION
TIRE AIR PRESSURE
28
MAINTENANCE
29
TROUBLE? DO NOT RETURN TO STORE contact us! MAINTENANCE PROCEDURES
TIRE INSPECTION
888-488-MOTO (6686) or email [email protected]
MAINTENANCE PROCEDURES
DRIVE CHAIN INSPECTION
TUBE & TIRE REPLACEMENT
30
MAINTENANCE
31
TROUBLE? DO NOT RETURN TO STORE contact us! MAINTENANCE PROCEDURES
DRIVE CHAIN INSPECTION
888-488-MOTO (6686) or email [email protected]
MAINTENANCE PROCEDURES
DRIVE CHAIN INSPECTION
DRIVE CHAIN SLACK ADJUSTMENT
32
MAINTENANCE
33
TROUBLE? DO NOT RETURN TO STORE contact us! troubleshooting
ENGINE DOES NOT START
34
888-488-MOTO (6686) or email [email protected]
TROUBLESHOOTING
ENGINE LACKS POWER
TROUBLESHOOTING
35
TROUBLE? DO NOT RETURN TO STORE contact us! troubleshooting
ENGINE LACKS POWER (continued)
888-488-MOTO (6686) or email [email protected]
TROUBLESHOOTING
POOR PERFORMANCE AT IDLE AND LOW SPEED (continued)
POOR PERFORMANCE AT HIGH SPEED
POOR PERFORMANCE AT IDLE & LOW SPEED
36
TROUBLESHOOTING
37
TROUBLE? DO NOT RETURN TO STORE contact us! RESOLVING THE UNEXPECTED
GENERAL GUIDELINES
888-488-MOTO (6686) or email [email protected]
RESOLVING THE UNEXPECTED
IF YOU HAVE A FLAT TIRE
IF YOU CRASH
ENGINE QUITS OR WON’T START
IF A COMPONENT FAILS
38
RESOLVING THE UNEXPECTED
39
TROUBLE? DO NOT RETURN TO STORE contact us! 888-488-MOTO (6686) or email [email protected]
EMISSION CONTROL WARRANTY
EMISSION CONTROL WARRANTY
YOUR WARRANTY RIGHTS AND OBLIGATIONS
EMISSIONS CONTROL WARRANTY EXCLUSIONS AND LIMITATIONS
The manufacturer warrants that each new 2010 and later vehicle:
• is designed, built and equipped so as to conform at the time of initial retail purchase with all applicable
regulations of the United States Environmental Protection Agency.
• is free from defects in material and workmanship which cause such vehicle to fail to conform with applicable
regulations of the United States Environmental Protection Agency or the California Air Resources Board for
the periods specified below.
The emission control system warranty period for this vehicle is 30 months, which applies to the owner and each
subsequent purchaser, begins on the date the vehicle is delivered to the first purchaser provided there has been no
modification, abuse, neglect or improper maintenance of your vehicle. Where a warrantable condition exists, the
manufacturer will repair your vehicle at no cost to you, including diagnosis, parts and labor. This is your emission
control defects warrantly.
EMISSION CONTROL WARRANTY INFORMATION
Your emission control system warranty covers components whose failure would increase an engine’s emission, including electronic controls, carburetor, the ignition system, or any other system utilized in this vehicle to control emission
if it is originally equipped. Also included may be hoses, connectors and other emission-related assemblies. Replacing
or repairing other components (including parts, labor, and other costs) not covered by this emission control system
warranty or the standard warranty is the responsibility of the owner.
Coverage of repairs under this emissions warranty applies when repairs are completed at a dealer repair facility
or person of thge owner’s choosing for the maintenance, replacement or repair of emissions-related devices. The
Distributor will not cover repairs performed outside of an authorized dealer or repair facility. The use of replacement
parts not equivalent to the original parts may impair the effectiveness of your vehicle’s emission control system. If such
a replacement part is used and an authorized dealer determines it is defective or causes a failure of a warranted part,
your claim for repair to bring your vehicle into compliance with applicable standards may be denied.
MODIFICATION OF ANY EMISSION CONTROL COMPONENT OR SETTING IS STRICTLY
PROHIBITED BY LAW AND CAN RESULT IN SUBSTANTIAL PENALTIES AND FINES.
THIS EMISSION CONTROL SYSTEM WARRANTY IS IN ADDITION TO THE
STANDARD PRODUCT WARRANTY.
This warranty does not cover the following:
• Failures or malfunctions of the emission control systems caused by abuse, alteration, accident, misuse or the
use of leaded gasoline.
• Replacement of expendable maintenance items unless they are original equipment defective in material or
workmanship under normal use, and the first required replacement interval for the item has not been reached.
Expendable maintenance items include but are not limited to spark plugs, filters and lubricants.
• Replacement of parts and other services and adjustments for required maintenance.
• Repairs or replacements as a result of
- Accident
- Misuse
- Use of replacement parts or accessories not conforming to the original specifications which
adversely affect performance
- Physical damage, corrosion, or defects caused by fire, explosions or similar causes beyond the
control of the Distributor.
- Failures not caused by a defect in material or workmanship.
• Use of this vehicle in any type of competitive racing, rental or any commercial use completely voids this and
all other warranties.
LIMITED LIABILITY
The liability of the manufacturer under this Emission Control System Warranty is limited solely to the remedying of
defects in material workmanship by an authorized dealer at its place of business during customary business hours.
This warranty does not cover inconvenience or loss of use of the vehicle or transportation of the vehicle to/from the
authorized dealer. The Distributor is not liable to any person for incidental, consequential or special damages of any
description, whether arising out of express or implied warranty or any other contract, negligence or other tort or
otherwise.
No express emission control system warranty is given by the manufacturer except as specifically set forth therein.
Any emission control system warranty implied by law, including any warranty of merchantability or fitness for a
particular purpose is limited to the express emission control system warranty terms stated in this warranty.
The foregoing statements of warranty are exclusive and in lieu of all other remedies. Some states do not allow
limitations on how long an implied warranty lasts, so the above limitations may not apply if it is inconsistent
with the controlling state law.
No dealer is authorized to modify this Emission Control System Warranty. If you have any questions regarding your
warranty rights and responsibilities, you should contact Motovox by calling (888)488-MOTO (6686).
40
WARRANTY INFORMATION
41
TROUBLE? DO NOT RETURN TO STORE contact us! Register your Motovox MVx70 Dirt Bike so that we can
provide you fast solutions to any problems you may have with
your product and so that we can keep in touch with you
regarding any product updates.
Simply detach the regsitration form on the next page, fill it out and mail it to
Motovox
8844 Hillcrest Road
Kansas City, Missouri 64138
888-488-MOTO (6686) or email [email protected]
Motovox MVx70 Product Registration
Please complete and mail this card within 10 days of purchase.
NameAge
Address
CityStateZip
Email
Home Phone
Work Phone
Or go to motovox.com and click on ACTION
to fill out your registration form online.
Purchase Date
Purchased from
VIN Number
Male
Female Occupation
Is this your first Motovox product?
Other similar product owned before
How did you hear about the MVx70?
How do you plan to use your MVx70?
Just for fun
Work
Sport
Commuting
Complete this form and mail it to:
8844 Hillcrest Road, Kansas City, Missouri 64138
Attention: Product Regsitration
42
43
TROUBLE? DO NOT RETURN TO STORE contact us! Motovox would sincerely like to thank you for choosing one of
our fine products and we hope you will have many years of
safe, fun enjoyment with your new dirt bike!
888-488-MOTO (6686) or email [email protected]
For step-by-step maintenance videos
and much more information about
your Motovox MVx70, visit
motovox.com
IF YOU HAVE TROUBLE
DO NOT RETURN TO STORE
CALL MOTOVOX AND WE WILL MAKE IT RIGHT.
Motovox Motorsports
8844 Hillcrest Road, Kansas City, MO 64138-3759
Toll Free: 1-888-488-MOTO (6686)
Motovox.com
email [email protected]