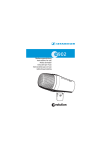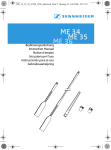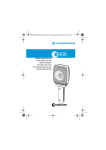
1
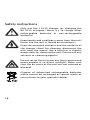
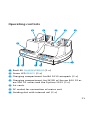
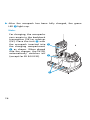
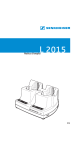
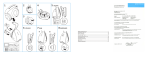
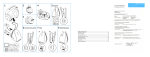
L 2015
Instructions for use
17
Safety instructions
Only use the L 2015 charger for charging the
BA 2015 accupack! Never try to charge other
rechargeable batteries or non-rechargeable
batteries!
Keep liquids and small parts away from the unit!
Never use the unit in humid environments!
Keep the accupack contacts and the contacts of
the charger clean! For cleaning, disconnect the
unit from the mains! Use a brush or a slightly
damp cloth for cleaning the unit. Do not use any
solvents or cleansing agents!
Do not set up the unit near any heat sources and
never expose it to direct sunlight! Make sure
that the air vents of the unit are not covered or
blocked!
Dispose of exhausted rechargeable batteries
which cannot be recharged as special waste or
return them to your specialist dealer.
18
The L 2015 quick charger
The L 2015 quick charger must only be used for automatically charging BA 2015 accupacks – individual rechargeable
battery cells or primary cells cannot be charged! The
BA 2015 accupack is suitable for units of the Sennheiser
ew G2 series and the System 2015.
The bodypack receivers (EK) and transmitters (SK) of the
Sennheiser ew 300 G2 and ew 500 G2 series and the
System 2015 have special charging contacts, i.e. these units
can be charged with the accupack inserted. When placed
into the charger, the SK and EK automatically switch off
(exception: the EK 300 IEM must be switched off manually).
Features of the charger:
! Quick charge in approx. 2½ hours (with completely
discharged accupacks and room temperature).
! Automatic detection of full charge and subsequent switching to trickle charge so the accupacks can remain in the
charger even when they have been fully charged.
! Highest possible operational reliability, since correct insertion, temperature and voltage of the accupacks are monitored during charging.
! Long accupack service life because of overcharge protection and recovery of deep-discharged accupacks.
! Up to two accupacks can be charged in any possible combination – i.e. accupacks can be charged in an EK or SK or
separatly.
19
! Up to three chargers can be cascaded together to form a
larger charging station which can be powered by a common mains unit.
Delivery includes
! L 2015 quick charger
! Instructions for use
Suitable mains units are available as accessories (see
”Accessories“ on page 29).
20
Operating controls
Red LED CHARGE/ERROR (2 x)
Green LED READY (2 x)
Charging compartment for BA 2015 accupack (2 x)
Charging compartment for SK/EK of the ew 300 G2 or
ew 500 G2 series and the System 2015 (2 x)
Air vents
DC socket for connection of mains unit
Guiding slot with internal rail (2 x)
21
LED indications
Each charging compartment has two LEDs which indicate
the following operating states:
No LED lit:
The charging compartment is ready
for operation (provided that the
charger is connected to the mains),
no accupack is identified.
All LEDs briefly light The charger has been connected to
up one after the
the mains and is carrying out a self
other:
test.
Red LED lit:
The accupack is being charged.
Red LED flashing: A problem has occured (see ”If problems occur...“ on page 27).
Green LED lit:
22
The accupack is fully charged and
the charger has switched to trickle
charging.
Cascading several chargers
왘 Make sure that the charger is
disconnected
from
the
mains.
왘 Unscrew the two screws at the right bottom side of
the charger.
왘 Slide the two rails out of
the guiding slots and screw
them tight using the two
screws .
왘 Unscrew the two screws at the left bottom side of the
second charger.
왘 Slide the second charger
onto the rails of the first
charger and screw the rails
tight
using
the
two
screws .
Up to three chargers can be
cascaded together with the
rails and can by powered by a common mains unit.
Numbers of chargers
1
up to 3
Mains unit required
NT 1
NT 3
23
Setting up the charger
The charger has four plastic feet to ensure that it cannot slip
on the surface on which it is placed.
Attention!
Some furniture surfaces have been treated with varnish,
polish or synthetics which might cause stains when they
come into contact with other synthetics. Despite a thorough testing of the synthetics used by us, we cannot rule
out the possibility of staining.
Switching the charger on or off
왘 To switch the charger on, insert the hollow jack plug on
the cable of the mains unit
(mains unit must be ordered
separately) into socket .
왘 Connect the mains unit to the
mains.
All LEDs briefly light up one
after the other.
24
Charging the BA 2015 accupack
왘 Insert the accupack into one of the two charging
compartments as shown.
The red LED at the occupied charging compartment
lights up.
Charging
a
completely
discharged accupack takes
approx. 2½ hours at room
temperature. It is normal for
the accupacks to get warm during charging.
However, the charging process may take longer if:
! the accupack is deep-discharged and first has to be reconditioned by a deep discharge recovery charge,
! the ambient temperature is close to or over 40 °C, since,
in order to protect the accupack, the charging process
will be interrupted until the accupack temperature has
fallen to an admissible value.
For safety reasons, the charging process will be interrupted and the red LED will start flashing if:
! excessively hot accupacks cannot cool down,
! an accupack cannot be fully charged within the max.
charging time of 6 hours, e.g. due to overaged cells.
25
왘 After the accupack has been fully charged, the green
LED lights up.
Note:
For charging, the accupacks
can remain in the bodyback
transmitter (SK) or receiver
(EK). Place the unit with
the accupack inserted into the charging compartment
as shown. When placed
into the charger, the EK/SK
automatically switches off
(except for EK 300 IEM).
26
If problems occur...
If a red LED starts flashing, one of the following errors has
occurred at the corresponding charging compartment:
! No contact with the accupack (contacts are dirty or
accupack is not inserted correctly):
Clean the contacts or insert the accupack correctly.
! Accupack is defective (overaged or defective rechargeable
battery cells):
Replace the accupack.
! Accupack temperature is too low or too high:
Always charge the accupack at room temperature.
! Batteries (primary cells) or individual rechargeable batteries have been inserted:
Only charge the BA 2015 accupack!
Care and maintenance
Use a slightly damp cloth to clean the switched-off charger
from time to time. Use a brush or similar to remove dust
from the charging compartments. Do not use any cleansing
agents or solvents.
27
Specifications
Input voltage:
12 V DC via hollow jack socket
Hollow jack:
Input current:
max. 750 mA
Charging voltage:
2 x 2.9 V
Charging current:
2 x 700 mA
Charging principle:
–∆U method
Deep discharge recovery charge
Trickle charge
Accupack temperature monitoring
Over/undercharge detection
Charging time limit (max. 6 h)
BA 2015 battery type: 2 x 1.2 V 1500 mAh, NiMH
Charging time:
approx. 2.5 h with a totally
discharged accupack and at room
temperature,
automatic security switch-off after
6 h at the latest
Operating temperature:0–40 °C
Dimensions:
approx. 145 x 80 x 110 mm
Weight:
approx. 310 g
28
Accessories
BA 2015
Accupack for powering units of the Sennheiser
ew G2 series and the System 2015
NT 1
Mains unit for powering a single L 2015 charger
NT 3
Mains unit for powering up to three cascaded
L 2015 chargers
29
ENGLISH
The guarantee period for this Sennheiser product is 24 months from the date
of purchase. Excluded are accessory items, rechargeable or disposable
batteries that are delivered with the product; due to their characteristics
these products have a shorter service life that is principally dependent on the
individual frequency of use.
The guarantee period starts from the date of original purchase. For this
reason, we recommend that the sales receipt be retained as proof of
purchase. Without this proof (which is checked by the responsible Sennheiser
service partner) you will not be reimbursed for any repairs that are carried
out.
Depending on our choice, guarantee service comprises, free of charge, the
removal of material and manufacturing defects through repair or
replacement of either individual parts or the entire device. Inappropriate
usage (e.g. operating faults, mechanical damages, incorrect operating
voltage), wear and tear, force majeure and defects which were known at the
time of purchase are excluded from guarantee claims. The guarantee is void
if the product is manipulated by non-authorised persons or repair stations.
In the case of a claim under the terms of this guarantee, send the device,
including acces-sories and sales receipt, to the responsible service partner. To
minimise the risk of trans-port damage, we recommend that the original
packaging is used. Your legal rights against the seller, resulting from the
contract of sale, are not affected by this guarantee.
The guarantee can be claimed in all countries outside the U.S. provided that
no national law limits our terms of guarantee.
30
Konformitätserklärung
Sennheiser electronic GmbH & Co. KG erklären, dass dieses
Gerät die anwendbaren CE-Normen und Vorschriften erfüllt.
Approval
Sennheiser electronic GmbH & Co. KG declare that this device
is in compliance with the applicable CE standards and regulations.
Certification
Sennheiser electronic GmbH & Co. KG déclarons que cet
appareil est en conformité avec les normes CE.
Certificazione
Sennheiser electronic GmbH & Co. KG diachiara che questo
apparecchio risponde alle normative e alle prescrizioni CE
applicabili.
Autorizacion
Sennheiser electronic GmbH & Co. KG declara que este aparato cumple las normas y directrices de la CE aplicables.
Vergunning
Sennheiser electronic GmbH & Co. KG verklaren, dat dit toestel voldoet aan de toepasselijke CE-normen en voorschriften.
95
Sennheiser electronic GmbH & Co. KG
30900 Wedemark, Germany
Phone +49 (5130) 600 0
Fax +49 (5130) 600 300
www.sennheiser.com
Printed in Germany
Publ. 01/04
93903/A01