1
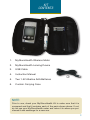
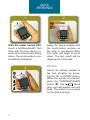
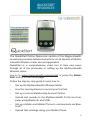
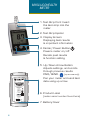
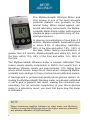
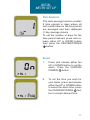
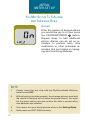
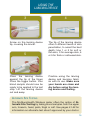
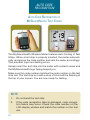
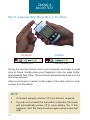
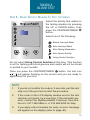
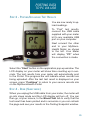
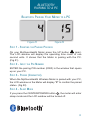
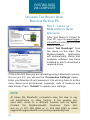
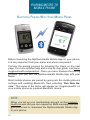
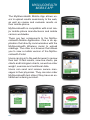
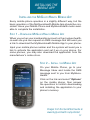
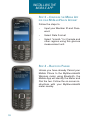
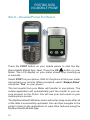
MyGlucoHealth Wireless Meter
Operational Manual
Model MGH-BT1
Rev 5-01.12
IMPORTANT
INFORMATION
MyGlucoHealth provides a quick and easy way for persons with
diabetes to measure and self-monitor blood glucose levels.
It should be used only for testing blood glucose (sugar) and only
with fresh capillary whole blood samples. It should not be used
for the diagnosis of diabetes or for the testing of newborns (neonates).
Do not use the MyGlucoHealth
er than blood glucose testing.
in vitro diagnostic use only.
for any purpose othMyGlucoHealth is for
NOTE:
MyGlucoHealth is accurate provided that testing areas are clean and
dry and contain no foreign substances such as lotions or creams. Lancets must be changed before every test and used only once, reusing
lancets will affect testing accuracy.
Before using the MyGlucoHealth Wireless Meter for the first time, read
all instructions in this manual and the additional information given in
instructions for use of the test strips. Practice for accurate and safe
testing.
Complete instructional videos can be found in the QuickStart section
of the Learning Centre of the MyGlucoHealth web site at www.myglucohealth.ca/quickstart.
You should have oversight from your diabetes care professional for
the proper use of this meter and daily management of your diabetes.
Do not change your therapy due to blood glucose results of MyGlucoHealth without consulting your doctor.
2
KIT
CONTENTS
j
n
k
o
1.
MyGlucoHealth Wireless Meter
2.
MyGlucoHealth Lancing Device
3.
USB Cable
4.
Instruction Manual
5.
Two 1.5V Alkaline AAA Batteries
6.
Custom Carrying Case
l
NOTE:
Prior to use, check your MyGlucoHealth Kit to make sure that it is
unopened and that it contains each of the parts shown above. If not,
do not use your MyGlucoHealth meter and return it to where you purchased it and exchange for a new one.
3
QUICK
REFERENCE
1
2
With the meter turned OFF,
insert a MyGlucoHealth Test
Strip with the logo facing forward and contact leads facing
down. The code number is automatically displayed.
Apply the blood sample until
the confirmation window on
the strip is completely filled.
The meter will begin to count
down. The test result will be
displayed in 3 seconds.
3
4
Optional
Select an activity related to
the test situation by pressing the UP or DOWN button.
When the activity is selected,
press the CENTER/POWER
button
. The
blood
drop icon will appear and will
flash. The meter is now ready
for the blood sample.
QUICKSTART
RESOURCES
The QuickStart Online Resources section of the Myglucohealth.
ca web site provides detailed instructions on all aspects of MyGlucoHealth Wireless meter use and application.
QuickStart is a comprehensive video tool to take new users
through all of the processes of setting up the MyGlucoHealth
Wireless meter.
Log on to www.myglucohealth.ca/quickstart or press the QuickStart button on the home page.
Follow the step by step guide to learn how to:
•
Set up the MyGlucoHealth Wireless Meter.
•
Use the Lancing Device to record your first test.
•
Set up a secure Membership Account Online.
•
Upload test records to the MyGlucoHealth Portal via Computer using Bluetooth and USB.
•
Set up a Meter and Mobile Phone to communicate via Bluetooth®.
•
Upload test readings using your Mobile Phone.
5
MYGLUCOHEALTH
METER
1. Test Strip Port: Insert
the test strip into the
meter
2. Test Strip Ejector
3. Display Screen:
Displaying test results
& important information
4. Center/Power Button
Powers meter on/off.
Recalls past results
& function setting
5. Up/Down Arrow Button:
Adjusts settings, and scrolls
through previous results
(up arrow only)
PAIR/SEND Pair your meter and send test
data using up arrow
1080800001
Blood Glucose Monitoring System
MODEL: MGH-BT1/MGH-1
RATING: 3V 70mA
For use with
MyGlucoHealth
test strips only!
THIS DEVICE COMPLIES
WITH PART 15 OF THE
FCC RULES.
FCC ID:VUG-EHS-MGEU00001
SELF-TESTING
Entra Health Systems
3111 Camino del Rio N., #101
San Diego, CA 92108 USA
[email protected]
+1 877 458 2646
+1 619 684 6232
EC
6
(meter serial number found here)
REP
EMERGO EUROPE
Rev 2-7.11
6. Product Label
0459
7. Battery Cover
LCD
DISPLAY
Low battery warning
Strip code
Blood drop for test,
meter ready for test
P
Alarm
Before having a meal
After having a meal
After medication
After sports activity
Control Solution test
Temperature/Date
mg/dL
mmol/L
Test result unit
Time
Delete
NOTE:
Before you use the MyGlucoHealth Wireless Meter to test your blood
for the first time, practice the procedure using the MyGlucoHealth
Control Solution. When you have completed three tests in a row that
are within the expected range, you are ready to test your blood.
7
METER
ACCURACY
The MyGlucoHealth Wireless Meter and
strip system is one of the most accurate
personal diabetic care products on the
market today. When tested against calibrated laboratory instruments, the MyGlucoHealth Meter meets higher performance
standards when compared to many off-theshelf glucometers.
In glucose concentrations of less than 4,2
mmol/L, MyGlucoHealth tested within plus
or minus 6.5% of laboratory calibration,
89% of the time and within 7.5%, 100% of
the time. When testing concentrations of
greater than 4.2 mmol/L, MyGlucoHealth was within 5%, 65% of
the time, within 10%, 92% of the time and within 15%, 98% of
the time.
The MyGlucoHealth Wireless meter is plasma calibrated. This
makes results directly comparable to HbA1c test results from a
laboratory. Plasma results are approximately 12% higher than
whole blood results. Keep this in mind when comparing MyGlucoHealth test readings to those of whole blood calibrated meters.
A few high-end or professional quality blood glucose meters, including the MyGlucoHealth Wireless meter, are already calibrated
or set to give a “plasma” test result, making this conversion unnecessary. For an accurate comparison of your blood glucose
meter to a laboratory result, you must first know how the meter
is calibrated.
NOTE:
When comparing readings between an older meter and MyGlucoHealth you may see differences due to the higher accuracy standards
and plasma calibration of MyGlucoHealth.
8
TEST
STRIPS
MyGlucoHealth Test Strips May Only Be Used With
MyGlucoHealth Meters
Test Chamber Opening
Confirmation Window
Meter Contacting Leads
(With Meter turned OFF,
Insert test strip into meter with contact
leads facing forward and down)
Storage And Handling Caution
1.
Keep out of direct sunlight.
2.
Store MyGlucoHealth Test Strip vials in a cool, dry place between
2-30°C. Do not refrigerate or freeze.
3.
Make a notation of the discard date on the vial label when you first
open it. Discard remaining MyGlucoHealth Strips 3 months after first
opening vial.
4.
Close the vial cap tightly immediately after removing the MyGlucoHealth Test Strip.
5.
Do not use test strips after the expiration date printed on the package
or vial since it may cause inaccurate results.
6.
Avoid getting dirt, food or water on the test strip. Do not bend, cut or
alter the MyGlucoHealth Test Strip.
7.
MyGlucoHealth Test Strips are for single use only.
8.
Keep the test strip vial away from children.
9.
Refer to the MyGlucoHealth Test Strip Instructions for Use data sheet
for additional information.
WARNING!
If you do not follow these instructions you may
receive incorrect results.
9
INITIAL
METER SET UP
Setting The Meter Date And Time:
Time, date and alarm settings for the MyGlucoHealth Wireless
meter must be set when the unit is initially turned on.
Power On
Press and hold the CENTER/POWER
button for at least 3 seconds
until the year starts flashing.
Year
Press either the UP or DOWN button to set the current year. Press
the CENTER/POWER
button.
The month (MON) will now be
flashing.
Date/Time
mmo/L
Press and release either UP or
DOWN button to set the date and
time. Month is first in sequence
Press the CENTER/POWER
button. Repeat these steps for day,
hour and minutes.
NOTE:
A beeping sound is made to alert when functions are set, including
date, time, testing units and the ability to designate three unique date
averages.
10
INITIAL
METER SET UP
Date Averages
The date average function creates
3 time periods in days where all
test results taken in the time period
are averaged and then displayed
(7 day average shown).
To set the number of days for the
time period desired, press and release either UP or DOWN button
then press the CENTER/POWER
button.
Alarm
1.
Press and release either the
UP or DOWN button to set the
alarm. Press the CENTER/
POWER
button.
2.
To set the time you wish for
your alarm, press and release
either the UP or DOWN button
to select the alarm time, press
the CENTER/POWER
button to accept desired time.
11
INITIAL
METER SET UP
You May Set Up To 5 Alarms
And 3 Average Dates
Alarms
Enter the number of desired alarms
you would like (up to 5) then press
the CENTER/POWER
button.
Repeat steps to add additional
alarms. Alarms can be set as reminders to perform tests, take
medication or other individual reminders that are helpful in managing and monitoring diabetes.
NOTE:
12
1.
Always insert the test strip with the MyGlucoHealth Wireless
meter turned OFF.
2.
Without setting the date properly, the average glucose level and
the results in memory will not show the proper values. You must
set the meter before use and confirm the date is correct when
new batteries are installed.
3.
You cannot test your blood glucose while in the Setting Mode.
4.
Valid years are 2007-2099 inclusive.
BLOOD TEST
PROCEDURES
Materials Needed for Blood Tests
Before testing, be sure to carefully read this section as well as the
test strip instructions found in the test strip box.
Make sure you have all the necessary items to begin testing:
1.
MyGlucoHealth Wireless Meter
2.
MyGlucoHealth Test Strip
3.
Lancing Device
4.
Sterile Lancet
NOTE:
The lancing device and sterile lancets should NOT be shared with
others. To reduce the chance of infection, they are for your personal
use only.
1.
Always use a new, sterile lancet. Lancets are for single use only.
2.
Make sure your hands are clean and completely dry before testing or using your lancing device to collect a drop of blood.
3.
Avoid getting hand lotion, oils, dirt or debris on the lancets and
the lancing device.
13
USING THE
LANCING DEVICE
1
Unscrew the lancing device
tip and insert a lancet firmly
into the carrier.
If a lancet was previously installed in the device, remove
the lancet and reattach the
lancet’s protective cover. Dispose of the used lancet safely.
2
Pinch the lancet and twist off
the protective cover. Do not
discard the lancet cover, as it
must be used to safely re-cover the needle before disposal.
Lancets are keyed to a slot in
the lancing device.
NOTE:
14
1.
The instructions for collecting a drop of blood in Steps 1
through 5 relate to the MyGlucoHealth Lancing Device
that is included in the meter kit. If using another lancing
device, read and follow instructions supplied with that
device.
2.
Lancing devices are for individual use only and not to
be shared. Lancets are SINGLE USE ONLY and are
not to be reused as test results will not be accurate and
BRUISING to the test area could occur. The reuse of a
single use lancet could cause unnecessary additional
pain.
USING THE
LANCING DEVICE
3
Screw on the lancing device
tip, covering the lancet.
5
Place the lancing device
against the tip of the finger
Press the trigger button. Your
blood sample should now be
ready to be applied to the test
strip. Lift the lancing device
out and away.
4
The tip of the lancing device
offers 5 different levels of skin
penetration, to select the best
depth: Use 1 or 2 for soft or
thin skin, 3 for average skin, 4
or 5 for thick or calloused skin.
Practice using the lancing
device and become familiar with its use. Make sure
your hands are clean and
dry before using the lancing device and testing.
Alternate Site Testing
The MyGlucoHealth Wireless meter offers the option of Alternate Site Testing by taking blood samples from the upper
arm, forearm, hand, palm, thigh or calf. See pages 41-42 for
information on alternate test sites if approved by your doctor.
15
AUTO CODE
RECOGNITION
Auto Code Recognition of
MyGlucoHealth Test Strips
The MyGlucoHealth Wireless Meter features Auto Coding of Test
Strips. When a test strip is properly inserted, the meter automatically recognizes the code number and sets the meter accordingly.
This prevents input and testing errors.
Simply insert the test strip into the meter with contacts down and
the MyGlucoHealth logo facing toward you.
Make sure the code number matches the code number on the test
strip vial. The test strip icon with a drop of blood will be flashing at
the top of your screen. You are now ready for testing.
NOTE:
16
1.
Do not bend the test strip.
2.
If the code recognition label is damaged, code recognition failure may occur. Check the code number on the
LCD display window and match the number on the test
vial.
TAKING A
BLOOD TEST
Step 1 Insert A Test Strip
Correct test strip
insert direction
®
Incorrect test strip
insert direction
With the meter turned OFF; insert a MyGlucoHealth Test Strip into
test port on the top of the meter. Insert the strip with the MyGlucoHealth logo facing you and the contacts down. Do not insert the
test strip upside down.
When you insert the strip into the meter, the power automatically
turns on, displaying the code and temperature. After 3 seconds,
the code number and testing temperature will disappear.
NOTE:
1.
Inserting a test strip in the wrong direction will turn the
meter on, but a test cannot be performed.
2.
If the meter does not power ON, pull the test strip out of
the port and re-insert the strip.
3.
Avoid testing in direct sunlight.
17
TAKING A
BLOOD TEST
Step 2 - Lance and Apply Blood Drop to Test Strip
Incorrect
Partially filled
Correct
Completely filled
Using the lancing device, lance your fingertip and draw a small
drop of blood. Gently place your fingertip on the top edge of MyGlucoHealth Test Strip. The blood will automatically draw into the
test strip channel.
Allow your finger to remain on the edge of the strip until you hear
a beep from the Meter.
NOTE:
18
1.
A minimal sample volume of 0.3 µL blood is required.
2.
If you do not conduct the test within 3 minutes, the meter
will automatically power off to save battery life. If this
happens, start the test procedure again using a new test
strip.
TAKING A
BLOOD TEST
Step 3 - Select Activity Relating To Test (optional)
Select the activity that relates to
the testing situation by pressing
the UP or DOWN button, then
press the CENTER/POWER
button.
Select one of the following:
Before Having A Meal
After Having A Meal
After Taking Medication
After Sports Activity
Using Control Solution
Do not select Using Control Solution at this time. This function
is not for testing your blood glucose and results will not be stored
or posted to your records.
Once you press the CENTER/POWER
button, the test icon
will appear flashing on the screen and you are ready to
apply blood for your test.
NOTE:
1.
If you do not confirm the code in 3 seconds, pull the test
strip out of the port and re-start the procedure.
2.
If the code on the LCD display window and on the test
vial does not match, try a new strip. If the mismatch persists, contact the MyGlucoHealth Customer Care Hotline at +1 877 458 2646 or +1 619 684 6232 for help.
3.
If you apply a blood sample too early, an error message
will appear on the display (refer to page 46).
19
TESTING
YOUR BLOOD
Step 4 - Review and Transmit Test Results
mmol/L
mmol/L
After the beep, the test will begin automatically and your results
will appear in 3 seconds. The meter will begin counting down from
3 to 1 on the LCD display window. The LCD window will display
the result of your blood glucose level, temperature and time. The
meter display will alternatively flash between month/day/time of
test and temperature/time of test.
Step 5 - Posting Data to the Portal
You can send your test results to the MyGlucoHealth Portal directly from your computer using Bluetooth or USB or by using the
MyGlucoHealth Mobile App refer to the “MyGlucoHealth Portal
Overview” beginning on page 22.
NOTE:
If the test result is out of the test range, an error message will be
shown on the LCD. Refer to page 45 for details on Troubleshooting
Error Messages.
20
REVIEWING
PREVIOUS RESULTS
Reviewing Previous Results On Your Meter
The MyGlucoHealth Wireless Meter saves up to 250 test results
in its internal memory and records the average glucose level for
a preset number of days (ie. 7, 14, 21). These values can be recalled in the LCD display window at any time. The newest results
will overwrite the oldest, after 250 tests are stored.
Press the CENTER/POWER
button briefly. The newest data
appears. You can check your individual test result data and previously set up averages through pressing the UP
or DOWN
button.
mmol/L
The third
latest
mmol/L
The second
latest
mmol/L
The Latest
mmol/L
7 day average
from test date
mmol/L
mmol/L
14 day average
from test date
21 day average
from test date
Average test result
mmol/L
Test unit
Test result quantity
Average test result days
Press DOWN
Press UP
test result
button: Displaying the previous result
button: Displaying the 7d
14d
21d average
21
MYGLUCOHEALTH
PORTAL OVERVIEW
MyGlucoHealth Portal
Secure Patient Log In
Automated Data Uploads
MyGlucoHealth is an intelligent diabetes management
platform providing comprehensive tools for patients,
clinicians, families and caregivers to improve lives and
lifestyles.
22
MYGLUCOHEALTH
PORTAL OVERVIEW
Easy to Read Charts
The MyGlucoHealth Wireless meter along with the MyGlucoHealth Network offer a comprehensive diabetes management
platform that gives patients more direct control over their care,
while providing clear lines of communication with their clinician,
family and caregivers.
MyGlucoHealth Wireless works in combination with a real time
online data collection network to upload and report patient blood
glucose readings. Using the MyGlucoHealth Portal at www.myglucohealth.ca, patients can digitally transmit and evaluate their daily
readings using their mobile phone, while communicating those
same results automatically to their clinician. This allows the care
team to stay up-to-date and intercede immediately if necessary.
23
MYGLUCOHEALTH
PORTAL OVERVIEW
The MyGlucoHealth Portal is an extensive communication and
data management web site that provides an easy-to-use interface
for automatically collecting test results from the meter. Stored
results are wirelessly transmitted by mobile phone or PC to the
Portal for posting. This is performed automatically using Bluetooth
technology or by connecting a USB cable directly to the meter.
The direct upload process eliminates manual logging of test results, improving accuracy, providing better access to critical data
and removing the opportunity for errors.
On the Portal, readings are charted and interpreted in a number of
ways to best analyze and evaluate blood glucose data. The Portal
is designed to help each patient take “ownership” of their disease,
so they can make better lifestyle choices.
24
MYGLUCOHEALTH
PORTAL OVERVIEW
The MyGlucoHealth Portal allows patients to automatically send
themselves or their care team alerts and reminders about their
changing condition or to remind them to test or take medication.
Alerts and reminders can be sent by email or SMS text message.
Each user can create personalized high or low “threshold” settings for blood glucose levels. The Portal monitors uploaded results and automatically sends an alert to the patient, their family,
physician or caregiver when the threshold is exceeded. In addition, patients can send related health information and secure
messages directly to their physician and schedule appointments
online using the Portal.
25
ACCOUNT
SET UP
Go to www.myglucohealth.ca and click on “Register”.
Upon receipt of your MyGlucoHealth Wireless Meter kit, you are
invited to register for a subscription to the MyGlucoHealth Portal
and mobile application.
To do this, enter the serial number located on the back of the meter along with your email address. Your email address, along with
the password you choose, will serve as your log in to the Portal.
NOTE:
Detailed instructions for downloading, installing, pairing and
using the MyGlucoHealth mobile application and the Portal
can be found at www.myglucohealth.ca/quickstart.
26
POSTING DATA
TO PC VIA USB
Posting Test Results to the MyGlucoHealth Portal
using Your PC and a USB Cable
Step 1 - Install Drivers
To Upload or “Post” test readings to the MyGlucoHealth Portal through your PC using a direct USB connection, begin by
logging into your account on the
Portal.
Go to www.myglucohealth.ca.
Select “Login” from the Home
page. Input your membership
ID and Password to proceed to
your secure account page.
Once logged in, locate the “Get
Readings” button on the upper
right side. If this is the first time
you are uploading using a USB
connection, you will need to
download a driver so that your
MyGlucoHealth meter can communicate with your PC using
USB.
MyGlucoHealth USB Cable
NOTE:
Use of the MyGlucoHealth Portal or mobile application requires subscription to the online service, charges may apply.
Consult your mobile phone carrier for data charges related to
the upload and use of any mobile services.
27
POSTING DATA
TO PC VIA USB
Select “Get Driver”, from the
menu just below the “Get
Readings” button. Follow the
Installation Wizard to complete the process. Your computer may also need Microsoft.NET Framework installed
in order to operate the MyGlucoHealth application. The
system will walk you through
the process of downloading
and installing both programs
as required.
Step 2 - Connection Settings
Once the driver(s) are installed, you are ready to upload readings.
Press the “Get Readings” button again and the MyGlucoHealth
upload program will start up. The first screen you will see is “Connection Settings”. Enter your Member ID and password. Select
your preferences, language, units of measure and date format.
You will only have to do this once. Press “Submit” to update your
settings.
NOTE:
1. The MyGlucoHealth portal requires that any Pop-up Blocker
settings for your Internet browser be disabled.
2. You must have tested your blood and recorded readings
with your MyGlucoHealth Meter before attempting to upload.
28
POSTING DATA
TO PC VIA USB
Step 3 - Posting/Uploading Test Results
You are now ready to upload readings.
To “Post” test results,
connect the USB cable
supplied with your meter
kit to any available USB
port on your computer.
Next connect the other
end to your MyGlucoHealth Meter as shown
to the left. Your Meter
will display “PC” when
the connection is made.
Select the “Start” button on the application pop-up window. The
LCD display on your meter will show time counting up in seconds. The test results from your meter will automatically post
to the Portal. The progress bar will indicate when records are
being uploaded. After the last test result is displayed on your
screen, press “Continue” to return to your secure records site
on the MyGlucoHealth Portal.
Step 4 - Done (Sleep mode)
When you unplug the USB cable from your meter, the meter will
go into sleep mode and the LCD display will turn off. You can
then go, at your leisure, to the Blood Test tab to verify that the
test result has been posted and is accurate or you can refresh
the page and see your results in the Testing Snapshot window.
29
BLUETOOTH
PAIRING TO A PC
Bluetooth Pairing Your Meter to a PC
In order to Connect or “Pair”
your MyGlucoHealth Wireless
meter to communicate with
your PC, you must first set up
your computer to allow Bluetooth connections.
Open the Control Panel on
your PC. If your computer
comes with Bluetooth, you will
see a Bluetooth icon on the
Control Panel.
Bluetooth Devices Control Panel
Double-click the Bluetooth
icon to open the Bluetooth
Devices dialog box. Click the
Options tab and make sure
“Allow Bluetooth devices
to find this computer” and
“Allow Bluetooth devices to
connect to this computer”
are both checked.
Next, click the Devices tab
and click the “Add” button.
This will open the “Add Bluetooth Device Wizard.”
Add Bluetooth Device Wizard
NOTE:
Screen images and Control Panel settings may vary slightly
depending on computer operating system and web browser.
MyGlucoHealth is optimized for most current operating system/browser combinations.
30
BLUETOOTH
PAIRING TO A PC
Bluetooth Pairing Your Meter to a PC
Figure #1
Figure #2
Step 1 - Starting the Pairing Process
On your MyGlucoHealth Meter press the UP button
(pair).
The LCD window will display the operating time count in one
second units. It shows that the Meter is pairing with the PC.
(Fig #1)
Step 2 - Input the Pin Number
ENTER the pairing PIN number (0000) in the window that opens
up on your PC.
Step 3 - Paired (Connected)
When the MyGlucoHealth Wireless Meter is paired with your PC,
the LCD window on the Meter will display “P” to confirm the paired
status. (Fig #2)
Step 4 - Sleep Mode
If you press the CENTER/POWER button , the meter will enter
sleep mode and the LCD window will be turned off.
31
POSTING DATA
VIA COMPUTER
Uploading Test Results Using
Bluetooth On Your PC
Step 1 - Launch the
MyGlucoHealth Online
Application
After Your Meter Is Paired To
Your PC, log in to www.myglucohealth.ca and log in to your
secure account.
Select “Get Readings” from
the menu on the right. The
MyGlucoHealth
application
will automatically check that
available software has been
installed or ask to download a
required driver.
If this is the first time you are uploading using a Bluetooth connection on your PC, you will see the “Connection Settings” menu.
Enter your Member ID and password. You will only have to do this
once. Select your preferences, language, units of measure and
date format. Press “Submit” to update your settings.
NOTE:
At times the Bluetooth connection may fail due to signal interference or other factors. If the posting process fails, move to a different location and try again.
Contact the MyGlucoHealth Customer Care Hotline on +1 877 458 2646 or +1 619 684 6232 or email
[email protected] if posting repeatedly fails.
32
POSTING DATA
VIA COMPUTER
Step 2 - Posting/Uploading Test Results
With the MyGlucoHealth application open, Press the UP button
on your Meter. The LCD display on the Meter will show time
counting up in seconds. The test results from your meter will automatically post to the Portal.
After the last test result is displayed on the screen, press “Continue” to return to your secure account on the MyGlucoHealth Portal.
Step 3 - Done (Sleep mode)
Pressing the CENTER/POWER button
mode and LCD display will turn off.
, the meter enters sleep
You can then go, at your leisure, to the Blood Test tab to verify
the test result has been posted and is accurate or you can refresh
the page and see your results in the Testing Snapshot window.
NOTE:
If you choose not to Post after any test, the test result will be
stored on your meter and not be added until the next time you
Post via your mobile phone or when you connect your meter
to the PC (either via Bluetooth or USB cable).
Although the meter can store up to 250 test results, it is
strongly advised that you post as often as possible and to
take best advantage of the capabilities of MyGlucoHealth, do
not exceed approximately 20 un-posted tests accumulated
on your meter.
33
PAIRING METER TO
MOBILE PHONE
Bluetooth Pairing With Your Mobile Phone
Before launching the MyGlucoHealth Mobile App on your phone,
it is very important that your meter and phone are paired.
Perform the pairing process by following the steps on the next
page. For more detailed help and a step by step guide, visit www.
myglucohealth.ca/quickstart. Once you have finished the pairing
process, you can use the MyGlucoHealth Mobile App with your
Meter.
Most mobile phones are paired by going into the mobile phone’s
settings and enabling Bluetooth, then selecting “Pair New Device.” The name of the meter will appear as “myglucohealth” on
your mobile phone as a paired Bluetooth device.
NOTE:
When you set up your membership account on the myglucohealth.ca web site you can request an SMS message that will
give you a link to download the MyGlucoHealth Mobile App
to your phone.
34
PAIRING METER TO
MOBILE PHONE
Pairing Your Meter To Your Mobile Phone
Figure #1
Figure #2
Step 1 - Begin with Your Mobile Phone
Turn your phone ON. Enable Bluetooth by accessing your phone’s
Network or Connectivity settings. While every phone is slightly
different, this is where to start. If you don’t know how to turn on
Bluetooth or aren’t sure whether your phone supports Bluetooth,
refer to your phone’s user guide.
Begin at the main menu. Turn Bluetooth On. Your phone will
search for Bluetooth signals in the area—you should see a small
Bluetooth icon
displayed on the screen.
Step 2 - Pairing
On your phone go to the section for “Paired Devices.” Select
“Add A New Device.” Press the UP button
(pair) on your
Meter. This will send out a signal that your phone can pick up. The
LCD window will display the operating time count by one second
units. (Figure #1)
Step 3 - Input the Pin Number
When your mobile phone finds the Meter, enter the PIN number
(0000) into the phone to start the pairing process. When the MyGlucoHealth Wireless Meter is paired with your phone, the LCD
window on the Meter will display “P” to confirm the paired status.
(Figure #2)
35
MYGLUCOHEALTH
MOBILE APP
The MyGlucoHealth Mobile App allows users to upload results seamlessly to the web,
as well as review and evaluate results on
their mobile phone.
MyGlucoHealth is compatible with most major mobile phone manufacturers and mobile
carriers worldwide.
There are two components to the MyGlucoHealth Mobile Application. One is an application that directly communicates with the
MyGlucoHealth Wireless meter to upload
readings. The other is a browser that allows
you to view a mobile version of the MyGlucoHealth Portal.
Users can log in to the web browser to review
their last 10 test results, view line charts, pie
charts and histogram charts, as well as enter
weight, exercise and nutritional data.
Users can send and receive secure messages to their physician. They can also order
MyGlucoHealth test strips if they have an established ordering account.
36
INSTALLING THE
MOBILE APP
Installing the MyGlucoHealth Mobile App
Every mobile phone operates in a slightly different way, but the
basic operation of the MyGlucoHealth Mobile App should be consistent. Have your Mobile Phone and MyGlucoHealth meter available to complete the installation.
Step 1 – Download MyGlucoHealth Mobile App
When you set up your membership account on the myglucohealth.
ca web site you can request an SMS message that will send you
a link to download the MyGlucoHealth Mobile App to your phone.
Input your mobile phone number and the system will send you a
link to activate the application and set it up on your phone. For
some phones, you may also download the application from the
manufacturer’s online store.
Step 2 – Install the Mobile App
On your Mobile Phone, go to your
Message Inbox and locate the SMS
message sent to you from MyGlucoHealth.
Click on the link and select “Options”
on the mobile phone, then answer
the questions to confirm downloading
and installing the application to your
phone’s memory.
Images from the QuickStart Guide at
www.myglucohealth.ca/quickstart
37
INSTALLING THE
MOBILE APP
Step 3 – Configure the Mobile App
for your MyGlucoHealth Account
Follow the steps to:
•
Input your Member ID and Password
•
Select Date Format
•
Select “mmol/L” for Canada and
other regions using this glucose
measurement unit.
Step 4 – Bluetooth Pairing
Unless you have already Paired your
Mobile Phone to the MyGlucoHealth
Wireless meter using Bluetooth, the
Mobile App will identify the Meter and
Pair the two. Follow the on-screen instructions with your MyGlucoHealth
meter nearby.
38
POSTING DATA
VIA MOBILE PHONE
Posting Test Results Using Your Mobile Phone
Posting test results to the MyGlucoHealth Portal via a mobile
phone is done using the MyGlucoHealth Mobile App.
Step 1 – Launch the Mobile App on
your Phone
Press Menu on your phone to find your
personal Applications. Select and
open Installations and launch the MyGlucoHealth Mobile App.
Make sure the Mobile App has been:
•
Fully installed
•
You have set up and input your
Member ID and Password
•
Paired your Meter using Bluetooth
to your Mobile Phone.
NOTE:
At times the Bluetooth connection may fail due to signal interference or other factors. If the posting process fails, move to a different location and try again.
Contact the MyGlucoHealth Customer Care Hotline on +1 877 458 2646 or +1 619 684 6232 or email
[email protected] if posting repeatedly fails.
39
POSTING DATA
VIA MOBILE PHONE
Step 2 – Uploading/Posting Test Results
Press the POST button on your mobile phone to start the MyGlucoHealth Mobile App. Next, Press the UP
button on your
Meter. The LCD display on your meter shows time counting up
in seconds.
Select POST on your phone. Wait for the phone to find your meter
and upload your records. When prompted, select “Always Allow”
and press “Yes” on your phone.
The test results from your Meter will transfer to your phone. The
mobile application will automatically post the results to your secure account on the Portal. You will see your last result on your
mobile phone screen.
The MyGlucoHealth Wireless meter will enter sleep mode after all
of the data is successfully uploaded. You can then navigate to the
portal or back to the applications to view other features using the
MyGlucoHealth Mobile App.
40
ALTERNATE SITE
TESTING
Upper Arm
Hand
(Dorsal)
Thigh
The MyGlucoHealth Wireless meter offers the option for alternate
site testing by taking blood samForearm
ples from the upper arm, forearm,
Palm hand, palm, thigh or calf. Using al(Ventral) ternate sites gives the user more
options, but you need to be aware
that blood glucose levels from
these sites may not always be as
accurate as readings from your
Fingertips
fingertips.
Alternate site results differ from fingertip results when glucose levels
are changing rapidly such as after
a meal, after taking insulin, during
exercise, or when you are ill or under stress.
Calf
Diabetes experts recommend the use of blood from a fingertip
rather than an alternate site if:
•
The user believes their blood glucose is low,
•
They don’t regularly have symptoms when their blood glucose is low, or
•
How the user is feeling doesn’t match the results from their
testing at an alternate site.
NOTE:
It is important to consult a physician before testing at alternate sites. Changes in blood glucose levels typically are identified sooner from tests on samples from fingertips than from
samples from alternate sites. Testing during or after a meal,
physical exercise, or any other event that will impact glucose
levels can alter your blood glucose test results. Use fingers
for most accurate testing.
41
ALTERNATE SITE
TESTING
Important Information About
Alternate Site Testing
1.
Consult your physician before testing at alternative sites.
2.
Testing during or after a meal, physical exercise or any other event
that will impact glucose levels can alter your blood glucose test results. Use fingers for most accurate testing.
3.
Test results may differ significantly between alternative site samples
and fingertip samples.
4.
Changes in blood glucose levels typically are identified sooner from
tests on samples from fingertips than from samples from alternate
sites.
5.
Alternative site testing should only be used two or more hours after
meals, physical exercise or any other event that may affect blood
glucose levels.
6.
Testing using a fingertip sample may identify a hypoglycemic (low
blood sugar) level sooner than a test performed at an alternative site.
7.
Use fingertip samples if you are concerned with hypoglycemia (insulin reactions) if you are about to drive a car, particularly if you suffer
from hypoglycemic unawareness (lack of symptoms to indicate an
insulin reaction), as arm testing may fail to detect hypoglycemia.
8.
Alternative site sample testing is NOT recommended for people with
a history of recurring hypoglycemia.
9.
Routine testing before meals can be done at either the fingertip or
alternative test sites.
NOTE:
Wash test sites with soap and water before testing. Be sure that the
area being tested is free from lotions, creams, or any foreign substance and is completely clean and dry before testing. To bring fresh
blood to the surface of test site, rub the test site for a few seconds until
it gets warm. Make sure hands are also clean and dry before testing.
42
CARE OF
YOUR METER
Taking Care Of Your MyGlucoHealth Meter
Cleaning Your Meter and Basic Maintenance
For safe, accurate and long-lasting use of the MyGlucoHealth Wireless
Meter, the meter must be properly cared for.
1.
The meter should be cleaned with a soft cloth or tissue. If necessary, rubbing alcohol can be used to wipe away dirt on the outer
surface of the meter. Do not use chemical solutions such as benzene
or acetone since both of these solutions can harm and damage the
meter surface. When cleaning the meter with rubbing alcohol, DO
NOT pour fluid directly onto the meter, but use the cloth soaked with
a small amount of alcohol. After cleaning the meter, dry completely in
a cool place avoiding direct sunlight.
2.
Do not soak the meter or test strips in water or liquid. Strong electromagnetic fields (e.g. microwave ovens) could disturb the meter
function. Do not put the meter or strips near fire, heat sources or
microwave ovens.
3.
After testing, place the MyGlucoHealth Wireless Meter in the carrying case to prevent loss or damage. Make sure it is placed in a cool
and dry area and out of reach of children. Do not refrigerate. Avoid
exposure to sun.
4.
Close the vial cap tightly immediately after removing the MyGlucoHealth Test Strips. Refer to your MyGlucoHealth Test Strip Instructions for more information.
5.
The lancing device should be cleaned if blood residue is visible after
the test to prevent infections.
6.
Dispose of used testing materials in accordance with local regulations for contaminated materials.
7.
The MyGlucoHealth Wireless Meter may be sent back to the manufacturer for recycling or proper disposal after its useful life. Alternatively the meter may be disposed of in accordance with local laws.
43
BATTERY
INSTALLATION
Installing or Replacing Batteries
mmol/L
The battery shortage mark will appear in the upper left corner of
the LCD display to alert you when the battery power is running
low, indicating new batteries are needed. The MyGlucoHealth
Wireless Meter will not power ON when the battery power is exhausted.
The MyGlucoHealth Wireless Meter uses two 1.5V alkaline batteries (AAA size). The first set of batteries is included with the
meter in the meter kit. When replacing the batteries, use only 1.5V
AAA equivalent alkaline batteries.
Before replacing the batteries, make sure your meter is in the
OFF position. When changing your batteries, match the polarity
symbols (+ or -) printed on the battery case of the meter to the
symbols on the face of the battery.
Note:
You must confirm that the date and time settings are correct
when new batteries are installed. For information on Initial
Meter Set Up see pages 10-12.
44
TROUBLE
SHOOTING
The following charts may help you identify certain problems, but
may not solve all problems that can occur. Contact the Customer
Care Hotline if any problem persists.
Message
Problem
Action Required
Problem with
the meter
Reinstall the batteries in the meter. If the problem persists, call
the MyGlucoHealth Customer
Care Hotline at +1 877 458 2646
or +1 619 684 6232 or email [email protected]
The use of a
polluted test
strip and/or a
used test strip
Test with a new strip
Problem with
the test strip
Try a new test strip. If Er3 display
persists, call the MyGlucoHealth
Customer Care Hotline at +1 877
458 2646 or +1 619 684 6232 or
email support@myglucohealth.
ca. If display blinks with Sun,
avoid direct sunlight and retest.
Problem with
the posting
sequence
Make sure the meter and mobile
are paired and the meter is
linked to the mobile application,
re-launch the mobile application then press up button on the
meter then press “Post” on the
mobile application.
45
TROUBLE
SHOOTING
Message
Problem
Action Required
Problem with
test strip
Re-test with new test strip
The blood
sample was
applied before
the test symbol
Repeat the test with new test
strip. Apply blood only after the
test strip symbol
appears
on the display.
appeared on the
display
The ambient
temperature is
too low
46
Be sure to press the CENTER/
POWER
button after selecting activity to ensure the meter is
ready for blood.
Make sure the meter is within
the operating temperature range
for at least 10 minutes and then
retest.
TROUBLE
SHOOTING
Message
The Meter does
not power on
Problem
Action Required
The ambient
temperature is
too high
Make sure the meter is within
the operating temperature range
for at least 10 minutes and then
retest.
The test result
is lower than
0.3 mmol/L
If Lo message persists; consult a
doctor for assistance.
The test
result is higher
than
33.3 mmol/L
If the HI message persists; consult a doctor for assistance.
Batteries are
dead or there is
a problem with
the meter.
Change the batteries and if the
problem persists, call the MyGlucoHealth Customer Care Hotline
on +1 877 458 2646 or +1 619
684 6232 or email support@
myglucohealth.ca.
47
TROUBLE
SHOOTING
Message
Problem
Action Required
Test does not
start after applying blood sample
Not enough
blood applied
Re-test and apply a sufficient
amount of the blood sample to a
new test trip and retest. You have
up to one minute after starting
to apply blood to the test strip to
apply more blood.
The result is
doubtful
There may be
a problem with
the test strip or
coding function
Re-test with a new strip. Match
code of the meter and of the test
strip vial.
INCONSISTENT OR UNEXPECTED RESULTS:
If you continue to get unexpected test results, check your
meter and test strip using control solution. If meter is not
functioning properly, call the MyGlucoHealth Customer Care
Hotline on +1 877 458 2646 or +1 619 684 6232 or email [email protected].
If you experience symptoms that are not consistent with your
blood glucose test results, make sure you have followed all
testing instructions in this manual then contact your doctor
or healthcare provider. Never ignore symptoms or make any
changes to your diabetes control program without consulting
with your healthcare professional.
48
METER
SPECIFICATIONS
Sample Type
Capillary Whole Blood
Sample Volume
0.3 µL
Test Range
0.6-33.3 mmol/L
Reading Time
3 seconds
Meter Memory
250 tests
Calibration
Auto Coding, Plasma Calibrated
Altitude
Sea Level up to 3048 m
Operating Temp.
10 - 40°C
Operating Humidity
10 - 90%
Strip Storage Temp. 2°- 30°C
Display Type
LCD
Dimensions
52.2 X 98.5 X 23.4 mm
Weight
74.5g
(including batteries)
Power Source
3 V (Alkaline Battery, 1.5V AAA Size X 2)
Battery Life
2,000 Tests
Communication
Communication is available via
Bluetooth® or USB.
Connect Mobile Phone via Bluetooth.
Connect PC via Bluetooth or USB cable.
49
SYMBOLS
Symbol
Description
Consult operating instructions
Expiration Date
This product fulfills the requirements of
Directive 98/79/EC on in vitro diagnostic
medical devices
Caution, consult accompanying documents
In-vitro Diagnostics
Batch Code
Storage Temperature
Do not re-use
Use within 3 months after first opening
Date Manufactured
Electrical waste and electronic equipment
Keep away from sunlight
Manufactured by
SELF TESTING
50
For Self Testing
TESTING
PRINCIPLES
Range Of Expected Values
Self-testing of blood glucose levels provides a great way to control
your diabetes. Consult with your doctor to determine the best range of
expected blood glucose values for you.
The fasting adult blood glucose range for a person without diabetes is
between 3.9 mmol/L and less than 6.1 mmol/L1.
Two hours after meals, normal blood glucose levels should be less
than 7.8 mmol/L2.
For persons with diabetes: your diabetes team will determine the appropriate blood glucose target range individually and jointly with you.
Principles Of Operation
Glucose enzyme oxidase on the MyGlucoHealth test strip reacts with
blood glucose detected in the blood sample. Electrical current is generated and measured and the result is displayed as the blood glucose
level on the meter.
The MyGlucoHealth system features an auto coding system and is
plasma calibrated and offers easy comparison of results with laboratory methods. Other blood glucose meters that are not plasma calibrated may have different results in comparison to MyGlucoHealth
Wireless Meters.
Source:
1.
Stedman’s Medical Dictionary, 27th Edition, 1999 p755.
2.
American Diabetes Association Clinical Practice Recommendations 2004, Diabetes Care,
Vol. 27 Supplement 1, pS9.
Warning!
Inaccurate results may occur in severely hypotensive individuals or
patients in shock.
Inaccurate low results may occur for individuals experiencing a hyperglycemic-hypersmolar state, with or without ketosis.
Critically ill patients should not be tested with blood glucose meters.
51
SYSTEM
LIMITATIONS
The Test Strips Provide Accurate Results When The Following
Constraints Are Observed:
1.
Use only MyGlucoHealth Test Strips with a MyGlucoHealth Wireless
Meter.
2.
Use fresh capillary whole blood only.
3.
Not for neonatal use.
4.
Lancets are for single use only. Do not reuse!
5.
Dehydration may lower test results.
6.
Inaccurate results may occur when in shock, hypotensive, hypoglycemic or hyperosmolar state, with or without ketosis.
7.
Test strips need to be stored between 2°- 30°C and testing is to be
performed between 10 - 40°C (and below altitudes of 3048 m).
The Following Interferences May Affect Test Results:
1.
Extremes in hematocrit may affect test results. Hematocrit levels less
than 20% may cause false high readings. Hematocrit levels greater
than 60% may cause false low readings. If you do not know your
Hematocrit level, consult your health care professional.
2.
Interferences: Acetaminophen, uric acid (vitamin C), and other reducing substances (when occurring in normal blood or normal therapeutic concentrations) do not significantly affect results. However,
abnormally high concentrations in blood may cause inaccurately high
results.
3.
Lipemic samples: Cholesterol up to 27.7 mmol/L or triglyceride up to
166.5 mmol/L do not significantly affect the results. Glucose values;
however, in specimens beyond these levels should be interpreted
with caution.
4.
Blood samples that contain a high concentration of dissolved oxygen
may lower the test result.
5.
Anti-coagulants containing EDTA are recommended to avoid interferences that may affect results.
6.
Dopamine and gentistic acid may interfere with the assay resulting in
falsely elevated results.
52
BLOOD GLUCOSE
CONVERSION
Blood Glucose Conversion Table
mmol/L
0.55 1.0
18
1.5
2.0
2.2
2.5
2.8
3.0
27
36
40
45
mg/dL
10
50
54
mmol/L
3.3 3.9 4.0 4.4 4.7 5.0 5.5 6.0
6.1
mg/dL
60
70
mmol/L
6.7
7.0
mg/dL
120 126 130 135 140 145 150 160
mmol/L
9.0 9.4 10.0 10.5 11.0 11.1 12.0 12.5 13.9
mg/dL
162 170 180 190 196 200 216 225 250
mmol/L
14.4 15.0 16.0 16.6 17.0 18.0 19.0 20.0
mg/dL
260 270 288 300 306 325 342 360
mmol/L
20.8 22.2 23.0 24.0 25.0 26.4 27.7 30.0 33.3
mg/dL
375 400 414 432 450 475 500 540 600
72
7.2
80
7.5
85
90 100 108 110
7.8
8.0
8.2
8.9
53
EC DECLARATION
OF CONFORMITY
54
EC DECLARATION
OF CONFORMITY
55
EC DECLARATION
OF CONFORMITY
EC-Annex IV, Sec.3 of the 98/79
Directive on in Vitro Diagnostic
Medical Devices and EC R&TTE.
0459
Indication of the intended use of
the equipment
Blood Glucose Monitoring System
with built in Bluetooth function (For
self testing only).
Declaration of Conformity (DoC)
Entra Health Systems declares
that this MyGlucoHealth (Blood
Glucose Monitoring System) is
in compliance with the essential
requirements and other relevant
provisions of Directive 98/79/EC.
The declaration of conformity may
be consulted at www.myglucohealth.ca/graphics/EHSDeclaration.pdf
Entra Health Systems
3111 Camino del Rio North
Suite 101
San Diego, California USA 92108
+1 877 458 2646
+1 619 684 6232
EC
56
REP
EMERGO EUROPE
Molenstraat 15
2513 BH, The Hague
The Netherlands
Phone +31.70.345.8570
Fax: +31.70.346.7299
WARRANTY
& SUPPORT
2 Year Limited Warranty
Entra Health Systems warrants the MyGlucoHealth Wireless Meter to be free from defects in materials and workmanship for a
period of 2 years from the date of original purchase. If at any time
during the warranty period the MyGlucoHealth Wireless Meter
does not work for any reason (except for obvious abuse), Entra
Health Systems will replace it with a new meter, or equivalent
product, free of charge.
The warranty policy applies only to the original purchaser of the
meter and does not include the batteries supplied with the meter.
Read your operation manual or contact Entra Health Systems’
Customer Care Hotline for more detailed instructions on using
your blood glucose meter. This warranty is in lieu of all other warranties, and does not cover damage caused by user modification,
misuse, tampering or abuse. This warranty applies only to the
original purchaser and/or its agents once registered.
Customer Service & Support
The toll free MyGlucoHealth Customer Care Hotline is +1 877
458 2646 or +1 619 684 6232. This line is available from 8am to
5pm Pacific Time, Monday through Friday. Outside these hours,
leave a message or send an email to [email protected].
Customer Support will respond within 2 hours on voice messages
or emails received during normal business hours.
It is recommended that you have your serial number available
when contacting us.
57
NOTES
Fill in Member ID, Password and Serial Number below.
Serial Number
Member ID/E-mail Address
Password
The serial number for your
MyGlucoHealth Wireless meter is
located on the back of your meter
at the top. You’ll need your serial
number to log on to the MyGlucoHealth Portal to upload and record
your results.
MyGlucoHealth
Customer Care Hotline
+1 877-458-2646
+1 619 684 6232
M-F 8-5 pm Pacific
(excluding holidays)
58
Copyright © 2012 Entra Health Systems
All rights reserved.
Entra Health Systems
3111 Camino del Rio North, Suite 101
San Diego, California USA 92108
+1 877 458 2646
+1 619 684 6232
www.entrahealthsystems.com
www.myglucohealth.ca
[email protected]
Certain pictures shown in this book are for illustrative purposes only and are
subject to change without notice.
Rev 5-01.12
MyGlucoHealth® is a registered
International Trademark of Entra Health Systems
Bluetooth® wireless technology, Bluetooth chip and related Bluetooth profiles
are all licensed through the Bluetooth SIG.
Any and all trademarks and service marks referenced in this publication are
the property of their registered owners.
YSI is a trademark of YSI Incorporated.