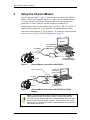
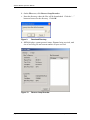
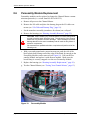
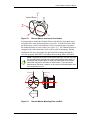
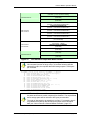
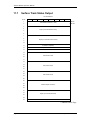
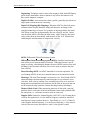
1
Channel Master
Horizontal ADCP
Operation Manual
Click http://www.rdinstruments.com/smartlink/cm/index.shtml to get the latest
documentation changes, Field Service Bulletins, FAQ's, and Product News!
TELEDYNE
P/N 95B-6001-00 (February 2006)
RD INSTRUM ENTS
A Teledyne Technologies Company
Table of Contents
1
Introduction....................................................................................................................................... 1
1.1
1.2
1.3
2
Channel Master Applications ..............................................................................................................1
Getting Started....................................................................................................................................2
Conventions Used in Manuals ............................................................................................................2
System Overview .............................................................................................................................. 3
2.1
2.2
2.3
3
Inventory .............................................................................................................................................3
Visual Inspection of the Channel Master.............................................................................................4
Channel Master Overview...................................................................................................................5
Channel Master Care ........................................................................................................................ 8
3.1
3.2
3.3
4
General Handling Guidelines ..............................................................................................................8
Assembly Guidelines ..........................................................................................................................8
Deployment Guidelines .......................................................................................................................9
Setup the Channel Master ............................................................................................................. 10
4.1
4.2
5
Power Requirements ........................................................................................................................11
What if the Channel Master Does Not Respond ...............................................................................11
Software........................................................................................................................................... 12
5.1
5.2
6
System Requirements.......................................................................................................................12
Software Installation..........................................................................................................................12
Testing Your Channel Master........................................................................................................ 13
7
Recovering Data from the Loop Recorder ................................................................................... 15
7.1
7.2
8
Using WinHADCP to Recover Data ..................................................................................................15
Using BBTalk to Recover Data .........................................................................................................15
Channel Master Maintenance ........................................................................................................ 17
8.1
8.2
8.2.1
8.2.2
8.3
8.4
8.4.1
8.4.2
8.4.3
8.5
8.6
8.7
8.8
8.9
8.9.1
8.9.2
8.9.3
8.10
8.11
8.11.1
8.11.2
8.12
8.12.1
8.12.2
8.12.3
8.13
8.13.1
8.13.2
9
Spare Parts .......................................................................................................................................17
I/O Cable and Dummy Plug ..............................................................................................................18
Disconnecting the I/O Cable or Dummy Plug....................................................................................19
Connecting the I/O Cable or Dummy Plug ........................................................................................19
Housing Assembly Removal .............................................................................................................22
Channel Master Re-assembly...........................................................................................................25
O-Ring Inspection and Replacement ................................................................................................25
Housing Assembly Replacement ......................................................................................................26
Pressure Sensor Calibration and Close-up .......................................................................................27
Firmware Upgrades ..........................................................................................................................28
Personality Module Replacement .....................................................................................................32
Desiccant Bags .................................................................................................................................33
Sealing the Channel Master for a Deployment..................................................................................33
Prevention of Biofouling ....................................................................................................................34
Controlling Biofouling ........................................................................................................................34
Recommended Antifouling Paints .....................................................................................................35
Applying Antifouling Paints................................................................................................................36
Thermistor Maintenance ...................................................................................................................36
Pressure Sensor Maintenance..........................................................................................................37
Pressure Sensor Cavity Oil Fill .........................................................................................................37
Zero the Pressure Sensor .................................................................................................................39
Storage and Shipping Maintenance ..................................................................................................39
Removal of Biofouling .......................................................................................................................39
Transducer Head Inspection .............................................................................................................40
Final Storage or Shipping Preparation ..............................................................................................40
Returning Channel Masters to RDI for Service .................................................................................41
Domestic Shipments .........................................................................................................................41
International Shipments ....................................................................................................................42
Channel Master Installation ........................................................................................................... 44
9.1
Mounting Plate Assembly .................................................................................................................44
9.2
9.3
10
Orientation and Tilt............................................................................................................................44
Installing the Channel Master on Site ...............................................................................................46
Channel Master Commands .......................................................................................................... 48
10.1
10.1.1
10.1.2
10.2
10.2.1
10.3
10.3.1
10.4
10.4.1
10.5
10.5.1
10.5.2
10.5.3
10.6
10.6.1
10.7
10.7.1
Data Communication and Command Format....................................................................................48
Command Input Processing..............................................................................................................48
Data Output Processing ....................................................................................................................49
Command Descriptions.....................................................................................................................50
Miscellaneous Commands ................................................................................................................50
? – Help Menus.................................................................................................................................50
Break ................................................................................................................................................51
Y – Display Banner ...........................................................................................................................51
Control System Commands ..............................................................................................................52
Control System Command Descriptions ...........................................................................................52
CB – Serial Port Control....................................................................................................................52
CF – Flow Control .............................................................................................................................54
CJ – SDI-12 Configuration ................................................................................................................55
CK – Keep Parameters .....................................................................................................................55
CL - Battery Saver Mode ..................................................................................................................56
CR – Retrieve Parameters ................................................................................................................56
CS – Start Pinging (Go) ....................................................................................................................57
CT - Turnkey Operation ....................................................................................................................57
CZ – Power Down Channel Master...................................................................................................58
Environmental Commands................................................................................................................59
Environmental Command Descriptions .............................................................................................59
EC – Speed of Sound .......................................................................................................................59
ED – Depth of Transducer ................................................................................................................59
ES – Salinity......................................................................................................................................60
ET – Temperature.............................................................................................................................60
EX – Coordinate Transformation.......................................................................................................61
EZ – Sensor Source..........................................................................................................................62
Index Velocity and Discharge Commands ........................................................................................63
Channel Description Commands ......................................................................................................64
IA - Area Rating Constants ...............................................................................................................64
IC – Channel Type ............................................................................................................................64
ID - Diameter.....................................................................................................................................65
IE - Transducer Elevation .................................................................................................................65
IP - XY pairs......................................................................................................................................65
Computation Commands ..................................................................................................................67
IB - Bank ...........................................................................................................................................67
IS - Select Velocity Bins ....................................................................................................................67
IV – Velocity Equation Constant........................................................................................................68
Output Commands............................................................................................................................69
IF - Flag Counter...............................................................................................................................69
IO - Q Calculation .............................................................................................................................69
IU - Output Units ...............................................................................................................................69
IT - Output Exponent.........................................................................................................................70
IZ - Zero Volume Accumulator ..........................................................................................................71
Loop Recorder Commands ...............................................................................................................72
Loop Recorder Command Descriptions ............................................................................................72
ME – Erase Recorder .......................................................................................................................72
MM – Show Memory Usage..............................................................................................................72
MN – Set File Name..........................................................................................................................73
MR – Set Recorder On/Off................................................................................................................73
MY – Y-Modem Output .....................................................................................................................74
Performance and Testing Commands ..............................................................................................75
Performance and Testing Command Descriptions............................................................................75
PA – Pre-deployment Tests ..............................................................................................................75
PC – User-Interactive Built-In Tests..................................................................................................75
PC4 – Surface Track Ping.................................................................................................................76
PD – Data Stream Select ..................................................................................................................77
PS – Display System Parameters .....................................................................................................77
10.8
10.8.1
10.9
10.9.1
10.10
10.10.1
10.10.2
10.11
10.11.1
11
Channel Master PD0 Output Data Format .................................................................................... 96
11.1
11.2
11.3
11.4
11.5
11.6
11.7
11.8
11.9
11.10
11.11
12
14
Header Data Format .........................................................................................................................98
Fixed Leader Data Format .............................................................................................................. 100
Variable Leader Data Format.......................................................................................................... 105
Velocity Data Format ...................................................................................................................... 109
Correlation Magnitude, Echo Intensity, Percent-Good Data, and Status Format ............................ 111
Firmware Version Data Format ....................................................................................................... 115
Surface Track Status Output........................................................................................................... 116
Surface Track Amplitude Output ..................................................................................................... 119
Surface Track Commands Output................................................................................................... 121
Binary Reserved BIT Data Format .................................................................................................. 123
Binary Checksum Data Format ....................................................................................................... 123
Channel Master PD14 Output Data Format ................................................................................ 124
12.1
12.2
13
PS1 – Fixed Leader ..........................................................................................................................78
PS2 – Variable Leader ......................................................................................................................78
PS4 – Ping Sequence.......................................................................................................................79
PT - Built-In Tests .............................................................................................................................79
PT0 - Help.........................................................................................................................................79
PT3 - Receive Path...........................................................................................................................79
Sensor Commands ...........................................................................................................................81
Sensor Command Descriptions ........................................................................................................81
SZ – Zero Pressure Sensor ..............................................................................................................81
ST – Temperature Units....................................................................................................................81
Timing Commands............................................................................................................................82
Standard Timing Command Descriptions .........................................................................................82
TD – Built-In Watchdog Timer...........................................................................................................82
TE – Time Per Ensemble ..................................................................................................................83
TF – Time of First Ping .....................................................................................................................84
TP – Time Between Pings.................................................................................................................85
TS – Set Real-Time Clock.................................................................................................................86
Vertical Beam Commands ................................................................................................................87
Vertical Beam Command Descriptions .......................................................................................87
VD – Vertical Beam Data Out ...........................................................................................................87
VF – Vertical Beam Blank after Transmit ..........................................................................................88
VP – Vertical Beam Number of Pings per Ensemble ........................................................................88
Expert Level Vertical Beam Command Descriptions ..................................................................89
#VC – Detection Filter, Pressure & Range Screening Control ..........................................................89
Water Profiling Commands ...............................................................................................................90
Water Profiling Command Descriptions......................................................................................90
WA – False Target Threshold Maximum...........................................................................................90
WB – Mode 1 Bandwidth Control ......................................................................................................91
WC – Low Correlation Threshold ......................................................................................................91
WD – Data Out..................................................................................................................................92
WF – Blank after Transmit ................................................................................................................93
WN – Number of Cells ......................................................................................................................93
WP – Pings per Ensemble ................................................................................................................94
WS – Cell Size ..................................................................................................................................94
WV – Ambiguity Velocity ...................................................................................................................95
Format ............................................................................................................................................ 124
Invalid Data ..................................................................................................................................... 124
Channel Master PD19 Output Data Format ................................................................................ 126
How to Decode a Channel Master Ensemble............................................................................. 127
14.1
14.2
14.3
14.4
Rules for the Channel Master Data Format PD0............................................................................. 127
Recommended Data Decoding Sequence for Data Format PD0 .................................................... 128
Pseudo-Code for Decoding PD0 Ensemble Data ........................................................................... 128
Example Code for Decoding Channel Master Ensembles .............................................................. 129
15
Specifications ............................................................................................................................... 132
15.1
15.2
Outline Installation Drawings........................................................................................................... 134
Mounting Plate Drawing .................................................................................................................. 137
16
Technical Support ........................................................................................................................ 137
17
Glossary ........................................................................................................................................ 138
List of Figures
Figure 1.
Figure 2.
Figure 3.
Figure 4.
Figure 5.
Figure 6.
Figure 7.
Figure 8.
Figure 9.
Figure 10.
Figure 11.
Figure 12.
Figure 13.
Figure 14.
Figure 15.
Figure 16.
Figure 17.
Figure 18.
Figure 19.
Figure 20.
Figure 21.
Figure 22.
Figure 23.
Figure 24.
Figure 25.
Figure 26.
Figure 27.
Figure 28.
Figure 29.
Figure 30.
Figure 31.
Figure 32.
Figure 33.
Figure 34.
Channel Master Inventory ............................................................................................... 4
Channel Master (300 kHz) Overview............................................................................... 6
Channel Master Transducer (1200 kHz) with Mounting Plate.......................................... 7
Channel Master Housing View ........................................................................................ 7
Channel Master Connections with RS-232.................................................................... 10
Channel Master Connections with RS-232 to RS-422 Adapter...................................... 10
Channel Master Connections with SDI12 ...................................................................... 11
Connecting to the Channel Master with BBTalk............................................................. 15
Download Directory....................................................................................................... 16
Recover Loop Recorder ................................................................................................ 16
Connecting and Disconnecting the I/O Cable................................................................ 18
RS232/RS422 I/O Cable Overview and Wiring Diagram ............................................... 20
SDI-12 I/O Cable Overview and Wiring Diagram........................................................... 21
Removing the Housing .................................................................................................. 22
Disconnecting the Internal I/O Cable............................................................................. 23
Channel Master Assembly............................................................................................. 24
CMFlash Upgrade Utility Program................................................................................. 29
Personality Module........................................................................................................ 32
Barnacle Damage ......................................................................................................... 34
Filling the Pressure Sensor Cavity with Oil.................................................................... 38
Mounting Plate Assembly .............................................................................................. 44
Channel Master Instrument Coordinates ....................................................................... 45
Channel Master Mounting Pitch and Roll ...................................................................... 45
Channel Master Mounting Plate Overview .................................................................... 47
PD0 Standard Output Data Buffer Format ..................................................................... 97
Binary Header Data Format........................................................................................... 98
Fixed Leader Data Format .......................................................................................... 101
Variable Leader Data Format ...................................................................................... 106
Velocity Data Format ................................................................................................... 109
Binary Correlation Magnitude, Echo Intensity, Percent-Good Data, and Status Format111
Surface Track Status Output ....................................................................................... 117
Surface Track Amplitude Output.................................................................................. 119
Binary Reserved BIT Data Format............................................................................... 123
Binary Checksum Data Format ................................................................................... 123
List of Tables
Table
Table
Table
Table
Table
Table
Table
Table
Table
Table
Table
Table
Table
Table
Table
Table
Table
Table
Table
Table
Table
Table
Table
Table
Table
Table
Table
Table
Table
Table
Table
Table
Table
Table
Table
Table
Table
Table
1:
2:
3:
4:
5:
6:
7:
8:
9:
10:
11:
12:
13:
14:
15:
16:
17:
18:
19:
20:
21:
22:
23:
24:
25:
26:
27:
28:
29:
30:
31:
32:
33:
34:
35:
36:
37:
38:
Channel Master Application Guide .................................................................................. 1
Visual Inspection Criteria................................................................................................. 4
Channel Master Software Main Modules....................................................................... 12
Spare Parts ................................................................................................................... 17
RS232 Personality Module (P/N 72B2006) ................................................................... 20
RS422 Personality Module (P/N 72B2008) ................................................................... 20
SDI-12 Personality Module (P/N 72B 2005) .................................................................. 21
Serial Port Control......................................................................................................... 52
Baud Rate ..................................................................................................................... 53
Flow Control .................................................................................................................. 54
Retrieve Parameters ..................................................................................................... 56
Coordinate Transformation Processing Flags................................................................ 61
Sensor Source Switch Settings ..................................................................................... 62
Data Stream Selections................................................................................................. 77
Bandwidth Control ......................................................................................................... 91
Data ID Codes............................................................................................................... 96
Header Data Format...................................................................................................... 99
Fixed Leader Data Format .......................................................................................... 102
Variable Leader Data Format ...................................................................................... 107
Velocity Data Format ................................................................................................... 110
Correlation Magnitude Data Format ............................................................................ 112
Echo Intensity Data Format......................................................................................... 112
Percent-Good Data Format ......................................................................................... 114
Status Data Format ..................................................................................................... 114
Firmware Version Data Format.................................................................................... 115
Surface Track Status Output ....................................................................................... 118
Surface Track Amplitude Output.................................................................................. 120
Surface Track Commands Output ............................................................................... 122
Reserved for RDI Format ............................................................................................ 123
Checksum Data Format .............................................................................................. 123
Channel Master PD14 Output Data Format................................................................. 125
PD19 Output Data Format........................................................................................... 126
Common Data Format IDs........................................................................................... 127
Velocity Profiling (Broadband Mode) Specifications .................................................... 132
Transducer Specifications ........................................................................................... 132
Power Specifications ................................................................................................... 133
Standard Sensors Specifications ................................................................................. 133
Communications Specifications................................................................................... 133
NOTES
Channel Master Operation Manual
TELEDYNE
RD INSTRUM ENTS
A Teledyne Technologies Company
Channel Master Operation Manual
1
Introduction
Thank you for purchasing the RD Instruments (RDI) Channel Master Horizontal Acoustic Doppler Current Profiler.
Channel Master deployments are most often Real-Time. Real-Time use refers to the fact you are viewing the data as the Channel Master collects it
via a personal computer. This data is also stored on the computer to allow
for data playback and processing at a later time.
NOTE. When you receive your Channel Master, review the Channel
Master Quick Start Guide to see all of the pieces you should have in your
box. If anything is missing or damaged, contact RD Instruments
immediately.
NOTE. When an addition or correction to the manual is needed, an Interim
Change Notice (ICN) will be posted to our web site on the Customer
Service page (www.rdinstrument.com). Please check our web site often.
NOTE. Click http://www.rdinstruments.com/smartlink/cm/index.shtml to get
the latest documentation changes, Field Service Bulletins, FAQ's, and
Product News!
1.1
Channel Master Applications
The Channel Master provides customers with reliable and repeatable
measurements of the horizontal current profile across a body of water at a
set depth, and displays the results through its user-friendly WinHADCP
software. For detailed information on how to use WinHADCP, see the
WinHADCP User’s Guide.
Table 1:
Channel Master Application Guide
Estuaries/River
Channel Master using WinHADCP
•
Horizontal current profiles velocity vs. range
•
Suspended sediment load estimation
•
Discharge Monitoring
P/N 95B-6001-00 (February 2006)
page 1
Channel Master Operation Manual
1.2
Getting Started
You are probably eager to get started, but take a moment to read a few
words of guidance. We strongly recommend you read all of the provided
documentation to learn the full capabilities of your Channel Master.
All documentation is being provided to you on CD in a fully searchable,
printable, electronic format. This way, information is always available,
whether you are at the office or in the field, and the electronic format is an
environmentally friendly way to provide a large set of technical manuals.
The documentation for each software program is located on the software
program's CD.
To purchase a printed copy of the system documentation (includes the
Channel Master Operation Manual and software guides), contact our Customer Service department at [email protected] or call (858)-6931178 and order the Channel Master Manual kit (P/N 75BK6000).
1.3
Conventions Used in Manuals
Conventions used in the Channel Master documentation have been established to help you learn how to use the Channel Master quickly and easily.
Windows menu items are printed in bold: File menu, Collect Data. Items
that need to be typed by the user or keys to press will be shown as F1. If a
key combination were joined with a plus sign (ALT+F), you would press and
hold the first key while you press the second key. Words printed in italics
include program names (BBTalk) and file names (default.txt).
Code or sample files are printed using a fixed font. Here is an example:
Horizontal ADCP
RD Instruments (c) 2005
All rights reserved.
Product Version: CM02.04
>?
You will find three other visual aids that help you.
NOTE. This paragraph format indicates additional information that may
help you avoid problems or that should be considered in using the
described features.
CAUTION. This paragraph format warns the reader of hazardous
procedures (for example, activities that may cause loss of data or damage to
the Channel Master).
Recommended Setting. This paragraph format indicates additional
information that may help you set command parameters.
page 2
Teledyne RD Instruments
Channel Master Operation Manual
2
System Overview
The Channel Master is designed to measure real-time horizontal current
profiles from a permanent fixed mount. The Channel Master system consists of a Channel Master Horizontal ADCP, cables, and software. The input power requirements for the Channel Master are +10 to 18 VDC. The
Channel Master system requires the addition of a Windows® compatible
computer to collect data.
2.1
Inventory
You should have the following items
•
Channel Master Horizontal ADCP
•
I/O cable (the type of I/O cable sent depends on what Personality Module is installed – see Figure 12, page 20 and
Figure 13, page 21)
•
Channel Master Quick Start Guide
•
Channel Master Documentation CD
•
WinHADCP software CD
•
RDI Tools software CD
•
Tools and Spare Parts kit
•
Shipping crate (please save all foam for reshipping use)
•
Stainless Steel Mounting Plate and hardware
P/N 95B-6001-00 (February 2006)
page 3
Channel Master Operation Manual
SHIPPING CRATE
DUMMY PLUG
(INSTALLED ON H-ADCP)
DOCUMENTATION CD
WinHADCP CD
RDI Tools CD
I/O CABLE
MOUNTING PLATE KIT
Figure 1.
2.2
CHANNEL MASTER H-ADCP
TOOLS AND SPARE PARTS KIT
Channel Master Inventory
Visual Inspection of the Channel Master
Inspect the Channel Master using Table 2 and Figure 2, page 6 through
Figure 4, page 7. If you find any discrepancies, call RDI for instructions.
Table 2:
page 4
Visual Inspection Criteria
Item
Inspection Criteria
Channel Master
H-ADCP
Check the urethane faces. There should be no gouges,
dents, scrapes, or peeling.
I/O connector
Check the I/O connector for cracks or bent pins.
I/O Cable
Check the cable connectors for cracks or bent pins.
Teledyne RD Instruments
Channel Master Operation Manual
2.3
Channel Master Overview
The Channel Master instrument contains two horizontal and one vertical
transducer ceramics and the electronics. The standard acoustic frequencies
for the horizontal transducers are 1200 kHz, 600 kHz, and 300 kHz. The
standard frequency for the vertical beam is 600 kHz. See “Outline Installation Drawings,” page 134 for dimensions and weights.
I/O Cable Connector – Input/Output (I/O) cable connects the Channel Mas-
ter to the computer.
Urethane Face – The urethane face covers the transducer ceramics. Never
set the transducer faces on a hard/rough surface. The urethane faces may be
damaged.
Housing – The standard housing allows deployment depths to 200M.
Thermistor – The Thermistor measures the water temperature.
Pressure Sensor (depth) – The pressure sensor measures water pressure.
Tilt Sensor – The internal tilt sensor measures pitch and roll of the Channel
Master.
Transducer Head – The electronics and transducer ceramics are mounted to
the transducer head.
NOTE. The Channel Master uses X-Y Instrument Coordinates. The
positive X direction is from transducer Beam 2 to transducer Beam 1. The
Y-axis is perpendicular to the X-axis (see Figure 22, page 45).
P/N 95B-6001-00 (February 2006)
page 5
Channel Master Operation Manual
VERTICAL BEAM
I/O CABLE
BEAM 1
BEAM 2
THERMISTOR
TRANSDUCER HEAD
URETHANE
FACES
I/O CABLE
STRAIN RELIEF
HOUSING
I/O CABLE
CONNECTOR
PRESSURE SENSOR
(ON BOTTOM)
Figure 2.
page 6
Channel Master (300 kHz) Overview
Teledyne RD Instruments
Channel Master Operation Manual
Figure 3.
Channel Master Transducer (1200 kHz) with Mounting
Plate
Figure 4.
Channel Master Housing View
P/N 95B-6001-00 (February 2006)
page 7
Channel Master Operation Manual
3
Channel Master Care
This section contains a list of items you should be aware of every time you
handle, use, or deploy your Channel Master. Please refer to this list often.
3.1
3.2
General Handling Guidelines
•
Never set the Channel Master on a hard or rough surface.
The urethane faces may be damaged.
•
Always remove the retaining strap on the end-cap underwater-connect cable and dummy plug when disconnecting them.
Failure to do so will break the retainer strap.
•
Disconnect the I/O cable by pulling it off in a straight in-line
motion. Stressing the end-cap connector may cause the
Channel Master to flood.
•
Do not expose the transducer faces to prolonged sunlight.
The urethane faces may develop cracks. Cover the transducer faces on the Channel Master if it will be exposed to
sunlight.
•
Do not expose the I/O connector to prolonged sunlight. The
plastic may become brittle. Cover the connector on the
Channel Master if it will be exposed to sunlight.
•
Do not store the Channel Master in temperatures over 75
degrees C. The urethane faces may be damaged. Check
the temperature indicator inside the shipping case. It changes
color if the temperature limit is exceeded.
•
Do not scratch or damage the O-ring surfaces or grooves. If
scratches or damage exists, they may provide a leakage
path and cause the Channel Master to flood. Do not risk a
deployment with damaged O-ring surfaces.
•
Do not lift or support a Channel Master by the external I/O
cable. The connector or cable will break.
Assembly Guidelines
•
page 8
Read the Maintenance section for details on Channel Master
re-assembly. Make sure the housing assembly O-rings stay
in their groove when you re-assemble the Channel Master.
Tighten the hardware as specified. Loose, missing, stripped
hardware, or damaged O-rings can lead to water ingress
and damage to the Channel Master.
Teledyne RD Instruments
Channel Master Operation Manual
3.3
•
The Channel Master uses Titanium hardware for the transducer housing and strain relief. These hardware sets are expensive and difficult to purchase locally. Don’t loose or
substitute other metal hardware.
•
Place a light amount of DC-111 lubricant on the end-cap
connector pins (rubber portion only). This will make it easier to connect or remove the I/O cable and dummy plug.
•
Do not connect or disconnect the I/O cable with power applied. When you connect the cable with power applied, you
may see a small spark. The connector pins may become
pitted and worn.
•
The I/O cable is wet mate-able, not underwater mate-able.
Deployment Guidelines
•
Read the Channel Master Quick Start Guide and the Software
User’s Guides. These guides have tutorials to help you
learn how to use the Channel Master.
•
The instrument should be electrically isolated from any
mounting structure to avoid electrolysis problems.
P/N 95B-6001-00 (February 2006)
page 9
Channel Master Operation Manual
4
Setup the Channel Master
Figure 5 through Figure 7, page 11 illustrates how to connect the Channel
Master cable to your computer and power. Make sure the Channel Master
is resting with the vertical beam facing upward or on its housing end to
protect the I/O cable connector and the transducer urethane faces.
Channel Master units are pre-configured to use RS-232, RS-422, or SDI-12
communications protocols. Your computer’s communication port must
match the Channel Master, or use an adapter. To change the communication
protocol, see “Personality Module Replacement,” page 32.
BBTalk
To COMPUTER
SERIAL PORT
I/O CABLE
RED = Pos (+)
BLACK = Neg (-)
12 VDC BATTERY
or POWER SUPPLY
H-ADCP
Figure 5.
Channel Master Connections with RS-232
Disconnect Cable here
To COMPUTER
SERIAL PORT
BBTalk
RS232 to RS422
Adapter
I/O CABLE
RED = Pos (+)
BLACK = Neg (-)
H-ADCP
Figure 6.
12 VDC BATTERY
or POWER SUPPLY
Channel Master Connections with RS-232 to RS-422
Adapter
NOTE. If you ordered the RS-422 configuration, the Channel Master is
supplied with a RS-232 to RS-422 converter. The RS-232 to RS-422
converter must be disconnected from the Channel Master when the cable
has been disconnected from the computer. If left connected, the internal
battery used to maintain ROM inside the Channel Master can be drained or
false Breaks may be sent.
page 10
Teledyne RD Instruments
Channel Master Operation Manual
NOTE. The RS-232 to RS-422 converter supplied with the Channel
Master is powered by the computer’s COM port. It may be necessary to
use a different converter when very long communication lines are used
(maximum 1300 meters).
BBTalk
To COMPUTER
SERIAL PORT
I/O CABLE
BLUE = SDI12
BLACK = GND
BLACK = Neg (-)
RED = Pos (+)
H-ADCP
Figure 7.
4.1
12 VDC BATTERY
or POWER SUPPLY
Channel Master Connections with SDI12
Power Requirements
The Channel Master requires a DC supply between 10 volts and 18 volts.
Either an external DC power supply or battery can provide this power. If
you are using a battery, use the largest rated amp-hour battery as possible.
A fully charged 48Ah battery should last five days powering a 600-kHz
Channel Master.
NOTE. Check that the battery voltage is above 10 Volts DC. Channel
Masters will work at 10 volts; however, batteries with voltages below 11
volts are at or near their end of life and are approaching uselessness.
4.2
What if the Channel Master Does Not Respond
If your Channel Master does not respond, check the following items.
a. Is the I/O cable connected from your computer’s COM port to the
Channel Master?
b. Is power connected to the Channel Master I/O Cable?
c. Check the communication setup using BBTalk. See the RDI Tools
User’s Guide for detailed help on using BBTalk. The computer and the
Channel Master must be using the same baud rate and COM port.
d. If wakeup still does not occur, contact RD Instruments.
P/N 95B-6001-00 (February 2006)
page 11
Channel Master Operation Manual
5
Software
RDI has utility programs to help you set up, use, test, and trouble-shoot
your Channel Master. Each program has a help file that you can print, or
you can view help while running the program.
Table 3:
5.1
Channel Master Software Main Modules
Program Name
Description
BBTalk
Windows Channel Master communication program. Use this program to "talk"
to the Channel Master and to run test script files. BBTalk is included on the RDI
Tools CD. For detailed information on how to use BBTalk, see the RDI Tools
User's Guide.
WinHADCP
Windows WinHADCP software is used for data acquisition, data display and
data archiving. It is recommended to use the default settings supplied by RD
Instruments. For detailed information on how to use WinHADCP, see the WinHADCP User's Guide.
Documentation CD
The Documentation CD has an Adobe Acrobat® (*.pdf) electronic version of the
Channel Master Technical Manual. Use the Documentation CD to search for
information.
System Requirements
The Channel Master software requires the following:
•
•
•
•
•
•
5.2
Windows 95®, Windows 98®, or Windows® NT 4.0 with
Service Pack 4 installed, Windows 2000®, Windows XP®
Pentium class PC 233 MHz (350 MHz or higher recommended)
32 megabytes of RAM (64 MB RAM recommended)
6 MB Free Disk Space (20 MB recommended)
One Serial Port (two High Speed UART Serial Ports recommended)
Minimum display resolution of 800 x 600, 256 color (1024 x
768 recommended)
Software Installation
To install the Channel Master software, do the following.
a. Insert the compact disc into your CD-ROM drive and then follow the
browser instructions on your screen. If the browser does not appear,
complete Steps “b” through “d.”
b. Click the Start button, and then click Run.
c. Type <drive>:launch. For example, if your CD-ROM drive is drive D,
type d:launch.
d. Follow the browser instructions on your screen
page 12
Teledyne RD Instruments
Channel Master Operation Manual
6
Testing Your Channel Master
Use the following steps to test the Channel Master.
a. Interconnect and apply power to the system as described in “Setup the
Channel Master,” page 10.
b. Start the BBTalk program (for help on using BBTalk, see the RDI Tools
User’s Guide).
c. On the File menu, click Break (you can also press the End key to send
a break or use the Toolbar and press the B button). You should see the
wakeup message appear on the log file window.
Horizontal ADCP
RD Instruments (c) 2005
All rights reserved.
Product Version: CM02.04
>
d. At the “>” prompt in the communication window, enter the direct command CR1 then press the Enter key. This will set the Channel Master to
the factory default settings.
e. At the “>” prompt in the communication window, enter the direct command CK then press the Enter key. This will save the factory default
setting.
f. At the “>” prompt in the communication window, enter the direct command PS0 then press the Enter key. This will display the Channel Master system configuration data.
>PS0
Serial Number:
Frequency:
Configuration:
Transducer Type:
Beam Angle:
Beam Pattern:
Sensors:
Product Version:
CPU Firmware:
FPGA Version:
Sensor Boot:
Sensor Firmware:
Board Serial
24 00 00 00
15 00 00 00
A8 00 00 00
E3 00 00 00
DC 00 00 00
90 00 00 00
>
5813
1228800 Hz
HADCP: 2-beam velocity + vertical stage.
PISTON
20 Degrees
CONVEX
TEMP PRESS TILTS
CM02.04
28.28f
2.00.003
32.02
33.03
Number Data:
32 23 40 23
31 65 DC 23
10 66 B6 23
1F CD 99 23
31 CA 43 23
31 AB 7F 23
P/N 95B-6001-00 (February 2006)
SNS72B-1000-00A
PIO72B-2001-00B
XDR71B-1007-00A
PER72B-2006-00X
RCV72B-2003-09A
DSP72B-2002-00A
page 13
Channel Master Operation Manual
g. At the “>” prompt in the communication window, enter the direct command PA then press the Enter key. This will run the Channel Master
Pre-Deployment test.
>PA
RAM test...........PASS
GO
>
h. If the wakeup, PS0 and PA message display, the Channel Master is functioning normally.
page 14
Teledyne RD Instruments
Channel Master Operation Manual
7
Recovering Data from the Loop Recorder
The loop recorder contains approximately two megabytes of solid-state
nonvolatile memory, which can be used to continuously record data. If
more data is collected than fits in the memory, the oldest data will be overwritten with the newest data. You always have up to the last two megabytes
of data available for download.
7.1
Using WinHADCP to Recover Data
a. On the Tools menu, click Recover CM Recorder.
b. Select the folder where the files will be downloaded. Click OK.
c. When the download is complete, click OK.
7.2
Using BBTalk to Recover Data
Use BBTalk to recover data from the loop recorder.
NOTE. You must use BBTalk version 3.04 or greater. Older versions of
BBTalk do not have the Loop Recorder functions.
a. Start BBTalk. Configure BBTalk to connect to a Channel Master ADCP
type device (see the RDI Tools User’s Guide for details on using
BBTalk).
Figure 8.
Connecting to the Channel Master with BBTalk
CAUTION. Make sure you select Channel Master as the Device. BBTalk
will communicate with the Channel Master if you select WorkHorse as the
device, but will not be able to recover the recorder.
P/N 95B-6001-00 (February 2006)
page 15
Channel Master Operation Manual
b. On the File menu, click Recover Loop Recorder.
c. Enter the directory where the files will be downloaded. Click the “…”
button to browse for the directory. Click OK.
Figure 9.
Download Directory
d. BBTalk displays current protocol status, filename being received, total
size of receiving file and current number of bytes received.
Figure 10.
page 16
Recover Loop Recorder
Teledyne RD Instruments
Channel Master Operation Manual
8
Channel Master Maintenance
This section explains how to prepare the Channel Master for deployment,
how to do certain maintenance, and how to prepare the Channel Master for
storage or shipment.
8.1
Spare Parts
The following parts are included in the spare parts kit.
Table 4:
Spare Parts
Description
Part number
O-ring, face
2-254
Desiccant, sealed bag
DES3
Lubricant, silicone, 4-pack
5020
Kit, fill, silicone oil
75BK6004-00
Copper screw
817-1067-00
Washer, 6mm Split Lock SST316
M6WASHSPL
Washer, 6mm Split Lock Titanium
M6WASHSPLTI
Washer, Flat, 12.5MMOD, Titanium
M6WASHSTDTI
Washer, Flat, 12.5MMOD, SST316
M6WASHSTD
Screw, Flat Head, Socket Head, SST 18-18
M6X1.0X16FHSH
Screw, Titanium
M6x1.0x16HHTI
Screw, Titanium
M6X1.0X25HHTI
Screw, Hex Head, SST 18-8
M6X1.0X35HH
P/N 95B-6001-00 (February 2006)
page 17
Channel Master Operation Manual
8.2
I/O Cable and Dummy Plug
The I/O cable connector (on the Channel Master housing) and the I/O cable
and dummy plug are molded wet-mate connectors. The I/O cable connector
is a factory-installed item. We do not recommend removing it for any routine maintenance.
NOTE. The dummy plug should be installed any time the I/O cable is
removed. Use the dummy plug when the Channel Master is in storage or
is being handled.
Strain Relief
(Removed)
Retaining Strap
Straight Out Motion
Figure 11.
page 18
Connecting and Disconnecting the I/O Cable
Teledyne RD Instruments
Channel Master Operation Manual
8.2.1
Disconnecting the I/O Cable or Dummy Plug
The I/O cable should be disconnected with a straight outward motion only.
Use the following procedure to disconnect the cable.
CAUTION. When disconnecting the Channel Master I/O cable, do not
apply any upward force on the connector as it is being pulled off. Applying
an upward angle as the cable is disconnected puts stress on the end-cap
connector. This may cause several serious problems: a) The housing
connector or connector pins can crack. b) The O-ring on the bottom of the
housing connector can be damaged. c) The molded urethane on the
housing connector may separate from the brass insert. If the housing
connector is damaged in any of these ways, your Channel Master will
flood.
a. Remove the strain relief. Save all hardware.
b. Release the retaining strap by pulling it over the connector.
CAUTION. Failure to release the retaining strap before removing the cable
will break the retainer strap.
c. Grasp the cable close to the housing (see Figure 11, page 18). Your
thumb should rest on top of the connector or against the edge of the
housing. Do not try to fit your hand under the cable as it passes over
the housing. This is what causes the upward force!
d. Pull the cable straight out away from the housing with a gentle side-toside rocking motion. Do not apply any upward force on the connector
as it is being disconnected.
e. Install the dummy plug to protect the I/O cable connector pins.
8.2.2
Connecting the I/O Cable or Dummy Plug
The cable should be connected with a straight inward motion only. Use the
following procedure to connect the cable.
a. Apply a light coat of DC-111 lubricant to the rubber portion of the housing I/O cable connector pins. This will help seat the connector.
b. Gently push the cable or dummy plug straight in toward the housing
connector. Do not apply any upward force on the connector as it is being connected.
c. Roll the retaining strap over the connector.
d. Install the strain relief.
P/N 95B-6001-00 (February 2006)
page 19
Channel Master Operation Manual
PIN 1
PIN 9
P2
P1
3
2
1
4
7
6
5
P1
P2
COMMUNICATION LINE 2
COMMUNICATION LINE 1
COMMUNICATION LINE 3
COMMUNICATION LINE 4
COMMUNICATION RETURN
POWER +
POWER Y-MOLD
Figure 12.
SPLICE
MOLD
RS232/RS422 I/O Cable Overview and Wiring Diagram
Communication lines 1 through 4 signal names depend on what personality
module is installed. Use the following tables to identify the signal name.
Table 5:
Communication Line
Signal Name
Comm1
TX1 232
Comm2
RX1 232
Comm3
RS485A
Comm4
RS485B
Table 6:
page 20
RS232 Personality Module (P/N 72B2006)
RS422 Personality Module (P/N 72B2008)
Communication Line
Signal Name
Comm1
RS422TB
Comm2
RS422TA
Comm3
RS422RA
Comm4
RS422RB
Teledyne RD Instruments
Channel Master Operation Manual
P2
P1
P2 (RS232)
P1
COMMUNICATION LINE 2
1
COMMUNICATION LINE 1
2
COMMUNICATION LINE 3
5
COMMUNICATION LINE 4
6
COMMUNICATION RETURN
4
BLK
3
WHT
2
BLU
9
BRN
NC
GRN
5
NC
POWER +
7
POWER -
3
WHT
BLU
BLK
BLK
YEL
WHT
RED
RED
BLK
BLK
Y-MOLD
Figure 13.
8
4
P5 (SD112)
P6 (GND)
P3 (RED)
P4 (BLK)
SPLICE
MOLD
SDI-12 I/O Cable Overview and Wiring Diagram
Communication lines 1 through 4 signal names depend on what personality
module is installed. Use the following table to identify the signal name.
Table 7:
SDI-12 Personality Module (P/N 72B 2005)
Communication Line
Signal Name
Comm1
TX1 232
Comm2
RX1 232
Comm3
TRIG IN
Comm4
SDI12
P/N 95B-6001-00 (February 2006)
page 21
Channel Master Operation Manual
8.3
Housing Assembly Removal
a. Remove all power to the Channel Master.
b. Remove the I/O cable and place the dummy plug on the I/O cable connector (see “I/O Cable and Dummy Plug,” page 18).
c. Set the transducer assembly (transducer face down) on a soft pad.
d. Loosen (do not remove) the four titanium bolts (M6) bolts to vent the
system.
e. Once all four bolts have been loosened, remove the four bolts that attach
the housing flange to the transducer head assembly.
f. Carefully lift the housing assembly straight up and away from the transducer assembly until you can gain access to the connector jack on the
top PC board (see Figure 14). Use care; the plastic mating surfaces
scratch easily. Do not damage the mating surfaces.
g. Squeeze the sides of the internal I/O cable connector to release it from
the jack (see Figure 15, page 23). Set the housing assembly aside.
Figure 14.
Removing the Housing
NOTE. The cable attached to the housing is only long enough to
disconnect the internal I/O cable. There is NOT enough cable to set the
housing down next to the transducer Assembly.
page 22
Teledyne RD Instruments
Channel Master Operation Manual
Figure 15.
Disconnecting the Internal I/O Cable
h. Clean the O-ring mating surfaces with a soft, lint-free cloth. Inspect the
surfaces for damage (see “O-Ring Inspection and Replacement,” page
25).
i. When you are ready to re-assemble the Channel Master, see “Channel
Master Re-assembly,” page 25.
P/N 95B-6001-00 (February 2006)
page 23
Channel Master Operation Manual
I/O Cable
Transducer Head
Housing
Retaining Strap
Strain Relief
I/O Cable
Connector
Housing Mounting Hardware (4)
O-Ring
Pressure Sensor Cover (Do Not Remove)
Copper Port Screw
Figure 16.
page 24
Channel Master Assembly
Teledyne RD Instruments
Channel Master Operation Manual
8.4
Channel Master Re-assembly
To replace the housing, proceed as follows. Use Figure 16, page 24 for
parts identification.
8.4.1
O-Ring Inspection and Replacement
This section explains how to inspect/replace the Channel Master O-ring. A
successful deployment depends on the condition of O-ring and the retaining
groove. See Figure 16, page 24 for the location of the O-ring. Read all instructions before doing the required actions.
We strongly recommend replacing the O-ring whenever you disassemble
the Channel Master. Inspecting and replacing the O-ring should be the last
maintenance task done before sealing the Channel Master.
NOTE. We recommend you use new O-rings if you are preparing for a
deployment.
a. Inspect the O-ring. When viewed with an unaided eye, the O-ring must
be free of cuts, indentations, abrasions, foreign matter, and flow marks.
The O-ring must be smooth and uniform in appearance. Defects must
be less then 0.1 mm (0.004 in.).
CAUTION. If the O-ring appears compressed from prior use, replace it.
Weak or damaged O-rings will cause the Channel Master to flood.
b. Clean and inspect the O-ring groove. Be sure the groove is free of foreign matter, scratches, indentations, corrosion, and pitting. Run your
fingernail across damaged areas. If you cannot feel the defect, the damage may be minor; otherwise, the damage may need repair.
CAUTION. Check the O-ring groove thoroughly. Any foreign matter in
the O-ring groove will cause the Channel Master to flood.
c. If a scratch is on the plastic housing flange O-ring groove, it may be
gently sanded using 600-grit (wet) sandpaper. Use care not to cause further damage.
d. Lubricate the O-ring with a thin coat of DC-111 lubricant. Apply the
lubricant using latex gloves. Do not let loose fibers or lint stick to the
O-ring. Fibers can provide a leakage path.
NOTE. RDI uses Dow Corning’s silicone lube model number 111 but any
type of silicone O-ring lube can be used.
CAUTION. Apply a very thin coat of silicone lube on the O-ring. Using
too much silicone lube on the O-ring can be more harmful than using no Oring lube at all.
P/N 95B-6001-00 (February 2006)
page 25
Channel Master Operation Manual
8.4.2
Housing Assembly Replacement
a. Set the Housing assembly on its end on a soft pad.
b. Make sure all printed circuit boards, spacers, cables, and screws have
been installed.
c. Inspect, clean, and lubricate the O-ring on the housing (see “O-Ring Inspection and Replacement,” page 25).
CAUTION. Follow all the steps for O-Ring Inspection and Replacement.
The watertight integrity of the Channel Master depends on this seal.
d. Connect the internal I/O connector to the plug on the top PC Board.
e. Install two fresh bags of desiccant just before closing the Channel Master (see “Desiccant Bags,” page 33).
f. Gently lower the transducer head assembly into the housing assembly,
aligning the mating holes and the making sure that the I/O cable connector pins on the housing are facing the vertical beam on the transducer
head. When mating the housing with the transducer head flange try to
apply equal pressure to all parts of the O-ring. Make sure the face Oring remains in the retaining groove.
CAUTION. Check that no wires or any other object is pinched between the
transducer head assembly and the housing. Use rubber bands to hold the
wiring in place as necessary. If the O-ring is not in the groove or if a
wire or other object is pinched, the Channel Master will flood.
NOTE. Make sure the I/O cable connector pins are facing the vertical
transducer beam.
g. Examine the titanium housing assembly bolts, split washer, and flat
washers (M6) for corrosion: replace if necessary. Figure 16, page 24
shows the assembly order of the transducer mounting hardware. All
hardware items are needed to seal the Channel Master properly.
h. Install all four sets of hardware but leave the housing hardware loose
enough to not make an airtight seal. You should be able to see a gap between the housing and transducer head. Slide a small wedge (a folded
piece of paper or credit card) between the housing and transducer head
to maintain the gap. Be careful not to dislodge the O-ring from the Oring groove.
page 26
Teledyne RD Instruments
Channel Master Operation Manual
8.4.3
Pressure Sensor Calibration and Close-up
a. Interconnect and apply power to the Channel Master as described in
“Setup the Channel Master,” page 10.
b. Start the BBTalk program (for help on using BBTalk, see the RDI Tools
User’s Guide).
c. On the File menu, click Break (you can also press the End key to send
a break or use the Toolbar and press the B button). You should see the
wakeup message appear on the log file window.
d. Leave the Channel Master powered up in a temperature-controlled area
for at least one hour so that any temperature gradients within the system
equalize.
e. At the > prompt, type #sc. The Channel Master will respond with:
>#sc
*** CAUTION: These commands are reserved for RDI use
and may not be currently supported!
Input local barometric pressure in inches of mercury:
f. Determine the barometric pressure at your location as accurately as possible. Use barometric pressure (what your barometer reads, or your
wrist watch barometer reads), not an airport weather forecasting service
altimeter reading that is corrected for sea level pressure.
For example, a barometer reading is 2984. The numbers represent
barometric pressure in hundredths of inches of mercury. Divide this
number by 100 so that it represents barometric pressure in inches of
mercury (e.g., 29.84inHg).
International users may be given the barometric pressure in millibars
(mb) or hectopascals (hPa). The barometric pressure must be entered in
inches of mercury (inHg). To convert between inches of mercury
(inHg) and millibars (mb) or hectopascals (hPa), use the formula
PinHg = 0.0295300 x Pmb.
For example, to convert 1013hPa to inches of mercury (inHg), multiply
1013 x 0.0295300 so that it represents barometric pressure in inches of
mercury (e.g., 29.92inHg).
g. Enter this number in inches of mercury (inHg) at the prompt and press
enter.
h. The Channel Master should respond with:
“Make sure the unit is open to ambient pressure. Hit any key to continue...”.
i. Press any key to continue.
P/N 95B-6001-00 (February 2006)
page 27
Channel Master Operation Manual
j. The Channel Master should respond with the following message.
“Now close the unit and tighten the closeup hardware. After this, hit any
key to continue...”.
k. Remove any wedge between the housing and transducer head. Tighten
the bolts in small increments in a “cross” pattern until the split washer
flattens out, and then tighten each bolt ¼ turn more to compress the face
seal O-ring evenly. Tighten the bolts to the recommended torque value
of 4 Newton-meters (34.4 pound-force inches).
CAUTION. Apply equal pressure to the O-ring as you tighten the bolts. If
one bolt is tightened more then the others, the O-ring can become pinched
or torn. A damaged O-ring will cause the Channel Master to flood.
CAUTION. Do not over tighten the bolts that hold the transducer and
housing together. If you tighten too far, you can crack or break the plastic
housing. On the other hand, leaving the bolts too loose can cause the
system to flood. Tighten the hardware to the recommended torque
value.
NOTE. The recommended torque value for the housing M6 bolts is 4 Nm
(34.4 lbf in).
l. If the calibration was successful, the unit should respond with:
“SUCCESS: Close up calibration complete. Execute PC2 to verify.”
m. At the > prompt, type PC2 and press return. Verify that the pressure reported by the PC2 Press (kPa) column is approximately +/- 0.050 kPa.
Temp(degC)
/
23.15
Press(kPa)
-0.009
Press(m) Pitch(deg) Roll(deg)
-0.001
0.31
0.67
NOTE. After a few samples the pressure will begin to change as a result
of changes in ATM pressure or interior building pressure. Verify the test
results within the first 20 seconds.
n. At the > prompt, type CZ and press return. Verify the “going to sleep”
message is present.
o. Exit BBTalk and turn off power to the Channel Master.
8.5
Firmware Upgrades
The Channel Master contains two processors (three if the SDI-12 personality module is present), each with two firmware modules. When new firmware is released, Teledyne RDI provides a firmware update package. The
package contains CMFlash, all the firmware modules, and a readme file. It
updates all out of date firmware to the latest version. The name of the update package may be CMFRM!.EXE or the name may contain a version
number, such as CMFlash_v0203.exe.
page 28
Teledyne RD Instruments
Channel Master Operation Manual
NOTES.
The most recent firmware versions can be seen at Teledyne RDI’s website.
To see what versions a firmware package contains, see the readme file.
A standard firmware package will only upload newer firmware than what is
already in the Channel Master.
The firmware versions in your Channel Master can be displayed with the
PS0 command (see “PS0 – System Configuration,” page 77).
Channel Master firmware packages may contain updates to one or more of
the following: CPU firmware, FPGA firmware, Sensor Boot firmware, or
Sensor firmware. In addition, they may include SDI-12 Boot firmware and
SDI-12 firmware. These are for the optional SDI-12 personality module.
To update your firmware, run the firmware package as described below.
a. Interconnect and apply power to the Channel Master as described in
“Setup the Channel Master,” page 10.
b. Download or copy the firmware update file to your computer’s hard
drive (see “Technical Support,” page 137 for contact information).
c. Double-click the exe file to begin. Click the Setup button when you are
ready to begin the firmware update.
Figure 17.
CMFlash Upgrade Utility Program
d. Click the ReadMe button to see what the changes are in the new firmware version. On the License page, click I Agree to continue.
P/N 95B-6001-00 (February 2006)
page 29
Channel Master Operation Manual
e. If you have not already read the Read me file, click the Read me button.
Click Start to begin the firmware upgrade.
f. Select the Serial port your PC uses to communicate with the Channel
Master.
NOTE. If you do not see this port listed, it may be in use by another
program such as WinHADCP or BBTalk. If this happens, close the port
and then close the firmware package and start it again.
g. Select the BAUD rate your Channel Master uses when it wakes up. Parity, Data bits, and Stop bits are rarely changed from their default values,
so leave them as they are.
h. Click Connect. If all is well, a wakeup banner will appear in the Connection message window and the indicator light will turn green. If this
does not happen, try again with other settings or click Auto Detect.
When the light is green, click OK to continue.
NOTE. Once the indicator light is green, you can change the
communication settings. If you do, the new settings are sent to the
Channel Master and saved with a CK command. They become the new
wakeup settings.
page 30
Teledyne RD Instruments
Channel Master Operation Manual
i. Select the temporary BAUD rate to use for the firmware upgrade. The
BAUD rate will be returned to the user default when done. Click OK to
continue.
j. Wait for the Firmware upload successful message. Click Exit.
k. Start BBTalk. At the “>” prompt, type PS0. Verify the firmware versions have been updated.
Horizontal ADCP
RD Instruments (c) 2006
All rights reserved.
Product Version: CM02.04
>PS0
Serial Number:
Frequency:
Configuration:
Transducer Type:
Beam Angle:
Beam Pattern:
Sensors:
Product Version:
CPU Firmware:
FPGA Version:
Sensor Boot:
Sensor Firmware:
Board Serial
24 00 00 00
15 00 00 00
A8 00 00 00
E3 00 00 00
DC 00 00 00
90 00 00 00
5813
1228800 Hz
HADCP: 2-beam velocity + vertical stage.
PISTON
20 Degrees
CONVEX
TEMP PRESS TILTS
CM02.04
28.28f
2.00.003
32.02
33.03
Number Data:
32 23 40 23
31 65 DC 23
10 66 B6 23
1F CD 99 23
31 CA 43 23
31 AB 7F 23
P/N 95B-6001-00 (February 2006)
SNS72B-1000-00A
PIO72B-2001-00B
XDR71B-1007-00A
PER72B-2006-00X
RCV72B-2003-09A
DSP72B-2002-00A>
page 31
Channel Master Operation Manual
8.6
Personality Module Replacement
Personality modules can be replaced to change the Channel Master communications protocols (i.e. switch from RS-422 to RS-232).
a. Remove all power to the Channel Master.
b. Remove the I/O cable and place the dummy plug on the I/O cable connector (see “I/O Cable and Dummy Plug,” page 18).
c. Set the transducer assembly (transducer face down) on a soft pad.
d. Remove the housing (see “Housing Assembly Removal,” page 22).
CAUTION. Before handling any Channel Master PC boards, always wear
an earth-grounding static protection strap. The electronics in the Channel
Master are very sensitive to static discharge. Static discharge can cause
damage that will not be seen immediately and will result in early failure of
electronic components.
We assume that a qualified technician or equivalent will perform all of the
following work.
e. With your earth-ground static protection strap on, push the side of the
black plastic board clamp toward the edge of the board far enough so the
Personality Module can be removed (see Figure 18). Pull out the Personality Module and replace it with the new module. Make sure the
board clamp is securely snapped over the new Personality Module.
f. Replace the housing (see “Housing Assembly Replacement,” page 26).
g. Test the Channel Master (see “Testing Your Channel Master,” page 13).
PUSH BOARD CLAMP
LIFT PERSONALITY MODULE
Figure 18.
page 32
Personality Module
Teledyne RD Instruments
Channel Master Operation Manual
8.7
Desiccant Bags
Desiccant bags are used to dehumidify the housing interior. Desiccant is
essential in deployments with plastic housings. The factory-supplied desiccant lasts a year at specified Channel Master deployment depths and temperatures. Remember that desiccant rapidly absorbs moisture from normal
room air.
The average dry weight of a new desiccant bag is 7.2 grams ((5%). The
weight increases to 8.4 to 9 grams for a “used” desiccant bag. Used desiccant bags may be dried at 250° for 14 hours. As a minimum, replace the
desiccant bags whenever you are preparing to deploy or store the Channel
Master for an extended time.
CAUTION. Do not open the desiccant bag. Contact with the silica gel can
cause nose, throat, and skin irritation.
NOTE. Desiccant bags are shipped in an airtight aluminum bag to ensure
maximum effectiveness. There is a moisture indicator inside the bag. If
the moisture indicator is pink, do not use the desiccant bag until it has
been dried. RDI recommends replacing the desiccant bag just before the
deployment.
a. Remove the housing (see “Housing Assembly Removal,” page 22).
b. Remove the new desiccant bags from the airtight aluminum bag.
c. Remove the old desiccant bags and install two new ones. Place the desiccant bags between the top circuit board and the housing.
d. Install the housing (see “Housing Assembly Replacement,” page 26).
8.8
Sealing the Channel Master for a Deployment
Use Figure 16, page 24 and the following steps to seal the Channel Master
for a deployment.
a. Check the Channel Master electronics; there should be no loose screws
or missing hardware.
b. Add two fresh desiccant bags inside the Channel Master housing (see
“Desiccant Bags,” page 33).
c. Install the housing assembly (see “Channel Master Re-assembly,” page
25).
d. The Channel Master is now ready for deployment unless you want to
take steps to prevent biofouling (see “Prevention of Biofouling,” page
34).
e. Test the Channel Master before the deployment.
P/N 95B-6001-00 (February 2006)
page 33
Channel Master Operation Manual
8.9
Prevention of Biofouling
This section explains how to prevent the buildup of organic sea life (biofouling) on the transducer faces. Objects deployed within about 100 meters
(≈328 feet) of the surface are subject to biofouling, especially in warm,
shallow water. Soft-bodied organisms usually cause no problems, but barnacles can cut through the urethane transducer face causing failure to the
transducer and leakage into the Channel Master (see Figure 19).
In shallow-water applications, the use of antifouling grease may be appropriate if you cannot clean the transducer faces often (weekly), and if the antifouling grease meets all of your local safety and environmental laws.
8.9.1
Controlling Biofouling
The best-known way to control biofouling is cleaning the Channel Master
transducer faces often. However, in many cases this is not possible. The
following options can help reduce biofouling.
Figure 19.
•
Coat the entire Channel Master except the pressure sensor
and thermistor with the recommended antifouling paint.
Make sure that the paint is applied in an even coat over the
transducer faces.
•
Apply a thin coat (≈4 mm; ≈0.16 in.) of either a 50:50 mix of
chili powder and petroleum jelly or chili powder and silicone
grease to the transducer faces. The chili powder should be
the hottest that can be found. Water flowing across the
transducers will wash this mix away over time. The silicone
mixture tends to last longer.
Barnacle Damage
CAUTION. Barnacles can cut through the urethane transducer face
causing failure to the transducer and leakage into the Channel Master.
page 34
Teledyne RD Instruments
Channel Master Operation Manual
If using antifouling grease, remove the grease immediately after recovering
the Channel Master from its deployment. Remove the grease with soapy
water. Be sure to wear protective gloves and a face shield.
CAUTION.
1. Do not arbitrarily use antifouling grease for every application. When
barnacles are a threat to the transducer faces; using antifouling grease
may be appropriate if you cannot clean the Channel Master regularly
(weekly). If using antifouling grease, remove it immediately after
recovering the Channel Master.
2. Antifouling grease is toxic. Read the product safety data sheet before
using the grease. Wear gloves and a face shield when applying the
grease. If the skin comes in contact with the grease, immediately
wash the affected area with warm, soapy water.
3. All U.S. coastal states prohibit the use of tributyl-tins on boat hulls.
The European Economic Commission has released a draft directive
that would prohibit the use of many organo-tins after July 1989. We
strongly recommend you obey your local laws.
8.9.2
Recommended Antifouling Paints
The plastic Channel Master housing simplifies anti-fouling paint application. You can use almost any EPA approved anti-fouling paint on the housing or the urethane transducer faces. You do have to be extra careful with
the urethane faces. We recommend the TRILUX II paint from Interlux.
Manufacturer
Contact
Courtalds Finishes
Telephone: 908-686-1300
Interlux brand paints
Web Page: www.interlux.com
P/N 95B-6001-00 (February 2006)
page 35
Channel Master Operation Manual
8.9.3
Applying Antifouling Paints
Follow the urethane faces application instructions for TRILUX II. One thin
coat can last for several months.
NOTE. You cannot protect the pressure sensor from biofouling. The
pressure sensor is located near the center of the transducer array,
between the urethane-covered transducers. The sensor port is a small
hole drilled through a screw (see “Pressure Sensor Maintenance,” page
37). You must tape off the screw during anti-fouling paint application.
This means that the sensor port is not fully protected from bio fouling. The
sensor port is surrounded by the antifouling paint, but bio fouling may build
up on the screw, and eventually clog the sensor port. However, most
organisms do not seem to find the small amount of unpainted surface
attractive. If it is logistically possible to periodically inspect/clean the
pressure sensor screw, it is highly recommended. This tradeoff situation
must be analyzed for individual deployments. Unfortunately, the location of
the deployment site usually dictates action in this regard.
Transducer Faces (urethane surfaces) and Plastic Housing
a. Lightly sand by hand the plastic housing and urethane face with 120-grit
paper.
b. Mask off the Thermistor and Pressure Sensor copper screw.
c. Apply one or two coats of Trilux-2 at four mil/coat. If applying a second coat, wait at least 12 hours to allow the first coat to dry. One coat
lasts one season (3-4 months); two coats might last one year.
8.10
Thermistor Maintenance
In order to respond quickly to changes in the water temperature, water must
be able to flow over the sensor. Do not block the sensor or paint over it
with antifouling paint. Remove any biofouling as soon as possible.
NOTE. The Thermistor is embedded in the transducer head. The sensor
is under a titanium cover that is highly resistant to corrosion.
page 36
Teledyne RD Instruments
Channel Master Operation Manual
8.11
Pressure Sensor Maintenance
In order to read the water pressure, water must be able to flow through the
copper screw on the pressure sensor. The tiny hole in the copper screw may
at times be blocked. Use the following procedure and Figure 16, page 24 to
clean the screw.
a. Place the Channel Master on its’ housing end. Use a soft pad to protect
the Channel Master.
b. Use a straight-slot screwdriver to remove the copper screw.
c. Gently clean out the hole in the copper screw with a needle. If the hole
becomes enlarged or the screw is corroded, replace the screw. A replacement copper screw is included in the spare parts kit (part number
817-1067-00).
d. Install the copper screw. Tighten the screw “finger tight” (0.226 N-m,
2 lbf-in). Do not over tighten the screw or you may strip the threads on
the plastic cover disc. If this happens, return the Channel Master to RDI
for repair.
CAUTION.
The pressure sensor is filled with silicone oil. Never poke a needle or other
object through the copper screw while the screw is installed over the
pressure sensor. You will perforate the sensor, causing it to fail.
Do not remove the cover disc or attempt to clean the surface of the
pressure sensor. The diaphragm is very thin and easy to damage.
Do not remove the pressure sensor. It is not field replaceable.
8.11.1 Pressure Sensor Cavity Oil Fill
The pressure sensor cavity needs to be filled with oil before deployment to
deal with both trapped air and long-term reliability of the pressure sensor.
The oil to be used is Dow Corning Q7-9120 Silicone fluid, 12,500 CST.
This fluid is supplied with the Channel Master in the spare parts kit. The
filling of the cavity can be completed any time before system installation
however care should be taken to keep the Channel Master from high temperature during this time.
NOTE. The pressure sensor cavity is not filled with oil when shipped. This
must be done before deploying the Channel Master.
Use the following procedure and Figure 16, page 24 and Figure 20, page 38
to fill the pressure sensor with oil.
P/N 95B-6001-00 (February 2006)
page 37
Channel Master Operation Manual
a. Place the Channel Master on its side with the vertical beam facing down
and the pressure sensor port facing up. Use a soft pad to protect the
Channel Master.
b. Use a straight-slot screwdriver to remove the copper port screw on the
pressure sensor. Do not remove the pressure sensor cover.
c. A plastic bottle with silicone oil (part number 75BK6004-00) is included
in the spare parts kit. Place the tip of the bottle over the screw hole.
Ensure the plastic bottle tip is not inserted into the screw hole. Slowly
administer the oil into the cavity through the hole. Allow time for the
air to escape as you fill. Once the oil level is up into the port screw
hole, then stop filling.
d. Install the copper port screw slowly, allowing time for the oil to pass
through the port screw orifice. Tighten the screw “finger tight”
(0.226 N-m, 2 lbf-in). Do not over tighten the screw or you may strip
the threads on the plastic cover disc. If this happens, return the Channel
Master to RDI for repair.
NOTE. The Pressure sensor cavity should be checked and if needed
refilled between deployments. Only remove the copper port screw for this
inspection and re-fill.
Figure 20.
page 38
Filling the Pressure Sensor Cavity with Oil
Teledyne RD Instruments
Channel Master Operation Manual
8.11.2 Zero the Pressure Sensor
Use the SZ-command to zero out the pressure sensor at the deployment site,
prior to deploying the Channel Master in the water.
a. Connect and apply power to the system as described in “Setup the
Channel Master,” page 10.
b. Start BBTalk and wakeup the Channel Master (press the END key).
c. Type SZ and press the Return key.
d. Exit BBTalk.
8.12
Storage and Shipping Maintenance
This section lists the maintenance items to do before storing the Channel
Master. These maintenance items include:
• Removing biofouling (see “Removal of Biofouling,” page 39).
• Inspecting the transducer head (see “Transducer Head Inspection,” page 40).
• Preparing the Channel Master for final storage or shipping (see
“Final Storage or Shipping Preparation,” page 40).
8.12.1 Removal of Biofouling
Before storing or shipping the Channel Master, remove all foreign matter
and biofouling. Remove soft-bodied marine growth or foreign matter with
soapy water. Waterless hand cleaners remove most petroleum-based fouling. Rinse with fresh water to remove soap residue. Dry the transducer
faces with low-pressure compressed air or soft lint-free towels.
CAUTION. The soft, thin urethane coating on the transducer faces is
easily damaged. Do not use power scrubbers, abrasive cleansers,
scouring pads, high-pressure marine cleaning systems, or brushes stiffer
than hand cleaning brushes on the transducer faces.
If there is heavy fouling or marine growth, the transducer faces may need a
thorough cleaning to restore acoustic performance. Barnacles do not usually affect Channel Master operation. We do however recommend removal
of the barnacles to prevent water leakage through the transducer face. Lime
dissolving liquids such as Lime-Away® break down the shell-like parts.
Scrubbing with a medium stiffness brush usually removes the soft-bodied
parts. Do NOT use a brush stiffer than a hand cleaning brush. Scrubbing,
alternated with soaking in Lime-Away®, effectively removes large barnacles. After using Lime-Away®, rinse the Channel Master with fresh water
to remove all residues. If barnacles have entered more than 1.0 to 1.5 mm
(0.06 in.) into the transducer face urethane, you should send the Channel
P/N 95B-6001-00 (February 2006)
page 39
Channel Master Operation Manual
Master to RDI for repair (see Figure 19, page 34). If you do not think you
can remove barnacles without damaging the transducer faces, contact RDI.
8.12.2 Transducer Head Inspection
The urethane coating on the transducer faces is important to Channel Master watertight integrity. Mishandling, chemicals, abrasive cleaners, and excessive depth pressures can damage the transducer ceramics or urethane
coating. Inspect the transducer faces for dents, chipping, peeling, urethane
shrinkage, hairline cracks, and damage that may affect watertight integrity
or transducer operation. Repair of the transducer faces should only be done
by RDI.
CAUTION. Never set the transducer on a rough surface; always use foam
padding to protect the transducers.
NOTE. The dummy plug should be installed any time the I/O cable is
removed. Use the dummy plug when the Channel Master is in storage or
is being handled.
8.12.3 Final Storage or Shipping Preparation
This section explains how to store or ship the Channel Master.
CAUTION. If you are shipping a Channel Master to RDI for repair or
upgrade, remove all customer-applied coatings or provide certification that
the coating is nontoxic. This certification must include the name of a
contact person who is knowledgeable about the coating, the name, and
manufacturer of the coating, and the appropriate telephone numbers. If
you return the equipment without meeting these conditions, we have
instructed our employees not to handle the equipment and to leave it in the
original shipping container pending certification. If you cannot provide
certification, we will return the equipment to you or to a customer-specified
cleaning facility. All costs associated with customer-applied coatings will
be at the customer's expense.
When shipping the Channel Master through a Customs facility, be sure to
place the unit/s so identifying labels are not covered and can be seen easily
by the Customs Inspector. Failure to do so could delay transit time.
NOTE. RDI strongly recommends using the original shipping crate
whenever transporting the Channel Master.
If you need to ship or store the Channel Master, use the original shipping
crate whenever possible. If the original packaging material is unavailable
or unserviceable, additional material is available through RDI.
For repackaging with commercially available materials, use the following
procedure:
page 40
Teledyne RD Instruments
Channel Master Operation Manual
a. Use a strong shipping container made out of wood or plastic.
b. Install a layer of shock-absorbing static-shielding material, 70-mm to
100-mm thick, around all sides of the instrument to firmly cushion and
prevent movement inside the container.
c. Seal the shipping container securely.
d. Mark the container FRAGILE to ensure careful handing.
e. In any correspondence, refer to the Channel Master by model and serial
number.
8.13
Returning Channel Masters to RDI for Service
When shipping the Channel Master to RDI from either inside or outside the
United States, the following instructions will help ensure the Channel Master arrives with the minimum possible delay. Any deviation from these instructions increases the potential for delay.
8.13.1 Domestic Shipments
Step 1 - Get a Return Authorization
The best way to make sure RDI is aware of your intentions to ship equipment is to obtain a Return Material Authorization (RMA) before sending
the shipment. Return Material Authorizations are issued by Sales Administration or Customer Service and are used to notify us of your needs in advance of arrival so we can provide a faster turnaround. When requesting a
Return Material Authorization, please give us the following information.
•
What is being shipped (include the serial number)
•
When you plan to send the shipment
•
What problem(s) need correction
•
When you need the instrument returned
When the Return Material Authorization is issued, we will tell you the
RMA number. Please include this number on all packages and correspondence.
Step 2 - Ship via air freight, prepaid
Urgent Shipments should be shipped direct to RDI via any of several overnight or priority air services. Do not send urgent airfreight as part of a consolidated shipment. If you ship consolidated, you will save money, but may
lose up to three days in transit time.
Non-urgent shipments may be shipped as part of a consolidated cargo shipment to save money. In addition, some truck lines may offer equivalent delivery service at a lower cost, depending on the distance to San Diego.
P/N 95B-6001-00 (February 2006)
page 41
Channel Master Operation Manual
Mark the Package(s)
To: RD Instruments, Inc. (RMA Number)
9855 Businesspark Avenue
San Diego, CA 92131-1101
Step 3 - Urgent shipments
Send the following information by fax or telephone to RDI.
Attention:
Fax:
Phone:
Sales Administration
(858) 695-1459
(858) 693-1178
•
Detailed descriptions of what you are shipping (number of
packages, sizes, weights, and contents).
•
The name of the freight carrier
•
Master Air bill number
•
Carrier route and flight numbers for all flights the package
will take
8.13.2 International Shipments
Step 1 - Get a Return Authorization
The best way to make sure RDI is aware of your intentions to ship equipment is to obtain a Return Material Authorization (RMA) before sending
the shipment. Return Material Authorizations are issued by Sales Administration or Customer Service and are used to notify us of your needs in advance of arrival so we can provide a faster turnaround. When requesting a
Return Authorization, please give us the following information.
•
•
•
•
What is being shipped (include the serial number)
When you plan to send the shipment
What problem(s) need correction
When you need the instrument returned
When the Return Material Authorization is issued, we will tell you the
RMA number. Please include this number on all packages and correspondence.
Step 2 - Ship Via Air Freight, Prepaid
Urgent Shipments should be shipped direct. Do not send urgent airfreight
as part of a consolidated shipment. If you ship consolidated, you will save
money, but may lose up to five days in transit time.
Non-urgent shipments may be shipped as part of a consolidated cargo shipment to save money.
page 42
Teledyne RD Instruments
Channel Master Operation Manual
Mark the package(s) as follows:
To:
RD Instruments, Inc. (RMA Number)
5 Avenue Hector Pintus
06610 La Gaude, France
Step 3 - Include Proper Customs Documentation
The Customs statement should be completed very carefully. It should accurately and truthfully contain the following information.
•
Contents of the shipment
•
Value
•
Purpose of shipment (example: “American made goods returned for repair”)
•
Any discrepancy or inaccuracy in the Customs statement
could cause the shipment to be delayed in Customs.
Step 4 - Send the Following Information by Fax or Telephone to RDI
Attention:
Phone:
Fax:
Sales Administration
+33(0) 492-110-930
+33(0) 492-110-931
•
Detailed descriptions of what you are shipping (number of
packages, sizes, weights, and contents).
•
The name of the freight carrier
•
Master Air bill number
•
Carrier route and flight numbers for all flights the package
will take
P/N 95B-6001-00 (February 2006)
page 43
Channel Master Operation Manual
9
Channel Master Installation
This section is a guide for installing the Channel Master. Use this section to
plan your installation layout. We recommend you distribute this information to your organization’s decision-makers and installation engineers.
9.1
Mounting Plate Assembly
Assemble the mounting plate by connecting the four standoffs to the base
plate (see Figure 21). Mount the standoffs with the flat end toward the base
plate. Use the provided M6x1.0x16 flat head screws.
Figure 21.
9.2
Mounting Plate Assembly
Orientation and Tilt
The Channel Master must be mounted with its transducer orientation in the
horizontal direction. That is, the two larger transducers, which are for water
velocity measurement, must be looking horizontally (also called sidelooking). The third transducer, which is for water depth measurement, must
be looking up towards the water surface.
We recommend the Channel Master be mounted with its Y-axis of the instrument coordinate perpendicular to the direction of the channel mean
flow. The Channel Master X-axis (direction from Beam 2 to Beam 1)
should be parallel to the channel main flow direction (Figure 22, page 45).
page 44
Teledyne RD Instruments
Channel Master Operation Manual
+Z
Vertical Beam
+X
Bea
m
1
Be a
m2
-X
+Y
Figure 22.
Channel Master Instrument Coordinates
It is important to mount the Channel Master with the two horizontal acoustic beams in the same horizontal plane (zero roll). A small tilt of the Channel Master may result in an interference of the acoustic beams with either
the channel bottom or water surface (see Figure 23). The Channel Master is
equipped with a tilt sensor that can be used to guide in mounting. During
installation, the user can monitor the pitch and roll readings through the
real-time program WinHADCP and adjust the mounting fixture as needed.
NOTE. Depending on channel cross-section geometry, the user may want
the Channel Master mounted with a small upward lean (positive pitch), or
downward lean (negative pitch) to avoid any interference of the acoustic
beams with either the river bottom or water surface. The lean must be
determined by field tests. However, in any case, the Channel Master must
be mounted with zero roll.
ZERO ROLL
ZERO PITCH
X-Axis
Y-Axis
POSITIVE FLOW
Figure 23.
Channel Master Mounting Pitch and Roll
P/N 95B-6001-00 (February 2006)
page 45
Channel Master Operation Manual
9.3
Installing the Channel Master on Site
The Channel Master must be mounted on a rigid structure in the channel,
such as a solid wall, pier, or pile. The mounting structure must be firm, stable, without settlement or displacement over time.
NOTE. In order to gain the maximum profiling range at a site, we
recommend the Channel Master be mounted near the middle of the water
depth at the mounting structure location. For a site with a significant
seasonal change of water level, the Channel Master may need to be
mounted at different elevations according to the seasonal water level
change.
The recommended mounting procedure is described below. A diver may be
needed for the installation work.
a. Assemble the mounting plate (see “Mounting Plate Assembly,” page
44).
b. Install the mounting fixture on the structure with four screws embedded
in or attached to the mounting base. See the “Mounting Plate Drawing,”
page 137 for the size and arrangement of the four screw holes.
NOTE. The four screws/bolts required to mount the base plate to your
structure are not provided by RD Instruments.
NOTE. For best results, select a mounting location so that the Channel
Master X-axis (direction from Beam 2 to Beam 1) is parallel to the channel
main flow direction (Figure 22, page 45).
c. Connect the I/O cable to the Channel Master. Attach the cable strain
relief.
d. Slide the Channel Master into the mounting fixture and secure the
Channel Master by using the provided four M6 socket head screws, lock
washers, and flat washers through the holes on the Channel Master
transducer head (see Figure 24, page 47).
e. Adjust the mounting fixture to make the Channel Master zero pitch and
roll or a desired lean pitch and zero roll.
f. Run the real-time program WinHADCP with the desired parameter settings. Examine the acoustic backscattering intensity profile and look for
any obstacle to the acoustic beams, surface or bottom interference, or
side lobe effect. Adjust the Channel Master lean if needed. Also examine the velocity profile for reasonability.
g. Secure the cable by attaching it to the structure. Use a plastic tube to
protect the cable for permanent installations.
page 46
Teledyne RD Instruments
Channel Master Operation Manual
NOTE. It should be emphasized that the acoustic backscattering intensity
profile is the most important parameter for Channel Master data quality
control and assurance. We recommend the user examine the intensity
profile during the installation to make sure the profile does not show any
thing abnormal. The velocity data will be questionable if the intensity
profile is abnormal. The intensity profile should also be monitored during
the Channel Master operation.
I/O Cable
Strain Relief
M6 Flat Head
Screws (4)
Standoff (4)
Base Plate
User Mounting Holes (4)
M6 Washer (4)
M6 Lock Washer (4)
M6 Socket Head Screws (4)
Figure 24.
Channel Master Mounting Plate Overview
P/N 95B-6001-00 (February 2006)
page 47
Channel Master Operation Manual
10
Channel Master Commands
This section defines the commands used by the Channel Masters. These
commands let you set up and control the Channel Master without using an
external software program such as our WinHADCP program. However, we
recommend you use our software to control the Channel Master because
entering commands directly from a terminal can be difficult. Most Channel
Master settings use factory-set values. If you change these values without
thought, you could ruin your deployment. Be sure you know what effect
each command has before using it. Call RDI if you do not understand the
function of any command.
Using WinHADCP for real-time deployments to develop the command file
will ensure that the Channel Master is set up correctly. The commands directly affect the range of the Channel Master and the standard deviation
(accuracy) of the data.
10.1
Data Communication and Command Format
You can enter commands with an IBM-compatible computer running RDI’s
BBTalk. The Channel Master communicates with the computer through an
RS-422 serial interface. We initially set the Channel Master at the factory
to communicate at 9600 baud, no parity, and one stop bit.
Immediately after you apply power to the Channel Master, it enters the
STANDBY mode. Send a BREAK signal using BBTalk by pressing the
End key. When the Channel Master receives a BREAK signal, it responds
with a wake-up message similar to the one shown below. The Channel
Master is now ready to accept commands at the “>” prompt from either a
terminal or computer program.
Horizontal ADCP
RD Instruments (c) 2005
All rights reserved.
Product Version: CM02.01
>
10.1.1 Command Input Processing
Input commands set Channel Master operating parameters, start data collection, run built-in tests (BIT), and asks for output data. All commands are
ASCII character(s) and must end with a carriage return (CR). For example,
>WP0001<CR> [Your input]
If the entered command is valid, the Channel Master executes the command. If the command is one that does not provide output data, the Channel Master sends a carriage return line feed <CR> <LF> and displays a new
“>” prompt. Continuing the example,
page 48
Teledyne RD Instruments
Channel Master Operation Manual
>WP00001<CR>
>
[Your original input]
[Channel Master response to a valid, no-output command]
If you enter a valid command that produces output data, the Channel Master
executes the command, displays the output data, and then redisplays the “>”
prompt. Some examples of commands that produce output data are ? (help
menus), CS (start pinging), PS (system configuration data), and PA (run builtin tests).
If the command is not valid, the Channel Master responds with an error
message similar to the following.
>WPA<CR>
>WPA ERR 002:
>
NUMBER EXPECTED<CR><LF>
[Your input]
[Channel Master response]
After correctly entering all the commands for your application, you would
send the CS-command to begin the data collection cycle.
10.1.2 Data Output Processing
After the Channel Master completes a data collection cycle, it sends a block
of data called a data ensemble. A data ensemble consists of the data collected and averaged during the ensemble interval (see “TE – Time Per Ensemble,” page 83). A data ensemble can contain header, leader, velocity,
correlation magnitude, echo intensity, percent good, status, surface track
fields, and firmware version data.
Channel Master output data can be in either hexadecimal-ASCII (HexASCII) or binary format (set by “CF – Flow Control,” page 54). The HexASCII mode is useful when you use a terminal to communicate with, and
view data from the Channel Master. The binary mode is useful for highspeed communication with a computer program. You would not use the binary mode to view data on a terminal because the terminal could interpret
some binary data as control codes.
NOTE. WinHADCP supports PD0, PD14, and PD19 Output Data Formats
(see “PD – Data Stream Select,” page 77).
When data collection begins, the Channel Master uses the settings last entered (user settings) or the factory-default settings. The same settings are
used for the entire deployment.
The Channel Master automatically stores the last set of commands used in
RAM. The Channel Master will continue to be configured from RAM until
it receives a CR-command or until the RAM loses its backup power. If the
Channel Master receives a CR0 it will load into RAM the command set you
last stored in non-volatile memory (semi-permanent user settings) through
the CK-command. If the Channel Master receives a CR1, it will load into
RAM the factory default command set stored in ROM (permanent or factory settings).
P/N 95B-6001-00 (February 2006)
page 49
Channel Master Operation Manual
10.2
Command Descriptions
Each listing includes the command’s purpose, format, default setting (if applicable) range, recommended setting, and description. When appropriate,
we include amplifying notes and examples. If a numeric value follows the
command, the Channel Master uses it to set a processing value (time, range,
percentage, processing flags). All measurement values are in metric units
(mm, cm, and dm).
10.2.1 Miscellaneous Commands
? – Help Menus
Purpose
Format
Description
Examples
Lists the major help groups.
x? (see description)
Entering ? by itself displays all command groups. To display
help for one command group, enter x?, where x is the command group you wish to view. When the Channel Master displays the help for a command group, it also shows the format
and present setting of those commands. To see the help or setting for one command, enter the command followed by a question mark. For example, to view the CB-command setting enter CB?.
See below.
>?
Available Commands:
C ---------------------E ---------------------I ---------------------M ---------------------P ---------------------S ---------------------T ---------------------V ---------------------Y ---------------------W ---------------------? --------------------->C?
Available Commands:
CB 811 -----------------CF 11110 ---------------CJ 0,0,0 ---------------CK ---------------------CL 1 -------------------CR ---------------------CS ---------------------CT 0 -------------------CZ ---------------------C? --------------------->
>CB?
CB 811 ----------------->
page 50
Control Commands
Environment Commands
Index Commands
Loop Recorder Commands
Performance Test Commands
Sensor Commands
Time Commands
Vertical Beam Commands
Display Banner
Water Profiling Commands
Display Main Menu
Serial Port Control {baud;parity;stop}
Set Ctrl Flags {e;p;b;s;*}
SDI-12 Configuration {En/Dis,Addr,E/M }
Save Command Parameters to Flash
Sleep Enable ( 1=Enabled, 0=Disabled )
Restore Cmd defaults [0=user,1=factory]
Start Pinging
Turnkey (0 = OFF, 1 = ON)
Put the ADCP to sleep.
Display C-Command Menu
Serial Port Control {baud;parity;stop}
Teledyne RD Instruments
Channel Master Operation Manual
Break
Purpose
Format
Description
Interrupts the Channel Master without erasing present settings.
<BREAK>
A BREAK signal interrupts Channel Master processing. It is
leading-edge triggered and must last at least 300 ms. A
BREAK initializes the system, sends a wake-up (copyright)
message, and places the Channel Master in the DATA I/O
mode. The BREAK command does not erase any settings or
data. Using BBTalk, pressing the End key sends a BREAK.
Software Breaks can be used with BBTalk. On the Tools
menu, click Options and select the Use Software Break box.
The Channel Master will use the “= = =” or “+++” strings instead of a break.
Y – Display Banner
Purpose
Displays the banner.
Format
Y
Description Use the Y command to display the Channel Master banner.
>Y
Horizontal ADCP
RD Instruments (c) 2006
All rights reserved.
Product Version: CM02.04
P/N 95B-6001-00 (February 2006)
page 51
Channel Master Operation Manual
10.3
Control System Commands
The Channel Master uses the following commands to control certain system
parameters.
>C?
Available Commands:
CB
CF
CJ
CK
CL
CR
CS
CT
CZ
C?
>
811 -----------------11110 ---------------0,0,0 ------------------------------------1 -------------------------------------------------------------0 --------------------------------------------------------------
Serial Port Control {baud;parity;stop}
Set Ctrl Flags {e;p;b;s;*}
SDI-12 Configuration {En/Dis,Addr,E/M }
Save Command Parameters to Flash
Sleep Enable ( 1=Enabled, 0=Disabled )
Restore Cmd defaults [0=user,1=factory]
Start Pinging
Turnkey (0 = OFF, 1 = ON)
Put the ADCP to sleep.
Display C-Command Menu
10.3.1 Control System Command Descriptions
This section lists the Control System commands.
CB – Serial Port Control
Purpose
Sets the RS-232/422 serial port communications parameters
(Baud Rate/Parity/Stop Bits).
CBnnn
nnn = baud rate, parity, stop bits (see description)
CB411
Format
Range
Default
Recommended Setting. The default setting for this command is
recommended for most applications.
Description
Table 8:
page 52
The Channel Master and your external device (dumb terminal,
computer software) MUST use the same communication parameters to talk to each other. After you enter valid CB parameters, the Channel Master responds with a “>” prompt.
You may now change the external device’s communication
parameters to match the Channel Master parameters before
sending another command.
Serial Port Control
Baud Rate
Parity
Stop Bits
0 = NA
1 = 1200
2 = 2400
3 = 4800
4 = 9600 (Default)
5 = 19200
6 = 38400
7 = 57600
8 = 115200
0 = None
1 = None (Default)
2 = Even
3 = Odd
4 = Low (Space)
5 = High (Mark)
0=1
1 = 1 Bit (Default)
2 = 2 Bits
Teledyne RD Instruments
Channel Master Operation Manual
Setting The Baud Rate In The Channel Master. The Channel Master can be
set to communicate at baud rates from 300 to 115200. The factory default
baud rate is always 9600 baud. The baud rate is controlled via the CBcommand. The following procedure explains how to set the baud rate and
save it in the Channel Master. This procedure assumes that you will be using the program BBTalk that is supplied by RD Instruments.
a. Connect the Channel Master to the computer and apply power (see
“Setup the Channel Master,” page 10).
b. Start the BBTalk program and establish communications with the
Channel Master. Wakeup the Channel Master by sending a break signal with the End key.
c. Send the command CR1 to place the Channel Master in the factory default setup.
d. Send the CB-command that selects the baud rate you wish. The following are the typical CB-command settings for different baud rates
with no parity and 1 stop bit:
Table 9:
Baud Rate
BAUD RATE
CB-command
1200
CB111
2400
CB211
4800
CB311
9600
CB411 (Default)
19200
CB511
38400
CB611
57600
CB711
115200
CB811
e. BBTalk will change the communication settings to match your CB
command settings.
f. Send the command CK to save the new baud rate setting.
g. Click File, Close to exit the terminal window.
The Channel Master is now set for the new baud rate. The baud rate will
stay at this setting until you change it back with the CB-command.
NOTE. If you send a BREAK before changing the external device’s
communication parameters, the Channel Master returns to the
communication parameters stored in non-volatile memory (user settings).
P/N 95B-6001-00 (February 2006)
page 53
Channel Master Operation Manual
CF – Flow Control
Purpose
Format
Range
Default
Sets various Channel Master data flow-control parameters.
CFnnnnn
Firmware switches (see description)
CF11110
Recommended Setting. The default setting for this command is
recommended for most applications.
Description
Table 10:
page 54
The CF-command defines whether the Channel Master: generates data ensembles automatically or manually; generates
pings immediately or manually; sends serial output data in binary or Hex-ASCII format; sends or does not send output data
to the serial interface; sends or does not send data to the loop
recorder.
Flow Control
Command
Description
CF1xxxx
Automatic Ensemble Cycling – Automatically starts the next data collection cycle after
the current cycle is completed. Only a <BREAK> can stop this cycling.
CF0xxxx
Manual Ensemble Cycling – Enters the STANDBY mode after transmission of the data
ensemble, displays the “>” prompt and waits for a new command.
CFx1xxx
Automatic Ping Cycling – Pings immediately when ready.
CFx0xxx
Manual Ping Cycling – Sends a < character to signal ready to ping, and then waits to
receive an <Enter> before pinging. The <Enter> sent to the Channel Master is not echoed. This feature lets you manually control ping timing within the ensemble.
CFxx1xx
Binary Data Output – Sends the ensemble in binary format, if serial output is enabled
(see below).
CFxx0xx
Hex-ASCII Data Output – Sends the ensemble in readable hexadecimal-ASCII format, if
serial output is enabled (see below).
CFxxx1x
Enable Serial Output – Sends the data ensemble out the RS-232/485/422 serial interface.
CFxxx0x
Disable Serial Output – No ensemble data are sent out the RS-232/485/422 interface.
CFxxxx1
Enable Loop Recorder – Records data ensembles on the Loop Recorder.
CFxxxx0
Disable Loop Recorder – No data ensembles are recorded on the Loop Recorder.
Example
CF01010 selects manual ensemble cycling, automatic ping cycling, Hex-ASCII data
output, enables serial output, and disables data recording.
Teledyne RD Instruments
Channel Master Operation Manual
CJ – SDI-12 Configuration
Purpose
Format
This command is used to enable SDI-12 communications.
CJ x,y,z
x – Enable/Disable (0 = Disable, 1 = Enable)
y – Address (The address can be any alphanumeric character)
z – English/Metric Units for output (0 = Metric, 1 = English)
CJ 0,0,0
Default
Recommended Setting. Use as needed.
Description
This command is used to enable SDI-12 communications for
data logging purposes only. It allows for configuration of the
SDI-12 Address and the units of the data returned from the
unit (English or Metric). The address, as specified by the
SDI-12 Specification v1.3, can be any alphanumeric character.
The data output can be in English or Metric Units. English
units are °F, ft, and ft/s. Metric Units are °C, m, and m/s.
Example
>CJ?
CJ 0,0,0 -------------- SDI-12 Configuration {En/Dis,Addr,E/M }
>CJ1,0,1
>CJ?
CJ 1,0,1 -------------- SDI-12 Configuration {En/Dis,Addr,E/M }
NOTES. The IU command controls the units for discharge data when
reported through the serial port (for example, if PD19 is enabled) (see “IU Output Units,” page 69).
The CJ command sets the units for the same data when reported by
SDI-12 (M9 command).
IU1,1,1,1,1 sets the same units as CJ1,0,0
IU2,2,2,2,2 sets the same units as CJ1,0,1
CK – Keep Parameters
Purpose
Format
Stores present parameters to non-volatile memory.
CK
Recommended Setting. Use as needed.
Description
CK saves the present user command parameters to nonvolatile memory on the CPU board. The Channel Master
maintains data stored in the non-volatile memory (user settings) even if power is lost. It does not need a battery. You
can recall parameters stored in non-volatile memory with the
CR0-command.
P/N 95B-6001-00 (February 2006)
page 55
Channel Master Operation Manual
CL - Battery Saver Mode
Purpose
Determines whether the Channel Master will attempt to conserve power.
CLn
n = 0 to 1 (0 = do not conserve power, 1 = conserve power)
CL1
Format
Range
Default
Recommended Setting. The default setting for this command is
recommended for most applications.
Description
CL0 means the ADCP will not make any attempt to conserve
power. Setting the CL command to CL1 means the ADCP
will attempt to conserve power by going to sleep at every opportunity.
NOTE. In order for software breaks to work, the CL-command must be set
to CL0.
CR – Retrieve Parameters
Purpose
Resets the Channel Master command set to factory or user
settings.
CRn
n = 0 (User), 1 (Factory)
Format
Range
Recommended Setting. Use as needed.
Description
Table 11:
The Channel Master automatically stores the last set of commands used in RAM. The Channel Master will continue to be
configured from RAM unless it receives a CR-command or
until the RAM loses its power.
Retrieve Parameters
Format
Description
CR0
Loads into RAM the command set last stored in non-volatile memory (user settings) using
the CK-Command.
CR1
Loads into RAM the factory default command set stored in ROM (factory settings).
NOTE. CR keeps the present baud rate and does not change it to the
value stored in non-volatile memory or ROM. This ensures the Channel
Master maintains communications with the terminal/computer.
page 56
Teledyne RD Instruments
Channel Master Operation Manual
CS – Start Pinging (Go)
Purpose
Starts the data collection cycle (same as the Tab key in
BBTalk).
CS
Format
Recommended Setting. Use as needed. Use WinHADCP to create the
command file. The CS command will be added to the end of the command
file or sent by the software.
Description
Use CS (or the Tab key in BBTalk) to tell the Channel Master
to start pinging its transducers and collecting data as programmed by the other commands.
NOTE. After a CS-command is sent to the Channel Master, no changes to
the commands can occur until a <BREAK> is sent (auto ensemble cycling
or at the > prompt if using manual ensemble cycling). See the CF – Flow
Control command, page 54.
If you are using SDI-12 communications, the <BREAK> must be sent to
the RS-232 port.
CT - Turnkey Operation
Purpose
Format
Range
Default
Description
Allows the Channel Master to initialize to predefined parameters and start pinging immediately after power is applied.
CTn
n = 0 to 1 (0 = Off, 1 = Turnkey)
CT0
Setting the CT command to CT1 lets the Channel Master
automatically initialize to a predefined command set during
any power up. To place the Channel Master in turnkey mode,
you must first set all other commands to the desired configuration. You must then send the CT1 and CK commands to save
this configuration. When power is cycled, the Channel Master
will start up with the desired configuration and begin the data
collection process. You can interrupt (not remove) this mode
by sending a <BREAK>. This will place the Channel Master
in the command mode, ready to accept inputs. Cycling the
power, however, will again start the data collection process.
To turn off the turnkey mode, first send a <BREAK> to the
Channel Master. Now send the CT0 and CK commands to
save this configuration. When power is cycled, the Channel
Master will NOT begin the data collection process.
P/N 95B-6001-00 (February 2006)
page 57
Channel Master Operation Manual
CZ – Power Down Channel Master
Purpose
Format
Tells the Channel Master to power down.
CZ
Recommended Setting. Use as needed.
Description
Sending the CZ-command powers down the Channel Master.
Channel Master processing is interrupted and the Channel
Master goes in the STANDBY mode (RAM is maintained).
NOTES.
1. When powered down using the CZ-command, the Channel Master still
draws up to 30µa, but wakes up periodically (every 8 to 12 hours) for a few
seconds to maintain RAM.
2. This command should be used whenever batteries have been installed
and you do not send commands to start a deployment. If you do not use
the CZ-command, the Channel Master will draw up to 50 milli-amps of
current. A new battery will be discharged in a few days.
page 58
Teledyne RD Instruments
Channel Master Operation Manual
10.4
Environmental Commands
The Channel Master uses the following commands to control the environmental and positional information that affects internal data processing.
>E?
Available Commands:
EC
ED
ES
ET
EX
EZ
E?
1500 ----------------00000 ---------------00 ------------------2100 ----------------01010 ---------------1101101 -----------------------------------
Speed Of Sound (m/s)
Xdcr Depth (deci-meters)
Salinity (ppt)
Water Temperature (.01 deg C)
Coordinate Transformations
Sensor Source {c;d;h;p;r;s;t}
Display E-Command Menu
10.4.1 Environmental Command Descriptions
This section lists the Environmental commands.
EC – Speed of Sound
Purpose
Sets the speed of sound value used for Channel Master data
processing.
ECnnnn
nnnn = 1400 to 1600 meters per second
EC1500
Format
Range
Default
Recommended Setting. The default setting for this command is
recommended for most applications.
Description
EC sets the sound speed value used by the Channel Master to
scale velocity data, cell size, and range to the bottom. The
Channel Master assumes the speed of sound reading is taken
at the transducer head. See the primer for information on
speed of sound calculations.
NOTE. If the EZ Speed of Sound field = 1, the Channel Master overrides
the manually-set EC value and calculates speed of sound using the values
determined by transducer depth (ED), salinity (ES), and transducer
temperature (ET). EZ also selects the source for ED, ES, and ET.
ED – Depth of Transducer
Purpose
Format
Range
Default
Sets the Channel Master transducer depth.
EDnnnnn
nnnnn = 0 to 65535 decimeters (meters x 10)
ED00000
Recommended Setting. Use the EZ-command (set by WinHADCP).
P/N 95B-6001-00 (February 2006)
page 59
Channel Master Operation Manual
Description
ED sets the Channel Master transducer depth. This measurement is taken from the water surface to the transducer faces.
The Channel Master uses ED in its speed of sound calculations. The Channel Master assumes the speed of sound reading is taken at the transducer head. See the primer for information on speed of sound calculations.
NOTE. If the EZ Transducer Depth field = 1, the Channel Master overrides
the manually set ED value and uses depth from the internal pressure
sensor. If a pressure sensor is not available, the Channel Master uses the
manual ED setting.
ES – Salinity
Purpose
Format
Range
Default
Sets the water’s salinity value.
ESnn
nn = 0 to 50
ES00
Recommended Setting. Set using WinHADCP. The default setting for
this command is recommended for most applications.
Description
ES sets the water’s salinity value. The Channel Master uses
ES in its speed of sound calculations. The Channel Master assumes the speed of sound reading is taken at the transducer
head.
ET – Temperature
Purpose
Format
Range
Default
Sets the water’s temperature value.
ET±nnnn
±nnnn = -5.00 C to +40.00 C
ET2100
Recommended Setting. Use the EZ-command.
Description
Example
ET sets the temperature value of the water. The Channel Master uses ET in its speed of sound calculations (see the primer).
The Channel Master assumes the speed of sound reading is
taken at the transducer head.
Convert temperatures of +14 C and -3.5 C to ET-command
values.
ET = 14.00 × 100 = 1400 = ET1400 (+ is understood)
ET = -3.50 × 100 = -350 = ET-0350
NOTE. If the EZ Temperature field = one, the Channel Master overrides
the manually set ET value and uses temperature from the transducer’s
temperature sensor. If the sensor is not available, the Channel Master
uses the manual ET setting.
page 60
Teledyne RD Instruments
Channel Master Operation Manual
EX – Coordinate Transformation
Purpose
Format
Range
Default
Sets the coordinate transformation processing flags.
EXnnnnn
Firmware switches (see description)
EX01010
Recommended Setting. The default setting for this command is
recommended for most applications.
Description
Table 12:
EX sets firmware switches that control the coordinate transformation processing for velocity and percent-good data.
Coordinate Transformation Processing Flags
Setting
Description
EX 00xxx
Output beam radial velocities
EX 01xxx
Transform velocities to instrument coordinates (X, Y where X is parallel to the transducer face; Y is normal to the transducer face)
EX xx0xx
Reserved, must be zero
EX xxx1x
Reserved, must be one
EX xxxx0
Reserved, must be zero
NOTE. Bit 2 is reserved, and must be set to one for the Channel Master
systems to get any velocity solution.
The Channel Master will not transform the data with only one good beam.
P/N 95B-6001-00 (February 2006)
page 61
Channel Master Operation Manual
EZ – Sensor Source
Purpose
Format
Default
Selects the source of environmental sensor data.
EZcdhprst
EZ1101101
Recommended Setting. The default setting for this command is
recommended for most applications.
Range
Description
Table 13:
Firmware switches (see description)
Setting the EZ-command firmware switches tells the Channel
Master to use data from a manual setting or from an associated
sensor. When a switch value is non-zero, the Channel Master
overrides the manual E_ command setting and uses data from
the appropriate sensor. If no sensor is available, the Channel
Master defaults to the manual E_ command setting. The following table shows how to interpret the sensor source switch
settings.
Sensor Source Switch Settings
Field
Value = 0
Value = 1
Value = 2
Value = 3
c
Speed Of Sound
Manual EC
Calculate using ED, ES, and ET
N/A
N/A
d
Depth
Manual ED
Depth Sensor
N/A
N/A
h
Heading
N/A
N/A
N/A
N/A
p
Pitch (Tilt 1)
Force 0
Internal Transducer Sensor
N/A
N/A
r
Roll (Tilt 2)
Force 0
Internal Transducer Sensor
N/A
N/A
s
Salinity
Manual ES
N/A
N/A
N/A
t
Temperature
Manual ET
Internal Transducer Sensor
N/A
N/A
Example
EZ1101101 means calculate speed of sound from readings,
use pressure sensor, internal tilt sensors, and the transducer
temperature sensor.
NOTE. If the bits for Pitch (Tilt 1) or Roll (Tilt 2) sensor are set to zero,
then a pitch or roll value of zero will be output.
page 62
Teledyne RD Instruments
Channel Master Operation Manual
10.5
Index Velocity and Discharge Commands
The Index Velocity and Discharge Commands allow the user to input data
and scale outputs to obtain average velocity, stage, cross-sectional area, discharge, and integrated volume directly from the Channel Master either via
serial RS-232/RS-422 or via SDI-12.
Rather than describe the commands in alphabetic order, it will be clearer to
describe them by functional grouping and logical order of their application.
The commands can be grouped into three distinct groups:
•
See “Channel Description Commands,” page 64 (IA, IC, ID,
IE, IP, and IW)
•
See “Computation Commands,” page 67 (IB, IS, and IV)
•
See “Output Commands,” page 69 (IF, IO, IT, IU, and IZ)
Command Summary
If you send ‘I?’ to the Channel Master you will receive back:
>I?
Available Commands:
IA
IB
IC
ID
IE
IF
IO
IP
IS
IT
IU
IV
IW
IZ
I?
1.000, 1.000, 1.000 - Area Rating Constants (-10000000 to 10000000)
1 -------------------- Bank 0=left,1=right
1 -------------------- Channel 0=cir,1=tra,2=rec,3=arb,4=rated
1.000 -------------- Diameter (0.5 to 100m)
0.000,
0.000 ---- Xdcr Elev.(0 to 5000m), Bot Elev. (-100 to 5000m)
10 ------------------ Flag Counter (1 to 100)
0 -------------------- Q Calc. 0=off, 1=on
---------------------- XY pairs IP0=help
---------------------- Select Velocity Bins IS0=help
0, 0 -------------- Output Exponent Dis,Vol (0 to 6)
1, 1, 1, 1, 1 -- Output Units Vel,Dis,Vol,Area,Stage 0=help
1.000, 1.000, 1.000 V. Equation Const. (-5to5,-5to5,-10to10)
1.000, 1.000 ------ BotWidth (0 to 500 m), SideSlope (run/rise)
+0, -329.95 ------ ------- ZeRo Volume Accumulator
---------------------- Display I-Command Menu
P/N 95B-6001-00 (February 2006)
page 63
Channel Master Operation Manual
10.5.1 Channel Description Commands
In order to compute cross-sectional area from stage, the shape of the channel needs to be described. The IA, IC, ID, IE, IP, and IW commands are
used for this purpose.
IA - Area Rating Constants
Purpose
Used to compute area of a rated channel using a rating
equation.
IA a.aaa, b.bbb, c.ccc
-10000000 to 10000000
IA 1.000, 1.000, 1.000
Format
Range
Default
Recommended Setting. Set using WinHADCP.
Description
These three parameters are used to compute area using a rating
equation for cross-sectional area of a rated channel where
Area = a.aaa * H2 + b.bbb * H + c.ccc
H is the stage where
H = range to surface + mounting elevation
Range to surface is the range measured by the vertical acoustic
beam and mounting elevation is from the first parameter of the
IE command.
IC – Channel Type
Purpose
Format
Range
Sets the shape of the channel.
ICn
n = 0 (circular), 1 (trapezoidal), 2 (rectangular), 3 (arbitrary),
4 (rated)
IC3
Default
Recommended Setting. Set using WinHADCP.
Description
page 64
The IC command is used to select the overall shape of the
channel.
Teledyne RD Instruments
Channel Master Operation Manual
ID - Diameter
Purpose
Format
Range
Default
Sets the diameter of a circular channel.
ID n.nnn
0.5 to 100 meters
ID 1.000
Recommended Setting. Set using WinHADCP.
Description
The ID commands sets the diameter of a circular channel in
meters. Diameters from 0.5 to 100 meters are allowed.
IE - Transducer Elevation
Purpose
Format
Range
Default
Sets the mounting elevation of the Channel Master.
IE m.mmm, n.nnn
m = 0 to 5000 meters, n = -100 to 5000 meters
IE 1.000, 0.000
Recommended Setting. Set using WinHADCP.
Description
the first value is the mounting elevation of the Channel Master. The second value is the elevation of the bottom of the
channel (for circular, trapezoidal and rectangular channels).
Both values are in meters. The range of allowed values for the
first parameter is 0 to 5000 meters and the allowed range for
the second parameter is -100 to 5000 meters.
IP - XY pairs
Purpose
Used to provide the geometric details of the channel shape for
an arbitrary channel.
IP n, x.xxx, y.yyy
n = 1 to 99, x = 1 to 9998, y = 1 to 9998 (IP0 = help)
N/A
Format
Range
Default
Recommended Setting. Set using WinHADCP.
Description
The initial position command is a list of up to 99 x, y pairs
describing the cross-section of the bottom of the channel. The
first value ‘n’ is the number of the coordinate pair in order
from one side to the other. The next two values are the horizontal distance across the channel and then the elevation of the
bottom at that distance. To end the list enter 9999, 9999 for x
and y. Entries below this are disregarded. Each n, x, y triplet
P/N 95B-6001-00 (February 2006)
page 65
Channel Master Operation Manual
must be entered on a separate line. For example, a channel
with four x, y pairs would be entered as:
IP
IP
IP
IP
IP
1,
2,
3,
4,
5,
10.5, 20.2
15.3, 15.9
20.22, 17.57
35.5, 20.2
9999, 9999
IW – Bottom Width and Side Slope
Purpose
Used to provide the geometric details of the channel shape for
a trapezoidal channel.
IW m.mmm, n.nnn
m = Bottom Width (0 to 500 m), n Side Slope (run/rise)
IW 5.000, 1.000
Format
Range
Default
Recommended Setting. Set using WinHADCP.
Description
page 66
the first value is the width of the bottom of the channel in meters. The second value is the slope of the sides as rise/run.
The first value is used for trapezoidal and rectangular channels. The second value applies only for trapezoidal channels.
Teledyne RD Instruments
Channel Master Operation Manual
10.5.2 Computation Commands
The Index Velocity and Discharge Commands Computation commands IB,
IS, and IV are used to compute the index velocity (rated mean velocity
based on the Channel Master’s velocity profile data).
IB - Bank
Purpose
Used to indicate whether the Channel Master is mounted on
the left bank or right bank.
IBn
n = 0 (left), 1 (right)
IB1
Format
Range
Default
Recommended Setting. Set using WinHADCP.
Description
the IB command is used to indicate whether the Channel Master is mounted on the left bank or right bank of the channel.
This is necessary since the Channel Master outputs negative
velocity for downstream flow if the Channel Master is
mounted on the left bank.
IS - Select Velocity Bins
Purpose
Used to select the cells that are averaged as part of the input to
compute the rated mean velocity.
IS n, B (IS0 = help)
n = 1 to 99
B = desired Bin number (1 to 255)
last entry B = 9999
IS 1,9999
Format
Range
Default
Recommended Setting. Set using WinHADCP.
Description
The IS command is used to select the cells that are to be averaged as part of the input to compute the rated mean velocity.
It is possible to select a range of cells or a list of individual
cells.
To select a continuous range of cells, use the command IS
100, B1, B2. Here, 100 indicates that a range of cells from B1
to B2 are to be used. Therefore, the command IS 100, 1, 20
selects all cells from 1-20 to be averaged together.
P/N 95B-6001-00 (February 2006)
page 67
Channel Master Operation Manual
To select a list of cells, the list is input using IS n, B where ‘n’
is the position in the list and B is the cell number. Input the
list one cell at a time. The last cell is designated by entering
9999 for the bin number. For example entering the following
will select cells 1, 3, 5, and 7 to be averaged.
IS
IS
IS
IS
IS
1,
2,
3,
4,
5,
1
3
5
7
9999
IV – Velocity Equation Constant
Purpose
Format
Range
Default
Sets the constants for the index velocity rating.
IV C1, C2, C3
C1 = -5 to 5, C2 = -5 to 5, C3 = -10 to 10
IV 0.000, 1.000, 0.000
Recommended Setting. Set using WinHADCP.
Description
page 68
The IV command is used to enter the constants for the index
velocity rating using the equation:
Vindex = C1 + (C2 + C3 * H) * Vavg
Where H is the stage of the channel and Vavg is the average
velocity of the cells selected using the IS command.
Teledyne RD Instruments
Channel Master Operation Manual
10.5.3 Output Commands
The following Index Velocity and Discharge Commands are used to set parameters used to control the output of the computed, flow, area, etc.
IF - Flag Counter
Purpose
Sets how long to use the last good velocity and vertical range
data for discharge calculation when invalid data is measured.
IFn
n = 1 to 100
IF10
Format
Range
Default
Recommended Setting. The default setting for this command is
recommended for most applications.
Description
The Channel Master calculates cumulative volume by calculating a volume for each ensemble and adding it to the total. If
a momentary problem causes a few ensembles to have invalid
data, the volume is calculated from the last good data. The IF
command sets the number of ensembles to hold the last good
data. If the problem persists longer than this, the cumulative
volume and other discharge values are not calculated or updated until more valid data is measured.
IO - Q Calculation
Purpose
Format
Range
Default
The IO commands enables and disables flow computation.
IO n
n = 0 (off), 1 (on)
IO 1
Recommended Setting. Set using WinHADCP.
Description
The IO commands enables/disables computation and output of
flow, area, volume, and stage.
IU - Output Units
Purpose
Format
Range
Default
Selects the output units to be used.
IU Velocity, Discharge, Volume, Area, Stage
See description
IU 1, 1, 1, 1, 1
Recommended Setting. Set using WinHADCP.
P/N 95B-6001-00 (February 2006)
page 69
Channel Master Operation Manual
Description
The IU command selects the units to be used for the output of
velocity, discharge, volume, area, and stage via, RS-232/422
ASCII output or via SDI-12, as well as internally recorded
data. The various possible selections are:
Velocity Units:
1 = Meters per second
2 = Feet per second
3 = Centimeters per second
Discharge Units:
1 = Cubic meters per second
2 = Cubic feet per second (cfs)
3 = Liters per second
4 = Gallons per minute
5 = Million gallons per day (mgd)
6 = Million liters per day
Volume Units:
1 = Cubic meters
2 = Cubic ft
3 = Gallons
4 = Acre-ft
5 = Liters
6 = Thousand gallons
7 = Million gallons
Area Units:
1 = Square meters
2 = Square ft
Stage Units:
1 = meters
2 = ft
NOTE. The IT command can modify some of the volume units.
IT - Output Exponent
Purpose
Format
Range
Default
The IT command allows a scaling factor to be applied to the
output of discharge and volume, respectively.
IT n1,n2
n1,n2 = 0 to 6
IT 0,0
Recommended Setting. Set using WinHADCP.
page 70
Teledyne RD Instruments
Channel Master Operation Manual
Description
Volume and discharge can be inconveniently large numbers.
For example, the SDI-12 protocol does not permit more than
seven digits in a single number. The scale factors shifts the
decimal point up to six places to the left. This effectively provides more units than the IU command alone does. For example, suppose the volume is 12345678.9 cubic feet. If the IT
command is set to 3, this would become 12345.67 kilo cubic
feet.
The IT command depends on the IU command (see “IU - Output Units,” page 69). The IT command only changes the volume if IU has set the volume unit to:
1 = Cubic meters
2 = Cubic ft
3 = Gallons
The discharge exponent is applied for all discharge units.
NOTE. In order to be able to correctly interpret output at a later time, you
should make careful records of the units and scale factors that you
selected above.
IZ - Zero Volume Accumulator
Purpose
Format
Resets or displays the cumulative volume.
IZ ZeRo (Reset to zero)
IZ ? (Display cumulative volume)
N/A
N/A
Range
Default
Recommended Setting. Use as needed. Reset using WinHADCP.
Description
IZ ZeRo resets the cumulative volume to zero. This command
is case sensitive and must be entered exactly as shown. Use
“IZ ?” to display the cumulative volume in cubic meters.
Some instruments cannot handle values larger than one million. For this reason, the cumulative volume is split into two
numbers. The first number is the millions part of the volume.
The second part is the rest of the volumn.
For example a volume of 12,345,678.90 cubic meters would
be reported as the following:
iz 12, 345678.90 ------ -----. zeRo Volume Accumulator
P/N 95B-6001-00 (February 2006)
page 71
Channel Master Operation Manual
10.6
Loop Recorder Commands
The loop recorder contains approximately two megabytes of solid-state
nonvolatile memory, which can be used to continuously record data. If
more data is collected than fits in the memory, the oldest data will be overwritten with the newest data. You always have up to the last two megabytes
of data available for download.
>M?
Available Commands:
ME
MM
MN
MR
MY
M?
---------------------- ErAsE recoder
---------------------- Show memory usage
CHM - Set file name [1..32 characters]
0 -------------------- Set recorder on/off [0=off,1=on]
---------------------- Y-Modem output
---------------------- Display M-Command Menu
10.6.1 Loop Recorder Command Descriptions
This section lists the Loop Recorder commands.
ME – Erase Recorder
Purpose
Format
Erase the contents of the loop recorder.
ME ErAsE
Recommended Setting. Use as needed.
Description
ME ErAsE erases the recorder memory. To make it more difficult to accidentally erase the data, the word “erase” must be
typed with exactly one space after the “ME” (which is not case
sensitive) and with alternating upper and lower case letters, as
shown.
>ME ErAsE
[ERASING...]
CAUTION. Once erased, data is not recoverable.
MM – Show Memory Usage
Purpose
Format
Shows recorder memory usage.
MM
Recommended Setting. Use as needed.
Description
MM
Shows memory usage and the number of used and free pages.
Loop Recorder pages: used = 0, free = 4096, bytes/page = 528
>
page 72
Teledyne RD Instruments
Channel Master Operation Manual
MN – Set File Name
Purpose
Format
Range
Default
Sets the file name for the recorder.
MN xxx
xxx = file name up to 32 characters long
MN CHM
Recommended Setting. Use as needed.
Description
The MN command sets the deployment name to be used for
any future deployments. The deployment name can be up to
32 characters long, and may contain letters, numbers, or the
underscore (i.e. “_”) character. If no deployment name is
specified, a default of “CHM” is used. The deployment name
is used as part of the file name for data files when downloaded
to the computer using BBTalk (see “Recovering Data from the
Loop Recorder,” page 15).
In order to prevent data files on the computer from being
overwritten, a ten-digit time stamp is appended to the file
name when OK is clicked on the Download Directory dialog
box (see Figure 9, page 16).
For example, the file CHM3281997475.000 would contain
data for the deployment named “CHM” (the 3281997475 in
the filename is the number of seconds since January 1st, 1900).
The file extension is always “.000”. If you wait 25 seconds
and download the same data again, the file name will change
to CHM3281997500.000.
MR – Set Recorder On/Off
Purpose
Format
Range
Default
Turns the recorder on or off.
MRn
n = 0, turn recorder off; n = 1, turn recorder on)
MR0
Recommended Setting. Use as needed.
Description Use the MR command to turn the recorder on/off.
P/N 95B-6001-00 (February 2006)
page 73
Channel Master Operation Manual
MY – Y-Modem Output
Purpose
Uploads recorder data to a host computer using standard
YMODEM protocol.
MY
Format
Recommended Setting. Use WinHADCP or BBTalk to recover data (see
“Recovering Data from the Loop Recorder,” page 15).
Description
page 74
Use the MY command to recover data from the recorder only
when BBTalk is not available to recover the data.
RY uploads the entire contents of the recorder via the serial
interface to a host computer using the standard YMODEM
protocol for binary file transfer. Any communications program that uses the YMODEM protocol may be used to upload
the recorder data. The data is transferred to the host and
stored as DOS files.
Teledyne RD Instruments
Channel Master Operation Manual
10.7
Performance and Testing Commands
The Channel Master uses the following commands for calibration and
testing.
P?
Available Commands:
PA
PC
PD
PS
PT
P?
------------------------------------------0 ----------------------------------------------------------------------------------
Run Go/No-Go Tests
Built In Tests [0=help]
Data Stream Select
System Info [0=config,1=fldr,2=vldr,4=pings]
Built In Tests, PT 0 = Help
Display P-Command Menu
10.7.1 Performance and Testing Command Descriptions
This section lists the Performance and Testing commands.
PA – Pre-deployment Tests
Purpose
Sends/displays results of a series of Channel Master system
diagnostic tests.
PA
Format
Recommended Setting. Use as needed.
Description
These diagnostic tests check the major Channel Master modules and signal paths. We recommend you run this command
before a deployment. These tests check the following
boards/paths.
• CPU - CPU RAM and real-time clock.
• DSP - RAM, registers, and DSP-to-CPU Communications.
Example
>PA
RAM test...........PASS
GO
>
PC – User-Interactive Built-In Tests
Purpose
Sends/displays results of user-interactive Channel Master system diagnostic tests.
PCnnn
nnn = 0, 2, 4 (PC0 = Help menu; see below for others)
Format
Range
Recommended Setting. Use as needed.
Description
Examples
These diagnostic tests check beam continuity and sensor data.
See below.
P/N 95B-6001-00 (February 2006)
page 75
Channel Master Operation Manual
PC0 – Help Menu
Sending PC0 displays the help menu.
>PC0
PC0
PC2
PC4
>
= Help
= Display Sensor Data
= Surface Track Ping – Advanced
PC2 – Display Sensor Data
PC2 makes measurements once a second. Lines of data end with a carriage
return so BBTalk prints successive lines on top of each other. PC20 is just
like PC2 except that lines end with a carriage return and a line feed. BBTalk
scrolls with this command.
>PC2
Sensor data is sampled and displayed in a loop.
An asterisk '*' to the right of a number indicates invalid data.
Press any key to exit the loop.
Temp(degC)
\
18.21
/
18.21
\
18.21
/
18.21
Press(kPa)
4.202
4.206
4.187
4.193
Press(m) Pitch(deg) Roll(deg)
0.429
5.66
-0.42
0.429
5.66
-0.42
0.427
5.66
-0.42
0.428
5.67
-0.43
Batt(V)
9.281
9.289
9.281
9.281
NOTE. Use the ST command to change the units for the temperature (see
“ST – Temperature Units,” page 81).
>ST?
ST C -------------------- Set temperature units (0=c; 1=f; 2=k)
>ST1
>PC2
Sensor data is sampled and displayed in a loop.
An asterisk '*' to the right of a number indicates invalid data.
Press any key to exit the loop.
Temp(degF)
\
64.78
/
64.78
\
64.78
/
64.78
Press(kPa)
4.189
4.179
4.197
4.192
Press(m) Pitch(deg) Roll(deg)
0.427
5.66
-0.43
0.426
5.67
-0.43
0.428
5.66
-0.43
0.428
5.66
-0.42
Batt(V)
9.281
9.281
9.281
9.281
>ST2
>PC2
Sensor data is sampled and displayed in a loop.
An asterisk '*' to the right of a number indicates invalid data.
Press any key to exit the loop.
Temp(degK)
\
291.36
/
291.36
\
291.36
/
291.36
Press(kPa)
4.204
4.199
4.194
4.192
Press(m) Pitch(deg) Roll(deg)
0.429
5.66
-0.42
0.428
5.67
-0.43
0.428
5.66
-0.42
0.428
5.66
-0.42
Batt(V)
9.289
9.281
9.281
9.281
PC4 – Surface Track Ping
PC4 displays the corrected/uncorrected range. Normally the corrected/uncorrected ranges are the same. In some cases, the range may be
corrected for a frequency offset in an internal oscillator.
>PC4
Uncorrected/Corrected Range =
>
page 76
2330
2330
Teledyne RD Instruments
Channel Master Operation Manual
PD – Data Stream Select
Purpose:
Format:
Range
Default
Selects the type of ensemble output data structure.
PDn
n = 0, 14, 19 (see description)
PD0
Recommended Setting. The default setting for this command is
recommended for most applications. PD14 and PD19 are used for
integration of the Channel Master with other systems or data loggers.
Description:
Table 14:
The PD command selects the normal output data structure, a
special application data structure, or a fixed data set for transmission/display as the data ensemble (see Table 14).
Data Stream Selections
Format
Description
PD0
Sends The real water-current data set
PD1 to PD13
Not used.
PD14
Send the Channel Master Condensed 2D Output Format
PD15 to PD18
Not used.
PD19
Sends discharge data in an NMEA-like ASCII format
NOTE. WinHADCP supports PD0, PD14, and PD19.
PS – Display System Parameters
Purpose
Format
Range
Sends/displays Channel Master system configuration data.
PSn
n = 0 (see description)
Recommended Setting. Use as needed.
Description
See below.
PS0 – System Configuration
PS0 sends the Channel Master hardware/firmware information. For example, the output may look like this:
>PS0
Serial Number:
Frequency:
Configuration:
Transducer Type:
Beam Angle:
Beam Pattern:
Sensors:
5813
1228800 Hz
HADCP: 2-beam velocity + vertical stage.
PISTON
20 Degrees
CONVEX
TEMP PRESS TILTS
P/N 95B-6001-00 (February 2006)
page 77
Channel Master Operation Manual
Product Version:
CPU Firmware:
FPGA Version:
Sensor Boot:
Sensor Firmware:
Board Serial
24 00 00 00
15 00 00 00
A8 00 00 00
E3 00 00 00
DC 00 00 00
90 00 00 00
>
CM02.04
28.28f
2.00.003
32.02
33.03
Number Data:
32 23 40 23
31 65 DC 23
10 66 B6 23
1F CD 99 23
31 CA 43 23
31 AB 7F 23
SNS72B-1000-00A
PIO72B-2001-00B
XDR71B-1007-00A
PER72B-2006-00X
RCV72B-2003-09A
DSP72B-2002-00A
PS1 – Fixed Leader
PS1 sends the Fixed Leader parameters (i.e., fixed system commands and
hardware/firmware information) in Hex-ASCII or binary format with the
Least Significant Byte (LSB) first (see Figure 27, page 101). For example,
a Hex-ASCII output may look like this:
>PS1
3B00001C0D4C21003502320A001900190001480300E8030000320A941100007D2D3D0023000101FF000C000
00000000000000000000000DC1200001914
>
NOTE. The output format of the PS1 command is determined by the CF
command (see “CF – Flow Control,” page 54).
PS2 – Variable Leader
PS2 sends the Variable Leader parameters (i.e., variable system commands
and sensor readings) in Hex-ASCII or binary format with the Least Significant Byte (LSB) first (see Figure 28, page 106). For example, a Hex-ASCII
output may look like this:
>PS2
3D8000130004031E10320352000000D005000000000505A40D0000BD0833005F00000000000000000000000
00000000000FFFFFFFF0000000000000000FA14
>
NOTE. The output format of the PS1 command is determined by the CF
command (see “CF – Flow Control,” page 54).
page 78
Teledyne RD Instruments
Channel Master Operation Manual
PS4 – Ping Sequence
PS4 sends an ASCII representation of the ping sequence generated by the
WP and VP commands (see “WP – Pings per Ensemble,” page 94, “VP –
Vertical Beam Number of Pings per Ensemble,” page 88 and “TP – Time
Between Pings,” page 85 for explanation of ping sequence). For example:
>PS4
Ping Sequence:
WV
>WP?
WP 001 ------------------ Number of Pings
>VP?
VP 001 ------------------ Number of Pings per Ensemble (<100)
>PS4
Ping Sequence: WV
>WP5
>VP3
>PS4
Ping Sequence:
W WV WV W WV
>WP3
>VP0
>PS4
Ping Sequence:
W W W
PT - Built-In Tests
Purpose
Sends/displays results of Channel Master system diagnostic
test.
PTnnn
nnn = PT0, PT103, PT200, PT3 (see below)
Format
Range
Recommended Setting. Use as needed.
PT0 - Help
Displays the test menu (shown below). Sending PT103 will repeat the PT3
test continually until the Channel Master receives a <BREAK>. Sending
PT200 runs all tests.
>PT0
Built In Tests
---------------PT0 = Help
PT3 = Receive Path
NOTE: Add 100 for automatic test repeat
PT200 = All tests
PT3 - Receive Path
This test displays receive path characteristics. This test is for expert users.
The test is done once for each combination of high and low gain and high
and low bandwidth. Even though there are only three transducers, the
Channel Master contains electronics to support four beams. Beams 1 and 2
P/N 95B-6001-00 (February 2006)
page 79
Channel Master Operation Manual
are the horizontal water profiling beams. Beam 4 is the vertical beam.
Beam 3 is unused electronics. The test contains four parts.
Part 1 - The Channel Master pings without transmitting and displays the result of an autocorrelation function performed on the received ambient sound
and internal electrical noise over 15 lag periods. Lag time can be calculated
from the sample rate at the bottom line of the output. Lag = 1/sample rate.
The receive path contains a band-pass filter that limits the correlation time
of the received signal for beams 1 and 2 to a few lag times. Longer correlation times indicate a problem such as interference from a radio station.
Beams 3 and 4 cannot be so easily interpreted because of electrical and frequency differences.
Part 2 - The received signal is split into two parts and hard limited into 1's
and 0's. A random signal should have about 50% of each. A duty cycle
much different from 50% is an indication of a problem.
Part 3 - Random electrical noise sampled at two different times have some
level of correlation. This correlation is called the noise floor. It can be
seen at the tail end of the 15 lags.
A higher than usual noise floor may indicate the presence of a signal that
self correlates better than random noise or a hardware problem. The noise
floor should be higher at high gain and lower at low gain. Too small a difference can indicate a problem in the demodulator, receiver, or RSSI
switching circuitry.
Part 4 - For beams 1 and 2, the bandwidth of the band-pass filter can be cal-
culated by integrating correlation over lag times.
>PT3
Receive Path Test (Hard Limited):
H-Gain W-BW
L-Gain W-BW
Correlation Magnitude (percent)
Lag Bm1 Bm2 Bm3 Bm4
Bm1 Bm2 Bm3 Bm4
0 100 100 100 100
100 100 100 100
1 83 83 86 85
80 79 79 90
2 51 51 55 70
46 41 41 71
3 24 26 28 49
18 15 16 49
4
9 13 12 33
6
2
3 28
5
5
8
6 20
2
0
4 14
6
5
6
5 10
4
2
5
4
7
5
6
5
6
4
1
3
3
8
4
5
4
4
2
3
1
6
9
3
3
4
4
1
4
2
6
10
2
2
4
3
2
4
3
7
11
3
3
4
6
2
5
3
8
12
1
5
4
5
4
6
3
8
13
0
4
3
4
5
6
3
7
14
2
3
3
4
6
8
2
6
15
1
3
2
5
5
7
3
5
Sin Duty Cycle (percent)
44 49 50 54
51 52 51 54
Cos Duty Cycle (percent)
51 48 50 54
51 49 50 51
RSSI Noise Floor (counts)
66 50 66 62
57 41 57 52
BandWidth (kHz)
369 350 347 293
379 383 394 291
Sample Rate (Hz)
1228800
1228800
page 80
H-Gain N-BW
L-Gain N-BW
Bm1 Bm2 Bm3 Bm4
100 100 100 100
79 81 81 93
43 44 45 79
16 18 19 61
3
3
7 43
2
3
6 30
1
4
6 20
3
3
6 13
4
1
5 10
4
4
1
8
3
5
2
8
0
5
2
9
2
3
3 11
2
1
2 12
2
1
3 12
4
1
4 13
Bm1 Bm2 Bm3 Bm4
100 100 100 100
78 77 78 93
42 41 41 77
16 16 15 57
6
5
5 38
5
3
6 22
3
3
7 10
1
1
6
3
2
2
3
4
5
2
2
7
7
1
2
8
6
1
2
7
6
3
3
5
6
5
3
3
6
3
5
1
3
3
6
1
46
51
52
65
51
52
51
54
49
48
53
62
51
52
53
58
73
58
74
70
57
41
57
52
99
97
94
60
94 100
95
70
307200
307200
Teledyne RD Instruments
Channel Master Operation Manual
10.8
Sensor Commands
The following commands let you set the sensor functions.
>S?
Available Commands:
ST C -------------------- Set temperature units (0=c; 1=f; 2=k)
SZ ---------------------- Zero Pressure Sensor
S? ---------------------- Display S-Command Menu
10.8.1 Sensor Command Descriptions
This section lists the sensor commands.
SZ – Zero Pressure Sensor
Purpose
Format
Zeros the pressure sensor.
SZ
Recommended Setting. Use as needed.
Description
This command zeros the pressure sensor at the specific location where the Channel Master will be used.
ST – Temperature Units
Purpose
Format
Range
Default
Description
Sets the units for the temperature sensor in the PC2 test.
STn
n = 0 (Celsius), 1 (Fahrenheit), 2 (Kelvin)
ST0
Sets the units for the temperature sensor as output by the PC2
command (see “PC2 – Display Sensor Data,” page 76).
NOTE. This command does not change the temperature units in the
Variable Leader Data (see Figure 28, page 106).
P/N 95B-6001-00 (February 2006)
page 81
Channel Master Operation Manual
10.9
Timing Commands
The following commands let you set the timing of various profiling functions.
>T?
Available Commands:
TD
TE
TF
TP
TS
00:20:00.00 ---------00:00:05.00 ---------00/00/00,00:00:00 ---00:00.60 ------------06/01/24,10:45:57.95 06/01/24,10:45:57.95 T? ----------------------
SDI-12 Watchdog timer reset
Time Between Ensembles
Set First Ping Time (yy/mm/dd,hh:mm:ss)
Time Between Pings
Set System Date and Time (yy/mm/dd,hh:mm:ss)
Stored Time
Display T-Command Menu
10.9.1 Standard Timing Command Descriptions
This section lists the Timing commands.
TD – Built-In Watchdog Timer
Purpose:
Format:
Range:
Default:
Sets the reset time period (TD) from the user-entered time on
the command line. The user must enter the TD time as eight
digits, with or without delimiters.
TDhh:mm:ss.ff (acceptable formats include: TDhhmmssff,
TDhh:mm:ss.ff, or TDhh mm ss ff)
hh = 00 to 23 hours
mm = 00 to 59 minutes
ss = 00 to 59 seconds
ff = 00 to 99 hundredths of seconds
TD00:20:00.00
Recommended Setting. Set TD to a duration longer than the SDI-12
measurement interval. Do not set it close to the actual SDI-12 measurement
interval as this could possibly cause unwanted resets just at the time the
next measurement request is occurring.
Description:
page 82
If the Channel Master fails to respond to an SDI-12 measurement request, the TD command will reset the Dual UART circuitry in the Channel Master. This will allow the Channel
Master to continue responding to subsequent measurements
although the last missed request will be lost.
The TD command should be set to an interval that’s a few
minutes longer than the expected time between SDI-12 measurements. If the SDI-12 measurement interval is 15 minutes,
set the TD value to 20 to 25 minutes; do not set the timer to 15
minutes.
Teledyne RD Instruments
Channel Master Operation Manual
TE – Time Per Ensemble
Purpose
Sets the time interval between data collection cycles (data ensembles).
TEhh:mm:ss.ff
hh
= 00 to 23 hours
mm
= 00 to 59 minutes
ss
= 00 to 59 seconds
ff
= 00 to 99 hundredths of seconds
TE 00:00:05.00
Format
Range
Default
Recommended Setting. Set using WinHADCP.
Description
Example
The TE command sets the time between the start of one ensemble and the start of the next. If TE is very short, the Channel Master will generate the next ensemble as soon as the last
ensemble completes. The time needed to complete an ensemble is controlled by the number of pings (WP, VP) and time
between pings (TP).
Min Ensemble time = (WP + VP - 1) x TP + Overhead
= WP x TP (approximately)
Overhead is the time needed to process and save the data. It is
typically less than a second, especially for high BAUD rates or
few cells. The time needed to complete a ping may be longer
than the TP command; For example, setting the TP command
to TP00:00.00 will cause the next ping to be transmitted immediately after the last ping completes.
TE01:15:30.00 tells the Channel Master to collect data ensembles every 1 hour, 15 minutes, 30 seconds.
NOTES.
The time tag for each ensemble is the time of the first ping of that
ensemble, not the time of output.
For SDI-12, the data logger tells the Channel Master when to generate an
ensemble. TE is ignored.
P/N 95B-6001-00 (February 2006)
page 83
Channel Master Operation Manual
TF – Time of First Ping
Purpose
Sets the time and date the Channel Master wakes up to start
data collection.
TFyy/mm/dd, hh:mm:ss
yy
= year
00-99
mm
= month 01-12
dd
= day
01-31 (leap years are accounted for)
hh
= hour
00-23
mm
= minute 00-59
ss
= second 00-59
Format
Range
Recommended Setting. Set using WinHADCP.
Description
Example
TF delays the start of data collection. This lets you deploy the
Channel Master in the Standby mode and have it
automatically start data collection at a preset time (typically
used in battery operated instruments). When the command is
given to the Channel Master to start pinging, TF is tested for
validity. If valid, the Channel Master sets its alarm clock to
TF, goes to sleep, and waits until time TF before beginning
the data collection process.
If you want the exact time of the first ping to be on November
23, 1992 at 1:37:15 pm, you would enter TF92/11/23,
13:37:15. If you want the Channel Master to begin pinging
immediately after receiving the CS-command (see notes), do
not enter a TF-command value.
NOTES.
1. Although you may send a TF-command to the Channel Master, you
also must send the CS-command before deploying the Channel Master.
2. If the entry is not valid, the Channel Master sends an error message
and does not update the wake-up time.
3. Sending a <BREAK> clears the TF time.
page 84
Teledyne RD Instruments
Channel Master Operation Manual
TP – Time Between Pings
Purpose
Format
Range
Sets the time interval between pings in an ensemble.
TPmm:ss.ff
mm
= 00 to 59 minutes
ss
= 00 to 59 seconds
ff
= 00 to 99 hundredths of seconds
TP00:00.60
Default
Recommended Setting. Set using WinHADCP.
Description
Example
The TP command sets the time interval between the start of
one ping and the start of the next within an ensemble. If TP is
very short, the Channel Master will generate the next ping as
soon as the last ping completes.
The time needed to complete a ping may not be easy to predict. It is controlled by sound propagation time (speed of
sound x max range x 2), processing overhead, and other factors. The max range is controlled by commands (WF, WN,
WS) and the environment (for example, range to the surface
for the vertical beam). The vertical beam ping consists of
multiple sub-pings.
TP00:00.10 sets the time between pings to 0.10 second.
NOTE. The Channel Master automatically increases TE if WP x TP > TE.
P/N 95B-6001-00 (February 2006)
page 85
Channel Master Operation Manual
TS – Set Real-Time Clock
Purpose
Format
Range
Sets the Channel Master’s internal real-time clock.
TSyy/mm/dd, hh:mm:ss
yy
= year
00-99
mm
= month 01-12
dd
= day
01-31
hh
= hour
00-23
mm
= minute 00-59
ss
= second 00-59
Recommended Setting. Set using WinHADCP.
Description
Use the TS command to set the Channel Master’s internal
clock. Sending TS? displays two times. Usually they are
identical, but the first time after power up, TS? displays the
current time and the time power was removed.
>ts?
TS 06/01/30,10:29:41.14
06/01/30,10:29:24.00
>ts?
TS 06/01/30,10:29:46.39
06/01/30,10:29:46.39
Example
- Set System Date and Time (yy/mm/dd,hh:mm:ss)
- Stored Time
- Set System Date and Time (yy/mm/dd,hh:mm:ss)
- Stored Time
TS06/06/17, 13:15:00 sets the real-time clock to 1:15:00 pm,
June 17, 2006.
NOTES.
When the Channel Master receives the carriage return after the TScommand, it enters the new time into the real-time clock and sets
hundredths of seconds to zero.
The internal clock does account for leap years.
If the entry is not valid, the Channel Master sends an error message and
does not update the real-time clock.
page 86
Teledyne RD Instruments
Channel Master Operation Manual
10.10 Vertical Beam Commands
The following commands define the criteria used to set the Vertical Beam
data.
>V?
Available Commands:
VD
VF
VP
V?
111000000 -----------0005 ----------------001 ---------------------------------------
Data Out {a;c;s;*;*;*;*;*;*}
Blank (cm)
Number of Pings per Ensemble (<100)
Display V-Command Menu
10.10.1 Vertical Beam Command Descriptions
This section lists the Vertical Beam commands.
VD – Vertical Beam Data Out
Purpose
Selects the vertical beam data types included in a PD0
ensemble.
VD abcdefghi
Firmware switches (see description)
VD 111000000
Format
Range
Default
Recommended Setting. The default setting for this command is
recommended for most applications.
Description
Example
The VD command uses firmware switches to tell the Channel
Master the types of vertical beam data to include in a PD0 ensemble. PD0 ensembles always contain a header, fixed and
variable leader, and checksum. The bits are described as follows:
a = surface track amplitude
d = Reserved
g = Reserved
b = surface track commands
e = Reserved
h = Reserved
c = surface track status
f = Reserved
I = Reserved
VD 111000000 (default) tells the Channel Master to include
surface track amplitude, surface track commands, and surface
track status.
NOTE.
1. Each bit can have a value of one or zero. Setting a bit to one means
output data, zero means suppress data.
2. IF VP = zero, the Channel Master does not collect vertical beam data,
and VD has no effect (see “VP – Vertical Beam Number of Pings per
Ensemble,” page 88). No vertical beam data is included.
3. The VD command does not affect the contents of PD14, PD19, or
SDI-12 data.
4. See the WD command for water profile and firmware version data (see
“WD – Data Out,” page 92).
P/N 95B-6001-00 (February 2006)
page 87
Channel Master Operation Manual
VF – Vertical Beam Blank after Transmit
Purpose
Format
Range
Default
Moves the start of the search away from the transducer head.
VFnnnn
nnnn = 5 to 9999 cm (328 feet)
VF0005
Recommended Setting. The default setting for this command is
recommended for most applications.
Description
Set the VF command to start the search for the surface to some
distance after transmit to avoid adjacent structures or to allow
transmit recovery.
VP – Vertical Beam Number of Pings per Ensemble
Purpose
Format
Range
Default
Sets the number of pings per ensemble.
VPnn
nn = 0 to 99 pings
VP1
Recommended Setting. The default setting for this command is
recommended for most applications.
Description
This is similar to the WP command. Unlike horizontal beam
pings, vertical beam pings contain multiple sub-pings. This
means vertical beam pings take longer, but produce higher
resolution and better averaged data than they otherwise would.
NOTE. IF VP = zero, the Channel Master does not collect vertical beam
data, and the VD command will have no effect (see “VD – Vertical Beam
Data Out,” page 87). No vertical beam data (Surface track amplitude,
surface track commands, and surface track status) will be included in the
output data.
page 88
Teledyne RD Instruments
Channel Master Operation Manual
10.10.2 Expert Level Vertical Beam Command Descriptions
The following expert commands define the criteria used to set the Vertical
Beam data.
#VC – Detection Filter, Pressure & Range Screening Control
Purpose
Format
Range
Default
1. Controls the surface detection filter that is applied to average RSSI data.
2. Controls whether the pressure sensor will be used as a first
guess in detecting the surface.
3. Controls the percent of range used in screening pings within
a burst.
#VC m p rrr
m = 0 to 2
p = 0 or 1
rrr = 0 to 100 %
#VC 0 0 25
Recommended Setting. The default setting for this command is
recommended for most applications.
Description: See below.
If m = 0, the ‘W’ filter is used on average data. If m = 1, the
leading edge filter is used on average data. If m = 2, the ‘W’
filter and then the leading edge filter is used on average data.
If p = 0, then the pressure sensor is not used. If p = 1, then the
pressure sensor is used. Using the pressure sensor can reduce
ping time and avoid false detection. Set the #VS command to
1 or 2 sub-pings for an improved ping rate if the pressure sensor is used.
The value set by the rrr digits determines the allowable difference of individual pings’ range from the average range over a
burst. The allowable difference is ±rrr, so the window is
twice rrr. Screening the individual pings in this way is an effective means of avoiding false detection.
NOTE. For information on other expert level vertical beam commands, see
FST-006 (available for download on www.rdinstruments.com) or contact
Teledyne RDI (see “Technical Support,” page 137).
P/N 95B-6001-00 (February 2006)
page 89
Channel Master Operation Manual
10.11 Water Profiling Commands
The following commands define the criteria used to collect the water-profile
data.
>W?
Available Commands:
WA
WB
WC
WD
WF
WN
WP
WS
WV
W?
255 -----------------0 -------------------072 -----------------111110000 -----------0050 ----------------025 -----------------001 -----------------0100 ----------------0175 --------------------------------------
False Target Amplitude Threshold [0-255]
Bandwidth 0=High, 1=low
Correlation Threshold [0-255]
Data Out {v;c;a;p;s;*;*;*;*}
Blanking Distance (cm)
Number of Bins [0-255]
Number of Pings
Bin Size (cm)
Ambiguity Velocity (cm/s)
Display W-Command Menu
10.11.1 Water Profiling Command Descriptions
This section lists the Water Profiling commands.
WA – False Target Threshold Maximum
Purpose
Format
Range
Default
Sets a false target (fish) filter.
WAnnn
nnn = 0 to 255 counts (255 disables this filter)
WA255
Recommended Setting. The default setting for this command is
recommended for most applications.
Description
The Channel Master uses the WA-command to screen watertrack data for false targets (usually fish). WA sets the maximum difference between echo intensity readings among the
profiling beams. If the WA threshold value is exceeded, the
Channel Master rejects velocity data on a cell-by-cell basis for
either the affected beam (fish detected in only one beam) or
for the affected cell in all beams (fish detected in more than
one beam). This usually occurs when fish pass through one or
more beams.
NOTE. A WA value of 255 turns off this feature.
page 90
Teledyne RD Instruments
Channel Master Operation Manual
WB – Mode 1 Bandwidth Control
Purpose
Sets profiling mode 1 bandwidth (sampling rate). Low bandwidth allows the Channel Master to profile farther, but the
standard deviation is increased by as much as 2.5 times.
WBn
n = 0 (High), 1 (Low)
WB0
Format
Range
Default
Recommended Setting. The default setting for this command is
recommended for most applications.
Description
Table 15:
The WB-command influences profiling range. If you narrow
the bandwidth of the system, the profiling range is increased.
See table below.
Bandwidth Control
Bandwidth
Sample rate
Data variance
Profiling range
0 = High
High
Low
Low
1 = Low
Low
High
High
WC – Low Correlation Threshold
Purpose
Sets the minimum threshold of water-track data that must
meet the correlation criteria.
WCnnn
nnn = 0 to 255 counts
WC072
Format
Range
Default
Recommended Setting. The default setting for this command is
recommended for most applications.
Description
The Channel Master uses WC to screen water-track data for
the minimum acceptable correlation requirements. WC sets
the threshold of the correlation below, which the Channel
Master flags the data as bad and does not average the data into
the ensemble.
NOTE. The default threshold for all frequencies is 72 counts. A solid
target would have a correlation of 255 counts.
P/N 95B-6001-00 (February 2006)
page 91
Channel Master Operation Manual
WD – Data Out
Purpose
Selects the water profile data types included in a PD0
ensemble.
WD abcdefghi
Firmware switches (see description)
WD 111110000
Format
Range
Default
Recommended Setting. The default setting for this command is
recommended for most applications.
Description
The WD command uses firmware switches to tell the Channel
Master the types of velocity profile data and firmware version
data to include in a PD0 ensemble. PD0 ensembles always
contain a header, fixed and variable leader, and checksum.
a = Velocity
d = Percent good
g = Reserved
b = Correlation
e = Status and Firmware Version
h = Reserved
c = Echo Intensity
f = Reserved
I = Reserved
Example
WD 111110000 (default) tells the Channel Master to include
velocity correlation, echo intensity, percent good, status, and
firmware version.
NOTES.
1. Each bit can have a value of one or zero. Setting a bit to one means
output data, zero means suppress data.
2. The WD command does not affect the contents of PD14, PD19, or
SDI-12 data.
3. IF WP = zero, the Channel Master does not collect water track data, and
therefore WD would only affect the firmware version output. No water
track data is included (see “WP – Pings per Ensemble,” page 94).
4. See the VD command for vertical beam data (see “VD – Vertical Beam
Data Out,” page 87).
5. If the Status bit is set to zero, this disables both the status data and the
firmware version (see “Firmware Version Data Format,” page 115).
page 92
Teledyne RD Instruments
Channel Master Operation Manual
WF – Blank after Transmit
Purpose
Moves the location of first cell away from the transducer head
to allow the transmit circuits time to recover before the receive
cycle begins.
WFnnnn
see table
Format
Range
Frequency
Minimum
Maximum
300 kHz
10 cm
9999 cm (328 feet)
600 kHz
5 cm
9999 cm (328 feet)
1200 kHz
5 cm
9999 cm (328 feet)
Default
WF0050 (1200 kHz), WF0100 (600 kHz), WF0200 (300 kHz)
Recommended Setting. The default setting for this command is
recommended for most applications.
Description
WF positions the start of the first cell at some vertical distance
from the transducer head. This allows the Channel Master
transmit circuits time to recover before beginning the receive
cycle. In effect, WF blanks out bad data close to the transducer head, thus creating a depth window that reduces unwanted data in the ensemble.
NOTES.
1. The distance to the middle of cell #1 is a function of blank after transmit
(WF), cell size (WS), and speed of sound. The fixed leader data contains
this distance.
2. Small WF values may show ringing/recovery problems in the first cells
that cannot be screened by the Channel Master.
WN – Number of Cells
Purpose
Sets the number of cells over which the Channel Master collects data.
WNnnn
nnn = 001 to 255 cells
WN025
Format
Range
Default
Recommended Setting. Set using WinHADCP.
Description
The range of the Channel Master is set by the number of cells
(WN) times the size of each cell (WS).
P/N 95B-6001-00 (February 2006)
page 93
Channel Master Operation Manual
WP – Pings per Ensemble
Purpose
Format
Range
Default
Sets the number of pings to average in each data ensemble.
WPnnnnn
nnnnn = 0 to 999 pings
WP00001
Recommended Setting. Set using WinHADCP.
Description
WP sets the number of pings to average in each ensemble before sending/recording the data.
NOTE. If WP = zero the Channel Master does not collect water-profile
data.
The WP command affects the minimum ensemble interval (see “TE – Time
Per Ensemble,” page 83).
WS – Cell Size
Purpose
Format
Range
Default
Selects the volume of water for one measurement cell.
WSnnnn
see table
see table
Frequency
Range
Default
300 kHz
100 to 1000 cm
WS0400
600 kHz
100 to 800 cm
WS0200
1200 kHz
10 to 400 cm
WS0100
Recommended Setting. Set using WinHADCP.
Description
page 94
The Channel Master collects data over a variable number of
cells. WS sets the size of each cell in centimeters.
Teledyne RD Instruments
Channel Master Operation Manual
WV – Ambiguity Velocity
Purpose
Format
Range
Default
Sets the radial ambiguity velocity.
WVnnn
nnn = 000 to 999 cm/s
WV175
Recommended Setting. It is strongly recommended that the WV
command be left at the default value of 175.
Description
Set WV as low as possible to attain maximum performance,
but not too low or ambiguity errors will occur. RDI recommends that the WV command not be set below 100cm/s. Rule
of thumb: Set WV to the maximum horizontal velocity relative to the Channel Master.
The WV command (ambiguity velocity setting) sets the
maximum velocity that can be measured along the beam. WV
is used to improve the single-ping standard deviation. The
lower the value of the WV command is, the lower the singleping standard deviation.
P/N 95B-6001-00 (February 2006)
page 95
Channel Master Operation Manual
11
Channel Master PD0 Output Data Format
This section shows the output data format of the Channel Master. Channel Master
output data can be in either hexadecimal-ASCII or binary format. You can select
this option through the CF-command (see the “CF – Flow Control,” page 54). We
explain the output data formats in enough detail to let you create your own data
processing or analysis programs (see “How to Decode a Channel Master Ensemble,” page 127).
The following description is for the standard PD0 Channel Master output data
format. Figure 26, page 98 through Figure 34, page 123 shows the ASCII and binary data formats for the Channel Master PD0 mode. Table 17, page 99 through
Table 30, page 123 defines each field in the output data structure.
After completing a data collection cycle, the Channel Master immediately sends a
data ensemble. The following pages show the types and sequence of data that you
may include in the Channel Master output data ensemble and the number of bytes
required for each data type. The Channel Master sends all the data for a given
type for all range cells and all beams before the next data type begins.
The Channel Master by default is set to collect velocity, correlation data, echo intensity, percent good data, and status. The data, preceded by ID code 7F7F, contains header data (explained in Table 17, page 99). The fixed and variable leader
data is preceded by ID codes 0000 and 0080, (explained in Table 18, page 102 and
Table 19, page 107). The Channel Master always collects Header and Leader data.
The table below shows some of the most common IDs.
Table 16:
Data ID Codes
ID
LSB
MSB
Description
0x7F7F
7F
7F
Header
0x0000
00
00
Fixed Leader
0x0002
02
00
Firmware Version
0x0080
80
00
Variable Leader
0x0100
00
01
Velocity Profile Data
0x0200
00
02
Correlation Profile Data
0x0300
00
03
Echo Intensity Profile Data
0x0400
00
04
Percent Good Profile Data
0x0500
00
05
Status Profile Data
0x4000
00
40
Surface Track Status
0x4001
01
40
Surface Track Commands
0x4002
02
40
Surface Track Amplitude
NOTE. The Channel Master always sends the Least Significant Byte
(LSB) first.
page 96
Teledyne RD Instruments
Channel Master Operation Manual
ALWAYS OUTPUT
WD-command
WP-command
VD-command
VP-command
HEADER
(6 BYTES + [2 x No. OF DATA TYPES])
FIXED LEADER DATA
(58 BYTES)
VARIABLE LEADER DATA
(60 BYTES)
VELOCITY
(2 BYTES + 8 BYTES PER RANGE CELL)
CORRELATION MAGNITUDE
(2 BYTES + 4 BYTES PER RANGE CELL)
ECHO INTENSITY
(2 BYTES + 4 BYTES PER RANGE CELL)
PERCENT GOOD
(2 BYTES + 4 BYTES PER RANGE CELL)
STATUS
(2 BYTES + 4 BYTES PER RANGE CELL)
FIRMWARE VERSION
(39 or 50 BYTES)
SURFACE TRACK AMPLITUDE
(16+7*N Ping - 1 BYTE)
SURFACE TRACK COMMANDS
(28 BYTES)
SURFACE TRACK STATUS
(46 BYTES)
RESERVED
(2 BYTES)
ALWAYS OUTPUT
CHECKSUM
(2 BYTES)
Figure 25.
PD0 Standard Output Data Buffer Format
NOTE. Some data outputs are in bytes per range cell. For example, if the
WN-command (number of range cells) = 30, and the following data are
selected for output, the required data buffer storage space is 1099 bytes
per ensemble.
WD-COMMAND = WD 111 110 000 (default), WP-COMMAND = 1 (default)
VD-COMMAND = VD 111 000 000 (default), VP-COMMAND = 1 (default)
28
BYTES OF HEADER DATA (6 + [2x Number Of Data Types])
58
BYTES OF FIXED LEADER DATA (FIXED)
60
BYTES OF VARIABLE LEADER DATA (FIXED)
242
BYTES OF VELOCITY DATA (2 + 8 x 30)
122
BYTES OF CORRELATION MAGNITUDE DATA (2 + 4 x 30)
122
BYTES OF ECHO INTENSITY (2 + 4 x 30)
122
BYTES OF PERCENT-GOOD DATA (2 + 4 x 30)
122
BYTES OF STATUS DATA (2 + 4 x 30)
50
BYTES OF FIRMWARE VERSION (with SDI)
95
BYTES OF SURFACE TRACK AMPLITUDE DATA (16 + 7*1 - 1)
28
BYTES OF SURFACE TRACK COMMANDS DATA
46
BYTES OF SURFACE TRACK STATUS DATA
2
BYTES OF RESERVED FOR RDI USE (FIXED)
2
BYTES OF CHECKSUM DATA (FIXED)
1099
BYTES OF DATA PER ENSEMBLE
NOTE. If the WD command Status bit is set to zero (WD xxx x0x xxx, then
the status and firmware version outputs will be disabled. The required data
buffer storage space will be reduced to 927 bytes per ensemble.
The order of data types in an ensemble is not fixed. For example, there is
no guarantee that velocity data will always be output before correlation
data (see “How to Decode a Channel Master Ensemble,” page 127).
P/N 95B-6001-00 (February 2006)
page 97
Channel Master Operation Manual
11.1
Header Data Format
BIT POSITIONS
BYTE
7
6
5
4
3
2
1
HEADER ID (7Fh)
2
DATA SOURCE ID (7Fh)
3
1
0
LSB
NUMBER OF BYTES IN ENSEMBLE
4
5
SPARE
6
NUMBER OF DATA TYPES
7
MSB
LSB
OFFSET FOR DATA TYPE #1
8
9
MSB
LSB
OFFSET FOR DATA TYPE #2
10
11
MSB
LSB
OFFSET FOR DATA TYPE #3
12
MSB
(SEQUENCE CONTINUES FOR UP TO N DATA TYPES)
↓
2N+5
OFFSET FOR DATA TYPE #N
2N+6
↓
LSB
MSB
See Table 17, page 99 for a description of the fields.
Figure 26.
Binary Header Data Format
NOTE. This data is always output in this format.
page 98
Teledyne RD Instruments
Channel Master Operation Manual
Header information is the first item sent by the Channel Master to the output buffer. The Channel Master always sends the Least Significant Byte
(LSB) first.
Table 17:
Header Data Format
Hex Digit
Binary
Byte
Field
Description
1,2
1
HDR ID /
Header ID
Stores the header identification byte (7Fh).
3,4
2
HDR ID / Data
Source ID
Stores the data source identification byte (7Fh for the Channel
Master).
5-8
3,4
Bytes / Number of bytes in
ensemble
This field contains the number of bytes from the start of the
current ensemble up to, but not including, the 2-byte checksum
(Figure 34, page 123).
9,10
5
Spare
Undefined.
11,12
6
No. DT / Number of Data
Types
This field contains the number of data types selected for collection. By default, fixed/variable leader, velocity, correlation
magnitude, echo intensity, and percent good are selected for
collection. This field will therefore have a value of six (4 data
types + 2 for the Fixed/Variable Leader data).
13-16
7,8
Address Offset
for Data Type
#1 / Offset for
Data Type #1
This field contains the internal memory address offset where
the Channel Master will store information for data type #1 (with
this firmware, always the Fixed Leader). Adding “1” to this
offset number gives the absolute Binary Byte number in the
ensemble where Data Type #1 begins (the first byte of the
ensemble is Binary Byte #1).
17-20
9,10
Address Offset
for Data Type
#2 / Offset for
Data Type #2
This field contains the internal memory address offset where
the Channel Master will store information for data type #2 (with
this firmware, always the Variable Leader). Adding “1” to this
offset number gives the absolute Binary Byte number in the
ensemble where Data Type #2 begins (the first byte of the
ensemble is Binary Byte #1).
21-24
thru
2n+13 to
2n+16
11,12
thru
2n+5,
2n+6
Address Offsets for Data
Types #3-n /
Offset for Data
Type #3
through #n
These fields contain internal memory address offset where the
Channel Master will store information for data type #3 through
data type #n. Adding “1” to this offset number gives the absolute Binary Byte number in the ensemble where Data Types #3n begin (first byte of ensemble is Binary Byte) #1).
P/N 95B-6001-00 (February 2006)
page 99
Channel Master Operation Manual
11.2
Fixed Leader Data Format
BIT POSITIONS
BYTE
1
7
6
5
4
3
2
FIXED LEADER ID = 0000
2
CPU F/W VER.
4
CPU F/W REV.
6
7
8
SYSTEM CONFIGURATION
NUMBER OF BEAMS
10
NUMBER OF CELLS {WN}
12
13
14
15
16
PINGS PER ENSEMBLE {WP}
RANGE CELL LENGTH {WS}
BLANK AFTER TRANSMIT {WF}
17
RESERVED
18
LOW CORR THRESH {WC}
19
NO. CODE REPS
20
RESERVED
21
22
ERROR VELOCITY MAXIMUM {WE}
23
TPP MINUTES
24
TPP SECONDS
25
TPP HUNDREDTHS {TP}
26
COORDINATE TRANSFORM {EX}
27
28
LSB 00h
LSB
MSB
RESERVED
9
11
0
MSB 00h
3
5
1
LSB
MSB
LSB
MSB
LSB
MSB
LSB
MSB
RESERVED
Continued Next Page
page 100
Teledyne RD Instruments
Channel Master Operation Manual
Continued from Previous Page
29
RESERVED
30
31
SENSOR SOURCE {EZ}
32
SENSORS AVAILABLE
33
BIN 1 DISTANCE
34
35
36
RESERVED
37
38
39
FALSE TARGET THRESH {WA}
40
RESERVED
41
TRANSMIT LAG DISTANCE
42
43
LSB
MSB
LSB
↓
CPU BOARD SERIAL NUMBER
50
↓
MSB
51
SYSTEM BANDWIDTH {WB}
52
LSB
MSB
RESERVED
53
54
55
↓
CHANNEL MASTER SERIAL NUMBER
58
See Table 18, page 102 for a description of the fields
Figure 27.
Fixed Leader Data Format
NOTE. This data is always output in this format.
P/N 95B-6001-00 (February 2006)
page 101
Channel Master Operation Manual
Fixed Leader data refers to the non-dynamic Channel Master data that only
changes when you change certain commands. Fixed Leader data also contain hardware information. The Channel Master always sends Fixed Leader
data as output data (LSBs first).
Table 18:
Fixed Leader Data Format
Hex Digit
Binary
Byte
Field
Description
1-4
1,2
FID / Fixed
Leader ID
Stores the Fixed Leader identification word 0000 (00 00h). LSB
is sent first.
5,6
3
fv / CPU F/W
Ver.
Contains the version number of the CPU firmware.
7,8
4
fr / CPU F/W
Rev.
Contains the revision number of the CPU firmware.
9-12
5,6
Sys Cfg / System Configuration
This field defines the Channel Master hardware configuration.
Convert this field (2 bytes, LSB first) to binary and interpret as
follows.
LSB
BITS
MSB
BITS
7
0
1
6
0
1
-
5
0
0
1
-
4
0
1
0
-
3
0
1
-
2
0
0
0
0
1
1
1
-
1
0
0
1
1
0
0
1
-
0
0
1
0
1
0
1
0
-
75-kHz SYSTEM
150-kHz SYSTEM
300-kHz SYSTEM
600-kHz SYSTEM
1200-kHz SYSTEM
2400-kHz SYSTEM
38-kHz SYSTEM
CONCAVE BEAM PAT.
CONVEX BEAM PAT.
RESERVED
RESERVED
RESERVED
XDCR HD NOT ATT.
XDCR HD ATTACHED
DOWN FACING BEAM
UP-FACING BEAM
7
0
0
0
1
6
0
1
1
1
5
1
0
0
1
4
0
0
1
1
3
-
2
-
1
0
0
1
1
-
0
0
1
0
1
-
15E BEAM ANGLE
20E BEAM ANGLE
30E BEAM ANGLE
25E BEAM ANGLE
2-BEAM + VERT. STAGE
4-BEAM JANUS CONFIG
5-BM JANUS CFIG DEMOD)
5-BM JANUS CFIG.(2 DEMD)
Example: Hex 5249 (i.e., hex 49 followed by hex 52) identifies
a 150-kHz system, convex beam pattern, down-facing, 30E
beam angle, 5 beams (3 demods).
13 - 16
7-8
Reserved
Reserved
17,18
9
#Bm / Number
of Beams
Contains the number of beams used to calculate velocity data
(not physical beams). The Channel Master uses two beams to
calculate horizontal velocity and one vertical beam to calculate
stage.
Continued Next Page
page 102
Teledyne RD Instruments
Channel Master Operation Manual
Table 18:
Fixed Leader Data Format (continued)
Hex Digit
Binary
Byte
Field
Description
19,20
10
WN / Number
of Cells
Contains the number of range cells over which the Channel
Master collects data (WN-command).
Scaling: LSD = 1 range cell; Range = 1 to 128 range cells
21-24
11,12
WP / Pings
Per Ensemble
Contains the number of pings averaged together during a data
ensemble (WP-command). If WP = 0, the Channel Master
does not collect the WD water-profile data. Note: The Channel
Master automatically extends the ensemble interval (TE) if the
product of WP and time per ping (TP) is greater than TE (i.e., if
WP x TP > TE).
Scaling: LSD = 1 ping; Range = 0 to 16,384 pings
25-28
13,14
WS / Range
cell Length
Contains the length of one range cell (WS-command).
Scaling: LSD = 1 centimeter; Range = 1 to 6400 cm (210 feet)
29-32
15,16
WF / Blank
after Transmit
Contains the blanking distance used by the Channel Master to
allow the transmit circuits time to recover before the receive
cycle begins (WF-command).
33,34
17
Reserved
Reserved
35,36
18
WC / Low Corr
Thresh
Contains the minimum threshold of correlation that water-profile
data can have to be considered good data (WC-command).
Scaling: LSD = 1 centimeter; Range = 0 to 9999 cm (328 feet)
Scaling: LSD = 1 count; Range = 0 to 255 counts
37,38
19
cr# / No. code
reps
Contains the number of code repetitions in the transmit pulse.
Scaling: LSD = 1 count; Range = 0 to 255 counts
39,40
20
Reserved
Reserved
41-44
21,22
WE / Error
Velocity
Threshold
This field, initially set by the WE-command, contains the actual
threshold value used to flag water-current data as good or bad.
If the error velocity value exceeds this threshold, the Channel
Master flags all four beams of the affected bin as bad.
Scaling: LSD = 1 mm/s; Range = 0 to 5000 mm/s
45,46
23
Minutes
47,48
24
Seconds
49,50
25
Hundredths
51,52
26
EX / Coord
Transform
These fields, set by the TP-command, contain the amount of
time between ping groups in the ensemble. NOTE: The Channel Master automatically extends the ensemble interval (set by
TE) if (WP x TP > TE).
Contains the coordinate transformation processing parameters
(EX-command). These firmware switches indicate how the
Channel Master collected data.
xxx00xxx
xxx01xxx
xxx10xxx
xxx11xxx
xxxxx1xx
NO TRANSFORMATION (BEAM COORDINATES)
INSTRUMENT COORDINATES
RESERVED
RESERVED
TILTS (PITCH AND ROLL) USED IN
TRANSFORMATION
xxxxxx1x = RESERVED
xxxxxxx1 = BIN MAPPING USED
53-60
27-30
Reserved
P/N 95B-6001-00 (February 2006)
=
=
=
=
=
Reserved
page 103
Channel Master Operation Manual
Table 18:
Fixed Leader Data Format (continued)
Hex Digit
Binary
Byte
Field
Description
61,62
31
EZ / Sensor
Source
Contains the selected source of environmental sensor data
(EZ-command). These firmware switches indicate the following.
FIELD
DESCRIPTION
1xxxxxx = CALCULATES EC (SPEED OF SOUND) FROM
ED, ES, AND ET
x1xxxxx = USES ED FROM DEPTH SENSOR
xx1xxxx = USES EH FROM TRANSDUCER HEADING
SENSOR
xxx1xxx = USES EP FROM TRANSDUCER PITCH SENSOR
xxxx1xx = USES ER FROM TRANSDUCER ROLL SENSOR
xxxxx1x = USES ES (SALINITY) FROM CONDUCTIVITY
SENSOR
xxxxxx1 = USES ET FROM TRANSDUCER TEMPERATURE
SENSOR
NOTE: If the field = 0, or if the sensor is not available, the
Channel Master uses the manual command setting. If the field
= 1, the Channel Master uses the reading from the internal
sensor.
63,64
32
Sensor Avail
This field reflects which sensors are available. The bit pattern
is the same as listed for the EZ-command (above).
65-68
33,34
dis1 / Bin 1
distance
This field contains the distance to the middle of the first range
cell (bin). This distance is a function of range cell length (WS),
the blank after transmit distance (WF), and speed of sound.
Scaling: LSD = 1 centimeter; Range = 0 to 65535 cm (2150
feet)
page 104
69-76
35-38
Reserved
Reserved
77,78
39
WA / False
Target Threshold
Contains the threshold value used to reject data received from
a false target, usually fish (WA-command).
Scaling: LSD = 1 count; Range = 0 to 255 counts (255 disables)
79,80
40
Reserved
Reserved
81-84
41,42
LagD / Transmit lag distance
This field contains the distance between pulse repetitions.
Scaling: LSD = 1 centimeter; Range = 0 to 65535 centimeters
85-100
43-50
CPU Board
Serial Number
Contains the serial number of the CPU board.
101-102
51
WB / System
Bandwidth
Contains the WB-command setting. Range = 0 to 1
103-108
52-54
Reserved
Reserved.
109-116
55-58
Serial #
Channel Master serial number.
Teledyne RD Instruments
Channel Master Operation Manual
11.3
Variable Leader Data Format
BIT POSITIONS
BYTE
7
1
2
3
4
6
5
4
3
VARIABLE LEADER ID = 0080
ENSEMBLE NUMBER
5
RTC YEAR {TS}
6
RTC MONTH {TS}
7
RTC DAY {TS}
8
RTC HOUR {TS}
9
RTC MINUTE {TS}
10
RTC SECOND {TS}
11
RTC HUNDREDTHS {TS}
12
ENSEMBLE # MSB
13
14
15
16
17
18
19
20
21
22
23
24
25
26
27
28
2
BIT RESULT
SPEED OF SOUND {EC}
DEPTH OF TRANSDUCER {ED}
RESERVED
PITCH
ROLL
SALINITY {ES}
TEMPERATURE {ET}
29
MPT MINUTES
30
MPT SECONDS
31
MPT HUNDREDTHS
32
RESERVED
33
PITCH STD
34
ROLL STD
1
0
LSB 80h
MSB 00h
LSB
MSB
LSB
MSB
LSB
MSB
LSB
MSB
LSB
MSB
LSB
MSB
LSB
MSB
LSB
MSB
LSB
MSB
Continued Next Page
P/N 95B-6001-00 (February 2006)
page 105
Channel Master Operation Manual
Continued from Previous Page
35
↓
RESERVED
↓
48
49
LSB
50
PRESSURE
51
52
MSB
53
↓
RESERVED
↓
60
See Table 19, page 107 for a description of the fields.
Figure 28.
Variable Leader Data Format
NOTE. This data is always output in this format.
page 106
Teledyne RD Instruments
Channel Master Operation Manual
Variable Leader data refers to the dynamic Channel Master data (from
clocks/sensors) that change with each ping. The Channel Master always
sends Variable Leader data as output data (LSBs first).
Table 19:
Variable Leader Data Format
Hex Digit
Binary
Byte
Field
Description
1-4
1,2
VID / Variable
Leader ID
Stores the Variable Leader identification word 0080 (80 00h).
LSB is sent first.
5-8
3,4
Ens / Ensemble
Number
This field contains the sequential number of the ensemble to
which the data in the output buffer apply.
Scaling: LSD = 1 ensemble; Range = 1 to 65,535 ensembles
NOTE: The first ensemble collected is #1. At “rollover,” we
have the following sequence:
1 = ENSEMBLE NUMBER 1
↓
65535 = ENSEMBLE NUMBER 65,535 | ENSEMBLE
0 = ENSEMBLE NUMBER 65,536 | #MSB FIELD
1 = ENSEMBLE NUMBER 65,537 | (BYTE 12)
INCR.
9,10
5
RTC Year
11,12
6
RTC Month
13,14
7
RTC Day
15,16
8
RTC Hour
17,18
9
RTC Minute
19,22
10
RTC Second
21,22
11
RTC Hundredths
23-24
12
Ensemble #
MSB
This field increments each time the Ensemble Number field
(bytes 3,4) “rolls over.” This allows ensembles up to
16,777,215. See Ensemble Number field above.
25-28
13,14
BIT / BIT Result
This field contains the results of the Channel Master’s Built-in
Test function. A zero code indicates a successful BIT result.
29-32
15,16
EC / Speed of
Sound
These fields contain the time from the Channel Master’s realtime clock (RTC) that the current data ensemble began. The
TS-command (Set Real-Time Clock) initially sets the clock.
The Channel Master does account for leap years.
MSB BYTE 14
LSB BYTE 13
76543210
xxxxxxxx
xxxxxxxx
xxxxxxxx
xxxxxxxx
xxxxxxxx
xxxxxxxx
xxxxxxx1
xxxxxx1x
76543210
xxxxxxx1
xxxxxx1x
xxxxx1xx
xxxx1xxx
xxx1xxxx
xx1xxxxx
xxxxxxxx
xxxxxxxx
=
=
=
=
=
=
=
=
transmitter shutdown
transmitter over current
transmitter under current
transmitter under voltage
FIFO interrupt missed
FIFO ISR Re-entry
Sensor module failure
Watchdog disabled
Contains either manual or calculated speed of sound information (EC-command).
Scaling: LSD = 1 meter per second; Range = 1400 to 1600
m/s
Continued next page
P/N 95B-6001-00 (February 2006)
page 107
Channel Master Operation Manual
Table 19:
Variable Leader Data Format (continued)
Hex Digit
Binary
Byte
Field
Description
33-36
17,18
ED / Depth of
Transducer
Contains the depth of the transducer below the water surface
(ED-command). This value may be a manual setting or a
reading from a depth sensor.
Scaling: LSD = 1 decimeter; Range = 1 to 9999 decimeters
-1 = Unknown (Hex FFFF)
37-40
19- 20
Reserved
Reserved
41-44
21-22
Pitch
45-48
23-24
Roll
For pitch, roll, and temperature, a value of –32768 indicates
no measurement (Hex 8000).
49-52
25,26
ES / Salinity
Contains the salinity value of the water at the transducer
head (ES-command).
Scaling: LSD = 1 part per thousand; Range = 0 to 40 ppt
-1 = Unknown (Hex FFFF)
53-56
27,28
ET / Temperature
Contains the temperature of the water at the transducer head
(ET-command). This value may be a manual setting or a
reading from a temperature sensor.
Scaling: LSD = 0.01 degree; Range = -5.00 to +40.00 degrees C.
This field contains the Minimum Pre-Ping Wait Time between
ping groups in the ensemble.
57,58
29
MPT minutes
59,60
30
MPT seconds
61,62
31
MPT hundredths
63 - 64
32
Reserved
Reserved
65-66
33
Pitch STD
Pitch standard deviation.
Scaling: LSB = 0.1 degree
67-68
34
Roll STD
Roll standard deviation.
Scaling: LSB = 0.1 degree
69-96
35 -48
Reserved
Reserved
97-104
49-52
Pressure
Contains the pressure of the water at the transducer head
relative to one atmosphere (sea level). Output is in decapascals.
Scaling: LSD=1 deca-pascal; Range = -2,147,483,648 to
+2,147,483,648 deca-pascals. Output is -2,147,483,648
when pressure is invalid.
105-120
page 108
53-60
Reserved
Reserved
Teledyne RD Instruments
Channel Master Operation Manual
11.4
Velocity Data Format
BIT POSITIONS
BYTE
7/S
1
6
5
4
3
2
1
0
VELOCITY ID = 0100
2
3
RANGE CELL #1, VELOCITY 1
4
5
RANGE CELL #1, VELOCITY 2
6
LSB 00h
MSB 01h
LSB
MSB
LSB
MSB
7
8
RESERVED
9
10
11
RANGE CELL #2, VELOCITY 1
12
13
RANGE CELL #2, VELOCITY 2
14
LSB
MSB
LSB
MSB
15
16
RESERVED
17
18
↓
(SEQUENCE CONTINUES FOR UP TO 255 CELLS)
1019
RANGE CELL #255, VELOCITY 1
1020
1021
RANGE CELL #255, VELOCITY 2
1022
↓
LSB
MSB
LSB
MSB
1023
1024
RESERVED
1025
1026
See Table 20, page 110 for description of fields
Figure 29.
Velocity Data Format
NOTE. The number of range cells is set by the WN-command.
P/N 95B-6001-00 (February 2006)
page 109
Channel Master Operation Manual
The Channel Master packs velocity data for each range cell of each beam
into a two-byte, two’s-complement integer [-32768, 32767] with the LSB
sent first. The Channel Master scales velocity data in millimeters per second (mm/s). A value of –32768 (8000h) indicates bad velocity values. All
velocities are relative based on a stationary instrument.
The setting of the EX-command (Coordinate Transformation) determines
how the Channel Master references the velocity data as shown below.
EX-CMD
COORD SYS
VEL 1
VEL 2
xxx00xxx
BEAM
TO BEAM 1
TO BEAM 2
xxx01xxx
INST
Bm2-Bm1
FROM TRANSDUCER
POSITIVE VALUES INDICATE WATER MOVEMENT
Table 20:
page 110
Velocity Data Format
Hex Digit
Binary
Byte
Field
Description
1-4
1,2
Velocity ID
Stores the velocity data identification word 0100 (00 01h). LSB
is sent first.
5-8
3,4
Range cell 1,
Velocity 1
Stores velocity data for range cell #1, velocity 1. See above.
9-12
5,6
Range cell 1,
Velocity 2
Stores velocity data for range cell #1, velocity 2. See above.
13-16
7,8
Reserved
Reserved
17-20
9,10
Reserved
Reserved
21-2052
11-1026
Cells 2 – 255
(if used)
These fields store the velocity data for range cells 2 through
255 (depending on the setting of the WN-command). These
fields follow the same format as listed above for range cell 1.
Teledyne RD Instruments
Channel Master Operation Manual
11.5
Correlation Magnitude, Echo Intensity, PercentGood Data, and Status Format
BIT POSITIONS
BYTE
7/S
6
5
4
3
2
1
0
1
ID CODE
2
Correlation Magnitude = 0200, Echo Intensity = 0300, Echo Intensity = 0400, Status = 0500
3
RANGE CELL #1, FIELD #1
4
RANGE CELL #1, FIELD #2
5
LSB 00h
MSB 02 – 05h
RESERVED
6
7
RANGE CELL #2, FIELD #1
8
RANGE CELL #2, FIELD #2
9
RESERVED
10
↓
(SEQUENCE CONTINUES FOR UP TO 255 BINS)
511
RANGE CELL #255, FIELD #1
512
RANGE CELL #255, FIELD #2
513
↓
RESERVED
514
See Table 21, page 112 through Table 24, page 114 for a description of the fields.
Figure 30.
Binary Correlation Magnitude, Echo Intensity, PercentGood Data, and Status Format
NOTE. The number of range cells is set by the WN-command.
P/N 95B-6001-00 (February 2006)
page 111
Channel Master Operation Manual
Correlation magnitude data give the magnitude of the normalized echo
autocorrelation at the lag used for estimating the Doppler phase change.
The Channel Master represents this magnitude by a linear scale between 0
and 255, where 255 is perfect correlation (i.e., a solid target). A value of
zero indicates bad correlation values.
Table 21:
Correlation Magnitude Data Format
Hex Digit
Binary
Byte
Field
Description
1-4
1,2
ID Code
Stores the correlation magnitude data identification word 0200
(00 02h). LSB is sent first.
5,6
3
Range cell 1,
Field 1
Stores correlation magnitude data for range cell #1, beam #1.
See above.
7,8
4
Range cell 1,
Field 2
Stores correlation magnitude data for range cell #1, beam #2.
See above.
9,10
5
Reserved
Reserved
11,12
6
Reserved
Reserved
13 – 1028
7 – 514
Cells 2 – 255
(if used)
These fields store correlation magnitude data for range cells 2
through 255 (depending on the WN-command) for all beams.
These fields follow the same format as listed above for range
cell 1.
The echo intensity scale factor is about 0.45 dB per Channel Master count.
The Channel Master does not directly check for the validity of echo intensity data.
Table 22:
page 112
Echo Intensity Data Format
Hex Digit
Binary
Byte
Field
Description
1–4
1,2
ID Code
Stores the echo intensity data identification word 0300
(00 03h). LSB is sent first.
5,6
3
Range cell 1,
Field 1
Stores echo intensity data for range cell #1, beam #1. See
above.
7,8
4
Range cell 1,
Field 2
Stores echo intensity data for range cell #1, beam #2. See
above.
9,10
5
Reserved
Reserved
11,12
6
Reserved
Reserved
13 – 1028
7 – 514
Cells 2 – 255
(if used)
These fields store echo intensity data for range cells 2 through
255 (depending on the WN-command) for all beams. These
fields follow the same format as listed above for range cell 1.
Teledyne RD Instruments
Channel Master Operation Manual
The percent-good data field is a data-quality indicator that reports the percentage (0 to 100) of good data collected for each range cell of the velocity
profile. The setting of the EX-command (Coordinate Transformation) determines how the Channel Master references percent-good data as shown
below.
EX-Command
Coord. Sys
Velocity 1
Velocity 2
Velocity 3
Velocity 4
Percentage Of Good Pings For:
xxx00xxx
Beam
Beam 1
BEAM 2
RESERVED
RESERVED
Percentage Of:
xxx01xxx
Inst
Partial Solution
Transformation
(note 1)
Transformations
Rejected (note 2)
No Solution
Available in Bin
Full Solution
Transformations
1. Because profile data did not exceed correlation threshold (WC).
2. Because the error velocity threshold (WE) was exceeded.
At the start of the velocity profile, the backscatter echo strength is typically
high on both beams. Under this condition, the Channel Master uses both
beams to calculate the orthogonal and error velocities. As the echo returns
from far away range cells, echo intensity decreases. At some point, the
echo will be weak enough on any given beam to cause the Channel Master
to reject some of its range cell data. This causes the Channel Master to stop
calculating velocities. As an example, let us assume range cell 60 has returned the following percent-good data.
FIELD #1 = 50, FIELD #2 = 5, FIELD #3 = 0, FIELD #4 = 0
If the EX-command was set to collect velocities in BEAM coordinates, the
example values show the percentage of pings having good solutions in cell
60 for each beam based on the Low Correlation Threshold (WCcommand). Here, beam 1=50% and beam 2=5%. These are not typical nor
desired percentages. Typically, you would want both beams to be about
equal and greater than 25%.
On the other hand, if velocities were collected in INSTRUMENT coordinates and bin 60 returned the following percent-good, the results would be
interpreted differently.
FIELD #1 = 50, FIELD #2 = 5, FIELD #3 = 45, FIELD #4 = 0
FIELD 1 - Percentage of Partial Solutions - Shows percentage of successful
velocity calculations (50%) resulting in Partial Solutions. A Partial Solution
is a solution that does not result in an error velocity. This occurs because
there is not enough information to compute the error velocity.
FIELD 2 - Percentage of transformations rejected - Shows percent of error
velocity (5%) that was less than the WE-command setting. The WE com-
P/N 95B-6001-00 (February 2006)
page 113
Channel Master Operation Manual
mand has a default of 5000 mm/s. This large WE setting effectively prevents the Channel Master from rejecting data based on error velocity.
FIELD 3 - Percentage of No Solution Transformations - 45% of the velocity
data were rejected because there was insufficient information (velocity
Data) to attempt a transformation.
FIELD 4 - Percentage of Full Solutions - 0% of the velocity data collected
during the ensemble for range cell 60 generated a Full Solution. A Full Solution indicates that an error velocity is available. The Channel Master is
not capable of generating Full Solutions because 2-beams do not provide
sufficient information to generate a Full Solution.
Table 23:
Percent-Good Data Format
Hex Digit
Binary
Byte
Field
Description
1-4
1,2
ID Code
Stores the percent-good data identification word 0400
(00 04h). LSB is sent first.
5,6
3
Range cell 1,
Field 1
Stores percent-good data for range cell #1, field 1. See above.
7,8
4
Range cell 1,
Field 2
Stores percent-good data for range cell #1, field 2. See above.
9,10
5
Range cell 1,
Field 3
Stores percent-good data for range cell #1, field 3. See above.
11,12
6
Range cell 1,
Field 4
Stores percent-good data for range cell #1, field 4. See above.
13-1028
7-514
Range cell 2 –
255 (if used)
These fields store percent-good data for range cells 2 through
255 (depending on the WN-command), following the same
format as listed above for range cell 1.
These fields contain information about the status and quality of the ADCP
data. A value of 0 means the measurement was good. A value of 1 means
the measurement was bad.
Table 24:
page 114
Status Data Format
Hex Digit
Binary
Byte
Field
Description
1-4
1,2
ID Code
Stores the percent-good data identification word 0500
(00 04h). LSB is sent first.
5,6
3
Range cell 1,
Field 1
Stores status data for range cell #1, field 1. See above.
7,8
4
Range cell 1,
Field 2
Stores status data for range cell #1, field 2. See above.
9,10
5
Range cell 1,
Field 3
Stores status data for range cell #1, field 3. See above.
11,12
6
Range cell 1,
Field 4
Stores status data for range cell #1, field 4. See above.
13-1028
7-514
Range cell 2 –
255 (if used)
These fields store status data for range cells 2 through 255
(depending on the WN-command), following the same format
as listed above for range cell 1.
Teledyne RD Instruments
Channel Master Operation Manual
11.6
Firmware Version Data Format
The firmware version field is a short section of ASCII text in the middle of
the binary ensemble data. It contains the version numbers of all the firmware in the Channel Master. The same version numbers are listed by the
PS0 command (see “PS0 – System Configuration,” page 77).
Version numbers in the field are separated by line feed characters (0Ah).
The text section is terminated with a NUL character (00h). The length of
this field is determined by the number of characters in each version number,
and the number of firmware modules. Given Teledyne RDI’s version number formats, this field should be either 39 or 50 bytes long with release version firmware. Table 25 illustrates the format for release firmware with an
SDI-12 personality module present. If there is no SDI-12 personality module, the SDI-12 firmware versions and their line feeds will not be present.
Table 25:
Firmware Version Data Format
Binary Byte
Field
Description
1,2
Firmware ID
Stores the Variable Leader identification word 0002 (02 00h). LSB is
sent first.
3
Line Feed
0Ah
4-11
Product Version
Product Version number plus line feed. When any firmware changes
version, the new set of the latest firmware modules are assigned a
new product version.
12-17
CPU Firmware
Firmware version number for the main CPU plus line feed.
18-26
FPGA Firmware
Low level firmware version number for the main CPU plus line feed.
27-32
Sensor Boot
Low level firmware version number for the sensor board processor
plus line feed.
33-38
Sensor Firmware
Firmware version number for the sensor board processor plus line
feed.
39-44
SDI-12 Boot
Low level firmware version number for the SDI-12 personality module
plus line feed.
45-49
SDI-12 Firmware
Firmware version number for the SDI-12 personality module plus line
feed.
50
Terminal NUL
00h
NOTE. Turning off the Status bit on the WD command (see “WD – Data
Out,” page 92) will disable the output of the Firmware Version Data
Format.
P/N 95B-6001-00 (February 2006)
page 115
Channel Master Operation Manual
11.7
Surface Track Status Output
BIT POSITIONS
BYTE
1
2
7
6
5
4
3
2
Vertical Beam Status ID = 4000
1
0
LSB 00h
MSB 40h
3
4
5
Depth (Corrected Surface Track)
6
7
8
9
Depth (Uncorrected Surface Track)
10
11
Evaluation Amplitude
12
Amplitude at the Surface
13
%Good of Surface Track
14
15
16
STD Surface Track
17
18
19
20
Min Surface Track
21
22
23
24
Max Surface Track
25
26
27
28
Pressure Depth Correction
29
30
31
32
Depth (Uncorrected Pressure)
33
34
Percent Good of Depth based on Pressure
Continued Next Page
page 116
Teledyne RD Instruments
Channel Master Operation Manual
Continued from Previous Page
BIT POSITIONS
BYTE
7
6
5
4
3
2
1
0
35
36
STD of Depth based on Corrected Pressure
37
38
39
40
Min of Depth based on Corrected Pressure
41
42
43
44
Max of Depth based on Corrected Pressure
45
46
Figure 31.
Surface Track Status Output
P/N 95B-6001-00 (February 2006)
page 117
Channel Master Operation Manual
For Evaluation Amplitude, Amplitude at the Surface, Standard Deviation,
Max Surface Track and Min Surface Track the following applies: If number
of bursts per ensemble is 1, then this is based on the good pings in the ensemble. If the number of bursts per ensemble is greater than 1, then this is
based on the output from each burst which could be from individual pings
or from average RSSI data.
Table 26:
page 118
Surface Track Status Output
Hex Digit
Binary
Byte
Field
Description
1-4
1,2
VB_STATUS_I
D / Vertical
Beam Status ID
Stores the Vertical Beam Status ID word 4000 (00 40h). LSB
is sent first.
5-12
3-6
Depth (Corrected Surface
Track)
Depth based on surface track output with corrections applied.
Units: 0.1mm
13-20
7-10
Depth (Uncorrected Surface
Track)
Depth based on raw surface track output. Units: 0.1mm
21,22
11
Evaluation
Amplitude
Maximum detection filter evaluation amplitude. Units: Counts
23,24
12
Amplitude at
the Surface
Signal amplitude at Surface. Units: Counts
25,26
13
%Good of Surface Track
Percentage of surface track pings in an ensemble burst that
are marked good based on signal strength and a comparison
with burst average depth (see VC command). Units: %
27-34
14-17
STD Surface
Track
Standard deviation of good depths from corrected surface
track pings. Units: 0.1mm
35-42
18-21
Min Surface
Track
Minimum depth of good corrected surface track. Units: 0.1mm
pings
43-50
22-25
Max Surface
Track
Maximum depth of good corrected surface track pings Units:
0.1mm
51-58
26-29
Pressure Depth
Correction
Last good difference between pressure depth and vertical
beam depth ensemble outputs. Units: 0.1mm
59-66
30-33
Depth (Uncorrected Pressure)
Depth based on raw pressure output. Units: 0.1mm
67,68
34
%Good of
Depth based on
Pressure
Percentage of corrected pressure measurements good in the
ensemble. Units: %
69-76
35-38
STD of Depth
based on Corrected Pressure
Standard deviation of good depths based on corrected pressure measurements in the ensemble. Units: 0.1mm
77-84
39-42
Min of Depth
based on Corrected Pressure
Minimum depth of corrected pressure measurements in the
ensemble. Units: 0.1mm
85-92
43-46
Max of Depth
based on Corrected Pressure
Maximum depth of corrected pressure measurements in the
ensemble. Units: 0.1mm
Teledyne RD Instruments
Channel Master Operation Manual
11.8
Surface Track Amplitude Output
BIT POSITIONS
BYTE
7
1
6
5
4
3
2
1
Vertical Beam Amp ID = 4002
2
3
0
LSB 02h
MSB 40h
Pings in Burst (NPing)
4
Bin Location of Surface (Avg.)
5
6
Filter Evaluation Amp (Avg.)
7
Amplitude at Surface (Avg.)
8
W Filter Bin Location of Surface (Avg.)
9
10
W Filter Evaluation Amp (Avg.)
11
W Filter Amplitude at Surface (Avg.)
12
Leading Edge Filter Bin Location of Surface (Avg.)
13
14
Leading Edge Filter Evaluation Amp (Avg.)
15
Leading Edge Amplitude at Surface (Avg.)
16 to
16+2*NPing-1
W Filter Bin Location (Individual Pings)
16+2*NPing to
16+5*NPing-1
W Filter Evaluation Amplitude (Individual Pings)
16+5*NPing to
16+6*NPing-1
W Filter Amplitude (Individual Pings)
16+6*NPing to
16+7*NPing-1
Status of Individual Pings
Figure 32.
Surface Track Amplitude Output
P/N 95B-6001-00 (February 2006)
page 119
Channel Master Operation Manual
The data in this structure is from the last burst in an ensemble.
Table 27:
page 120
Surface Track Amplitude Output
Hex Digit
Binary Byte
Field
Description
1-4
1,2
VB_AMP_ID /
Vertical Beam
Amp ID
Stores the Vertical Beam Amplitude ID word 4002
(02 40h). LSB is sent first.
5,6
3
Pings in Burst
(NPing)
Number of surface track pings in an ensemble
burst
7-10
4,5
Bin Location of
Surface (Avg)
Final bin location of the surface based on either
averaged RSSI data or averages of detected bin
locations from single pings. Units: Samples
11,12
6
Filter Evaluation Amp (Avg)
Final filter evaluation amplitude based on either
averaged RSSI data or averages of evaluation
amplitudes from single pings. Units: Counts
13,14
7
Amplitude at
Surface (Avg)
Final amplitude based on either averaged RSSI
data or averages of amplitudes from single pings.
Units: Counts
15-18
8,9
W Filter Bin
Location of
Surface (Avg)
W filter bin location of the surface from averaged
RSSI data. Units: Samples
19,20
10
W Filter
Evaluation Amp
(Avg)
Evaluation amplitude output of the W Filter where
the filter detects the surface using averaged RSSI
data. Units: Counts
21,22
11
W Filter Amplitude at Surface
(Avg)
RSSI amplitude at the bin location where the W
filter detects the surface using averaged RSSI
data. Units: Counts
23-26
12,13
Leading Edge
Filter Bin Location of Surface
(Avg)
Leading edge filter bin location of the surface from
averaged RSSI data. Units: Samples
27,28
14
Leading Edge
Filter Evaluation Amp (Avg)
Evaluation amplitude output of the leading edge
filter where the filter detects the surface using averaged RSSI data. Units: Counts
29,30
15
Leading Edge
Amplitude at
Surface (Avg)
Leading edge amplitude at the bin location where
the Filter detects the surface using averaged RSSI
data. Units: Counts
31 to
31+4*NPing
16 to
16+2*NPing-1
W Filter Bin
Location (Individual Pings)
W filter bin location where the filter detects the
surface for individual pings in the ensemble burst.
Units: Samples
31+4*NPing+
1 to
31+6*NPing
16+2*NPing to
16+5*NPing-1
W Filter
Evaluation
Amplitude (Individual Pings)
W filter evaluation amplitude where the filter detects the surface for individual pings in the ensemble burst. Units: Counts
31+6*NPing-1
to
31+8*NPing
16+5*NPing to
16+6*NPing-1
W Filter Amplitude (Individual
Pings)
W filter amplitude where the filter detects the surface for individual pings in the ensemble burst.
31+8*NPing-1
to
31+10*NPing
16+6*NPing to
16+7*NPing-1
Status of Individual Pings
Final status of each ping after data quality checks.
Teledyne RD Instruments
Channel Master Operation Manual
11.9
Surface Track Commands Output
BIT POSITIONS
BYTE
7
1
2
3
4
5
6
6
5
4
3
Vertical Beam Commands ID = 4001
8
VM_DetectMode
9
VM_PressScreen
10
VM_RangeScreen
11
VM_EdgeDetectThres
14
15
16
17
18
19
20
21
22
23
24
25
26
27
28
P/N 95B-6001-00 (February 2006)
0
LSB 01h
MSB 40h
VM_Pings
VM_BW
13
1
VM_Blank
7
12
2
VM_EdgeDetectDelta
VM_RcvrGain
VM_OffsetTenthsMM
VM_ScalePPM
VM_MaxRange
VM_MaxRange
VM_XmtLength
VM_WThreshold
VM_WWidth
VM_XmitPwr
page 121
Channel Master Operation Manual
Table 28:
Surface Track Commands Output
Hex Digit
Binary
Byte
Field
Description
1-4
1,2
VB_CMD_ID / Vertical
Beam Commands ID
Stores the Vertical Beam Commands ID word 4001
(01 40h). LSB is sent first.
5-8
3,4
VM_Blank
See VF command (see “VF – Vertical Beam Blank
after Transmit,” page 88).
9-12
5,6
VM_Pings
See VP command (see “VP – Vertical Beam Number
of Pings per Ensemble,” page 88).
13,14
7
VM_BW
See #VB command.
15,16
8
VM_DetectMode
17,18
9
VM_PressScreen
19,20
10
VM_RangeScreen
21,22
11
VM_EdgeDetectThres
See #VE command.
23-26
12,13
VM_EdgeDetectDelta
See #VE command.
27,28
14
VM_RcvrGain
See #VJ command.
29-32
15,16
VM_OffsetTenthsMM
See #VO command.
33-36
17,18
VM_ScalePPM
See #VO command.
27-40
19,20
VM_MaxRange
See #VR command.
41-44
21,22
VM_SubPings
See #VS command.
45-48
23,24
VM_XmtLength
See #VT command.
49,50
25
VM_WThreshold
See #VW command.
51-54
26,27
VM_WWidth
See #VW command.
55,56
28
VM_XmitPwr
See #VX command.
See #VC command (see “Expert Level Vertical Beam
Command Descriptions,” page 89).
NOTE. For information on other expert level vertical beam commands, see
FST-006 (available for download on www.rdinstruments.com) or contact
Teledyne RDI (see “Technical Support,” page 137).
page 122
Teledyne RD Instruments
Channel Master Operation Manual
11.10 Binary Reserved BIT Data Format
BIT POSITIONS
BYTE
7
6
1
5
4
3
2
1
0
LSB
RESERVED FOR RDI USE
2
Figure 33.
MSB
Binary Reserved BIT Data Format
NOTE. The data is always output in this format. See Table 29 for a
description of the fields.
Table 29:
Reserved for RDI Format
Hex Digit
Binary
Byte
Field
Description
1-4
1,2
Reserved for
RDI’s use
This field is for RDI (internal use only).
11.11 Binary Checksum Data Format
BIT POSITIONS
BYTE
7
6
5
1
4
3
CHECKSUM DATA
2
Figure 34.
2
1
0
LSB
MSB
Binary Checksum Data Format
NOTE. The data is always output in this format. See Table 30 for a
description of the fields.
Table 30:
Checksum Data Format
Hex Digit
Binary
Byte
Field
Description
1-4
1,2
Checksum Data
This field contains a modulo 65535 checksum. The Channel
Master computes the checksum by summing all the bytes in
the output buffer excluding the checksum.
P/N 95B-6001-00 (February 2006)
page 123
Channel Master Operation Manual
12
Channel Master PD14 Output Data Format
This section details the specification of an output format for data consisting
of a header (with timestamp), a two dimensional profile of velocity, acoustic intensity, and standard error data, tilt sensor data, stage data, and a
checksum. This format is primarily intended for integrating the Channel
Master with other systems or data loggers. Data will be output in this format when PD14 is selected as the output format.
12.1
Format
Table 31, page 125 below summarizes the PD14 format. The number of
bytes in the ensemble, not including the checksum is reported in the NBytes
field and is equal to 10 * NBins + 23 bytes, where NBins is the number of
range cells in the profile. The NEnsemble field shows the number of ensembles since the start of a deployment and provides for tracking sequences
of ensembles and distinguishing one ensemble from another. Tilts are reported as signed quantities in the interval –180.00 to +180.00 degrees.
Stage measurements are reported as unsigned quantities in units of 1/10th
mm. Velocities are reported as signed quantities in mm/sec. Acoustic intensities are reported in unsigned units of counts. Standard error will be
reported as unsigned quantities in mm/sec. The checksum will be calculated as described by the CRC-16 algorithm using the polynomial
x16+x15+x2+1 with an initial register value of 0xFFFF.
12.2
Invalid Data
Several quantities may on occasion be out of range or may not pass quality
checks. In such cases, an invalid result will be indicated. For tilts, an invalid result will be indicated by a value of –327.68 degrees. Invalid velocities
are indicated by a value of –32768 mm/s. Invalid standard error will be indicated by a value of 65535 (all bits set). Invalid stage measurements are
indicated by a value of 42949.67295 meters (all bits set). No provision will
be made for any other invalid quantities in this format.
page 124
Teledyne RD Instruments
Channel Master Operation Manual
Table 31:
Channel Master PD14 Output Data Format
Position
Size
Name
Description
0
2
SOE
Start of ensemble - always 0x8F8F
2
2
NBytes
Number of bytes
4
2
NEnsemble
Number of ensembles since start of deployment
6
2
Year
4-digit year
8
1
Month
Month
9
1
Day
Day of month
10
1
Hour
Hour of day since midnight
11
1
Minutes
Number of minutes since the last hour
12
1
Seconds
Number of seconds since the last minute
13
1
Hundredths
Hundredths of a second since the last second
14
2
Tilt 1
Tilt 1 measurement in 1/100 degree
16
2
Tilt 2
Tilt 2 measurement in 1/100 degree
18
4
Vertical
Vertical stage measurement in 1/10 millimeter
22
1
NBins
Number of profile bins
23
2
X1
X component of velocity for bin 1
25
2
Y1
Y component of velocity for bin 1
th
th
th
-
-
-
-
4n+19
2
Xn
X component of velocity for bin n
4n+21
2
Yn
Y component of velocity for bin n
4N+23
1
I11
Beam 1 intensity for bin 1 (NBins = N)
4N+24
1
I21
Beam 2 intensity for bin 1 (NBins = N)
-
-
-
-
4N+2m+21
1
I1m
Beam 1 intensity for bin m (NBins = N)
4N+2m+22
1
I2m
Beam 2 intensity for bin m (NBins = N)
6N+23
2
SX1
Standard error of X component of velocity for bin 1
(NBins = N)
6N+25
2
SY1
Standard error of Y component of velocity for bin 1
(NBins = N)
-
-
-
-
6N+4m+19
2
SXm
Standard error of X component of velocity for bin m
(NBins = N)
6N+4m+21
2
SYm
Standard error of Y component of velocity for bin m
(NBins = N)
10N+23
2
Checksum
CRC-16
P/N 95B-6001-00 (February 2006)
page 125
Channel Master Operation Manual
13
Channel Master PD19 Output Data Format
PD19 output data format outputs ASCII data on the serial port and records
PD0 data internally, if recording is enabled. The output of PD19 is a
comma delimited format similar to a NEMA format. A typical output would
appear as:
PRDIQ, 12, 432456.123, 2.45, 234.45, 0.65, 345.33, 15.12, 2.56, -0.32, 0
In order from left to right, the fields are described in Table 32.
Table 32:
PD19 Output Data Format
Field
Description
Header
“PRDIQ” which is the unique identifier that the following data is in PD19 ASCII format
High Volume
The first numeric field is always an integer which represents the millions portion of
accumulated volume.
Low Volume
The second data field is the lower part of the total volume. So, in the above output,
the total volume is 12432456.123. The volume has been split into two separate fields
because many devices like RTUs or PLCs can only accept values up to 999999.999
in a single field.
Stage
The total of the Channel Master elevation (from the IE command) and the range to
the surface from the vertical acoustic beam.
Flow rate
The computed flow using the mean velocity and area computed from the channel
geometry.
Mean velocity
The average x-component velocity of the cells selected with IS multiplied by the rating
from the coefficients from the IV command.
Area
Area computed from stage and the channel geometry.
Temperature
Temperature from the internal sensors of the Channel Master
Pitch
Pitch from the internal sensors of the Channel Master
Roll
Roll from the internal sensors of the Channel Master
Fault Count
The number of successive readings for which either vertical range to surface or more
than 50% of velocity cells are no valid. This will count up to the value set in IF. Until
this value is reached, the last good velocity or stage data will be used to compute the
other quantities.
NOTE. The SDI-12 output now includes pitch, roll, and mean rated
velocity (the same as PD19), as additional fields of the output available
following the M! command. The SDI-12 command aM9! (where “a” is the
Channel Master SDI-12 address) will output, mean rated velocity, stage,
area, flow, high volume, and low volume in the same units and with the
same scaling as the output using PD-19.
page 126
Teledyne RD Instruments
Channel Master Operation Manual
14
How to Decode a Channel Master Ensemble
Use the following information to help you write your own software.
14.1
Rules for the Channel Master Data Format PD0
a. All data types (i.e. fixed leader, variable leader, velocity, echo intensity,
correlation, percent good, etc.) will be given a specific and unique ID
number. The table below shows some of the most common IDs.
Table 33:
Common Data Format IDs
ID
Description
0x7F7F
Header
0x0000
Fixed Leader
0x0080
Variable Leader
0x0100
Velocity Profile Data
0x0200
Correlation Profile Data
0x0300
Echo Intensity Profile Data
0x0400
Percent Good Profile Data
0x0500
Status Profile Data
0x4000
Surface Track Status
0x4001
Surface Track Commands
0x4002
Surface Track Amplitude
b. Once a data type has been given an ID number and the format of that
data has been published we consider the format for each field has being
fixed. Fixed refers to units used for a given field, the number of bytes in
a given field, and the order in which the fields appear within the data
type. Fixed does not refer to the total number of bytes in the data type see Rule “c”.
c. Data may be added to an existing data type only by adding the bytes to
the end of the data format. As an example, the variable leader data contains information on ensemble number, time, heading, pitch, roll, temperature, pressure, etc. The format for the bytes 1-65 are now specified
by changes added in support to the Channel Master ADCP. If additional
sensor data is to be added to the variable leader data then it must be
added to the end of the data string (bytes 66-x as an example).
d. The order of data types in an ensemble is not fixed. That is there is no
guarantee that velocity data will always be output before correlation
data.
e. The header data will include the number of data types in the files and
the offset to each ID number for each data type.
P/N 95B-6001-00 (February 2006)
page 127
Channel Master Operation Manual
f. The total number of the bytes in an ensemble minus the 2-byte checksum will be included in the header.
14.2
Recommended Data Decoding Sequence for
Data Format PD0
a. Locate the header data by locating the header ID number (in the case of
PD0 profile data that will be 7F7F).
b. Confirm that you have the correct header ID by:
1. Locating the total number of bytes (located in the header data) in the
ensemble. This will be your offset to the next ensemble.
2. Calculate the checksum of total number of bytes in the ensemble excluding the checksum. The checksum is calculated by adding the
value of each byte. The 2-byte least significant digits that you calculate will be the checksum.
3. Read the 2-byte checksum word at the end of the ensemble, located
by using the checksum offset in the header (determined in step
“b-1”) and compare this checksum word to the value calculated in
step “b-2”.
4. If the checksums match then you have a valid ensemble. If the
checksums do not match then you do not have a valid ensemble and
you need to go back to step “a” and search for the next header ID
number occurrence.
c. Locate the number of data types (located in the header data).
d. Locate the offset to each data type (located in the header data).
e. Locate the data ID type you wish to decode by using the offset to each
data type and confirm the data ID number at that offset matches the ID
type you are looking for.
f. Once the proper ID type has been located, use the Channel Master Operation Manual to understand what each byte represents in that particular data type.
14.3
Pseudo-Code for Decoding PD0 Ensemble Data
The following examples show the pseudo-code for decoding PD0 ensemble
data.
a. Define structures, which contain all fields in all data types of the PD0
format.
1. typedef struct { <lists of types and fields> } FixedLeader.
2. typedef struct { <lists of types and fields> } VariableLeader.
page 128
Teledyne RD Instruments
Channel Master Operation Manual
3. typedef struct { <lists of types and fields> } VelocityType
4. and so on for every available type.
b. Clear checksum.
c. Look for PD0 ID 0x7F. Add to checksum.
d. Is next byte a 0x7F? Add to checksum.
e. If no, return to step “b”.
f. Else, read next two bytes to determine offset to checksum. Add two
bytes to checksum.
g. Read in X more bytes, where X = offset to checksum - 4. Adding all
bytes to checksum.
h. Read in checksum word.
i. Do checksums equal?
j. If no, return to “b”.
k. For each available data type (the header contains the # of data types), go
to the offset list in header.
1. Create a pointer to type short to the data type at an offset in the list.
2. Check the Type ID.
3. Create a pointer of appropriate type to that location.
4. Repeat for all available data types.
l. Work with data.
m. Return to “b” for next ensemble.
14.4
Example Code for Decoding Channel Master
Ensembles
Here is an example of how to decode a Channel Master ensemble. It is
written in “C.”
NOTE. Structures must be “packed”; i.e. Don’t let the compiler add “fill
bytes” to align fields on word boundaries.
This is an example of a section of code, not a full executable program.
/****************************************************************************/
/* Data ID Words */
/****************************************************************************/
#define
#define
#define
#define
#define
#define
#define
FLdrSelected
VLdrSelected
VelSelected
CorSelected
AmpSelected
PctSelected
SttSelected
P/N 95B-6001-00 (February 2006)
0x0000
0x0080
0x0100
0x0200
0x0300
0x0400
0x0500
page 129
Channel Master Operation Manual
/****************************************************************************/
/* structures */
/****************************************************************************/
typedef unsigned char uchar;
typedef unsigned short ushort;
typedef unsigned long ulong;
typedef struct {
uchar
Minute,
Second,
Sec100;
} TimeType;
typedef struct {
uchar
Year,
Month,
Day,
Hour,
Minute,
Second,
Sec100;
} DateTimeType;
typedef struct {
uchar
Version,
Revision;
} VersionType;
typedef struct {
uchar
ID,
DataSource;
ushort
ChecksumOffset;
uchar
Spare,
NDataTypes;
ushort
Offset [256];
} HeaderType;
typedef struct {
ushort
ID;
VersionType CPUFirmware;
ushort
Configuration;
uchar
reserved1,
reserved2,
NBeams,
NBins;
ushort
PingsPerEnsemble,
BinLength,
BlankAfterTransmit;
uchar
reserved3,
PctCorrelationLow,
NCodeRepetitions,
reserved4;
ushort
ErrVelocityMax;
TimeType
TimeBetweenPings;
uchar
CoordSystemParms;
ushort
reserved5,
reserved6;
uchar
SensorSource,
AvailableSensors;
ushort
DistanceToBin1Middle,
reserved7;
ushort
reserved8
uchar
FalseTargetThreshold,
reserved9;
ushort
AmtLagDist;
uchar
CMSerialNum [8];
uchar
Bandwidth;
uchar
reserved10 [3];
ulong
CMSewrialNum;
} FixLeaderType;
typedef struct {
ushort
ID,
EnsembleNumber;
DateTimeType RecordingTime;
uchar
ensemble_msb;
page 130
Teledyne RD Instruments
Channel Master Operation Manual
ushort
}
BITResult,
SpeedOfSound,
Depth,
reserved1;
short
Pitch,
Roll;
ushort
Salinity;
short
Temperature;
TimeType
MaxTimeBetweenPings;
uchar
HeadingStddev,
PitchStddev,
RollStddev;
uchar
reserved2 [14];
ulong
pressure;
uchar
reserved3 [4];
VarLeaderType;
typedef struct
{
ushort
ID;
short
Data [256];
} OneBeamShortType;
typedef struct
{
ushort
ID;
uchar
Data [256];
} OneBeamUcharType;
typedef struct {
ushort
ID;
short
Data [1024];
} IntStructType;
typedef struct {
ushort
ID;
uchar
Data [1024];
} ByteStructType;
/****************************************************************************/
/* Global Pointers */
/****************************************************************************/
HeaderType
*HdrPtr;
FixLeaderType
*FLdrPtr;
VarLeaderType
*VLdrPtr;
IntStructType
*VelPtr;
ByteStructType
*CorPtr;
ByteStructType
*AmpPtr;
ByteStructType
*PctPtr;
ByteStructType
*SttPtr;
/*--------------------------------------------------------------------------*/
unsigned char RcvBuff[8192];
void DecodeBBensemble( void )
{
unsigned short i, *IDptr, ID;
FLdrPtr = (FixLeaderType *)&RcvBuff [ HdrPtr->Offset[0] ];
if (FLdrPtr->NBins > 255)
FLdrPtr->NBins = 32;
for (i=1; i<HdrPtr->NDataTypes; i++)
{
IDptr = (unsigned short *)&RcvBuff [ HdrPtr->Offset [i] ];
ID = IDptr[0];
switch (ID)
{
case VLdrSelected:
{
VLdrPtr = (VarLeaderType *)&RcvBuff [ HdrPtr->Offset [i] ];
break;
}
case VelSelected:
P/N 95B-6001-00 (February 2006)
page 131
Channel Master Operation Manual
{
}
15
}
VelPtr = (IntStructType *)&RcvBuff [ HdrPtr->Offset [i] ];
break;
}
case CorSelected
{
CorPtr =
break;
}
case AmpSelected
{
AmpPtr =
break;
}
case PctSelected
{
PctPtr =
break;
}
case SttSelected
{
SttPtr =
break;
}
}
:
(ByteStructType *)&RcvBuff [ HdrPtr->Offset [i] ];
:
(ByteStructType *)&RcvBuff [ HdrPtr->Offset [i] ];
:
(ByteStructType *)&RcvBuff [ HdrPtr->Offset [i] ];
:
(ByteStructType *)&RcvBuff [ HdrPtr->Offset [i] ];
Specifications
Table 34:
Velocity Profiling (Broadband Mode) Specifications
300kHz
600 kHz
1200 kHz
# Cells
1-128
1-128
1-128
Min. Cell size (cm)
100
50
25
Max. Cell size (cm)
1600
800
400
Max. Range (m)*
300
90
20
1st Cell start (m)
2-10
1-10
0.5 – 10
±0.5%
±0.5%
±0.5%
± 0.2cm/s
± 0.2cm/s
± 0.2cm/s
Resolution (mm/s)
1
1
1
Velocity Range (m/s)
±5
±5
±5
Accuracy
(Cell=1/2 max.)
Table 35:
page 132
Transducer Specifications
Geometry
2 beams, ±20º beam angle
Beam Width
1.5º for 1200 kHz& 600 kHz, 2.2º for 300 kHz
Construction
Cast polyurethane with titanium hardware. Mounting plate included.
Teledyne RD Instruments
Channel Master Operation Manual
Table 36:
Power Specifications
Voltage
10 to 18 VDC
Maximum Current
1.5A
NOTE. Energy consumption depends on velocity profiling parameters.
Contact RD Instruments or a representative for an accurate prediction for
your application.
Table 37:
Standard Sensors Specifications
Acoustic Stage
Pressure
Temperature
Tilt
Table 38:
Range
0.15 to 10 meters
Accuracy
±0.1%, ± 3 mm (which ever is greater)
Resolution
0.1 mm
Range
0.1 to 10.5 meters
Accuracy
± 26 mm
Resolution
1.0 mm
Range
-4º to 35ºC
Accuracy
±0.2ºC
Resolution
0.01º C
Range
± 10°
Accuracy
±0.2° @ 0°, ±0.5° @ 10°
Resolution
0.01°
Communications Specifications
RS-232 with SDI-12, RS-422, RS-485
- SDI-12 supports v 1.3
- Simultaneous RS-232, SDI-12, and internal logging supported.
Serial Baud Rates: 300-115,200 bps
P/N 95B-6001-00 (February 2006)
page 133
Channel Master Operation Manual
15.1
page 134
Outline Installation Drawings
Teledyne RD Instruments
Channel Master Operation Manual
P/N 95B-6001-00 (February 2006)
page 135
Channel Master Operation Manual
page 136
Teledyne RD Instruments
Channel Master Operation Manual
15.2
Mounting Plate Drawing
16
Technical Support
If you have technical problems with your instrument, contact our field service group in any of the following ways:
RD Instruments
RD Instruments Europe
9855 Businesspark Ave.
5 Avenue Hector Pintus
San Diego, California 92131
06610 La Gaude, France
(858) 693-1178
+33(0) 492-110-930
FAX (858) 695-1459
+33(0) 492-110-931
Sales - [email protected]
[email protected]
Field Service – [email protected]
[email protected]
Web: www.rdinstruments.com
After Hours Emergency Support - +1 858-578-0781
P/N 95B-6001-00 (February 2006)
page 137
Channel Master Operation Manual
17
Glossary
If, after reviewing this section, you are unable to find the word/jargon in
question, please send us an e-mail containing that word. Your questions
will ensure that our glossary remains an effective reference tool for our customers.
------ A -----Acoustic Doppler Current Profiler (ADCP): An instrument that obtains
profiles of water velocity by transmitting sound of known frequency into
the water and measuring the Doppler shift of reflections from scatterers,
which are assumed to be passively moving with the water.
Acoustic Window: A covering for the hull-side opening of a sea chest that
is transparent to sound. A vessel mounted ADCP is typically mounted in a
sea chest and the acoustic window helps to isolate it from biofouling organisms and also the flow noise generated by the vessel.
ADCP: Acoustic Doppler Current Profiler
ADCP Coordinates: Profile data is reported in an orthogonal coordinate
system as referenced to the instrument. Beam 3 is forward. Sideways is to
the right of forward (beam 2 for a down-looking ADCP, beam 1 for an uplooking ADCP).
Ambiguity: ADCPs determine the radial motion between a source and scatterer by measuring the phase change of the reflected signal. Because phase
is periodic, this solution is multi-valued. For example, all three of the displacements shown below will return the same phase measurement, which
results in ambiguity:
Ambiguity Resolution: A method to count the number of wavelengths included between two points where phase is measured, thereby removing the
ambiguity associated with measuring only phase.
Ambiguity Velocity: The maximum allowable radial motion for phase
measurements to be unambiguous, corresponding to a maximum observable
velocity, beyond which ambiguity resolution is required.
Autonomous Underwater Vehicle (AUV): An unmanned submersible with
propulsion, generally capable of navigation and accomplishing specific
tasks (such as data gathering).
page 138
Teledyne RD Instruments
Channel Master Operation Manual
AUV: Autonomous Underwater Vehicle
------ B -----Backscatter: 1) The portion of a sound wave that is reflected by scatterers
directly back toward the source. 2) A qualitative measurement (in decibels)
of scatterer concentration which is calculated in the WinRiver software.
This calculation corrects the echo intensity data for sound absorption, beam
spreading, transducer temperature, etc. and provides an excellent means of
tracking relative concentration (e.g. “Is most of the sediment in the water
here or is it there?”). Obtaining a quantitative measurement (e.g. “How
many mg/L of bottom sediment are in this parcel of water?”) requires a field
calibration at the measurement site. There is a third-party software package, Sediview, designed for this task.
BBBatch: Utility program to allow automated conversion of a series of raw
binary ADCP files to ASCII files.
BBCheck: Utility program that checks the integrity and quality of raw binary ADCP files.
BBConv: Utility program to convert some portion of a raw binary ADCP
file into an ASCII file using a decoder file. Several decoder files are included on the RDI Tools CD, for example: extract only distance to first bin,
extract only navigation data, etc. Complete documentation on these decoder files as well as information on how to write your own is available.
BBList: Utility program for viewing and converting raw binary ADCP data
files. It is a menu-driven program offering a step-by-step process to convert
raw binary files to ASCII files.
BBMerge: Utility program to convert comma-delimited ASCII files back
into raw binary ADCP format.
BBSlice: A raw data sub-sectioning utility program. BBSlice converts a
raw data file into a series of ASCII files, opening a new ASCII file whenever there is a jump in the sequence of ensemble numbers.
BBss: Utility program to calculate the speed of sound when given temperature, salinity and depth.
BBSub: A raw data sub-sectioning utility program. BBSub allows you to
extract subsets of raw data from a large raw data file by choosing the starting and ending ensemble number.
BBTalk: Terminal emulator program for direct communication with the
CPU of an ADCP or DVL.
Beam Angle: The angle between a transducer beam’s main axis and the vertical axis of the ADCP or DVL (typically 20 or 30º).
P/N 95B-6001-00 (February 2006)
page 139
Channel Master Operation Manual
Beam Coordinates: Profile data is reported as referenced along each beam
(i.e. no coordinate transformation is performed upon the raw data).
Beam Spreading: The extent to which the main lobe of energy generated
by a transducer fans out, or spreads as an acoustic wave front, with distance
from the transducer. This is proportional to λ/d where λ is the wavelength
of sound generated and d is the diameter of the transducer. Note: this is
why ADCP transducer diameter increases with decreasing operating frequency (and increasing wavelength).
Bin (Depth Cell): A measurement within a profile, generally equivalent to a
single-point current meter on a mooring.
Bin Mapping (Depth Cell Mapping): When the ADCP is tilted; the measurements taken at equal distances along each beam are no longer in the
same horizontal layer of water. For example, in the image below the tilted
ADCP bins do not line up horizontally, they are offset by one bin. In this
case the tilted ADCP will offset the bins on the “right” beam by one bin in
order to line them up horizontally with the bins on the “left” beam before
combining the measurements to compute the velocity.
Blank Zone: The area near the head of an ADCP in which no measurements are taken. This is usually the minimum distance required to avoid
collecting data that is potentially contaminated by ringing, but is sometimes
extended for other reasons (e.g. to begin measurement well beyond the flow
influence of a mounting structure).
Bottom Discharge: When using an ADCP to measure river discharge, it is
not possible to measure all the way to the bottom (due to sidelobe contamination and the finite resolution of the depth cells). In order to get an accurate approximation of the total discharge, the flow in this area must be estimated and included, usually by extrapolating the measured velocities to the
bottom using a power curve fit.
Bottom Track: In moving platform applications where the bottom is within
range of the ADCP or DVL, a special ping can be transmitted to measure
the Doppler shift of the signal return from the bottom. If the bottom is not
moving, this measurement is a very accurate measurement of the platform
velocity. For ADCPs this velocity is typically used to extract the true water
velocity profile from the measured velocity profile (by removing the vehicle
motion from the measurements). For DVLs, this IS the desired velocity.
page 140
Teledyne RD Instruments
Channel Master Operation Manual
Bottom Track Modes: There are currently four bottom tracking modes of
operation available from RDI:
Bottom Mode 4: Uses ambiguity resolution, and adjusts lags for reduced variance at higher elevations (or deeper depths).
Bottom Mode 5: Specifically designed for reduced variance in shallow water/low elevations. It transmits several pings with computations to best determine depth and speed. This mode is the default
mode, but it will automatically switch to Bottom Mode 4 if conditions warrant.
Bottom Mode 6: Offers special narrow bandwidth operation to reduce the potential for interference or for stealth. No ambiguity resolution, instead bottom mode 6 requires user input of an approximate
operating elevation (or depth).
Bottom Mode 7: Similar to bottom mode 5, except that it is optimized for slow-moving platforms in very shallow, high backscatter
environments.
Break: A wake up command to an ADCP or DVL that places the instrument
in command mode.
Broadband ADCP: An ADCP that uses broadband processing.
Broadband Processing: Use of coded pulses to make multiple measurements of phase with a single ping, and thereby greatly increase the precision
of the measurement.
------ C -----Channel Master: Model name for an ADCP designed to use horizontal
profiling for flow monitoring in inland waterways.
Command Mode: The state into which an ADCP or DVL goes upon receiving a break. In this mode the ADCP or DVL is waiting to receive a command. It draws relatively high power, so the ADCP or DVL will go to sleep
if no command is received for five minutes.
Correlation: A key quality control parameter, this is essentially a measurement of how much the particle distribution has changed between phase
measurements. The less the distribution has changed, the higher the correlation, and the more precise the velocity measurement.
------ D -----Dead Reckoning: A navigation method where position is estimated by
measuring velocity, heading and time from the last known position.
P/N 95B-6001-00 (February 2006)
page 141
Channel Master Operation Manual
Degaussing: Technique used to remove the magnetic field from RDI battery
packs before installation, done to minimize any effects the batteries will
have on the magnetic compass.
Depth Cell (Bin): A measurement within a profile, generally equivalent to a
single-point current meter on a mooring.
Depth Cell Mapping (Bin Mapping): When the ADCP is tilted; the measurements taken at equal distances along each beam are no longer in the
same horizontal layer of water. For example, in the image below the tilted
ADCP bins do not line up horizontally, they are offset by one bin. In this
case the tilted ADCP will offset the bins on the “right” beam by one bin in
order to line them up horizontally with the bins on the “left” beam before
combining the measurements to compute the velocity.
DGPS: Differential Global Positioning System
Differential Global Positioning System (DGPS): Satellite-based navigation aid for precise measurement of location. When the bottom is out of
range or moving, calculating the distance between DGPS position fixes and
dividing by the time between those fixes can be used to measure the platform velocity.
Direct-Reading ADCP: An ADCP intended for real-time operation. Direct-Reading ADCPs do not have internal batteries or an internal recorder.
Discharge: The total flow through a section of a river. Rio Grande ADCPs
obtain discharge measurements by transecting the river to measure water
velocities, boat velocity, and the cross sectional area of the river and combining these measurements with estimates for the flow in the areas that can
not be measured (edge estimates, bottom discharge and top discharge).
Distance Made Good: When measuring transects of data with a moving
platform, this is a measure of the actual distance between the platform and
the start point (i.e. variations in course track are removed).
Doppler Shift: Named for Johann Doppler (1803-1853), the German physicist who first predicted it: it is the shift in frequency caused by radial motion between a source and an observer. Specifically, fD= fS (v/c): Where D
is the Doppler-shifted frequency, fS is the source frequency, v is the relative
velocity between source and observer, and c is the speed of sound.
page 142
Teledyne RD Instruments
Channel Master Operation Manual
Doppler Velocity Log (DVL): An instrument designed to measure the velocity and elevation of a moving platform with bottom tracking. Most
DVLs will switch to measuring velocity relative to the water when the bottom is out of range.
DVL: Doppler Velocity Log.
------ E -----Earth Coordinates: Profile data is reported in an orthogonal coordinate
frame as referenced to the Earth (East, North and Up). “North” can mean
magnetic or true, depending on the heading input.
Echo Intensity: A key quality control parameter, echo intensity is a measure of the signal strength intensity returned to the transducer. High echo
intensity can show solid targets (e.g. a boundary, obstruction or fish), while
low echo intensity can show insufficient scatterers or the limits of profiling
range for the environment.
Edge Estimate: When measuring river discharge with an ADCP it is not
possible to measure to zero depth at the banks of the river. The flow
through this unmeasured area must be approximated in order to obtain an
accurate estimate of the total discharge.
Ensemble: A group of measurements (pings) considered together. An ensemble is usually the average of the individual measurements, and has a
higher precision than any individual measurement.
Error Velocity: A key quality control parameter that derives from the four
beam geometry of an ADCP. Each pair of opposing beams provides one
measurement of the vertical velocity and one component of the horizontal
velocity, so there are actually two independent measurements of vertical
velocity that can be compared. If the flow field is homogeneous, the difference between these vertical velocities will average to zero. To put the error
velocity on a more intuitive footing, it is scaled to be comparable to the
variance in the horizontal velocity. In a nutshell, the error velocity can be
treated as an indication of the standard deviation of the horizontal velocity
measurements.
------ F -----Fish Detection Threshold: Used to identify and mark as bad any velocity
measurement that was potentially contaminated by a fish (because fish are
generally not passively following the flow). It is a flag on the maximum
allowable value for the measured echo intensity return.
Frequency: The number of wave crests passing a given point per unit time.
P/N 95B-6001-00 (February 2006)
page 143
Channel Master Operation Manual
------ G -----Gimbals: Frame that will support the weight of an object but allow its free
rotation. Gimbals can be constructed to allow free rotation in one, two, or
three axes.
Gyro: A rapidly spinning device mounted on gimbals to maintain a constant
orientation. These devices are commonly used to measure heading on ships
because, unlike magnetic compasses, they are unaffected by ferrous metals
or by varying electromagnetic fields. They can also be used to measure
pitch and roll because, unlike liquid level sensors, they are unaffected by
accelerations.
------ H -----Homogeneity: The extent to which the current measured by all four beams
is the same. A key assumption of all ADCP processing is that the currents
are horizontally homogeneous across the four beams. This assumption is
checked for each measurement by using the error velocity measurement.
Horizontal ADCP (H-ADCP): Instrument designed to measure velocity
profiles in a horizontal plane.
------ I -----Inertial Navigation: Method for estimating the attitude and position of a
moving platform (of primary interest here are AUVs) by integrating measurements from gyros and accelerometers. This integration is subject to
large errors over time, so DVLs and pressure sensors are commonly incorporated as external inputs to measure and correct these errors.
------ J ----------- K ----------- L -----Lag: A time delay between pulses or pings.
Long Ranger: Model name for Workhorse ADCPs of frequency 75 kHz.
Lowered ADCP (L-ADCP): Technique whereby one or two ADCPs are
lowered through the water column (typically on a rosette) to obtain velocity
profiles over the full ocean depth. Note that a whole body of research exists
on how to properly remove the motion of the rosette from the velocity
measurements obtained in this manner.
page 144
Teledyne RD Instruments
Channel Master Operation Manual
------ M -----Main Lobe: The main focus of energy emitted from a transducer. If the
transducer were a flashlight, the main lobe would be the visible beam of
light.
Mariner: Model name for a Workhorse Monitor ADCP configured for underway current measurement in shallow water (as opposed to the deep water
Ocean Surveyor systems).
Modes: RDI offers several modes of operation that are optimized for certain conditions. There are currently five modes of operation for water profiling available from RDI:
Mode 1: General purpose water profiling. This is the most robust
profiling mode, designed for the widest variety of measurement applications. Mode 1 can resolve high velocities and can measure over
long ranges.
Mode 5: For high resolution profiling in shallow water with low
flows. Mode 5 should be used with bottom tracking. It offers the
lowest standard deviation per measurement, but is also the most limited in its allowed performance envelope (e.g. low velocity flow,
slow platform movement, no high shears or turbulence).
Mode 8: Also for high resolution profiling in shallow water. Mode
8 should also be used with bottom tracking. It has higher standard
deviation per measurement than mode 5, but allows a somewhat
wider performance envelope.
Mode 11: The latest in our high resolution profiling modes. Intended for the shallowest water, it is also well suited for boundary
layer studies. Mode 11 should be used with bottom tracking. It allows smaller depth cells (1 cm), more depth cells, and has improved
signal processing which allows faster ping rates and a wider performance envelope than modes 5 and 8. Mode 11 is intended to supercede mode 5.
Mode 12: Offers increased resolution (1 cm depth cells) and uses
multiple sub-pings to improve the standard deviation of each measurement. Mode 12 allows measurement of fast moving, shallow water; and can also be used to improve the standard deviations of any
measurement (any range, any velocity) when the ADCP heading is
fixed or reasonably steady.
Monitor: Model name for a direct reading Workhorse ADCP.
Moving Bottom: Some rivers carry such a heavy sediment load that they
do not have a clearly identifiable bottom. In essence, the mud just keeps
getting thicker and slower with depth. In such environments it is not un-
P/N 95B-6001-00 (February 2006)
page 145
Channel Master Operation Manual
common for bottom tracking measurements to lock onto a sediment layer
that is still moving, resulting in a bias to the bottom tracking velocity. This
is especially important for river discharge measurements, where the vessel’s
navigation must be substituted for the bottom track velocity to obtain accurate results.
------ N -----Navigator: Model name for the RDI Doppler Velocity Log.
Narrowband ADCP: An ADCP that uses narrowband processing.
Narrowband Processing: Uses a single pulse per ping to measure velocity.
The lack of coding in the pulse makes a narrowband measurement much
less precise, but it allows profiling over a longer range. Narrowband processing generally requires much larger ensembles to get a precise measurement.
------ O -----Ocean Observer: Low frequency Phased Array ADCP for cabled deployment, usually from an oilrig.
Ocean Surveyor: Low frequency Phased Array ADCP for vessel-mounted
operations.
------ P -----Percent Good: A key quality control parameter, percent good indicates
what fraction of the pings passed the various error thresholds. Each depth
cell reports four values for percent good, and the meaning depends on the
coordinate frame. If data is collected in beam coordinates, then the four
percent good values represent the percentage of the pings collected by each
beam for that depth cell whose correlation exceeded a low correlation
threshold. In the other coordinate frames (ADCP, Ship and Earth Coordinates), the four Percent Good values represent (in order): 1) The percentage
of good three beam solutions (one beam rejected); 2) The percentage of
good transformations (error velocity threshold not exceeded); 3) The percentage of measurements where more than one beam was bad; and 4) The
percentage of measurements with four beam solutions.
Phase: An engineering measure of the propagation delay caused by radial
motion between scatterer and source. Phase is ambiguous in that it is cyclical (e.g. 10 º is the same phase as 370 º).
Phased Array Transducer: A single, flat, multi-element transducer that
uses an RDI proprietary technique to simultaneously form all four beams.
Available phased array transducers are generally low frequency (38 kHz, 75
kHz and 150 kHz) long range devices.
page 146
Teledyne RD Instruments
Channel Master Operation Manual
Ping: The entirety of the sound generated by an ADCP transducer for a single measurement cycle. A broadband ping contains a coded series of pulses
and lags, while a narrowband ping contains a single pulse.
Ping Mode: Power conserving mode for a deployed ADCP or DVL, where
only the power needed for the immediate deployment task is drawn (as opposed to command mode, where the ADCP consumes considerable power
while simply waiting for input). This mode saves the deployment configuration so that, in the event of a power interruption, the ADCP or DVL will
be able to automatically resume the configured deployment upon return of
power.
PlanADCP: Windows-based software package allowing the user to configure, and evaluate the consequences of, a deployment command-set for an
ADCP.
Profile: A series of regularly spaced depth cells in which the ADCP measures velocity along with several quality control parameters.
Pulse: A sound wave generated by a transducer.
Propagation Delay: The change in the travel time of sound between a
source and scatterer, generally due to radial motion. As an example: if it
takes longer for sound to reflect back from a scatterer than it did a short
while ago (and the speed of sound has not changed), then the scatterer must
be getting farther away.
------ Q ----------- R -----Radial Motion: Movement which alters the distance between source and
scatterer.
Range: The maximum profile length of an ADCP, it depends on several factors (note that these factors are inter-related in a complex way, and the generalizations below are intended only as rules of thumb – use PlanADCP to
check specific combinations):
1. Frequency: the lower the frequency, the longer the range.
2. Depth cell size: the larger the cell, the longer the range.
3. Mode of operation: mode 1 has the longest range.
4. Bandwidth: the narrower the bandwidth, the longer the range.
5. Concentration of scatterers: generally, the more scatterers,
the longer the range.
6. Temperature: generally, the colder the water, the longer the
range.
P/N 95B-6001-00 (February 2006)
page 147
Channel Master Operation Manual
7. Salinity: generally, the fresher the water, the longer the
range.
Range Gating: After sending a ping into the water, the ADCP transducers
listen for returned signal. The time series of the returned signal is then broken into a sequence of time segments, or range gates. Each segment is
equivalent to a depth cell, with the last segment coming from the farthest
range from the ADCP.
RDI Tools: Software package containing all of the BB* programs (BBTalk,
BBList, etc.) as well as several commonly used decoder files.
Reference Layer: In moving platform applications where the bottom is out
of range, the vessel motion can be approximated by assuming the water is
motionless at some point in the measured profile. This point is the reference layer.
Remotely Operated Vehicle (ROV): unmanned submersible controlled by
an operator via a tethering cable.
Ringing: After transmission the ADCP electronics, transducer and immediate surrounding equipment (particularly in vessel mounted ADCPs) all require some finite time to dampen the transmit energy, during which time
any signal return from scatterers will be contaminated.
Rio Grande ADCP: The model name for an ADCP optimally configured
for measurement of river discharge. A distinguishing feature of Rio Grande
ADCPs is that they are designed to operate from a 12 VDC power supply
(all other ADCPs operate from 20 – 50 VDC).
Rosette: Oceanographic instrumentation package found on most research
vessels. Rosettes are designed to be lowered to depths of interest while collecting data of various types. Most Lowered-ADCPs are mounted on rosettes.
ROV: Remotely Operated Vehicle
------ S -----Scatterers: Small particles or plankton in the water which reflect sound
waves.
Sea Chest: Cavity in the hull of a vessel to allow stream-lined, recessed
mounting of equipment such as a Vessel Mount ADCP.
Sediview: Third party software designed to use ADCP echo intensity measurements and in situ sampling to obtain quantitative estimates of sediment
concentration.
Self-Contained ADCP: An ADCP equipped with internal batteries and an
internal recorder for autonomous operation.
page 148
Teledyne RD Instruments
Channel Master Operation Manual
Sentinel: The model name for a self-contained Workhorse ADCP.
Ship Coordinates: Profile data is reported in an orthogonal coordinate
frame as referenced to the ship (if beam 3 is forward then ship coordinates
are the same as instrument coordinates).
Sidelobes: Peaks in sound intensity generated by a transducer found to the
side of the main lobe.
Sidelobe Contamination: This only need be considered when operating an
ADCP near a boundary (e.g. in shallow water). The beam angle of the main
lobe of an ADCP transducer is 20 or 30º off the vertical, which means that
the distance to the boundary along the ADCP centerline is shorter than the
distance to the boundary along a beam. Because most boundaries will reflect very strongly (much more strongly than the scatterers), sidelobe energy can travel the shorter path directly to the surface and thereby include
the “velocity” of the boundary with the velocity measurements taken along
the beams at any longer distance. This potential for interference depends
strictly on the beam angle. An ADCP with a 20º beam angle has the potential for sidelobe contamination at (distance to the boundary)*cos(20º), or
equivalently, the last 6% of the profile. Note: Sidelobe contamination is not
relevant for DVLs, which specifically look for the bottom.
Software Break: When using radio or acoustic telemetry, it is usually not
possible to send a break signal. Under these circumstances an ADCP can be
configured to recognize a series of keystrokes (i.e. = = =) as a break.
Source: Originator of sound of known frequency, here typically the transducer of an ADCP.
StreamPro: Model name for ADCP designed for discharge measurement in
shallow waterways.
------ T -----Top Discharge: When using an ADCP to measure river discharge, it is not
possible to measure all the way to the surface (due to the blank zone and to
the need to mount the transducers at sufficient depth to remain submerged
with no air entraining past the transducers). In order to get an accurate approximation of the total discharge, the flow in this area must be estimated
and included, usually by extrapolating the measured velocities to the surface.
Transducer: A device to convert electrical energy into sound waves, and
vice versa.
------ U -----Unmanned Underwater Vehicle (UUV): Generic term referring to both
AUVs and ROVs.
P/N 95B-6001-00 (February 2006)
page 149
Channel Master Operation Manual
UUV: Unmanned Underwater Vehicle
------ V -----Vessel Mount: An ADCP mounted to the hull of a vessel, typically in a sea
chest, and having inputs from the vessel’s navigation equipment.
VM-DAS: Windows-based data acquisition package for vessel mount
ADCPs. This package includes the ability to incorporate the ship’s navigation equipment.
------ W -----Wavelength: The distance between successive wave crests in a sound
wave.
WinADCP: Windows-based post-processing package for ADCP data.
WinH-ADCP: Windows-based data acquisition and playback package for
Horizontal ADCPs.
WinRiver: Windows-based software package for real time ADCP data
gathering. It is designed primarily for measurement of river discharge and
allows integration of the platform’s navigation equipment. It also converts
echo intensity measurements to qualitative estimates of backscatter.
WinSC: Windows-based software package for self-contained ADCPs includes configuring, testing, data recovery and viewing options.
Workhorse ADCP: The generic model name for all of the non-phased array broadband ADCPs currently produced by RDI.
------ X -----Xdcr: A common abbreviation for transducer.
------ Y ----------- Z -----ZedHed: RDI trade name for a transducer designed to minimize ringing.
page 150
Teledyne RD Instruments
Channel Master Operation Manual
NOTES
P/N 95B-6001-00 (February 2006)
page 151
Channel Master Operation Manual
NOTES
page 152
Teledyne RD Instruments