1
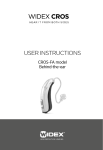
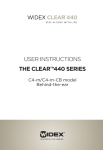
User instructions SCOLA™ FM system SCOLA FLEX RECEIVER and SCOLA FLEX-i RECEIVER symbols The following symbols will be used throughout the manual: WARNING Messages with this heading indicate adverse reactions, potential safety hazards or inadequate device performance. Not for general waste 2 Contents symbols . . . . . . . . . . . . . . . . . . . . . . . . . . . . . . . . . . . . . . . . 2 Introduction . . . . . . . . . . . . . . . . . . . . . . . . . . . . . . . . . . . 4 The SCOLA™ FM system . . . . . . . . . . . . . . . . . . . . . . . . . . . 5 Description . . . . . . . . . . . . . . . . . . . . . . . . . . . . . . . . . . . . 7 Preparing the scola receiver . . . . . . . . . . . . . . . . . . 8 Battery information . . . . . . . . . . . . . . . . . . . . . . . . . . . . . 8 Connecting SCOLA FLEX, FM shoe version: . . . . . . . . 8 Connecting SCOLA FLEX, Europlug version: . . . . . . . . 8 Connecting the SCOLA FLEX-i integrated version: . . 9 Operating the scola receiver . . . . . . . . . . . . . . . . . 10 The mode switch . . . . . . . . . . . . . . . . . . . . . . . . . . . . . . 10 Changing the receiving channel . . . . . . . . . . . . . . . . . 11 The scan button . . . . . . . . . . . . . . . . . . . . . . . . . . . . . . . 12 Good advice . . . . . . . . . . . . . . . . . . . . . . . . . . . . . . . . . . . 13 Care and maintenance . . . . . . . . . . . . . . . . . . . . . . . . 15 warnings . . . . . . . . . . . . . . . . . . . . . . . . . . . . . . . . . . . . . . 16 In case of malfunction . . . . . . . . . . . . . . . . . . . . . . . . 17 Terms and definitions explained . . . . . . . . . . . . . . 20 Warranty . . . . . . . . . . . . . . . . . . . . . . . . . . . . . . . . . . . . . 24 Regulatory information . . . . . . . . . . . . . . . . . . . . . . 25 Settings . . . . . . . . . . . . . . . . . . . . . . . . . . . . . . . . . . . . . . 29 3 Introduction SCOLA provides hearing aid users with additional opportunities in difficult listening situations. The SCOLA FM system has been developed specifically for children and educational environments. These instructions therefore primarily address parents and teachers. The symbol refers to the section 'Terms and definitions explained’, where you will find detailed explanations of functions and technical terms. WARNING This booklet contains important information and instructions. Read this booklet carefully before you start using the device. Note Your SCOLA receiver and accessories may not look exactly as illustrated in this booklet. We furthermore reserve the right to make any changes considered necessary. The SCOLA FLEX-i is the design-integrated version of the SCOLA FLEX. Unless otherwise stated, these instructions apply to both the SCOLA FLEX receiver and the SCOLA FLEX-i receiver. 4 The SCOLA™ FM system The SCOLA™ FM system consists of a SCOLA transmitter and one or two SCOLA FLEX or SCOLA FLEX-i receivers. The SCOLA transmitter’s primary function is to transmit sound signals from the microphone or audio equipment to the receiver. The operating range is up to 20-30 metres, depending on the surroundings. The receiver’s function is to receive sound signals from a SCOLA transmitter or other FM transmitters. For Widex behind-the-ear hearing aids, the shoe and receiver are assembled to form an integrated unit, henceforth referred to as an FM shoe. For use with other behind-the-ear hearing aid types, the receiver (only SCOLA FLEX) can be provided with a 3-pin plug (Europlug) to fit an audio shoe. The SCOLA FLEX-i receiver is connected directly to the hearing aid without the use of any FM shoe. The SCOLA transmitter and receiver must be on the same channel to work together. 5 SCOLA FLEX SCOLA FLEX FM shoe, 1 or 2 units SCOLA FLEX with Europlug, 1 or 2 units SCOLA FLEX-i SCOLA FLEX-i Design-integrated receiver which can be connected to specific Widex hearing aids. User instructions s ction teM instrU UserLA™ FM SyS R SCO SCO EIVE X REC LA FLEand R EIVE X-i REC LA FLE SCO 6 Description The receiver has the following functions: 3-position mode switch. 101 180 Channel scan button allowing scanning and automatic selection of the receiving channel. Right (red) / left (blue) / neutral (transparent) mark for correct positioning of receivers on the hearing aids (if two hearing aids are used). The serial number and CE mark are found on the side of the receiver. Note We recommend that you make a note of the serial number at the back of this booklet. 7 Preparing the scola receiver Battery information The receiver is powered by the hearing aid battery. We recommend that you insert a new battery in the hearing aid when using the SCOLA system for the first time. The receiver is provided with an automatic hibernation mode , which reduces the power usage. Connecting SCOLA FLEX, FM shoe version: Several different FM shoe versions are available for Widex BTE hearing instruments, in which the shoe and the SCOLA FLEX are an integrated unit. In the manual ”The FM shoes for the SCOLA™ system” you can see how to connect SCOLA FLEX to various Widex hearing instruments. Connecting SCOLA FLEX, Europlug version: When SCOLA FLEX is used with hearing aids and shoes that require a Europlug version, connecting SCOLA FLEX is a two-step process: • Click the SCOLA FLEX onto the shoe. Push the plug into the shoe until it clicks. • Now attach the shoe with the connected SCOLA FLEX to the hearing aid. 8 The shoes are available in various makes and designs. Your shoe may therefore look different from the one shown in these instructions. However, the way to attach it is, in principle, the same. Connecting the SCOLA FLEX-i integrated version: After removing the cover plate, slide the SCOLA FLEX-i into position on the bottom of the hearing aid. Slide the locking button upwards to lock the SCOLA FLEX-i into place. Open Locked We recommend that the SCOLA FLEX-i remains on the hearing aid. 9 Operating the scola receiver The mode switch The receiver is turned on and off by means of the mode switch. The standard switch positions are: 0, 1 and 2. • position 0: The receiver is off. Only the sound signal from the hearing aid can be heard. • position 1: The receiver is on. Only the FM signal can be heard. In some older hearing aid models, the microphone will not be completely turned off, which means that loud sounds can still be heard. This setting is called “FM”. • position 2: The receiver is on. Both the FM signal and the sound signal from the hearing aid are received. This setting is called “FM+M”. 10 With recent Widex hearing aids, the mode switch may function differently. This is described in the manual: “The FM shoes for the SCOLA™ system”. The hearing care professional can program the mode switch so that it functions differently than described here. This can then be noted at the back of this booklet. Changing the receiving channel When the receiver is turned on, the starting channel will be the channel last used unless programmed differently. 11 The scan button By using the channel scan button: Press the scan button down. The receiver will then scan the pre-selected channels automatically. During scanning, a brief beep will be heard every 1½ seconds. When an FM signal is detected on one of the channels, the scanning stops automatically and two beep tones are heard. If no FM signal is detected on any of the preselected channels, the scanning will not stop until all channels have been scanned, i.e. it will return to the starting channel. A long beep will then be heard. The hearing care professional can change the channel scan button function so that it is no longer possible to operate the scan button. The scan button setting can be noted at the back of these instructions. The frequency and volume of the beep tone can also be adjusted by the hearing care professional. By synchronising: SCOLA CLASSMATE, SCOLA TEACH or other compatible products can wirelessly set the SCOLA receiver to a specific receiving channel. 12 Good advice To benefit fully from the SCOLA FM system, it is important to: • practise using the FM system and test the different settings in familiar surroundings • inform other people that you use an FM system with your hearing aid, so that they can understand why they should talk into the microphone and how the system works • select the right settings for the SCOLA transmitter and receiver 13 Listening situation Suggested setting of the mode switch on the receiver In kindergartens / With young children, we recommend classrooms choosing setting 2 (FM+M) to allow the children to hear themselves as well as those around them. Using SCOLA TEACH as the transmitter device, the teacher may also choose to set the receiver temporarily to another setting, e.g. “FM+M” irrespective of the physical position of the switch. In this setting the receiver cannot be turned off. Lectures If you want to listen to the teacher / lecturer only, choose setting 1 (FM). If you also want to listen to speech around you, choose setting 2 (FM+M). In a car In general, we always suggest using the receiver with setting 2 (FM+M). If a child only needs to hear what a parent is saying, choose setting 1 (FM). 14 Care and maintenance In general, the SCOLA™ FM system should be cared for in the same way as the hearing aid. It is a good idea to clean and remove dirt and debris from the FM system on a daily basis. There are also some special precautions which should be taken. • Remove any dirt from the receiver with a dry, soft cloth. • Do not disassemble any of the SCOLA products or hearing aid, as this will void the guarantee. • Do not use water, alcohol or the like to clean the FM system. • Make sure that the microphone, audio and power supply cords do not become tangled up. • Do not expose the receiver to cosmetics, hair spray, water, cleaning solutions or other chemicals. 15 warnings WARNING •Make sure that the SCOLA receiver and the batteries for the hearing aid are kept out of reach of children, who might place them in their mouths. Discard used batteries carefully. Do not change batteries in front of children and do not let them see where you keep your supply. 16 In case of malfunction With proper use and maintenance, your SCOLA™ FM system will give you years of reliable service. The following pages contain some brief advice to follow if you experience problems with your SCOLA FM system. Before contacting the hearing care professional where you acquired your SCOLA FM system, please follow the advice below: If there is no sound from the SCOLA FM system or the audio equipment, or the sound is distorted, it could be because: • The hearing aid, the SCOLA receiver or SCOLA transmitter is not set correctly. Check that all the settings are correct for the desired use, including that both the transmitter and receiver are on. • The FM shoe is not correctly attached. Check that the shoe clicks correctly when you attach it to the hearing aid. There must be contact between the shoe and the hearing aid’s contact points. (NB: This does not apply to the SCOLA FLEX-i.) 17 • The hearing aid’s contact points for the shoe are dirty. Consult the hearing care professional where you acquired your hearing aid to have the contact points cleaned. • The earmould or tubing is blocked. Check that the tubing and earmould are securely in place and that they are free of wax, moisture and debris. • The receiver and transmitter are not set to the same channel. Check that the channel number in the display of the SCOLA transmitter is the same as the receiving channel of the receiver by making a channel scan. • The hearing aid battery cannot supply both the hearing aid and the receiver. Replace the battery. If there is noise in the hearing aid, it could be because: • You are at or beyond the limit of the receiving range of the receiver. Reduce the distance between the receiver and the transmitter. 18 • The receiver is set to ”FM” and the signal from the FM microphone or from the audio equipment is too weak, or there is no signal. Set the receiver to ”FM+M”. Check that the SCOLA transmitter is turned on, place it closer to the person speaking, or turn up the volume on the audio equipment. • Noise and whistling are interfering with reception, possibly because two or more FM transmitters are transmitting on the same channel as your receiving channel. To avoid this type of interference, make sure that only one FM transmitter is transmitting on the receiving channel. Try turning off your SCOLA transmitter. If you hear another FM signal, this is what is causing the noise. There are several ways to avoid interference : • Turn on one FM transmitter only. • Find another available channel, and select this channel on both the receiver and transmitter. • Increase the distance between the interfering FM transmitter and the receiver until the interference stops. 19 Terms and definitions explained Antenna The receiver and transmitter are both provided with an antenna. The SCOLA receiver has a built-in directional antenna. To help ensure the best possible reception, the hearing aid user should face in the direction of the transmitter. Approval and CE marking The SCOLA receivers and the SCOLA transmitters are tested at an EU/FCC accredited test laboratory. The CE/FCC marking and declaration of conformity document that the products conform to the directives and technical requirements laid down in North America and the EU, as well as associated countries. The transmitters and receivers are provided with serial numbers. 20 Synchronisation The transmitting channel of external devices such as SCOLA TEACH can be synchronised with the receiver’s receiving channel in two ways: Channel synchronisation The receiver is set wirelessly to a specific receiving channel. Teacher’s synchronisation This is an expanded type of synchronisation that is performed from SCOLA TEACH and includes both the receiving channel and the temporary settings of the switch and scan button. It allows the teacher or parent to lock the receiver mode switch in a specific setting, e.g. FM+M, and/or disable the scan button. These temporary settings will remain active until the hearing aid is switched off or the receiver is removed. You can read more about this function in the SCOLA TEACH user instructions, or at http://scolasimulator.widex.com/ 21 FM system An FM system is a radio communication system in which a transmitter sends signals to a receiver via carrier waves. ”FM” stands for “frequency modulation” and is a technical term for the way in which the radio signal is produced. FM transmission ensures high quality reception without any noise, hum or distortion. If you have two hearing aids, they should both have a receiver. Hibernation mode If the receiver receives no signal from the transmitter, it will automatically switch to hibernation mode, reducing power consumption significantly. The receiver “wakes up” automatically after a maximum period of 20 seconds after a transmitting signal is received. Interference Interference occurs when signals from two transmitters on the same frequency are mixed in the same receiver. When the signals are equally strong, the interference will be most noticeable. The further away one transmitter is from the receiver compared to the other transmitter, the weaker the disturbing noise will be. Interference can be avoided by selecting another transmitting and receiving channel. 22 Operating range The operating range of the FM system is highly dependent on the surroundings, including construction materials. The optimum operating range of 20-30 metres can be obtained in the open and with the microphone lead hanging freely. Inside buildings with steel and concrete walls and floors, the operating range may be reduced to ten metres. The position of the receiver also affects the range. Power drain on the hearing aid battery The receiver is powered by the hearing aid battery. Please note that when it is turned on and receives signals from the transmitter, battery power drain will increase by approximately 100% compared to use without FM. Also note that if the hearing aid is provided with a low battery alarm, FM reception may stop before the alarm beeps. If the receiver is turned off, the hearing aid may be able to work for slightly longer. 23 Warranty A warranty of two years is provided. The warranty covers any defects in manufacture or materials. Defects arising from improper handling or repairs carried out by an unauthorised party are not covered by this warranty. 24 Regulatory information Hereby, Widex A/S declares that this SCOLA FLEX and SCOLA FLEX-i are in compliance with the essential requirements and other relevant provisions of Directive 1999/5/EC. A copy of the Declaration of Conformity can be found at http://www.widex.com 25 FCC ID: U28AR12712 CAN RSS-Gen/CNR-Gen Federal Communications Commission Statement This device complies with part 15 of the FCC Rules. Operation is subject to the following two conditions: (1) This device may not cause harmful interference, and (2) this device must accept any interference received, including interference that may cause undesired operation. NOTE: This equipment has been tested and found to comply with the limits for a Class B digital device, pursuant to part 15 of the FCC Rules. These limits are designed to provide reasonable protection against harmful interference in a residential installation. This equipment generates, uses and can radiate radio frequency energy and, if not installed and used in accordance with the instructions, may cause harmful interference to radio communications. However, there is no guarantee that interference will not occur in a particular installation. If this equipment does cause harmful interference to radio or television reception, which can be determined by turning the equipment off and on, the user is encouraged to try to correct the interference by one or more of the following measures: 26 — Reorient or relocate the receiving antenna. — Increase the separation between the equipment and receiver. — Connect the equipment into an outlet on a circuit different from that to which the receiver is connected. — Consult the dealer or an experienced radio/TV technician for help. NOTE: This equipment complies with FCC radiation exposure limits set forth for an uncontrolled environment. This transmitter must not be co-located or operating in conjunction with any other antenna or transmitter. Changes or modifications to the equipment not expressly approved by Widex could void the user’s authority to operate the equipment. Industry Canada Statement / Déclaration d’industrie Canada This device complies with RSS-Gen of Industry Canada. Operation is subject to the condition that this device does not cause harmful interference. Le présent appareil est conforme aux CNR-Gen d’industrie Canada. L’exploitation est autorisée à la condition que l’appareil ne doit pas produire de brouillage nuisible. 27 FM systems and hearing aids, accessories and batteries should not be disposed of with normal household waste. Please consult your national Widex distributor for advice on how to dispose of these items. 28 Settings SCOLA FLEX / SCOLA FLEX-i Serial numbers Right: Left: Starting channel Mode switch (check the selected setting) Standard setting Changed setting to ”FM+M” Changed setting to ”FM” Scan button Scan possible Yes 29 No 30 31 MANUFACTURER ¡9 514 0196 001J¤ ¡#01v¤ Printed by HTO / 2012-08 9 514 0231 001 #01