1
BIGMOW
User Manual
USA Version
Authorized Dealer:
Probotics
215-886-4717
Please read this manual carefully to fully understand its content prior to using BIGMOW
for the first time
This page intentionally left blank.
PAGE 3
Introduction
You have decided to invest in a revolutionary piece of machinery – the
Bigmow robot mower.
Congratulations on choosing this high-tech equipment!
We would like to thank you for the trust you have placed in our young
company. After having completed the industrial development of the Bigmow robot
mower, we have now begun the manufacture and marketing of this extraordinary
product, which will take care of the maintenance of your leisure areas, lawns and
sports fields, all by itself!
As fantastic as it is, the Bigmow must be put into operation, its areas of work must
be defined, its recharging station must be installed and its electrical supply must be
controlled. This brochure aims to answer all your questions and give you the information required for obtaining the best return and service from your Bigmow.
It is suggested in our brochure that you carry out certain checks, controls and basic
maintenance in the course of the season; if you do these, the return from the Bigmow will be all the better.
We also suggest in the brochure that you follow the safety instructions, as provided
for all garden tractors and lawnmowers on the market. In paying a little attention to
Bigmow now, you will gain a great deal of satisfaction from it in the long run.
We will help you to obtain these results.
Michel Coenraets
Managing Director
BI G MOW
B IGMOW
PAGE 4
The safety of
BIGMOW
B
B
The IGMOW automatic lawnmower has been designed from a user-safety perspective.The IGMOW automatic lawnmower is subject to a specific patent relating to the cutting blades. The blades are self-retractable on contact with objects, which is one of Bigmow’s main assets. Moreover, its sonar system allows it to detect the presence of
a person or object nearby, which makes it slow down instantaneously and, on slight contact, to stop and change direction automatically.
B
The IGMOW offers peace of mind and safety when on the lawn. This does not preclude the need to take certain
precautions when handling the machine.
Instructions and diagrams.
IMPORTANT !
Please read this manual to fully understand its content prior to using your Bigmow for the first time.
WARNING!
This automatic lawnmower can be dangerous when used improperly. It is imperative that the usage and safety instructions be followed for optimum use and
safety.
WARNING!
Never place your hands or feet near the rotating blades or under the bonnet
when the Bigmow is in operation. Do not place any objects on the Bigmow.
WARNING!
When children, animals or persons who are unaware are in the mowing area,
never use your Bigmow. Always allow your Bigmow to operate on its own.
IMPORTANT !
Always use suitable protective gloves when working on the Bigmow.
B IGMO W
PAGE 5
Table of contents
1.
Introduction ..................................................................................3
2.
Safety instructions and diagrams. ..................................................4
3.
Description of the BIGMOW............................................................6
BIGMOW
4.
Composition...................................................................................7
5.
Technical Specifications. ...............................................................8
6.
BIGMOW mowing methods .............................................................9
7.
Options and spare parts for the BIGMOW .....................................10
8.
Installing the peripheral wire: land boundaries.............................11
9.
Installing the peripheral wire: boundaries and incline. .................12
10.
Installing the peripheral wire: marking boundaries.......................13
11.
Installing the recharging station ..................................................14
12.
Cutting height of BIGMOW............................................................15
BIGMOW.
13.
Using BIGMOW: Charging ............................................................16
14.
Configuring BIGMOW: Keyboard ..................................................17
15.
Configuring BIGMOW: Menus .......................................................18
16.
Using BIGMOW: Miscellaneous ....................................................19
17.
Using BIGMOW: Reminders on setting parameters ......................20
18.
BIGMOW quick start in 5 steps .....................................................22
19.
Maintenance of BIGMOW..............................................................24
BIGMOW.
0.
Troubleshooting...........................................................................27
PAGE 6
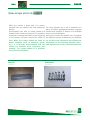
Description of the BIGMOW
The BIGMOW
The Bigmow is a completely automatic lawnmower for areas up to
5 acres. By moving in an area defined by a low-voltage underground sheathed wire, it allows the owner to maintain his lawn
consistently and independently. The Bigmow moves mainly at
random while adapting to its environment, avoiding any obstacle
through sonar and different sensors. The Bigmow will recharge its
battery automatically when it reaches a minimum charge level.
The Bigmow uses modern cutting-edge technology, such as the
electronics managing a multitude of information in real time on
safety, the battery charge, maintenance and work requirements,
amongst other things.
The Bigmow has a display showing a large amount of information
that is useful in its operation.
The use of the keyboard allows the owner:
1.
to enter the anti-theft security code essential to the operation of the Bigmow
2.
to modify certain options in order to optimise usage (e.g.
choice of mowing mode, choice of language, information
display,...).
A sound alert is also used to inform the user.
B IG MO W
BIGMOW
PAGE 7
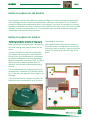
Composition
11.
2.
12.
1.
8.
4.
13.
3.
13.
13.
13.
9.
7.
19.
15.
20.
10.
11.
5.
13.
17.
14.
16.
13.
18.
6.
1.Bigmow upper
9.Protective plate (deflector)
16.Recharging station
2.Bodywork
10.Cutting blades
17.Charging socket on station
3.Bigmow underneath
11.Sonar
18.Tactile flange
4.Case containing computer
12.Front wheels
19.Contact sensor
5.Battery compartment
13.Back wheels
6.Charger socket on Bigmow
14.Bonnet
20.Lever for adjusting cutting
height
7.Power switch
15.Command keyboard with display
8.Cutting elements
B IG MO W
PAGE 8
Technical Specifications.
Cutting system
5 discs with 3 blades
Cutting height
From 0.75 in. To 3.75 in **
Cutting disk motor
3 phases, 24 Volts, 50 Watts
Rotation speed
3700 RPM
Back wheel motor
24 Volts, 50 Watts
Maintenance capacity
5 acres, +- 20%
Mowing speed
3600 sq yds.
Weight
105 pounds
Length
51.2 in.
Height
19.7 in.
Width
47.2 in.
Recharging station
30 Volts AC
Peripheral wire
0.5 Volts, 50mA
Transformer
230 / 15 V, double insulation
Consumption
100w/h
General Operation
Once installation is complete, you get start your
new automatic lawnmower: the Bigmow. Depending on its mowing mode (automatic or systematic) and its programme, the Bigmow will start
mowing the lawn.
The Bigmow will instantly recharge when his batteries fall below the minimum charge level. It
moves in the direction of the peripheral wire and
follows it in the right direction towards the recharging station. After recharging fully, the BigWhen it encounters an obstacle (minimum height mow automatically resumes mowing the lawn.
16 in), its sonar will instruct it to slow down and, When the lawn does not need mowing, the Bigon contact with the obstacle, its various sensors mow remains at its recharging station and resumes mowing later. It only works when required
will instruct it to stop, reverse, change direction
to do so.
and continue to mow the lawn.
The Bigmow will also systematically mow the
thicker areas of the lawn, and it will do so automatically.
** There are 12 manual incremental positions for
height control. The height is changed by 0.25 inch
B IG MO W
Mowing modes of the
PAGE 9
BIGMOW
Mowing modes
Random
Random mode is the most frequently used
mode for use of the Bigmow. It consists in
choosing the route to be taken at random.
Every time it encounters an obstacle or the
peripheral wire, the computer instructs Bigmow to move in a different direction. In this
way, the route taken will never the same.
Systématic.
Systematic mode is more specific to certain
applications and requires a uniform area with
as few obstacles as possible (e.g. sports
fields). The idea is to turn concentrically following the shape of the lawn, until Bigmow
reaches the center of the mowing area. Approaching the center (at ± 20% of the remaining surface), the Bigmow will mow the center
at random for a time before resuming its concentric mowing, but this time heading for the
exterior of the mowing area. The placement of
the peripheral wire thus remains the same, as
does the response to obstacles. The Bigmow
detects and goes around them in order to resume the position it was in the process of
reaching. The selection of systematic mode is
done via the “Options” menu (F1). It is possible to begin mowing from the center towards
the exterior ('#' 'F1' 'F3' 'F3' 'F3' '#' 'F3' '#')
B IG MO W
PAGE 10
Options and spare parts for the
BIGMOW
When you require a spare part, it is recommended that you contact the local distributor
directly.
Approximately two sets of cutting blades are
needed in the course of a season. It is therefore
important to change the blades at the beginning
of the season and then around the month of
June. When the cutting blades are used on
harder materials (such as branches, gravel,
etc.), it is strongly recommended that the
blades be checked more frequently and
changed. The cutting blades kit is available
from your local distributor.
The usual lifespan for a set of batteries is 2
years. A battery management system regularly
checks their condition. A battery kit is available
from your local distributor.
Each option has its own specific use. As regards
the different options available for your Bigmow,
you will find more information and different developments on the following websites: http://
www.bigmow.com or http://www.belrobotics.be
Battery Kit
Cutting blade kit
…………….
……………….
B IG MO W
PAGE 11
Installing the peripheral wire: land boundaries
It is advisable to let the local distributor install your Bigmow. He has the necessary equipment
and knowledge of how to install the peripheral wire. However, it is possible for you to install it
yourself by following the explanations given in this chapter. If you wish to increase your mowing
area after installation, you must contact your local distributor so that he may carry out the modification(s), as only he is authorized to do. The guarantee does not cover problems arising after
modifications are carried out by the owner.
Installing the peripheral wire: boundaries
Positioning boundaries in relation to the property
depending on the incline.
When placing the peripheral wire, the outer lim- With regards paths or terraces on the same
level as the lawn, the Bigmow can encroach a
its of the mowing area must be taken into aclittle on the path or terrace. The wire should be
count.
placed 12 inches away from the edge of the
If there is a fragile boundary (e.g. flowerbed)
grass.
just outside the mowing area, the peripheral
wire will have to be positioned 24 inches away
to prevent the Bigmow from causing damage.
When the boundary runs along a wall, it is advisable to provide a distance greater than 24
inches to avoid scraping unnecessarily along
the wall.
For boundaries such as planting beds or landscaped areas, a distance of 20 inches is possible. In this way, the grass will be cut right up to
the edge.
If the boundary lies on a slope in the lawn, the
distance must be increased by up to 4 inches
B IG MO W
PAGE 12
Installing the peripheral wire: boundaries and incline
Boundaries for a long path or a lane.
When the Bigmow has to pass along a long
path, a lane or a narrowing in the path/lane, it
is imperative that this passage be at least 13
feet wide, otherwise there is a risk that part of
the lawn will not be cut when the lawn is
mowed.
Maximum incline of the slope
The incline limit is 30% (15°). Over and above
this limit, the Bigmow may spin in difficult conditions (humidity, rain, lawn thickness, unevenness of the ground). For this reason, when the
Bigmow comes to an overly steep incline, it performs a maneuver similar to the one it performs when it comes to an obstacle. BigMow is,
however, capable of descending steeper
slopes.
B IGMO W
PAGE 13
Installing the peripheral wire: marking boundaries
Marking boundaries within the mowing area
When you have large trees or a garden shed
in the mowing area, it is not particularly necessary to mark boundaries for these, but depending on certain conditions, the Bigmow is
able to detect them with its sonar and change
direction when it comes into contact with the
obstacle.
No tree roots should be above ground. The
tree must have a diameter of at least 2 inches
and be rigid for the Bigmow to manuever
around it.
For sheds, please ensure that the structure is
solid and that there are low obstacles under 6
inches in height.
For any other boundaries within the mowing
area, there are two different methods: either
by marking the area as an isolated patch with
the peripheral wire, or by setting up obstacles,
such as small posts or a border of at least 16
inches in height. Sloped obstacles (stones,
roots, etc.) should also be protected or removed. It is advisable to protect hazardous
areas (such as ponds) to avoid any problems.
When marking areas to be isolated be sure to
run the peripheral wire around the entire
area. Use the same furrow for the return wiring.
When marking the boundary of the mowing
area, you need to be aware that there can be
interference caused by metallic objects (metal
fencing, metal bedplate, waste or reinforced
concrete). The peripheral wire must therefore
be installed at least 12 inches away from
these objects. If the BigMow always stops unexpectedly in the same spot, there may be
interference caused by a metal object. The
display will show an alarm as though the peripheral wire had been cut (loss of signal). Removing the metal object will resolve this issue. If not, please see the “Troubleshooting”
section.
The peripheral wire should ideally be buried at
a depth of 1 to 2 inches. Ideally, the peripheral wire should not cross any electrical installation, so as to avoid any interference with the
signal.
B IG MO W
PAGE 14
Installing the recharging station
Positioning the recharging station
When setting up the station, an ideal place must be found
which is both close to a power supply (220VAC) and on a relatively level, steady surface, which allows at least 10 feet of
peripheral wire to be placed in a straight line in front of and
behind the recharging station.
The power connection must be made to a circuit breaker
(National Electrical Code Approved) safe for underground and
outdoor use.
The recharging station should be set back from the peripheral
wire in such a way that when your Bigmow goes to recharge, a
visible connection is made to the top and bottom charging
bars.
Recommendation for
the recharging station
1.
Close to 220 AC power supply
2.
Plug connected to a NEC approved
circuit breaker suitable for outside underground service
3.
Level surface
4.
Peripheral wire straight for 10 feet in
front and behind station
5.
Station to be set back from the peripheral wire line.
B IGMOW
Cutting heights of the
PAGE 15
BIGMOW.
Adjusting the cutting height
The cutting height can be adjusted between
0.75 and 3.75 inches in 12 positions. This selection is made by means of a sliding bar under
the cover. To change cutting height, lift the
maintenance pin (the small ball) and slide the
selection bar (the large ball). Each position
raises or lowers the height one quarter of an
inch.
When using Bigmow for the first time or when it
has not been used for a few days, the lawn may
be too thick or too long. It is then advisable to
increase the cutting height for a few days and
then reduce it gradually. When the height of the
grass is irregular, the Bigmow systematically
mows those places where the grass is too long.
Progressive lowering of the cutting height gives
an optimum return in relation to consumption
and wear and tear.
1.
2.
Adjusting the cutting height
3.
1.
Open cover
2.
Lift selection pointer/indicator pin
3.
Slide selection bar to chosen height
4.
Release pin
5.
Close cover
B IG MO W
PAGE 16
Using
BIGMOW : Recharging
The Bigmow is configured in the factory with standard parameters. When the property presents
certain characteristics, it is advisable for your local distributor to configure the Bigmow for your
property conditions.
When the peripheral wire (see “peripheral wire” section) and the recharging station (see
“recharging station” section) are correctly connected, you may put the Bigmow into operation.
Charging the battery
When using Bigmow for the first time, place it
on the recharging station for an initial battery
charge (the Bigmow is delivered with an uncharged battery for safety reasons). The first
charging will take longer (approximately 3
hours). Recharging in normal operation takes
approximately one and a half hours. It is possible to speed up the recharging process (in
BOOST mode) by selecting the O000: ) option.
In this mode, one hour of recharging gives one
hour of operation.
In continuous operation mode, the Bigmow will
automatically recharge itself when its battery
charge level falls too low. Once the battery is
recharged, the Bigmow begins a cycle again
(one mow + one recharge) If, during a cycle, the
resistance of the grass is weak (which means
the grass has not grown much), the Bigmow will
wait a few hours before starting again. In this
way, it will work only when needed.
If the Bigmow has not returned to recharge
automatically, or after a long period in storage
(after winter), it may be that the display remains
inactive after pressing ' ' . In this case, take it
to the recharging station and put on charge
manually (contact). If, after ten minutes, there is
still no display, refer to the “Troubleshooting”
section. If this fails please contact your local
distributor.
Position in recharging mode
Charging
1.
Place Bigmow on recharging station
2.
Switch the power switch to ‘ON’
3.
Press ‘
4.
Enter your code followed by ‘#’
5.
Leave to charge
’
BIGMOW
PAGE 17
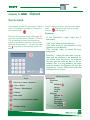
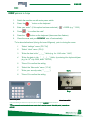
Configuring the BIGMOW
: Keyboard
Using the keyboard.
The keyboard is under the rear cover. Open the Prior to closing the cover, the user must always
cover. The keyboard consists of 16 keys and
press .
The screen will flash for the Bigone operation key.
mow to
start up again.
Functions.
There are 10 numerals and 6 action keys: 'F1'
isa short cut to the menu «Options »; 'F2’ and
‘F3’ for scrolling up/down the various submenus or to select an action in a menu; ‘#’to
select the chosen action; ‘ ’to enter the code
and ‘C’ to go back to the previous menu or to
delete.
In the “Belrobotics” menu, there are 3
sub-menus:
•The
•The
“stop” menu to put the Bigmow;
“data” menu for all information on the
operation of your Bigmow;
•The “settings” menu to access the user
parameters.
Selecting ‘*’ allows the user code to be entered and the machine to be activated for
one month. After this period, the machine
will stop and the code will have to be reentered. Prior to a long absence, the code
must be entered; the Bigmow will thus be
activated for 1 month. Without this code, the
machine will not function.
Control panel
Keys
: Shortcut to menu « Options »
: # Up, « Stats »
: $ Down, « See debug »
: Ä Select
: Enter code
: Return to previous menu option
… : Number entries
Menu structure :
Belrobotics
Shutdown
Info
Statistics
History
Version
serial
Settings
Options
Clock
New code
Language
See debug
‘*’ + ‘ _ _ _ _’ user code
B IG MO W
PAGE 18
Configurating the
BIGMOW : Menus
6. Automatic search for recharging station.
7. Starting direction for systematic mode
28.3
15H40
(towards inside or outside of mowing area)
There are three sub-menus in the “Data” menu: 8. Manual Mode (for traction)
• The "statistics" menu allows general data to
II.The "Clock" menu
* clock
25/02
be displayed on the operation of your Bigmow.
allows the time and
28.3
15H40
date to be adjusted.
Entering values into
* statistics
25/02
the fields as follows: "hour / minute; day /
28.3
15H40
month / year". On entering the new value,
press ‘#’ to confirm. The ‘F2’ and ‘F3’ keys
allow the selection of the number to be ad• The "history" menu
* history
25/02
justed.
allows the events re28.3
15H40
III.The "New Code"
corded by the Bigmow
* new CODE
25/02
menu allows the user
to be displayed.
28.3
15H40
* version
25/02
code to be changed.
• The "version" menu
28.3
15H40
When the following field is displayed Ԧ_ _ _ _
allows the Bigmow’s
_’, enter the old code, followed by‘#’; the folsoftware version to be viewed.
lowing field is then displayed: '# _ _ _ _'; now
* settings
25/02
enter the new code followed by '#' to confirm.
28.3
15H40
When the old code is incorrect, the display returns to "New Code".
IV.The “Language”
* LANGUagE
25/02
menu
gives the choice
28.3
15H40
« Settings» Menu
between English,
There are five sub-menus in the “Settings”
French, Dutch, Italian and German. In this
menu:
sub-menu, scroll through the different possibilities with the ‘F2’ and ‘F3’; then select by
pressing ‘#’.
I. The "Options" menu (‘F1’) is configured as
* see Debug
25/02 V.The “See Debug”
follows:
28.3
15H40 menu offers the choice
1. Normal or demonstration mode (does not
of displaying either the
mow).
"Time" or the "info-service" (technical infor2. Mowing mode (random or systematic).
mation).
3. Direction for systematic mode (clockwise or
counter-clockwise).
4. Action after next battery recharge (stand-by
at station or automatic).
5. Sound alert when on charge (with or without).
« Data » Menu
* data
O001:28.3
Selected factory setting
25/02
O001:
25/02
9
25/02
28.3
Selected user option or action
B IG MO W
Using the BIGMOW
PAGE 19
: Miscellaneous
Sound and visual alerts
Error Messages
In the course of different functions, your Bigmow alerts you to its condition through short
‘beeps’ and/or information shown on the display.
An error message is displayed on the processor window when the Bigmow encounters an
unforeseen situation. The message is displayed in the form of codes, such as A00,
which correspond to a particular alarm. In order to put the Bigmow back into operation,
please refer to the "Troubleshooting" section.
Beeps
1 long beep
: machine stop
1 short beep : action on one key
2 long beeps/2sec: recharging
To solve any problem with the machine,
please refer to the "Troubleshooting" section.
Information messages
The computer window can display either the
time or technical data ( "See Debug" menu).
B IG MO W
PAGE 20
Using the
BIGMOW : Summary for setting parameters
•
« SETTINGS » MENU
Setting the password
•
« OPTIONS » MENU
BOOST mode (quick recharge)
1.
« New code » Menu
1.
« Options » Menu
2.
O000:√ ; to change :
3.
Close cover
•
Immediate return to recharging station
1.
« Options » Menu
2.
O001:√ ; to change :
3.
Close cover
2.
Enter code ‘’Ô_ _ _ _’’
3.
Confirm
•
Setting the clock
1.
« Clock » Menu
2.
Enter time ‘’hh:mm’’
3.
Enter date ‘’DD/MM/YY’’
•
Stand-by at recharging station
4.
Confirm
1.
« Options » Menu
2.
O002:√ ; to change :
•
Setting the language
3.
Close cover
1.
« Language » Menu
•
Return in automatic mode(continuous
cycle of recharging and mowing)
...
2.
Scroll through the menu: press
3.
Language selected by
or
•
1.
« Options » Menu
2.
O002:- ; to change :
3.
Close cover
B IG MO W
PAGE 21
Using the BIGMOW : Summary for setting parameters
•
Demonstration Mode (does not mow)
1.
« Options » Menu
1.
« Options » Menu
2.
O003:√ ; to change :
2.
O007:- ; to change :
3.
Close bonnet
3.
Close bonnet
•
•
Phase inversion
2.
Silent charging (No beeps during re1.
charge)
2.
« Options » Menu
3.
O004:√; to change :
3.
Close bonnet
•
Systematic mowing
1.
« Options » Menu
2.
O005:√ ; to change :
3.
Close bonnet
1.
mowing area (in systematic mode)
« Options » Menu
O008:√ ; to change :
Close bonnet
•
Direction of return to recharging station:
Anti-clockwise
1.
« Options » Menu
2.
O009:√ ; to change :
3.
Close bonnet
•
•
Anti-clockwise: Counter-Clockwise
direction (in systematic mode)
Direction of return to recharging station:
clockwise
1.
« Options » Menu
1.
« Options » Menu
2.
O009:- ; to change :
2.
O006:√ ; to change :
3.
Close bonnet
3.
Close bonnet
•
Movement from centre to exterior of
mowing area (in systematic mode)
1.
« Options » Menu
2.
O007:√ ; to change :
3.
Close bonnet
•
Movement from exterior to interior of
•
B IG MO W
PAGE 22
BIGMOW quick start in 5 steps
1.
Switch the machine on with main power switch
2.
Press the
3.
Enter your code** (if this option has been selected) :
4.
Press
5.
Press the ‘
6.
Close the cover and your BIGMOW sets off automatically.
‘
’ button on the keyboard
‘ ‘+CODE (e.g.’* 1234’)
‘ ’ to confirm the code*
’ button on the keyboard (the screen then flashes)
*To be done beforehand (during first use of Bigmow), prior to closing the cover:
1.
*Select “settings” menu ('F3 F3 #')
2.
*Select “clock” menu ('F3 #')
3.
*Enter the time in the “_ _:_ _” fields (e.g. for 14:43 enter '1443')
4.
*Enter the date in the “_ _/_ _/_ _” fields, by entering the day/month/year
(e.g. for 15th July 2006, enter '150706')
5.
*Press '#' to confirm the setting
6.
*Select the “New code” menu (' F3 #')
7.
*Enter your security code (‘ * _ _ _ _’)
8.
*Press '#' to confirm the setting
Start
Stop
Numerical keyboard
*The clock setting is carried out only once prior to using the BIGMOW for the first time
General power switch
**The password remains active for one month after it was last entered. After this period, it must be rereentered.
PAGE 23
B IGMOW
Maintenance of the
BIGMOW.
Maintenance of the Bigmow is important. Regular checks can improve the day-to-day quality of
mowing. You may wish to refer to the maintenance summary sheet for further help.
Cutting blades
The blades are the principal elements that give
a good result. It is advisable to check them at
least once a month and the replace them when
they are broken.
For one season,
the user must
have two sets of
blades (15
pieces per set). It
is advisable to
change them at
the beginning of
the season and
then in the course of the month of June (the
grass is thicker at that time).
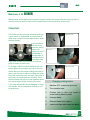
3.Position hole
4.Unscrew
To change a blade (machine switched off, protective gloves on), position the hole in the protective disc over the screw holding the blade in
place, and unscrew it without holding the blade.
Once the screw has been removed, take hold of
the blade, tilt it and remove it carefully. Take
the new blade and carry out the opposite operation, screwing the blade securely into place.
If you have any doubts about changing or fixing
your blades, do not hesitate to contact your local distributor.
5.Remove blade
Changing cutting blades
1.
Machine OFF, protective gloves on
2.
Turn machine over
3.
Position hole in disc over head of
screw holding blade in place
4.
Unscrew blade
5.
Remove blade from support
6.
Insert new blade and screw into place.
B IG MO W
PAGE 24
Maintenance of the
BIGMOW.
Batteries
Batteries
During winter
The batteries have a certain functional capacity. At the end of the mowing season, recharge your
In automatic mowing mode, your Bigmow returns Bigmow and place it in a sheltered, dry place.
to the recharging station at the moment when the It is advisable to have the machine serviced durbatteries reach a set charge. In this way, your Big- ing the winter so that your local distributor may
mow retains a margin of power to reach the sta- examine your Bigmow’s history via a PC link. Contion and increases the batteries’ performance.
tact your local distributor to arrange for your BigMow annual service.
When the batteries are due to be changed,
please contact your local distributor.
Cleaning
A clean, well-maintained machine will always last
longer. Weekly cleaning is advisable. Running a
brush over the underneath of the Bigmow will suffice and, if necessary, removing any eventual
build-ups of grass (around the front wheels, on
the tires and around the cutting discs). DO NOT
USE WATER.
B IGMO W
PAGE 25
Problems
1
The machine operates in
reverse
Situation
Solution
1 Bonnet position connectors clogged
up
1 Clean between the connectors and
chassis
2 Protective flange connector in contact
1 Press along full length of flange
from top to bottom to disconnect
2 Remove flange connector and test
without the connector. If the
problem persists, it is being
caused elsewhere in the machine.
If necessary, consult your local distributor
2 The machine constantly moves
slowly
1 The sonar is clogged (or damp, having
come into contact with water)
1 CAREFULLY clean the inside of the
sonar, including the inside of both
“eyes”
2 Interference
1 There is something in close
proximity reflecting the sonar’s
waves (on the bonnet?)
3 The sonar is out of position
1 Check that the sonar in properly
positing in its setting
4 The sonar is defective
1 Have it changed by a technician
If necessary, consult your local distributor
3
The machine is systematically
moving in squares
4
Machine Alarm Message:
Head blocked
1 The grass is too long in one spot and
the machine is systematically dealing
with it.
1 Simply check that the grass in the
mowing area is not too long. If this
is the case, the user must start by
mowing at a greater height and
gradually lower the cutting heads
until the desired grass length is
achieved (this may take several
days)
If necessary, consult your local distributor
5
6
7
Machine Alarm Message:
Wheel blocked
Machine Alarm Message: Wire
not found
Machine Alarm Message:
Blocked
1 The cut grass was too long and has
clogged up a cutting head
2 Cutting motor is defective
1 The wheel is blocked by an object (e.g.
a branch)
2 Motor is defective
1 Clean the cutting head in question
1 Consult your local distributor, who
will change the defective
component
1 Remove the object in question
1 The recharging station is disconnected
1 Consult your local distributor, who
will change the defective
component
1 Reconnect the plug
2 The wire has been cut
2 Wait for the network to become
live again
1 Call the local distributor to repair it
1 The machine is stuck between several
obstacles
1 If there are objects obstructing the
path and blocking manoeuvres,
2 The machine has a number of
magnetic field actions; check that
there are no metal objects in or on
the ground
If necessary, consult your local distributor
PAGE 26
Notes :
FR040824
B IGMOW
Your Distributor
SofTee Manufacturing, LLC
3163 Wexford Way
Southport, NC 28461
Your Local Dealer
Date of Purchase : _ _ / _ _ / 200...
Serial number :
Bigmow