Transcript
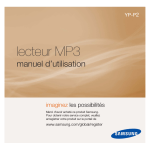
1
What’s in the box?
NeXus™ Car Kit
2
Remote
YA-CP200
Mode – “Live XM” or
“My Music” (recorded
content)
Power button
car install guide
Left arrow button –
Pressing the left arrow button
also allows you to “back out”
of any menu you have selected
power
mode
vol vol +
record
pause/m
ute
bookmar
k
favorites
1
4
7
2
3
5
8
6
9
power
0
car cradle with
FM modulation
remote
car
antenna
power
adapter
cassette
adapter
mounts
Record – Press and release to
start recording a song, or to
stop recording. Press and hold
to start recording a channel. If
you’re already recording a
channel, pressing and holding
this button ends recording after
the current song.
Listen to live XM*, recorded XM*, and WMA/MP3 files
To listen in your car or at home; you only
have to carry your NeXus* player and the
XM Mini-Tuner* between these installations.
Bookmark – Tag interesting
songs or tracks
8
op
tio
n
1
vol +
record
4
7
Step 1:
First, determine the proper location for your satellite radio antenna based on the
following criteria for your specific vehicle:
You must locate the satellite radio antenna on the top of the roof either in front
of the rear window (option 1) or behind the windshield (option 2). The satellite
radio antenna will perform best if magnetically attached to a steel surface with
an unobstructed view of the open sky and minimum of 3 to 6 inches of metal
surrounding the antenna.
When routing the antenna cable along the windshield or rear window, tuck the
antenna cable under the window seal to maintain a professional looking
installation and to avoid loose wires on the exterior of the vehicle which are
susceptible to damage. Follow the interior cable routing diagram depicted by
dashed lines in Figure 1 where possible.
Fig 1
6
This XM Receiver offers the listener a variety of options for connecting XM Satellite
Radio to your vehicle’s FM radio. XM research and lab test results show that using a
vehicle cassette adapter can best maximize the relationship between the best sound
quality and ease of installation. If your vehicle kit does not include a cassette adapter,
one should be available at your local retailer or visit www.xmradio.com, click “Shop XM
Radio.”
antenna
line out
power
1. Insert XM Mini-Tuner and NeXus player into the
car dock.
2. Turn your NeXus player on.
favorites
2
3
5
8
0
6
9
2. Firmly press the swivel mount to the
surface for 30 seconds. Allow 24
hours before using the mount.
Favorites – Go to
favorite channels
Step 2:
or
You can adjust the
tension of the mount
with a screwdriver.
2. Attach the car cradle to either mount by
sliding it into place.
Either orientation may be used.
9
10
Step 3:
Be sure to locate your car cradle and receiver below the top of the dash in your
vehicle to keep the product within easy reach while driving. Choosing a lower
location in your installation should also make it easier to manage the cables and
achieve a more desirable appearance when the installation is completed. A lower
location for the receiver in the vehicle will ensure that the installation does not cause
interference with other FM radios outside the vehicle.
Once you have plugged the power
and antenna jacks in to the car
cradle, use the included cable
organizer as shown in figure 3 to
improve the overall appearance of
the installation.
See illustration below (Fig 2) and be sure to locate your car cradle within the shaded
area.
Step 4:
Fig 3
Re-use the cable twist ties that were
provided with the power adaptor
and car antenna cables and always
be sure to gather, bundle, twist tie,
and secure any excess cable
remaining after determining the best
location for your satellite radio
installation.
For best FM Modulator performance, you must locate the satellite radio antenna
in a location that is in close proximity to the vehicle’s FM antenna.
Avoid kinking, crimping, twisting or chafing the cable. Use pre-existing wire
channels when possible.
For option 1 and rear mounting locations, route the cable into the trunk as
shown. Always cross the weather seal at the lowest part of the trunk to reduce
water leaks. From the trunk, route the cable into the passenger compartment
through available wire channels and then along the floor under the door jam
trim or under the carpet to the front of the passenger compartment. Do not
leave the cable loose in the passenger compartment where it is likely to be
damaged.
1. Cassette Adapter
3. Turn on your car stereo. Look for a channel that
sounds like it is receiving a weak or no station.
(88.1 - 107.9)
Pause/mute – Pause
playback or mute Live XM
If you need to remove the mount, carefully lift the adhesive pad with your fingers or a
spoon. Warming with a hair dryer for several minutes will help soften the adhesive.
Keep excess cable
behind or under the
dashboard
For option 2 and front mounting locations, route the cable along the door jam
and into the vehicle as shown. Route the cable across the weather seal near the
bottom of the door to reduce water leaks.
To remove the vent mount,push it into the vent and lift upwards slightly to release the
mount’s hooks from the vent vane.
Peel off adhesive liner.
pause/m
ute
bookmar
k
1
Arrow buttons –
menu entries, change
channels, and more
2
For example, with reference to Figure 1, if your FM antenna is located on a rear
fender or top of the roof, mount the XM antenna near the rear window location
(option 1). If your FM antenna is located on a front fender, mount the XM antenna
near the windshield location (option 2). Remember, the closer the satellite radio
antenna can be to the FM antenna, the better the wireless FM reception and sound
quality will be.
In order to optimize the operation of the wireless FM modulator, follow the
installation guidelines outlined in steps 1 through 4 below:
Once you have mounted the radio, installed
the antenna, and plugged in the power
adapter you are ready to plug in all of the
connectors. The line out may be used for an
optional cassette adapter or direct adapter if
FM reception is not good in your area.
1. To insert the vent
mount, push it into
the vent as shown.
1. Clean the mounting surface with the
surface preparation kit. Peel away the
adhesive liner.
*Hardware and required monthly subscription sold separately. Recorded music not for use in commercial establishments. Installation cost and other fees and taxes,
including a one-time activation fee may apply. Subscription fee is consumer only. XM products, programming, services, and fees are subject to change, at any time,
without notice. Channels with frequent explicit language are indicated with an XL. Channel blocking is available for XM radio receivers by calling 1-800-XM-RADIO.
Subscriptions subject to Customer Agreement available at xmradio.com. XM service only available in the 48 contiguous United States. ©2006 XM Satellite Radio Inc.
All rights reserved.
op
tio
n
How to use the swivel mount
To install the vent mount, find a horizontal vent that is strong enough to hold your NeXus
and its car cradle.
To install the swivel mount, first find a suitable location. The swivel mount’s adhesive is very
strong and may be difficult to remove. Do not install this mount on leather surfaces and make
sure the air temperature is at least 60°F.
Numeric keypad – Select
XM channels by channel number
7
How to use the vent mount
Vehicle Installation Guidelines for XM Satellite Radio
Volume
NeXus + Car Cradle + Antenna = Live XM
IMPORTANT: For best wireless FM Modulator performance, you must locate the
satellite radio antenna in a location that is in close proximity to the vehicle’s FM
antenna.
5
How to receive XM through your car stereo
cleaning kit
vol -
XM Satellite Radio Digital Audio Player
4
Choose the best way to mount your car cradle.
XM button – Access
menus and confirm selections
mode
3
Setup: In Car
4. On your NeXus player press the XM button. Scroll
down to “Settings”; choose “FM Frequency.” You
may be in either “Live XM” or “My Music” modes.
(You will not hear any music in the “My Music” mode
unless you have recorded content or MP3s.)
2. Wired FM (Professional Installation Recommended)
5. Follow the on screen instructions to choose the
same frequency as you chose on your car stereo.
You should now be able to hear XM through your
car stereo.
3. Wireless FM Modulator
11
FCC INFORMATION:
For further information relating to the Authorized Service Centers, contact 1-800SAMSUNG (1-800-726-7864).
Warranty Conditions
This equipment has been tested and found to comply with the limits for a Class B digital
device, pursuant to Part 15 of the FCC Rules. These limits are designed to provide
reasonable protection against harmful interference in a residential installation.
- Reorient or relocate the receiving antenna.
- Increase the separation between the equipment and receiver.
- Connect the equipment into an outlet on a circuit different from that to
which the receiver is connected.
- Consult the dealer or an experienced radio/TV technician for help.
13
5.
This device complies with Part 15 of the FCC Rules. Operation is subject to the following
two conditions: (1) This device may not cause harmful interference, and (2) this device
must accept any interference received, including interference that may cause undesired
operation.
For wireless FM modulator installations, securing and tie wrapping the excess
cable is important to reduce background hissing noise. Be sure to choose a
location carefully by taking notice of how doors and trunks open and close, as well
as how seats move when they are adjusted so you can be certain there is ample
clearance provided for the cables.
The XM receiver is equipped with a FM modulator which can transmit the XM audio
to your car’s FM radio without wires.
12
Samsung warrants MP3 players to be free of defects in material and workmanship for a period
of twelve (12) months from the original date of purchase by the consumer. If during the
period of warranty this product proves defective under normal use and service, you should
return the product to the retailer from whom it was originally purchased, or to any Samsung
Authorized Dealer or Authorized Service Center, if outside the time limit for returns imposed
by the retailer. The liability of Samsung and its appointed maintenance company is limited to
the cost of repair and/or replacement of the unit under warranty.
The user is cautioned that changes or modifications not expressly approved by XM
Satellite Radio, Inc. can void the user’s authority to operate this device.
For example, secure the excess cable up under your dash board, between the seat
and the console, or on the floor under a seat or floor mat. This will help to prevent
the excess cable from interfering with the everyday use of your vehicle, improve
the appearance of the installation, and avoid any undesirable accidental damage
to the cables that might result in loss of power or satellite signal.
A wired FM installation kit is available from your retailer for professional installation.
See your retailer for details. This solution is recommended if you cannot get
acceptable performance with the wireless FM modulator.
Warranty
Please note that the cables and antenna wire that has been supplied with your device
are supplied with permanently attached ferrite beads. It is the responsibility of the user
to use the cable and antenna wire with the ferrite beads.
This equipment generates, uses and can radiate radio frequency energy and, if not
installed and used in accordance with the instructions, may cause harmful interference
to radio communications. However, there is no guarantee that interference will not
occur in a particular installation. If this equipment does cause harmful interference to
radio or television reception, which can be determined by turning the equipment off
and on, the user is encouraged to try to correct the interference by one or more of the
following measures:
Using a cassette adapter for audio is the most popular and best sounding solution.
Please follow steps 1 through 4 below for mounting the satellite radio antenna and
securing the XM receiver and cables.
1.
The warranty is only valid upon presentation of the proof of purchase consisting of
original invoice or sales slip confirmation, indicating the date of purchase, retailer’s name,
model, serial number and product number. Samsung reserves the right to refuse warranty
service if this information has been removed or changed after the original purchase of the
product from the retailer.
a. Periodic checks, maintenance, repair and replacement of parts due to normal wear and tear.
b. Abuse or misuse, including but not solely limited to the failure to use this product for its
normal purpose in accordance with Samsung’s instructions for usage and maintenance.
c. Use of the product in conjunction with accessories not approved by Samsung for use with
this product.
d. Failure of or damage to the product arising from incorrect installation or use inconsistent
with technical or safety standards, or failure to comply with product manual instructions.
e. Accidents, Acts of God, lightning, water, fire, public disturbances, improper ventilation or any
cause beyond the control of Samsung.
f. Unauthorized modifications carried out for the product to comply with local or national
technical standards in countries for which the Samsung product was not originally
designed.
2.
Samsung’s sole obligations are to the repair of the defective part, or at its discretion,
replacement of the product (service exchange unit).
g. Repairs performed by non-authorized service centers such as opening of the product by a
non-authorized person.
3.
Warranty repairs must be carried out by an Authorized Samsung Dealer/Service Center.
No reimbursement will be made for repairs carried out by non-Samsung Centers, and
warranty coverage will not be valid for any repairs or damage caused by such repairs.
h. Products that have had model numbers, serial numbers, or product number on the product
altered, deleted, removed or made illegible.
4.
Repair or replacement under the terms of this warranty does not give right to extension
to or a new starting of the period of warranty. Repair or direct replacement under the
terms of this warranty may be fulfilled with functionally equivalent service exchange
units.
6.
Fig 2
The warranty is not applicable in cases other than defects in material and workmanship. The
warranty does not cover the following:
This warranty does not affect the consumer’s statutory rights nor the consumer’s rights to
return the product to the retailer under the retailer’s return policy.
6.30.06
PMS 151 C
PMS 116 C