1
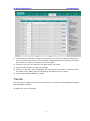
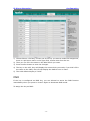
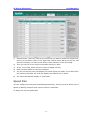
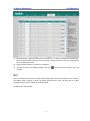
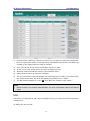
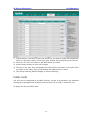
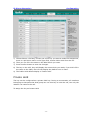
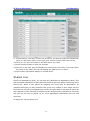
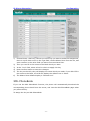
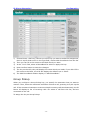
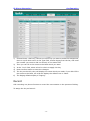
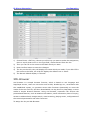
About This Guide This Expansion Module EXP39 has a 4.5-inch LCD, the resolution is 320*160pi.It has 20 hard key, and you can set up switch function to set 38 programmable keys which are able to set up to 28 functions per key. And you can daisy-chain 6 modules for 228 programmable keys. It applies to IP Phone SIP-T28P and SIP-T26P, expansion module(≤2) is power by the host phone, but the EXP39 does not support plug and play. It also has dual color(red or green) LEDs for line status information. This Expansion Module EXP39 is designed for connection of the Enterprise IP Phone T28P/T26P VoIP phone. In the following sections, we will take T28P to make a brief description. Declaration of Conformity Hereby, it’s declared that this phone is in conformity with the essential requirements and other relevant provisions of the CE, FCC. CE Mark Warning This is a class B device, in a domestic environment; this product may cause radio interference, in which case the user may be required to take adequate measures. WEEE Warning To avoid the potential effects on the environment and human health as a result of the presence of hazardous substances in electrical and electronic equipment, end users of electrical and electronic equipment should understand the meaning of the crossed-out wheeled bin symbol. Do not dispose of WEEE as unsorted municipal waste and have to collect such WEEE separately. Tables of Contents Getting Started.......................................................................... - 1 Packing List ............................................................................................................................ - 1 - Connection ................................................................................... - 2 Connect to the Phone ........................................................................................................ - 2 Connect to the next module............................................................................................ - 3 Connect the cords ............................................................................................................... - 4 - Configuration ............................................................................. - 5 Switch ...................................................................................................................................... - 6 Conference ............................................................................................................................. - 7 Forward ................................................................................................................................... - 7 Transfer ................................................................................................................................... - 8 Hold........................................................................................................................................... - 9 DND ........................................................................................................................................ - 10 Redial ......................................................................................................................................- 11 Call Return ........................................................................................................................... - 12 SMS ......................................................................................................................................... - 13 Pick Up ................................................................................................................................... - 14 Call Park ................................................................................................................................ - 15 DTMF ...................................................................................................................................... - 16 Voice mail ............................................................................................................................. - 17 Speed Dial ............................................................................................................................ - 18 Intercom ............................................................................................................................... - 19 Line ......................................................................................................................................... - 20 BLF .......................................................................................................................................... - 21 URL.......................................................................................................................................... - 22 Group Listening .................................................................................................................. - 23 Public Hold ........................................................................................................................... - 24 Private Hold ......................................................................................................................... - 25 Shared Line .......................................................................................................................... - 26 XML PhoneBook.................................................................................................................. - 27 Group Pickup ....................................................................................................................... - 28 Paging .................................................................................................................................... - 29 Record .................................................................................................................................... - 30 XML Browser........................................................................................................................ - 31 Hot Desking ......................................................................................................................... - 32 URL Record .......................................................................................................................... - 33 - IP Phone Expansion Getting Started Getting Started Packing List The following components are included in your package: Expansion Module Stand Connecting sheet Connecting cord Spiral shell Check this list before installation to ensure that you have received each item. If you are missing any items, contact your IP phone reseller. -1- IP Phone Expansion Connection Connection Please refer to the following sections to install the EXP39. Before the installation,please unplug the power connector and the phone stand from the enterprise IP phone T28P. Then place the telephone and the expansion module upside down on a soft surface so that you can read nameplates from the front. The expansion module must be placed to the left of the telephone. Connect to the Phone Use the connecting sheet and screw to connect the EXP39 to the IP phone. Shown as: Your phone and the expansion module will be connected as the following picture shows: -2- IP Phone Expansion Connection Connect to the next module Follow the same step to connect the next expansion module: After the installation, it will be shown as: Note: Our IP phone T28P can support six expansion modules at most. But if you use more than three expansion modules, you need to connect an additional power adapter to anyone of the expansion modules. -3- IP Phone Expansion Connection Connect the cords Plug the connecting cord into the Ext jack of the IP phone, the next port to the Ext in jack of the first module; If you want to connect more than one module, then go on to plug another cord into the Ext out jack, and the other port to the Ext in jack of the second module. Shown as the following picture: Note: Users can connect six modules at most. Connect the Ext in port of the previous module and the Ext out port of the next module with a connecting cord will be ok. Then attach the stand and the power adapter, connect handset and headset to use. -4- IP Phone Expansion Configuration Configuration The expansion module EXP39 has 38 programmable keys which are able to set up to 28 functions per key and it has a large LCD. You can use the web interface or the IP phone user interface to configure key functions. Pressing the special key of the EXP39 you want to set for about 5 seconds, the IP phone will turn to the user setting interface of this key, then you can make desired configuration to this key by the IP phone interface. In the following sections, we will make detail description of setting by the web interface. The following list shows the functions you can set on the programmable keys and provides a description for each function. The default configuration for each key is N/A which means the key hasn’t been set for any functions. N/A Switch Conference Forward Transfer Hold DND Redial Call Return SMS Pick Up Call Park DTMF Voice Mail Speed Dial Intercom Line BLF URL Group Listening Public Hold Private Hold Share Line XML PhoneBook Group Pickup Paging Record XML Browser -5- IP Phone Expansion Hot Desking URL Record Configuration Note: Quick access features like Intercom and Voicemail must first be configured on your PBX in order to work on your phone. See your system administrator for more information. Switch If you set key1 as Switch(default label is List1), you can enjoy the function of switch, and the EXP39 can offer you 38 DSS key, and also you should set key21 as Switch(default label is List2). If you set key1 as other function, and EXP39 can only use the 20 DSS key. To assign the key as Switch: 1) Choose Phone->EXT Key, choose key1, there is a pull-down menu in the Type field, choose Swicth from the list. 2) Then you can fill in the name to the label which you want. 3) Press Confirm button to save the changes. 4) The key on the LCD, it will display the name which you made, if you didn’t fill in the name to the label, the LCD will display the default icon or name. 5) The Switch default display is List1. 6) And the key21 only has Switch function, the Switch default display is List2. -6- IP Phone Expansion Configuration Conference You are allowed to configure the programmable key to be used as a conference key. This key allows a user on a call to conference another party at a pre-defined number while remaining in the current call. To assign the key as Conference: 1) Choose Phone->EXT Key, choose one of the key you want to make the assignment, there is a pull-down menu in the Type field, choose Conference from the list. 2) Then you can fill in the name to the label which you want. 3) Press Confirm button to save the changes. 4) The key on the LCD, they will display the name which you made, if you didn’t fill in the name to the label, the LCD will display the default icon or name. 5) The Conference default display is “CONF”. Forward If the key is configured as Forward key, press this key under the idle status, then when there is any call to the extension number will be forwarded to the number automatically. To assign the key as Forward: -7- IP Phone Expansion Configuration 1) Choose Phone->EXT Key, choose one of the key you want to make the assignment, there is a pull-down menu in the Type field, choose Forward from the list, and enter the number you want to forward in the value field. 2) Then you can fill in the name to the label which you want. 3) Press Confirm button to save the changes. 4) The key on the LCD, they will display the name which you made, if you didn’t fill in the name to the label, the LCD will display the default icon or name. 5) The Forward default display is “FWD”. Transfer You are able to configure the key as a transfer key to perform the Blind/Semi-Attend Tran/Attended Transfer. To assign the key as Transfer: -8- IP Phone Expansion Configuration 1) Choose Phone->EXT Key, choose one of the key you want to make the assignment, there is a pull-down menu in the Type field, choose Transfer from the list. 2) Then you can fill in the name to the label which you want. 3) Press Confirm button to save the changes. 4) The key on the LCD, they will display the name which you made, if you didn’t fill in the name to the label, the LCD will display the default icon or name. 5) The Transfer default display is “TRAN”. Hold The key can be configured as a hold key. You can use this key to hold and retrieve a call during the conversation. To assign the key as Hold: -9- IP Phone Expansion Configuration 1) Choose Phone->EXT Key, choose one of the key you want to make the assignment, there is a pull-down menu in the Type field, choose Hold from the list. 2) Then you can fill in the name to the label which you want. 3) Press Confirm button to save the changes. 4) The key on the LCD, they will display the name which you made, if you didn’t fill in the name to the label, the LCD will display the default icon or name. 5) The Hold default display is “Hold”. DND If the key is configured as DND key, you are allowed to active the DND function immediately when you press it. Press it again to deactivate DND mode. To assign the key as DND: - 10 - IP Phone Expansion Configuration 1) Choose Phone->EXT Key, choose one of the key you want to make the assignment, there is a pull-down menu in the Type field, choose DND from the list. 2) Then you can fill in the name to the label which you want. 3) Press Confirm button to save the changes. 4) The key on the LCD, they will display the name which you made, if you didn’t fill in the name to the label, the LCD will display the default icon or name. 5) The DND default display is “DND”. Redial If the key is configured as Redial key, press this key under the idle status, it will fetch the last dialed number, then you can choose a special line to call out by pressing the line keys. To assign the key as Redial: - 11 - IP Phone Expansion Configuration 1) Choose Phone->EXT Key, choose one of the key you want to make the assignment, there is a pull-down menu in the Type field, choose Redial from the list. 2) Then you can fill in the name to the label which you want. 3) Press Confirm button to save the changes. 4) The key on the LCD, they will display the name which you made, if you didn’t fill in the name to the label, the LCD will display the default icon or name. 5) The Redial default display is “Redial”. Call Return When the key is configured as Call Return key you are allowed to dial out the last phone call you received. To assign the key as Call Return: - 12 - IP Phone Expansion Configuration 1) Choose Phone->EXT Key, choose one of the key you want to make the assignment, there is a pull-down menu in the Type field, choose Call Return from the list. 2) Then you can fill in the name to the label which you want. 3) Press Confirm button to save the changes. 4) The key on the LCD, they will display the name which you made, if you didn’t fill in the name to the label, the LCD will display the default icon or name. 5) The Call Return default display is “Call Return”. SMS When the key is configured as SMS key you are allowed to access SMS quickly by pressing this key. To assign the key as SMS: - 13 - IP Phone Expansion Configuration 1) Choose Phone->EXT Key, choose one of the key you want to make the assignment, there is a pull-down menu in the Type field, choose SMS from the list. 2) Then you can fill in the name to the label which you want. 3) Press Confirm button to save the changes. 4) The key on the LCD, they will display the name which you made, if you didn’t fill in the name to the label, the LCD will display the default icon or name. 5) The SMS default display is “SMS”. Pick Up When you configure a Pick Up key, you specify the extension that you want to monitor. Then, when the monitored extension receives a call, you can press this key to pick up the incoming call. To assign the key as Pick Up: - 14 - IP Phone Expansion Configuration 1) Choose Phone->EXT Key, choose one of the key you want to make the assignment, there is a pull-down menu in the Type field, choose Pick Up from the list, and enter the number you want to pick up in the value field. 2) Then you can fill in the name to the label which you want. 3) In the "Line" field, select a line for which to apply this key. 4) Press Confirm button to save the changes. 5) The key on the LCD, they will display the name which you made, if you didn’t fill in the name to the label, the LCD will display the default icon or name. 6) The Pick Up default display is “Pick Up”. Call Park Call Park is a feature that allows a person to put a call on hold at one telephone set and continue the conversation from any other telephone set. The “call park” feature is activated by pressing a preprogrammed button or a special sequence of buttons. This transfers the current conversation to an unused extension number and immediately puts the conversation on hold. The telephone system will then display the extension number of the parked call so that the call can later be retrieved. To assign the key as Call Park: - 15 - IP Phone Expansion 1) Configuration Choose Phone->EXT Key, choose one of the key you want to make the assignment, there is a pull-down menu in the Type field, choose Call Park from the list, and enter the number you want to park in the value field. 2) Then you can fill in the name to the label which you want. 3) In the "Line" field, select a line for which to apply this key. 4) Press Confirm button to save the changes. 5) The key on the LCD, they will display the name which you made, if you didn’t fill in the name to the label, the LCD will display the default icon or name. 6) The Call Park default display is a icon “ ” and “Call Park”. DTMF You are allowed to send out the desired DTMF number during the conversation. The number needs to be set in advance. To assign the key as DTMF: - 16 - IP Phone Expansion 1) Configuration Choose Phone->EXT Key, choose one of the key you want to make the assignment, there is a pull-down menu in the Type field, choose DTMF from the list, and enter the character you want to send out during the conversation in the value field. 2) Then you can fill in the name to the label which you want. 3) Press Confirm button to save the changes. 4) The key on the LCD, they will display the name which you made, if you didn’t fill in the name to the label, the LCD will display the default icon or name. 5) The DTMF default display is “DTMF” Voice mail When the key is configured as Voice Mail key you are allowed to access voicemail quickly by pressing this key. To assign the key as Voice Mail: - 17 - IP Phone Expansion 1) Configuration Choose Phone->EXT Key, choose one of the key you want to make the assignment, there is a pull-down menu in the Type field, choose Voice Mail from the list, and enter the number you want to set as the voice mail box in the value field 2) Then you can fill in the name to the label which you want. 3) In the "Line" field, select a line for which to apply this key 4) Press Confirm button to save the changes. 5) The key on the LCD, they will display the name which you made, if you didn’t fill in the name to the label, the LCD will display the default icon or name. 6) The Voice Mail default display is “Voice Mail” Speed Dial You can configure the key as a simplified speed dial key. This key function allows you to speed up dialing numbers often used or hard to remember. To assign the key as Speed Dial: - 18 - IP Phone Expansion 1) Configuration Choose Phone->EXT Key, choose one of the key you want to make the assignment, there is a pull-down menu in the Type field, choose Speed Dial from the list, and enter the number you want to dial out directly in the value field 2) Then you can fill in the name to the label which you want. 3) In the "Line" field, select a line for which to apply this key. 4) Press Confirm button to save the changes. 5) The key on the LCD, they will display the name which you made, if you didn’t fill in the name to the label, the LCD will display the default icon or name. 6) The Speed Dial default display is a icon “ ” and “the content of the value”. Intercom You can configure the key for Intercom mode and it is useful in an office environment as a quick access to connect to the operator or the secretary. To assign the key as Intercom: - 19 - IP Phone Expansion 1) Configuration Choose Phone->EXT Key, choose one of the key you want to make the assignment, there is a pull-down menu in the Type field, choose Intercom from the list, then enter the feature code and number in the value field you want to set as intercom. 2) Then you can fill in the name to the label which you want. 3) In the "Line" field, select a line for which to apply this key. 4) Press Confirm button to save the changes. 5) The key on the LCD, they will display the name which you made, if you didn’t fill in the name to the label, the LCD will display the default icon or name. 6) The Intercom default display is “Intercom” Note: Your VoIP PBX must support this feature. And make sure the intercom extension enables the Auto-answer function. Line You can set these keys as line keys to active up to the user accounts. To assign the key as Line: - 20 - IP Phone Expansion 1) Configuration Choose Phone->EXT Key, choose one of the key you want to make the assignment, there is a pull-down menu in the Type field, choose Line from the list, and choose the correspondent line. 2) Press Confirm button to save the changes. 3) The key on the LCD default display is a icon “ ” and the account which one you choose. BLF You can configure the key for Busy Lamp Field (BLF) use which allows you to monitor the status (idle, ringing, or busy) of other SIP accounts. User can dial out on a BLF configured key on the expansion module EXP39. To assign the key as BLF: - 21 - IP Phone Expansion 1) Configuration Choose Phone->EXT Key, choose one of the key you want to make the assignment, there is a pull-down menu in the Type field, choose BLF from the list, and enter the number in the value field you want to monitor. 2) Then you can fill in the name to the label which you want. 3) In the "Line" field, select a line for which to apply this key. 4) And then enter the feature codes in the extension field. 5) Press Confirm button to save the changes. 6) The key on the LCD, they will display the name which you made, if you didn’t fill in the name to the label, the LCD will display the default icon or name. 7) The BLF default display is a icon “ ” and “BLF:’the content of the value’” Note: 1) Please contact your system administrator for more information about the feature codes URL If the key is configured as URL, then pressing this key, you can send HTTP requests to a web server. To assign the key as URL: - 22 - IP Phone Expansion 1) Configuration Choose Phone->EXT Key, choose one of the key you want to make the assignment, there is a pull-down menu in the Type field, choose URL from the list, and enter the url you want to set as URL in the Value field. 2) Then you can fill in the name to the label which you want. 3) Press Confirm button to save the changes. 4) The key on the LCD, they will display the name which you made, if you didn’t fill in the name to the label, the LCD will display the default icon or name. 5) The URL default display is “the content of the value”. Group Listening When the key is configured as Group Listening key, you are allowed to enable the Speakerphone and Handset/Headset mode at the same time. It is suitable for the group conversation which has more than one person at one side. You are able to speak and listen using handset/headset; meanwhile the others near by can listen using speakerphone. You can get back to the previous mode by pressing the key again. To assign the key as Group Listening: - 23 - IP Phone Expansion Configuration 1) Choose Phone->EXT Key, choose one of the key you want to make the assignment, there is a pull-down menu in the Type field, choose Group Listening from the list. 2) Then you can fill in the name to the label which you want. 3) Press Confirm button to save the changes. 4) The key on the LCD, they will display the name which you made, if you didn’t fill in the name to the label, the LCD will display the default icon or name. 5) The Group Listening default display is “Group Listening” Public Hold The key can be configured as a public hold key. During a conversation, all members belonging to that particular SLA group can use this key to hold or retrieve a call. To assign the key as Public Hold: - 24 - IP Phone Expansion Configuration 1) Choose Phone->EXT Key, choose one of the key you want to make the assignment, there is a pull-down menu in the Type field, choose Public Hold from the list. 6) Then you can fill in the name to the label which you want. 7) Press Confirm button to save the changes. 8) The key on the LCD, they will display the name which you made, if you didn’t fill in the name to the label, the LCD will display the default icon or name. 9) The Public Hold default display is “Public Hold” Private Hold The key can be configured as a private hold key. During a conversation, all members belonging to that particular SLA group can use this key to hold the call, but only the initiator can retrieve the call. To assign the key as Private Hold: - 25 - IP Phone Expansion Configuration 1) Choose Phone->EXT Key, choose one of the key you want to make the assignment, there is a pull-down menu in the Type field, choose Private Hold from the list. 10) Then you can fill in the name to the label which you want. 11) Press Confirm button to save the changes. 12) The key on the LCD, they will display the name which you made, if you didn’t fill in the name to the label, the LCD will display the default icon or name. 13) The Private Hold default display is “Private Hold”. Shared Line Share Line Appearance (SLA), you can also call it Bridged Line Appearance (BLA). This feature allows subscribers to share SIP lines and also provides status monitoring of the shared line. When a user places an outgoing call using such an appearance, all members belonging to that particular SLA group are notified of this usage and are blocked from using this line appearance until the line goes back to idle state or when the call is placed on hold. Similarly all members of the SLA group are notified of an incoming call and the call can be picked up on a line appearance associated with the SLA extension. To assign the key as Share Line: - 26 - IP Phone Expansion 1) Configuration Choose Phone->EXT Key, choose one of the key you want to make the assignment, there is a pull-down menu in the Type field, choose Shared Line from the list, and enter number in the value field you want to set as shared line. 2) Then you can fill in the name to the label which you want. 3) In the "Line" field, select a line for which to apply this key. 4) Press Confirm button to save the changes. 5) The key on the LCD, they will display the name which you made, if you didn’t fill in the name to the label, the LCD will display the default icon or name. 6) The Shared Line default display is “Shared Line”. XML PhoneBook If you set the XML PhoneBook function, the phone will automatically download the corresponding phone book from the server, and into the XML PhoneBook page when you press the key. To assign the key as XML PhoneBook: - 27 - IP Phone Expansion 1) Configuration Choose Phone->EXT Key, choose one of the key you want to make the assignment, there is a pull-down menu in the Type field, choose XML PhoneBook from the list. 2) Then you can fill in the name to the label which you want. 3) In the "Line" field, select a PhoneBook for which to apply this key. 4) Press Confirm button to save the changes. 5) The key on the LCD, they will display the name which you made, if you didn’t fill in the name to the label, the LCD will display the default icon or name. 6) The XML PhoneBook default display is “XML PhoneBook”. Group Pickup When you configure a Group Pickup key, you specify the extension that you want to monitor. Then, when the monitored extension receives a call, pressing it to pick up the call. If the monitored extension receives multiple incoming calls simultaneously, the IP Phone UI displays a list of incoming calls. You select a call from this list, and are connected to the call. To assign the key as Group Pickup: - 28 - IP Phone Expansion 1) Configuration Choose Phone->EXT Key, choose one of the key you want to make the assignment, there is a pull-down menu in the Type field, choose Group Pickup from the list, and enter the number you want to set as Group Pickup in the value filed. 2) Then you can fill in the name to the label which you want. 3) In the "Line" field, select a line for which to apply this key. 4) Press Confirm button to save the changes. 5) The key on the LCD, they will display the name which you made, if you didn’t fill in the name to the label, the LCD will display the default icon or name. 6) The Group Pickup default display is “Group Pickup”. Paging You can configure the key as Paging key. When you press this key, the phone will dial the number out directly. To assign the key as Paging: - 29 - IP Phone Expansion 1) Configuration Choose Phone->EXT Key, choose one of the key you want to make the assignment, there is a pull-down menu in the Type field, choose Paging from the list, and enter the number you want to dial out directly in the Value field 2) Then you can fill in the name to the label which you want. 3) In the "Line" field, select a line for which to apply this key. 4) Press Confirm button to save the changes. 5) The key on the LCD, they will display the name which you made, if you didn’t fill in the name to the label, the LCD will display the default icon or name. 6) The Paging default display is “Paging”. Record Call recording is a phone function to record the conversation in the process of dialog. To assign the key as Record: - 30 - IP Phone Expansion 1) Configuration Choose Phone->EXT Key, choose one of the key you want to make the assignment, there is a pull-down menu in the Type field, choose Record from the list. 2) Then you can fill in the name to the label which you want. 3) Press Confirm button to save the changes. 4) The key on the LCD, they will display the name which you made, if you didn’t fill in the name to the label, the LCD will display the default icon or name. 5) The Record default display is “Record”. XML Browser Xml browser is a simple browser function, which is based on xml language and http/https service, users can use tools such as PHP, JavaScript, etc., accordance with the established syntax, to generate server-side functions dynamically to meet the needs of the user xml file, and then downloaded it to sip phone by http/https, so as to realize a simple browser features. Using xml browser, customers can achieve the personalized features, such as weather information, stock information, date of inquiry, access to address book, Google search, news browsing, playing music, configuration of the terminal parameters and other functions. To assign the key as XML Browser: - 31 - IP Phone Expansion 1) Configuration Choose Phone->EXT Key, choose one of the key you want to make the assignment, there is a pull-down menu in the Type field, choose XML Browser from the list, and enter the url you want to set as XML Browser in the Value field 2) Then you can fill in the name to the label which you want. 3) Press Confirm button to save the changes. 4) The key on the LCD, they will display the name which you made, if you didn’t fill in the name to the label, the LCD will display the default icon or name. 5) The XML Browser default display is “XML Browser”. Hot Desking Hot Desking is regularly used in places where not all the employees are in the office at the same time, or not in the office for a very long time, which means actual personal offices would be often vacant, consuming valuable space and resources. Hot Desking is a phone feature that allows accounts to login or logout in an IP phone. After a certain account landing, the corresponding configuration of the account will be applied to the phone. To assign the key as Hot Desking: - 32 - IP Phone Expansion 1) Configuration Choose Phone->EXT Key, choose one of the key you want to make the assignment, there is a pull-down menu in the Type field, choose Hot Desking from the list. 2) In the "value" field, enter the URL address in the input frame to active the advanced mode. Or you can leave it black to active the base mode. 3) Then you can fill in the name to the label which you want. 4) Press Confirm button to save the changes. 5) The key on the LCD, they will display the name which you made, if you didn’t fill in the name to the label, the LCD will display the default icon or name. 6) The Hot Desking default display is “Hot Desking”. URL Record You can set this key as URL Record, recording the call when you press the key. To assign the key as URL Record: - 33 - IP Phone Expansion 1) Configuration Choose Phone->EXT Key, choose one of the key you want to make the assignment, there is a pull-down menu in the Type field, choose URL Record from the list, and enter the URL you want to set as URL in the Value field. 2) Then you can fill in the name to the label which you want. 3) Press Confirm button to save the changes. 4) The key on the LCD, they will display the name which you made, if you didn’t fill in the name to the label, the LCD will display the default icon or name. 5) The URL Record default display is “URL Record”. The manual is only for reference, please take the object as the standard. We reserve the right to improve or change the product and the user guide without notice. You can download the latest user manuals from our website: http://www.yealink.com/en/download.asp?BigClassName=IP%20Phone V51.0 - 34 -