1
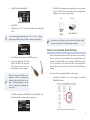
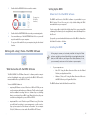
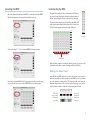
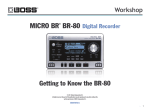
Workshop
MICRO BR BR-80 Digital Recorder
®
Share
© 2011 BOSS Corporation U.S.
All rights reserved. No part of this publication may be reproduced in any form without the
written permission of BOSS Corporation U.S.
BR80WS04
1
About the BOSS BR-80 Workshop Booklets
The BOSS MICRO BR® BR-80 is an awesome portable tool for any songwriter
or musician, especially if you’re a guitarist. Packed into its convenient,
pocket-sized body are three incredibly useful tools: a stereo recorder for
capturing ideas and live sounds using the high-quality built-in mics, an
eight-track multitrack recorder for developing your songs, and an irresistibly
fun eBand jamming system. The MICRO® BR BR-80 also contains a library of
acclaimed BOSS COSM® amps and effects, as well as tons of rhythms you can
use in your songs. If you’re a computer user, the MICRO BR® BR-80 can serve
as an effect-packed USB audio interface for your recording software, and it
comes with a copy of SONAR X1 LE for Windows.
Each MICRO BR® BR-80 Workshop booklet focuses on one MICRO BR® BR-80
topic, and is intended as a companion to the MICRO BR® BR-80 Owner’s
Manual.
About This Booklet
Part of the fun in music-making is making it with others. With the included
BRWC wave converter software, the BR-80’s built-in recording studio blows
wide open, letting you export BR-80 tracks for your friends to play with, and
allowing you to bring their musical contributions into your BR-80 songs. This
booklet explains how to use the BRWC software.
Understanding the Symbols in This Booklet
Throughout this booklet, you’ll come across information that deserves
special attention—that’s the reason it’s labeled with one of the following
symbols.
A note is something that adds information about the topic at hand.
A tip offers suggestions for using the feature being discussed.
Our Small World
This blue planet on which we reside gets smaller every day, thanks to the
internet, and the rich variety of human experience become more and more
obvious to each of us as our friendships spread across the globe. Our ideas,
our experiences, and our music can be instantly shared through social
networks, email, and music sites, as we noted in the Jam BR-80 Workshop
booklet. And it’s never been easier to collaborate with musicians, wherever
they are, using tools such as the BR-80’s BRWC software.
Connecting the BR-80 to Your Computer
Before using the BRWC, you’ve got to connect your BR-80 to your computer.
In this booklet, we’re going to assume you know how to use your
computer. If you don’t, please consult its documentation as needed.
If you’ve read the Jam BR-80 Workshop booklet, you’ve already seen
the section below—we’re repeating it here for your convenience.
The BR-80 ships with the USB A/mini-B cable you’ll need in a little
while for connecting to your computer.
To connect the BR-80 to your computer for use with the BRWC, you
don’t need to install the BR-80’s USB drivers—they’re for using the
BR-80 as your computer’s audio interface.
1
Turn on your BR-80 in MTR mode.
2
Press the MENU button to display the Menu screen.
3
Highlight FUNCTION.
Warnings contain important information that can help you avoid
possible damage to your equipment, your data, or yourself.
2
4
Press ENTER, and then highlight USB.
The BR-80’s SD card appears as a removable drive on your computer.
If you’re on a Mac, it’ll be on your desktop. If you’re using Windows,
it’ll appear as one of your computer’s drives.
In OSX:
5
Press ENTER.
6
If USB isn’t set to STORAGE—the factory default—turn the Value dial
so it is.
BR-80
EBAND
If you need to change the setting from AUDIO to STORAGE, a dialog
appears—press ENTER, restart your BR-80, and skip to Step 8 below.
In Windows:
BR-80 EBAND (E:)
On Windows, you’ll need to wait a few moments as Windows installs
the necessary drivers for the BR-80 to become available.
Sharing Your Completed, Mixed MTR Songs
7
Press EXIT three times to return to the MTR home screen.
8
Connect the mini-B end of the USB
cable to the BR-80’s left side panel’s
USB jack, and the other end to an
unused USB port on your computer.
When you connect the BR-80 to your
computer via USB, you’ll typically get
the best results using USB jacks on the
back of a desktop computer or on the
side of a laptop. We recommend not
using a hub.
When you’ve mixed and mastered an MTR song down to a stereo mastering
track—see page 80 in the Owner’s Manual—you can grab it from your SD
card after connecting the BR-80 to your computer as described above. Once
it’s on your computer, you can convert it to a file for your personal music
player, email it, post it on a web site, or burn it to a CD using a CD-burning
program.
Here’s how to find your mastering V-Tracks on the computer.
1
Double-click your BR-80 icon on your computer to reveal the
ROLAND folder inside.
The BR-80’s display shows “ACCESSING...” and then “IDLING...” as it
handshakes with the computer, and then waits for you.
3
2
Double-click the ROLAND folder to reveal its contents.
(You may not see
all of the files
shown here.)
3
Double-click the MASTERING folder to reveal your mastering tracks.
4
You can audition any of the MASTERING folder’s files as you would
any other audio file on your computer.
5
To copy one of the audio files to your computer, drag it to the desired
location.
Working with a Song’s Tracks—The BRWC Software
What You Can Do with the BRWC Software
The BR-80’s BRWC—for “BR Wave Converter”—software provides a way in
and out of multitrack songs you’ve recorded in the BR-80’s MTR mode. It
interacts with the files on your BR-80’s SD card.
You use the BRWC software to
Setting Up the BRWC
Where You’ll Find the BRWC Software
The BRWC—and the rest of the BR-80 software—is pre-installed on your
BR-80’s factory SD card. You can get to it by double-clicking the BR-80
removable drive on your computer.
If you’re using a Mac, double-click the Mac.dmg file to open a virtual disk
containing the software; if you’re using Windows, extract the Win.zip file on
the SD card.
If you prefer, you can download the latest version of the BR-80 software from
the Roland US website—click here.
Installing the BRWC
We’re going to assume you’ve already installed the Song List Editor
software, and that you have a Roland folder in your Applications folder
(Mac) or a BOSS folder in your Program Files folder (Windows). If not,
you can manually create one in this location on your computer.
1
If your computer uses
• Mac OS X—drag the Wave Converter folder onto the Roland
folder in your Applications folder.
• Windows 7, Vista, or XP—drag the Wave Converter folder onto
the BOSS folder in your Program Files folder.
The BRWC software’s inside the Wave Converter folder.
• export any BR-80 mono or stereo V-Track—as a WAV or AIFF file you can
send to musicians with whom you collaborate. This file can be brought
into the multitrack recording device or software they use, allowing
them to record parts for your BR-80 song. When they’re done, they can
send their recording back to you as a WAV or AIFF file.
• import audio files—onto V-Tracks in your MTR-mode song. This is how
you add friends’ recordings to your arrangements, or add sounds or
loops you’ve acquired on the internet or elsewhere. You can import
16-bit, 44,1 kHz mono or stereo audio files in WAV or AIFF format.
4
Launching the BRWC
Once the software’s installed and the BR-80’s connected, launch the BRWC.
When it first starts up, your computer’s hard drive is selected.
Understanding the BRWC
The grid in the window shows you the tracks and V-Tracks in
the selected song. Each track is shown as a vertical column of
buttons representing its V-Tracks, as shown here to the right.
The track columns are presented from left to right, with each
track’s number appearing at the bottom of its column. Each
V-Track’s number appears at the right edge of the grid.
One track
Start by selecting BR-80 EBAND from the BRWC’s Drive popup menu.
Track numbers
When a V-Track contains a recording, its button is green. As you can see, all
eight tracks in the demo contain recordings on their first V-Tracks.
Working with Stereo Tracks
Once you’ve selected the BR-80, the Song popup menu shows you the songs
on your SD card. Here, we’ve selected the BR-80 demo from the popup.
In the BR-80, each MTR track can be used on its own as a mono track, or
linked in stereo with its odd/even partner. In the BRWC, you can see if tracks
are stereo-linked by looking at the L/R buttons beneath each track pair.
When the Export button’s lit—as shown on the next page—you can also
click the buttons to link or un-link the corresponding pair of tracks.
Tracks 1 and 2
are stereo-linked,
as shown by the
green button.
Tracks 3 and 4
aren’t linked, as
shown by their
clear button.
5
Using the BRWC
3
Exporting V-Tracks as Audio Files
How Exporting Works
Here are some things to understand about exporting recordings from an
MTR mode:
• You’re actually exporting V-Tracks, not tracks— This allows you to export
If you’re exporting more than a single mono or stereo V-Track, you’ll
want to create a new folder in this dialog before proceeding to keep
your audio files organized and easy to locate later.
4
any V-Track you want, instead of being locked in to merely the V-Track
that’s currently selected for playback on the BR-80 itself.
Some Windows machines can, too, but not all, so if you’re using
Windows, or if your collaborators are, don’t select this option.
operation, you can export one or more V-Tracks. You can even export all
of the V-Tracks in the song that contain audio in one shot.
• Windows RIFF Wave—for a standard WAV file. All Macs and PCs
• You can export stereo-linked tracks—When stereo-linked tracks are
can play WAV files.
exported, their matching-numbered V-Tracks are exported as a
combined stereo audio file.
• Windows RIFF Wave (BWF)—for a Broadcast WAV file. This type of
WAV file contains time-stamp information. This can automatically
place the audio at the correct time location in a BWF-supporting
DAW, or if you re-import it back into the BR-80. All Macs and PCs
can play BWF files.
Configuring the BRWC for Exporting
Click the BRWC’s Export button so it lights
green if it’s not already.
2
Click each V-Track you want to export by
clicking its button so it turns orange. (To
un-select a V-Track if you change your mind,
click it again.)
This V-Track
has data on it.
This V-Track has data on
it and is selected.
Select the type of audio file you
want in the dialog’s Format popup
menu. You can select
• Apple AIFF Wave—for an AIFF file. All Macs can play these files.
• You can export multiple V-Tracks at once—During a single Export
1
Click the Go (Mac) or GO (Windows) button—a dialog
opens in which you select the destination on your
computer for the exported audio.
5
Click the Save button—the BRWC exports the selected V-Tracks
into the selected location on your computer. This can take a while,
depending on the length and number of V-Tracks you’re exporting.
Importing Audio Tracks Onto Song Tracks
How Importing Works
Here are some details about importing audio files into a song:
When tracks are stereo-linked, selecting a V-Track for one of the tracks
also automatically selects the same-numbered V-Track for the other
one.
• Be sure you’re importing a supported file type—You can import any
standard 16-bit, 44.1 kHz WAV or AIFF file.
• You can import one audio file at a time—In each Import operation, you
can import a mono audio file or a stereo audio file.
To select all of the song’s V-Tracks at once, click the All (Mac) or ALL
(Windows) button beneath the Export button.
• Ask your collaborators to send you BWF files if possible—When you import
a BWF-format file, the BRWC automatically places it at the correct time
location in the song.
6
• Consider your Song’s tempo—To sit properly in your BR-80 song, the
Once you’ve selected a file, you’re provided information about it at
the bottom of the dialog window.
tempo of the audio file you’re importing should match the song’s. If it
doesn’t, it may sound sped-up or slowed-down in the song. (Of course,
this may be a good thing, depending on your taste.)
• Imported audio files are placed on V-Tracks—You select the track and
V-Track onto which the file is imported.
• Imported audio files can replace what’s on a V-Track—If you import a file
to a V-Track and time location that’s already in use, it’ll replace any audio
that’s already there. This can be handy when you’re replacing unwanted
recordings, but it also means you’ve got to be careful not to accidentally
replace something you want to keep.
4
Click the Open button to import the audio file into your song.
Importing may take a while, depending on the length of the audio
file you’re importing.
Wrapping Up Your BRWC Session
Configuring the BRWC for Importing
1
Click the BRWC’s Import button to light it green if
it’s not already.
Selecting V-Tracks as the destination for your
imported audio works a bit differently than when
you’re exporting audio.
When you click to select a
V-Track that contains data,
its button turns orange.
2
When you click to select a
V-Track with no data, its
button turns red.
Click the V-Track on which you’d like the audio file placed so it turns
orange. If you’re importing
After quitting the BRWC, be sure to properly un-mount the BR-80 from
the computer before disconnecting the BR-80. To do this, use the same
procedure you’d use for un-mounting any removable drive from your
computer.
Once you’ve unmounted the BR-80, you can safely un-plug the USB cable
from your BR-80 and computer—the BR-80 checks your SD card and
resumes normal operation.
The End
We hope you’ve found this workshop helpful. Keep an eye out for other
MICRO BR® BR-80 Workshop booklets available for downloading at
www.Rolandus.com.
• a mono audio file—click the V-Track to which you want the audio
file imported.
• a stereo audio file—click the odd/even pair of V-Tracks to which
you want the audio file imported.
3
Click the Go button to display a dialog in which you can
highlight the audio file you want to import.
7