1
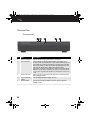
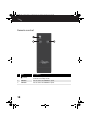
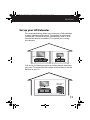
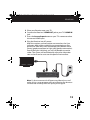
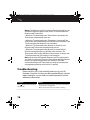
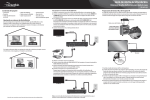
RF-HPL302_14-0333_MAN_V1_ENG.fm Page 1 Tuesday, April 22, 2014 2:39 PM
Whole Home HD Extender
RF-HPL302
User Guide
Before using your new product, please read these instructions to prevent any damage.
RF-HPL302_14-0333_MAN_V1_ENG.fm Page 2 Tuesday, April 22, 2014 2:39 PM
Rocketfish RF-HPL302
Whole Home HD Extender
Contents
Introduction............................................................................................. 2
Features..................................................................................................... 5
Set up your HD Extender ..................................................................11
Use your HD Extender........................................................................15
Troubleshooting...................................................................................16
Specifications ........................................................................................18
Legal notices..........................................................................................18
One-Year Limited Warranty..............................................................21
Introduction
Congratulations on your purchase of a Rocketfish Whole Home
HD Extender. This system delivers 1080p full HD video and
audio content anywhere in your home, using your home’s
power lines. Power line transmission results in great range and
high performance video without wireless interference or WiFi
range limitations.
You can connect a cable or satellite box, DVR, or other video
source to another TV anywhere in the house. An IR receiver
cable and an IR emitter cable are included, allowing you to
control your video source device, even when it’s in another
room.
2
RF-HPL302_14-0333_MAN_V1_ENG.fm Page 3 Tuesday, April 22, 2014 2:39 PM
RF-HPL302
Safety information
CAUTION:TO REDUCE THE RISK OF
ELECTRIC SHOCK, DO NOT REMOVE
COVER (OR BACK). NO USER-SERVICEABLE
PARTS INSIDE. REFER SERVICING TO
QUALIFIED SERVICE PERSONNEL.
WARNING:
TO REDUCE THE RISK OF FIRE OR ELECTRIC SHOCK,
DO NOT EXPOSE THIS APPLIANCE TO RAIN OR
MOISTURE.
The lightning flash with arrowhead symbol, within an
equilateral triangle is intended to alert the user to the
presence of uninsulated dangerous voltage within the
product’s enclosure that may be of sufficient magnitude
to constitute a risk of electric shock.
The exclamation point within an equilateral triangle is
intended to alert the user to the presence of important
operating and maintenance (servicing) instructions in the
literature accompanying the appliance.
Important Safety Instructions
1) Read these instructions.
2) Keep these instructions.
3) Heed all warnings.
4) Follow all instructions.
5) Do not use this apparatus near water.
6) Clean only with dry cloth.
3
RF-HPL302_14-0333_MAN_V1_ENG.fm Page 4 Tuesday, April 22, 2014 2:39 PM
7) Do not block any ventilation openings. Install in accordance
with the manufacturer’s instructions.
8) Do not install near any heat sources such as radiators, heat
registers, stoves, or other apparatus (including amplifiers) that
produce heat.
9) Do not defeat the safety purpose of the polarized or
grounding-type plug. A polarized plug has two blades with one
wider than the other. A grounding type plug has two blades
and a third grounding prong. The wide blade or the third prong
are provided for your safety. If the provided plug does not fit
into your outlet, consult an electrician for replacement of the
obsolete outlet.
10) Protect the power cord from being walked on or pinched
particularly at plugs, convenience receptacles, and the point
where they exit from the apparatus.
11) Only use attachments/accessories specified by the
manufacturer.
12) Unplug this apparatus during lightning storms or when
unused for long periods of time.
13) Refer all servicing to qualified service personnel. Servicing is
required when the apparatus has been damaged in any way,
such as power-supply cord or plug is damaged, liquid has been
spilled or objects have fallen into the apparatus, the apparatus
has been exposed to rain or moisture, does not operate
normally, or has been dropped.
Additional safety information
• Do not expose the system to any dripping or splashing
liquid.
• The AC plug is used as the disconnect device. The
disconnect device shall remain readily available.
4
RF-HPL302_14-0333_MAN_V1_ENG.fm Page 5 Tuesday, April 22, 2014 2:39 PM
RF-HPL302
• Read the Rating Labels on the bottom of the Transmitter and
Receiver for power input and other safety information.
Features
Package contents
•
•
•
•
•
•
•
•
•
•
Transmitter
Receiver
AC power cords (2)
HDMI cables (2)
Dual IR emitter cable
IR Receiver cable
Remote control
AAA Batteries (2)
Quick Setup Guide
User Guide
5
RF-HPL302_14-0333_MAN_V1_ENG.fm Page 6 Tuesday, April 22, 2014 2:39 PM
Transmitter
Front panel
#
Item
Description
1
2
Source indicators Light to show which input source is selected.
Sync indicator
If this indicator is off, the HD Extender Transmitter and
Receiver have not established a connection. When they are
connected, the indicator will blink according to the quality
of the connection: as the connection quality improves, the
indicator will blink slower. When the quality of the
connection is perfect, the indicator stays on (non-blinking).
Note: The Sync indicator will always be active to show the power
line sync state, regardless of whether the Transmitter is turned on
or not.
3
Power indicator
4
Source selector
button
Power button
5
6
Lights green to indicate that the power is turned on. Turns
red in standby mode.
Press to toggle between input sources.
Press to turn the Transmitter on. Press again to go into
standby mode.
RF-HPL302_14-0333_MAN_V1_ENG.fm Page 7 Tuesday, April 22, 2014 2:39 PM
RF-HPL302
Back panel
#
Item
Description
1
RESET button
2
HDMI INPUTS
3
4
5
6
HDMI OUT
SERVICE port
AC input
IR OUT jack
Press (with a pen tip or paperclip) to reset to factory default
settings.
Plug the HDMI cable from the source HD audio/video devices
into these jacks. HDMI 1 is the default.
Plug the HDMI cable from an HD TV into this jack.
Service port, do not use.
Plug the AC power cord into this jack.
Plug the Dual IR Emitter cable into this jack.
7
RF-HPL302_14-0333_MAN_V1_ENG.fm Page 8 Tuesday, April 22, 2014 2:39 PM
Receiver
Front panel
#
Item
1
2
Source indicators Light to show which input source is selected.
Sync indicator
If this indicator is off, the HD Extender Transmitter and
Receiver have not established a connection. When they are
connected, the indicator will blink according to the quality
of the connection: as the connection quality improves, the
indicator will blink slower. When the quality of the
connection is perfect, the indicator stays on (non-blinking).
Description
Note: The Sync indicator will always be active to show the power
line sync state, regardless of whether the Receiver is turned on or
not.
3
Power indicator
4
Source selector
button
Power button
5
8
Lights green to indicate that the power is turned on. Turns
red in standby mode.
Press to toggle between input sources.
Press to turn the Receiver on. Press again to go into standby
mode.
RF-HPL302_14-0333_MAN_V1_ENG.fm Page 9 Tuesday, April 22, 2014 2:39 PM
RF-HPL302
Back panel
#
Item
Description
1
RESET button
2
3
4
5
HDMI OUT
SERVICE port
AC input
IR IN jack
Press (with a pen tip or paperclip) to reset to factory default
settings.
Plug the HDMI cable from an HD TV into this jack.
Service port, do not use.
Plug the AC power cord into this jack.
Plug the IR Receiver cable into this jack.
9
RF-HPL302_14-0333_MAN_V1_ENG.fm Page 10 Tuesday, April 22, 2014 2:39 PM
Remote control
#
1
2
3
10
Item
(power)
Source 1
Source 2
Description
Press to turn on power to the Transmitter or Receiver. Press
to switch to standby mode.
Press to select the SOURCE 1 input.
Press to select the SOURCE 2 input.
RF-HPL302_14-0333_MAN_V1_ENG.fm Page 11 Tuesday, April 22, 2014 2:39 PM
RF-HPL302
Set up your HD Extender
This unique technology allows you to connect a DVR, cable box,
or other video device to another TV anywhere in your home!
Connect the Transmitter to your video device(s) and TV, then
connect the Receiver to another TV to extend your viewing
environment.
Video source & Transmitter
Receiver
Or if you're just looking to move your video devices away from
your main TV, connect the Transmitter to those devices and the
Receiver to your TV.
Video source &
Transmitter
Receiver
11
RF-HPL302_14-0333_MAN_V1_ENG.fm Page 12 Tuesday, April 22, 2014 2:39 PM
To set up your HD Extender:
1 Place your Transmitter near your DVR, cable box, or other
video device.
2 Connect your video source devices' HDMI output to the
Transmitter's HDMI IN 1 or HDMI IN 2 inputs. You do not
have to connect video devices to both HDMI inputs.
3 If your TV is near your video sources, connect the TV's HDMI
IN jack to the Transmitter's HDMI OUT jack. This connection
will allow you to view your video device(s) on this TV and on
the TV connected to your Receiver in another room. If your
TV is not near your video devices (across the room or in
another room), you can connect it to the Receiver.
4 Plug the Transmitter into AC power.
Optional
12
RF-HPL302_14-0333_MAN_V1_ENG.fm Page 13 Tuesday, April 22, 2014 2:39 PM
RF-HPL302
5 Place your Receiver near your TV.
6 Connect the Receiver's HDMI OUT jack to your TV's HDMI IN
jack.
7 Press the Source/Input button on your TV's remote to select
the correct HDMI input.
8 Plug the Receiver into AC power.
After the receiver and transmitter are turned on, the Sync
indicators blink while establishing a connection over the
power line. After they have connected, the indicators blink
slower (good connection) or light solid (perfect connection).
Even if the light is blinking, you will still be able to receive
video. The system will automatically adjust the video data
rate so that it can be sent over the power line interface.
Note: It's best to connect the AC power cord directly to a wall
outlet. Using a surge protector with noise filtering may decrease
the data rate and may affect the quality of the signal.
13
RF-HPL302_14-0333_MAN_V1_ENG.fm Page 14 Tuesday, April 22, 2014 2:39 PM
Set up the IR emitter and IR receiver
An IR receiver cable and an IR emitter cable are included,
allowing you to control a video source, even when it's in
another room. Just point your devices' remote control at the IR
receiver instead of your video sources themselves.
Transmitter
Dual IR
emitter
cable
Stick each emitter to
the IR sensor on your
video sources.
Receiver
Note: Do not place the IR
receiver over the IR window of
your TV.
IR receiver
cable
(optional)
14
RF-HPL302_14-0333_MAN_V1_ENG.fm Page 15 Tuesday, April 22, 2014 2:39 PM
RF-HPL302
1 Plug the IR emitter cable into the Transmitter.
2 The IR emitter cable has two separate IR emitters, one for
each video source device you want to control. For each IR
emitter, remove the protective cover from the tape on the
emitter and stick the emitter near the IR sensors on your
video sources.
3 Plug the IR receiver cable into the Receiver if your Receiver is
out of view or hidden in a media cabinet. If you can point
your remote directly at the Receiver, you do not need to
connect this cable, go to Use your HD Extender (page 15).
4 Remove the protective cover from the tape on the IR
receiver and stick the IR receiver on the front of your TV, or in
another visible location you can point to with your remote.
Note: Do not place the IR receiver over the IR window of your
TV.
Use your HD Extender
1 Place two AAA batteries (included) into the remote control.
2 Press (power) on the Transmitter and Receiver to turn
them on. The Sync indicators blink while establishing a
connection over the power line. Once connected, the
indicators blink slower (good connection) or light solid
(perfect connection). You can watch video and hear audio
through your TV.
3 Make sure your video device is turned on, then press the
SOURCE 1 or SOURCE 2 button on the remote control or the
Receiver and Transmitter to select the source you want to
view.
4 Turn on your TV and set it to the correct HDMI input.
15
RF-HPL302_14-0333_MAN_V1_ENG.fm Page 16 Tuesday, April 22, 2014 2:39 PM
Notes: The Receiver and Transmitter will automatically turn on
and off based on the power state of the TVs connected to the
Receiver and Transmitter.
• When the TV connected to the Transmitter is turned on, the
Transmitter automatically turns on.
• When the TV connected to the Transmitter is turned off, the
Transmitter will automatically turn off after a few minutes if the
TV connected to the Receiver is not turned on.
• When the TV connected to the Receiver is turned on, the
Receiver and Transmitter automatically turn on.
• When the TV connected to the Receiver is turned off, the
Receiver automatically turns off after a few minutes. The
Transmitter will also turn off after a few minutes as long as the
TV connected to the Transmitter is not turned on.
Note: Up to three HD Extender Receiver and Transmitter pairs
can work in one home. Each new Transmitter and Receiver pair
forms a new and unique power line network. The video
transmitted from each Transmitter can only be viewed at the
corresponding Receiver with which it is paired.
Troubleshooting
Please read this User Guide carefully before using your HD
Extender. Check this list for a possible troubleshooting solution
before calling for service. Refer to rocketfishproducts.com for
additional information.
Problem
The (power) indicator does
not turn on
16
Solution
• Make sure that the AC power cords to the Transmitter
and Receiver are plugged in.
• Make sure that the AC power outlet is working.
RF-HPL302_14-0333_MAN_V1_ENG.fm Page 17 Tuesday, April 22, 2014 2:39 PM
RF-HPL302
Problem
No picture on your TV or
projector
You can’t view different
channels or video content
Poor picture quality
Intermittent or no sound
The IR emitter will not control
the source device
Solution
• Make sure that the connections are correct and secure
between the Transmitter input and your HD device
output.
• Make sure that an HDMI input has been selected as the
source on your TV or projector.
• Make sure that the (power) indicator is on (lit green)
and the SOURCE indicator shows the correct input.
• Make sure that the video resolution from your HD
device is set to 1080p, 1080i, 720p, or 480p.
• Reconnect the HDMI cable to the TV first. If you still do
not have video, power cycle both the transmitter and
receiver units by unplugging the power cords for five
seconds and then plugging them back in.
• Make sure you are connected directly into the wall and
not into a surge protector. Some surge protectors can
interfere with powerline networking and could
degrade performance.
• Make sure the Receiver is not located too far away from
the Transmitter. To check this, move the Receiver into
the same room as the Transmitter and verify that it
works there, then try again in the remote room.
Observe the Sync LED to make sure it is not blinking
rapidly. If it is off or blinking rapidly, it indicates that the
Receiver is positioned too far from the transmitter.
• Remember that the HD Extender is not an additional TV
tuner for your Cable or TV service. It will only show the
video output from the video source devices that your
HD Extender Transmitter is connected to.
• Make sure that the video resolution from your HD
device is 1080p, 1080i, 720p, or 480p.
• Make sure that your TV's volume is turned up and not
set to MUTE.
• Reconnect the HDMI cable to the TV first. If you still do
not have audio, power cycle both the Transmitter and
Receiver units by unplugging the power cords for five
seconds and then plugging them back in.
• Make sure that the IR emitter is aligned with the IR
sensor on the source device.
17
RF-HPL302_14-0333_MAN_V1_ENG.fm Page 18 Tuesday, April 22, 2014 2:39 PM
Specifications
Video CODEC
Video Resolution
Digital audio
Power Line Link speed
Power Consumption
H.264 video encode and decode
Support up to 1920 x 1080 @ 60p
Dual channel, Linear PCM, 44.1 KHz,
48KHz
500 Mbps SmartLink PLC technology
Standby - 4.2 W
On - 6.0 W
Legal notices
FCC
This device complies with Part 15 of the FCC Rules. Operation is
subject to the following two conditions: (1) this device may not
cause harmful interference, and (2) this device must accept any
interference received, including interference that may cause
undesired operation.
This equipment has been tested and found to comply with the
limits for a Class B digital device, pursuant to Part 15 of the FCC
Rules. These limits are designed to provide reasonable
protection against harmful interference in a residential
installation. This equipment generates, uses and can radiate
radio frequency energy and, if not installed and used in
accordance with the instructions, may cause harmful
interference to radio communications. However, there is no
guarantee that interference will not occur in a particular
installation. If this equipment does cause harmful interference
to radio or television reception, which can be determined by
18
RF-HPL302_14-0333_MAN_V1_ENG.fm Page 19 Tuesday, April 22, 2014 2:39 PM
RF-HPL302
turning the equipment off and on, the user is encouraged to try
to correct the interference by one or more of the following
measures.
-- Reorient or relocate the receiving antenna.
-- Increase the separation between the equipment and
Receiver.
-- Connect the equipment into an outlet on a circuit different
from that to which the Receiver is connected.
-- Consult the dealer or an experienced radio/TV technician for
help.
Warning: Changes or modifications not expressly approved by
the party responsible for compliance could void the user's
authority to operate the equipment.
Copyright
© 2014 Rocketfish. Rocketfish and the Rocketfish logo are
trademarks of Best Buy Enterprise Services, Inc. Other brands
and product names are trademarks or registered trademarks of
their respective holders. Specifications and features are subject
to change without notice or obligation.
For service and support call (800) 620-2790.
Open Source Software
For Open Source Software information, if you require additional
information or you wish to receive the complete corresponding
licensed source code, please call the Rocketfish support line at
1-800-620-2790. This source code is available for a period of
three (3) years from the date of the distribution of this product
by Rocketfish.
19
RF-HPL302_14-0333_MAN_V1_ENG.fm Page 20 Tuesday, April 22, 2014 2:39 PM
20
RF-HPL302_14-0333_MAN_V1_ENG.fm Page 21 Tuesday, April 22, 2014 2:39 PM
RF-HPL302
One-Year Limited Warranty
Rocketfish Products (“Rocketfish”) warrants to you, the original purchaser of this new
RF-HPL302 (“Product”), that the Product shall be free of defects in the original
manufacture of the material or workmanship for one (1) year from the purchase of
the Product (“Warranty Period”). This Product must be purchased from an authorized
dealer of Rocketfish brand products and packaged with this warranty statement. This
warranty does not cover refurbished Product. If you notify Rocketfish during the
Warranty Period of a defect covered by this warranty that requires service, terms of
this warranty apply.
How long does the coverage last?
The Warranty Period lasts for one year (365 days), beginning on the date you
purchased the Product. The purchase date is printed on the receipt you received with
the product.
What does this warranty cover?
During the Warranty Period, if the original manufacture of the material or
workmanship of the Product is determined to be defective by an authorized
Rocketfish repair center or store personnel, Rocketfish will (at its sole option): (1)
repair the Product with new or rebuilt parts; or (2) replace the Product at no charge
with new or rebuilt comparable products or parts. Products and parts replaced under
this warranty become the property of Rocketfish and are not returned to you. If
service of Products and parts are required after the Warranty Period expires, you
must pay all labor and parts charges. This warranty lasts as long as you own your
Rocketfish Product during the Warranty Period. Warranty coverage terminates if you
sell or otherwise transfer the Product.
How to obtain warranty service?
If you purchased the Product at a retail store location, take your original receipt and
the Product to the store you purchased it from. Make sure that you place the Product
in its original packaging or packaging that provides the same amount of protection
as the original packaging. If you purchased the Product from an online web site, mail
your original receipt and the Product to the address listed on the web site. Make sure
that you put the Product in its original packaging or packaging that provides the
same amount of protection as the original packaging.
Where is the warranty valid?
This warranty is valid only to the original purchaser of the Product in the United
States, Canada, and Mexico.
21
RF-HPL302_14-0333_MAN_V1_ENG.fm Page 22 Tuesday, April 22, 2014 2:39 PM
What does the warranty not cover?
This warranty does not cover:
• Customer instruction
• Installation
• Set up adjustments
• Cosmetic damage
• Damage due to acts of God, such as lightning strikes
• Accident
• Misuse
• Abuse
• Negligence
• Commercial use
• Modification of any part of the Product, including the antenna
This warranty also does not cover:
• Damage due to incorrect operation or maintenance
• Connection to an incorrect voltage supply
• Attempted repair by anyone other than a facility authorized by Rocketfish to
service the Product
• Products sold as is or with all faults
• Consumables, such as fuses or batteries
• Products where the factory applied serial number has been altered or removed
REPAIR REPLACEMENT AS PROVIDED UNDER THIS WARRANTY IS YOUR EXCLUSIVE
REMEDY. ROCKETFISH SHALL NOT BE LIABLE FOR ANY INCIDENTAL OR
CONSEQUENTIAL DAMAGES FOR THE BREACH OF ANY EXPRESS OR IMPLIED
WARRANTY ON THIS PRODUCT, INCLUDING, BUT NOT LIMITED TO, LOST DATA, LOSS
OF USE OF YOUR PRODUCT, LOST BUSINESS OR LOST PROFITS. ROCKETFISH
PRODUCTS MAKES NO OTHER EXPRESS WARRANTIES WITH RESPECT TO THE
PRODUCT, ALL EXPRESS AND IMPLIED WARRANTIES FOR THE PRODUCT, INCLUDING,
BUT NOT LIMITED TO, ANY IMPLIED WARRANTIES OF AND CONDITIONS OF
MERCHANTABILITY AND FITNESS FOR A PARTICULAR PURPOSE, ARE LIMITED IN
DURATION TO THE WARRANTY PERIOD SET FORTH ABOVE AND NO WARRANTIES,
WHETHER EXPRESS OR IMPLIED, WILL APPLY AFTER THE WARRANTY PERIOD. SOME
STATES, PROVINCES AND JURISDICTIONS DO NOT ALLOW LIMITATIONS ON HOW
LONG AN IMPLIED WARRANTY LASTS, SO THE ABOVE LIMITATION MAY NOT APPLY TO
YOU. THIS WARRANTY GIVES YOU SPECIFIC LEGAL RIGHTS, AND YOU MAY ALSO
HAVE OTHER RIGHTS, WHICH VARY FROM STATE TO STATE OR PROVINCE TO
PROVINCE.
Contact Rocketfish:
For customer service please call 1-800-620-2790
www.rocketfishproducts.com
22
RF-HPL302_14-0333_MAN_V1_ENG.fm Page 23 Tuesday, April 22, 2014 2:39 PM
RF-HPL302
Distributed by Best Buy Purchasing, LLC
7601 Penn Avenue South, Richfield, Minnesota, U.S.A. 55423-3645
© 2014 Best Buy Enterprise Services, Inc.
All rights reserved. ROCKETFISH is a trademark of Best Buy Enterprise Services, Inc.
Registered in some countries. All other products and brand names are trademarks of
their respective owners.
23
RF-HPL302_14-0333_MAN_V1_ENG.fm Page 24 Tuesday, April 22, 2014 2:39 PM
www.rocketfishproducts.com
(800) 620-2790
Distributed by Best Buy Purchasing, LLC
7601 Penn Avenue South, Richfield, MN 55423-3645 USA
© 2014 BBY Solutions, Inc.
All rights reserved. ROCKETFISH is a trademark of BBY Solutions, Inc.
All other products and brand names are trademarks of their respective owners.
V1 ENGLISH 14-0333