1
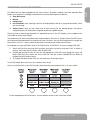
Black Box
Quick Start Guide
English
New Version 2 Firmware
Thank you for purchasing the Black Box, a very exciting product created collaboratively by Roger Linn
Design and the great folks at M-Audio. You may know me as the inventor of the first digital drum machines
in the 1980s, or from my MPC MIDI Production Center products with AKAI in the 1990s. But you may not
know that I’m also a guitarist, and my passion for guitar sound led to my more recent creation of the
award-winning AdrenaLinn beat-synced guitar effects processor (www.rogerlinndesign.com.) Now I’m
very proud to combine the best parts of AdrenaLinn with M-Audio’s considerable expertise in computercentric recording products. The result is the Black Box.
What is the Black Box? It’s a superb amp modeler combined with a unique effects processor that syncs to
an internal drum machine. It’s also a complete digital audio interface to your computer. The beat-synced
effects are the part I enjoy most: tremolo, flanging, delay—even looped sequences of filtered tones or
arpeggiated notes and more—all playing in perfect sync to the beat or your recording software! And now
with the improved Version 2 firmware, it’s far more powerful than before. I think you’ll find—as others
have—that the Black Box will lead you down a path of new musical ideas and head-turning recordings.
On behalf of all the creative minds at both M-Audio and Roger Linn Design, I’d like to welcome you to the
brave new world of the Black Box!
INTRODUCTION
This Quick Start Guide contains enough information to get you up and running quickly. IT IS NOT A
COMPLETE USER GUIDE. To download the User Guide, go to www.m-audio.com and click on Support/
Manuals. This document will give you more details about the extensive functionality of the Black Box,
including pedal programming, software driver installation, and more.
IMPORTANT!
Audio equipment should ALWAYS be powered on and off in a precise order. The power amp that feeds
your speakers should ALWAYS be turned ON LAST and turned OFF FIRST. If you turn other pieces of audio
equipment on while they are connected to the powered speakers, loud transient pop noises will occur—
possibly damaging your hearing and your speakers. Always turn on all of the other audio devices that
are connected to your powered speakers BEFORE you turn on your powered speakers. The same is true
for turning things off. ALWAYS turn off your powered speakers BEFORE you turn off any other equipment
connected to them. Following this simple rule will ensure that both your ears and your speakers will
function optimally for a long time to come.
Black Box Quick Start Guide
•
1
English
GREETINGS FROM ROGER LINN
NEW VERSION 2 FIRMWARE
This Black Box has been upgraded to our new version 2 firmware, making it far more powerful than
before at no extra cost. Enhancements include:
< The number of amp models has been increased from 12 to 40 and the original amps have been
improved to be more accurate. We’ve also included four classic bass amps, a fuzz tone, an octave
fuzz and a clean mic preamp.
< The number of effect types is increased from 43 to 121. In addition to new variations on the existing
effects, we’ve added many unique filter sequences, tremolo sequences and arpeggio sequences,
as well as great new effects like rotary, vibrato, auto-pan, talk pedal, volume swell, fixed filters and
even a few sci-fi effects.
< An assortment of minor enhancements.
However, we didn’t stop there. We also added a number of new bonus features:
Amp Mid control
Reverb
Compression
Link Drumbeat: Now selecting a preset will automatically call up its assigned drumbeat, which
you can change.
< Tempo Source: Now you can select one of three sources for the playing tempo: the preset’s
assigned tempo, the drumbeat’s assigned tempo or the global tempo.
<
<
<
<
These new bonus features go beyond the 16 parameter menus in the LCD display, so we created a new
Shift mode to access their settings. To learn about Shift mode, see the section entitled “Additional Shift
Parameters.”
HOOK IT UP AND START JAMMING NOW
To start playing immediately, follow the simple instructions below. For more detailed information, please
read the rest of this guide and the User Guide.
Quick Setup
1.
Plug the main 1⁄4” outputs on the back of the Black Box into a pair of powered speakers and/or
plug a pair of headphones in the front.
Plug your guitar in the front of the Black Box and turn up your guitar’s volume.
Set the MIX knob on the upper-right side of the Black Box to the hard left “Input” setting.
Start playing and turn up the Guitar Input level knob until the clip light only comes on when you
play hard.
Turn up the Output Level knob on the upper-right side to taste.
2.
3.
4.
5.
Getting Sounds
Use the PRESET INCREMENT and PRESET DECREMENT buttons to try out different effect presets.
Press the START/STOP button to hear the drum machine.
Use the DRUMBEAT INCREMENT and DRUMBEAT DECREMENT buttons to select different beats.
Use the TAP TEMPO button to set the tempo of the drum machine.
<
<
<
<
2
•
Black Box Quick Start Guide
These are the four knobs on the right side of the Black Box:
< Guitar input level knob - controls the amount of incoming guitar signal.
< Mic input level knob - controls the amount of incoming mic signal.
< Mix input/playback level knob - controls how much of the guitar and drum sounds you hear
versus how much output from the computer you will hear.
< Output level knob - controls the overall unit volume output.
WORKING WITH PRESETS
A preset is a unique combination of all the settings that affect the guitar sound, including guitar amp
models, effects and delay. There are 100 fixed factory presets (0-99) followed by 100 editable user presets
(0-99). To browse the presets, press the PRESET INCREMENT and PRESET DECREMENT keys. Hold either
button to quickly scroll through the presets. The number and 6-character name of the currently active
preset will always appear in the LCD display after a preset is selected.
To edit the settings that comprise a preset, you’ll use the AMP, FX, DELAY and UTILITY buttons. When one
of these buttons is pressed, the lower part of the LCD display will show different parameter name sets
in each of the four lower sections of the display. These parameters can be adjusted using the four rotary
controls below the display.
Note that unless you store the preset after you make any changes, your changes will be lost when you
select a different preset. To remind you to save, the word EDIT will appear in the display whenever you
change any of the preset’s parameters..
ADJUSTING THE AMP MODELS AND COMPRESSION
When you press AMP, the four rotary controls will show the functions AMP, AMP DRIVE, AMP BASS and
AMP TREBLE in the bottom of the LCD:
Amp - This knob (#1) is used to select one of 40 guitar amplifier models. For a complete list and
descriptions of the AMP models, please refer to the PDF manual.
Amp Drive - This knob (#2) lets you control the amount of distorted overdrive for the selected amp.
< SHIFT: To adjust Compression, select Amp Drive then double-tap the AMP button. (See the
“Additional Shift Parameters” section below.) The range is from CMP 0 (no compression) to
CMP 99 (maximum compression).
Amp Bass - This knob (#3) behaves just like the bass control of the modeled amp that’s selected.
< SHIFT: To adjust Amp Mid, select Amp Bass then double-tap the AMP button. (See the “Additional
Shift Parameters” section below.) This control behaves just like the mid control of the modeled
amp that’s selected. The range is from MID 0 (minimum) to MID 99 (maximum).
Amp Treble - This knob (#4) behaves just like the treble control of the selected modeled amp.
Black Box Quick Start Guide
•
3
English
INPUT/OUTPUT CONTROLS
ADJUSTING THE EFFECTS
The Black Box has 121 different modulation and filter effects, including 60 looped sequences of filter tones
or tremolo effect levels. The modulation and sequence effects are normally beat-synced to the internal
drum machine tempo, but they can also lock to incoming MIDI Clock tempo. This assures that your effects
are always in perfect time with the drum machine or your DAW session. For a complete list of the effects,
refer to the full Users Guide.
When you press FX, the following four rotary control functions will appear in the bottom of the LCD:
Effect - This knob (#1) is used to select one of 121 effect types.
FX Speed or FX Freq - This knob (#2) controls either the FX SPEED or FX FREQUENCY, depending on
which effect is selected:
1) FX Speed controls the speed of modulation effects (effects that cycle up and down over time)
and ranges from 0-99 (fixed speeds of .1 cycle per second through 10 cycles per second),
followed by 16 tempo-synced speeds:
8M
8 measures
4N
1/4 note
4M
4 measures
4T
1/4 note triplet
2M
2 measures
8N
1/8 note
2MT
One cycle every 2 whole note triplets
8T
1/8 note triplet
1M
1 measure
16N
1/16 note
1MT
One cycle every whole note triplet
16T
1/16 note triplet
2N
1/2 note
32N
1/32 note
2T
1/2 note triplet
32T
1/32 note triplet
2) FX Freq (frequency) controls the “brightness” of the effect for Random Filter or Filter Sequence
effects. “0” is the lowest frequency setting, which creates a deep tone. The highest setting is
“99,” which creates a very bright tone.
FX Depth or FX Key - This knob (#2) controls either the FX DEPTH or FX KEY, depending on which effect
is selected:
1) FX Depth controls how shallow or deep the effect becomes over time. A setting of 0 gives
no movement; a setting of 99 gives maximum movement. A setting of -99 gives maximum
negative movement; for example, this will cause the Auto Wah effect to sweep down instead
of up when you play a note.
2) FX Key only appears when the Arpeggiator effect is selected. It allows you to transpose the
arpeggio sequence to a different musical key in semitone steps from 0 to 99.
FX Wet/Dry - This is a balance control between the affected and unaffected signal. 0 is no effect (effect
is bypassed) and 99 is full effect.
4
•
Black Box Quick Start Guide
The settings for Black Box’s beat-synced delay and reverb are accessed by pressing the DELAY button.
The delay time can be either a fixed time or it can be synced to the internal drum machine (or incoming
MIDI Clock). For a complete description, please refer to the full User Guide. Push the DELAY menu key to
bring up the following four menus:
Delay Time - This parameter value sets the time between your original signal and the delayed signal.
There are 100 fixed delay times (shown in milliseconds), followed by 19 beat-synced settings:
2M
2 measures (Uses ‘1M’ below 172 BPM, ‘2n’ below 86 BPM and ‘4n’ below 43 BPM)
2MT
2 measure triplets (3 delays in 4 measures; uses ‘1Mt’ below 115 BPM and ‘2t’ below
58 BPM)
1MD
Dotted whole note (1.5 measures; uses ‘2d’ below 129 BPM and 4d below 65)
1M
1 measure (Uses ‘2n’ below 86 BPM and ‘4n’ below 43 BPM)
1MT
1 measure triplet (3 delays in 2 measures; uses ‘2t’ below 58 BPM)
2D
Dotted 1⁄2 note (1/2 note + 50%; uses ‘4d’ below 65 BPM)
2N
1⁄2 note (Uses ‘4n’ below 43 BPM)
2T
1⁄2 note triplet (3 delays in 1 measure)
4D
Dotted 1⁄4 note (1/4 note + 50%)
4N
1⁄4 note
4T
1⁄4 note triplet (3 delays in a 1⁄2 note)
8D
Dotted 1/8 note (1/8 note + 50%)
8N
1/8 note
8T
1/8 note triplet (3 delays in a 1⁄4 note)
16D
Dotted 1/16 note (1/16 note + 50%)
16N
1/16 note
16T
1/16 note triplet (3 delays in an 1/8 note)
32N
1/32 note
32T
1/32 note triplet (3 delays in a 1/16 note)
< SHIFT: To adjust Reverb Time, select Delay Time then double-tap the DELAY button. (See the
“Additional Shift Parameters” section below.) There are five Reverb times: RVTM 1 (shortest)
through RVTM 5 (longest).
Delay Repeats - This parameter value sets the amount of repeats in your delayed signal.
< SHIFT: To adjust Reverb High Frequency, select Delay Repeats then double-tap the DELAY
button. (See the “Additional Shift Parameters” section below.) The range is from RHF 0 (least
high frequencies) to RHF 99 (most high frequencies).
Black Box Quick Start Guide
•
5
English
ADJUSTING THE DELAY AND REVERB
Delay Volume - This parameter value simply sets how loud the delayed signal is compared to your
original signal.
< SHIFT: To adjust Reverb Volume, select Delay Volume then double-tap the DELAY button. (See
the “Additional Shift Parameters” section below.) The range is from RVL 0 (reverb off) to RVL 99
(highest reverb volume).
Drums > Delay - This is a special feature that allows you to send the Drum machine signal to the Delay
effect, as well as the reverb or the input of the entire guitar signal path. The options are:
1) DLY 00 - DLY 99: This is the level of the drum signal that is sent to the delay.
2) INP 00 - INP 99: This is the level of the drum signal that is sent to the input of the entire guitar
signal path.
3) REV 00 - REV 49: This is the level of the drum signal that is sent to the reverb.
ADJUSTING THE UTILITIES
Pressing the UTILITY key brings up the four Utility menus in the LCD:
Preset Volume - This controls the volume of any individual preset. Note that this actually controls the
output of the amp model and will have no effect if the amp processing is bypassed.
< SHIFT: To adjust the Noise Gate, select Preset Volume then double-tap the UTILITY button. (See
the “Additional Shift Parameters” section below.) The options are GATE 0 (gate off), followed by
GATE 1 (lowest gate threshold) through GATE 9 (highest gate threshold). Lower settings allow
the quietest notes to be heard but will also let through more noise, while higher settings cut
more noise but may be less sensitive to softly played notes.
Guitar/Drums Balance - This controls the relative balance between the two signals. This is a “global”
parameter, meaning that it stays as you set it even after you change presets. The range is from G50 (all
guitar, no drums) through EQU (equal guitar and drums) to D50 (all drums, no guitar), followed by SEP
(guitar to left output, drums to right).
< SHIFT: To turn Link Drumbeat on or off, select Guitar/Drums Balance then double-tap the
UTILITY button. (See the “Additional Shift Parameters” section below.) The options are:
1) LKDB N: When you select a new preset, the drumbeat won’t change.
2) LKDB Y: When you select a new preset, its assigned drumbeat is automatically selected.
Expression Pedal - This allows you to assign the function of the expression pedal. (For more information,
please refer to the full Users Guide.)
Tempo - This control speeds up or slows down the drum machine and beat-synced effects.
< SHIFT: To change the Tempo Source setting, select Tempo then double-tap the UTILITY button.
(See the “Additional Shift Parameters” section below.) The options are:
1) TPO PR (Preset tempo): Whenever a new preset is selected, its assigned tempo automatically
becomes active.
2) TPO DB (Drumbeat tempo): Whenever a new drumbeat is selected, its assigned tempo
becomes active.
3) TPO GL (Global tempo): The tempo never changes unless manually changed.
6
•
Black Box Quick Start Guide
This Black Box has been upgraded to our new version 2 firmware, making it far more powerful than
before at no extra cost. Among the enhancements are the following bonus features:
Amp Mid control
Reverb
Compression
Link Drumbeat: Now selecting a preset will automatically call up its assigned drumbeat, which
you can change.
< Tempo Source: Now you can select one of three sources for the playing tempo: the preset’s
assigned tempo, the drumbeat’s assigned tempo or the global tempo.
<
<
<
<
These new bonus features go beyond the 16 parameter menus in the LCD display, so we created a new
Shift mode to access their settings.
The parameters for these new features are implemented as Shift menus. Similar to how the SHIFT key on
your computer keyboard permits a single key to have 2 functions, the new Shift mode permits a single row
and column in the 4 x 4 menu matrix to have both a normal and a shifted menu function.
For example, the new AMP MID control is the Shift function of AMP BASS. To view or change AMP MID:
1)
2)
3)
Select AMP BASS by pressing AMP and then turning the 3rd menu knob one “click” to select its
column. You’ll now see the current value of AMP BASS.
Double-tap the AMP button to view the Shift parameter, AMP MID. Even though the menu still
blinks AMP BASS, the screen text shows “MID 50” and the screen’s PARAMETER icon blinks to
indicate that Shift mode is active.
To change the value of AMP MID, turn the third menu knob up or down.
To exit Shift mode, press any key or turn another menu knob.
Here’s an overview of the new Shift functions and where they are located in the 4 x 4 menu matrix:
For an explanation of these functions, see the relevant section of this Quick Start Guide.
Black Box Quick Start Guide
•
7
English
ADDITIONAL SHIFT PARAMETERS
STORE
If you make any changes to a preset, the EDIT icon will show on the LCD. This is to remind you that you
must store your changes to keep them. If you change to another preset before you save your changes to
the old one, they will be lost. To store a preset:
1.
Quickly press the PRESET INCREMENT and PRESET DECREMENT keys simultaneously. (The preset
number and the first three characters of the preset name will blink.)
To select the destination preset, use the PRESET INCREMENT or PRESET DECREMENT buttons. (Note
that you can only save to a user preset; if the original preset was a factory preset, the same preset
number in the user bank will be automatically selected for you.)
If you like, you can rename the preset before saving it. Use the first three rotary controls to rename
the first three characters, respectively, of the preset name. Then, turn the fourth rotary control one
click to the right to make the last three characters blink. Now you can use the first three rotary
controls again, this time to change characters four through six of the preset name.
To save the preset, again quickly press the PRESET INCREMENT and PRESET DECREMENT keys
simultaneously.
2.
3.
4.
“SAVED” will briefly appear on the screen to confirm the save.
TUNER
Pressing the UTILITY and DELAY buttons simultaneously will engage the Black Box’s built-in instrument
tuner. This is a tuner sensitive enough for any guitar or bass. Play a note and it will be displayed in the
LCD with 2 arrows to either side. The left and rightmost arrows indicate coarse tuning, and the two inner
arrows are for fine tuning. More arrows on the left side indicate that the note is flat; more arrows on the
right side indicate that it is sharp. When both arrows are displayed on both sides (two on either side of
the note) then you are perfectly in tune for the note displayed. Pressing any button will exit the tuner
function.
WORKING WITH THE DRUM MACHINE
There are 100 fixed drumbeats numbered 0 to 99. To change from one drumbeat to another, press the
DRUMBEAT INCREMENT and DRUMBEAT DECREMENT keys. The number and name of the currently active
drumbeat will appear after it is selected, and will remain showing in the display for three seconds. After
that, the LCD will revert to whatever the display was showing previously. To view the active drumbeat,
press both the DRUMBEAT INCREMENT and DRUMBEAT DECREMENT buttons simultaneously; the active
drumbeat number and name will appear for three seconds.
TAP TEMPO - This button allows you to enter the drum machine tempo by tapping on it. Since the
effects are beat-synced to the drum machine, this will also set the tempo of the effects. The drums do
not need to be playing for the effects to lock to the tempo.
START/STOP - This button will start and stop the drum machine. When in play mode, the tempo LED
will blink at the current tempo. When in stop mode, the LED will be dark.
(For a complete list of the drumbeats, please refer to the full User Guide.)
8
•
Black Box Quick Start Guide
Minimum Computer System Requirements
If you intend to use your Black Box as an audio interface with your computer, please make certain that
your computer meets these minimum requirements:
Windows
<
<
<
<
Pentium III – 500 MHz or higher
128 MB RAM
Windows XP (SP2) with DirectX 9.0c or higher
Onboard USB connection
NOTE: The Black Box is not supported under Windows 98, Windows Me or Windows 2000.
Mac OS
<
<
<
<
Macintosh G3/G4* 500 MHz or higher
512 MB RAM
OS X 10.3.9 / 10.4.4
Onboard USB connection
*G3/G4 accelerator cards not supported
Please also check the minimum system requirements of your DAW software as they may be higher.
Connecting Your Hardware to the Computer
The Black Box is a class-compliant device for both Windows XP and Mac OS X. This means that no
software drivers are required to be installed on your computer in order to achieve minimum functionality.
Minimum functionality means that you will be able to record the guitar sound using most standard DAW
applications, including Ableton Live Lite 4 GTR. To start using the Black Box as a class-compliant device,
simply connect it to your computer via USB and power it on using only the included 9V AC 1000mA power
supply.
Please note that if you do not install the M-Audio software drivers, you will not have access to certain
features. For example, your DAW application will not have access to the dry guitar signal or the XLR mic
input. In addition, your unit will not be able to lock to incoming MIDI Clock from a DAW. You will not be
able to save and load presets to the computer, nor will you be able to update your unit, as these features
require that you install drivers. You can always start by running the unit as a class-compliant device and
then install the drivers later to obtain additional functionality. However, be sure that your Black Box is not
connected to your computer via USB when you install the drivers.
Black Box Quick Start Guide
•
9
English
INTERFACING WITH THE COMPUTER
Windows Sounds and Audio Devices Setup
In your Windows XP control panel, double-click on the Sounds and Audio Devices icon. You should see
the properties dialog below. If the Black Box does not show up automatically, use the drop-down menus
to select it. If the device is not shown available on the menu, restart your computer and try again.
Macintosh Audio MIDI Setup
On the Mac, open Audio MIDI Setup in Applications > Utilities. You should see the screen below. If the
Black Box does not show up automatically, use the drop-down menus to select it. If the device is not
available, restart your computer and try again.
10
•
Black Box Quick Start Guide
FRONT PANEL CONNECTORS
English
< Plug your headphones into the jack with the headphone icon.
< Plug your guitar into the Guitar Input jack.
REAR PANEL CONNECTORS
Plug a dynamic microphone into the Mic input.
Use the Balanced Outputs to connect to powered speakers or an analog mixer.
Use a 75-Ohm S/PDIF cable to record from the S/PDIF digital output.
Connect an expression pedal, like the M-Audio EX-P, to the Expression pedal jack to control
functions like wah effects.
< Connect momentary pedals, like the M-Audio SP-1, to the P1 and/or P2 jacks to control functions
like Start/Stop, etc.
< Connect the USB connection on the Black Box to your computer with the included USB cable.
< Only use the 9V AC 1000mA power supply included in the package. Using an improper power
supply can damage your unit.
<
<
<
<
IF YOU CANNOT HEAR SOUND:
< Be sure your Input/Playback knob is set appropriately and that your output level knob is turned up.
Also make sure that you are plugged into the proper input jack and the input level knob is turned
up.
< If you can hear drums but not guitar—or you can hear guitar but not drums—check the GTR/DRM
BAL parameter in the Utility menu. A setting of P50 will only provide guitar sound. A setting of D50
will only provide drum sounds. Any setting in between will play a little of both. A middle setting
of EQU means that the output of the drums is equal in volume to the output of the guitar effect. A
setting of SEP means the drum signal will come out of one output, while the guitar effect signal will
come out of the other.
Black Box Quick Start Guide
•
11
WARRANTY
Warranty Terms
M-Audio warrants products to be free from defects in materials and workmanship, under normal use and
provided that the product is owned by the original, registered user. Visit www.m-audio.com/warranty for
terms and limitations applying to your specific product.
Warranty Registration
Thank you for registering your new M-Audio product. Doing so immediately both entitles you to full
warranty coverage and helps M-Audio develop and manufacture the finest quality products available.
Register online at www.m-audio.com/register to receive FREE product updates and for the chance to win
M-Audio giveaways.
Black Box
Tested to comply with
FCC standards
FOR HOME OR STUDIO USE
WARNING: This product contains chemicals, including lead, known to the State of California to cause
cancer, and birth defects or other reproductive harm. Wash hands after handling.
12
•
Black Box Quick Start Guide
M-Audio USA
M-Audio Germany
5795 Martin Rd., Irwindale, CA 91706
Kuhallmand 34, D-74613 Ohringen, Germany
Technical Support
Technical Support
web:
www.m-audio.com/tech
e-mail:
[email protected]
tel (pro products):
(626) 633-9055
tel:
+49 (0)7941 - 9870030
tel (consumer products):
(626) 633-9066
fax:
+49 (0)7941 98 70070
fax (shipping):
(626) 633-9032
Sales
Sales
e-mail:
[email protected]
e-mail:
[email protected]
tel:
+49 (0)7941 98 7000
tel:
1-866-657-6434
fax:
+49 (0)7941 98 70070
fax:
(626) 633-9070
Web
www.m-audio.de
Web
www.m-audio.com
M-Audio U.K.
Floor 6, Gresham House, 53 Clarenden Road, Watford
WD17 1LA, United Kingdom
M-Audio Canada
1400 St-Jean Baptiste Ave. #150, Quebec City,
Quebec G2E 5B7, Canada
Technical Support
Technical Support
email:
[email protected]
e-mail:
[email protected]
phone:
(418) 872-0444
tel:(Mac support):
+44 (0)1765 650072
fax:
(418) 872-0034
tel: (PC support):
+44 (0)1309 671301
Sales
Sales
e-mail:
[email protected]
tel:
+44 (0)1923 204010
phone:
(866) 872-0444
fax:
+44 (0)1923 204039
fax:
(418) 872-0034
Web
www.maudio.co.uk
Web
www.m-audio.ca
M-Audio Japan
M-Audio France
Floor 6, Gresham House, 53 Clarenden Road, Watford
WD17 1LA, United Kingdom
アビッドテクノロジー株式会社 | エムオーディオ事業部
〒 460-0002 愛知県名古屋市中区丸の内 2-18-10
Renseignements Commerciaux
Avid Technology K.K.
2-18-10 Marunouchi, Naka-Ku, Nagoya, Japan 460-0002
tel :
0 810 001 105
カスタマーサポート(Technical Support)
e-mail :
[email protected]
e-mail :
[email protected]
(Macintosh 環境専用):
e-mail
[email protected]
Assistance Technique
PC :
0 0820 000 731
MAC :
0 0820 391 191
Assistance Technique
e-mail :
fax :
Site Web
[email protected]
[email protected]
+33 (0)01 72 72 90 52
www.m-audio.fr
tel :
052-218-0859
(10:00~12:00/13:00~17:00)
セールスに関するお問い合わせ(Sales)
e-mail:
[email protected]
tel:
052-218-3375
fax:
052-218-0875
Web
www.m-audio.jp
060419_BlkBx_QSG_EN02