1
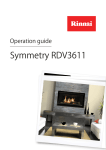
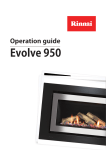
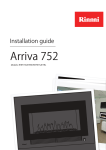
Operation guide
Arriva 752
Important:
Appliance must be installed with a Rinnai approved flue
system.
This appliance shall be installed in accordance with:
-- Manufacturer’s installation instructions
-- AS/NZS 5601
-- Local regulations and municipal building codes
Installation, servicing and repair shall be carried out only by
authorised personnel.
Please retain this manual for future reference.
Warning
Improper installation, adjustment, alteration, service or
maintenance can cause property damage, personal injury
or loss of life.
For more information about buying, living and servicing
of Rinnai appliances call: 0800 RINNAI (0800 746 624)
Rinnai New Zealand Limited
105 Pavilion Drive, Mangere, Auckland
PO Box 53177, Auckland Airport, Auckland 2150
Phone:(09) 257 3800, Fax: (09) 257 3899
Email: [email protected], www.rinnai.co.nz
:
s
t
n
e
cont
About your Arriva 7524
Safety5
Clearances6
General information7
Operation without the remote
8
Operation using the remote
9
Care of your Arriva 752
11
Maintenance and servicing12
Troubleshooting14
Error codes16
Abnormal flame pattern17
Installation checklist18
Installer details18
Limited warranty19
About your Arriva 752
Auto overheat discharge vent
Error display
Displays error
codes
Control panel
Operation indicator*
Indicates operation
status
Timer indicator
Indicates timer
program status
Room air return
On/Off button
Turns the heater
on or off
Room air return
Burn media
Double glazed
frame window
Blockage indicator
for filter and louvre blockages
Remote receiver window for
infra red remote (5 m range)
Louvre, warm air discharge
Room air
return
Beauty and efficiency rolled into one great fireplace. Elegant and stylish—with six beautiful fascia options and
modern quartz or pebble burn media. High performance and resource considerate, the Arriva 752 ensures the
highest heat output for the lowest energy consumption.
* Control panel operating colours; red - on, green - standby, green flashing - error code indication
4 | Arriva 752 Operation Guide: 12219-A 01-12
Safety
Important
This appliance is not intended for use by persons (including children) with reduced physical, sensory or mental
capabilities, or lack of experience and knowledge, unless they have been given supervision or instruction
concerning use of the appliance by a person responsible for their safety.
--
The heater must not be used if the glass or panels are damaged
--
Do not place articles on or against this appliance
--
Do not use or store flammable materials near this appliance
--
Do not modify this appliance
--
Do not spray aerosols in the vicinity of this appliance while it is in operation
Do not restrict warm air discharge
by placing articles in front of the
appliance.
This appliance must not be used
for any other purpose other than
heating.
Do not allow anyone to sit, lean
or sleep directly in front of the
appliance.
Do not place articles on the top
panel or obstruct the automatic
overheat discharge vent.
Do not allow anyone to post
articles through into the heater.
Do not spray aerosols while the
appliance is operating. Most
contain butane gas which can
be a fire hazard if used near the
appliance.
Children should be supervised at
all times to ensure they do not
play with the appliance. Hand or
body contact with the appliance
must be avoided.
Do not unplug the appliance
while it is operating. Do not use
power boards or double adaptors
to operate this appliance.
Arriva 752 Operation Guide: 12219-A 01-12 | 5
Clearances
The clearances listed below are minimum clearances unless otherwise stated.
Clearances around the heater
The appliance must not be
installed where curtains or other
combustible materials (coffee
tables, couches etc.) could come
into contact with the heater. In
some cases curtains may need
restraining.
Floor protection
Heat emanating from this fire may
over time affect the appearance of
some materials used for flooring,
such as, carpet, vinyl, cork or
timber. This may be amplified if
the air contains cooking vapours
or cigarette smoke. To avoid this
occurring, it is recommended that
a mat be placed in front of the
appliance.
250 mm
100 mm
100 mm
1000 mm
Clearances required around the heater when operating
Mantels and surrounds
Mantels and surrounds are allowed
providing they conform to the
minimum clearances shown. These
clearances are important as they:
--
allow heat to escape in the
event of a power failure
during operation
--
allow optimum performance
of the heater (room air return)
--
allow access to the side mesh
filters
Clearance calculation example
At a 75 mm vertical clearance, the
maximum mantel depth is 25 mm.
For every 25 mm of added mantel
depth, there must be an additional
25 mm of vertical clearance. For
example a mantel depth of
100 mm requires a vertical
clearance of 150 mm
Arriva 752 mantel clearances
Arriva 752 surround clearances
6 | Arriva 752 Operation Guide: 12219-A 01-12
General information
Before operation please read these instructions to get an overview of how to operate,
maintain and service your Rinnai gas fire.
Electrical connection
The Arriva 752 is
fitted with a
1.5 m power cord
and 3-pin plug. The
standard electrical
connection is to the right hand
side of the heater front assembly.
If necessary this can be changed
by your electrician to terminate on
the left.
The connection is either direct
wired or connected to a power
point within the cavity. This must
be connected to a dedicated
earthed power point. The electric
isolation switch must be accessible
after the appliance has been
installed. The heater must not
be located immediately below
a socket outlet (potential fire
hazard).
If the supply cord is damaged, it
must be replaced by a licensed
tradesperson. This must be a
genuine replacement part available
from Rinnai, part number 6765B.
Hearths
A hearth is not necessary, but can
be used for decorative purposes
or protection of sensitive flooring
if required. General guidelines if
installing a hearth.
•
It must not obscure the front
of the fire
•
The bottom of the appliance
must be level with the top
of the hearth so there is a
continuous level
•
Size should be at least the
width and depth of the fire
Installation by a licensed
tradesperson
Ensure your installer talks to
you about the use and care of
this appliance, and that you
understand these instructions. The
installer also needs to complete
the appliance installation checklist
and installer details, and leave this
guide with you.
Positioning the Arriva 752
To gain maximum heating
advantage from the bottom air
discharge, position the Arriva 752
close to the floor.
The unit can be fully recessed as
long as the mantel and surround
clearances on the previous page
are maintained.
Power failure
If the power is disrupted while
the heater is operating, once the
power is restored, the heater will
go into power failure mode—on
the control panel there will be
flashing zeros in the error display,
and the LED will flash green.
To reset the heater, press the On/
Off button on the control panel
twice, or use the remote control
and press the Standby/On button
once (to go on standby) and then
a second time to turn the heater
on.
Safety devices
Your Rinnai Arriva 752 is designed
with the following safety devices:
--------
Soot deposits
Small soot deposits inside
the heater or glass is normal.
Significant build up however is not
normal and will require a service
call. Refer to the troubleshooting
section for further information.
TV installation above the
fireplace
If installing a flat
screen television
above the fire,
the main issue is
heat, heat from the
appliance, and heat from the
flueing components that may sit
behind the television (especially if
recessed).
The Arriva 752 has a fan that
distributes warm air at a low level.
This pushes heat out and around
the room as opposed to straight
up, so installation of a television
may be an option. The Arriva 752
also has a power flue that has
virtually zero clearance to any
cavity in which it is installed. The
flueing components are also small
and generate very little heat.
Generally the bottom of the
television recess should be at
least 450 mm above the fire.
Please check with the television
supplier to check clearances. Some
television manufacturers have
warranty conditions that state a
television is not to be installed
above a fireplace.
flame failure sensing system
pressure relief
overheat safety switch
air temperature sensor
thermal fuse
overcurrent fuse
spark detector
Arriva 752 Operation Guide: 12219-A 01-12 | 7
Operation without the remote
Ignition
This appliance has a sealed
combustion chamber that requires
purging before gas can flow and
the unit can start. This means the
combustion fan will start several
seconds before the unit comes on.
Normal ignition sequence:
1. When the On/Off button is
pressed on the control panel,
the LED will glow red and the
combustion fan will start.
2. The ignition sparker will
operate and as soon as a
spark is sensed gas will flow to
the main burner.
3. When the main burner has
established, the heater will
automatically modulate
between the burner settings
to achieve and maintain the
default set temperature of
22 °C.
If the heater is turned off using
the On/Off button on the heater
control panel, when it is turned
back on, it will lose any timer
and clock settings until the
remote is used to re-transmit the
information. The remote stores
the clock, timer, and temperature
settings of the heater.
Do not unplug power supply
Do not unplug the main power
supply to turn the unit off as
the convection fan is required to
operate for several minutes after
the unit is turned off to assist in
cooling the unit down.
8 | Arriva 752 Operation Guide: 12219-A 01-12
Operation using the remote
For the remote control functions to be available, the appliance On/Off button must be in the
on position.
General information about the
remote control
The remote control emits an infrared signal. It must be aimed at the
receiver unit located on the right
side of the unit, normal operating
range is 5 m. Some fluorescent
lights may interfere with the
transmission of the remote signal.
If you experience this problem,
changing position from which
you are operating the remote may
help.
Standby/On
Stops and operates the heater remotely.
Flame
Sets the flame picture.
Extra low
Energy saving room temperature control.
Lock
Locks out control to prevent tampering.
Timer 1
Sets timer program 1.
Timer 2
Sets timer program 2.
Unless the remote display is
deactivated or the lock function is
activated, the remote control will
transmit information to the heater
every time a button is pressed.
Override
Manually overrides current timer
operation.
Time Set
Sets clock and timers.
When the timers are being set,
information is transmitted only
when the ‘Time Set’ button is
pressed.
When the remote is not used for
a period of approximately five
seconds, the display will default
to standby mode, displaying only
the time. To reactivate press any
button on the keypad.
Signal transmissions
Signal transmissions are
confirmed by a brief
illumination of the signal
indicator on the remote.
The unit will also flash and beep
to confirm the settings have been
received.
Batteries
The remote uses
two x 1.5 V AAA
batteries. Never
mix old and new
batteries.
Remove the batteries if the remote
is not going to be used for a long
time. This will help avoid damage
from leaking batteries.
After battery replacement the
clock and timers may need to be
reprogrammed.
Turning the heater on
When the heater is in standby
mode, pressing the Standby/
On button will start the ignition
sequence and the LED will glow
red to indicate that the heater is
operating.
Turning the heater to standby
Press the Standby/On button. This
will turn off the unit and the LED
will glow green to indicate the
appliance is in standby.
Adjusting the temperature
Pressing the up and down buttons
will change the preset temperature
by increments of 1 °C—the
temperature will be displayed on
the remote.
The temperature can be preset to:
• L (low) - continuous
combustion on low
•
16~26 °C (in 1 °C) steps
- combustion rate varies
to maintain the selected
temperature
•
H (high) - continuous
combustion on high
Arriva 752 Operation Guide: 12219-A 01-12 | 9
Setting the clock
The clock must be set
AM
before the timers will
Clock Set
operate.
1. Press the Time Set button
once, ‘Clock Set’ will be
displayed to confirm the
function is initiated. The
remote will show ‘AM 12:00’.
2. Use the up and down buttons
to set AM or PM, then press
the Time Set button once to
start programming the timers.
If you do not want to set the
timers at this point press Time Set
four more times until the display
returns to the time. If no button is
pressed within approximately 90
seconds, the screen will deactivate
and any settings that have not be
transmitted will be lost.
Setting the timers
After the clock has been set and
the Time Set button selected:
1. ‘Timer 1 Set On’ and ‘AM
06:00’ will be displayed. Use
the up and down buttons to
set the desired AM or PM.
Press the Time Set button
once.
AM
Timer 1 Set ON
2. ‘Timer 1 Set Off’ and ‘AM
09:00’ will be displayed. Use
the up and down buttons to
set the desired AM or PM.
Press the Time Set button
once.
AM
Timer 1 Set
OFF
3. To set up Timer 2 repeat the
above steps, or press Time Set
three times to exit the timer
programme.
4. The set On/Off timers will be
displayed briefly to confirm
the settings. When the
programs have been received,
the remote display will revert
to the time mode.
10 | Arriva 752 Operation Guide: 12219-A 01-12
Using the timers
Prior to using the timers ensure
the desired temperature has
been set—refer ‘Adjusting the
temperature’ on the previous
page.
You can view the timer settings
by pressing the Timer 1 or Timer
2 buttons while the heater is
operating. The display will briefly
show the status of each timer,
i.e. Timer 1 On, Timer 1 Off. If
the current time is outside of the
programmed times the heater will
go into standby mode and the LED
will glow green.
To turn the timers off, press the
relevant timer button again. The
heater will return to standby
mode. If there are no timers set
the Timer indictor will go out.
Preheat
The preheat automatically
functions in conjunction with
the timers. The preheat function
ensures the room reaches the
desired temperature by the
programmed on time. This is
achieved by sensing the room
temperature one hour prior to
start.
Override
This is used to manually override
the timers so the heater can be
operated outside of the timer
settings. When override is selected
‘Override’ will be displayed. While
in override mode all remote
control functions, except for the
flame function’ are available until
the next timer setting is reached.
To return to the timer setting,
press the Override button a second
time. If Standby/On is pressed
during override the heater will
revert to standby and the timer
programs will be cancelled.
Extra low
The Extra Low function is useful
in situations when the room
temperature keeps rising even
when the heater is on the lowest
heat setting.
Extra low function off
When the room temperature
reaches the preset temperature,
the heater continues to operate
with the main burner on low
to provide a flame picture with
minimal heat output. In some
cases this may still cause the room
to become warmer than desired.
Extra low function on
When the room temperature
exceeds the preset temperature,
the burner will reduce to an extra
low setting. The burner will return
to normal to maintain the set
temperature.
Flame
The flame function
can be used
Time
approximately 90
seconds after heater
has started. The
flame function is used to select a
desired flame picture and overrides
the automatic mode. There are
seven flame settings available.
Flame
AM
While the heater is in operation,
press the Flame button. The heater
will automatically default to the
last flame picture setting. The
word ‘Flame’ and a series of short
bars will be displayed to show the
flame function is in operation. Use
the up and down buttons to select
the desired flame picture. The
number of bars illuminated will
correspond to your selection.
Should the room temperature
exceed 40 °C while the flame
function is activated, the heater
will switch off—this is a safety
feature.
Lock
This is designed as a child lock
function. When Lock is pressed all
remote functions will be locked,
with the exception of the Standby/
On button (for the purpose of
turning the heater to standby
only). The remote will show ‘Lock’.
To cancel press the Lock button for
three seconds.
Care of your Arriva 752
Your heater needs very little maintenance, however the following information will keep it
looking good and working efficiently.
Important
Switch off the appliance before
cleaning, DO NOT attempt
to clean the heater while it is
operating or hot.
Cleaning the filters
Clean any dust or debris from both
sides of the filters using a vacuum
cleaner, a soft dry cloth, or a soft
brush. NEVER attempt to clean the
filters with water.
DO NOT use solvents, all parts
of the heater and remote can be
cleaned using a soft damp cloth
and mild detergent.
2. Clean the filters.
3. Press the On/Off button to
turn the heater back on.
4. Use remote control to resume
normal operation.
About the filters
The filters of this appliance are
located inside the room air return
doors (side louvres) and consist of
two metal mesh strips.
Filters are located
inside the Room Air
Return doors
The build up of dust on the
filters reduce air flow through
to the heater. This reduces the
heater’s efficiency and can lead
to the appliance shutting down.
Regular filter cleaning during the
heating season will stop this from
happening.
Returning the appliance to
normal after a shutdown
To restore normal operation after a
filter blockage:
1. Press the On/Off button once
to turn off the heater.
Heater shutdown due to filter
blockages
Do not wait for the blockage
indicator (error code 14) to come
on before cleaning the filters. Do
not continue to use the heater
once this indicator is flashing red.
When a build up is detected the
blockage indicator LED, located
above the receiver window, will
begin to flash red to let you know
there is a problem.
Lower louvres
It is important that the warm air
discharge louvres are kept clear of
any obstructions as this will affect
the performance of the heater.
When an obstruction is detected
the blockage indicator LED (above
receiver window) will go red and
the heater will turn down to low
operation (front burner only). To
restore normal operation, remove
the obstruction and use the
remote control to resume normal
heater operation.
Once the indicator light is flashing,
if no action is taken, the heater
will eventually shut down to avoid
overheating. Error code 14 will
be displayed in the error display
window on the control panel of
the unit.
Arriva 752 Operation Guide: 12219-A 01-12 | 11
Maintenance and servicing
All external surfaces of the heater can be cleaned using a soft damp cloth and mild detergent.
Do not use solvents and do not attempt to clean the heater while it is hot or operating.
Rinnai has a
maintenance/
service and spare
parts network
with personnel
who are fully
trained and
equipped to give the best advice
on your Rinnai appliance. Servicing
and repair should only be carried
out by authorised personnel.
If your appliance needs
maintenance/servicing, please call
Rinnai (0800 746 624) from a land
line and select option one for a
service centre in your area.
For reliable operation Rinnai gas
fireplaces should be serviced every
two years, including inspection
of the flue system. If they are in a
particularly dusty environment or
subject to excess lint, for example
dog hair, or where there are newly
laid carpets, then annual servicing
would be beneficial.
Regular maintenance/servicing
is not covered by the Rinnai
warranty.
Do not attempt to carry out any
service work other than that
mentioned in the troubleshooting
section. If you have any other
faults or problems, please refer to
your installer or call Rinnai.
12 | Arriva 752 Operation Guide: 12219-A 01-12
Arriva 752
Troubleshooting
& error codes
Troubleshooting
Check the following information before making a service call as some performance characteristics of
the Arriva are a normal part of operation. If you are still unsure or concerned after reading this section,
please contact Rinnai.
During installation there will be an initial burning in period where some smoke and smell may be
experienced. This is a normal part of the operation.
The appliance is fitted with an overheat safety switch. Under overheating conditions this switch will
shut off the appliance. If the appliance shuts off repeatedly servicing may be required.
Using the heater for the first time, or after a long period of non use
Ignition may not occur the first time it is operated due to air in the gas pipes. If ignition does not occur
within approximately one minute the appliance will attempt to re-light. If ignition does not occur the
unit will switch off automatically. Try operating the heater again if this occurs.
The heater may make noises after ignition or switching off. This is due to the expansion and contraction
of the internal components—this is normal. The heater will not ignite if the On/Off button is pressed
straight after the heater has turned off. It will take approximately 20 seconds before the unit will switch
on again.
Characteristic
When turning
on
Explanation
Warm air does not start when the burner
lights.
The fan starts automatically after a short delay.
This is to allow the appliance to warm up,
helping avoid cold draughts.
Smoke or strange smells are produced
when first operating the appliance after
installation.
This is caused by grease, oil, or dust within the
appliance. This will stop after a short time.
Sharp clicking noises at ignition, or when
the unit thermostat modulates to a lower
or higher setting, or shuts down.
This is expansion and contraction of the heat
exchanger and is a normal part of operation.
During
operation
Clunking noise when the thermostat
operates
This is the sound of the gas valve opening and
closing to regulate the flow of gas.
When turning
off
Fan continues to run after the heater is
turned off.
This is to remove residual heat from within the
appliance. This stops once the unit cools down.
Other
Steam is discharged from the flue terminal High efficiency appliances tend to discharge
outside.
water vapour on cold days—this is normal.
Heater doesn’t start when the Standby/On Check the appliance On/Off button is on. Check
button is pushed (thermostat on high)
timer(s). Timer programmes must be turned off
or overridden for manual operation.
Timers
Timer(s) do not operate at the set time
They may be inactivated or incorrectly
programmed. Check timers are set correctly.
Timer operates for a short time then cuts
out
Room temperature may be higher than the set
temperature. Increase set temperature if desired.
Turn off the Extra Low button if on.
14 | Arriva 752 Operation Guide: 12219-A 01-12
Probable cause Fault condition
No
display
on
remote
No
Burners
ignition
fail to
or control ignite
panel
indicators
Not plugged in
or turned off
•
Mains power
failure
•
Air in gas pipe
when initially
installed
Possible solution
Arriva
Smell of
stops
gas
during
operation
Use power failure
reset procedure p. 7
•
Installer to purge air
from gas supply
•
Remove and clean
filters
•
Isolate gas supply and
contact Rinnai for a
Service Centre
•
Gas escape
•
•
Timer set
Lock set
Gas supply
turned off
Remote lockup due to
signal being
out of range,
incorrectly
aimed, or
obstructed
Plug in power cord or
press On/Off button
•
Filter obstructed
Flat batteries
Remote
control
doesn’t
work
•
Use override button
Cancel lock
Turn gas supply on at
the meter or cylinder
•
Replace batteries in
remote control
•
•
Press the Standby/On
button
Arriva 752 Operation Guide: 12219-A 01-12 | 15
Error codes
The Arriva has self diagnostic electronics that monitor the appliance during start up and
operation.
Should a fault occur the heater will shut down. The fault that has caused the shut down will be
indicated by a pair of flashing digits in the error display window of the control panel, and a green
flashing operation indicator.
Error code
Likely cause
Suggested solution
00
Mains power failure
Reset heater, press the On/Off button twice, or use
remote control and press the Standby/On button once
for standby mode, press the Standby/On button a second
time to turn the heater on.
11
Ignition failure
Check gas supply is turned on, switch heater to standby
and then on again. If ignition failure continues a service
call will be required.
12
Incomplete combustion
As above.
14
Filter blockage/overheat
Clean filters, if error continues a service call is required.
16
Room overheat
Lower room temperature to below 40 °C.
31
Room temperature sensor faulty
Service call.
32
Overheat temperature sensor faulty
Service call.
33
Overheat temperature sensor faulty
Service call.
53
Spark sensor faulty
Service call.
61
Combustion fan motor faulty
Service call.
71
Solenoids faulty
Service call.
72
Flame detection circuit fault
Service call.
73
Communication error
Service call.
16 | Arriva 752 Operation Guide: 12219-A 01-12
Abnormal flame pattern
Each Rinnai Flame Fire has a distinct flame pattern. This should look the same every time you
start your fire, after an initial warm up period of approximately 20 minutes.
Abnormal flame performance and/
or pattern can indicate a problem
with your fire, such as blocked gas
injectors, or that the burn media
has shifted from when the fire
was first installed. There are some
warning signs that could indicate a
problem.
--
Unusual smell from the
appliance
--
Continued difficulty or delay in
establishing a flame
--
Flame appears either very
short or very long
--
Flame only burns part way
across the burner
--
Severe soot building up on the
inside of the glass door1
If any of the above signs occur,
please call Rinnai to discuss.
1
Normal flame pattern
Abnormal flame pattern
Appliances incorporating a live fuel effect, and designed to operate with luminous flames, may exhibit slight carbon deposits—this is
normal.
Arriva 752 Operation Guide: 12219-A 01-12 | 17
Installation checklist
The installer must complete the installation checklist below and make sure this guide is left
with you. They must also instruct you about the use and care of the appliance, and ensure
you understand the safety instructions and operation of the appliance.
Checklist
FF Appliance positioned in a suitable location (clearances, mantels, surrounds etc.).
FF Rinnai flue system installed and tested to ensure effective draw.
FF Gas pressure checked, set, and down rated (if applicable) according to data plate instructions
FF Burn media installed as per instructions.
FF Appliance tested for correct operation and to ensure no gas leaks.
FF Customer instructed on operating procedure and safety requirements.
FF Customer advised to service the heater every two years.
Installer details
Company name:
Installer name:
Address:
Phone:Mobile:
Certificate of compliance number for installation:
Signed:Date:
18 | Arriva 752 Operation Guide: 12219-A 01-12
Limited Warranty
Rinnai brings you peace of mind with a:
2 Year minimum warranty
Terms and conditions
1. During the 24 month period from date
of purchase and subject to clauses 2 and
3 below, Rinnai New Zealand Limited
(“Rinnai”) will, at its own discretion, either
replace or repair any defective product at
no charge to the customer.
2. This warranty covers manufacturing
defects only. This warranty will not
apply if (for example) the product has
been improperly installed or is otherwise
installed contrary to manufacturer’s
recommendations, has been damaged
during or after installation, has not been
operated in accordance with operating
instructions, or has been subjected to
damage or abuse beyond that expected
from conditions of normal use.
3. Warranty claims may be invalid if not
accompanied by details of the installing or
supervising gas fitter’s registration number
and the gas fitting certification number.
All Rinnai appliances meet or exceed the
safety standards required by New Zealand
gas and electrical regulations. The company
is constantly improving its products and as
such specifications are subject to change or
variation without notice.
4. This warranty commences from the date of
purchase. Proof of purchase is required at
the time of any warranty claim.
5. Servicing of the product is to be carried out
by a Rinnai authorised service centre.
RECORD YOUR details
OF PURCHASE BELOW:
ATTACH YOUR PROOF OF
PURCHASE HERE:
Retailer:
Retailer address:
Date of purchase:
Product details:
Please keep these details in a safe place for future reference.
Arriva 752 Operation Guide: 12219-A 01-12 | 19
Experience our innovation
Rinnai.co.nz 0800 746 624
https://www.youtube.com/rinnainz