1
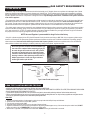
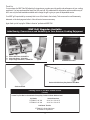
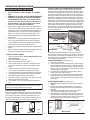
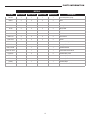
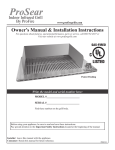
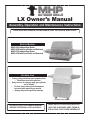
LX Owner’s Manual Assembly, Operation and Maintenance Instructions THIS GAS APPLIANCE IS DESIGNED FOR OUTDOOR USE ONLY. Built-In Models: MHPLX26G without Rear Broiler MHPLX26R with Rear Broiler and Rotisserie MHPLX33G without Rear Broiler MHPLX33R with Rear Broiler and Rotisserie Portable Cart Heavy-duty stainless steel construction Stainless steel side shelves Easy access to storage and gas cylinder on LP model 12-foot hose with quick disconnect included with natural gas model • Heavy-duty locking swivel casters Portable Cart Shown YOU MUST READ THIS OWNERS MANUAL BEFORE OPERATING YOUR GAS GRILL. THESE INSTRUCTIONS SHOULD BE LEFT WITH THE CUSTOMER. KEEP THESE INSTRUCTIONS FOR FUTURE REFERENCE. IMPORTANT SAFEGUARDS DANGER Failure to follow the Dangers, Warnings and Cautions contained in this Owner’s Manual may result in serious bodily injury or death, or in a fire or an explosion causing damage to property FOR YOUR SAFETY If you smell gas: 1. Shut off gas to appliance. 2. Extinguish any open flame. 3. Open Lid. 4. If odor continues, immediately call your gas supplier or your fire department. FOR YOUR SAFETY 1. 2. 3. Do not store or use gasoline or other flammable vapors and liquids in the vicinity of this or any other appliance. An LP cylinder not connected for use shall not be stored in the vicinity of this or any other appliance. Keep any electrical supply and the fuel supply hose away from any heated surfaces. FOR YOUR SAFETY Follow all leak-test procedures carefully in this manual before using. Do this even if the grill was dealer assembled. Do not try to light this appliance without reading the “Lighting” instructions in this manual. WARNINGS -Improper assembly may be dangerous. Please carefully follow the assembly instructions in this manual. -After a period of storage, and/or nonuse, the MHP Grill should be checked for gas leaks and burner obstructions before use. -Do not operate the MHP Grill if there is a gas leak present. -Check all gas connections for leaks with soapy water solution and brush. Never use an open flame. -Minimum clearance of 12 inches from the back and sides of the grill to adjacent combustible construction must be maintained. This outdoor cooking appliance shall not be located under overhead-unprotected combustible construction. -Do not put a barbecue cover or anything flammable on, or in the storage area under the grill. -The utilization of an external electrical source requires that when installed, this outdoor cooking gas appliance must be electrically grounded in accordance with the local codes or, in the absence of local codes, with the National Electrical Code, ANSI/NFPA 70, or the Canadian Electrical Code, CSA C22.1. Keep any electrical supply cord, or the rotisserie motor cord and the fuel supply hose away from any heated surfaces. -Children should never use your MHP Grill. Accessible parts of the grill may be very hot. Keep young children away while it is in use. You should exercise reasonable care when operating your MHP Grill. It will be hot during cooking or cleaning and should never be left unattended, or moved while in operation. -Should the burners go out while in operation, turn all gas valves off. Open lid and wait five minutes before attempting to relight, using the lighting instructions. -Do not use charcoal or lava rock in your MHP Gas Grill. -Never lean over open grill or place hands or fingers on the front edge of cooking box. -Do not enlarge the valve orifices or burner ports when cleaning the valves or burners. -The MHP Grill should be thoroughly cleaned on a regular basis. -Liquid Propane Gas is not Natural Gas. The conversion or attempted use of Natural Gas in a Liquid Propane unit or Liquid Propane Gas in a Natural Gas unit is dangerous and will void your warranty. -Do not attempt to disconnect any gas fitting while your grill is in operation. -Use heat-resistant grill mitts or gloves when operating grill. -California Proposition 65-Warning: The burning of gas cooking fuel generates some by-products which are on the list of substances known by the State to cause cancer or reproductive harm. California law requires businesses to warn customers of potential exposure to such substances. To minimize exposure to these substances always operate this unit according to the use and care manual, ensuring you provide good ventilation when cooking with gas. The installation of this appliance must conform with local codes or, in the absence of local codes, either the National Fuel Gas Code, ANZI Z223.1/ NFPA 54, or CAN/CGA-B149.1,Natural Gas Installation Code or CAN/CGA-B149 2, Propane Installation Code. In Massachusetts: All gas products must be installed using a “Massachusetts” licensed plumber or gasfitter. A “T” handle type manual gas valve must be installed in the gas supply line to this appliance. This applies to permanently installed natural gas and propane installations. This does not apply to propane portable installations using a 20 pound tank. 2 SAFETY INSTRUCTIONS -Never grill without the drip pan in place and pushed all the way to the back of the grill. Without it, hot grease could leak downward and produce a fire or explosion hazard. -Do not locate the grill under overhead unprotected surfaces. Use only in well ventilated areas. Do not use in buildings, garages, sheds, breezeways, or other such enclosed areas. THIS UNIT IS FOR OUTDOOR USE ONLY. -If a cart unit is stored indoors the LP cylinder must be disconnected and the LP cylinder stored outside in a well ventilated area, out of reach of children. -Never use the grill during windy conditions. If located in a consistently windy area, oceanfront, mountaintop, etc., a windbreak will be required. Always adhere to the specified clearances. -Never use a dented or rusty LP tank. -Never place paper inside the grill. -The MHP gas grill is designed for use without lava rock. The use of lava rock or other forms of briquettes may cause a fire hazard. -Never obstruct the flow of combustion and ventilation air to the grill. -Keep the ventilation opening of the cylinder enclosure free and clear from debris. Only original factory parts should be used when repairing your grill. The use of unapproved or untested parts will void your warranty and may cause serious personal harm. LOCATING YOUR MHP GRILL This gas appliance is designed and certified for outdoor use only. Do not locate this grill under overhead combustible surfaces. Do not operate the grill inside a building, garage, recreational vehicle or any enclosed area. When choosing an area, consider exposure to wind, proximity to traffic paths and length of gas supply line. Keep gas supply lines as short as possible to reduce pressure drop. Keep the grill away from windy areas, but keep the grill in a well-ventilated area. Do not obstruct the flow of combustion and ventilation air around the grill. The supporting edges of the grill must be located level and flat. The counter should also be leveled. LP GAS CYLINDER VENTILATION REQUIREMENTS To prevent invisible combustible gas from accumulating in your cylinder enclosure, you must provide adequate ventilation. This is accomplished by having one side of the gas cylinder enclosure left completely open to the outside or by providing four ventilation openings. Two openings are to be at the cylinder valve level (approx 16” above the floor) and on opposite walls of the enclosure. Two more openings must be at the floor level on opposite sides of the enclosure The floor level openings must start at the floor level and shall extend no higher than 5” above the floor. Each opening must have a minimum 10 square inches of free area. To achieve proper ventilation, you must drill a series of holes, omit grout from the masonry joints or replace a brick with a hardware cloth screen. If the floor in the cabinet is raised and the space beneath the cabinet is open to the outside, the lower ventilation openings may be in the floor. For your safety, you must provide these openings for drainage, replacement air and cross ventilation of any storage area exposed to possible leakage from gas connections, the barbecue or propane cylinder. HOUSEHOLD PROPANE SERVICE It is recommended that the same ventilation requirement be used for household propane service as propane cylinders. CLEARANCE TO COMBUSTIBLE CONSTRUCTION A minimum clearance of 12” from the sides and 12” from the back of the grill to adjacent vertical combustible construction must be maintained. CLEARANCE TO NONCOMBUSTIBLE CONSTRUCTION A minimum clearance of 2 1/2” from the back of the grill above cooking surface to non-combustible construction is required to allow the grill hood to open completely. A minimum of 6” clearance to the sides of the grill above cooking surface to non-combustible construction is recommended to provide space for the rotisserie motor and the spit rod. The grill can be installed directly next to non-combustible construction below the cooking surface. . MODEL IDENTIFICATION Your MHP Gas Grill is identified by a model number and a serial number located on the rear of the grill behind the side burners or on the right side behind the faceplate. Always use both the model and serial numbers when contacting MHP about your grill. For future reference, take the time now to record the model and serial numbers below: MODEL NUMBER:__________SERIAL NUMBER:_____________________DATE PURCHASED:_________________ How to contact us: Phone: 888.647.4745, Fax: 800.637.2918, Email: [email protected] or write: Customer Service, Modern Home Products Corp., 150 South Ram Road, Antioch, IL 60002 3 GAS SAFETY REQUIREMENTS Each appliance is set and tested at the factory for the type of gas supply to be used. Identify the type of gas, either natural gas or LP gas and make sure that the marking on the data plate (rating plate) matches the gas being supplied to the grill. The data plate is located on the rear of the grill behind the side burner or on the right side behind the faceplate. An “X” will be marked next to the type of gas that the unit is equipped for. All gas connections should be made by a qualified technician and in accordance with local codes and ordinances. WARNING: CHECK TO ENSURE THAT THE GAS SUPPLY HOSE DOES NOT COME IN CONTACT WITH ANY HOT SURFACE OF THE GRILL. NEVER CONNECT THE GRILL TO AN UNREGULATED GAS SUPPLY. NATURAL GAS HOOK-UP • Check with your local gas utility company or with local codes for instructions on installing supply lines. Be sure to check on type and size of run, and how deep to bury the line. If the line is too small the MHP gas grill will not function properly. Any joint sealant used must be an approved type and be resistant to actions of LP and Natural gases. Do not forget to place the installer supplied gas valve in an accessible location. Check local codes, Consult your local gas dealer. In the absences of local codes, installation must conform to the latest edition of the national Fuel Gas Code ANSIZ223.1/NFPA 54, or CAN/CGA-B149.1, Natural Gas Installation Code or CAN/CGA-B149.2, Propane Installation Code. • The grill is designed to operate on Natural Gas at a pressure of 7” water column (WC) (1.75kPa) unregulated. Check with your gas utility for local gas pressure. Use of your grill at pressures other than approximate 7” water column could affect the performance of your grill and requires installation of a natural gas regulator set at 7” WC. • The grill and its individual shut-off valve must be disconnected from the gas supply piping system during any pressure testing of that system at test pressures in excess of 1/2 psig (3.5kPa). The grill must be isolated from the gas by closing its valves during any pressure testing of the supply system at test pressures equal to or less than 1/2 psig (3.5kPa). Never use LP gas in a unit designed for natural gas. If you wish to convert your grill from one type of gas to the other you may order a gas conversion kit from MHP or your dealer. Connection: 3/8” Flare Male Fitting in Left Rear Corner of Grill. Operating Pressure: 7.0” W.C. Front of Grill Factory Installed 3/8” Male Flare Adapter 3/8” Flare To Gas Supply 4 GAS SAFETY REQUIREMENTS LP GAS HOOK-UP • A dented or rusty LP tank may be hazardous and should be checked by your LP Supplier. Never use a cylinder with a damaged valve. Cylinder dimensions should be approximately 12 inches in diameter and 18 inches high. The LP cylinder must be constructed and marked in accordance with the specifications for LP Gas Cylinders of the US Department of Transportation (DOT) or the National Standard of Canada, CAN/CSA-B339, Cylinders, Spheres and Tubes for Transportation of Dangerous Goods. Only Worthington, Manchester, or Wolfdale brand cylinders should be used with this appliance. • The propane gas cylinder valve must be equipped with a cylinder connection coupling device, described as Type 1 in the Harmonized ANSI standard ANSIZ 21.58 and CGA 1.6-M95-1995 with addenda Z 21.58. This device is commonly described as an Acme Thread Quick Coupler (see Fig. 1 below). The gas must be turned off at the supply cylinder when the unit is not in use. If the appliance is stored indoors the cylinder must be disconnected and removed from the appliance. Cylinders must be stored outdoors in a well ventilated area out of reach of children. • The cylinder supply system must be arranged for vapor withdrawal and must include a collar to protect the cylinder valve. Disconnected cylinders must not be stored in a building, garage, or any other enclosed area. The grill is designed to operate on Propane gas regulated at a gas pressure of 10” water column (W.C.) (2.7kPa). A regulator adjusted to this pressure must be installed in the gas supply line before the grill is connected to the propane source. Use only the type regulator and hose specified by ProFire. NOTE: Hose and Regulator is preassembled to the grill valve at the factory. • Only 20 lb. cylinders equipped with an OPD (Overfill Protection Device) should be used with your MHP Grill. Only one propane cylinder may be located in an enclosure or cart. Extra spare cylinders must be stored outdoors out of the reach of children and outside of any building, garage or other enclosed area. Read and Follow All Warnings Provided with Propane Cylinders. Never locate a cylinder under or near the barbecue unless sufficient ventilation and shielding is provided to prevent any heating of the cylinder, regulator and hose. Do not turn gas valve on unless connection between regulator and tank is complete. Before attempting to light grill, be certain the gas valve knobs are in the “OFF” position, turn tank on by turning knob on top of the tank counterclockwise, check all connections for leaks by spraying or brushing a solution of 50% liquid soap and 50% water. If bubbles appear there is a leak, turn off gas and have a certified gas installer repair the leak. Hand Nut With Acme Thread Hand Wheel Regulator Valve Cylinder QCC-1 Fitting Hose Type 1 Acme Thread Quick Coupler LEAK TEST-CAUTION BEFORE TESTING • NEVER USE THE GRILL WITHOUT FIRST LEAK TESTING THE GAS CONNECTIONS. • WARNING: DO NOT USE OPEN FLAME TO CHECK FOR LEAKS. USE OF AN OPEN FLAME COULD RESULT IN A FIRE, EXPLOSION AND BODILY HARM. • DO NOT SMOKE WHILE PERFORMING THE LEAK TEST! • To prevent fire or explosion hazard, DO NOT use or permit sources of ignition in the area while performing a leak test. Perform leak test outdoors only. • Check to ensure that flexible hoses do not have any cuts and wear that may affect the safety before each use. Only the factory supplied hose and regulator must be used. Use only replacement regulator and hose assemblies specified by MHP Grills. LEAK TEST 1. Prepare a leak testing solution of sudsy water by mixing in a spray bottle with half liquid soap and half water. 2. Confirm that all control knobs are in the “OFF” position. 3. Turn the main gas valve supply “ON” 4. Apply leak testing solution by spraying on the pipe joints, fittings and hose. 5. A gas leak is detected if: A) there is a faint gas smell and/or B) growing bubbles appear on any of the connection points and/or hose, DO NOT attempt to ignite the grill and IMMEDIATELY turn off the gas supply valve. 6. When there is a gas leak, call a qualified service technician. DO NOT use the grill until the leak is corrected. 5 Thank You Your purchase of a MHP Gas Grill attests to the importance you place upon the quality and performance of your cooking equipment. You have purchased the finest Gas Grill ever built. We understand this importance and have made every effort to use only the finest materials available and to design the grill to give you years of dependable service. Your MHP grill is protected by a warranty that is one of the finest in the industry. Take a moment to read the warranty statement on the back page and refer to it should service become necessary. Again thank you for buying the “Made in America” professional MHP Grill. MHP Grill Upgrades Available Adds Beauty, Convenience and Versatility to Your Outdoor Cooking Enjoyment (B) (A) A. Double Side Burner, 30,000 BTU’s B. Single Side Burner, 15,000 BtU’s C. Drop-In Single Side Burner, 14,000 BTU’s (C) All-Weather Grill Cover Rotisserie Kit With Heavy-Duty Stainless Steel Motor Aluminum Griddle Finishing Touch To Your MHP Outdoor Kitchen (Trim Kits) Counter Top Trim Kits Are Constructed of Heavy-Duty Commercial Grade Stainless Steel Grill Heads PFTRIM26 For 26” Grill PFTRIM33 For 33” Grill Cut-Out Dimensions 26 3/4” W x 10”H x 20”D 33 3/4” W x 10”H x 20”D Side Burner Trim Kits PFTRIMDS For Double Side Burner PFTRIMSS For Single Burner 6 BUILT-IN SPECIFICATIONS Built-In Grill Unit NOTE: Enclosure Must Be Constructed Of Non-Combustible Materials. Consult the table below for enclosure cut-out dimensions. NOTE: Area directly beneath the grill must be open. No solid surface. CAUTION: An enclosure for LP Gas Cylinder must be vented on the level of the cylinder valve and at floor level. The effectiveness of the opening(s) for purposes of ventilation must be determined with the LP Gas Cylinder in place. This should be accomplished by one of the following: A. One side of the enclosure should be fully open; or for a cylinder enclosure having four sides, a top and a bottom, and intended for installation in a built-in enclosure: 1. At least one (1) ventilation opening shall be provided on the exposed exterior side of the enclosure located within 5 inches of the top of the enclosure and unobstructed. 2. At least one ventilation opening should be provided on the exposed, exterior side of the enclosure 1 inch or less from the floor level. The upper edge should be no more than 5 inches above the floor level. 3. Every opening should have a minimum dimension so as to permit the entrance of 1/8 inch rod. ENCLOSURE TOP VIEW 2” Minimum Clearance to Allow Lid To Fully Open ENCLOSURE FRONT VIEW Cut-Out B Cut-Out Front to Back FLOOR A Left to Right Description of Measurement ENCLOSURE CUT-OUT DIMENSIONS MHPLX26 MHPLX33 A Horizontal Width Of Opening 26 3/4” 33 3/4” B Horizontal Depth Of Opening 20” 20” C Vertical Depth Of Opening 10” 10” GENERAL SPECIFICATIONS C Top to Bottom MODEL MHPLX26 26 Inch Gas Grill 400 Sq. In. Cooking Area Burner Rating 35,000 BTU Overall Width 26 1/2” Overall Height 10” Overall Depth 24 1/2” 7 MODEL MHPLX33 33 Inch Gas Grill 560 Sq. In. Cooking Area Burner Rating 46,000 BTU Overall Width 33 1/2” Overall Height 10” Overall Depth 24 1/2” ASSEMBLY INSTRUCTIONS The MHP Grill is produced fully assembled and tested in the factory and requires no major assembly in the field. For the purpose of safe shipping and transit, some parts such as the Flavor Plates, Cooking Grids and Rotisserie components are wrapped inside the grill and require minor assembly. Check to ensure that all packaging material have been removed prior to grill operation. Assembly Grill Head to Portable Cart 1. 2. 3. Remove drip pan from grill head. Lay grill head on its back for attaching side shelves (Fig. A). Remove Protective white film from shelves. Attach side shelves to grill head using 4 1/4-20 x 1/2” Philips head bolts and 4 KEP nuts on each side (Fig. A). Align grill head to top of cart and attach using 4 1/4-20 x 1/2” Philips head bolts and 4 KEP nuts (Fig. B). 4. Fig. A INSTALL FLAVOR PLATES and COOKING GRIDS 1. 2. Put Flavor Plates into the grill above the burner. Place the Cooking Grids directly above the Flavor Plates. Fig. B Warming Rack Assembly Align tabs of warming rack with slots in rear of grill head. Insert tabs in slots and press down to lock in position. Tabs GREASE COLLECTOR TRAY (Drip Pan) 1. Slide tray into track and all the way to back. NOTE: never operate grill without the drip pan in place. GETTING TO KNOW YOUR GRILL Gas Collector Box Ignitor Probe Burner HEAT INDICATOR 1. Valve Place Heat Indicator through hole in lid and attach using wing nut provided. Manifold 8 Ignitor Wiring OPERATING INSTRUCTIONS CAUTION: CAREFUL AS THE BURNER MAY BE VERY HOT! If the burners do not operate correctly, check if the air shutter or burner ports are blocked by dirt, debris, spider webs, etc. and proceed with air shutter adjustment. The amount of air which is drawn into a burner is governed by a metal cup at the inlet of the burner called an air shutter. It is locked in place by a screw, which must be loosened prior to lighting the burner for adjustment. To access the grill burner air shutters, first remove the control panel by removing the screws on the corners of the control panel (Fig. 2). Remove the control knobs. Pull the control panel outwards while unplugging the ignitor (Fig 3). With a screwdriver, loosen the screw on the side of the air shutter. Light the burner and adjust according to the directions below (Fig. 4). Access and adjustment of the side burner and rear burner (when equipped) air shutters is done in the same manner as the main burners. BEFORE LIGHTING THE GRILL DO NOT ATTEMPT TO LIGHT THE GRILL IF YOU SMELL GAS. WARNING! IT IS CRITICAL THAT THE GAS BURNERS ARE PROPERLY INSTALLED WITH THEIR ORIFICES INSIDE THE BURNERS AIR SHUTTERS. If not properly installed, gas may leak outside of the burner that could lead to fire, potential damage to your grill and bodily injury. (Please refer to Fig. 1 for correct burner installation) Inspect the gas supply piping or hose prior to turning the gas “ON”. If there is evidence of cuts, wear, or abrasion, it must be replaced prior to use. The replacement pressure regulator and hose assembly for the LP unit must be the type specified by MHP. Do not use the grill if the odor of gas is present. The pressure regulator and hose assembly supplied with the unit must be used. If the unit is LP, screw the regulator and hand tighten to the valve of the cylinder and leak check the hose and regulator connections with a soap and water solution before operating the grill. Reference page 5 for leak test procedure. Always keep your face and body as far away as possible when lighting. Refer to spiders and insects warning and procedure under the cleaning and maintenance page of this manual. CONTROL PANEL SCREWS Cross Holes Facing Up MAIN BURNER GOOD FLAME Air Shutter Fig. 4 Fig. 1 Orifice Rear Broiler Side Burner BLUE BAD FLAME Orifice Manifold LIGHTING REAR BURNER (If Equipped) (Fig. 5) 1. Open The Lid. Push and turn the rotisserie burner control to “LIGHT”. 2. Push the ignitor button (marked rotisserie). You will hear a snapping sound indicating that a spark is being delivered to the burner. 3. If the burner does not light in 4 seconds, turn the knob to “OFF” and wait 5 minutes before try to light again. 4. If the ignitor does not light the burner it may be lit with a long stemmed match or match holder. Hold the match next to the burner then turn burner control knob to “LIGHT”. Remove and extinguish the match quickly when the burner lights. YELLOW BLUE Shutter Set Screw LIGHTING SIDE BURNER (If Equipped) (Fig. 4) 1. Remove the burner cover. 2. Push and turn the burner control knob to the “LIGHT” position and immediately push ignitor button for 4 seconds or until the burner is lit. If the burner does not light in 4 seconds turn the burner to “OFF” and wait at least 5 minutes for the gas to dissipate before trying to light again. 3. The side burner can also be lit with a long match or match holder if ignitor fails to light the burner. 4. To light with a match or match holder, hold the lighted match next to the burner ports and turn the burner control knob to “LIGHT”. Remove and extinguish the match quickly when the burner lights. ADJUSTING FOR PROPER FLAME Each burner is tested and adjusted at the factory prior to shipment. However, variations in the local gas supply or conversion from one gas to another may make it necessary to adjust the burners. On the main burners and side burners the flames should be blue and stable with yellow tips and no excessive noise or lifting (Fig. 1). YELLOW Fig 3. A yellow flame indicates insufficient air: Open the air shutter to allow more air to the burner. Flame is noisy, blows out, or lifts away from the burner or will not light, this indicates too much air. Close the air shutter. Once the air shutter is adjusted turn the burner off and reverse steps to reassemble. TO LIGHT THE GRILL BURNER 1. Open the grill lid completely. Do not attempt to light the grill with the lid closed. 2. Open the gas supply shut-off valve. 3. Push and turn the burner knob to “LIGHT”. 4. Push the ignitor button for 4 seconds. You will hear a snapping sound, indicating that a spark is being delivered to the burner. 5. If the burner does not light in 4 seconds, turn the knob to “OFF” and wait 5 minutes before repeating steps 3 and 4. 6. To light burners using a long stemmed match or match holder. Insert lighted match through the cooking grid to the burners below the flavor plates and turn knob to “LIGHT”. 7. If grill does not light, turn all knobs to “OFF” and have a qualified service technician check the grill. 8. Turn all knobs to “OFF” and shut off gas supply when not in use. NOTICE: On the initial use, light the grill and let it run on “HIGH” for 15-20 minutes to burn off any residues from the factory. Burner Flame Fig . 2 Fig. 5 Fig. 4 9 MATCH LIGHT USING YOUR MHP GRILL TO BEGIN: 1. Be sure the drip pan is in place and pushed all the way to the back of the grill. 2. Light the burners using the instructions given. 3. Turn the control knobs to “HIGH” and allow the grill to PREHEAT for 15 minutes or until desired temperature is displayed on the thermometer. The lid is to be closed during the grill preheat period. 4. Place the food on the grill and cook to the desired temperature doneness. Adjust heat setting, if necessary. The control knob may be set to any position between “HIGH and “LOW”. 5. Turn all knobs to “OFF” and shut off gas supply when you are finished grilling. 6. Allow grill to cool and clean the drip pan and cooking grids after each use. HEAT SETTINGS: HIGH: Used for quick searing of meats and vegetables. MEDIUM: Grill steaks, pork chops and hamburgers. You may also sear meats on Medium and finish cooking them on LOW. LOW: Used for cooking dense vegetables, roasts, thick cuts of meat, poultry and fish. SUGGESTIONS FOR SUCCESSFUL GRILLING Never leave food unattended. Cooking with the lid closed will decrease cooking time, provide an even temperature, conserve gas, lessen flare-ups and improves flavor. When opening the lid, wear a barbecue mitt that covers your wrist. Stand to the side of the grill and lift the lid handle slowly. Apply salt to meat only after cooking to prevent it from drying out. Baste meat with barbecue sauce or other sugar-based sauces only during the last few minutes of cooking to prevent burning. Turn food only once, halfway through cooking time. Use a long handle spatula or tongs to turn meat instead of piercing with a prong to prevent juices from escaping. Brush vegetables, lean cuts of meat, skinless poultry, fish and seafood with oil to prevent sticking. If using bamboo skewers, soak the skewers in cold water for 30 to 45 minutes before cooking time. To burn off grease after cooking, operate the grill on high for 10 minutes or until it stops smoking. When the grill cools down, brush the cooking grids with a brass wire brush and remove and clean the drip pan. Grilling requires high heat for searing and proper browning. Most foods are cooked at the highest heat setting for the entire cooking time. However, when grilling large pieces of meat or poultry, it may be necessary to turn the heat to a lower setting after the initial browning, this will cook the food completely through without burning the outside. Foods cooked for a long time or basted with a sugary marinade may need a lower heat setting near the end of the cooking time. The doneness of the meat whether rare, medium, or well done, is affected to a large degree by the thickness of the cut. Trim any excess fat from the meat before cooking. To prevent steaks or chops from curling during cooking, slit the fat around the edges at 2-inch intervals. When defrosting meats, it is recommended that it be done overnight in a refrigerator as opposed to a microwave as the microwave can dry out or even partially cook the meat. ROTISSERIE and REAR BROILER (if equipped) (Fig. 6) The rear broiler is an infrared type, which provides intense searing radiant heat. Preferred by professional chefs over other methods, this intense heat is perfect for searing in the natural juices and nutrients found in quality cuts of meats. When lit, the rear broiler will reach cooking temperatures in about 3 minutes. The orange/red glow will even out in about 5 minutes. GRILLING TECHNIQUES Direct For grilling/searing steaks, chops, burgers, sausages, fish filets, chicken parts or shish kabobs. Your MHP Gas Grill is designed to cook with the lid closed. Close lid to finish grilling and to retain natural juices and moisture. Use high heat for quick searing and more of a char flavor. Indirect (using 2 outside burners) For roasts, ribs, hams, whole chicken, turkey, game or whole fish. Using the indirect heat method, turn on right and left burners with center burner off, then place food over the center unlit burner. Indirect (with water pan) Fill an aluminum foil pan with water or other ingredients, (such as wine, juices, herbs, spices, etc.). Center the pan on the flavor plates to moderate the temperature and to add moisture and flavor. The cooking juices from the food drops into the water pan creating a savory water vapor from which the foods absorbs flavor and moisture. Pan Roasting To cook large cuts of meat, pot roast, turkey, whole chickens or ham in natural juices or seasoning. Place aluminum roasting pan on top of cooking grids. For extra flavor, add your favorite vegetables, wine or juices, garlic and onions to the drip pan. Use the liquid to baste or as a gravy. Smoke (addition of wood chips or chunks) Ordinary meat, whole fish, poultry and game becomes a taste sensation when smoked. Using the water pan technique and your hard wood soaked in water for several hours. Place wood in a convenient MHP reusable stainless steel smoke box directly on flavor plates alongside of water pan. Rotisserie (if equipped, or is available as an accessory) Poultry, lamb, beef and pork retain their flavor when spit-roasted. Meat is rotated over the heat keeping it constantly bathed in its own juices, ensuring that all sides become done at one time. A drip pan can be used to collect the drippings for basting or gravy. The rotisserie motor is equipped with gears capable of turning up to a 25-lb. cut of meat or poultry. The motor is mounted to a stainless steel bracket, which attaches to the left side of the grill. The rotisserie motor must be electrically grounded in accordance with local codes or, in the absence of local codes, with the National Electrical Code, ANSI/NFPA 70-1990. WARNING: This appliance is equipped with a three-prong (grounding) plug for your protection against shock hazard and should be plugged directly into a property grounded three-prong receptacle. Do not cut or remove the grounding prong from this plug. The spit rod for the rotisserie fits into the motor assembly by placing the pointed end into the motor and the other end on the support at the left side of the grill. With the spit rod pushed in as far as possible into the motor, the grooved spit rod bushing should rest on the right side bracket. The removable handle should only be in place when handling the spit rod. Fig. 6 To load the spit rod begin with the handle in place, and slide one of the meat holders with prongs facing away from the handle onto the rod. Push the rod through the center of the food, then slide the second meat holder with prongs towards the food onto the rod. Center the food on the rod then push the meat holders firmly into the food. Tighten the wing nuts. Once the food is secure insert the spit rod into the motor. It is normal for the spit rod to flex when large cuts of meats are being cooked. NOTE: After the first use, it is likely that the stainless steel above the burner will darken to a dark blue color. The electric motor should be removed and stored in a dry place when not in use. WARNING: Do not use the Rear Broiler and the bottom burners at 10 the same time! COOKING TIMES A Quick Reference BEEF Hamburgers Steaks Tenderloin Thick Thick 3” Diameter 3-5 Minutes Per Side 4-10 Minutes Per Side* 30-40 Minutes PORK Chops Tenderloin (whole) Ribs 3/4-1” Thick 2” Diameter Half Rack 8-10 Minutes Per Side* 20-25 Minutes* 1 Hour 30 Minutes.-2 Hours Ham Steak 1” Thick 10-15 Minutes Per Side Flattened to 1/2” 3-5 Lbs. 5-6 Lbs. 1 1/2-2 Lbs. 20 Lbs. 4-5 Lbs. 3/4-1 Lbs. 8-10 Per Side 28-32 Minutes 16-20 Minutes 20-25 Minutes 35-40 Minutes 80-90 Minutes 40-50 Minutes 2 Hours 45 Minutes-3 Hours 2 Hours 30 Minutes-3 Hours 45-55 Minutes 1”-1 1/4” Thick 12-14 Minutes MEDIUM Brush oil on food and grids before grilling VEGETABLES Corn (with husks) Summer Squash and Zucchini (halves) Winter Squash Bell Peppers (whole) Portabella Mushrooms (whole) 20 Minutes 10-13 Minutes 1 Hour 10-15 Minutes 12-15 Minutes MEDIUM MEDIUM Brush with oil before grilling INDIRECT (MED) brush with oil before grilling MEDIUM MEDIUM brush with oil before grilling FRUIT Apples (whole) Pears (halved) 35-40 Minutes 10-14 Minutes INDIRECT (MED) MEDIUM brush with oil before grilling, skin side down POULTRY Chicken (boneless breast) Chicken (bone-in breast) Chicken (bone-in legs) Chicken (bone-in thighs) Chicken (halved) Chicken (whole) Cornish Hens Turkey (halved) Turkey Breast (boneless) Turkey (bone-in legs and thighs FISH and SEAFOOD Fish Fillets MEDIUM MEDIUM Med-Low Turning Occasionally MEDIUM Medium-Low Turning Occasionally Medium for 5 Minutes Bone Down, Turn Heat to LOW and Turn Every 30 Minutes MEDIUM MEDIUM MEDIUM MEDIUM MEDIUM MEDIUM MEDIUM-LOW MEDIUM-LOW MEDIUM-LOW INDIRECT MEDIUM-LOW *Sear at “HIGH” up to 2 minutes per side, finish at “MEDIUM” Safe Minimum Cooking Temperatures CATEGORY Ground Meat & Meat Mixtures Fresh Beef, Veal Lamb Poultry FOOD TEMP. (°F) REST TIME** Beef, Pork, Veal, Lamb, 160 None Turkey, Chicken 165 None Steaks, Roast 145 None Chops 146 3 minutes Chicken & Turkey, Whole 165 None Poultry Breasts, Roasts 165 None Poultry Thighs, Legs, Wings 165 None Duck & Goose 166 None Stuffing (cooked alone or in Bird) 167 None Pork and Ham Fresh Pork 145 3 minutes Fresh Ham (raw) 145 3 minutes Precooked Ham (to reheat) 140 None Sausage Fresh Bratwurst, Italian & Polish 170 None Eggs & Egg Dishes Eggs………...Cook Until Yolk and Whites Are Firm None Egg Dishes 160 None Seafood Fin Fish 145 (Cook Until Flesh is Opaque And Separates easily With a Fork) (Cook Until Flesh is Pearly And Opaque) Shrimp, Lobster, and Crabs (Cook Until Shells Open During Cooking) Clams, Oysters, and Mussels (Cook Until Scallops Turn Milky White or Opaque and Firm ) Scallops **After removing food from the grill, allow it to rest for the specified amount of time. During the rest time, its temperature remains constant or continues to rise, destroying harmful bacteria. The above are only guidelines, as personal taste and weather conditions differ greatly. We know you’ll enjoy many of these suggested guides when creating your own favorites to outdoor cooking 11 CARE AND MAINTENANCE Stainless Steel Exterior General Maintenance Grill Burner Inspection: Inspect the grill burners for spiders and insects once a year or if the grill has not been used for more than a month. Inspect the grill burners if the grill does not reach temperature, heats unevenly or flames appear yellow along with the smell of gas. Never clean the stainless steel exterior when it is hot. After the initial grilling, certain areas of the grill may discolor. This is a normal discoloration caused by the intense heat given off by the burners. After the grill has cooled, routine cleaning is done with warm soapy water applied with a sponge or soft cloth. Always rinse with clean hot water and wipe dry with a soft cloth. Specks of grease can gather on the surface of the stainless steel and get baked-on. These stubborn stains can be removed with a mild non-scratching abrasive household powder. Add a small amount of vinegar to the scouring powder to increase its potency. Always scrub in the direction of the grain. Commercial stainless steel cleaner and polishers also work well, such as MHP’s Stainless Steel Cleaner (Part #SSC). Do not use steel wool to clean stainless steel. NOTE: Over time the stainless steel will turn a mild gold patina from the grill’s heat. This is normal. WARNING: Spiders and other insects can nest and spin webs in the burner venturi tubes which causes the gas to flow from the front of the burner. This dangerous condition can cause a fire behind the control panel, damaging the grill and making it unsafe to operate. To remove spider webs and/or other obstructions, you must clean out the venturis. This should be done routinely if the grill has sat idle for extended periods. Also, if you live in an area where spiders are plentiful, you should clean the venturis often, especially in the fall when there is an increase in egg sack production. Follow Burner instructions under Interior Cleaning. Grill Interior Cleaning Turn all grill burners on “HIGH”. Do not turn on the Rotisserie Burner if Equipped. Let the grill heat for 15 minutes or so with the lid closed. Turn burners “OFF” and allow the grill to cool completely. Cooking Grids: After the grill has cooled, use a brass bristle long handle brush to scrub the cooking grids. Wipe out the inside of the grill with a sponge, SOS pad and water. A putty knife can be used to scrape off thicker debris. Drip Tray: The drip tray will collect grease from the grill area and spills from the side burners. Do not attempt to remove or clean until thoroughly cooled. Slide the tray out and wipe it clean. Make sure the drip tray is fully inserted back into the grill. To avoid a grease fire, the drip tray should be cleaned after every use. Burners: The burners are constructed of stainless steel and should only require minimal maintenance. However, they should be checked every 6 months and cleaned if needed. 1. Shut off gas supply and make sure the grill is cool before attempting to check the burners. 2. Remove the cooking grids, then lift out the flavor plates. 3. Remove the mounting screw holding the burner in place then lift the burner up and forward so that the burner is pulled away from the valve. 4. Clean the exterior of the burner with a wire brush. Clear any clogged gas ports with a straightened paper clip. Shake out any debris through the air shutter. Orifices: No regular maintenance should be needed for the orifices. They should only be removed if it is determined that there is a blockage. Flavor Plates: The flavor plates should be cleaned regularly as it has grease and other debris falling directly on to it. Keeping it clean will greatly reduce flare-ups and grease fires. TO CLEAN; Be sure the grill is cool. Remove the cooking grids and lift out the flavor plates. Brush with a steel wire brush until all the carbon build up and other debris are removed. Replacing The Burners: Slide the end with air shutter over the brass orifice. Then place the burner onto the mounting bracket and replace the screw. The burners have an offset hole for mounting to the rear bracket, which will allow the burner to be installed with the crossover holes facing up. Once reinstalled, light all of the burners and check for proper flame. (Refer to page 8) WARNING: Serious injury may occur if the orifice is not located properly seated into the burner. Ignitor System If you experience an occasional “No-Spark, No Light” condition here’s a check list to troubleshoot the problem 1. Inspection: WITH GAS OFF, position a mirror along side of the gas collector box and press ignitor button. Observe the condition of the spark. (Low light conditions are the best for seeing the spark). 2. If there’s a good spark, but the grill won’t light, gas may not be flowing to the burner and into the collector box. The gas orifice or the venturi tube may be blocked. 3. If a weak spark arcs down around the ceramic insulator, the insulator should be cleaned. 4. If there is no spark in the collector box, check the wire connections at the ignitor and electrode under the grill. 5. Check spark, by pulling connector wire from the collector box. Hold wire end about 1/8” from grill metal part and operate ignitor. Check for spark. If there is no spark, first replace the battery, if there still isn’t a spark, replace the electronic ignitor. If there is a spark the electronic ignitor is okay. 6. Make sure ignitor button module is tight on the control panel. If it is loose a good ground will not be attained. SPARK MODULE BEZEL + BATTERY REPLACEMENT 12 “AAA” BATTERY PUSH BUTTON GETTING TO KNOW YOUR MHP GAS GRILL Some Questions and Answers. There is really no mystery to gas grill cooking. The best of two worlds are combined in the use of a gas grill, the flavor of charcoal cooking and the convenience and heat control of your kitchen oven. Let’s look at some of the most commonly asked questions about gas grill cooking: Can I Get That Charcoal Flavor? The fact is that charcoal does not flavor your outdoor meal, but is only a heat source. The MHP Gas Grill utilizes a special metal flavor plate above the burners that heats up fast and spreads the heat evenly. The delightful backyard taste that comes with barbecue cooking is caused by meat drippings falling on the heat source where they are vaporized to rise and add outdoor flavor to the food. What Control Settings Should I Use? The greatest cause of gas grill cooking failures is excess heat. Understanding the three basic heat setting (High, Medium, Low) along with experience, you will find the precise heat you need will become easier and easier to achieve. HIGH-Is used primarily for preheating and cleaning. It may also be used for quick searing of meats, such as steaks and chops. MEDIUM-For broiling or quick cooking foods. Also use MEDIUM for searing foods that have been cooked at LOW, for more of a smoke flavor. LOW-Most foods should be cooked at LOW. Even thick steaks, which have been seared on both sides at HIGH, will finish with better texture and more juices at LOW. All roasts, poultry, rotisserie and smoke cooking should be at LOW. Do I Cook With The Lid Open Or Closed? Like your kitchen oven, the MHP Gas Grill is designed to cook with the lid closed, except for quick searing. Cooking with the lid closed helps food retain natural juices, moisture, enhances flavor and keeps annoying flare-ups to a minimum. Also, heat is reflected from the lid, and meat cooks not only from below, but, evenly on all sides from circulating hot air, (similar to convection oven) for faster, more fuel efficient cooking Can I Cook More Than One Thing At A Time? You can prepare entire meals in the MHP Gas Grill…and you’ll love it even more. Baked potatoes, corn-on-the-cob, stuffed tomatoes, peppers, squash, vegetables, garlic bread, baked apples, pies...grill them on the warming rack or alongside the meat for complete menus. When And How Do I Use A Meat Thermometer? Use an oven-safe meat thermometer when cooking large pieces of meat, poultry and game to determine if cooked adequately. The thermometer should be inserted into the thickest part of the meat. For accurate temperature reading, the tip of the thermometer should not touch fat layers, bone or gristle, or if using the rotisserie, the spit rod. What Utensils Should I Use? Always use long handle forks, spatulas or tongs, designed especially for outdoor cooking when testing or turning food on your grill. Keep hot pads or mitt handy for removing food from cooking grid. For juicy more flavorful meats, use tongs when handling and turning. Piercing the meat with a fork allows juices to escape. Can I Use Aluminum Foil? Aluminum foil is probably the most convenient accessory of all. Foil can be used to cook food on or in. It also serves as a drip pan and heat deflector. Vegetables cook best when wrapped in foil. Foil holds in natural liquids, and foods cook moist and tender. Delicate foods such as fish fillets and seafood may be cooked on foil placed directly on the cooking grid. When spit-cooking foods of uneven shape, smaller parts that may cook too fast, may be wrapped in foil. When Should I Use Seasoning and Sauces? Salt, which tends to dry out foods, is best added after cooking. Sauces and marinades add a special taste treat when grilled. Marinades are popular because they turn less expensive cuts of meat into tasty entrees. Large items such as roasts should be marinated at least 8 hours or overnight. Fish, poultry and ribs may be marinated successfully in an hour or two. Food in the marinade should be turned occasionally and kept cool under refrigeration. Sugar-based glazes and sauces will burn faster and should be brushed on during final stages of cooking or used as a table sauce. Can I Cook Frozen Food? For best results, thaw all meat in the refrigerator. This allows for juicier, more flavorful meats. However, very good results can be obtained by cooking your steaks while still frozen. Just remember to allow more cooking time. The microwave oven provides an alternative for thawing your meat, although it is our least recommended method. Fish and vegetables can be successfully grilled frozen. How Economical Is A Gas Grill? You will save on your utility bill using a gas grill instead of conventional oven or charcoal cooking. Less energy for air-conditioning, fewer dishes to wash and no charcoal or starter fluid to buy. Charcoal grilling costs 30 times more than natural gas and 10 times more than propane gas to cook an average meal. Handling Food Safely Always thaw your frozen products in the refrigerator. Never thaw at room temperature. Do not use the same cutting board or platter for raw meats and cooked meats. Wash hands, utensils, cutting boards and counters that contact raw food. Cook meats to the proper degree of doneness; Never serve ground meats rare or raw. Do not allow cooked meats to stand at room temperature. Always refrigerate leftovers immediately. 13 TROUBLESHOOTING Problem Cause The smell of gas with burner flames appearing yellow. The gas grill does not reach temperature. Check for spiders or insects. Spiders and insects can nest in the burner of this or any grill, and cause a disruption in the flow of gas from the burner. This is dangerous and can cause a fire behind the control panel, damaging the grill and making it unsafe to operate. Check air shutter adjustment. Check burners for clogged gas ports. The gas grill heats unevenly. The burners make popping noises. Yellow or orange flame and the smell of gas. Check 1. 2. 3. Blockage in the venturi tube or orifice. Orifice not seated properly in the venturi Tube. Bent or kinked hose. 1. 2. 3. Burner does not light or flame is low in HIGH position. 1. 2. 3. Could be a kink in the gas supply line. LP tank could be low or empty. LP regulator excess flow feature has been activated. 1. 2. 3. Clean venturi (See section “Annual Maintenance”). Orifice must fit into venturi tube at least ¼” to ½” Check gas supply line. Also, check all connections. Straighten Refill LP cylinder Turn grill control knobs off, close LP tank valve and reopen valve slowly. Wait 5seconds before turning on grill valves Erratic flame pattern from burner or flame is low Dirty burner when burner control knob set at HIGH or flames do not run the whole length of burner. Clean burner PORT holes with a small pin. Be careful not to enlarge holes Constant flare-ups 1. 1. 2. 3. 4. Grill too cold before start of cooking. Cooking grid or flavor plates may be heavily coated with burned-on grease. Fatty foods. Heat setting too high. 2. 3. 4. You should always pre-heat grill for 5 to 10 minutes before cooking. Clean cooking grids. Clean Flavor Plates. Trim excessive fat from fatty meats. Lower heat setting. Flavor plates have turned black. This is normal. Grease is burned on flavor plates. Scrape with wire brush and scrub with soap and water. Food sticks to cooking grid. 1. 2. 1. Cooking grid is probably too hot. Food being turned before sear lines are produced. 2. Flame blows out. Lower heat setting. Grids transfer heat quickly. You’ll need to experiment with heat setting to get the best results. Or use a non -stick cooking spray. Time food to turn over only once. During periods of high wind and sometimes while cooking on a low setting, flame may be extinguished. 1. Discoloring of the Stainless Steel Due to extreme cooking temperatures over time stainless steel will turn a mild gold patina. Follow cleaning instruction in the Maintenance section. Grill does not get hot. 1. 2. 1. 2. 3. See low flame above. On natural gas, inadequate pressure at grill. Incorrect orifice. 2. 3. On cart models, simply turn away from wind. Increase the heat setting. See low flame above. Check pressure. Should be at or near 7" water column. Check orifice size. CAUTION: If problems can not be corrected using these methods, contact your local MHP dealer for assistance. 14 PARTS INFORMATION MODELS Part No. MHPLX26G MHPLX26R MHPLX33G MHPLX33R Description GGTG4 1 1 1 1 Round temperature gauge KKK10 3 3 4 4 Knobs LX-106 2 2 3 3 Gas collector box LX-125 2 2 3 3 Cooking Grids LK-29 3 3 4 4 Flavor Plates LX-39 1 1 1 1 Drip Pan LX-68 1 1 1 1 Manifold PERF-137 3 3 4 4 Burner Orifice PF80-10LX 3 3 4 4 Burners PF80-3828S 2 2 3 3 Electrode W/28” Ignitor Wire PERF137-101 1 1 Bushing for Rotisserie PERF13710H 1 1 Rotisserie Bracket PERF137-S14-4 1 1 Infrared Rear Broiler Burner PF80-100 2 2 Rotisserie Mear Forks PF80-99 1 1 Rotisserie Spit Rod PF80-98 1 1 Rotisserie Spit Rod Handle PFR06 1 1 Rotisserie Motor PF80-34R 1 1 Electrode for Rear Broiler 15 WARRANTY Modern Home Products Corp. hereby warrants to the Original Purchaser of the MHP Gas Grill that it will be free of defects in material and workmanship from the date of purchase as follows: 10-YEAR (against rust-through) Stainless Steel Bodies, Smoker Tops, Lids, Carts, Cooking Grids, Stainless Steel Burners 5-YEAR (against rust-through) Infrared Rear Burner 3-YEAR (against rust-through) Stainless Steel Flavor Plates, Manifold Assemblies 1-YEAR Ignition System, Drawer Slides, Knobs, Grill Accessories When assembled and operated in accordance with the printed instructions accompanying it. MHP requires reasonable proof of your date of purchase. Therefore, you must retain your sales slip or invoice. This warranty is in effect for all grills purchased after November 1, 2006. This Limited Warranty shall be limited to the repair or replacement of parts, which prove defective under normal use and service and which on examination, shall indicate, to MHP’s satisfaction, they are defective. Warranty is for parts only. There is no warranty for labor. Before returning any parts, contact the MHP Customer Service Department. If MHP confirms the defect and approves the claim, MHP will elect to replace such parts without charge. If you are required to return defective parts, transportation charges must be prepaid. MHP will return parts to the purchaser, freight or postage prepaid. This Limited Warranty does not cover failures or operating difficulties due to accident, abuse, misuse, alteration, misapplication, vandalism, improper installation or improper maintenance or service, or failure to perform normal and routine maintenance, including but not limited to damage caused by insects within the burner tubes, as set out in the owner’s manual. Deterioration or damage due to severe weather conditions such as hail, discoloration due to exposure to chemicals either directly or in the atmosphere, hurricanes, earthquakes, tornadoes, or acts of God are not covered by this Limited Warranty. Discoloration of Stainless Steel is normal and is not covered by this Warranty. There are no other express warrants except as set forth herein and any applicable implied warranties of merchantability and fitness are limited in duration to the period of coverage of this express written Limited Warranty. MHP is not liable for any special, indirect or consequential damages. MHP does not authorize any person or company to assume for it any other obligation or liability in connection with the sale, installation, use, removal, return, or replacement of its equipment; and no such representations are binding on MHP. Implied warranty shall not extend beyond the duration of this written warranty. This warranty is in lieu of all other warranties expressed or implied and all other obligations or liability in connection with the sale of this appliance. 150 South Ram Road, Antioch, Illinois 60002 Ph: 847.395.6556 • 888.647.4745 Fax: 847.395.9121 • 800.637.2918 Email: [email protected] • www.mhpgrills.com One Quality Modern Home Products Leads To Another Everglow Stainless Steel Grills First in Grill Replacement Parts Charcoal or Gas MHP configuration, ProFire and Phoenix are registered trademarks of Modern Home Products Corporation ©2013 Modern Home Products Corp. #MHPLX 4/13 Outdoor Lighting Printed in U.S.A.