1
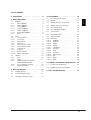
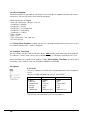
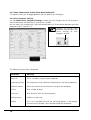
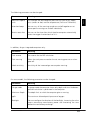
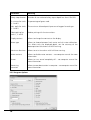
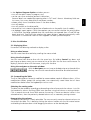
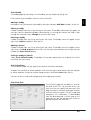
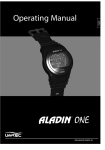
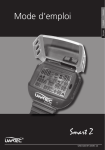
Deutsch
Français
English
User Guide
SmartTRAK
®
SWISS MADE BY UWATEC AG
Dive window
Dive information
panel
Dive profile
panel
Dive
computer
display
Tissue
panel
Alarm
symbols
Physiology
panel
Notes panel
Dive table
2
UWATEC® SmartTRAK
List of chapters
4
2. Menu Description . . . . . . . . . . . . . . . .
4
2.1 Logbook . . . . . . . . . . . . .
2.1.1
New Logbook . . . . . .
2.1.2
Open Logbook . . . . . .
2.1.3
Save Logbook . . . . . .
2.1.4
Import Logbook . . . . .
2.1.5
Export Logbook . . . . .
2.1.6
Renumber Logbook . .
2.1.7
Print . . . . . . . . . . . . .
.
.
.
.
.
.
.
.
.
.
.
.
.
.
.
.
.
.
.
.
.
.
.
.
.
.
.
.
.
.
.
.
.
.
.
.
.
.
.
.
.
.
.
.
.
.
.
.
.
.
.
.
.
.
.
.
.
.
.
.
.
.
.
.
.
.
.
.
.
.
.
.
4
4
5
5
5
5
6
6
2.2 Dives . . . . . . . . . . . . .
2.2.1
Transfer Dives . . . .
2.2.2
Insert Dive . . . . . . .
2.2.3
Delete Dive . . . . . .
2.2.4
Edit Dive . . . . . . . .
2.2.5
Insert Partner Profile
2.2.6
Clear Partner Profile
2.2.7
Select Dives . . . . . .
2.2.8
Statistics . . . . . . . .
2.2.9
Dive Template . . . .
2.2.10 Adjust Time Zone . .
.
.
.
.
.
.
.
.
.
.
.
.
.
.
.
.
.
.
.
.
.
.
.
.
.
.
.
.
.
.
.
.
.
.
.
.
.
.
.
.
.
.
.
.
.
.
.
.
.
.
.
.
.
.
.
.
.
.
.
.
.
.
.
.
.
.
.
.
.
.
.
.
.
.
.
.
.
.
.
.
.
.
.
.
.
.
.
.
. 7
. 7
. 8
. 8
. 8
. 9
. 9
. 9
. 9
. 10
. 10
.
.
.
.
.
.
.
.
.
.
.
.
.
.
.
.
.
.
.
.
.
.
2.3 Options . . . . . . . . . . . . . . . .
2.3.1
Units . . . . . . . . . . . . . . . .
2.3.2
Layout . . . . . . . . . . . . . . .
2.3.3
Show Temperature Profile/
Show Workload Profile . . .
2.3.4
Dive Computer Settings . .
2.3.5
Program Options . . . . . . .
. . . . . . 10
. . . . . . 10
. . . . . . 11
. . . . . . 12
. . . . . . 12
. . . . . . 14
3. Dive List Window . . . . . . . . . . . . . . . . 15
3.1
Displaying Dives . . . . . . . . . . . . . . . . 15
3.2
Customizing the Table . . . . . . . . . . . . 15
3.3
Selecting a Group of Dives . . . . . . . . 16
UWATEC® SmartTRAK
4. Dive Window . . . . . . . . . . . . . . . . . . . 16
4.1
Dive Information Panel . . . . . . . . . . . 17
4.2
Markers . . . . . . . . . . . . . . . . . . . . . . 17
4.3
Adding Remarks to the Dive . . . . . . . 18
4.4
Adding Pictures to the Dive . . . . . . . . 18
4.5
Dive Profile Panel . . . . . . . . . . . . . . . 18
4.6
Dive Computer Display . . . . . . . . . . . 19
4.7
Tissue Panel . . . . . . . . . . . . . . . . . . . 19
4.8
Physiology Panel . . . . . . . . . . . . . . . . 20
4.9
Alarm Symbols . . . . . . . . . . . . . . . . . 20
4.10 Edit Dive . . . . .
4.10.1 Logbook . .
4.10.2 Dive Site . .
4.10.3 Wreck . . . .
4.10.4 Buddy . . . .
4.10.5 Conditions .
4.10.6 Gas/Tank . .
4.10.7 Gear . . . . .
4.10.8 Activities . .
4.10.9 Type of Dive
4.10.10 Fish . . . . . .
4.10.11 Notes . . . .
4.10.12 DAN . . . . .
.
.
.
.
.
.
.
.
.
.
.
.
.
.
.
.
.
.
.
.
.
.
.
.
.
.
.
.
.
.
.
.
.
.
.
.
.
.
.
.
.
.
.
.
.
.
.
.
.
.
.
.
.
.
.
.
.
.
.
.
.
.
.
.
.
.
.
.
.
.
.
.
.
.
.
.
.
.
.
.
.
.
.
.
.
.
.
.
.
.
.
.
.
.
.
.
.
.
.
.
.
.
.
.
.
.
.
.
.
.
.
.
.
.
.
.
.
.
.
.
.
.
.
.
.
.
.
.
.
.
.
.
.
.
.
.
.
.
.
.
.
.
.
.
.
.
.
.
.
.
.
.
.
.
.
.
.
.
.
.
.
.
.
.
.
.
.
.
.
.
.
.
.
.
.
.
.
.
.
.
.
.
.
.
.
.
.
.
.
.
.
.
.
.
.
.
.
.
.
.
.
.
.
.
.
.
.
.
.
.
.
.
.
.
.
.
.
.
.
.
.
21
21
21
22
23
23
23
24
24
25
25
26
26
5. Hardware and Software Requirements 26
5.1
Installing an IrDA Device . . . . . . . . . . 26
5.2
Establishing IrDA Connection . . . . . . . 27
6. FAQ / Troubleshooting . . . . . . . . . . . . 27
3
English
1. Introduction . . . . . . . . . . . . . . . . . . . .
1. Introduction
SmartTRAK is an advanced tool for keeping track of your dives.
With SmartTRAK you can:
• Keep a dive log at your computer containing information about your dives.
• See the depth, temperature and workload variations of your dive.
• See how the relative gas saturation varies in different tissues during the dive.
• Print your logbook.
• Generate statistics about your dive.
• Set different criteria for the dives to be displayed with SmartTRAK’s advanced dive select
feature.
• Add pictures to your dive and write notes and remarks.
• Replay the dive computer screen during different stages of the dive.
2. Menu Description
2.1 Logbook
2.1.1 New Logbook
Choose Logbook/New and enter a name for a new SmartTRAK logbook. The new logbook will open up in the main window.
You can now start to add your dives, either by downloading from your
Uwatec SmartTRAK compatible dive computer or by importing a logbook in DataTrak format.
4
UWATEC® SmartTRAK
Choose Logbook/Reopen to select a previously opened logbook from a list that SmartTRAK
creates as you open different files.
2.1.3 Save Logbook
When changes to a logbook are made, they are automatically saved to the active logbook.
Therefore a logbook does not need to be saved when exiting the program.
With Logbook/Save as.. command, a copy of the logbook can be saved under a different
name. The Logbook/Save as.. command compacts the logbook too.
2.1.4 Import Logbook
You can import old and new logbooks and view old dives together with your new dives.
Importing a SmartTRAK logbook
Under Logbook/Import choose SmartTRAK Logbook in the file types. Choose the file and
press Open.
Importing an old style logbook (DataTrak)
Under Logbook/Import choose DataTrak Logbook in the file types. Choose the file and
press Open.
Importing a Windows CE / Pocket PC based PDA logbook (TravelTrak)
Under Logbook/Import choose TravelTrak CE Logbook in the file types. Choose the file and
press Open.
Importing a Palm OS based PDA logbook (TravelTrak Palm)
Under Logbook/Import choose TravelTrak Palm Logbook in the file types. Choose the file
and press Open.
2.1.5 Export Logbook
You can export dives to another SmartTRAK logbook or to other formats.
Exporting to a SmartTRAK logbook
Mark the dives in the logbook that you would like to export.
Choose Logbook/Export and enter a new filename; or choose an existing logbook and press
Save. The dives are now transferred to the new logbook.
Exporting a Windows CE / Pocket PC based PDA logbook (TravelTrak)
In the logbook, mark the dives that you would like to export.
Enter a new filename or choose an existing logbook to overwrite and press Save. The dives are
now exported to the TravelTrak logbook.
Exporting a DL7 file
You can export dives in two different DAN (Divers Alert Network) formats: DL7 level 1 or DL7
level3. Level 1 includes just the profile data but level 3 includes diver’s personal information and
also detailed description of the dive.
Mark the dives in the logbook that you would like to export. Choose Logbook/Export and
enter a new filename or choose an existing file to overwrite and press Save. The dives are now
exported to DL7 format.
UWATEC® SmartTRAK
5
English
2.1.2 Open Logbook
Choose Logbook/Open to open up an existing logbook. The currently open logbook will be
saved and closed.
Exporting an Excel file
You can export dive profile(s) into a new or existing Excel file. Each dive profile is saved to a
separate sheet. The sheet includes the following columns: dive time, depth, temperature, tank
pressure (gas integrated computers only) and RBT (gas integrated computers only). Note: if a
sheet with the same name exists already in the Excel workbook, it will be replaced with the
exported sheet and all the old data on the sheet will be lost.
Exporting dives into Excel file is only possible if Microsoft Excel is installed on the PC.
Exporting a dive profile as text file
You can export one dive profile at a time as text file. The file includes the following columns: dive
time, depth, temperature, tank pressure (gas integrated computers only) and RBT (gas
integrated computers only). This file can then be imported into other applications for further
processing.
2.1.6 Renumber Logbook
Logbook/Renumber allows you to change the starting number of the first dive in the
logbook. When you insert new dives or delete existing ones, the logbook is automatically
renumbered using the given starting number. If no number is given, SmartTRAK uses the
default starting number of one.
Choose Logbook/Renumber and enter a number for the first dive. SmartTRAK will renumber
the whole logbook for you.
Renumbering is done by date and time. Oldest dive is assigned the lowest number.
2.1.7 Print
Logbook/Print allows you to print the logbook, statistics or a dive profile.
Choose Logbook/Print to open the print window.
6
UWATEC® SmartTRAK
Printing a logbook
Select Logbook. Only the columns which are visible in the Dive table window will be printed.
If not all columns fit on the paper, the rightmost ones are left out. The printed column widths
can be adjusted by adjusting column widths on the Dive table window.
Printing the statistics for dives
Select Statistics. Select the kind of statistics you would like to print by checking the
appropriate statistics types.
Previewing a dive profile/logbook/statistics
Press the Preview button to preview the print out in a preview window.
Profile scale
1 means that the dive profile will span the whole sheet.
0.9 means that the dive will span 90 % of the sheet.
Grey scale dive profile
If you have a black and white printer, with this option you can enhance dive profile graphics
printing quality.
Font size
The font size for the logbook and statistics print out can be selected with this option. Default
value is 10. Decreasing the number will decrease the font size. Smaller font size will enable
more logbook columns to fit on the page.
Font color
The font color for the logbook and statistics print out can be selected with this option.
Select…
Press Select… to select what dives and pertinent information to be printed out.
2.2 Dives
2.2.1 Transfer Dives
Use Dives/Transfer to transfer
the dives from your dive computer.
You can transfer all dives or new
dives only. When all dives are
transferred, each transferred dive
is checked against dives in the
logbook and if it exists already,
the transferred dive is discarded.
See section 5.1 on how to set-up
and configure an IrDA device if
you do not have an IrDA
device installed.
UWATEC® SmartTRAK
7
English
Printing a dive profile
Select Dive Profile.
Transferring new dives
Press Dives/Transfer to bring up the transfer window. Choose Only new dives to transfer
new dives only.
Transferring all dives
Press Dives/Transfer to bring up the transfer window. Choose All dives to transfer all dives
in the dive computer.
You can use the dive template (section 2.2.9) to define a default buddy, gear, type, activity
and fish when the dive is created.
Discard dives shallower than
You can select this option and define a minimum depth for transferred dives. All dives which
are shallower than the set limit will not be written into the logbook after transfer (this option
allows to discard shallow pool training dives).
2.2.2 Insert Dive
Dives/Insert allows to create a new and empty dive in the logbook and to manually edit the
details.
Choose Dives/Insert to insert a new dive.
You can use the dive template (section 2.2.9) to define a default buddy, gear, type, activity
and fish when the dive is created.
2.2.3 Delete Dive
Use Dives/Delete to delete dive(s) from the logbook. To delete several dives, you must first
select them. If you have not selected dives, only the dive shown is deleted.
Choose Dives/Delete or choose Delete from the keyboard to delete the dives. Next, in the
confirmation window you have to choose Yes.
Note! You cannot undo a delete. If the dive is still in your dive computer then you can download the dive again, else the information is lost.
2.2.4 Edit Dive
Dives/Edit opens up the logbook page of the edit window. You can use edit to add additional
information for the dive, which you have loaded from the dive computer. Or you can fill all dive
information for user created logbook entries.
In the Edit window you can change the following dive information: Logbook, Dive Site, Wreck,
Buddies, Conditions, Gas/Tank, Gear, Activities, Type of dive, Fish, Notes, DAN
8
UWATEC® SmartTRAK
Select the directory and logbook name from which to load the dives, then select the dive
number.
You can add as many profiles to your graph as you like.
If there is an offset in the starting time, you can shift the partner profile with the help of the
‘Shift profile’ panel buttons.
Note that your partner’s profile is not saved in the logbook.
2.2.6 Clear Partner Profile
Choose this option to remove the last inserted partner profile. The partner profile(s) are also
cleared if you view another dive in the logbook.
2.2.7 Select Dives
Use the select window to select a set of dives to display. You can choose among different
criteria.
Choose Dives/Select to open up the select window. You can build selection criteria based on:
dive numbers, date of the dives, depth, your dive buddy.
Or you can select on the basis of the place, weather, gear, suit, activity, type or fish.
2.2.8 Statistics
The Statistics window counts and displays important information about your dives.
Among other things you can show:
• how many dives you did at different locations
• what types of dive you have made
• how many dives you did in different depth ranges
• what gear you used during the dives.
Statistics can be sorted by values of a selected column in normal or reverse order. Just click the
header of the column and SmartTRAK sorts statistics using that column as sorting criteria. Click
a second time and SmartTRAK reverses the sorting.
UWATEC® SmartTRAK
9
English
2.2.5 Insert Partner Profile
You can temporarily show the dive profile(s) of your diving buddy/buddies together with your
own.
2.2.9 Dive Template
The dive template lets you define a dive from which settings are copied whenever you insert a
new dive or you transfer dives from the dive computer.
Following settings are copied:
• Dive site information: location, site, etc.
• Conditions / Weather
• Conditions / Surface
• Conditions / Air Temperature
• Conditions / Underwater
• Conditions / Visibility
• Gear / Weight
• Gear / Suit
• Tank information: size, type, etc.
• All DAN settings
In the Dives/Dive Template window you can turn the dive template feature on or off. Or you
can choose the dive that is used as template.
2.2.10 Adjust Time Zone
You can correct the date and time of your dive(s) after reading them from your dive computer.
This feature is meant to be used if you have been diving in a different time zone than usual.
Select the dive(s) you would like to update. Choose Dives/Adjust Time Zone and enter how
many days, hours and minutes that should be added or subtracted.
2.3 Options
2.3.1 Units
The units used by SmartTRAK are configurable and can be changed on
the fly.
You can change the following units in SmartTRAK:
Depth
Pressure
Temperature
Volume
Weight
Coordinate
SI-units
[metre]
[bar]
[Celsius]
[Litre]
[kg]
ddºmm.mmm’
Imperial units
[foot]
[psi]
[Fahrenheit]
[Cft]
[Lbs]
ddºmm’ss.ss”
The settings are saved when you exit the program.
10
UWATEC® SmartTRAK
You can also configure the dive Profile Cursor (vertical line, cross or diver) and change the background colour of the dive window or the dive profile cursor colour.
Changing the cursor colour
The leftmost colour button is for changing the Cursor Colour. The cursor colour can be
changed only for the vertical line and for the cross cursor, not for the diver cursor. Both
cursors will have the new colour.
Changing the dive profile background colour
The rightmost colour button is for changing the Background colour. Each different background
style (light to dark, dark to light and constant colour) can have an individual colour. The colour
can be selected by selecting first the background type and then activating the colour dialog
with the colour button.
Colour dialog box
The colour dialog box allows you to change the background or cursor colour. A colour can be
selected in one of the following ways:
• from the Basic or Custom colours by clicking one of them.
• by giving the RGB value as numbers or by giving hue, saturation and luminosity as numbers.
• by clicking the colour matrix (square spectrum area) for selecting the colour and clicking the
luminosity bar (right of the colour matrix) to select the lightness/darkness of the colour.
You can save newly created colours as custom colours for later selection. This can be done by
first selecting the cell for the Custom Colour, then selecting the colour with one of the above
described methods and then pressing the Add to Custom Colours button.
UWATEC® SmartTRAK
11
English
2.3.2 Layout
You can change the default layout of SmartTRAK in the Options/Layout window. You can
choose what panes are displayed when the program starts and you can set the remarks panel
font size.
2.3.3 Show Temperature Profile/Show Workload Profile
This option allows you to toggle between the two profiles on the display.
2.3.4 Dive Computer Settings
Via the Options/Dive Computer Settings window you can change many of the settings in
the dive computer and read the ID and version numbers.
You can access this window only if you have established an IrDA connection between your dive
computer and PC (section 5.2).
Changes to settings take
effect only after you push the
“write settings to dive
computer” button.
The following information is displayed:
Parameter
Meaning
Smart ID
This is a number unique to your computer.
Hardware revision
The hardware revision identifies the electronics and the components.
Software version
Shows the version of the software running on the computer.
# Dives
Total number of dives.
Dive time
Total dive time with this dive computer.
Amb. pressure
Ambient air pressure.
Battery
This is an estimated value of the remaining power in the battery.
If the remaining charge is low, consider replacing the battery.
12
UWATEC® SmartTRAK
Parameter
Meaning
Metric or imperial
units
This changes the dive computer pressure units (bar or psi), depth
units (meters or feet) and the temperature (Celsius or Fahrenheit).
Attention beeps
You can turn all the warning sounds on and off together or set
some specific warnings on and off individually.
Premix reset after
You can set the time after which the dive computer automatically
resets the oxygen fraction back to 21%.
English
The following parameters can be changed:
In addition, for gas integrated computers only:
Parameter
Meaning
Tank reserve
Gas reserve for the RBT calculation.
Tank warning
When the tank pressure reaches the set warning pressure an alarm
goes off.
Work sensitivity
Sensitivity of the increased gas consumption warning.
On some models, the following parameters can be changed:
Parameter
Meaning
Gauge mode
In gauge mode the computer shows only depth and time. No decompression calculation is performed in the computer.
Maximum Depth
The depth limit at which the computer gives a warning.
ppO2
The maximum allowed partial pressure of oxygen.
Backlight
You can configure the duration of the backlight. Increasing the value
means consuming more battery power and shortening the time
before the next battery exchange.
UWATEC® SmartTRAK
13
Parameter
Meaning
Safety stop duration
Duration of user activated safety stop at depth less than 6.5m/20ft.
O2 mixture for tanks
1, 2 and D
O2 percentage of gases used.
Max. ppO2 for tanks
1, 2 and D
The maximum allowed partial pressure of oxygen for each gas.
Delete pairing for
tanks 1, 2 and D
Deletes pairing with the transmitters.
Display contrast
Allows to change the contrast on the display.
Water type
Allows to choose between fresh water and salt water calibration.
This affects only the displayed depth, not the accuracy of the
decompression calculations or MOD warning.
Maximum dive time
Allows to set a time alarm with half-time warning.
Water contacts
Allows to disable water contacts – see computer manual for more
information.
Buzzer
Allows to turn sound completely off – see computer manual for
more information.
Remaining
saturation
Allows to reset desaturation in computer – see computer manual for
more information.
2.3.5 Program Options
14
UWATEC® SmartTRAK
3. Dive List Window
3.1 Displaying Dives
Use one of the following methods to display a dive:
Using a wheel mouse
You can move from dive to dive by scrolling the mouse wheel.
Using the dive logbook
You can move from dive to dive with the arrow keys. By holding Control key down and
pressing up or down arrow, you can move to first or last dive. You can also use the mouse. To
display a particular dive with the mouse, simply click the dive.
Using the navigator on the main window
With the Navigator you can jump to the beginning or to the end of the
dive log. You can also move one dive forward or one dive backward.
3.2 Customizing the Table
The Dive Table grid can be easily modified to accommodate needs of different divers. All the
modifications below, except the sorting order, are automatically saved. Note that all these
modifications below affect the logbook print out as well.
Selecting the sorting order
The dives can be sorted by ascending or descending values of one particular column. Just click
the header of a column and SmartTRAK sorts the dives using that column as sorting criterion.
Click a second time and SmartTRAK reverses the sorting. If there are identical values in the
selected column, then the previously selected column acts as secondary sorting criterion.
Reorganizing the columns
The order of the columns is freely selectable. The user can easily move less relevant columns to
the end of the table. This is done by clicking the column header with the left mouse button
and holding the button down while dragging the column to the desired place.
UWATEC® SmartTRAK
15
English
In the Options/Program Options window you can:
• turn off the splash screen at program start;
• set the user name and other personal information;
Personal details are needed for exporting dives in DL7 level 3 format. Mandatory fields are:
last name, first name, date of birth and phone number;
• choose which alarms should be shown in the dive window;
• turn off tooltips;
• turn off markers on the dive profile;
• set on/off or limit automatic generation of bookmarks on the profile (not all models);
• set logbook import options. With these options you can control whether the existing dives
in SmartTRAK should be updated when the same dives are imported from a TravelTrak logbook. And with TravelTrak Palm whether the import dialog is opened automatically when
SmartTRAK is started and TravelTrak Palm logbook has been synchronized prior.
Adjusting the width of columns
The width of each column can be adjusted by placing the cursor at the right edge of the
column header. The standard cursor changes to vertical bar cursor. Click the header with the
left mouse button and hold the button down while stretching the right edge of the column to
the desired width.
Setting which columns to show
Right click over the grid to invoke a pop-up menu in which you can activate or deactivate the
columns.
3.3 Selecting a Group of Dives
You can select several dives for importing, exporting, adjusting the time zone or for deleting
dives. If no dives are selected, then the above functions will act on the current dive.
To select a block of successive dives
Hold down the Shift key and select the first and last dive by clicking them with the left mouse
button. If you need to scroll the dive table page, use the scroll bar on the right. Do not use any
other means (mouse wheel etc.). The dives (rows) selected will have a different colour (default
is blue) and a small dot on the leftmost column.
Alternatively hold down the Shift key and select dives with the up or down arrow keys.
To select individual / scattered dives
Hold down the Control key and select individual dives by clicking them with the left mouse
button. If you need to scroll the dive table page, use the scroll bar on the right. Do not use any
other means (mouse wheel etc.). The dives (rows) selected will have a different colour (default
is blue) and a small dot on the leftmost column.
4. Dive Window
The dive window shows the dive profile, dive computer display, saturation of tissues, physiological
data, remarks, dive pictures, fish pictures and other information about the dive.
Dive computer display, tissues and physiological panels can be set on or off as a group.
Remarks panel and dive picture panel can both be set on or off individually. This can be done
either from the layout window, which has more advanced features, or from a pop-up menu
(see below).
Pop-up menu
The dive window pop-up menu can be activated by clicking the right mouse button over the
dive window. The pop-up menu gives the following selection:
• Marker: insert, edit, delete
• View: set on or off dive pictures, fish pictures, remarks or dive
computer display, tissues and physiology panel or select between
temperature and workload profiles
• Cursor: dive profile cursor selection
• Background: dive profile background style selection
16
UWATEC® SmartTRAK
English
4.1 Dive Information Panel
The top panel is called the dive information panel. It shows the following information:
• number of dive
• date of dive
• dive site
• dive location
• MB-level during the dive
• altitude class
• buddies
• weather and conditions
• gear
• tank data
• type of dive
• dive computer buzzer
To update the information on the information panel, the edit window can be opened by
clicking the icons or editable data on the panel.
The buzzer panel (see picture) shows alarms (red star) and warnings
(yellow star), which have occurred during the dive. Warnings that have
been turned off are shown with a gray star. OFF indicates that the
sound was turned off completely. Note that the buzzer panel is not
visible with dives imported from DataTrak.
The arrow tip button at the lower left corner of the information panel can be used to
enlarge/shrink the panel.
4.2 Markers
Markers can be added to the dive profile to mark special events that
happen during the dive. Each marker can be from a minimum of one
to a maximum of 50 characters long.
Marker
Add marker
To add a marker, move the dive profile cursor to the point where the marker should be added.
Click the right mouse button to activate a pop-up menu, then select Marker. Select Insert and
a small window will open in which you can enter the marker text. The position of the marker
can be freely selected over the dive profile graph by dragging the marker window to the
desired place.
Click OK to place the marker in the chosen spot. To exit from the marker window without
placing the marker, click Cancel.
Edit marker
Marker text can be moved to a new location by pressing the left mouse button over the text
and holding it down while dragging the text to the new location.
Marker text can be altered by pressing the right mouse button over the text and selecting
Marker and then Edit from the pop-up menu. This opens the same window as Add marker
above. Note that the Cancel button cancels only changes made for the text, but not the
changes made for the placement.
UWATEC® SmartTRAK
17
Delete marker
A marker can be deleted by pressing the right mouse button over the text and selecting
Marker and then Delete from the pop-up menu.
4.3 Adding Remarks to the Dive
You can write and edit remarks for every dive if the remarks panel is active. The remarks panel
can be activated from the layout window or from the dive window pop-up menu. The remarks
panel font size can be adjusted from the layout window only.
Remarks can be edited on the Edit page too.
4.4 Adding Pictures to the Dive
You can add and view pictures for every dive if the picture panel is active. The picture panel
can be activated from the layout window or from the dive window pop-up menu. The picture
panel has its own pop-up menu, which enables to load/insert a new picture into the picture
panel, delete pictures from the panel and view them in full size in a separate window. Dive
picture panel and fish picture panel alternate; they cannot be shown at the same time.
Note that only a link to the picture file is saved in the logbook, therefore after inserting a
picture to the logbook, do not rename it or move it to a different directory or delete it.
Otherwise SmartTRAK cannot find it and display it any more. If you move the dive picture
folder to another location, you can correct the links by inserting one picture from the new
location to the collection and SmartTRAK will correct automatically all broken links for the dive
pictures which it can find from that folder.
4.5 Dive Profile Panel
The dive profile panel shows some information about the dive at the top and the dive profile
below it.
The information shown at the top is the following:
• left: interval and immersion time
• middle left: maximum depth and dive time
• middle right: average depth and CNS after the dive
• right: desaturation time and time at end of dive
The average gas consumption and maximum gas consumption (gas integrated computers only)
is shown to the right of average depth and CNS. For Smart TEC the average gas consumption
includes all tanks and the maximum gas consumption is indicated for the tank which had the
highest instantaneous consumption. Gas consumption information can be displayed only if the
tanks are defined under section 4.10.6.
The dive profile shows the depth as a function of time. It also shows the water temperature or
workload (gas integrated computers only). Water temperature is not shown for dives imported
from DataTrak.
The Maximum Operating Depth (MOD, function of the set ppO2max) is shown with a thick
black line, if the depth scale allows to show it. Normally the line is constant for the whole dive.
For Smart TEC the MOD is individual for each tank and the line can have a step after each tank
switch.
18
UWATEC® SmartTRAK
4.6 Dive Computer Display
The dive computer display shows you the face of the dive computer as it appears during the
different stages of the dive.
For dive logs imported from DataTrak a default screen is shown. Tank information is displayed
only for gas integrated computers.
For detailed information about the contents of the display(s), please refer to your dive computer
operating manual.
To make the display symbols more readable, activate the option “Smooth edges of screen
fonts” from the Windows Control Panel / Display / Appearance / Effects.
4.7 Tissue Panel
This graph shows the different tissues. Tissue
half times increase from left to right. The
graph shows the relative saturation with
respect to the ambient pressure. 100% marks
the maximum allowed saturation.
A red colour indicates on gassing.
A green colour indicates off gassing.
A purple colour indicates over saturation.
UWATEC® SmartTRAK
19
English
Zoom and pan the profile
With the help of zoom and pan buttons you can enlarge small details
in your dive profile.
4.8 Physiology Panel
This graph shows estimated micro bubble
formation (left), estimated skin temperature
cooling (middle) and estimated workload
(right). For gas integrated computers this
panel also shows the gas consumption gauge
if the tank has been defined and there is a
non-zero tank pressure difference between
beginning and end of dive.
4.9 Alarm Symbols
The following alarm symbols appear at the bottom of the dive profile display:
S
L
O
W
CNS
Excessive ascent rate
The icon indicates that an ascent rate of 110% has been reached or
exceeded.
Oxygen toxicity
The icon indicates that the oxygen toxicity of 75% / 100% has been
reached.
Missed deco stop
The icon indicates that the diver has ignored decompression stop.
ppO2
L
Oxygen partial pressure
The icon indicates that the set value of ppO2 (default is 1.4 bar) has
been reached or exceeded.
Missed level stop
The icon indicates that the diver has ignored a level stop and that
the MB-level has decreased.
Maximum depth
The icon indicates that the preset maximum depth has been reached.
Maximum dive time
The icon indicates that the preset maximum dive time has been
reached.
Gas integrated computers only:
RBT alarm
The icon indicates that the remaining bottom time (RBT) is less than
three minutes (yellow) or 0 minutes (red).
Increased gas consumption warning
The icon indicates increased gas consumption.
20
UWATEC® SmartTRAK
4.10 Edit Dive
English
4.10.1 Logbook
The Logbook (Dives/Edit) shows the following information:
• repetitive dive number
• interval between two consecutive dives;
• the date when the dive took place;
• altitude class;
• desaturation time before and after the dive;
• no-fly time before and after the dive;
• CNS O2% before and after the dive;
• start time, end time and duration;
• the MB-level of the dive;
• the maximum depth of the dive;
• depth setting for maximum depth alarm;
• time setting for maximum dive time alarm;
• the minimum and maximum water
temperature;
If you have a manually inserted dive then the information can be edited, except for end time
and CNS O2%.
4.10.2 Dive Site
In the Dive Site page you can select the name of the dive site if it is already defined. After
selecting the site, SmartTRAK automatically selects the matching location, platform, water type
(e.g. sea, lake, river etc) and bottom type.
You can also add dive site pictures, notes and wrecks.
Adding a new site to the list
To add a new site, click with the right mouse button over the site list box to activate a pop-up
menu and select Insert from the list.
Write the new site name and when you press the OK button, the dive site edit page will appear.
There you can add site information, such as coordinates of the dive site, location, water type
and bottom type.
UWATEC® SmartTRAK
21
To add a new location, platform, water or bottom, click with the right mouse button over the
location, platform, water or bottom list box to activate a pop-up menu and select Insert from
the list. With location and water you will enter the location edit when you press the OK button. There you can add additional data for location and water type.
Editing a dive site
Choose a dive site from the pull down list. If you do not want to change the name of the dive
site, you can double click the name and go directly to dive site edit page. If you want to change
the name, click with the right mouse button over the site list box to activate a pop-up menu
and select Edit from the list. After pressing the OK button, the dive site edit will appear. Note
that changes to the dive site will carry over to all dives at the same site.
Deleting a dive site
Choose a dive site from the pull down list. Click with the right mouse button over the site list
box to activate a pop-up menu and select Delete from the list.
Insert, show and delete images
By right clicking on the picture background you can bring up a pop-up menu that allows you
to add/delete/view pictures.
Clicking the thumbnail will open the original picture in the picture viewer. Note that the site
pictures are not stored in the logbook. Only a link to the picture is created.
If you move the picture, the link will be broken and only the picture name will show up. To fix
this, you need to delete the picture from the logbook and re-add the picture to the collection.
If there are other missing dive site pictures, SmartTRAK will check if it can find them from the
same folder and corrects automatically all broken links for pictures that it found.
4.10.3 Wreck
The Wreck page, which is a sub page for Dive Site page, lets you keep a list of wrecks related
to a certain dive site.
Adding a wreck
Write down the name of the wreck below the list and press Add New to add the new wreck
to the list.
Editing a wreck
Choose a wreck from the list by clicking on the name. The wreck information will appear to
the right and the wreck name below the list. You can update wreck information by just writing
new texts on the fields. If you change the name of the wreck, press Change to save the new
name.
Deleting a wreck
Choose a wreck from the list by clicking on the name. The wreck name will appear below the
list. Press Delete to delete it from the list.
Insert, show and delete images
Choose a wreck from the list by clicking on the name. The wreck name will appear below the
list. Select Wreck Pictures page. Click with the right mouse button over the picture area to
bring up a pop-up menu that allows you to add, delete or view pictures.
22
UWATEC® SmartTRAK
4.10.4 Buddy
The Buddy page lets you keep a list of buddies you are frequently diving with.
Adding a buddy
Write down the nickname of the buddy to the right and press Add New to add it to the list.
Editing a buddy
Choose a buddy from the list by clicking on the name. The buddy information will appear to
the right. You can update the buddy information by just writing new text on the fields. If you
change the nickname, press Change to save the new name.
Deleting a buddy
Choose a buddy from the list by clicking on the name. The buddy name will appear to the
right. Press Delete to delete it from the list.
Adding a picture
Choose a buddy from the list by clicking on the name. The buddy name will appear to the
right. Press the Load Image button or click with the right mouse button over the picture area
to open the Open Picture dialog.
Setting a buddy as default
Select Set as default buddy. The buddy will now be automatically set as default for all the
new dives that you create.
4.10.5 Conditions
The Conditions page lets you specify the weather and water conditions.
To add a new weather or water condition, click with the right mouse button over the weather
or water condition list box to activate a pop-up menu and select Insert from the list.
You can set the air and water temperature and underwater visibility.
4.10.6 Gas/Tank
The Gas/Tank page lets you define a tank for
the dive (Smart TEC: up to three tanks). For
each tank you can specify the pressure in the
beginning and in the end, the oxygen fraction
and the maximum ppO2. For gas integrated
computers this information is downloaded
from the dive computer, in which case on this
page you can see the average and maximum
gas consumption for each tank.
UWATEC® SmartTRAK
23
English
Enter names of your buddies and set a mark to the left.
Adding a new tank to the list
To add a new tank, click with the right mouse button over the tank list box to activate a popup menu and select Insert from the list. You can now give a name to the tank and when you
press the OK button, the tank edit page will appear. There you can set tank size, tank type,
nominal pressure, gas type for this tank and some notes.
Editing a tank
Choose a tank from the pull down list. If you do not want to change the name of the tank,
you can double click the name and go directly to tank edit page. If you want to change the
name, click with the right mouse button over the tank list box to activate a pop-up menu and
select Edit from the list. After pressing the OK button, the tank edit page will appear.
Deleting a tank
Choose a tank from the pull down list. Click with the right mouse button over the tank list box
to activate a pop-up menu and select Delete from the list.
4.10.7 Gear
The Gear page lets you configure the equipment which you were using when diving. You can
configure default gear that you always have with you. You can add other gear to the list of
additional gear.
To add a new suit to the list, click with the right mouse button over the suit list box to activate
a pop-up menu and select Insert from the list.
Adding a new piece of gear
Enter the name of the gear to the right and press Add New to add it to the list.
Editing gear
Choose a piece of gear from the list by clicking on the name. The gear name will appear to the
right. Edit the name and press Change to save the new information.
Deleting gear
Choose a piece of gear from the list by clicking on the name. The gear name will appear to the
right. Press Delete to delete it from the list.
Apply gear to all dives
Choose a piece of gear from the list by clicking on the name. The gear name will appear to the
right. Press Apply to make the same setting (on/off) to all dives.
Setting a piece of gear as default
Select Set as default gear. The gear will now be automatically set as default for all the new
dives that you create.
4.10.8 Activities
On the Activities page you can add activities which you were involved in during your dive.
Adding a new activity
Write down the name of the activity to the right and press Add New to add it to the list.
24
UWATEC® SmartTRAK
Deleting an activity
Choose an activity from the list by clicking on the name. The activity name will appear to the
right. Press Delete to delete it from the list.
Applying an activity to all dives
Choose an activity from the list by clicking on the name. The activity name will appear to the
right. Press Apply to apply the same setting (on/off) to all dives.
Setting an activity as default
Select Set as default activity. The activity will now be automatically set as default for all the
new dives that you create.
4.10.9 Type of Dive
Adding a new type
Write down the type of the dive to the right and press Add New to add it to the list.
Editing a type
Choose a type from the list by clicking on the name. The type name will appear to the right.
Edit the name and press Change to save the new information.
Deleting a type
Choose a type from the list by clicking on the name. The type name will appear to the right.
Press Delete to delete it from the list.
Applying a type to all dives
Choose a type from the list by clicking on the name. The type name will appear to the right.
Press Apply to apply the same setting (on/off) to all dives.
Setting a type as default
Select Set as default type of dive. The type of dive will now be automatically set as default
for all the new dives that you create.
4.10.10 Fish
This page is intended for saving information of things seen during the dive, like fish and other
animals, plants, corals etc. Selected fish can be shown on the dive window picture panel.
Adding a new fish
Write down the name of the fish to the right and press Add New to add it to the list.
Editing a fish
Choose a fish from the list by clicking on the name. The fish name will appear to the right. You
can update fish information by just writing new text in the fields. If you change the name of
the fish, press Change to save the new name.
UWATEC® SmartTRAK
25
English
Editing an activity
Choose an activity from the list by clicking on the name. The activity name will appear to the
right. Edit the name and press Change to save the new information.
Deleting a fish
Choose a fish from the list by clicking on the name. The fish name will appear to the right.
Press Delete to delete it from the list.
Adding a picture
Choose a fish from the list by clicking on the name. The fish name will appear to the right.
Press the Load Image button or click with the right mouse button over the picture area to
open the Open Picture dialog.
Adding dive specific information
You can add some specific details for each fish related with the active dive. Just select the fish
and a new tab On this dive will appear. Fill in the information on that page. Beware that, if
you unselect the fish, this information will be lost.
Setting a fish as default
Select Set as default fish. The fish will now be automatically set as default for all the new
dives that you create.
4.10.11 Notes
In the Notes page you can add comments and additional information relative to your dive.
4.10.12 DAN
At the DAN page you can add specific information for each dive about dive details, outcome
and safety. This information is needed for DAN (Divers Alert Network) DL7 level 3 export.
Mandatory fields are: purpose, environment, platform, dive plan, gas source, breathing gas,
thermal comfort and workload.
5. Hardware and Software Requirements
One of the following operating systems is required to run SmartTRAK:
Software:
• Windows
• Windows
• Windows
• Windows
XP
2000
ME
98
Hardware:
An IBM compatible Pentium class PC equipped with an infrared port or a dongle. With
Windows ME and 98 minimum of 32MB RAM. With Windows XP and 2000 minimum of
64MB RAM. Minimum of 10MB free hard disk space.
5.1 Installing an IrDA Device
For installing the infrared device, please follow the instructions delivered with your PC and/or
infrared dongle. You can find help in Windows by selecting Help in the Start menu. From the
Help window, select the Index tab and type in infrared devices as key words. Select the
subentry adding, configuring or installing.
26
UWATEC® SmartTRAK
6. FAQ / Troubleshooting
Question 1: What does it mean when the tissues are up to 100 %? I have noticed that the
colour is neither red nor green, as usual, but purple. Answer: The purple colour indicates that
the tissues are saturated over 100 % and there is an increased risk of decompression sickness.
If you have not followed instructed decompression stops, you might see this happen.
Question 2: My pictures are not showing up in the dive window or in the edit window.
Answer: SmartTRAK only stores the filename and the path to the file in the logbook. SmartTRAK
cannot find the picture file if the picture file was moved or deleted. Restore the picture file or
delete the picture from the logbook and insert it again from the new directory location.
Question 3: When I start SmartTRAK, I get an error message “Field ‘xxx’ not found.” and
SmartTRAK terminates immediately. Answer: SmartTRAK stores the name of the last opened
logbook in the Windows registry for convenience and tries to open it when the program starts.
If the logbook is corrupted, this kind of situation may happen. The solution for this problem is
to remove or rename the logbook, which SmartTRAK tries to open. If you don’t know which
one it is, then you can remove the registry setting for the logbook name. You can do this by
starting SmartTRAK with the option –rml from a command prompt or from Windows Start
menu selecting Run….
C:\Program Files\SmartTRAK\SmartTRAK –rml
After clearing the registry setting, do not try to open the logbook any more. Use a backup file
instead, if available. Or create a new one.
All registry settings can be cleared with the option –rmr.
Note that, if you do this, all SmartTRAK window positions and sizes, dive profile background
colours, units etc. will restore to factory default.
Question 4: What kind of algorithm does SmartTRAK use for simulating the physiology?
Answer: The physiological model built into SmartTRAK and the Uwatec dive computers is a
Neo Haldanian model that estimates the tissue tensions in a Buehlmann fashion with our own
bubble estimator. World leading physiologists have extensively verified the model.
Question 5: When I try to communicate with my dive computer, SmartTRAK IrDA-Monitor
window says “No device”. Answer: Check that you have followed the instructions at at
Section 5.2 Establishing IrDA connection. Next check that your IrDA port in the PC is properly installed and enabled. If you are using a dongle, check that it is connected to the right
serial port or properly connected to the USB port (USB models).
Trademarks
The following trademarks are used within this text: Windows XP, Windows 2000, Windows
ME, Windows 98 and Excel are trademarks of Microsoft Corp. IBM is a trademark of
International Business Machines. Pentium is a trademark of Intel Corp.. Aladin® is a trademark
of Uwatec AG.
UWATEC® SmartTRAK
27
English
5.2 Establishing IrDA Connection
The PC must have an IrDA device installed before trying to establish a connection.
If you have a dive computer model in which the infrared window is positioned under the
display protecting lid, first open the lid (for example Smart PRO).
Next switch on the dive computer and position the infrared window so that it points towards
the PC’s infrared window within 30 centimetres (12 inches).
Now you can activate the SmartTRAK function for which you need the IrDA connection
(Transfer Dives or Dive Computer Settings).
SCUBAPRO UWATEC Americas
(USA/Canada/Latin America)
1166 Fesler Street
El Cajon, CA 92020 USA
t: +1 619 402 1023
f: +1 619 402 1554
www.scubapro.com
SCUBAPRO UWATEC France
Les Terriers Nord
175 Allée Belle Vue
F-06600 Antibes
t: +33 (0) 4 92 91 30 30
f: +33 (0) 4 92 91 30 31
www.scubapro-uwatec.com
SCUBAPRO UWATEC Asia Pacific
1208 Block A, MP Industrial Center
18 Ka Yip St.
Chai Wan Hong Kong
t: +852 2556 7338
f: +852 2898 9872
www.scubaproasiapacific.com
SCUBAPRO UWATEC Benelux
Avenue des Arts, 10/11 Bte 13
1210 Bruxelles
t: +32 (0) 2 250 37 10
f: +32 (0) 2 250 37 11
www.scubapro-uwatec.com
SCUBAPRO UWATEC Australia
Unit 21, 380 Eastern Valley Way
Chatswood, N.S.W. 2067
t: +61 2 9417 1011
f: +61 2 9417 1044
www.scubapro.com.au
SCUBAPRO UWATEC Deutschland
(Germany / Austria / Scandinavia)
Taucherausrüstungen GmbH
Rheinvogtstraße 17
79713 Bad Säckingen-Wallbach
t: +49 (0) 7761 921050
f: +49 (0) 7761 921051
www.scubapro.de
SCUBAPRO UWATEC Italy
Via G.Latiro 45
I-16039 Sestri Levante (GE)
t: +39 0185 482 321
f: +39 0185 459 122
www.scubapro.it
SCUBAPRO UWATEC España
Pere IV, nº359, 2º
08020- Barcelona
t: +34 93 303 55 50
f: +34 93 266 45 05
www.scubapro-uwatec.com
SCUBAPRO UWATEC U.K.
Vickers Business Centre
Priestley Road
Basingstoke, Hampshire RG24 9NP
England
t: +44 0 1256 812 636
f: +44 0 1256 812 646
www.scubapro.co.uk
SCUBAPRO UWATEC Switzerland
Oberwilerstrasse 16
CH-8444 Henggart
t: +41 (0) 52 3 16 27 21
f: +41 (0) 52 3 16 28 67
www.scubapro.de
SCUBAPRO UWATEC Japan
4-2 Marina Plaza 5F
Kanazawa-Ku
Yokohama
Japan
t: +81 45 775 2288
f: +81 45 775 4420
www.scubapro.co.jp
www.uwatec.com
11.04
UWATEC® SmartTRAK