1
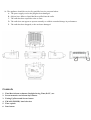
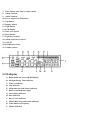
RCR-22 AM/MW 2 bands Digital Clock Radio instruction manual
Important safety instructions
1. Read and understand all safety and operating instructions before the radio is operated.
2. Retain instruction: The safety and operating instructions should be retained for future reference.
3. Heed warnings. All warnings on the appliance and operating instructions should be followed.
4. Follow all operations and use instructions.
5. Water and moisture: The appliance should not be used near water. Do not use near a bathtub, washbowl,
laundry tub, kitchen sink, wet basement, swimming pool, etc.
6. Unplug the radio from the AC power outlet before cleaning. Use only a damp cloth for cleaning the exterior
of the radio.
7. Do not place the radio on an unstable cart, stand, bracket or table. The radio may fall, causing serious
personal injury and damage to the radio.
8. Ventilation: This radio should be situated so that its location or position does not interfere with its proper
ventilation. For example, the radio should not be used on a bed, sofa, rug or other soft surfaces that may
block the ventilation openings. It should not be placed in a built-in situation like a cabinet that may reduce air
flow through the ventilation openings.
9. Power sources: The radio should be operated only from the type of power source indicated on the marking
label. If you are not sure of the type of power supply to your home, consult your radio dealer or power
company.
10. Power cords: The power cord should be positioned so it is not walked on, pinched, or items placed on top of
it. Pay particular attention to cords at plugs, convenience receptacles, and the point where they exit from the
unit. Unplug the power cord by gripping the power plug, not the cord. Operate the radio using only the
current type of power source indicated. If you are not sure of the type of power supply to your home, consult
your dealer or local power company.
11. Do not overload wall outlets or extension cords. This can result in a risk of fire or electrical shock. Never
insert objects of any kind into the radio through opening. The objects may touch dangerous voltage points or
short out parts. This could cause a fire or electrical shock.
12. If the radio is left attended and unused for long periods of time, unplug it form the wall outlet. This will
prevent damage caused by lightning or power line surges.
13. If the radio is left unattended and unused for a long period of time, remove the batteries. The batteries may
leak and damage furniture of your radio.
14. Do not attempt to service the receiver yourself. Removing the cover may expose you to dangerous voltage,
and will void the warranty.
Refer all servicing to authorized service personnel.
15. Object and Liquid Entry-Never push objects of any kind into this radio through opening as they may touch
dangerous voltage points or short-out parts that could result in a fire or electric shock. Never spill liquid of
any kind of product.
16. The appliance should be serviced by qualified service personnel when:
A. The power supply cord or the plug has been damaged.
B. Objects have fallen or liquid had been spilled into the radio.
C. The radio has been exposed to rain or water.
D. The radio does not appear to operate normally or exhibits a marked change in performance.
E. The radio has been dropped, or the enclosure damaged.
Controls
1. Time/Date/Alarm set button; Daylight Saving Time (D.S.T.) set.
2. Preset memories and Alarm days buttons
3. Tuning Up/Down and Snooze button
4. FM/AM (FM/MW) band selection
5. Time capsule
6. Date button
7. Time button, auto time set enforcement
8. Alarm 2 button
9. Alarm 1 button
10. Power button and Sleep timer
11. Nap button
12. Display button
13. Light button
14. LCD display
15. Time zone switch
16. Reset button
17. Light level control
18. Alarm sound level control
19. AUX-IN
20. Headphones socket
21. Volume control
LCD display
A. Radio band and clock AM/PM display
B. Daylight Saving Time indicator
C. Time set indicator
D. Nap indicator
E. Sleep indicator and Snooze indicator
F. Radio controlled time signal
G. Auto tuning indicator
H. Date indicator
I. Day of week indicator
J. Month/Date/Year/alarm time indicator
K. Time indicator/Frequency
L. Minute indicator
M. Memory and seconds indicator
N. Alarm AM/PM indicator
O. Alarm indicator
Operation
Clock
Automatic clock setting
1. Connect the plug to a wall socket, and your clock radio will display -:- and the indicator
will flash on
the display.
2. When the radio is off, press and hold Time button
for more than 4 seconds to receive Auto Time Set
signal.
Manual clock setting (only if automatic setting fails)
1. Press the TIME button, and the display will show
.
2. Press the SET button, and the hour digits will flash on the display.
3. Press the up or down button to adjust the hours.
4. Then press the SET button, and the minute digits will flash on the display.
5. Press the up or down button to adjust the minutes.
6. Press SET button to complete the time setting.
* You can also stop the process anytime by pressing TIME button.
Manual date setting (only if automatic setting fails)
1. Press the DATE button then press SET button, the year digits will flash.
2. Press the up or down button to adjust the year.
3. Press the SET button again and the month digits will flash.
4. Press the up or down button to adjust the month.
5. Press the SET button again and the date digits will flash.
6. Press the up or down button to adjust the date.
7. Preset SET button to complete the time setting.
* You can also stop the process anytime by pressing DATE button.
Change 12/24 hour clock format
1.
Press TIME button, and then press SET button.
2.
To set 12 hour clock format, press Station preset 1, or, to set 24 hours clock format, press Station preset 2.
3.
Press Power button to finish the setting.
D.S.T. (Daylight Saving Time)
1. When the display shows the time, press the SET button for more than 4 seconds to set the clock 1 hour faster,
and the display will show
.
2. To set the clock back from D.S.T., press the SET button for more than 4 seconds, the symbol
will
disappear.
Radio operation
Tuning into radio stations
There are 3 ways of tuning your radio:
A. Manual tuning
1. Press the Power button to turn on your radio.
2.
Press the BAND button repeatedly to select AM (MW) or FM waveband.
3.
Press the up or down button to change the frequency.
4.
Press the Power button again to turn off your radio.
B. Scan tuning
1. Press the Power button to turn on your radio.
2. Press the BAND button repeatedly to select AM (MW) or FM waveband.
3. Press the up or down button for more 0.5 second and release, it will tune into the next frequency with
reception.
4. Press the Power button again to turn off your radio.
C. Presetting and recalling stations
Presetting stations:
1. Press the Power button to turn on your radio.
2. Press the BAND button repeatedly to select AM (MW) or FM waveband.
3. Tune into the station that you would like to preset.
4. There are 7 preset buttons from 1 to 7. Press 1 of them and hold for more than 2 seconds until the radio
beeps, and the station frequency will be saved into the chosen preset.
5. Repeat the procedure for the remaining presets. Your radio has 7 presets for each AM and FM.
6. The preset can be overwritten by following the above procedure.
Recalling stations:
1. Press the BAND button for AM or FM.
2. Simply press 1 of the PRESET buttons (from 1 to 7) you would like to tune into. And the preset number
and frequency will appear on the display.
Alarm operation
There are 2 alarms which can be set independently. Also each alarm can be set to wake you by buzzer or radio.
When the alarm light (alarm 1 or alarm 2 or both) is on, it means the indicated alarm will active in 24 hours.
How to set buzzer alarm
The radio buzzer beep increases in volume every 15 seconds. It beeps 1 minute, followed by 1 minute silence
and repeat the cycle. The buzzer will beep for 1 hour, or stop by pressing the Power button.
The buzzer alarm volume may be adjusted through the Alarm sound level control button on the bottom of the
radio.
1. Press the Alarm 1 (or Alarm 2) button and Alarm 1 time (or Alarm 2) time will show on the display.
2. Press the SET button, the alarm hour will show on the display.
3. Press up or down button to adjust the hour.
4. Press the SET button again and adjust the minute by pressing up or down button.
5. Select required days of week on which the alarm will beep by pressing day of week buttons.
6. Press the SET button again and press up or down button until the display shows
7. Press the SET button to complete the setting.
* You can press the Alarm 1(or Alarm 2) button anytime to complete the setting.
How to set Radio alarm
.
The radio alarm will sound for 1 hour, or stop by pressing the Power button.
1. Press the Alarm 1 (or Alarm 2) button and Alarm 1 time (or Alarm 2) time will show on the display.
2. Press the SET button, the alarm hour will show on the display.
3. Press up or down button to adjust the hour.
4. Press the SET button again and adjust the minute by pressing up or down button.
5. Select required days of week on which the alarm will beep by pressing day of week buttons.
6. Press the SET button again and press up or down button until the display shows
.
7. Press the SET button again and press up or down button to tune into the station that you wish to wake up
and adjust volume. Also press BAND button to select FM or AM (MW), then press he SET button to
complete the setting.
8. Press the Power button to switch off the radio.
9. When the radio signal is weak, the radio alarm will be buzzer alarm.
* You can press the Alarm 1(or Alarm 2) button anytime to complete the setting.
* When it is AUX-IN, and the ratio band is not set, the alarm will be buzzer alarm.
Snooze function
1. To interrupt the alarm signal (radio alarm or beep alarm), press the up or down button. The alarm will stop
for 5 minutes and the display will show
alarm is active.
. The snooze function can be repeat during the period of the
2. Press the Power button to cancel the snooze and alarm function.
How to cancel alarms
1.
Press and continue to hold the Alarm 1 or Alarm 2 button that you wish to cancel for more than 2
seconds.
2.
The symbol
3.
To reactive the alarm, press and hold Alarm 1 or Alarm 2 button that you wish to reactive, and the
symbol
or
or
will disappear from the display. And the alarm you press will be cancelled.
will appear on the display and it will be reactive.
How to set alarm sound level
With alarm level adjustment switch 18 on the bottom of the radio, you may adjust the alarm sound level.
Note: Alarm level adjustment works only for buzzer alarm
Nap timer
4. It is a countdown alarm which will sound after the time period that you set. And the time period can be set
from 10 to 120 minutes in 10 minutes steps.
5. Press the NAP button until the required time period is shown on the display.
6. The word NAP will be shown on the display and the Nap timer is set.
7. While the Nap timer is alarming, press the Power button to silence the alarm.
8. To cancel the Nap timer before the time Nap time is elapsed, press and release the NAP button until the
OFF word is appeared on the display.
Sleep timer radio auto shut off
The Sleep timer can be set from 15-120 min. The radio will be switch off after the time you set has elapsed.
1. When the radio is off, press and continue to hold the
button, the radio will be switched on
and the display will show the timer minutes in turn, and release the
button when the required
time is appeared. Then the Sleep timer is set.
2. To cancel the Sleep timer, press the Power button and the
symbol will be gone.
Time zone setting
Set TIME ZONE switch (on the bottom of the radio) to 0 position for regular case.
For some countries where don t provide radio controlled time facility but able to receive radio controlled time
signal from nearby countries and the time zone is different , you may use the TIME ZONE switch to correct the
time .
For example , in Turkey which is one hour ahead of Central European time but still can receive radio controlled
time signal from Germany (Central European time) , you may use this TIME ZONE switch to correct the local
time.
If you are in USA just simply switch the TIME ZONE switch to the time zone for where you are. There are
4 time zones: PST (Pacific Standard Time), MST (Mountain Standard Time), CST (Central Standard Time), or EST
(Eastern Standard Time).
Display button
When the radio is on, you can switch the display between station frequency and time by pressing the DISPLAY
button.
Display backlight adjustment
Press the
button to switch the display backlight to be brighter or darker. When it is switched to darker, you
can turn the button 17 (on the back of the radio) to adjust the display light to be the most dark.
Headphone socket
Plus in a headphone to the Headphone socket
for headphone function, and the built-in radio speaker will
be muted.
AUX IN socket
Plug in external audio devices such as CD player to the AUX IN socket (on the side of the radio), then play your
device and press the Band button repeatedly until you see AU on the display. The radio will amplify and play out
the signal form your device.
Reset the radio
If your radio doesn t operate correctly, or some display digits are missing, press the RESET button (on the
bottom of the radio) with suitable implement for more than 2 seconds, the whole memory will be reset as a
brand-new one.
Technical data
Power supply
110-120 Volt/50-60 Hz (USA version); 220-230 Volt/50-60 Hz (Europe version)
Output power
800 mW (max)
Power consumption
7W (max)
Frequency coverage
FM 87.5
108.0 MHz
AM 520
1710 kHz (USA version); AM 522- 1629 kHz (Europe version)