1
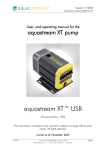
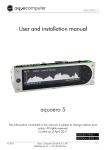
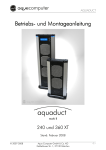
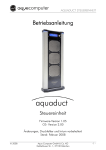
INS412A
OWNER’S MANUAL
TM
With Under Sink Water Filtration System
Model Numbers 77100, 77100W, 77100S, 77100V,
77100P, 77100CPR, 77100SL, 77100PM, 77100ST,
77100CG, 77100BP, 77100NL
U.S. Patent Pending
Other Foreign and Domestic Patents Pending
PRODUCT FEATURES
Optional left hand / right hand setup
Includes 2 interchangeable spouts
Filter life
indicator light
Rapid flow rate
Easy to install under sink
Easy to replace
water filter
1
HELPLINE: 1-877-DRINK-H2O
(1-877-374-6542)
INS412A
WELCOME TO MOEN
Congratulations on your purchase of the PureTouch®
AquaSuite™ Under Sink Water Filtration System! This water
filtration system is designed to provide great tasting, cleaner
water where and when you want it. To get the most enjoyment
from your PureTouch AquaSuite, please read all installation
and operating instructions carefully. With simple care and
maintenance, the AquaSuite will provide many years of
reliable performance. If you should have any questions,
please call us toll-free at 1-877-DRINK-H2O (1-877-374-6542).
TABLE OF CONTENTS
Product Features . . . . . . . . . . . . . . . . . . . . . . . . . . . . . . . . . . . . . .1
Water Filtration Safeguards . . . . . . . . . . . . . . . . . . . . . . . . . . . . .3
Parts Description . . . . . . . . . . . . . . . . . . . . . . . . . . . . . . . . . . . . . .4
Installation Instructions for the PureTouch AquaSuite . . . . . . .5
Filter Installation/Replacement . . . . . . . . . . . . . . . . . . . . . . . . . .7
Filter Replacement Guidelines . . . . . . . . . . . . . . . . . . . . . . . . .11
Operating Instructions . . . . . . . . . . . . . . . . . . . . . . . . . . . . . . . .12
Battery Replacement . . . . . . . . . . . . . . . . . . . . . . . . . . . . . . . . .13
Faucet Disassembly . . . . . . . . . . . . . . . . . . . . . . . . . . . . . . . . . .13
Troubleshooting . . . . . . . . . . . . . . . . . . . . . . . . . . . . . . . . . . . . .15
Care and Maintenance . . . . . . . . . . . . . . . . . . . . . . . . . . . . . . . .15
PureTouch® AquaSuite™ Filtering System Warranty . . . . . . . .16
INS412A
HELPLINE: 1-877-DRINK-H2O
(1-877-374-6542)
2
WATER FILTRATION SAFEGUARDS
Your Moen PureTouch® AquaSuite System utilizes carbon block filtration made
by Culligan®. This technology is fast and effective at reducing contaminants
commonly found in water and is certified by NSF® International. To ensure
optimal operation of your new PureTouch filtration system, please read the
following safeguards carefully.
MicroTech® Filters
• MicroTech filters will reduce:
Chlorine, Taste and Odor
Lead
Cysts (Cryptosporidium, Giardia)
Lindane
Atrazine
Mercury
Turbidity
The contaminants removed or reduced by this filter are not necessarily in your water.
• Do not use with water that is microbiologically unsafe or of unknown quality
without adequate disinfection before or after the system. Systems certified
for cyst reduction may be used on disinfected waters, since they may also
contain filterable cysts.
• MicroTech filters are designed for replacement after dispensing 750 gallons
of filtered water, or after 6 months (whichever comes sooner). Water
conditions and usage may affect filter life.
• The electronic indicator will signal when filter replacement is necessary
(See “Operating Instructions” on page 11).
• Use only MicroTech 9000 filters with the PureTouch AquaSuite.
• Filter flow rate = 1 gpm at rated pressure.
• Maximum operating pressure = 125 psi.
Water Temperature
•
CAUTION: Do not filter water above 100°F (37° C). For cold water supply only.
MicroTech® Filter Flushing Instructions
• New MicroTech Filter: After installing a new filter, allow cold water to run
through a new filter for 5 minutes to flush out any loose carbon particles.
Once these small particles are washed out the filter is ready for use. The
filter life indicator will alternately flash amber & green for the first five
minutes after the indicator is manually reset as an aid in timing the filter
flushing period. The filter life indicator will then flash only green when the
flushing period is complete.
• Daily Use: Allow cold water to run through the filter for 10-15 seconds prior
to first use. If the filter has not been used for two days, run cold water
through the filter for 30 seconds prior to the first use.
Questions
If you have any questions please call our toll-free helpline at:
1-877-DRINK-H2O (1-877-374-6542)
Monday thru Friday 8am - 8pm EST
Saturday 8am - 6:30pm EST
3
HELPLINE: 1-877-DRINK-H2O
(1-877-374-6542)
INS412A
PARTS DESCRIPTION
1
2
3
4
5
6
7
8
9
10
11
12
13
INS412A
Mounting Tool
Spout Nut
T Fitting + Stop Valve
Mounting Hardware Pack
High Profile Spout
Low Profile Spout
Spout Tip
Hose Assemblies (2)
Escutcheon w/Filter Life
Indicator and LED Wire
Handle Insert w/ O-Ring
Valve Body w/ Mounting Shank
Filter Life Indicator Module w/
Mounting Bracket
Filter Assembly
HELPLINE: 1-877-DRINK-H2O
(1-877-374-6542)
4
PRE-INSTALLATION TIPS
Recommended tools:
Safety glasses, flash light, drill
w/ 1" circular hole saw, punch
(optional), phillips screw
driver, thread seal tape, 8”
adjustable wrenches (2), pliers,
tape measure.
Kitchen
Determining the location
for install
The PureTouch® AquaSuite can
be installed near a kitchen or
bathroom sink. The AquaSuite
faucet may be installed either
to the left or right of your
current faucet. When you install
the AquaSuite you will have the
choice of orienting the handle
direction for easy operation on
the left or right side of your
kitchen or bath faucet.
hole cutout options
Bathroom
Decide which spout you will
install (low profile or high profile
– see page 4 for picture) and
ensure that spout will extend far
enough into the sink for your
filtration needs. If installing the
low profile spout, the
recommended distance from
edge of sink to center of
installation hole is 4-1/4" to
4-3/4". If installing the high
profile spout, the recommended distance from edge of sink to center of
installation hole is 3-1/2" to 4".
The AquaSuite faucet can easily fit into a pre-existing hole such as those used
for a soap dispenser or kitchen faucet side spray. If a hole is not already
available, you’ll need to cut out a 1" diameter hole in the location on the sink or
countertop where you wish to install the faucet, making sure that the location is
a flat surface with minimal obstruction. A 1" diameter hole is recommended but
can be as large as 1-5/8" diameter.
5
HELPLINE: 1-877-DRINK-H2O
(1-877-374-6542)
INS412A
INSTALLATION INSTRUCTIONS
AquaSuite™ Faucet Installation
After determining in which location you will install your PureTouch AquaSuite
(may involve drilling mounting hole – see page 5), install gasket onto escutcheon
and drop LED wire through mounting hole. Orient filter life indicator to the front
so it will be visible during faucet use.
Thread handle insert into valve body with mounting shank and drop through
mounting hole, taking care to orient the handle to either the left or right side for
comfortable use.
To install the mounting bracket,
you must first determine your
deck thickness. Your deck
thickness determines whether
the mounting bracket is installed
open side up or down. A
minimum of 1/2" of mounting
shank must be exposed for
proper attachment of the supply
hose from the filter. Position
mounting bracket onto mounting
shank. Install mounting nut and
tighten by hand. Be sure that
faucet is positioned evenly on
the mounting surface. Make final
tightening of mounting nut with
mounting tool (supplied).
CAUTION: Be careful not
to pinch the LED Wire
when tightening the
faucet into place.
Select either low profile or high
profile spout to install (see page
5). Slide spout through spout nut with the flared side of the nut facing down.
Insert spout into valve body and thread nut onto valve body. Thread spout tip
onto spout and tighten.
INS412A
HELPLINE: 1-877-DRINK-H2O
(1-877-374-6542)
6
INSTALLATION INSTRUCTIONS
Installation of Filtration Unit
Determine the best location for the installation of the undersink filtration unit.
Ensure that the hose connections will reach from the water supply to the water
inlet on the filter unit, and the hose connection from the water outlet of the filter
unit up to the connection under the faucet. Make sure water supply is turned
off before proceeding.
CAUTION: Risk of property damage. Do not install unit where the
temperature may drop below freezing.
Installation Overview
Install T-fitting
T-fitting
The T-fitting (packaged in the T-fitting & Stop Valve hardware pack (3)) is used to
divert the cold water supply to the filtration unit. Install the T-fitting into the
cold water line as shown.
1. Attach the T-fitting with washer to the rigid leg of your faucet or stop valve.
Hold the supply leg of the faucet steady by putting a wrench or pliers on the
flats of the supply leg fitting when tightening the T-fitting.
Note: The T-fitting can be installed at either end of the cold water supply line
depending on your line configuration and ease of installation.
7
HELPLINE: 1-877-DRINK-H2O
(1-877-374-6542)
INS412A
INSTALLATION INSTRUCTIONS
2. Screw one end of the Hose Assembly (8) onto the T-Fitting. Hold the
T-Fitting while tightening the Hose Assembly Nut.
3. Finally, connect the sink’s cold water supply line to the remaining open end
of the T-Fitting.
Attach Filter Mounting Bracket to Cabinet Wall
Stop valve
Begin by screwing the Stop Valve (packaged in the T-fitting & Stop Valve
hardware pack (3))to the Filter Life Indicator Module (12) taking care not to
overtighten plastic threads on the Filter Life Indicator Module. Tighten snugly
until black lever is facing the front or top for easy shut off when changing filter in
the future.
CAUTION: The Stop Valve must be installed to allow filter replacement.
INS412A
HELPLINE: 1-877-DRINK-H2O
(1-877-374-6542)
8
INSTALLATION INSTRUCTIONS
Stop valve
LED Wire connection
13
When determining the location of the bracket make sure you leave at least
1–1/2" of free space from the floor surface to the bottom of the filter (13) (or 15"
from floor to the underside filter connection of the Filter Life Indicator Module
(12)), and at least 4" of space on both sides to make the hose connections.
1. With the filter removed, use the Filter Life Indicator with Mounting Bracket
(12) as a template for marking the location of the mounting screws.
2. Connect one hose from the T-fitting to the Stop Valve on the Filter Life
Indicator Module. Connect the other hose from the Filter Life Indicator
Module outlet, up to the faucet. Make sure that all connections are at least
finger tight.
3. Attach the Filter Life Indicator with Mounting Bracket securely to the wall
using the self threading screws (supplied). If the cabinet wall is not solid
wood, locate the bracket so that the screws penetrate a wall stud to allow
adequate support for the weight of the filter unit.
4. Using 2 wrenches, tighten all hoses securely to the Filter Life Indicator
Module. Use one wrench to hold the bracket firmly while using the second
wrench to tighten the hose nut. Attach filter to the Filter Mounting Bracket
(See “Filter Installation/Replacement” on page 10). Connect LED Wire to the Filter
Life Indicator Module.
CAUTION: Take care not to overtighten or crossthread the hose
connections on the plastic threads of the Filter Life Indicator Module.
9
HELPLINE: 1-877-DRINK-H2O
(1-877-374-6542)
INS412A
FILTER INSTALLATION / REPLACEMENT
1. The filter needs to be replaced when the Filter Life Indicator Light begins to
flash red. A flashing amber light indicates less than 8% filter life remaining.
2. Turn off water pressure by closing the Stop Valve located next to the Filter
Life Indicator Module (12). Turn lever of stop valve to form a 90° angle with
the hose. Open position of stop valve shown below.
CAUTION: The Stop Valve must be closed before removal of filter.
3. Next, turn the AquaSuite faucet
handle to the full ‘ON’ position for
several seconds to relieve any
remaining water pressure, then
turn back ‘OFF’.
4. Rotate the filter (13) by moving
the arrow from the locked position
until it comes to a complete stop
in the unlocked position.
5. Pull the filter down and out of the
Filter Mounting Bracket. It is
normal for a small amount of water
to drip from the mounting bracket
when the filter is removed.
6. Remove new filter from packaging
and install by reversing steps 4
and 5 above.
7. Turn on water pressure by opening
the Stop Valve.
8. Turn the AquaSuite faucet lever to
the full ‘ON’ position for several
seconds to confirm proper
operation of the filter and turn
back ‘OFF’.
AquaSuite
Faucet
Filter Life
Indicator Light
Stop valve
CAUTION: Air pressurization of
the filter occurs once the stop
valve is opened following a
new filter installation. Make
sure to relieve the pressure in
the system by opening up the
AquaSuite faucet valve after
you open the stop valve on the
Filter Life Indicator Module.
INS412A
HELPLINE: 1-877-DRINK-H2O
(1-877-374-6542)
Locked Position
Unlocked Position
10
FILTER INSTALLATION / REPLACEMENT
Reset Button
9. Reset the Filter Life Indicator Module by pushing the reset button on the
Filter Life Indicator Module (12).
10.A new filter must be flushed with cold water for 5 minutes after it is installed.
This procedure helps clean the filter of loose carbon particles. The Filter Life
Indicator Lights will alternate green and amber until flushing is complete.
Once completed, the light will change to flashing green.
11.Filter replacement complete.
MICROTECH REPLACEMENT FILTERS
Replacement filters can be purchased at retail home centers, plumbing supply
warehouses, internet retailers and directly from Moen at www.pure-touch.com.
11
HELPLINE: 1-877-DRINK-H2O
(1-877-374-6542)
INS412A
OPERATING INSTRUCTIONS
Controlling the Water
Turn the handle on the valve body 1/4 turn clockwise to activate water flow.
Return valve to original position to shut off water flow.
CAUTION: Only filter cold water. Do not filter water above 100° F.
Electronic Indicator
The flashing light on the Filter Life Indicator Module provides information
regarding the performance of the filter. The indicator provides you with
information throughout the life of the filter. Only reset the indicator when
installing a new filter. Resetting the indicator at any other time will cause
incorrect filter life indication.
Indicator Color
Meaning
Performance
Amber & Green
(flashing)
New filter installation Green/amber display
flashing for first 5 min. or
5 gal. of operation (0.7%
of life)
A new filter must be flushed
with cold water for 5 minutes
after it is installed. This
procedure helps clean the filter
of loose carbon particles.
Green
(flashing)
Normal operation - Green
display flashing for 685
min. or 685 gal. of
operation (91.3% of life)
Filter performing at optimum
efficiency.
Amber
(flashing)
Filter nearing end of life Amber display flashing
for 60 min. or 60 gals. of
operation (8% of life)
Caution: filter is ready for
replacement (less than 8% of
life left).
End of filter life
Filter life is depleted. Discard
old filter and replace with a
new MicroTech 9000.
Red (flashing)
The electronic indicator is powered by a replaceable, standard 3V lithium watch
battery (2032) and should last up to 2 years of normal operation.
INS412A
HELPLINE: 1-877-DRINK-H2O
(1-877-374-6542)
12
BATTERY REPLACEMENT
Replace battery when no light
appears. Locate battery
compartment on the Filter Life
Indicator Module (12). Pull out
battery holder and replace
battery. Keep the battery and
battery compartment dry. The
electronic indicator will retain the
correct filter life information when
the battery tray is removed and
replaced. A new battery should
last up to 2 years under normal
operating conditions.
( - )
Battery holder
12
FAUCET DISASSEMBLY
This faucet uses a standard Moen
cartridge that will provide years
of trouble free usage. If
necessary, the following
procedure shows how to remove
and replace this cartridge.
CAUTION: Make sure water
supply is turned off before
proceeding.
Valve body
Handle
retainer
ring
1. Turn the Handle Retainer
Ring Counterclockwise (CCW)
and remove handle
assembly from Valve Body.
2. Remove the Cartridge Nut
using the removal tool (not
supplied). Call the
PureTouch helpline number
noted below if you need a
cartridge removal tool (part
#14272).
13
HELPLINE: 1-877-DRINK-H2O
(1-877-374-6542)
Cartridge nut
INS412A
FAUCET DISASSEMBLY
Cartridge
3. Grasp the stem of the cartridge with pliers and pull straight out. This will
remove the cartridge as one unit.
For reassembly reverse the steps above.
.
CAUTION: Be careful not to damage the rubber seals when reinstalling
cartridge. During installation be sure of the following:
• Stem must be in open position
• Key in cartridge fits into notch on valve body
• Start cartridge nut by hand; do not cross thread
• Tighten firmly
INS412A
HELPLINE: 1-877-DRINK-H2O
(1-877-374-6542)
14
TROUBLESHOOTING
PROBLEM:
Filter life indicator is still red after installing a new filter.
POSSIBLE CAUSES: Filter life indicator was not reset.
SOLUTION:
Perform reset sequence.
PROBLEM:
Slow or uneven water flow.
POSSIBLE CAUSES: The filter has been installed for too long.
SOLUTION:
Recommend replacement of the filter every six months.
Replace the filter.
PROBLEM:
Slow or uneven water flow.
POSSIBLE CAUSES: The filter has become clogged.
SOLUTION:
Replace the filter. Filter may be clogged with captured
contaminants. If problem persists call Moen’s PureTouch
Helpline at 1-877-DRINK-H2O (1-877-374-6542.)
PROBLEM:
Electronic display doesn’t function.
POSSIBLE CAUSES: Dead battery.
SOLUTION:
Replace battery.
PROBLEM:
Water contains tiny black particles.
POSSIBLE CAUSES: New filters contain activated carbon, which is a harmless black powder.
SOLUTION:
Turn on the faucet and allow the carbon particles to purge
from the filter. Turn off the faucet when the water is clear.
PROBLEM:
Water has a chlorine taste and/or odor present.
POSSIBLE CAUSES: Filter is no longer removing chlorine from the water supply.
SOLUTION:
Replace filter.
PROBLEM:
Water has air bubbles and is cloudy.
POSSIBLE CAUSES: Air in system after installation or filter replacement.
SOLUTION:
Will go away after water runs for a while.
PROBLEM:
SOLUTION:
Faucet handle is loose.
Tighten the Handle Retainer Ring by turning it clockwise.
Care and Maintenance
All that is needed to clean your faucet is a soft damp cloth. Moen does not
recommend the use of scour pads, cleansers or chemicals. The abrasive nature of
these substances could damage the faucet’s finish.
15
HELPLINE: 1-877-DRINK-H2O
(1-877-374-6542)
INS412A
PURETOUCH® AQUASUITE™ FILTERING SYSTEM WARRANTY
Definitions:
“Faucet” – That part of the Pure Touch AquaSuite Filter System that includes all parts installed above the sink.
(numbers 2, 5-7, 9-11; See “Parts Description” on page 4).
“Filtering Unit” – All undersink parts including Filter bracket, Electronics, Hoses, etc. (numbers 3-4, 8, 12; See
“Parts Description” on page 4).
“Filter” – That part of the PureTouch AquaSuite Filtering System that is to be replaced once 750 gallons of water
have run through the system (number 13; See “Parts Description” on page 4).
Moen products have been manufactured under the highest standards of quality and workmanship. Moen
warrants to the original consumer purchaser that for as long as the original consumer purchaser occupies the
location of original product installation (the “Warranty Period”), that the Faucet (see definition for “Faucet”
above) will be leak and drip-free during normal use and all parts and finishes of the Faucet will be free from
defects in material and manufacturing workmanship (the “Consumer Faucet Warranty Period”). All parts and
finishes of the Filtering Unit (see definition for “Filtering Unit” above) will be free from defects in material and
manufacturing workmanship for a period of one (1) year from the original date of purchase (the “Consumer
Filtering Unit Warranty Period”). All other purchases (including purchases for industrial, commercial and
business use) are warranted for a period of five (5) years from the original date of purchase (the “Commercial
Warranty Period”) for the Faucet (“Commercial Faucet Warranty Period”) and six (6) months for the Filtering
Unit (“Commercial Filtering Unit Warranty Period”). The Filter (see definition for “Filter” above) is warranted
to all purchasers to be free from defects in material and manufacturing workmanship for a period of thirty (30)
days from the original date of purchase (“Filter Warranty Period”).
If the Faucet should develop a leak or drip during the applicable “Faucet Warranty Period,” Moen will FREE
OF CHARGE provide the parts necessary to put the faucet back in good working condition and will replace
FREE OF CHARGE any part or finish that proves defective in material and manufacturing workmanship under
normal installation, use and service. If the Filtering Unit should prove defective in material and manufacturing
workmanship under normal installation, use and service during the applicable “Filtering Unit Warranty
Period,” Moen will replace any part or finish FREE OF CHARGE. If the Filter should prove defective in material
and manufacturing workmanship under normal installation, use and service during the “Filter Warranty
Period,” Moen will replace the Filter FREE OF CHARGE. Replacement parts may be obtained by calling 1-800289-6636 (1-800-465-6130 in Canada), or by writing to the address shown on the back of this booklet. Proof of
purchase (original sales receipt) from the original consumer purchaser must accompany all warranty claims.
Defects or damage caused by the use of other than genuine Moen parts are not covered by this warranty. This
warranty is applicable only to faucets purchased after February 2001 and shall be effective from the date of
purchase as shown on the purchaser’s receipt.
This warranty is extensive in that it covers repair or replacement of defective parts and finishes for the periods
indicated. However, damage due to installation error, product abuse, product misuse or use of cleaners
containing abrasives, alcohol or other organic solvents, whether performed by a contractor, service company
or yourself, is excluded from this warranty. Moen will not be responsible for labor charges and/or damage
incurred in installation, repair or replacement, nor for any indirect, incidental or consequential damages,
losses, injury or costs of any nature relating to this product or its parts. Except as provided by law, this
warranty is in lieu of and excludes all other warranties, conditions and guarantees, whether expressed or
implied, statutory or otherwise, included without restriction those of merchantability or of fitness for use.
Some states, provinces and nations do not allow the exclusion or limitation of incidental or consequential
damages, so the above limitations or exclusions may not apply to you. This warranty gives you specific legal
rights and you may also have other rights which vary by state, province or nation. Moen will advise you of the
procedure to follow in making warranty claims. Simply write to, or call Moen. Explain the defect and include
proof of purchase and your name, address, area code and telephone number.
INS412A
HELPLINE: 1-877-DRINK-H2O
(1-877-374-6542)
16
NOTES
17
HELPLINE: 1-877-DRINK-H2O
(1-877-374-6542)
INS412A