1
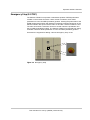
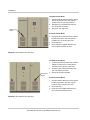
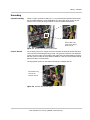
Xantrex™ GT250 E 250 kW Grid-Tied Photovoltaic Inverter Planning and Installation Manual www.schneider-electric.com Xantrex GT250 E 250 kW Grid-Tied Photovoltaic Inverter Planning and Installation Manual www.schneider-electric.com Copyright and Contact Trademarks Schneider Electric, the Schneider Electric logo, and Xantrex are trademarks or registered trademarks of the Schneider Electric group of companies. Other trademarks, registered trademarks, and product names are the property of their respective owners and are used herein for identification purposes only. Notice of Copyright Copyright © 2008, 2009, 2010 Xantrex Technology Inc. All rights reserved. No part of this document may be reproduced in any form or disclosed to third parties without the express written consent of: Xantrex Technology Inc. 161-G South Vasco Road Livermore, California USA 94551 Xantrex Technology Inc. reserves the right to revise this document and to periodically make changes to the content hereof without obligation or organization of such revisions or changes unless required to do so by prior arrangement. Exclusion for Documentation UNLESS SPECIFICALLY AGREED TO IN WRITING, XANTREX TECHNOLOGY INC. (“XANTREX”) (A) MAKES NO WARRANTY AS TO THE ACCURACY, SUFFICIENCY OR SUITABILITY OF ANY TECHNICAL OR OTHER INFORMATION PROVIDED IN ITS MANUALS OR OTHER DOCUMENTATION; (B) ASSUMES NO RESPONSIBILITY OR LIABILITY FOR LOSSES, DAMAGES, COSTS OR EXPENSES, WHETHER SPECIAL, DIRECT, INDIRECT, CONSEQUENTIAL OR INCIDENTAL, WHICH MIGHT ARISE OUT OF THE USE OF SUCH INFORMATION. THE USE OF ANY SUCH INFORMATION WILL BE ENTIRELY AT THE USER’S RISK; AND (C) REMINDS YOU THAT IF THIS MANUAL IS IN ANY LANGUAGE OTHER THAN ENGLISH, ALTHOUGH STEPS HAVE BEEN TAKEN TO MAINTAIN THE ACCURACY OF THE TRANSLATION, THE ACCURACY CANNOT BE GUARANTEED. APPROVED XANTREX CONTENT IS CONTAINED WITH THE ENGLISH LANGUAGE VERSION WHICH IS POSTED AT WWW.SCHNEIDER-ELECTRIC.COM. Date and Revision March 2010 Revision B Part Number 152936 Contact Information www.schneider-electric.com ☎ North America 1 408 987 6255 ✉ 1 925 245 1022 [email protected] France 0 825 012 999 [email protected] Deutschland +49 (0) 180 575 6575 +49 (0) 2102 404 7101 [email protected] España +34 93 498 7466 +34 93 305 5026 [email protected] L'Italia +39 035 4151111 +39 035415 3200 [email protected] For other country details please contact your local Schneider Electric Sales Representative or visit our website at: http://www.schneider-electric.com/sites/corporate/en/support/operations/local-operations/local-operations.page About This Manual Purpose The purpose of this Planning and Installation Manual is to provide explanations and procedures for planning and installing the Schneider Electric Xantrex GT250 E 250 kW Grid-Tied Photovoltaic Inverter. Scope The Manual provides safety guidelines, detailed planning and setup information, and procedures for installing the inverter. Audience The Manual is intended for use by anyone who plans to construct or install a system involving the Xantrex GT250 E 250 kW Grid-Tied Photovoltaic Inverter. Installers must meet all local and state code requirements for licensing and training for the installation of Electrical Power Systems with AC and DC voltage to 1000 volts. Organization This Manual is organized into four chapters: Chapter 1, “Introduction” provides information about the features and functions of the Xantrex GT250 E 250 kW Grid-Tied Photovoltaic Inverter. Chapter 2, “Planning” provides information to help plan the installation of the Xantrex GT250 E 250 kW Grid-Tied Photovoltaic Inverter. Chapter 3, “Installation” describes the procedures needed to install the Xantrex GT250 E 250 kW Grid-Tied Photovoltaic Inverter. This section includes unpacking and moving instructions, mounting instructions, and cabling instructions. Chapter 4, “Verification” provides a checklist to ensure the installation of the Xantrex GT250 E is correct and complete. iii This manual is for use by qualified personnel only. About This Manual Conventions Used The following conventions are used in this guide. WARNING Warnings identify conditions or practices that could result in personal injury or loss of life. CAUTION Cautions identify conditions or practices that could result in damage to the unit or other equipment. Important: These notes describe things which are important for you to know, but not as serious as a caution or warning. Abbreviations and Acronyms ANSI American National Standards Institute CCU2 Converter Control Unit 2 CFM Cubic Feet per Minute CW Clockwise DSP Digital Signal Processor FPGA Field Programmable Gate Array GUI Graphical User Interface IEEE Institute of Electrical and Electronics Engineers IGBT Insulated Gate Bipolar Transistor IPM Intelligent Power Module kcmil 1000 circular mils LCD Liquid Crystal Display NFPA National Fire Protection Association PBX Private Branch Exchange PSL Phase-Shift Loop PV Photovoltaic UFCU Universal Frontpanel Control Unit Related Information You can find more information about Schneider Electric as well as its products and services at www.schneider-electric.com. iv 152936 This manual is for use by qualified personnel only. Important Safety Instructions SAVE THESE INSTRUCTIONS - DO NOT DISCARD This manual contains important safety instructions for the Xantrex GT250 E 250 kW Grid-Tied Photovoltaic Inverter (Xantrex GT250 E) that shall be followed during installation and maintenance procedures. WARNING: Shock Hazard Read and keep this Planning and Installation Manual for future reference. Before installing Xantrex GT250 E read all instructions, cautionary markings, and all other appropriate sections of this manual. Failure to adhere to these warnings could result in severe shock or possible death. Exercise extreme caution at all times to prevent accidents. WARNING: Shock Hazard The Xantrex GT250 E Enclosures contain exposed high-voltage conductors. The Enclosure doors should remain closed with the latches tightened, except during installation, maintenance or testing. These servicing instructions are for use by qualified personnel who meet all code requirements for licensing and training for the installation of Electrical Power Systems with AC and DC voltage to 1000 volts. To reduce the risk of electric shock, do not perform any servicing other than that specified in the installation instructions unless you are qualified to do so. Do not open the cabinet doors if extreme moisture is present (rain or heavy dew). WARNING: Lethal Voltage In order to remove all sources of voltage from the Xantrex GT250 E, the incoming power must be de-energized at the source. This may be done at the main utility circuit breaker and by opening the AC Disconnect and the DC Disconnect Switches on the Xantrex GT250 E. Review the system configuration to determine all of the possible sources of energy. In addition, allow 20 minutes for the DC bus capacitors, located within the cabinet, to discharge after removing power. v This manual is for use by qualified personnel only. Safety Risks WARNING: Shock hazard Parts of the condenser charge will still be energized for a maximum of 20 minutes after being disconnected. Open device cover plates or doors only after the device is disconnected and discharged. Check whether the device is no longer live (DC voltage) including terminals PV+ and PV-. WARNING: Explosion hazard The IGBT module may explode in the event of a major malfunction. Do not operate larger devices while the pivoting part is opened. WARNING: Crush hazard The inverters have a very high balance point and can easily topple down. Only move while exercising care. Pay attention to the balance point sticker during transport. WARNING: Amputation hazard The inverters contain integrated ventilators including rotating ventilator wheels. Do not place fingers in ventilator. WARNING: Burn hazard Inverters contain components that become hot during normal operation. Do not touch. CAUTION The inverters have a supply air and exhaust air area, which must remain unobstructed. The device can overheat and be destroyed if the installation signs are not adhered to. Disassemble the tracks required for transportation located at the top for operating the cabinet devices. CAUTION Inverter electronics can be destroyed when touched and when electrostatically charged. Discharge via earth potential before touching and wear appropriate protective gear. CAUTION No connections or disconnections are allowed at the terminal strips or internal connectors during operation. Turn device off before performing terminal work; wait 5 to 20 minutes (condenser charge) and recheck to ensure device is no longer live. vi 152936 This manual is for use by qualified personnel only. Safety General Safety Precautions 1. When installing the Xantrex GT250 E use only components recommended or sold by the manufacturer. Doing otherwise may result in a risk of fire, electric shock, injury to persons, and will void the warranty. 2. Do not attempt to operate the Xantrex GT250 E if it has been dropped, or received more than cosmetic damage during transport or shipping. If the Xantrex GT250 E is damaged, or suspected to be damaged, see the Warranty for this unit in the Xantrex GT250 E Operation and Maintenance Manual. 3. To reduce the risk of electrical shock, lock-out and tag the Xantrex GT250 E before attempting any maintenance, service, or cleaning. Personal Safety Follow these instructions to ensure your safety while working with the Xantrex GT250 E. Qualified Personnel Only qualified personnel should perform the transportation, installation and initial operation and maintenance of the Xantrex GT250 E (IEC 364 or CENELEC HD 384 or DIN VDE 0100 and IEC 664 or DIN VDE 0110). Follow all national accident prevention regulations. Qualified personnel, within the meaning of these basic safety regulations, will be people who are familiar with the installation, assembly, start-up and operation of the Xantrex GT250 E and have the appropriate qualifications with respect to their functions. Safety Equipment Authorized service personnel must be equipped with standard safety equipment including the following: • Safety glasses • Ear protection • Steel-toed safety boots • Safety hard hats • Padlocks and tags • Appropriate meter to verify that the circuits are de-energized (1000 Vac and DC rated, minimum) Check local safety regulations for other requirements. 152936 vii This manual is for use by qualified personnel only. Safety Wiring Requirements 1. All wiring methods and materials shall be in accordance with the National Electrical Code ANSI/NFPA 70, European Requirements, as well as all state and local code requirements (for example, DIN / VDE). 2. The Xantrex GT250 E has a three-phase output. 3. The AC power conductor wiring interfacing with the AC terminals in the AC Interface Enclosure (-H0) are located at L1, L2, L3. These terminals requires the use of a crimp-on type ring terminal or compression-type lug. Keep these cables together as much as possible and ensure that all cables pass through the same knockout and conduit fittings, allowing any inductive currents to cancel. For torque values, see Table A-5 on page A–5. See Figure 3-8 on page 3–9 for the location of these terminals. 4. The AC neutral conductor from the transformer is terminated in the AC Interface Enclosure (-H0) at the Copper Ground Bar. This terminal requires the use of a crimp-on type ring terminal or compression-type lug. For torque values, see Table A-5 on page A–5. See Figure 3-8 on page 3–9 for the location of these terminals. 5. The AC Control Voltage wiring interfacing with the Control Voltage terminals in the AC Interface Enclosure are located at -X2 L1, L2 and PE. For torque values, see Table A-5 on page A–5. See Figure 3-8 on page 3–9 for the location of these terminals. 6. The DC power conductor wiring interfacing with the DC terminals is terminated in the DC Interface Enclosure (-H2). These terminals requires the use of a crimp-on type ring terminal or compression-type lug. Keep these cables together as much as possible and ensure that all cables pass through the same knockout and conduit fittings, allowing any inductive currents to cancel. For torque values, see Table A-6 on page A–5. See Figure 3-9 on page 3–11 for the location of these terminals. 7. This product is intended to be installed as part of a permanently grounded electrical system as per the National Electric Code ANSI/NFPA70 and EU requirements, as well as all state and local code requirements (for example, DIN/VDE). A copper ground rod must be installed within 3 ft. (1 m) of the Xantrex GT250 E Enclosure. This is the single point earth ground for the inverter system. The single point ground for the system is to be made at the ground bus bar in the AC Interface Enclosure. 8. The equipment grounds on the Xantrex GT250 E are marked with PE. 9. AC overcurrent protection for the utility interconnect (Grid-tie) must be provided by the installers as part of the Xantrex GT250 E installation. CAUTION: Fire Hazard In accordance with the National Electrical Code, ANSI/NFPA 70, connect only to a circuit provided with 1200 amperes maximum branch circuit overcurrent protection. viii 152936 This manual is for use by qualified personnel only. Safety Operational Safety Procedures Never work alone when servicing this equipment. A team of two is required until the equipment is properly de-energized, locked-out and tagged, and verified deenergized with a meter. Thoroughly inspect the equipment prior to energizing. Verify that no tools or equipment have inadvertently been left behind. Lockout and Tag Safety requirements mandate that this equipment not be serviced while energized. Power sources for the Xantrex GT250 E must be locked-out and tagged prior to servicing. A padlock and tag should be installed on each energy source prior to servicing. WARNING: Shock Hazard Review the system schematic for the installation to verify that all available energy sources are de-energized. DC bus voltage may also be present. Be sure to wait the full 20 minutes to allow the capacitors to discharge completely. Schematics are located inside the front door of the unit. The Xantrex GT250 E can be energized from both the AC source and the DC source. To ensure that the inverter is de-energized prior to servicing, lockout and tag the Xantrex GT250 E using the following procedure. 1. Open, lockout, and tag the incoming power at the utility main circuit breaker. 2. Open, lockout, and tag the AC Disconnect Switch (-Q1) on the AC Interface Enclosure (-H0). See Figure 1-4 on page 1–6 for the location of the AC Disconnect Switch. 3. Open, lockout, and tag the DC Disconnect Switch (-Q11) on the DC Interface Enclosure (-H2). See Figure 1-4 on page 1–6 for the location of the DC Disconnect Switch. 4. Using a confirmed, accurate meter, verify all power to the inverter is deenergized. A confirmed, accurate meter must be verified on a known voltage before use. Ensure that all incoming energy sources are de-energized by checking the following locations. a) AC Utility Terminals: (Bottom of L1, L2, L3 and PE) See Figure 3-9 on page 3–11 and Figure 3-10 on page 3–11 for the location of these terminals. b) PV Terminals: (PV+ and PV-) See Figure 3-11 on page 3–12 for the location of these terminals. 152936 ix This manual is for use by qualified personnel only. Safety De-Energize/Isolation Procedure The following procedure should be followed to de-energize the Xantrex GT250 E for maintenance. WARNING The terminals of the DC input may be energized if the PV arrays are energized. In addition, allow 20 minutes for all capacitors within the main Enclosure to discharge after disconnecting the Xantrex GT250 E from AC and DC sources. To isolate the Xantrex GT250 E: 1. Turn the ON/OFF switch to the OFF position. 2. Open the DC interface disconnect switch (-Q11). 3. Open the AC interface disconnect switch (-Q1). 4. Open the utility connection circuit breaker. 5. Install lockout devices on the utility connection circuit breaker, AC and DC disconnect switch. Interconnection Standards Compliance The Xantrex GT250 E complies with the German grid protection requirements of VDEW and the Spanish RD 1663/2000. The Xantrex GT250 E is designed to meet UL 1741 Static Inverters And Charge Controllers For Use In Photovoltaic Power Systems, as well as IEEE 519. Refer to both documents for details of these recommendations and test procedures. Intended Use The Xantrex GT250 E may only be used in connection with PV modules. It is not suitable for any other application areas. An initial operation (e.g. starting the intended operation) will only be allowed when observing the EMC guideline (89/336/EWG). The Xantrex GT250 E complies with the 73/23/EWG low voltage directive requirements. The harmonized standards of the series EN 50178/DIN VDE 0160 in connection with EN 60439-1/DIN VDE 0660 part 500 and EN 60146/DIN VDE 0558 will be used for the inverters. x 152936 This manual is for use by qualified personnel only. Contents Important Safety Instructions - - - - - - - - - - - - - - - - - - - - - - - - - - - - - - - - - - - - - - - - - - - v 1 Introduction Description of the Xantrex GT250 E - - - - - - - - - - - - - - - - - - - - - - - - - - - - - - - - - - - - - - - - - - - - 1–2 Operator Interface Controls - - - - - - - - - - - - - - - - - - - - - - - - - - - - - - - - - - - - - - - - - - - - - - - - - - 1–3 ON/OFF Switch - - - - - - - - - - - - - - - - - - - - - - - - - - - - - - - - - - - - - - - - - - - - - - - - - - - - - - - - 1–4 Emergency Stop (E-STOP) - - - - - - - - - - - - - - - - - - - - - - - - - - - - - - - - - - - - - - - - - - - - - - - - 1–5 AC and DC Disconnect Switches - - - - - - - - - - - - - - - - - - - - - - - - - - - - - - - - - - - - - - - - - - - 1–6 Communication Features and Methods - - - - - - - - - - - - - - - - - - - - - - - - - - - - - - - - - - - - - - - - - 1–7 System Status and Fault Reporting - - - - - - - - - - - - - - - - - - - - - - - - - - - - - - - - - - - - - - - - - - 1–7 Data Logging - - - - - - - - - - - - - - - - - - - - - - - - - - - - - - - - - - - - - - - - - - - - - - - - - - - - - - - - - 1–9 PC Connection Methods - - - - - - - - - - - - - - - - - - - - - - - - - - - - - - - - - - - - - - - - - - - - - - - - - - 1–9 Direct Access Connection - - - - - - - - - - - - - - - - - - - - - - - - - - - - - - - - - - - - - - - - - - - - 1–10 Remote Access Connection - - - - - - - - - - - - - - - - - - - - - - - - - - - - - - - - - - - - - - - - - - - 1–10 Optional Equipment - - - - - - - - - - - - - - - - - - - - - - - - - - - - - - - - - - - - - - - - - - - - - - - - - - - - - - 1–11 RS232 Converter Kit - - - - - - - - - - - - - - - - - - - - - - - - - - - - - - - - - - - - - - - - - - - - - - - - - - - - 1–11 2 Planning Overview of Xantrex GT250 E Installation - - - - - - - - - - - - - - - - - - - - - - - - - - - - - - - - - - - - - - - - 2–2 PV Planning - - - - - - - - - - - - - - - - - - - - - - - - - - - - - - - - - - - - - - - - - - - - - - - - - - - - - - - - - - - - - 2–2 Environmental Requirements - - - - - - - - - - - - - - - - - - - - - - - - - - - - - - - - - - - - - - - - - - - - - - - - - 2–3 Ground Requirements - - - - - - - - - - - - - - - - - - - - - - - - - - - - - - - - - - - - - - - - - - - - - - - - - - - - - - 2–3 Communication Requirements - - - - - - - - - - - - - - - - - - - - - - - - - - - - - - - - - - - - - - - - - - - - - - - - 2–3 Utility Side Isolation Transformer Requirements - - - - - - - - - - - - - - - - - - - - - - - - - - - - - - - - - - - - 2–4 Electrical Diagrams - - - - - - - - - - - - - - - - - - - - - - - - - - - - - - - - - - - - - - - - - - - - - - - - - - - - - - - 2–5 Conduit Entry - - - - - - - - - - - - - - - - - - - - - - - - - - - - - - - - - - - - - - - - - - - - - - - - - - - - - - - - - - - - 2–5 Anchoring the Xantrex GT250 E - - - - - - - - - - - - - - - - - - - - - - - - - - - - - - - - - - - - - - - - - - - - - - - 2–6 3 Installation Unloading - - - - - - - - - - - - - - - - - - - - - - - - - - - - - - - - - - - - - - - - - - - - - - - - - - - - - - - - - - - - - - 3–2 Moving the Xantrex GT250 E - - - - - - - - - - - - - - - - - - - - - - - - - - - - - - - - - - - - - - - - - - - - - - 3–2 Unpacking the Xantrex GT250 E - - - - - - - - - - - - - - - - - - - - - - - - - - - - - - - - - - - - - - - - - - - - 3–2 Removing the Pallet and Moving the Xantrex GT250 E - - - - - - - - - - - - - - - - - - - - - - - - - - - - 3–3 Moving with a Forklift - - - - - - - - - - - - - - - - - - - - - - - - - - - - - - - - - - - - - - - - - - - - - - - - - 3–3 Moving with a Crane - - - - - - - - - - - - - - - - - - - - - - - - - - - - - - - - - - - - - - - - - - - - - - - - - 3–4 Mounting and Anchoring the Units - - - - - - - - - - - - - - - - - - - - - - - - - - - - - - - - - - - - - - - - - - - - - 3–5 Opening or Closing Access Doors - - - - - - - - - - - - - - - - - - - - - - - - - - - - - - - - - - - - - - - - - - - - - 3–5 Wiring - General - - - - - - - - - - - - - - - - - - - - - - - - - - - - - - - - - - - - - - - - - - - - - - - - - - - - - - - - - - 3–7 Overcurrent Protection - - - - - - - - - - - - - - - - - - - - - - - - - - - - - - - - - - - - - - - - - - - - - - - - - - - 3–8 Conductor Termination - - - - - - - - - - - - - - - - - - - - - - - - - - - - - - - - - - - - - - - - - - - - - - - - - - - 3–8 Grounding - - - - - - - - - - - - - - - - - - - - - - - - - - - - - - - - - - - - - - - - - - - - - - - - - - - - - - - - - - - - 3–9 Wiring - Specific - - - - - - - - - - - - - - - - - - - - - - - - - - - - - - - - - - - - - - - - - - - - - - - - - - - - - - - - - 3–10 PV Array Connections - - - - - - - - - - - - - - - - - - - - - - - - - - - - - - - - - - - - - - - - - - - - - - - - - - 3–12 xi This manual is for use by qualified personnel only. Contents Remote Communications - - - - - - - - - - - - - - - - - - - - - - - - - - - - - - - - - - - - - - - - - - - - - - - - - Telephone Line Connections - - - - - - - - - - - - - - - - - - - - - - - - - - - - - - - - - - - - - - - - - - - - PC Connection Methods - - - - - - - - - - - - - - - - - - - - - - - - - - - - - - - - - - - - - - - - - - - - - - - Remote Connection (Standard) - - - - - - - - - - - - - - - - - - - - - - - - - - - - - - - - - - - - - - - Direct Connection (Serial) - - - - - - - - - - - - - - - - - - - - - - - - - - - - - - - - - - - - - - - - - - - - 4 3–13 3–13 3–14 3–14 3–14 Verification Verification Procedure Summary - - - - - - - - - - - - - - - - - - - - - - - - - - - - - - - - - - - - - - - - - - - - - Visual Inspection of Mechanical Connections - - - - - - - - - - - - - - - - - - - - - - - - - - - - - - - - - - - - Visual Inspection of Electrical Connections - - - - - - - - - - - - - - - - - - - - - - - - - - - - - - - - - - - - - Corrective Action - - - - - - - - - - - - - - - - - - - - - - - - - - - - - - - - - - - - - - - - - - - - - - - - - - - - - - - - - 4–2 4–3 4–3 4–3 A Specifications System Specifications - - - - - - - - - - - - - - - - - - - - - - - - - - - - - - - - - - - - - - - - - - - - - - - - - - - - - A–2 Environmental Specifications - - - - - - - - - - - - - - - - - - - - - - - - - - - - - - - - - - - - - - - - - - - - - - A–2 Electrical Specifications - - - - - - - - - - - - - - - - - - - - - - - - - - - - - - - - - - - - - - - - - - - - - - - - - - A–3 Regulatory Specifications - - - - - - - - - - - - - - - - - - - - - - - - - - - - - - - - - - - - - - - - - - - - - - - - A–3 Over Voltage, Under Voltage and Frequency Ranges - - - - - - - - - - - - - - - - - - - - - - - - - - - - A–4 Bolt Sizing and Torque Requirements - - - - - - - - - - - - - - - - - - - - - - - - - - - - - - - - - - - - - - - - A–5 Dimensions - - - - - - - - - - - - - - - - - - - - - - - - - - - - - - - - - - - - - - - - - - - - - - - - - - - - - - - - - - - - - A–6 xii 152936 This manual is for use by qualified personnel only. Figures Figure 1-1 Figure 1-2 Figure 1-3 Figure 1-4 Figure 1-5 Figure 1-6 Figure 1-7 Figure 1-8 Figure 2-1 Figure 2-2 Figure 2-3 Figure 3-1 Figure 3-2 Figure 3-3 Figure 3-4 Figure 3-5 Figure 3-6 Figure 3-7 Figure 3-8 Figure 3-9 Figure 3-10 Figure 3-11 Figure 3-12 Figure 3-13 Figure A-1 Xantrex GT250 E Operator Interface Components- - - - - - - - - - - - - - - - - - - - - - - - - - - 1–3 ON/OFF Switch - - - - - - - - - - - - - - - - - - - - - - - - - - - - - - - - - - - - - - - - - - - - - - - - - - - 1–4 Emergency Stop- - - - - - - - - - - - - - - - - - - - - - - - - - - - - - - - - - - - - - - - - - - - - - - - - - - 1–5 AC and DC Disconnect Switches- - - - - - - - - - - - - - - - - - - - - - - - - - - - - - - - - - - - - - - 1–6 LCD Display and UFCU Location- - - - - - - - - - - - - - - - - - - - - - - - - - - - - - - - - - - - - - - 1–8 MultiTech® 56K Modem and RS232/FO Converter - - - - - - - - - - - - - - - - - - - - - - - - - 1–10 Surge Arrester - - - - - - - - - - - - - - - - - - - - - - - - - - - - - - - - - - - - - - - - - - - - - - - - - - - 1–10 RS232/FO Converter Kit - - - - - - - - - - - - - - - - - - - - - - - - - - - - - - - - - - - - - - - - - - - - 1–11 Xantrex GT250 E Electrical Diagram - - - - - - - - - - - - - - - - - - - - - - - - - - - - - - - - - - - - 2–5 Enclosure Conduit Entries, Bottom Side View - - - - - - - - - - - - - - - - - - - - - - - - - - - - - - 2–5 Main Inverter Anchor Bolt Pattern (Not to scale) - - - - - - - - - - - - - - - - - - - - - - - - - - - - 2–6 Center of Gravity - - - - - - - - - - - - - - - - - - - - - - - - - - - - - - - - - - - - - - - - - - - - - - - - - - 3–3 Forklift Lifting Locations - Underneath Unit - - - - - - - - - - - - - - - - - - - - - - - - - - - - - - - - 3–4 Lifting Using a Crane - - - - - - - - - - - - - - - - - - - - - - - - - - - - - - - - - - - - - - - - - - - - - - - 3–4 Inverter Enclosure Access Doors - - - - - - - - - - - - - - - - - - - - - - - - - - - - - - - - - - - - - - - 3–5 AC Interface Access Door- - - - - - - - - - - - - - - - - - - - - - - - - - - - - - - - - - - - - - - - - - - - 3–6 DC Interface Access Door - - - - - - - - - - - - - - - - - - - - - - - - - - - - - - - - - - - - - - - - - - - 3–6 Single-point Ground; Ground Bar - - - - - - - - - - - - - - - - - - - - - - - - - - - - - - - - - - - - - - 3–9 Chassis Ground Bar (TB1) - - - - - - - - - - - - - - - - - - - - - - - - - - - - - - - - - - - - - - - - - - - 3–9 AC Terminal Connections from the Utility - - - - - - - - - - - - - - - - - - - - - - - - - - - - - - - - 3–11 AC Control Voltage Terminal Connections - - - - - - - - - - - - - - - - - - - - - - - - - - - - - - - 3–11 PV Array Cable Routing and Terminations - - - - - - - - - - - - - - - - - - - - - - - - - - - - - - - 3–12 Telephone Cable Routing - - - - - - - - - - - - - - - - - - - - - - - - - - - - - - - - - - - - - - - - - - - 3–13 RS232/FO Converter Kit Installation - - - - - - - - - - - - - - - - - - - - - - - - - - - - - - - - - - - - 3–15 Xantrex GT250 E Dimensions - - - - - - - - - - - - - - - - - - - - - - - - - - - - - - - - - - - - - - - - - A–6 xiii This manual is for use by qualified personnel only. xiv Tables Table A-1 Table A-2 Table A-3 Table A-4 Table A-5 Table A-6 Environmental Specifications- - - - - - - - - - - - - - - - - - - - - - - - - - - - - - - - - - - - - - - - - Electrical Specifications - - - - - - - - - - - - - - - - - - - - - - - - - - - - - - - - - - - - - - - - - - - - Regulatory Specifications - - - - - - - - - - - - - - - - - - - - - - - - - - - - - - - - - - - - - - - - - - - Over/Under Voltage and Over/Under Frequency Ranges - - - - - - - - - - - - - - - - - - - - AC Terminal Bolt Size, and Torque Values - - - - - - - - - - - - - - - - - - - - - - - - - - - - - - - DC Terminal Bolt Size, and Torque Values - - - - - - - - - - - - - - - - - - - - - - - - - - - - - - - - A–2 A–3 A–3 A–4 A–5 A–5 xv This manual is for use by qualified personnel only. xvi 1 Introduction Chapter 1, “Introduction” provides information about the features and functions of the Xantrex GT250 E 250 kW Grid-Tied Photovoltaic Inverter. This manual is for use by qualified personnel only. Introduction Description of the Xantrex GT250 E The Xantrex GT250 E 250 kW Grid-Tied Photovoltaic Inverter is a utility interactive, three-phase power conversion system for grid-connected photovoltaic arrays with a power rating of 250 kW. Designed to be easy to install and operate, the Xantrex GT250 E automates start-up, shutdown, and fault detection scenarios. With user-definable power tracking that matches the inverter to the array and adjustable delay periods, users are able to customize start up and shut down sequences. Multiple Xantrex GT250 E inverters are easily paralleled for larger power installations. The Xantrex GT250 E power conversion system consists of a pulse-width modulated (PWM) inverter, switch gear for isolation and protection of the connected AC and DC power sources. Housed in a rugged IP21 rated, galvanized steel Enclosure, the Xantrex GT250 E incorporates sophisticated Intellimod (IPM) Insulated Gate Bipolar Transistors (IGBTs) as the main power switching devices. An advanced, field-proven, Maximum Peak Power Tracker (MPPT) integrated within the Xantrex GT250 E control firmware ensures the optimum power throughput for harvesting energy from the photovoltaic array. The advanced design of the Xantrex GT250 E includes an EMI output filter and the main AC contactor located electrically on the inverter side of the isolation transformer. Additionally, the Xantrex GT250 E integrated controller contains self-protection features including over and under voltage and frequency safeguards. An integral anti-island protection scheme prevents the inverter from feeding power to the grid in the event of a utility outage. The Xantrex GT250 E includes a local user interface comprised of an ON/OFF switch, keypad, and 4-line, 80 character LCD display. A user-friendly, Graphic User Interface (GUI) provides a remote interface for operator interrogation of Xantrex GT250 E system status, control, metering/ data logging and protective functions within the Xantrex GT250 E. The status, control, and logging features are also supported by the data modem (included) and can be accessed remotely. The Xantrex GT250 E comes in a set of three Enclosures to house the Electronics described above. The left section is the AC Interface Enclosure (-H0). The center section is the Main Inverter Enclosure (-H1). The right section is the DC Interface Enclosure (-H2). The three Enclosures are constructed and delivered as one complete assembly. These components are identified in Figure 1-1 on page 1–3 and the dimensions are identified in Figure A-1 on page A–6. 1–2 152936 This manual is for use by qualified personnel only. Operator Interface Controls Operator Interface Controls The Xantrex GT250 E comes in a set of 3 enclosures to house the Electronics described above. The left section is the AC Interface Enclosure (-H0). The center section is the Inverter Enclosure (-H1). The right section is the DC Interface Enclosure (-H2). The 3 enclosures are constructed and delivered as one complete assembly. Operator interface controls are located on the front door of the main inverter Enclosure. These controls include an ON/OFF Switch, 4-line LCD display and keypad called the Universal Frontpanel Control Unit (UFCU). Additionally there is an AC and DC Disconnect on the AC Interface Enclosure and the DC Interface Enclosure Doors and an Emergency (E-STOP) push button. Exhaust Exhaust Exhaust Exhaust DC Interface Enclosure -H2 AC Interface Enclosure -H0 LCD Display Universal Frontpanel Control (UFCP) On/Off Switch E-STOP Push button AC Disconnect Switch DC Disconnect Switch Main Inverter Enclosure -H1 (Front View) Air Intake Figure 1-1 Xantrex GT250 E Operator Interface Components WARNING: Shock Hazard Before attempting to service the Xantrex GT250 E, follow the de-energize Lockout and Tag procedure in the Xantrex GT250 E Operation and Maintenance Manual. 152936 1–3 This manual is for use by qualified personnel only. Introduction ON/OFF Switch The Xantrex GT250 E incorporates a maintained position ON/OFF switch located on the right center door, under the main control display. Under normal conditions, the ON/OFF switch is in the ON position. Turning the switch to the OFF position will initiate an immediate controlled shutdown of the Xantrex GT250 E and open both the main AC and DC contactors within the unit. The main AC and DC contactors cannot be closed unless the switch is in the ON position. The Xantrex GT250 E is prevented from being restarted until the ON/OFF switch is turned back to the ON position. WARNING: Shock Hazard Turning the ON/OFF switch to the OFF position does NOT remove all hazardous voltages from inside the inverter. Before attempting to service the Xantrex GT250 E, follow the de-energize Lockout and Tag procedure page ix. Figure 1-2 ON/OFF Switch 1–4 152936 This manual is for use by qualified personnel only. Operator Interface Controls Emergency Stop (E-STOP) The Xantrex GT250 E incorporates a maintained position E-STOP pushbutton located on the Inverter Enclosure. Under normal conditions, the E-STOP pushbutton is in the CLOSED (extended) position. Pushing the pushbutton to the OPEN (depressed) position will initiate an immediate controlled shutdown of the Xantrex GT250 E and open both the main AC and DC contactors within the unit. The main AC and DC contactors cannot be closed unless the pushbutton is in the CLOSED (extended) position. The Xantrex GT250 E is prevented from being restarted until the E-STOP pushbutton is in the CLOSED (extended) position. Provisions are supplied for adding a remote emergency stop circuit. Figure 1-3 Emergency Stop 152936 1–5 This manual is for use by qualified personnel only. Introduction AC and DC Disconnect Switches Both AC and DC Interface Enclosure doors are equipped with lockout hasps for personnel safety. The Enclosure doors should not be opened while the Xantrex GT250 E is operating. The switch handles and shafts provide a door interlock for both the AC and DC interface Enclosures. The doors cannot be opened when the switch is in the ON position. The AC and DC Disconnect switches are each equipped with an auxiliary contact block which enables the switch to be used as a load break disconnect. In the event that either Disconnect switch is opened while the Xantrex GT250 E is processing power from the PV array, the early-break contact block will signal the CCU2 (Converter Control Unit) to stop processing power prior to opening the Disconnect switch. Additionally, opening the Disconnect switch will cause the Xantrex GT250 E to execute an immediate orderly shutdown, open both the main AC and DC contactors, and report a E-STOP fault on the LCD of the UFCU. When working on the system, disconnecting only the main control switch on the AC and DC side is insufficient. All Xantrex GT250 E Inverter Enclosure doors must be locked during normal operation. WARNING: Shock Hazard Disengaging the Inverter Enclosure door interlock switch does NOT remove all hazardous voltages from inside the inverter. Before attempting to service the Xantrex GT250 E, follow the de-energize Lockout and Tag procedure on page ix. AC Disconnect Switch AC Interface Enclosure DC Disconnect Switch DC Interface Enclosure Figure 1-4 AC and DC Disconnect Switches 1–6 152936 This manual is for use by qualified personnel only. Communication Features and Methods Communication Features and Methods The Xantrex GT250 E provides two types of information to the user: • system status and/or fault information, and • data logging information. System status and fault information can be accessed using the Universal Front Panel Control Unit (UFCU) or a personal computer using the Xantrex Solar Graphic User Interface (GUI) software. Data logging requires the use of a PC using the GUI software. The Xantrex GT250 E communicates system status information to the user using the following methods. • The Front Panel Control Unit (UFCU) Display • PC Connection (Direct and/or Remote) - Xantrex Solar Graphic User Interface (GUI) Software required (may require additional hardware) • External Analog Monitoring - (Optional) (e.g., Irradiance, PV temp, ambient temp, wind speed) (requires additional hardware) System Status and Fault Reporting Basic system status and all fault conditions rising from within the Xantrex GT250 E are reported to the UFCU. The unit stores the time and details of all faults in nonvolatile memory. The 4-line LCD will display a hexadecimal value and a brief text description of the fault. The fault value is also made available to the Graphic User Interface (GUI). The GUI has a more extensive description of the fault. The UFCU keypad is located on the right center door to manipulate and view system operation and status. The keypad is comprised of 20 touch-sensitive keys that provide a means to navigate through the menus and alter userchangeable settings. See the Xantrex GT250 E 250 kW Grid-Tied Photovoltaic Inverter Operation and Maintenance Manual (Part #: 152937) for details. 152936 1–7 This manual is for use by qualified personnel only. Introduction LCD Display Universal Front Panel Control Unit (UFCU) Figure 1-5 LCD Display and UFCU Location This information can also be accessed using a personal computer using the GUI software either directly or remotely. Alternatively, the fault reporting can be accomplished using the optional Fax Modem. Types of status information include: • Current Operating State or Goal State • Fault Code (if applicable) • Inverter State • Line Voltage and Current • Inverter Matrix Temperature • Inverter Power • PV State • PV Voltage and Current • PV Power • Grid Frequency • Peak Power Tracker Enabled 1–8 152936 This manual is for use by qualified personnel only. Communication Features and Methods Data Logging The inverter stores data values and software metrics for debugging. These values are stored within the CCU2 controller board in non-volatile memory. Data logging requires the use of a PC connection using the Xantrex Solar Graphic User Interface (GUI) software. • The Data Logging features include: • Operational Values • Internal Metrics • Data Log Acquisition • Graphic Data Analysis • Fault Log Acquisition • Software Upgrade • Accumulated Values • Configurable Parameters PC Connection Methods Personal computers can be used to access the system status and programming features of the Xantrex GT250 E. This allows monitoring and control of the inverter from a remote office, a home office, motel room, or any location where a laptop or desktop computer can make a modem telephone call. Computers can be connected either directly or remotely. Software is included to provide a graphic user interface that relates important system information. This software is called Xantrex Solar Graphic Interface (GUI). See "Computer Communications with the Xantrex GT250 E" in the Xantrex GT250 E 250 kW Grid-Tied Photovoltaic Inverter Operation and Maintenance Manual (Part #: 152937) for additional information. The Enclosure comes with a factory-installed MultiTech® 56K modem and Surge Arrestor (-F36). The RS232/Fiber optic converter is configured for ethernet use. If you are planning on using this connection for direct PC access, it will be necessary to replace the RS232/FO converter (Part #: 1-152059-03) with RS232/ FO converter (Manufacturer p/n: 1-152624-01 KIT, COMM, DIRECT, PC TO CCU). The GUI can dial up the inverter and receive fault report calls from it through a standard Hayes-compatible, landline modem. When the GUI initiates a call through the modem at the GUI computer, the inverter’s modem answers the call and initiates a 9600 baud serial connection, effectively as if the GUI was connected directly. Or, if the inverter experiences a fault, it will initiate a call to the GUI and report the fault details. 152936 1–9 This manual is for use by qualified personnel only. Introduction RS232/FO Converter MultiTech® 56K Modem Figure 1-6 MultiTech® 56K Modem and RS232/FO Converter -F36 Surge Arrester Figure 1-7 Surge Arrester Direct Access Connection The Xantrex GT250 E can be directly accessed by a computer. This connection requires using the RS232 Converter kit (Manufacturer p/n: 1-152624-01 KIT, COMM, DIRECT, PC TO CCU). The kit contains an RS232/FO converter configured for PC use with an adapter, a DB9/DB25 serial cable and a fiber optic harness. Remote Access Connection The Xantrex GT250 E can be remotely accessed through a telephone connection. A MultiTech® 56 Kbps data modem is installed in the inverter for connection to a remote computer. The customer has the ability to control and monitor the status of the inverter through this connection. 1–10 152936 This manual is for use by qualified personnel only. Optional Equipment Optional Equipment The following options are available for purchase for use with the Xantrex GT250 E to enhance its communications capability. The additional Xantrex GT250 E options can be field installed. Contact a Schneider Electric distributor for further information on installation options. RS232 Converter Kit RS232 Converter kit (Manufacturer p/n: 1-152624-01 KIT, COMM, DIRECT, PC TO CCU) contains an RS232/FO converter configured for PC use with an adapter, a DB9/DB25 serial cable and a fiber optic harness (not shown). RS232/FO Converter Kit (Part #: 1-152624-01) DB25 Adapter on Serial Cable DB25-DB25 Gender Changer Adapter DB9 Adapter on Serial Cable RS232 Converter Figure 1-8 RS232/FO Converter Kit 152936 1–11 This manual is for use by qualified personnel only. 1–12 2 Planning Chapter 2, “Planning” provides information to help plan the installation of the Xantrex GT250 E 250 kW Grid-Tied Photovoltaic Inverter. This manual is for use by qualified personnel only. Planning Overview of Xantrex GT250 E Installation WARNING: Shock Hazard Installations of this equipment should only be performed by qualified technicians. Installers must meet all local and state code requirements for licensing and training for the installation of Electrical Power Systems with AC and DC voltage to 600 volts. Planning Planning for a system requires complete understanding of all the components that are involved to successfully install the Xantrex GT250 E to meet the required national, state, and local codes. Definition A power system (such as the Xantrex GT250 E) is a collection of devices designed to supply AC power to the utility grid from a solar energy (PV) source. Components All types of grid-tied inverter installations, residential or industrial, share common components. This chapter describes each component and suggests the minimum requirements for a safe installation. Location The Xantrex GT250 E 250 kW Grid-Tied Photovoltaic Inverter is designed to be installed in an indoor location. The Xantrex GT250 E must be anchored to a level, concrete floor or pad. Clearance Adequate ventilation and service access must be taken into consideration when installing the Xantrex GT250 E. See “Environmental Requirements” for specific clearance requirements and ambient temperature requirements. PV Planning To determine the number of photovoltaic panels that are required for the PV power plant, please use the PV planning tool from the Schneider Electric website: 1. Go to www.schneider-electric.com. 2. Open the Products and Services tab and click Renewable Energies. 3. Navigate to your specific product page. 4. Click Sizing Tools. 2–2 152936 This manual is for use by qualified personnel only. Environmental Requirements Environmental Requirements The following environmental conditions must be established and maintained to ensure the safe and efficient operation and servicing of the Xantrex GT250 E. • Maintain a minimum clearance of 60 cm plus local safety requirements in front of the enclosure for air intake, maintenance and serviceability. • External cabling enters the Xantrex GT250 E from the bottom. Either the Xantrex GT250 E needs to be placed over a foundation hole which holds the cables, or placed on top of a hollow platform which allows access to the bottom of the Xantrex GT250 E. • If external air is used for ventilation, the required liter per minute (L/M) rate must be no less than 87,000 L/M. This assumes the temperature inside the building is allowed to rise 10 °C (18 °F) above the outside temperature. Therefore, the maximum allowable outside ambient temperature is 50 °C (50 °C minus 10 °C equals 40 °C Maximum Ambient Temperature) or 122 °F (122 °F minus 18 °F equals 104 °F Maximum Ambient Temperature). If air conditioning is planned the heat load of the Xantrex GT250 E is 60,000 BTU/Hour at full load. Ground Requirements This product is intended to be installed as part of a permanently grounded electrical system per National Electric Code ANSI/NFPA 70 and EU requirements as well as all state and local code requirements (for example DIN/VDE). A copper ground rod must be installed within 3 ft. (1 m) of the Xantrex GT250 E Enclosure. This is the single point earth ground for the inverter system. The single point ground for the system is to be made at the AC ground bus bar (PE) in the AC Interface Enclosure. Communication Requirements The Xantrex GT250 E comes equipped with a MultiTech® 56K modem to provide remote access to the unit. A direct analog phone line to the local phone service is required to use this feature. The phone line used for Xantrex GT250 E communication cannot be routed through a Private Branch Exchange (PBX) unless an analog PBX card is used. Determine which communications options are required for the installation and procure the appropriate equipment and phone access. 152936 2–3 This manual is for use by qualified personnel only. Planning Utility Side Isolation Transformer Requirements The Xantrex GT250 E may be supplied with a custom, high-efficiency, isolation transformer as a separate component. The utility side windings of the isolation transformer are configured Wye and must match the voltage at the utility inter-tie. The Xantrex GT250 E is a balanced, three-phase, current-sourcing inverter and only operates with the presence of a stable utility voltage. The transformer is also supplied with a neutral connection on the utility interconnect. Connection of this utility-side neutral does not affect the operation of the inverter, however connection of the neutral on the inverter-side does affect the operation and must be left floating or disconnected. Single-phase, grounded loads which may be present between the transformer and utility, will maintain their existing ground reference at the utility distribution transformer. WARNING: Lethal Voltage Grounding the neutral of a Wye-wound transformer may create an “open delta” condition, depending on the utility configuration. This condition may keep the Xantrex GT250 E from detecting a loss of phase condition on the utility system, which may allow potentially lethal voltage to be present on the open-phase wiring. CAUTION: Equipment Damage If the Isolation Transformer neutral terminal is tied to ground, it will cause irreparable damage to the Xantrex GT250 E. Check local regulations for their requirements regarding the connection of these neutrals. 2–4 152936 This manual is for use by qualified personnel only. Electrical Diagrams Electrical Diagrams Since installations vary widely, a sample electrical diagram of the Xantrex GT250 E is provided in Figure 2-1. This diagram is to be used for system planning purposes only. For more detailed information, refer to the schematic illustrations inside the door of the enclosure for electrical schematics. Solar inverter GT500E Sinus Filter high voltage transformer IGBT matrix line contactor 315 V L1 grid L2 lightning protection EMV Filter DC-link L3 AC switch line choke inverter choke lightning protection DC INPUT EMV Filter DC switch Figure 2-1 Xantrex GT250 E Electrical Diagram Conduit Entry Figure 2-2 shows the maximum allowable area and location in which electrical conduits may penetrate the Enclosures of the Xantrex GT250 E. All measurements in mm Figure 2-2 Enclosure Conduit Entries, Bottom Side View 152936 2–5 This manual is for use by qualified personnel only. Planning Anchoring the Xantrex GT250 E The Xantrex GT250 E is designed to be installed in an indoor location. It must be placed on and anchored to a level concrete floor or pad. The concrete floor or pad, upon which the Xantrex GT250 E is anchored, must be structurally designed to meet any local, state, or national requirements for weight, seismic, and wind sheer if applicable. Twelve 16 mm holes are provided in the feet of the Enclosure for anchoring to the floor or pad. Figure 2-3 depicts the layout pattern of the anchoring holes for the Xantrex GT250 E inverter assembly. All measurements in mm Figure 2-3 Main Inverter Anchor Bolt Pattern (Not to scale) The floor or pad should either be pre-drilled to accept masonry anchors or have pre-installed anchoring bolts. 2–6 152936 This manual is for use by qualified personnel only. 3 Installation Chapter 3, “Installation” describes the procedures needed to install the Xantrex GT250 E 250 kW Grid-Tied Photovoltaic Inverter. This section includes unpacking and moving instructions, mounting instructions, and cabling instructions. This manual is for use by qualified personnel only. Installation Unloading WARNING: Heavy Equipment The Xantrex GT250 E weighs approximately 1160 kg. Attempting to lift the equipment by other than the recommended lifting points may damage the equipment or present a personnel safety hazard and void the warranty. Keep all the doors closed and latched when moving the Enclosures. Leaving the door latches unsecured may result in damage to the unit and void the warranty. Moving the Xantrex GT250 E To move the Xantrex GT250 E, use a forklift that has a sufficient lift capacity and has a 66 cm fork span or a crane with a minimum lift capacity of 2000 kg. WARNING: Equipment is heavy If lifted incorrectly, the Xantrex GT250 E could overbalance and cause personal injury. Follow Figure 3-2 and Figure 3-3 to locate the balance point (center of gravity symbol) of various configurations. CAUTION: Equipment Damage c To move the Xantrex GT250 E, use a forklift that has a sufficient lift capacity and has a 66 cm fork span. To move the Xantrex GT250 E by forklift while it is still inside the shipping crates: 1. Place the forks of the forklift below the shipping crate at the points specified on the shipping crate. 2. Pay attention to the balance point (center of gravity) sticker. 3. Lift the Enclosure from beneath the shipping crate. Unpacking the Xantrex GT250 E To unpack the Xantrex GT250 E from the shipping crate: 1. Using a claw hammer or pry bar, remove the crate’s wood top and side panels. 2. Remove the Xantrex GT250 E anchor hardware that attaches it to the shipping pallet. 3–2 152936 This manual is for use by qualified personnel only. Unloading Removing the Pallet and Moving the Xantrex GT250 E CAUTION: Equipment Damage c To move the Xantrex GT250 E, use a forklift that has a sufficient lift capacity and a 66 cm fork span. Use Figure 3-1 to locate the balance point or center of gravity ( symbol). Center of Gravity Side view Figure 3-1 Center of Gravity Moving with a Forklift To move the Xantrex GT250 E using a forklift: 1. Place the forks of the forklift below the unit at the points specified in Figure 3-2. 2. Lift the Xantrex GT250 E from beneath the respective Enclosures. Be sure to use a forklift with a 66 cm fork span. 3. Remove the pallet from beneath the unit. 4. Once the pallets are removed from the units, use the same lifting locations to lift the units into the place where they are to be permanently located. 152936 3–3 This manual is for use by qualified personnel only. Installation Figure 3-2 Forklift Lifting Locations - Underneath Unit Moving with a Crane Ensure you dismantle the top for transport. To move the Xantrex GT250 E with a crane: 1. Attach the crane to the four anchor points on the track. 2. Pay attention to the balance point (center of gravity) sticker. 3. Lift the Enclosure into position. 4. Remove the tracks before operating the Xantrex GT250 E. Figure 3-3 Lifting Using a Crane Important: Before proceeding with the installation, determine the location and layout of the components, conduit penetration locations, conductor and conduit sizing, and method for anchoring the unit. Ensure adequate space is provided for clearance for ventilation and serviceability. Review Chapter 2, “Planning” if necessary before proceeding. 3–4 152936 This manual is for use by qualified personnel only. Mounting and Anchoring the Units Mounting and Anchoring the Units To mount and anchor the Xantrex GT250 E: 1. Predrill the floor or pad to accept masonry anchors for 12 mm bolts, or ensure it has pre-installed anchoring bolts that will fit the 16 mm mounting holes. See Figure 2-3 on page 2–6. 2. Lift the Xantrex GT250 E from beneath with a forklift or pallet jack as shown in Figure 3-2 on page 3–4, or lift the Xantrex GT250 E from above with a crane as shown in Figure 3-3 on page 3–4. Move the Enclosure into place. 3. Secure the Enclosure feet to the floor with the appropriate anchoring hardware. Opening or Closing Access Doors To lock or unlock the front door on the main inverter: 1. Use the key provided with the unit. a) Insert the key in the lock and turn clockwise to open or counterclockwise to lock. b) Pull the front door open from the center. Main Inverter Front Door Lock Figure 3-4 Inverter Enclosure Access Doors 152936 3–5 This manual is for use by qualified personnel only. Installation To Open Access Door: 1. Confirm that the AC Disconnect Switch handle is placed in the OFF (Open) position prior to opening the door. AC Interface 2. Using the key supplied with the unit, turn clockwise to unlock. 3. Pull open from right side. Disconnect Switch To Close Access Door: 1. Confirm that the AC Disconnect Switch handle is placed in the OFF (Open) position prior to closing the door. 2. Close the door. 3. Using the key supplied with the unit, turn counterclockwise to lock. Figure 3-5 AC Interface Access Door To Open Access Door: 1. Confirm that the DC Disconnect Switch handle is placed in the OFF (Open) position prior to opening the door. DC 2. Using the key supplied with the unit, turn clockwise to unlock. Disconnect Switch 3. Pull open from the left side. To Close Access Door: 1. Confirm that the DC Disconnect Switch handle is placed in the OFF (Open) position prior to closing the door. 2. Close the door. 3. Using the key supplied with the unit, turn counterclockwise to lock. Figure 3-6 DC Interface Access Door 3–6 152936 This manual is for use by qualified personnel only. Wiring - General Wiring - General All wiring methods and materials shall be in accordance with the National Electrical Code ANSI/NFPA 70, European Requirements, as well as all state and local code requirements (for example, DIN / VDE). When sizing conductors and conduits interfacing to the Xantrex GT250 E, both shall be in accordance with the National Electric Code ANSI/NFPA 70, European Requirements, as well as all state and local code requirements (for example DIN / VDE). WARNING: Shock Hazard The Xantrex GT250 E Enclosures contain exposed high-voltage conductors. The Enclosure doors should remain closed with the latches tightened, except during installation, maintenance or testing. These servicing instructions are for use by qualified personnel who meet all local and state code requirements for licensing and training for the installation of Electrical Power Systems with AC and DC voltage to 880 volts. To reduce the risk of electric shock, do not perform any servicing other than that specified in the installation instructions unless you are qualified to do so. Do not open the cabinet doors if extreme moisture is present. WARNING: Lethal Voltage In order to remove all sources of voltage from the Xantrex GT250 E, the incoming power must be de-energized at the source. This may be done at the main utility circuit breaker and by opening the AC Disconnect and the DC Disconnect Switches on the Xantrex GT250 E. Review the system configuration to determine all of the possible sources of energy. In addition, allow 20 minutes for the DC bus capacitors, located within the cabinet, to discharge after removing power. CAUTION: Equipment Damage When connecting external AC wires to the Xantrex GT250 E, positive phasing sequence must be maintained throughout the installation process. Refer to the system schematics in the unit enclosure for proper phasing convention. Important: Take care to keep the wire bundles away from any sharp edges which may damage wire insulation over time. Consult the European Standards (for example, DIN/VDE) and NEC ANSI/NFPA 70 Code Book to ensure code compliance. The model Xantrex GT250 E has a three-phase output. Conductor size should have been pre-determined when the conduit was installed. Prepare the appropriate length conductors for each connection. 152936 3–7 This manual is for use by qualified personnel only. Installation Overcurrent Protection Unless provided as part of the Schneider Electric supplied equipment; the AC overcurrent protection for the Utility Interconnect (Grid-tie) must be provided by the installer as part of the Xantrex GT250 E installation. CAUTION: Equipment Damage In accordance with the NEC, ANSI/NFPA 70 (Ninth Edition) the following branchcircuit overcurrent protection must be provided: • 1200A maximum Conductor Termination The Xantrex GT250 E has terminals and bus bars for making all wiring connections required for the installation. All terminals used for making AC and DC connections require the use of copper conductors with an insulation rating of 90 °C (194 °F) (or higher). For bolt size, and torque values for the AC terminals, see Table A-5 on page A–5. For bolt size, and torque values for the DC terminals, see Table A-6 on page A–5. All wiring methods and materials shall be in accordance with the National Electrical Code ANSI/NFPA 70, European Requirements, as well as all state and local code requirements (for example, DIN/VDE). AC Interface Enclosure The AC line terminals in the AC Interface Enclosure (L1, L2, and L3) have three bolts per pole and a maximum of two cables per bolt. These terminals require the use of crimp-on type ring-terminals or compression lugs. See Figure 3-8 on page 3–9 for the location of these terminals. The AC neutral terminal in the AC Interface Enclosure is one bolt per pole and and a maximum of two cables per bolt. These terminals require the use of crimpon type ring terminals or compression-type lugs. See Figure 3-9 on page 3–11 for the location of this terminal. The AC Control Voltage Terminals are one wire per terminal (-X2-L1, -X2-L2, -X2PE). These terminals require a crimp-on ferrule properly sized for the wire. See Figure 3-10 on page 3–11 for the location of these terminals. DC Interface Enclosure The DC terminals in the DC Interface Enclosure (PV+ and PV-) have four bolts per pole and a maximum of two cable per bolt. These terminals require the use of crimp-on type ring-terminals or compression lugs. See Figure 3-11 on page 3–12 for the location of these terminals. Important: Keep these cables together as much as possible, and ensure that all cables pass through the same knockout and conduit fittings, thus allowing any inductive currents to cancel. 3–8 152936 This manual is for use by qualified personnel only. Wiring - General Grounding System Grounding Install a copper ground rod within 3 ft. (1 m) of the Xantrex GT250 E Enclosures per the National Electric Code ANSI/NFPA 70. The single-point ground for the system is to be made at the ground bar in the AC Interface Enclosure. Ground Bar to be used for the Single Point Ground Figure 3-7 Single-point Ground; Ground Bar Chassis Ground The chassis ground is a copper bus bar in the Main Inverter Enclosure and has a 12 mm bolt for terminating the DC ground. The ground conductor size depends on the size of the main circuit breaker. NEC Table 250.122 (Ninth Edition) requires that the ground conductor be at least #3 AWG for a 400 A circuit breaker and #6 AWG for a 200 A circuit breaker. The equipment ground on the Xantrex GT250 E is marked with PE. Ground Bar to be used for the Chassis Ground Figure 3-8 Chassis Ground Bar (TB1) 152936 3–9 This manual is for use by qualified personnel only. Installation Wiring - Specific This section provides information for connecting the AC and DC conductors and the ground conductors. Table A-5 and Table A-6 on page A–5 show the specifications of the AC and DC wiring. To connect the transformer to AC Interface Enclosure: 1. Open the door to the AC Interface Enclosure. 2. Route the AC power conductors L1, L2, L3 phase, neutral, and a neutral ground cable through the conduit from the transformer to the AC Interface Enclosure. 3. Connect the AC power conductors at the L1 (A phase), L2 (B phase), and L3 (C phase) terminals using the M12 hardware. Cables to these terminals must use a crimp-on type ring terminal or compression-type lug. See Figure 3-9 for the location of these terminals. 4. Connect the neutral conductor at the Groundbar. Terminations for the neutral and ground conductors within the AC Interface Enclosure at the groundbar are made with 12 mm hardware. Cables to these terminals must use a crimpon type ring terminal or compression-type lug. See Figure 3-8 for the location of these terminals. 5. Close the door to the AC Interface Enclosure. To connect the AC Control Voltage to AC Interface Enclosure: 6. Open the door to the AC Interface Enclosure. 7. Route the AC Control voltage conductors –X2-L1, -X2-L2 and –X2-PE through the conduit from the source to the AC Interface Enclosure. 8. Connect the AC Control voltage conductors at the –X2 terminal block. These conductors must use crimp-on type Ferrule terminations and the M3 terminal hardware. See Figure 3-9 for the location of these terminals. 9. Close the door to the AC Interface Enclosure. 3–10 152936 This manual is for use by qualified personnel only. Wiring - Specific L1 Phase terminal L3 Phase terminal L2 Phase terminal Figure 3-9 AC Terminal Connections from the Utility AC Control Voltage Terminals (-X2-L1, -X2-L2, X2-PE) Figure 3-10 AC Control Voltage Terminal Connections 152936 3–11 This manual is for use by qualified personnel only. Installation PV Array Connections To make the connections from the PV Array/combiner to DC Interface Enclosure: 1. Open the door to the DC Interface Enclosure. 2. Route the PV Array cables conductors POSitive (PV+) and NEGative (PV-) through the conduit to the DC Interface Enclosure, entering on the underside. 3. The DC power conductor terminations are made at the PV+, and PVallocations and the ground bar. See Figure 3-11. 4. Terminations for the POSitive, NEGative, and PE (ground) conductors within the DC Interface Enclosure are made using the 12 mm hardware. 5. Close the door to the DC Interface Enclosure. PV+ PV- Figure 3-11 PV Array Cable Routing and Terminations 3–12 152936 This manual is for use by qualified personnel only. Remote Communications Remote Communications The Xantrex GT250 E provides remote communications for system monitoring or data logging through a personal computer using the Xantrex Solar Graphic User Interface (GUI) software. The GUI software provides a windows-based interface program that accesses, monitors, and controls the features and functions of the unit. The GUI also provides additional data logging and tracking features which are not available through the UFCU. If multiple inverters are networked together, the software is capable of tracking up to 50 inverters on the same network. The PC can be connected to the unit either directly or remotely. Before installing the GUI software, it will be necessary to determine and establish the proper communication line to support the desired connection. A local telephone line is required to use the factory-installed modem. Telephone Line Connections To connect telephone service: 1. Unlatch and open the door to the AC interface enclosure. 2. Route the Telephone line through the wiring duct work. 3. Connect the Telephone to the RJ-11 termination. The RJ11 Termination is located to the right of -F36, see Figure 3-12. 4. Close and latch the door to the AC interface enclosure. -F36 Communication Port Figure 3-12 Telephone Cable Routing 152936 3–13 This manual is for use by qualified personnel only. Installation PC Connection Methods The personal computer can be connected the following ways. • direct connection - to serial communication port on the controller board • remote connection - through the modem installed in the Enclosure Remote Connection (Standard) The Xantrex GT250 E comes with a MultiTech™ 56K modem installed. This allows monitoring and control of the inverter from a remote office, a home office, motel room, or any location where a laptop or desktop computer can make a modem telephone call. The GUI can dial up the inverter and receive fault report calls from it through a standard Hayes-compatible, landline modem. When the GUI initiates a call through the modem at the GUI computer, the inverter’s modem answers the call and initiates a 9600 baud serial connection, effectively as if the GUI was connected directly. Or, if the inverter experiences a fault, it will initiate a call to the GUI and report the fault details. If connecting to the Inverter remotely using the factory-installed modem: 1. Plug the local phone line into the port provided in the Inverter Enclosure following the instructions on page 3–13. 2. Install the GUI Software. See the Xantrex GT250 E 250 kW Grid-Tied Photovoltaic Inverter Operation and Maintenance Manual (Part #: 152937) for installation instructions. 3. Use a Terminal Emulation program on the PC to access the modem. See the GUI Help Menu "Communication by Modem" for instructions on setting up the Terminal Emulation program on the computer. See also, "Connect to Telephone Number" and "Connect to Remote Inverter by Modem" for additional information. Direct Connection (Serial) The direct connection provides the means to use the features of the GUI by connecting a PC directly to the CCU. This allows field personnel to monitor and control the inverter from a nearby laptop computer directly connected by a serial cable. The computer connects to the inverter directly through one of its serial COM ports running at 9600 baud. The RS232/FO Converter kit (Manufacturer p/n: 1-152624-01 – KIT, COMM, DIRECT, PC TO CCU) is required for this connection to change the communication protocol from ethernet to serial in the Enclosure. The kit contains an RS232/FO converter configured for PC use with an adapter, a DB9/DB25 serial cable and a fiber optic harness. 3–14 152936 This manual is for use by qualified personnel only. Remote Communications If connecting the PC directly to the inverter: 1. Procure an RS232/FO Converter kit containing the converter, a DB9/DB25 serial cable and a fiber optic harness. 2. Record the color of the fibers connected to the white(TX) and Grey(RX) connectors of the Factory installed RS232/FO Converter and disconnect them from the Converter. 3. Remove the two covers from the fiber connectors on the new RS232/FO Converter and install them on the Factory installed converter. 4. Disconnect the power plug from the factory-installed converter and plug it in to the new RS232/FO Converter. 5. Using the fiber colors recorded in Step 2, connect the fibers to the new converter. Allow the Converter to hang from the fibers and the power cord. 6. Plug the DB25-to-DB25 Gender-changer Adapter into the Serial Communications Port on the RS232/FO Converter. 7. Plug the DB25 connector on the serial cable into the gender-adapter and the DB9 connector of the serial cable into the serial port on the computer. Route the cable such that it does not put additional strain on the fibers and power cord. RS232/FO Converter Kit (Part #: 1-152624-01) DB25 Adapter on Serial Cable DB25-DB25 Gender Changer Adapter DB9 Adapter on Serial Cable RS232 Converter Figure 3-13 RS232/FO Converter Kit Installation 152936 3–15 This manual is for use by qualified personnel only. 3–16 4 Verification Chapter 4, “Verification” provides a checklist to ensure the installation of the Xantrex GT250 E is correct and complete. This manual is for use by qualified personnel only. Verification Verification Procedure Summary WARNING: Electrocution Hazard This chapter describes specific steps to ensure the installation of the Xantrex GT250 E 250 kW Grid-Tied Photovoltaic Inverter is correct and complete. Failure to adhere to these warnings could result in severe shock or possible death. Exercise extreme caution at all times to prevent accidents. These installation instructions are for use by those familiar and skilled with high voltage procedures. WARNING: Shock Hazard The Xantrex GT250 E Enclosures contain exposed high-voltage conductors. The Enclosure doors should remain closed with the latches tightened, except during installation, maintenance or testing. To reduce the risk of electric shock, do not perform any servicing other than that specified in the installation instructions unless you are qualified to do so. WARNING: Lethal Voltage In order to remove all sources of voltage from the Xantrex GT250 E, the incoming power must be de-energized at the source. This may be done at the utility main circuit breaker and by opening the AC disconnect and the DC disconnect switches on the Xantrex GT250 E. Review the system configuration to determine all of the possible sources of energy. In addition, allow 20 minutes for the DC bus capacitors, located within the cabinet, to discharge after removing power. The following procedures are intended to verify correct installation and proper wiring of the Xantrex GT250 E. Prior to performing the following verification steps on the Xantrex GT250 E, review all safety requirements and procedures outlined in this manual and on any cautionary markings on the components within the system. Inspect the following items prior to completion of the installation: 1. Visually inspect all the mechanical connections. This would include both electrical conduit fittings, as well as Enclosure anchoring and seismic bracing if required. 2. Visually inspect the electrical connections and verify proper tightness of all terminations. 3. Visually inspect the Isolation Transformer Wye/Wye connections and ensure the transformer neutral connection is left disconnected or floating. 4. Perform corrective actions if required. 4–2 152936 This manual is for use by qualified personnel only. Visual Inspection of Mechanical Connections Visual Inspection of Mechanical Connections To perform a visual inspection of the Xantrex GT250 E mechanical connections: 1. Ensure that the AC and DC Disconnect Switches, as well as any utility interconnect circuit breakers or main disconnect switches, are opened. ❐ 2. Ensure all anchor bolts and any required seismic bracing is properly tightened and in place. ❐ 3. Remove the latches and open the doors of the Inverter Enclosure, the AC and DC Interface Enclosures and inspect. ❐ 4. Verify all wire conduit fittings and connections are properly tightened. ❐ Visual Inspection of Electrical Connections To perform a visual inspection of the Xantrex GT250 E electrical connections: 1. Ensure that the AC and DC disconnect switches, as well as any utility interconnect circuit breakers or main disconnect switches, are opened. ❐ 2. Ensure all conductors and wiring connections interfacing with the Xantrex GT250 E are tightened to the correct torque value. For specific torque values, see Table A-5 on page A–5 and Table A-6 on page A–5. ❐ 3. Verify the AC power conductors terminated at L1, L2, L3 within the AC Interface Enclosure are terminated correctly and properly sequenced. ❐ 4. Verify DC power conductors terminated at PV+ and PV- within the DC Interface Enclosure are terminated correctly and properly polarized. ❐ Corrective Action Perform after initial inspection (if required): 1. Correct any necessary repairs pertaining to the previous inspection steps. 2. Replace the latches and close the doors of the Inverter Enclosure, the AC and DC Interface Enclosures. 3. Ensure that the AC and DC Disconnect Switches, as well as any utility interconnect circuit breaker or main disconnect circuit breaker, are left open. 152936 4–3 This manual is for use by qualified personnel only. 4–4 A Specifications Appendix A provides the environmental and electrical specifications for the Xantrex GT250 E 250 kW Grid-Tied Photovoltaic Inverter. This manual is for use by qualified personnel only. Specifications System Specifications The Xantrex GT250 E has been designed for photovoltaic power systems, which operate within the following specifications. CAUTION: Equipment Damage Operation of the Xantrex GT250 E in a manner other than specified in this manual may cause damage to the Xantrex GT250 E and other system components and will void the terms of the warranty. Environmental Specifications CAUTION The Xantrex GT250 E will be destroyed if stored outside. Only store in dry areas. Table A-1 Environmental Specifications Specification Value Dimensions 2112 mm H x 2006 mm W x 605 mm D (83 in. H x 78 in. W x 24 in. D) Weight 1160 kg (2557 lbs) Allowable Ambient Temperature Operating Storage -10 °C to 45 °C Maximum (14 °F to 113 °F) -25 °C to 55 °C Maximum (-13 °F to 131 °F) Relative Humidity EN60721 temperature 1K1 humidity 1K3 Elevation 1500 m Storage Air Pressure 700 to 1060 mbar Protection Class IP21 Cooling Air Power Element 1800 m3/h starting temperature 68 °C Interior Cooling Air 2400 m3/h starting temperature 40/45 °C Clearance (ventilation and serviceability) Top 100 mm Front 600 mm (door clearance) plus local safety standards A–2 152936 This manual is for use by qualified personnel only. System Specifications Electrical Specifications Table A-2 provides the AC and DC specifications for the Xantrex GT250 E. Table A-2 Electrical Specifications Specification Value Suggested Maximum PV Array Power 280 kWp Nominal AC Input Voltage 315 Vac ± 5% Maximum AC Output Current 460 Arms Nominal AC Input Frequency 50 Hz (+0.5 to -0.7 Hz acceptable range) Rated Output Power 250.0 kW at nominal AC input voltage (315 V) Peak Power Tracking Window 450 to 800 Vdc Maximum Open Circuit Voltage 850 Vdc (880 Vdc optional) Maximum DC Input Current 555 A DC Input 450 to 850 Vdc Line Power Factor approximately 1 (above 20% rated power) AC Current Distortion < 3% THD at rated power Switching Frequency 4.5 kHz Efficiency without Transformer 700 Vdc 315 Vac 250 kW 96.8% control voltage supplied externally External Control Voltage 230 V/400 V External Control Voltage’s max. Power Output 2000 W Inverter’s Couple Capacity Against Earth approx. 15 µF Regulatory Specifications Table A-3 provides the regulatory specifications for the Xantrex GT250 E. Table A-3 Regulatory Specifications Standard Regulation Met General Standards EN50178 VDEW CE Emitted Interference EN61000-6-4 Interference Resistance EN61000-6-2 152936 A–3 This manual is for use by qualified personnel only. Specifications Over Voltage, Under Voltage and Frequency Ranges Table A-4 provides the over voltage, under voltage, over-frequency, and underfrequency detection limits for the Xantrex GT250 E. These detection limits have been factory tested and deemed to be in compliance with requirements for utility interaction. Table A-4 Over/Under Voltage and Over/Under Frequency Ranges Vac Condition (% of Nominal) Voltage Range 50Hza Voltage Range 60Hza Low Range 275 < Vac < 325 275 < Vac < 325 100 ms 283.5 < Vac 283.5 < Vac 100 ms 305 Vac <355 305 Vac <355 100 ms 346.5 < Vac 346.5 < Vac 100 ms Trip Time 87% < Vac < 103% Low Default 90% < Vac High Range 97% < Vac < 113% High Default 110% < Vac 50 Hz Low Range 48.0 < f < 50.5 2 cycles 49.0 < f 2 cycles 49.5 < f < 52.0 2 cycles 51.0 < f 2 cycles -2.0 < f < 0.5 50 Hz Low Default -1.0 < f 50 Hz High Range -0.5 < f < 2.0 50 Hz High Default 1.0 < f 60 Hz Low Range 59.5 < f < 60.5 2 cycles 59.5 < f 2 cycles 59.5 < f < 60.5 2 cycles 60.5 < f 2 cycles -0.5 < f < 0.5 60 Hz Low Default -0.5 < f 60 Hz High Range -0.5 < f < 0.5 60 Hz High Default -0.5 < f a.Adjustable, password protected A–4 152936 This manual is for use by qualified personnel only. System Specifications Bolt Sizing and Torque Requirements Table A-5 provides acceptable bolt sizes, and torque values for AC terminal connections. Table A-5 AC Terminal Bolt Size, and Torque Values Max. # of Conductors per Terminal Bolt (Hardware) Size Torque Requirement s PE (Enclosure Ground) 2 1/M12 75 Nm (55 lb ft) L1, L2, L3 6 3/M12 75 Nm (55 lb ft) -X2-L1, -X2-L2, -X2-PE 1 M3 0.6 – 0.8 Nm (5.3 – 7 lb ft) AC Terminal Connections Table A-6 provides acceptable bolt sizes, and torque values to be connected to the Xantrex GT250 E DC terminal connections. Table A-6 DC Terminal Bolt Size, and Torque Values AC Terminal Connections Max. # of Conductors per Terminal Bolt (Hardware) Size Torque Requirement s PV+, PV- 8 4/M12 75 Nm (55 lb ft) 152936 A–5 This manual is for use by qualified personnel only. Specifications Dimensions Dimensions in mm 475 675 475 605 2112 2006 Figure A-1 Xantrex GT250 E Dimensions A–6 152936 This manual is for use by qualified personnel only. Schneider Electric www.schneider-electric.com ☎ North America 1 408 987 6255 ✉ 1 925 245 1022 [email protected] France 0 825 012 999 [email protected] Deutschland +49 (0) 180 575 6575 +49 (0) 2102 404 7101 [email protected] España +34 93 498 7466 +34 93 305 5026 [email protected] L'Italia +39 035 4151111 +39 035415 3200 [email protected] For other country details please contact your local Schneider Electric Sales Representative or visit our website at: http://www.schneider-electric.com/sites/corporate/en/support/operations/local-operations/local-operations.page 152936 Printed in USA