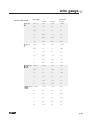
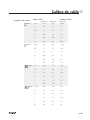
1
CC
CC Power Amplifier
Owner’s Manual
TM
Intended to alert the user to the presence of uninsulated “dangerous voltage” within the product’s enclosure that
may be of sufficient magnitude to constitute a risk of electric shock to persons.
Intended to alert the user of the presence of important operating and maintenance (servicing) instructions in the literature accompanying the product.
CAUTION: Risk of electrical shock — DO NOT OPEN!
CAUTION:To reduce the risk of electric shock, do not remove cover. No user serviceable parts inside. Refer servicing to
qualified service personnel.
WARNING:To prevent electrical shock or fire hazard, do not expose this appliance to rain or moisture. Before using this
appliance, read the operating guide for further warnings.
Este símbolo tiene el propósito, de alertar al usuario de la presencia de “(voltaje) peligroso” sin aislamiento dentro de
la caja del producto y que puede tener una magnitud suficiente como para constituir riesgo de descarga eléctrica.
Este símbolo tiene el propósito de alertar al usario de la presencia de instruccones importantes sobre la operación y
mantenimiento en la información que viene con el producto.
PRECAUCION: Riesgo de descarga eléctrica ¡NO ABRIR!
PRECAUCION: Para disminuír el riesgo de descarga eléctrica, no abra la cubierta. No hay piezas útiles dentro. Deje todo
mantenimiento en manos del personal técnico cualificado.
ADVERTENCIA: Para evitar descargas eléctricas o peligro de incendio, no deje expuesto a la lluvia o humedad este aparato Antes de usar este aparato, Iea más advertencias en la guía de operación.
Ce symbole est utilisé dans ce manuel pour indiquer à l’utilisateur la présence d’une tension dangereuse pouvant être
d’amplitude suffisante pour constituer un risque de choc électrique.
Ce symbole est utilisé dans ce manuel pour indiquer à l’utilisateur qu’il ou qu’elle trouvera d’importantes instructions
concernant l’utilisation et l’entretien de l’appareil dans le paragraphe signalé.
ATTENTION: Risques de choc électrique — NE PAS OUVRIR!
ATTENTION: Afin de réduire le risque de choc électrique, ne pas enlever le couvercle. Il ne se trouve à l’intérieur aucune
pièce pouvant être reparée par l’utilisateur. Confiez I’entretien et la réparation de l’appareil à un réparateur agréé.
AVERTISSEMENT: Afin de prévenir les risques de décharge électrique ou de feu, n’exposez pas cet appareil à la pluie ou
à l’humidité. Avant d’utiliser cet appareil, lisez attentivement les avertissements supplémentaires de ce manuel.
Dieses Symbol soll den Anwender vor unisolierten gefährlichen Spannungen innerhalb des Gehäuses warnen, die von
Ausreichender Stärke sind, um einen elektrischen Schlag verursachen zu können.
Dieses Symbol soll den Benutzer auf wichtige Instruktionen in der Bedienungsanleitung aufmerksam
machen, die Handhabung und Wartung des Produkts betreffen.
VORSICHT: Risiko — Elektrischer Schlag! Nicht öffnen!
VORSICHT: Um das Risiko eines elektrischen Schlages zu vermeiden, nicht die Abdeckung enfernen. Es befinden sich keine
Teile darin, die vom Anwender repariert werden könnten. Reparaturen nur von qualifiziertem Fachpersonal durchführen
lassen.
ACHTUNG: Um einen elektrischen Schlag oder Feuergefahr zu vermeiden, sollte dieses Gerät nicht dem Regen oder
Feuchtigkeit ausgesetzt werden.Vor Inbetriebnahme unbedingt die Bedienungsanleitung lesen.
IMPORTANT SAFETY INSTRUCTIONS
WARNING: When using electrical products, basic cautions should always be followed, including the following:
1.
2.
3.
4.
5.
6.
7.
8.
9.
10.
11.
12.
13.
14.
15.
16.
17.
18.
19.
Read these instructions.
Keep these instructions.
Heed all warnings.
Follow all instructions.
Do not use this apparatus near water.
Clean only with a dry cloth.
Do not block any of the ventilation openings. Install in accordance with manufacturer’s instructions.
Do not install near any heat sources such as radiators, heat registers, stoves or other apparatus (including amplifiers)
that produce heat.
Do not defeat the safety purpose of the polarized or grounding-type plug. A polarized plug has two blades with one
wider than the other. A grounding type plug has two blades and a third grounding plug. The wide blade or third prong is
provided for your safety. If the provided plug does not fit into your outlet, consult an electrician for replacement of the
obsolete outlet.
Protect the power cord from being walked on or pinched, particularly at plugs, convenience receptacles, and the point
they exit from the apparatus.
Only use attachments/accessories provided by the manufacturer.
Use only with a cart, stand, tripod, bracket, or table specified by the manufacturer, or sold with the apparatus. When a
cart is used, use caution when moving the cart/apparatus combination to avoid injury from tip-over.
Unplug this apparatus during lightning storms or when unused for long periods of time.
Refer all servicing to qualified service personnel. Servicing is required when the apparatus has been damaged in any
way, such as power-supply cord or plug is damaged, liquid has been spilled or objects have fallen into the apparatus,
the apparatus has been exposed to rain or moisture, does not operate normally, or has been dropped.
Never break off the ground pin. Write for our free booklet “Shock Hazard and Grounding.” Connect only to a power
supply of the type marked on the unit adjacent to the power supply cord.
If this product is to be mounted in an equipment rack, rear support should be provided.
Note for UK only: If the colors of the wires in the mains lead of this unit do not correspond with the terminals in your
plug‚ proceed as follows:
a) The wire that is colored green and yellow must be connected to the terminal that is marked by the letter E‚ the earth
symbol‚ colored green or colored green and yellow.
b) The wire that is colored blue must be connected to the terminal that is marked with the letter N or the color black.
c) The wire that is colored brown must be connected to the terminal that is marked with the letter L or the color red.
This electrical apparatus should not be exposed to dripping or splashing and care should be taken not to place objects
containing liquids, such as vases, upon the apparatus.
Exposure to extremely high noise levels may cause a permanent hearing loss. Individuals vary considerably in susceptibility to noise-induced hearing loss, but nearly everyone will lose some hearing if exposed to sufficiently intense noise
for a sufficient time. The U.S. Government’s Occupational Safety and Health Administration (OSHA) has specified the
following permissible noise level exposures:
Duration Per Day In Hours
8
6
4
3
2
1 1⁄2
1
1⁄2
1⁄4 or less
Sound Level dBA, Slow Response
90
92
95
97
100
102
105
110
115
According to OSHA, any exposure in excess of the above permissible limits could result in some hearing loss. Ear plugs or protectors to
the ear canals or over the ears must be worn when operating this amplification system in order to prevent a permanent hearing loss, if
exposure is in excess of the limits as set forth above. To ensure against potentially dangerous exposure to high sound pressure levels, it is
recommended that all persons exposed to equipment capable of producing high sound pressure levels such as this amplification system be
protected by hearing protectors while this unit is in operation.
SAVE THESE INSTRUCTIONS!
WICHTIGE SICHERHEITSHINWEISE
ACHTUNG: Beim Einsatz von Elektrogeräten müssen u.a. grundlegende Vorsichtsmaßnahmen befolgt werden:
1.
Lesen Sie sich diese Anweisungen durch.
2.
Bewahren Sie diese Anweisungen auf.
3.
Beachten Sie alle Warnungen.
4.
Befolgen Sie alle Anweisungen.
5.
Setzen Sie dieses Gerät nicht in der Nähe von Wasser ein.
6.
Reinigen Sie es nur mit einem trockenen Tuch.
7.
Blockieren Sie keine der Lüftungsöffnungen. Führen Sie die Installation gemäß den Anweisungen des Herstellers durch.
8.
Installieren Sie das Gerät nicht neben Wärmequellen wie Heizungen, Heizgeräten, Öfen oder anderen Geräten (auch Verstärkern),
die Wärme erzeugen.
9.
Beeinträchtigen Sie nicht die Sicherheitswirkung des gepolten Steckers bzw. des Erdungssteckers. Ein gepolter Stecker weist
zwei Stifte auf, von denen einer breiter ist als der andere. Ein Erdungsstecker weist zwei Stifte und einen dritten Erdungsstift auf.
Der breite Stift bzw. der dritte Stift dient Ihrer Sicherheit. Sollte der beiliegende Stecker nicht in Ihre Steckdose passen, wenden
Sie sich bitte an einen Elektriker, um die ungeeignete Steckdose austauschen zu lassen.
10.
Schützen Sie das Netzkabel, sodass niemand darauf tritt oder es geknickt wird, insbesondere an Steckern oder Buchsen und
ihren Austrittsstellen aus dem Gerät.
11.
Verwenden Sie nur die vom Hersteller erhältlichen Zubehörgeräte oder Zubehörteile.
12.
Verwenden Sie nur einen Wagen, Stativ, Dreifuß, Träger oder Tisch, der den Angaben des Herstellers entspricht oder zusammen
mit dem Gerät verkauft wurde. Wird ein Wagen verwendet, bewegen Sie den Wagen mit dem darauf befindlichen Gerät besonders
vorsichtig, damit er nicht umkippt und möglicherweise jemand verletzt wird.
13.
Trennen Sie das Gerät während eines Gewitters oder während längerer Zeiträume, in denen es nicht benutzt wird, von der
Stromversorgung.
14.
Lassen Sie sämtliche Wartungsarbeiten von qualifizierten Kundendiensttechnikern durchführen. Eine Wartung ist erforderlich,
wenn das Gerät in irgendeiner Art beschädigt wurde, etwa wenn das Netzkabel oder der Netzstecker beschädigt wurden,
Flüssigkeit oder Gegenstände in das Gerät gelangt sind, das Gerät Regen oder Feuchtigkeit ausgesetzt wurde, nicht normal
arbeitet oder heruntergefallen ist.
15.
Der Erdungsstift darf nie entfernt werden. Auf Wunsch senden wir Ihnen gerne unsere kostenlose Broschüre „Shock Hazard and
Grounding“ (Gefahr durch elektrischen Schlag und Erdung) zu. Schließen Sie nur an die Stromversorgung der Art an, die am
Gerät neben dem Netzkabel angegeben ist.
16.
Wenn dieses Produkt in ein Geräte-Rack eingebaut werden soll, muss eine Versorgung über die Rückseite eingerichtet werden.
17.
Hinweis – Nur für Großbritannien: Sollte die Farbe der Drähte in der Netzleitung dieses Geräts nicht mit den Klemmen in Ihrem
Stecker übereinstimmen, gehen Sie folgendermaßen vor:
a) Der grün-gelbe Draht muss an die mit E (Symbol für Erde) markierte bzw. grüne oder grün-gelbe Klemme angeschlossen
werden.
b) Der blaue Draht muss an die mit N markierte bzw. schwarze Klemme angeschlossen werden.
c) Der braune Draht muss an die mit L markierte bzw. rote Klemme angeschlossen werden.
18.
Dieses Gerät darf nicht ungeschützt Wassertropfen und Wasserspritzern ausgesetzt werden und es muss darauf geachtet
werden, dass keine mit Flüssigkeiten gefüllte Gegenstände, wie z. B. Blumenvasen, auf dem Gerät abgestellt werden.
19.
Belastung durch extrem hohe Lärmpegel kann zu dauerhaftem Gehörverlust führen. Die Anfälligkeit für durch Lärm bedingten
Gehörverlust ist von Mensch zu Mensch verschieden, das Gehör wird jedoch bei jedem in gewissem Maße geschädigt, der über
einen bestimmten Zeitraum ausreichend starkem Lärm ausgesetzt ist. Die US-Arbeitsschutzbehörde (Occupational and Health
Administration, OSHA) hat die folgenden zulässigen Pegel für Lärmbelastung festgelegt:
Dauer pro Tag in Stunden
Geräuschpegel dBA, langsame Reaktion
8
6
4
3
2
1 1⁄2
1
1
⁄2
1
⁄4 oder weniger
90
92
95
97
100
102
105
110
115
Laut OSHA kann jede Belastung über den obenstehenden zulässigen Grenzwerten zu einem gewissen Gehörverlust führen. Sollte
die Belastung die obenstehenden Grenzwerte übersteigen, müssen beim Betrieb dieses Verstärkungssystems Ohrenstopfen oder
Schutzvorrichtungen im Gehörgang oder über den Ohren getragen werden, um einen dauerhaften Gehörverlust zu verhindern. Um sich vor
einer möglicherweise gefährlichen Belastung durch hohe Schalldruckpegel zu schützen, wird allen Personen empfohlen, die mit Geräten
arbeiten, die wie dieses Verstärkungssystem hohe Schalldruckpegel erzeugen können, beim Betrieb dieses Geräts einen Gehörschutz zu tragen.
BEWAHREN SIE DIESE SICHERHEITSHINWEISE AUF!
INSTRUCTIONS IMPORTANTES DE SECURITE
ATTENTION: L’utilisation de tout appareil électrique doit être soumise aux precautions d’usage incluant:
1.
2.
3.
4.
5.
6.
7.
8.
9.
10.
11.
12.
13.
14.
15.
16.
17.
18.
19.
Lire ces instructions.
Gardez ce manuel pour de futures références.
Prétez attention aux messages de précautions de ce manuel.
Suivez ces instructions.
N’utilisez pas cette unité proche de plans d’eau.
N’utilisez qu’un tissu sec pour le nettoyage de votre unité.
N’obstruez pas les systèmes de refroidissement de votre unité et installez votre unité en fonction des instructions
de ce manuel.
Ne positionnez pas votre unité à proximité de toute source de chaleur.
Connectez toujours votre unité sur une alimentation munie de prise de terre utilisant le cordon d’alimentation
fourni.
Protégez les connecteurs de votre unité et positionnez les cablages pour éviter toutes déconnexions accidentelles.
N’utilisez que des fixations approuvées par le fabriquant.
Lors de l’utilsation sur pied ou pole de support, assurez dans le cas de déplacement de l’ensemble enceinte/
support de prévenir tout basculement intempestif de celui-ci.
Il est conseillé de déconnecter du secteur votre unité en cas d’orage ou de durée prolongée sans utilisation.
Seul un technicien agréé par le fabriquant est à même de réparer/contrôler votre unité. Celle-ci doit être contrôlée si
elle a subit des dommages de manipulation, d’utilisation ou de stockage (humidité,…).
Ne déconnectez jamais la prise de terre de votre unité.
Si votre unité est destinée a etre montée en rack, des supports arriere doivent etre utilises.
Note pour les Royaumes-Unis: Si les couleurs de connecteurs du cable d’alimentation ne correspond pas au guide
de la prise secteur, procédez comme suit:
a) Le connecteur vert et jaune doit être connectrer au terminal noté E, indiquant la prise de terre ou correspondant
aux couleurs verte ou verte et jaune du guide.
b) Le connecteur Bleu doit être connectrer au terminal noté N, correspondnat à la couleur noire du guide.
c) Le connecteur marron doit être connectrer au terminal noté L, correspondant à la couleur rouge du guide.
Cet équipement électrique ne doit en aucun cas être en contact avec un quelconque liquide et aucun objet
contenant un liquide, vase ou autre ne devrait être posé sur celui-ci.
Une exposition à de hauts niveaux sonores peut conduire à des dommages de l’écoute irréversibles. La susceptibilité au bruit varie considérablement d’un individu à l’autre, mais une large majorité de la population expériencera
une perte de l’écoute après une exposition à une forte puissance sonore pour une durée prolongée. L’organisme de
la santé américaine (OSHA) a produit le guide ci-dessous en rapport à la perte occasionnée:
Durée par Jour (heures)
8
6
4
3
2
1 1⁄2
1
1
⁄2
1
⁄4 ou inférieur
Niveau sonore moyen (dBA)
90
92
95
97
100
102
105
110
115
D’après les études menées par le OSHA, toute exposition au delà des limites décrites ce-dessus entrainera des pertes de l’écoute chez la
plupart des sujets. Le port de système de protection (casque, oreilette de filtrage,…) doit être observé lors de l’opération cette unité ou des
dommages irréversibles peuvent être occasionnés. Le port de ces systèmes doit être observé par toutes personnes susceptibles d’être exposées à des conditions au delà des limites décrites ci-dessus.
GARDEZ CES INSTRUCTIONS!
INSTRUCCIONES IMPORTANTES PARA SU SEGURIDAD
CUIDADO: Cuando use productos electrónicos, debe tomar precauciones básicas, incluyendo las siguientes:
1.
Lea estas instrucciones.
2.
3.
4.
5.
6.
7.
8.
9.
10.
11.
12.
13.
14.
15.
16.
17.
18.
19.
Guarde estas instrucciones.
Haga caso de todos los consejos.
Siga todas las instrucciones.
No usar este aparato cerca del agua.
Limpiar solamente con una tela seca.
No bloquear ninguna de las salidas de ventilación. Instalar de acuerdo a las instrucciones del fabricante.
No instalar cerca de ninguna fuente de calor como radiadores, estufas, hornos u otros aparatos (incluyendo amplificadores)
que produzcan calor.
No retire la patilla protectora del enchufe polarizado o de tipo “a Tierra”. Un enchufe polarizado tiene dos puntas, una de
ellas más ancha que la otra. Un enchufe de tipo “a Tierra” tiene dos puntas y una tercera “a Tierra”. La punta ancha (la
tercera ) se proporciona para su seguridad. Si el enchufe proporcionado no encaja en su enchufe de red, consulte a un
electricista para que reemplaze su enchufe obsoleto.
Proteja el cable de alimentación para que no sea pisado o pinchado, particularmente en los enchufes, huecos, y los puntos
que salen del aparato.
Usar solamente añadidos/accesorios proporcionados por el fabricante.
Usar solamente un carro, pie, trípode, o soporte especificado por el fabricante, o vendido junto al aparato. Cuando se use
un carro, tenga cuidado al mover el conjunto carro/aparato para evitar que se dañe en un vuelco. No suspenda esta caja de
ninguna manera.
Desenchufe este aparato durante tormentas o cuando no sea usado durante largos periodos de tiempo.
Para cualquier reparación, acuda a personal de servicio cualificado. Se requieren reparaciones cuando el aparato ha sido
dañado de alguna manera, como cuando el cable de alimentación o el enchufe se han dañado, algún líquido ha sido
derramado o algún objeto ha caído dentro del aparato, el aparato ha sido expuesto a la lluvia o la humedad, no funciona de
manera normal, o ha sufrido una caída.
Nunca retire la patilla de Tierra.Escríbanos para obtener nuestro folleto gratuito “Shock Hazard and Grounding” (“Peligro
de Electrocución y Toma a Tierra”). Conecte el aparato sólo a una fuente de alimentación del tipo marcado al lado del cable
de alimentación.
Si este producto va a ser enracado con más equipo, use algún tipo de apoyo trasero.
Nota para el Reino Unido solamente: Si los colores de los cables en el enchufe principal de esta unidad no corresponden
con los terminales en su enchufe‚ proceda de la siguiente manera:
a) El cable de color verde y azul debe ser conectado al terminal que está marcado con la letra E‚ el símbolo de Tierra
(earth)‚ coloreado en verde o en verde y amarillo.
b) El cable coloreado en azul debe ser conectado al terminal que está marcado con la letra N o el color negro.
c) El cable coloreado en marrón debe ser conectado al terminal que está marcado con la letra L o el color rojo.
Este aparato eléctrico no debe ser sometido a ningún tipo de goteo o salpicadura y se debe tener cuidado para no poner
objetos que contengan líquidos, como vasos, sobre el aparato.
La exposición a altos niveles de ruido puede causar una pérdida permanente en la audición. La susceptibilidad a la pérdida
de audición provocada por el ruido varía según la persona, pero casi todo el mundo perderá algo de audición si se expone
a un nivel de ruido suficientemante intenso durante un tiempo determinado. El Departamento para la Salud y para la
Seguridad del Gobierno de los Estados Unidos (OSHA) ha especificado las siguientes exposiciones al ruido permisibles:
Duración por Día en Horas
8
6
4
3
2
1 1⁄2
1
1
⁄2
1
⁄4 o menos
Nivel de Sonido dBA, Respuesta Lenta
90
92
95
97
100
102
105
110
115
De acuerdo al OSHA, cualquier exposición que exceda los límites arriba indicados puede producir algún tipo de pérdida en la audición.
Protectores para los canales auditivos o tapones para los oídos deben ser usados cuando se opere con este sistema de sonido para prevenir una pérdida permanente en la audición, si la exposición excede los límites indicados más arriba. Para protegerse de una exposición a
altos niveles de sonido potencialmente peligrosa, se recomienda que todas las personas expuestas a equipamiento capaz de producir altos
niveles de presión sonora, tales como este sistema de amplificación, se encuentren protegidas por protectores auditivos mientras esta unidad esté operando.
GUARDE ESTAS INSTRUCCIONES!
important precautions
1
Save the carton and packing materials! Should you ever need to ship the
unit, use only the original factory packing.
¡
For replacement packaging, call Crest Audio’s
Customer Service Department directly.
2
3
Read all documentation before
operating your equipment. Retain all
documentation for future reference.
Follow all instructions printed on
unit chassis for proper operation.
4
Never hold a power switch or circuit breaker in the "on" position,
if it won’t stay there by itself!
5
Do not use the unit if the electrical
power cord is frayed or broken.
The power supply cords should be
routed so that they are not likely to be
walked on or pinched by items placed
upon or against them.
6
7
8
Ô
Always operate the unit with the
AC ground wire connected to the
electrical system ground. Precautions
should be taken so that the means of
grounding of a piece of equipment is not
defeated.
Damage caused by connection to
improper AC voltage is not covered by any warranty. Mains voltage
must be correct and the same as that
printed on the rear of the unit.
£
¢
ˆ
Power down and disconnect units
from mains voltage before making
connections.
0
Do not drive the inputs with a
signal level greater than that
required to enable equipment to
reach full output.
Do not remove the cover!
Removing the cover will expose you to
potentially dangerous voltages. There are
no user serviceable parts inside.
Crest Audio is not responsible for damage
to loudspeakers for any reason.
Equipment should be serviced by
qualified service personnel when:
Do not connect the inputs or
outputs of amplifiers to any other
voltage source: such as a battery,
mains source, or power supply, regardless of whether the amplifier is turned
on or off.
Connecting amplifier outputs to
oscilloscopes or other test equipment while the amplifier is in bridged
mono mode may damage both the
amplifier and test equipment!
Do not spill water or other liquids
into or on the unit, or operate the
unit while standing in liquid.
A. The power supply cord or the plug has
been damaged.
B. The equipment has been exposed to rain.
C. The equipment does not appear to oper-
ate normally, or exhibits a marked change
in performance.
D. The equipment has been dropped, or the
enclosure damaged.
To obtain service:
contact your nearest Crest Audio
Service Center, Distributor, Dealer,
or Crest Audio at 201.909.8700 USA
or visit www.crestaudio.com for additional information.
email
[email protected]
Do not block fan intake or exhaust
ports.
§
If the unit is used in an extremely
dusty or smoky environment: the
unit should be periodically blown free
of foreign matter.
¶
Do not use the unit near stoves,
heat registers, radiators, or other
heat producing devices.
ƒ
The power cord of equipment
should be unplugged from the outlet when left unused for a long
period of time.
Never connect a hot (red) output to
ground or to another hot (red) output!
Service Information
Do not parallel- or series-connect an amplifier output with any
other amplifier output.
Do not operate equipment on
a surface or in an environment
which may impede the normal
flow of air around the unit: such
as a bed, rug, weathersheet, carpet, or
completely enclosed rack.
Do not ground any hot (red) terminal.
9
Do not run the output of any amplifier channel back into another
channel’s input.
This symbol is used to alert
the operator to follow important
procedures and precautions
detailed in documentation.
This symbol is used to warn operators that uninsulated “dangerous
voltages” are present within the
equipment enclosure that may
pose a risk of electric
shock.
WARNING
THE ON/OFF SWITCH IN THIS APPARATUS
DOES NOT BREAK BOTH SIDES OF THE MAINS.
HAZARDOUS ENERGY MAY BE PRESENT INSIDE
THE ENCLOSURE WHEN THE POWER SWITCH IS
IN THE OFF POSITION.
table of contents
to use this manual
1 how
introduction
2 installation
unpacking
p.2
ENGLISH p.1
p.3
p.4
DEUTSCH p.19
mounting
connecting power
cooling requirements
operating precautions
connecting inputs
connecting outputs
FRANÇAIS p.39
overview
3 features
front panel
ESPAÑOL p.58
p.6
rear panel
operation modes
4 stereo
p.9
contents
parallel
bridged mono
features
5 protection
automatic clip limiting
p.10
IGM™ impedance sensing
thermal protection
short circuit
DC voltage protection
turn on/off protection
AUTORAMP™ signal control
6 safety
speaker protection
p.12
user responsibility
and support
7 service
support
p.13
contact us
a
specifications
b
wire gauge charts
p.14
appendices
p.17
p. 1
1 how to use this manual
conventions
terms
official Crest Audio features and
each indicator or control on the amplifier will appear as: terms
actions
specific actions or selections the user can execute will appear as: actions
tasks
are broken down into steps 1
2
3
warnings
a
Procedures not to
attempt.
Issues or hazards to keep in
mind when operating
the equipment.
indicators
®
What to look for on
the equipment display.
Alerts, indicators, or
prompts that may appear.
tips
Preferred methods.
Helpful hints.
Feature insights.
+
see
see—refers to other sections of the manual containing
supplementary information on the current topic or a related issue
note
note—supplementary feature information
p. 2
CCTM owner’s manual
introduction 1
welcome
Congratulations on your purchase of a Crest Audio CC™ Series power
amplifier. Designed for years of reliable, flawless operation under rigorous use. The Crest CC Series amplifiers offer the sonic superiority and
unsurpassed reliability for which Crest Audio is famous, while remaining
surprisingly compact. Advanced technology and extensive protection circuitry allow operation with greater efficiency into difficult loads and power
conditions. The ACL™ (Automatic Clip Limiting) circuit ensures troublefree operation into loads as low as 2 ohms. The Automatic Clip Limiting
circuits protect drivers and ensure that sonic integrity is maintained, even
in extreme overload conditions. Crest Audio’s high-efficiency designs use
tunnel-cooled heat sinks and variable speed DC fans.This cooling topology
maintains a lower overall operating temperature, resulting in longer output
transistor life. Model CC 4000, CC 2800, and CC 1800 power amplifiers
use Crest Audio’s innovative “Power Density” circuitry and packaging.
a
For your safety,
read the important
precautions section,
as well as input, output, and power connection sections.
p. 3
2 installation
CCTM owner’s manual
unpacking
Upon unpacking, inspect the amplifier. If you find any damage, notify your supplier
immediately. Only the consignee may institute a claim with the carrier for damage
incurred during shipping. Be sure to save the carton and all packing materials. Should
you ever need to ship the unit back to Crest Audio, one of its offices, service centers,
or the supplier, use only the original factory packing. If the shipping carton is unavailable,
contact Crest to obtain a replacement.
For replacement
packaging, call Crest
Audio’s
Customer Service
Department directly.
+
see—service and support
mounting
CC Series amplifiers will mount in standard 19" racks. Rear mounting ears are also
provided for additional support, which is recommended in non-permanent installations
like mobile or touring sound systems. Because of the cables and connectors on the
rear panel, a right angle or offset screwdriver or hex key will make it easier to fasten
the rear mounting ears to the rails.
connecting power
CC Series amplifier power requirements are rated at 1/8th power (typical music
conditions) and 1/3rd power (extreme music conditions).The maximum power current draw rating is limited only by the front panel circuit breaker. Consult the specifications in the Appendices section for figures on the current that each amplifier will
demand. Make sure the mains voltage is correct and is the same as that printed on
the rear of the amplifier. Damage caused by connecting the amplifier to improper AC
voltage is not covered by any warranty. Unless otherwise specified when ordered,
Crest amplifiers shipped to customers are configured as follows:
p. 4
Option 1 North America
120VAC / 60 Hz
Option 2 Europe, Asia
230VAC / 50 Hz
Option 3 Australia
240VAC / 50 Hz
Option 4 South America
120VAC / 60 Hz or 240VAC / 50 Hz
Always turn off and
disconnect the amplifier
from mains voltage before
making audio connections.
Also, as an extra precaution,
have the attenuators turned
down during power-up.
a
installation 2
cooling requirements
The CC™ Series amplifiers use a forced-air cooling system to maintain a low, even
operating temperature. Air is drawn into the amplifier by fan(s) on the rear panel,
courses through the cooling fins of the tunnel-configured channel heat sink(s), and then
exhausts through the front panel grille. If a heat sink gets too hot, its sensing circuit
will open the output relay, disconnecting the load from that particular channel.The CC
1800 utilizes one common heat sink and a single fan, but retains the separate circuitry.
It is important to have an adequate air supply at the back of the amplifier and enough
space around the front of the amplifier to allow the cooling air to escape. If the amp
is rack mounted, do not use doors or covers on the front of the rack; the exhaust air
must flow without resistance. If you are using racks with closed backs, use fans on the
rear rack panel to pressurize the rack and ensure an ample air supply.
operating precautions
Make sure the mains voltage is correct and is the same as that printed on the rear of
the amplifier. Damage caused by connecting the amplifier to improper AC voltage is
not covered by any warranty. See the Connecting Power section for more information
on voltage requirements.
Although the CC Series amplifiers have AUTORAMP™ circuitry, which raises the signal
level gradually after the output relay closes, it is always a good idea to have the gain
controls turned down during power-up to prevent speaker damage if there is a high
signal level at the inputs.Whether you buy or make them, use good-quality connections,
input cables and speaker cables, along with good soldering technique, to ensure
trouble-free operation. Most intermittent problems are caused by faulty cables.
Make certain that there
is enough space around
the front and rear of the
amplifier to allow the
heated air to escape.
suggestion: In racks
with closed backs
allow at least one
standard-rack-space
opening for every four
amps.
a
+
a
Always turn off and
disconnect the amplifier
from mains voltage
before making audio
connections. Also, as an
extra precaution, turn the
attenuators down during
power-up.
Consult the Wire Gauge Charts to determine proper gauges for different load
impedances and cable lengths. Remember that cable resistance robs amplifier power in
two ways: power lost directly to resistance (I2R loss), and by increasing the impedance
of the load presented to the amplifier, thereby decreasing the power demanded of the
amplifier. Also make sure the mode switch is correctly set for the desired application.
See Sections on Stereo, Parallel and Bridged Mono Operation for more information.
connecting inputs
Input connections are made via the 3-pin XLR (pin 2+) or 6.3 mm plug “Combi”
connectors on the rear panel of the amplifier. The inputs are actively balanced. The
input overload point is high enough to accept the maximum output level of virtually
any signal source.
connecting outputs
All models have two output (speaker) connections per channel. Cables can be
connected with banana plugs, spade lugs, or bare wire to the five-way binding posts.
The preferred method is connection via the Speakon connectors.
p. 5
3 features overview
CCTM owner’s manual
2
3 5
1
4 6
-6
-10
CCPROFESSIONAL
1800
1800 WATT
POWER AMPLIFIER
-6
-3
-10
ACL
SIGNAL
-15
ON
-15
-1
-1
TEMP
-30
-80
ch A
0dB
-30
POWER
-80
ACTIVE
2
2800 WATT
POWER AMPLIFIER
-10
ACL
-15
ON
-15
-1
TEMP
ch A
0dB
-30
POWER
-80
ACTIVE
ch B
0dB
1
3 5
4 6
-6
-10
-6
-3
-10
ACL
SIGNAL
-15
-3
ON
-15
-1
-1
TEMP
-30
-80
p. 6
-3
-1
-30
2
4000 WATT
POWER AMPLIFIER
0dB
-6
-3
SIGNAL
-80
CCPROFESSIONAL
4000
ch B
3 5
1
4 6
-6
-10
CCPROFESSIONAL
2800
-3
ch A
0dB
ACTIVE
-30
POWER
-80
ch B
0dB
front panel
features overview 3
switches and controls
1 AC Power Switch/Circuit Breaker
The CC Series amplifiers have a combination AC switch/circuit breaker
on the front panel. If the switch shuts off during normal use, push it
back to the ON position once. If it will not stay on, the amplifier needs
servicing.
The power only breaks
one side of the AC mains.
Hazardous energy may be
present in the enclosure
when the power switch is in
the off position.
a
2 Input Attenuators
Whenever possible, set the attenuators fully clockwise to maintain
optimum system headroom.The input attenuator controls (one for
channel A, one for channel B) located at the front panel adjust gain for
their respective amplifier channels in all modes. See the specifications
at the end of this manual for standard voltage gain and input sensitivity
information.
When operating in the bridged
mode, both attenuators must
be in the same position so the
speaker load will be equally
shared between the channels.
See the section on Bridged
Mono Operation for more
information and precautions.
a
indicators
CC Series amplifiers feature four front panel LED indicators per channel: ACL™
(Automatic Clip Limiting), Signal,Temp, and Active.These LED indicators inform
the user of each channel’s operating status and warn of possible abnormal conditions.
3 ACL LED
A channel’s ACL LED will light at the onset of clipping. If the LED’s are
flashing quickly and intermittently, the channel is just at the clip
threshold, while a steady, bright glow means the amp is clip limiting,
or reducing gain to prevent severely clipped waveforms reaching
the loudspeakers. See the Automatic Clip Limiting section for more
information. During initial power up the ACL LED will light indicating
that the AUTORAMP™ gain reduction circuitry is activated.This will
prevent sudden signal bursts when the speaker relays are closed.
4 Signal LED
This LED lights when its channel produces an output signal of about
4 volts RMS or more (0.1 volt or more at the input, with 0 dB
attenuation and standard x40 voltage gain). It is useful in determining
whether a signal is reaching and being amplified by the amplifier.
5 Temp LED
The Temp LED lights to indicate that the channel’s output relay is open,
disconnecting the speaker(s) due to an overheating condition. Once the
channel temperature has returned to safe operating conditions the LED
will turn off, the channel's output relay will close, and the speaker(s) will be
reconnected.
6 Active LED
The Active LED indicates that its channel’s output relay is closed and the
channel is operational. It lights under normal operation and remains on even
when the channel is in Automatic Clip Limiting or ACL gain reduction. These
are protection features which leave the output relay closed. If the Active LED
goes off, there is no signal at the output connectors.
p. 7
3 features overview
2
CCTM owner’s manual
3
1
INPUT
CLASS 2 WIRING
OUTPUT
MOUNT IN RACK ONLY INSTALLER SUR SUPPORT
DE MONTAGE SEULEMENT
GAIN
IN=x20
SELECT OUT=x40
WWW.CRESTAUDIO.COM
ch A
MADE IN CHINA
BRIDGE
PARALLEL
STEREO
ch B
This info will be on sticker
A PRODUCT OF
CREST AUDIO CORP.
FAIR LAWN, NJ
120 VAC
60 Hz 1000 WATTS
UL Sticker
rear panel legend
rear panel
1 IEC power connector
Accepts a standard IEC terminated power cable
2 Mode Select Switch
The rear panel Mode Select Switch determines whether the amplifier
is in the stereo, parallel, or bridged mono mode. Do not operate the
Mode Select Switch with the amplifier powered on. See the sections on
Stereo and Bridged Mono Mode for more information.
3 Gain Select Switch
The rear panel Gain Select Switch determines whether the amplifier
has an overall gain of 40 (32 dB) or a gain of 20 (26 dB). The out
position will select x40 while the in position will select x20.
input connection
XLR connector polarity
TRS connector polarity
bridged mono mode
parallel mode
stereo mode
output connection
Speakon® output
channel A stereo/parallel
channel B stereo/parallel
bridged mono
five-way binding post
channel A stereo/parallel
bridged mono
channel B stereo/parallel
p. 8
operation modes 4
stereo
For stereo (dual channel) operation, turn the amplifier off and set the mode
select switch to the stereo position. In this mode, both channels operate
independently of each other, with their input attenuators controlling their
respective levels. Thus, a signal at channel A’s input produces an amplified
signal at channel A’s output, while a signal at channel B’s input produces an
amplified signal at channel B’s output.
parallel
For parallel (dual-channel/single input) operation, turn the amplifier off and
set the mode switch in the parallel position; both amplifier channels are
then driven by the signal at channel A’s input. No jumper wires are needed.
Output connections are the same as in the stereo mode. Channel A’s and
channel B’s input connectors are strapped together to allow patching to
another amplifier. Both input attenuators remain active, allowing you to
set different levels for each channel. Power and other general performance
specifications are the same as in the stereo mode.
bridged mono
Both amplifier channels can be bridged together to make a very powerful
single-channel monaural amplifier. Use extreme caution when operating in
the bridged mode; potentially lethal voltage may be present at the output
terminals. To bridge the amplifier, turn the amplifier off and slide the rear
panel amplifier mode select switch to the bridge position. Apply the signal to
channel A’s input and connect the speakers across the hot outputs which are
either the “+” binding posts of channels A and B. Alternately connect across
pins “1+POS” and “2+NEG” of the channel A Speakon® connector. As with
parallel operation, both input connectors are strapped together to drive the
input of another amplifier.
Unlike the stereo and parallel modes, in which one side of each output is at
ground, in the bridged mode both sides are hot. Channel A’s side is the same
polarity as the input. The minimum nominal load impedance in the bridged
mode is 4 ohms which is equivalent to driving both channels at 2 ohms.
Driving bridged loads of less than 4 ohms will activate the ACL circuitry
resulting in a loss of power, and may also cause a thermal overload.
When operating in the
bridged mode, both
attenuators must be in
the same position so
the speaker load will be
equally shared between
the channels.
a
p. 9
5 protection features
CCTM owner’s manual
CC Series amplifiers incorporate several circuits to protect both themselves and loudspeakers
under virtually any situation. Crest Audio has attempted to make the amplifiers as foolproof as
possible by making them immune to short and open circuits, mismatched loads, DC voltage, and
overheating. If a channel goes into the Automatic Clip Limiting or ACL™ gain reduction mode, the
speaker load remains connected, but clipping percentage or output power are instantly reduced.
When a problem occurs that causes a channel to go into a protection mode, the Temp LED for
that channel will glow. DC voltage on the output, excessive subsonic frequencies, or thermal
overload will cause the channel’s output relay to disconnect the speaker load until the problem is
corrected or the amplifier cools down.
automatic clip limiting (ACL)
Any time a channel is driven into hard, continuous clipping, the clip limiter circuit will
automatically reduce the channel gain to a level just slightly into clipping, guarding the speakers
against the damaging high power continuous square waves that may be produced. Situations
that may activate the clip limiter include uncontrolled feedback, oscillation, or an improper
equipment setting or malfunction upstream from the amplifier. Normal program transients will
not trigger the clip limiter; only steady, excessive clipping will.The ACL LED will glow brightly
and continuously when limiting occurs.
IGM™ impedance sensing
CC Series amplifiers feature innovative circuitry that allows safe operation into any load.
When an amplifier sees a load that overstresses the output stage, the Instantaneous Gain
Modulation (IGM) circuit adjusts the channel gain to a safe level.This method of output stage
protection is far superior to conventional, brute force type limiting found on other amplifiers.
The IGM circuit is sonically transparent in normal use and unobtrusive when activated.
thermal protection
The internal fans will keep the amplifier operating well within its intended temperature range
under all normal conditions. If a channel’s heat sink temperature reaches 75°C, which may
indicate an obstructed air supply, that channel will protect itself independently by disconnecting its load and shutting down until it has cooled. During this time, the channel’s Temp LED
will glow, the Active LED will go out, the ACL LEDs will stay lit and the cooling fans will run
at high speed. The CC 1800 utilizes one common heat sink and single fan, but retains the
separate circuitry.
short circuit
If an output is shorted, the IGM and thermal circuits will automatically protect the amplifier.The
IGM circuit senses the short circuit as an extremely stressful load condition and attenuates the
signal, protecting the channel’s output transistors from over current stress. If the short circuit
remains, the channel will eventually thermally protect itself by disconnecting the load.
DC voltage protection
If an amplifier channel detects DC voltage or subsonic frequencies at its output terminals, its
output relay will immediately open to prevent loudspeaker damage.
p. 10
protection features 5
turn-on/turn-off protection
At power-up, the amplifier stays in the protect mode, with outputs disconnected, for
approximately six seconds while the power supplies charge and stabilize. While the output
relays are open, the ACL LEDs light.When power is removed, the speaker loads immediately
disconnect so that no thumps or pops are heard.
AUTORAMP™ signal control
Whenever a CC Series amplifier powers up or comes out of a protect mode, the AUTORAMP
circuit activates. While the speakers are disconnected, the AUTORAMP circuit fully attenuates
the signal. After the output relay closes, the signal slowly and gradually raises up to its set level.
The AUTORAMP Signal Control circuit has some important advantages over conventional
instant-on circuits:
1. If a signal is present during power-up (or when coming out of protect), the speakers are
spared a sudden, potentially damaging burst of audio power.
2. Because the gain is reduced until after the output relay closes, no arcing occurs at the
contacts, thereby extending their useful life.
p. 11
6 safety
CCTM owner’s manual
speaker protection
All loudspeakers have electrical, thermal and physical limits that must be observed to prevent
damage or failure.Too much power, low frequencies applied to high frequency drivers, severely
clipped waveforms, and DC voltage can all be fatal to cone and compression drivers.The Crest
Audio CC Series amplifiers automatically protect speakers from DC voltages and subsonic
signals. For more information, see the section on Protection Features. Mid- and high-frequency
speakers, especially compression drivers, are highly susceptible to damage from overpowering,
clipped waveforms, or frequencies below their rated passband. Be extremely careful that the
low and mid bands of an electronic crossover are connected to the correct amplifiers and
drivers and not accidentally connected to those for a higher frequency band. The amplifier’s
clipping point is its maximum peak output power, and some of the higher power Crest Audio
CC Series amplifiers can deliver more power than many speakers can safely handle. Be sure
the peak power capability of the amplifier is not excessive for your speaker system.
To ensure that the speakers never receive excessive power and that the amplifier never clips,
use a properly adjusted external limiter (or a compressor with a ratio of 10:1 or higher) to
control power output. In systems with active electronic crossovers, use one for each frequency band.The clip limiter will automatically limit the duration of continuous square waveforms
applied to the speakers. The amplifier will, however, allow normal musical transient bursts to
pass. Some speaker systems are packaged with processors that have power limiting circuits
and should not require additional external limiting.
Fuses may also be used to limit power to speaker drivers, although as current-limiting (rather
than voltage-limiting devices) they are an imperfect solution. As the weakest links, fuses only
limit once before needing replacement. Some poor quality fuses have a significant series
resistance that could degrade the amplifier’s damping of the speaker’s motion and may even
deteriorate the system’s sound quality. If you elect to use fuses, check with the speaker manufacturer to determine the proper current rating and time lag required.
Do not drive any low-frequency speaker enclosure with frequencies lower than its own tuned
frequency.The reduced acoustical damping could cause a ported speaker to bottom out even
at moderate power. Consult the speaker system specifications to determine its frequency
limits.
amplifier maintenance and user responsibility
A CC Series amplifier requires no routine maintenance and should never need any
internal adjustment during its lifetime. Your CC Series amplifier is very powerful and can
be potentially dangerous to loudspeakers and humans alike. It is your responsibility to
read the Important Precautions section in the front of this manual, and to make sure that
the amplifier is installed, wired and operated properly. Many loudspeakers can be easily
damaged or destroyed by overpowering, especially with the high power available from a
bridged amplifier. Read the Speaker Protection section and always be aware of the speaker’s
continuous and peak power capabilities.
p. 12
service and support 7
support
In the unlikely event that your amplifier develops a problem, it must be
returned to an authorized distributor, service center, or shipped directly to
our factory for service.
To obtain service, contact your nearest Crest Audio Service Center,
Distributor, Dealer, or any of the worldwide Crest Audio offices. For those
with Internet access, please visit the Crest Audio web site.
+
Because of the complexity
of the design and the
risk of electrical shock, all
repairs must be attempted
only by qualified technical
personnel. If the unit needs
to be shipped back to the factory,
it must be sent in its original carton.
If improperly packed, your amplifier
may be damaged..
a
contact us
customer service
phone 866.812.7378 USA
fax
601.486.1380 USA
email [email protected]
technical support
phone 866.812.7378 USA
fax
601.486.1380 USA
email [email protected]
web site
www.crestaudio.com
mail
For replacement
packaging, call Crest
Audio’s Customer
Service.
+
Crest Audio Inc.
711 A Street
Meridian, MS 39301 USA
p. 13
a
specifications
CCTM Series
CC™ owner’s manual
1800
Rated Power Bridge 4 ohms
1850 watts @ 1 kHz at <0.1% T.H.D.
Rated Power (2 x 2 ohms)
900 watts per channel @ 1 kHz <0.05% T.H.D. both channels driven
Rated Power (2 x 4 ohms)
700 watts per channel @ 1 kHz at <0.05% T.H.D. both channels driven
Rated Power (2 x 8 ohms)
450 watts per channel @ 1 kHz at <0.05% T.H.D. both channels driven
Rated Power (1 x 2 ohms)
950 watts @ 1 kHz at <0.05% T.H.D.
Rated Power (1 x 4 ohms)
775 watts @ 1 kHz at <0.05% T.H.D.
Rated Power (1 x 8 ohms)
475 watts @ 1 kHz at <0.05% T.H.D.
Minimum Load Impedance
2 ohms
Maximum RMS Voltage Swing
73 volts
Frequency Response
10 Hz - 100 kHz; +0, -3 dB at 1 watt
Power Bandwidth
10 Hz - 50 kHz; +0, -3 dB at rated 4 ohm power
T.H.D. (2 x 2 ohms)
<0.2% @ 700 watts per channel from 20 Hz to 20 kHz
T.H.D. (2 x 4 ohms)
<0.1% @ 600 watts per channel from 20 Hz to 20 kHz
T.H.D. (2 x 8 ohms)
<0.1% @ 425 watts per channel from 20 Hz to 20 kHz
Input CMRR
> - 75 dB @ 1 kHz
Voltage Gain
x40 (32 dB)
Crosstalk
> -55 dB @ 1 kHz at rated power @ 8 ohms
Hum and Noise
> -106 dB, “A” weighted referenced to rated power @ 8 ohms
Slew Rate
> 35V/us
Damping Factor (8 ohms)
> 150:1 @ 20 Hz - 1 kHz at 8 ohms
Phase Response
+6 to - 12 degrees from 20 Hz to 20 kHz
Input Sensitivity (x40)
1.32 volts +/- 3% for 1 kHz, 4 ohm rated power, 1.06 volts +/- 3% for 1 kHz, 2 ohm rated power
Input Impedance
15 k ohms, balanced
Current Draw @ 1/8 power
1,000 watts @ 2 ohms, 685 watts @ 4 ohms,
400 watts @ 8 ohms
Current Draw @ 1/3 power
2,340 watts @ 2 ohms, 1,650 watts @ 4 ohms, 1,000 watts @ 8 ohms
Cooling
One back panel temperature dependant variable speed 80 mm DC fan
Controls
2 front panel attenuators, rear panel Mode switches
Indicator LEDs
2 ACL™ (automatic clip limiting), 2 Signal presence, 2 Active status, 2 Temp
Protection
Thermal, DC, turn-on bursts, subsonic, incorrect loads
Connectors
Combi XLR & 6.3 mm phone input, Speakon and 5-way Binding Post speaker output, 15 amp
IEC mains connector
Construction
16 ga. steel with cast front panel
Dimensions
88.9 mm x 482.6 mm x 377.8 mm + 31.8 mm for rear support ears and connectors
(3.5" x 19" x 14.875" + 1.25")
Net Weight
14.8 kg (32.6 lbs.)
Gross Weight
15.9 kg (35 lbs.)
x20 (26 dB)
All power measurements made at 120 VAC, power transformer cold. 2 ohm power is time limited by magnetic circuit breaker.
p. 14
specifications a
2800
Rated Power Bridge 4 ohms
2,800 watts @ 1 kHz at <0.1% T.H.D.
Rated Power (2 x 2 ohms)
1,400 watts per channel @ 1 kHz <0.05% T.H.D. both channels driven
Rated Power (2 x 4 ohms)
965 watts per channel @ 1 kHz at <0.05% T.H.D. both channels driven
Rated Power (2 x 8 ohms)
595 watts per channel @ 1 kHz at <0.05% T.H.D. both channels driven
Rated Power (1 x 2 ohms)
1,850 watts @ 1 kHz at <0.1% T.H.D.
Rated Power (1 x 4 ohms)
1,150 watts @ 1 kHz at <0.05% T.H.D.
Rated Power (1 x 8 ohms)
665 watts @ 1 kHz at <0.05% T.H.D.
Minimum Load Impedance
2 ohms
Maximum RMS Voltage Swing
82 volts
Frequency Response
10 Hz - 100 kHz; +0, -2.0 dB at 1 watt
Power Bandwidth
10 Hz - 35 kHz; +0, -3 dB at rated 4 ohm power
T.H.D. (2 x 2 ohms)
<0.15 @ 1,150 watts per channel from 20 Hz to 20 kHz
T.H.D. (2 x 4 ohms)
<0.1% @ 880 watts per channel from 20 Hz to 20 kHz
T.H.D. (2 x 8 ohms)
<0.1% @ 560 watts per channel from 20 Hz to 20 kHz
Input CMRR
> - 65 dB @ 1 kHz
Voltage Gain
x40 (32 dB)
Crosstalk
> -65 dB @ 1 kHz at rated power @ 8 ohms
Hum and Noise
> -111 dB, “A” weighted referenced to rated power @ 8 ohms
Slew Rate
> 15V/us
Damping Factor (8 ohms)
> 500:1 @ 20 Hz - 1 kHz
Phase Response
+5 to - 15 degrees from 20 Hz to 20kHz
Input Sensitivity (x40)
1.7 volts +/- 3% for 1 kHz, 4 ohm rated power, 1.36 volts +/- 3% for 1 kHz, 2 ohm rated
power
Input Impedance
15 k ohms, balanced
Current Draw @ 1/8 power
1,250 watts @ 2 ohms, 880 watts @ 4 ohms, 570 @ 8 ohms
Current Draw @ 1/3 power
2,905 watts @ 2 ohms, 2,220 watts @ 4 ohms, 1,355 watts @ 8 ohms
Cooling
Two back panel temperature dependant variable speed 80 mm DC fans
Controls
2 front panel attenuators, rear panel Mode switches
Indicator LEDs
2 ACL™ (automatic clip limiting), 2 Signal presence, 2 Active status, 2 Temp
Protection
Thermal, DC, turn-on bursts, subsonic, incorrect loads
Connectors
Combi XLR & 6.3 mm phone input, Speakon and 5-way Binding Post speaker output, 15 amp
IEC mains connector
Construction
16 ga. steel with cast front panel
Dimensions
88.9 mm x 482.6 mm x 377.8 mm + 31.8 mm for rear support ears and connectors
(3.5" x 19" x 14.875" + 1.25")
Net Weight
18.05 kg (39.8 lbs.)
Gross Weight
19.23 kg (42.4 lbs.)
x20 (26 dB)
All power measurements made at 120 VAC, power transformer cold. 2 ohm power is time limited by magnetic circuit breaker.
p. 15
a
specifications
CCTM owner’s manual
CCTM Series
4000
Rated Power Bridge 4 ohms
4,000 watts @ 1 kHz at <0.1% T.H.D.
Rated Power (2 x 2 ohms)
2,000 watts per channel @ 1 kHz <0.1% T.H.D. both channels driven
Rated Power (2 x 4 ohms)
1,350 watts per channel @ 1 kHz at <0.05% T.H.D. both channels driven
Rated Power (2 x 8 ohms)
800 watts per channel @ 1 kHz at <0.05% T.H.D. both channels driven
Rated Power (1 x 2 ohms)
2,550 watts @ 1 kHz at <0.1% T.H.D.
Rated Power (1 x 4 ohms)
1,600 watts @ 1 kHz at <0.05% T.H.D.
Rated Power (1 x 8 ohms)
900 watts @ 1 kHz at <0.05% T.H.D.
Minimum Load Impedance
2 ohms
Maximum RMS Voltage Swing
93 volts
Frequency Response
10 Hz - 100 kHz; +0, -2 dB at 1 watt
Power Bandwidth
10 Hz - 35 kHz; +0, -3 dB at rated 4 ohm power
T.H.D. (2 x 2 ohms)
<0.2% @ 1,475 watts per channel from 20 Hz to 20 kHz
T.H.D. (2 x 4 ohms)
<0.1% @ 1,150 watts per channel from 20 Hz to 20 kHz
T.H.D. (2 x 8 ohms)
<0.1% @ 700 watts per channel from 20 Hz to 20 kHz
Input CMRR
> -65 dB @ 1 kHz
Voltage Gain
x40 (32 dB)
Crosstalk
> -65 dB @ 1 kHz at rated power @ 8 ohms
Hum and Noise
> -112 dB, “A” weighted referenced to rated power @ 8 ohms
Slew Rate
> 15V/us
Damping Factor (8 ohms)
> 500:1 @ 20 Hz - 1 kHz
Phase Response
+5 to - 15 degrees from 20 Hz to 20 kHz
Input Sensitivity (x40)
1.88 volts +/- 3% for 1 kHz, 4 ohm rated power, 1.62 volts +/- 3% for 1 kHz, 2 ohm rated
power
Input Impedance
15 k ohms, balanced
Current Draw @ 1/8 power
1,825 watts @ 2 ohms, 1,185 watts @ 4 ohms, 720 @ 8 ohms
Current Draw @ 1/3 power
4,535 watts @ 2 ohms, 2,975 watts @ 4 ohms, 1,835 watts @ 8 ohms
Cooling
Two back panel temperature dependant variable speed 80 mm DC fans
Controls
2 front panel attenuators, rear panel Mode switches
Indicator LEDs
2 ACL™ (automatic clip limiting), 2 Signal presence, 2 Active status, 2 Temp
Protection
Thermal, DC, turn-on bursts, subsonic, incorrect loads
Connectors
Combi XLR & 6.3 mm phone input, Speakon and 5-way Binding Post speaker output, 15
amp IEC mains connector
Construction
16 ga. steel with cast front panel and cast handles
Dimensions
88.9 mm x 482.6 mm x 377.8 mm + 31.8 mm for rear support ears and connectors
(3.5" x 19" x 14.875" + 1.25")
Net Weight
19.64 kg (43.3 lbs.)
Gross Weight
20.8 kg.(45.8 lbs.)
x20 (26 dB)
All power measurements made at 120 VAC, power transformer cold. 2 ohm power is time limited by magnetic circuit breaker.
p. 16
wire gauge b
wire gauge
stranded cable length
2
5
meters
meters
10
meters
30
power loss
8 Ω load
4 Ω load
0.3mm2
2.9%
5.6%
10.8%
0.5
1.74
3.4
6.7
0.75
1.16
2.3
4.5
1.5
0.58
1.16
2.3
2.5
0.35
0.70
1.39
4.0
0.22
0.44
0.87
0.5mm2
4.3%
8.2%
15.5%
0.75
2.9
5.6
10.8
1.5
1.45
2.9
5.6
2.5
0.87
1.74
3.4
4
0.55
1.09
2.2
6
0.37
0.73
1.45
0.5mm2
8.24%
5.5%
28%
0.75
5.6
10.8
19.9
1.5
2.9
5.6
10.8
2.5
1.74
2.9
6.7
4
1.09
1.74
4.3
6
0.73
1.09
2.9
15.5%
0.73%
45%
1.5
8.2
15.5
28
2.5
5.1
9.8
18.2
4
3.2
6.3
12.0
6
2.2
4.3
8.2
10
1.31
2.6
5.1
meters 0.75mm2
2 Ω load
p. 17
b
wire gauge
wire gauge
stranded cable length
5
18 AWG
feet
10
feet
40
80
p. 18
CCTM owner’s manual
feet
feet
power loss
8 Ω load
0.81%
4 Ω load
1.61%
2 Ω load
3.2%
16
0.51
1.02
2.0
14
0.32
0.64
1.28
12
0.20
0.40
0.80
10
0.128
0.25
0.51
18 AWG
1.61%
3.2%
6.2%
16
1.02
2.0
4.0
14
0.64
1.28
2.5
12
0.40
0.80
1.60
10
0.25
0.51
1.01
18 AWG
6.2%
11.9%
22%
16
4.0
7.7
14.6
14
2.5
5.0
9.6
12
1.60
3.2
6.2
10
1.01
2.0
4.0
8
0.60
1.20
2.4
18 AWG
11.9%
22%
37%
16
7.7
14.6
26
14
5.0
9.6
17.8
12
3.2
6.2
11.8
10
2.0
4.0
7.7
8
1.20
2.4
4.7
DEUTSCH
Wichtige Sicherheitshinweise
1
Heben Sie den Karton und das
Verpackungsmaterial bitte auf! Sollte
es irgendwann einmal erforderlich sein,
das Gerät zu versenden, verwenden
Sie dazu ausschließlich die OriginalWerksverpackung
Für Ersatzverpackung wenden Sie sich bitte
direkt an die Kundendienstabteilung von Crest
Audio.
2
3
4
5
6
7
8
Lesen Sie sich die gesamte
Dokumentation durch, bevor Sie Ihr
Gerät in Betrieb nehmen. Bewahren
Sie die gesamte Dokumentation auf, um
später noch darin nachschlagen zu können.
9
Schalten Sie die Geräte immer
aus und trennen Sie sie von der
Netzspannung, bevor Sie Anschlüsse
durchführen.
0
Treiben Sie die Eingänge nicht
mit einem Signalpegel über dem
Pegel, der erforderlich ist, damit
die Ausrüstung ihre volle Leistung
erreicht.
¡
Schließen Sie den Ausgang eines
Verstärkerkanals nicht wieder an
den Eingang eines anderen Kanals
an.
Schließen
Sie
einen
Verstärkerausgang nicht parallel
oder in Reihe an einen anderen
Verstärkerausgang an.
Um einen korrekten Betrieb zu
garantieren, befolgen Sie alle
Anweisungen, die auf dem Gerät
aufgedruckt sind.
Versuchen Sie nicht mit Gewalt,
einen Netz- oder Schutzschalter
auf der Position ON zu halten,
wenn er immer wieder von alleine
herausspringt!
Schalten Sie das Gerät nicht ein,
wenn das Netzkabel ausgefranst
oder beschädigt ist
Die Netzkabel müssen so verlegt werden,
dass niemand darauf treten kann und dass
sie nicht durch Gegenstände gequetscht
werden, die darauf gestellt oder daran
gelehnt werden.
Betreiben Sie das Gerät immer mit
an die elektrische Systemerdung
angeschlossenem WechselstromErdungskabel.
Es
müssen
Vorsichtsmaßnahmen ergriffen werden,
damit die Erdungsvorrichtung an einem
Ausrüstungsteil nicht beeinträchtigt wird.
Schäden, die
aufgrund
des
Anschlusses an eine ungeeignete
Wechselspannung
entstehen,
werden nicht von der Garantie
abgedeckt. Die Netzspannung muss
korrekt sein und mit den Angaben auf der
Rückseite des Geräts übereinstimmen.
Crest Audio ist nicht verantwortlich für
Schäden, die aus jedweden Gründen an
Lautsprechern entstehen.
Ô
£
Werden Verstärkerausgänge an
Oszilloskope oder andere Testgeräte
angeschlossen, während sich der
Verstärker im Bridged-Mono-Betrieb
befindet, können sowohlVerstärker als
auch Testgeräte beschädigt werden!
¢
Verschütten Sie kein Wasser oder
Flüssigkeiten in oder auf das Gerät,
und betreiben Sie es nicht, wenn es
auf nassem Boden steht.
ˆ
Lüfter- oder Abluftöffnungen
dürfen nicht blockiert werden.
Betreiben Sie die Ausrüstung nicht
auf Flächen oder in Umgebungen,
in denen der normale Luftstrom
um das Gerät behindert ist,
wie etwa Betten, Wolldecken,
Abdeckplanen, Teppiche oder
vollständig abgeschlossene Racks.
Erden Sie keine spannungsführenden
(roten) Klemmen.
Schließen
Sie
nie
einen
spannungsführenden (roten) Ausgang
an die Erde oder einen anderen
spannungsführenden (roten) Ausgang
an!
Schließen Sie die Eingänge oder
Ausgänge von Verstärkern nicht
an andere Spannungsquellen an,
wie Batterien, Stromanschlüsse
oder Netzteile, ganz gleich ob der
Verstärker ein- oder ausgeschaltet
ist.
§
Wird das Gerät in einer extrem
staubigen
oder
verrauchten
Umgebung eingesetzt, muss
es regelmäßig von Staub usw.
gereinigt werden.
¶
Betreiben Sie das Gerät nicht neben
Öfen, Heizungen, Heizgeräten
oder anderen Geräten, die Wärme
erzeugen.
ƒ
Die Netzkabel der Geräte müssen
aus der Steckdose gezogen werden,
wenn sie längere Zeit nicht eingesetzt
werden.
Kundendienstinformationen
Entfernen Sie nicht die Blende!
Wird die Blende entfernt, werden
möglicherweise gefährliche Spannungen
freigesetzt. Im Gerät befinden sich keine
vom Anwender zu wartenden Teile.
Die Ausrüstung sollte in den
folgenden Fällen von qualifizierten
Kundendiensttechnikern gewartet
werden:
A. Das Netzkabel oder der Stecker wurden
beschädigt.
B. Die Ausrüstung war Regen ausgesetzt.
C. Die Ausrüstung arbeitet anscheinend nicht
normal oder mit deutlich veränderter
Leistung.
D. Die Ausrüstung ist heruntergefallen oder das
Gehäuse ist beschädigt.
Hier erreichen Sie den Kundendienst:
Wenden Sie sich bitte an Ihr CrestAudio-Kundendienstcenter,
Ihren
Vertrieb oder Händler, oder Crest Audio,
Tel. 201.909.8700 (USA) oder besuchen
Sie www.crestaudio.com für weitere
Informationen.
email
[email protected]
Dieses Symbol weist den
Bediener auf wichtige zu
befolgende Vorgehensweisen
und Sicherheitshinweise hin, die
in der Dokumentation ausführlich
behandelt werden.
Dieses Symbol warnt die Bediener
vor nicht isolierten „gefährlichen
Spannungen“, die innerhalb des
Gerätegehäuses vorliegen und die
Gefahr des elektrischen Schlags
bergen können.
WARNUNG
DER AN/AUS SCHALTER IN DIESEM GERÄT UNTERBRICHT
NICHT BEIDE SEITEN DES NETZES. AUCH WENN DER
SCHALTER AUF "AUS" STEHT KANN IM INNERN DES
GERÄTES IMMER NOCH GEFÄHRLICHE ELEKTRISCHE
ENERGIEN VORHANDEN SEIN.
Inhalt
CCTM Bedienungsanleitung
dieser
1 Handhabung
Bedienungsanleitung
Einführung
2 Installation
Auspacken
s.21
s.22
s.23
Montage
Netzanschluss
Kühlanforderungen
Sicherheitshinweise für den Betrieb
Anschluss der Eingänge
Anschluss der Ausgänge
über die Funktionen
3 Übersicht
Vorderseite
s.26
Rückseite
Betriebsmodi
4 Stereo
s.29
Inhalt
Parallel
Bridged-Mono
5 Schutzfunktionen
Automatic Clip Limiting, ACL
s.30
IGM™ -Impedanzermittlung
Thermoschutz
Kurzschluss
Gleichspannungsschutz
Ein-/Ausschaltschutz
AUTORAMP™ -Signalregelung
6 Sicherheit
Lautsprecherschutz
s.32
Verantwortung des Anwenders
und Unterstützung
7 Kundendienst
Unterstützung
s.33
Kontakt
p. 20
a
Technische Daten
b
Drahtdicketabellen
s.34
s.37
Anhang
Handhabung dieser Anleitung 1
Erklärungen zum Gebrauch
Begriffe
Offizielle Funktionen von Crest Audio sowie alle Anzeigen oder Regler am Verstärker
werden als Begriffe bezeichnet.
Aktionen
Eine bestimmte Vorgehensweise oder Auswahl, die der Anwender durchführen kann,
wird als Aktion bezeichnet.
Aufgaben
Sind in Schritte unterteilt:
1
2
3
Warnungen
Verfahren, die nicht
durchgeführt werden
dürfen.
Probleme oder Gefahren,
an die beim Betrieb der
Ausrüstung gedacht werden
muss.
a
Anzeigen
Sie befinden sich am Gerät
und zeigen Informationen
an, die beachtet werden
müssen.
Alarmmeldungen, Anzeigen
oder Aufforderungen, die
vorkommen können.
®
Tipps
Bevorzugte Methoden.
Hilfreiche Hinweise.
Informationen zu Funktionen.
+
Siehe
Siehe – bezieht sich auf andere Abschnitte in der Anleitung, in denen zusätzliche Informationen
zum jeweiligen Thema oder ähnlichen Problemen enthalten sind.
Hinweis
Hinweis – ergänzende Informationen zur Funktion.
p. 21
1 Einführung
Herzlich willkommen!
Herzlichen Glückwunsch zum Kauf einer Endstufe der Crest Audio
CCTM Series. Sie wurde für zuverlässigen, störungsfreien Betrieb unter
anspruchsvollen Bedingungen über viele Jahre entwickelt. Die Verstärker
der Crest CC Series zeichnen sich durch die überragende Schallleistung
und die einzigartige Zuverlässigkeit aus, für die Crest Audio bekannt ist.
Gleichzeitig sind sie überraschend kompakt. Fortschrittliche Technologie
und umfassende Schutzschaltungen ermöglichen einen effizienteren Betrieb
auch bei problematischen Lasten und Energiebedingungen. Die ACLTM(Automatic Clip Limiting) Schaltung gewährleistet einen störungsfreien
Betrieb auch bei niedrigen Lasten bis zu 2 Ohm. Die ACL-Schaltung schützt
die Treiber und sorgt dafür, das die Schallleistung selbst unter extremer
Überlastung nicht beeinträchtigt wird. Crest Audios hochleistungsfähige
Geräte arbeiten mit tunnelgekühlten Kühlkörpern und Gleichstromlüftern
mit variabler Drehzahl. Aufgrund dieser Kühlmethode ist eine niedrigere
Gesamtbetriebstemperatur möglich, was wiederum die Lebensdauer des
Endstufen-Transistors verlängert. Die Endstufenmodelle CC 4000, CC
2800 und CC 1800 sind mit Crest Audios innovativer Power-DensitySchaltung und Verkapselung ausgestattet.
p. 22
CCTM Bedienungsanleitung
Lesen Sie sich bitte
die Abschnitte
über wichtige
Sicherheitshinweise
sowie über Eingang,
Ausgang und
Stromanschluss durch,
um Ihre Sicherheit zu
gewährleisten.
a
installation 2
Auspacken
Untersuchen Sie den Verstärker beim Auspacken. Sollten Sie Beschädigungen feststellen,
informieren Sie unverzüglich Ihren Händler. Nur der Empfänger kann gegenüber dem
Spediteur einen Anspruch aufgrund von Transportschäden geltend machen. Heben Sie
den Karton und sämtliches Verpackungsmaterial bitte auf. Sollte es irgendwann einmal
erforderlich sein, das Gerät zu Crest Audio oder zu einem unserer Büros, ServiceCenter oder Händler zurückzuschicken, verwenden Sie dazu bitte nur die OriginalWerksverpackung. Sollte keine Versandverpackung mehr vorhanden sein, bitten Sie
Crest um Ersatz.
Für Ersatzverpackung
wenden Sie sich
bitte direkt an die
Kundendienstabteilung
von Crest Audio (siehe
– Kundendienst und
Unterstützung).
+
Montage
Die Verstärker der CC Series werden in genormten 19”-Racks montiert. Zur
zusätzlichen Verstärkung sind Montageösen auf der Rückseite angebracht; dies wird
für vorübergehende Installationen wie etwa mobile oder Tour-Beschallungssysteme
empfohlen. Aufgrund der Kabel und Anschlüsse auf der Rückseite wird die Befestigung
der hinteren Montageösen an den Schienen durch einen rechtwinkligen Schraubendreher,
Winkelschraubendreher oder Sechskantschlüssel erleichtert.
Netzanschluss
Der Leistungsbedarf der Endstufen der CC Series ist auf 1/8 (übliche Musikbedingungen)
und 1/3 (extreme Musikbedingungen) ausgelegt.Der Nennwert der Starkstromaufnahme
wird nur über den Schutzschalter auf der Vorderseite begrenzt. Den Strombedarf des
jeweiligen Verstärkers können Sie den technischen Daten im Anhang entnehmen.
Achten Sie darauf, dass die Netzspannung korrekt ist und mit den Angaben auf der
Rückseite des Verstärkers übereinstimmt. Schäden, die aufgrund des Anschlusses des
Verstärkers an eine ungeeignete Wechselspannung entstehen, werden nicht von der
Garantie abgedeckt. Wenn bei Bestellung nicht anders angegeben, werden die an die
Kunden versandten Crest-Verstärker folgendermaßen konfiguriert:
Option 1 Nordamerika
120VAC / 60 Hz
Option 2 Europa, Asien
230VAC / 50 Hz
Option 3 Australien
240VAC / 50 Hz
Option 4 Südamerika
120VAC / 60 Hz or 240VAC / 50 Hz
Schalten Sie den Verstärker
immer aus und trennen Sie
ihn von der Netzspannung,
bevor Sie Audiogeräte
anschließen. Als zusätzliche
Vorsichtsmaßnahme sollten
Sie vor dem Einschalten die
Dämpfer herunterdrehen.
a
p. 23
2 installation
CCTM Bedienungsanleitung
Kühlanforderungen
Die Verstärker der CC™ Series arbeiten mit einem Fremdkühlsystem, das eine niedrige
gleichmäßige Betriebstemperatur gewährleistet. Luft wird durch den bzw. die Lüfter
auf der Rückseite in den Verstärker eingesaugt, läuft durch die Kühlrippen des bzw.
der tunnelartigen Kanalkühlkörper(s) und wird durch die Schlitze an der Vorderseite
wieder abgegeben. Wird ein Kühlkörper zu heiß, öffnet seine Sensorschaltung das
Ausgangsrelais, wodurch die Last von diesem jeweiligen Kanal abgetrennt wird. Der
CC 1800 arbeitet mit einem gemeinsamen Kühlkörper und einem Lüfter, jedoch
mit eigener Schaltung. Auf der Rückseite des Verstärkers muss eine angemessene
Luftzufuhr gewährleistet sein, und um die Vorderseite des Verstärkers herum muss
genügend Platz belassen werden, damit die Kühlluft entweichen kann. Wird der
Verstärker im Rack montiert, darf das Rack vorne nicht mit Türen oder Abdeckungen
verschlossen werden; die Abluft muss unbehindert strömen können. Werden Racks
mit geschlossener Rückseite verwendet, müssen zur Fremdbelüftung Lüfter an der
rückseitigen Rack-Platte angebracht werden, und es muss für eine ausreichende
Luftzufuhr gesorgt werden..
Achten Sie darauf, dass
sowohl an der Vorderals auch an der Rückseite
des Verstärkers genügend
Platz zum Abführen der
erwärmten Luft gelassen
wird.
Empfehlung: In Racks
mit geschlossener
Rückseite sollte
mindestens eine
Standard-Rack-Höhe für
jeweils vier Verstärker
offen bleiben..
+
Sicherheitshinweise für den Betrieb
Achten Sie darauf, dass die Netzspannung korrekt ist und mit den Angaben auf
der Rückseite des Verstärkers übereinstimmt. Schäden, die durch Anschließen des
Verstärkers an eine ungeeignete Wechselspannung entstehen, werden nicht von der
Garantie abgedeckt. Nähere Informationen zur erforderlichen Spannung finden Sie im
Abschnitt Netzanschluss.
Die Verstärker der CC Series sind zwar mit der AUTORAMP™-Schaltung ausgestattet,
die den Signalpegel nach dem Schließen des Ausgangsrelais allmählich anhebt. Es
empfiehlt sich jedoch, die Gain-Regler während des Einschaltens heruntergedreht zu
lassen, um eine Beschädigung der Lautsprecher zu verhindern, wenn an den Eingängen
ein hoher Signalpegel vorliegt. Ganz gleich, ob Sie sie kaufen oder selber herstellen,
verwenden Sie nur Anschlüsse, Eingangskabel und Lautsprecherkabel guter Qualität,
und gehen Sie beim Löten sorgfältig und korrekt vor, um einen störungsfreien Betrieb
zu gewährleisten. Die meisten Probleme durch Ausfälle werden durch defekte Kabel
verursacht.
Die geeigneten Durchmesser für verschiedene Lastimpedanzen und Kabellängen
finden Sie in der untenstehenden Drahtdicketabelle. Denken Sie daran, dass der
Kabelwiderstand die Leistung desVerstärkers auf zweifache Weise beeinträchtigt: Durch
direkten Leistungsverlust aufgrund des Widerstands (I2R-Verlust) und durch Erhöhung
der Lastimpedanz an den Verstärker, wodurch die für den Verstärker erforderliche
Leistung verringert wird. Achten Sie zudem darauf, dass der Modusschalter für
die gewünschte Anwendung korrekt eingestellt ist. Näheres dazu finden Sie in den
Abschnitten Stereo-, Parallel- und Bridged-Mono-Betrieb.
p. 24
a
Schalten Sie den
Verstärker immer aus
und trennen Sie ihn
vom Netz, bevor Sie
Audiogeräte anschließen.
Als zusätzliche
Vorsichtsmaßnahme
sollten Sie während des
Einschaltens die Dämpfer
herunterdrehen..
a
installation
2
Anschluss der Eingänge
Die Eingangsanschlüsse erfolgen über dreipolige XLR- (Stift 2+) oder 6,3-mm„Kombibuchsen“ auf der Rückseite desVerstärkers. Die Eingänge sind aktiv symmetriert.
Der Eingangsüberlastpunkt ist hoch genug, sodass der maximale Ausgangspegel nahezu
jeder Signalquelle toleriert wird.
Anschluss der Ausgänge
Alle Modelle sind mit zwei Ausgangsanschlüssen (Lautsprecheranschlüssen) pro Kanal
ausgestattet. Die Kabel können mittels Bananenstecker, Greifer oder blankem Draht
an die Fünfwege-Anschlussklemmen angeschlossen werden. Empfohlen wird der
Anschluss über die Speakon-Buchsen.
p. 25
Übersicht über die Funktionen
CCTM Bedienungsanleitung
2
3 5
1
4 6
-6
-10
CCPROFESSIONAL
1800
1800 WATT
POWER AMPLIFIER
-6
-3
-10
ACL
SIGNAL
-15
ON
-1
-1
TEMP
-30
-80
ch A
0dB
-30
POWER
-80
ACTIVE
2
2800 WATT
POWER AMPLIFIER
-10
ACL
SIGNAL
ON
-1
TEMP
-30
ch A
0dB
-30
POWER
-80
ACTIVE
ch B
0dB
3 5
1
4 6
-6
-10
-6
-3
-10
ACL
SIGNAL
-15
-3
ON
-15
-1
-1
TEMP
-30
-80
p. 26
-3
-15
-1
2
4000 WATT
POWER AMPLIFIER
0dB
-6
-3
-15
-80
CCPROFESSIONAL
4000
ch B
3 5
1
4 6
-6
-10
CCPROFESSIONAL
2800
-3
-15
ch A
0dB
ACTIVE
-30
POWER
-80
ch B
0dB
Vorderseite
Übersicht über die Funktionen 3
Schalter und Regler
1 Wechselstrom-Netzschalter/Schutzschalter
Die Verstärker der CC Series sind mit einem kombinierten WechselstromNetzschalter bzw. Schutzschalter auf der Vorderseite ausgestattet. Schaltet sich der
Schalter während des Normalbetriebs aus, drücken Sie ihn einmal in die Position
ON zurück. Schaltet er sich erneut aus, muss der Verstärker gewartet werden.
2 Eingangsdämpfer
Drehen Sie die Dämpfer, falls möglich, immer vollständig im Uhrzeigersinn auf, um
einen optimalen System-Headroom zu gewährleisten. Die Eingangsdämpferregler
(einer für Kanal A, einer für Kanal B) befinden sich auf der Vorderseite und dienen
zur Gain-Regelung der jeweiligen Verstärkerkanäle in sämtlichen Modi. Angaben zur
Standard-Spannungsverstärkung sowie zur Eingangsempfindlichkeit finden Sie in den
technischen Daten am Ende dieser Anleitung.
Anzeigen
Der Netzschalter unterbricht
nur eine Seite der
Wechselstromleitung. Daher
kann im Gehäuse gefährliche
Energie vorhanden sein,
selbst wenn der Netzschalter
auf OFF steht.
a
a
Beim Betrieb im BridgedModus müssen beide
Dämpfer auf derselben
Position stehen, sodass die
Lautsprecherlast gleichmäßig
auf die Kanäle verteilt wird.
Weitere Informationen und
Sicherheitshinweise finden Sie im
Abschnitt Bridged-Mono-Betrieb.
Die Verstärker der CC Series sind mit vier LED-Anzeigen pro Kanal auf der Vorderseite
ausgestattet: ACLTM (Automatic Clip Limiting), Signal,Temp und Active. Die LED-Anzeigen
informieren den Anwender über den Betriebsstatus des jeweiligen Kanals und warnen vor
möglichen Störungen.
3 ACL-LED
Die ACL-LED eines Kanals leuchtet auf, sobald Clipping einsetzt. Blinken die LEDs
eines Kanals schnell und unregelmäßig, befindet sich der Kanal an der Schwelle
zum Clipping. Leuchten sie kontinuierlich und hell auf, grenzt der Verstärker das
Clipping ein oder verringert die Verstärkung um zu verhindern, dass stark gekappte
Wellenformen die Lautsprecher erreichen.Weitere Informationen dazu finden Sie
im Abschnitt Automatic Clip Limiting.Während des ersten Einschaltens leuchtet
die ACL-LED auf um anzuzeigen, dass die AUTORAMPTM-Schaltung zur GainVerringerung aktiviert ist. Dadurch werden plötzliche Signalstöße verhindert, wenn
die Lautsprecherrelais geschlossen werden.
4 Signal-LED
Diese LED leuchtet auf, wenn der zugehörige Kanal ein Ausgangssignal von ca. 4
Volt RMS oder darüber (0,1 Volt oder darüber am Eingang, mit 0 dB Dämpfung und
üblicher Spannungsverstärkung von x40) produziert. Hiermit lässt sich einfacher
ermitteln, ob ein Signal den Verstärker erreicht und von ihm verstärkt wird.
5 Temp-LED
Die TEMP-LED leuchtet auf um anzuzeigen, dass das Ausgangsrelais des Kanals
geöffnet ist, wodurch der bzw. die Lautsprecher aufgrund von Überhitzung abgetrennt
werden. Ist die Temperatur des Kanals wieder auf einen betriebssicheren Wert
gesunken, erlischt die LED, das Ausgangsrelais des Kanals schließt sich, und der bzw.
die Lautsprecher werden wieder angeschlossen.
6 Active-LED
Die Active-LED zeigt an, dass das Ausgangsrelais des zugehörigen Kanals geschlossen
und der Kanal in Betrieb ist. Sie leuchtet beim Normalbetrieb sowie auch bei aktivierter
Automatic-Clip-Limiting-Funktion oder ACL-Gain-Verringerung im Kanal auf. Hierbei
handelt es sich um Schutzfunktionen, durch die das Ausgangsrelais geschlossen bleibt.
Erlischt die Active-LED, liegt kein Signal an den Ausgangssteckern vor.
p. 27
3 Übersicht über die Funktionen
2
CCTM Bedienungsanleitung
3
1
INPUT
CLASS 2 WIRING
OUTPUT
MOUNT IN RACK ONLY INSTALLER SUR SUPPORT
DE MONTAGE SEULEMENT
GAIN
IN=x20
SELECT OUT=x40
WWW.CRESTAUDIO.COM
ch A
MADE IN CHINA
BRIDGE
PARALLEL
STEREO
ch B
This info will be on sticker
A PRODUCT OF
CREST AUDIO CORP.
FAIR LAWN, NJ
120 VAC
60 Hz 1000 WATTS
UL Sticker
Legende – Rückseite
Rückseite
1 IEC-Netzbuchse
Geeignet für ein genormtes Netzkabel mit IEC-Ende.
2 Moduswahlschalter
Mit dem Moduswahlschalter auf der Rückseite wird der Verstärker
in Stereo-, Parallel- bzw. Bridged-Mono-Betrieb geschaltet. Der
Moduswahlschalter darf nicht bei eingeschaltetem Verstärker betätigt
werden. Weitere Informationen dazu finden Sie in den Abschnitten
Stereo- und Bridged-Mono-Betrieb.
3 Gain-Wahlschalter
Mit dem Gain-Wahlschalter auf der Rückseite wird der Verstärker in
eine Gesamtverstärkung von 40 (32 dB) oder 20 (26 dB) geschaltet. Ist
er nicht gedrückt, beträgt die Verstärkung x40, ist er gedrückt, beträgt
sie x20.
Eingangsanschluss
Polarität XLR-Buchse
Polarität Klinkenbuchse
Bridged-Mono-Modus
Parallel-Modus
Stereo-Modus
Ausgangsanschlus
Speakon®-Ausgang
Stereo/Parallel Kanal A
Stereo/Parallel Kanal B
Bridged Mono
Fünfwege-Anschlussklemme
Stereo/Parallel Kanal A
Bridged Mono
Stereo/Parallel Kanal B
p. 28
Betriebsmodi
4
Stereo
Für Stereobetrieb (mit zwei Kanälen) schalten Sie den Verstärker aus und
stellen den Moduswahlschalter auf die Position Stereo. In diesem Modus
arbeiten beide Kanäle unabhängig voneinander, wobei ihre jeweiligen Pegel
über die Eingangsdämpfer geregelt werden. Ein Signal am Eingang von Kanal
A erzeugt somit ein verstärktes Signal am Ausgang von Kanal A, während ein
Signal am Eingang von Kanal B ein verstärktes Signal am Ausgang von Kanal
B erzeugt.
Parallel
Für den Parallelbetrieb (zwei Kanäle, ein einziger Eingang) schalten Sie den
Verstärker aus und stellen den Moduswahlschalter auf die Position Parallel.
Beide Verstärkerkanäle werden dann vom Signal am Eingang von Kanal A
getrieben. Steckverbindungen sind nicht erforderlich. Die Ausgangsanschlüsse
sind dieselben wie im Stereomodus. Die Eingangsbuchsen von Kanal A
und Kanal B sind verknüpft, um einen weiteren Verstärker anschließen zu
können. Beide Eingangsdämpfer bleiben aktiviert, sodass Sie verschiedene
Pegel für jeden Kanal einstellen können. Stromwerte und andere allgemeine
Leistungsdaten sind dieselben wie im Stereomodus.
Bridged Mono
Beide Verstärkerkanäle können gebrückt werden, um einen äußerst
leistungsfähigen Mono-Verstärker mit einem Kanal einzurichten. Gehen
Sie beim Betrieb im Bridged-Modus mit äußerster Vorsicht vor, da an
den Ausgangsklemmen möglicherweise tödliche Spannung vorliegen kann.
Zum Brücken des Verstärkers schalten Sie ihn aus und schieben den
Moduswahlschalter auf der Rückseite des Verstärkers auf die Position
Bridge. Schließen Sie das Signal an den Eingang von Kanal A an, und schließen
Sie die Lautsprecher über die spannungsführenden Ausgänge an (die „+“Anschlussklemmen der Kanäle A und B). Sie können auch über die Stifte
„1+POS“ und „2+NEG“ der Speakon®-Buchse von Kanal A anschließen.
Wie beim Parallelmodus sind beide Eingangsbuchsen miteinander verknüpft,
um den Eingang eines weiteren Verstärkers treiben zu können.
Anders als Stereo- und Parallelmodus, bei denen eine Seite jedes Ausgangs
geerdet ist, sind im Bridged-Modus beide Seiten spannungsführend.
Die Seite von Kanal A und der Eingang haben dieselbe Polarität. Die
Mindestnennlastimpedanz im Bridged-Modus beträgt 4 Ohm, was dem
Betrieb beider Kanäle bei 2 Ohm entspricht. Durch das Treiben gebrückter
Lasten von unter 4 Ohm wird die ACL-Schaltung aktiviert, was zu einem
Leistungsverlust führt und eine Wärmeüberlastung zur Folge haben kann.
Beim Betrieb im
Bridged-Modus
müssen beide Dämpfer
auf derselben Position
stehen, sodass die
Lautsprecherlast
gleichmäßig auf beide
Kanäle verteilt wird.
a
p. 29
5 Schutzfunktionen
CCTM Bedienungsanleitung
Die Verstärker der CC Series sind mit verschiedenen Schaltungen ausgestattet, durch die sie selbst
und auch die Lautsprecher in nahezu jeder Situation geschützt werden. Crest Audio hat versucht, die
Verstärker so narrensicher wie möglich zu machen, und sie gegen Kurzschluss, Leerlauf, ungeeignete
Lasten, Gleichspannung und Überhitzung geschützt. Schaltet ein Kanal in den Automatic-Clip-Limitingbzw. ACLTM-Modus zur Gain-Verringerung, bleibt die Lautsprecherlast angeschlossen, ClippingProzentsatz oder Ausgangsleistung werden jedoch sofort verringert. Tritt ein Problem auf, das den
Schutzmodus eines Kanals aktiviert, leuchtet die Temp-LED für diesen Kanal auf. Bei Gleichspannung
am Ausgang, übermäßigen Unterschallfrequenzen oder Wärmeüberlastung trennt das Ausgangsrelais
des Kanals die Lautsprecherlast, bis das Problem behoben wird oder der Verstärker abgekühlt ist.
Automatic Clip Limiting (ACL)
Wird ein Kanal angesteuert, bis hartes kontinuierliches Clipping erfolgt, verringert die ClipLimiter-Schaltung automatisch die Verstärkung des Kanals auf einen Pegel knapp unter der
Clipping-Schwelle, sodass die Lautsprecher vor den starken kontinuierlichen Rechteckwellen
geschützt sind, die erzeugt werden und Schaden verursachen können. Situationen, in denen
der Clip-Limiter aktiviert werden kann, sind u.a. unkontrolliertes Feedback, Schwingungen,
unsachgemäße Einstellung der Ausrüstung oder Störungen in den vor dem Verstärker
angeschlossenen Geräten. Die ACL-Schaltung wird nicht durch normale Programmspitzen,
sondern nur durch kontinuierliches, übermäßiges Clipping ausgelöst. Erfolgt eine Begrenzung,
leuchtet die ACL-LED hell und kontinuierlich auf.
IGM™-Impedanzermittlung
Die Verstärker der CC Series sind mit einer innovativen Schaltung ausgestattet, die einen
sicheren Betrieb bei jeder Last ermöglicht. Liegt an einem Verstärker eine Last vor, die die
Endstufe überlastet, korrigiert die Instantaneous-Gain-Modulation- bzw. IGM-Schaltung die
Kanalverstärkung auf einen sicheren Pegel. Dieses Verfahren zum Schutz der Endstufe ist den
herkömmlichen Begrenzungsverfahren anderer Verstärker, die mit „roher Gewalt“ arbeiten, weit
überlegen. Die IGM-Schaltung beeinträchtigt die Schallleistung im Normalbetrieb nicht und ist
unauffällig, wenn sie aktiviert ist.
Thermoschutz
Die internen Lüfter sorgen dafür, dass der Verstärker unter Normalbedingungen innerhalb
seines Temperaturbereichs störungsfrei arbeitet. Erreicht die Temperatur des Kühlkörpers
eines Kanals 75 °C, was auf eine gestörte Luftzufuhr hinweisen kann, schützt sich der Kanal
unabhängig selbst, indem er seine Last abtrennt und sich abschaltet, bis er wieder abgekühlt ist.
Währenddessen leuchtet die Temp-LED auf, die Active-LED erlischt, die ACL-LEDs leuchten
weiter, und die Kühllüfter laufen mit hoher Drehzahl. Der CC 1800 arbeitet mit einem gemeinsamen Kühlkörper und einem Lüfter, jedoch mit der eigenen Schaltung.
Kurzschluss
Wird ein Ausgang kurzgeschlossen, schützen IGM- und Thermoschaltungen den Verstärker
automatisch. Die IGM-Schaltung ermittelt den Kurzschluss als äußerst starke Überlastung und
dämpft das Signal, wodurch die Endstufen-Transistoren des Kanals vor Überlaststrom geschützt
werden. Dauert der Kurzschluss an, kann sich der Kanal selbst vor Überhitzung schützen, indem
er die Last abtrennt.
Gleichspannungsschutz
Ermittelt ein Verstärkerkanal Gleichspannung oder Unterschallfrequenzen an seinen
Ausgangsklemmen, öffnet sich sofort sein Ausgangsrelais, um die Lautsprecher vor Beschädigung
zu schützen.
p. 30
Schutzfunktionen
5
Ein-/Ausschaltschutz
Beim Einschalten bleibt der Verstärker im Schutzmodus, wobei die Ausgänge für etwa sechs
Sekunden abgetrennt sind, während das Gerät unter Spannung gesetzt wird und sich diese
stabilisiert. Solange die Ausgangsrelais geöffnet sind, leuchten die ACL-LEDs auf. Wird das
Gerät nicht mehr mit Strom gespeist, werden die Lautsprecherlasten sofort abgetrennt, sodass
kein Knacken oder Ploppen ertönt.
AUTORAMP™-Signalregelung
Wird ein Verstärker der CC Series eingeschaltet oder ein Schutzmodus ausgeschaltet, wird
die AUTORAMP-Schaltung aktiviert. Solange die Lautsprecher abgetrennt sind, dämpft die
AUTORAMP-Schaltung das Signal vollständig. Nachdem sich das Ausgangsrelais geschlossen
hat, steigt das Signal langsam und allmählich auf seinen eingestellten Pegel an. Die AUTORAMPSignalregelung hat gegenüber den herkömmlichen Momenteinschaltungen einige wichtige
Vorteile:
1. Ist während des Einschaltens (oder bei Ausschalten eines Schutzmodus) ein Signal
vorhanden, werden die Lautsprecher vor einem plötzlichen, möglicherweise schädigen
den Audiosignalbündel geschützt.
2. Da die Verstärkung verringert wird, bis das Ausgangsrelais geschlossen ist, gibt es an den
Kontakten keine Bogenbildung, was ihre Lebensdauer verlängert.
p. 31
6 Sicherheit
CCTM Bedienungsanleitung
Lautsprecherschutz
Sämtliche Lautsprecher verfügen über elektrische, thermische und physikalische Grenzwerte, die eingehalten werden müssen, um Schäden oderVersagen zu verhindern. Zu hohe Leistung, Niederfrequenzen
an Hochfrequenztreibern, stark gekappte Wellenformen und Gleichspannung können für Kegel und
Kompressionstreiber das Ende bedeuten. Die Verstärker der Crest Audio CC Series schützen die
Lautsprecher automatisch vor Gleichspannungen und Unterschallsignalen. Weitere Informationen
hierzu finden Sie im Abschnitt Schutzfunktionen. Mittel- und Hochfrequenzlautsprecher, insbesondere
Kompressionstreiber, sind äußerst empfindlich gegenüber Schäden durch zu starke Netzspannung,
gekappte Wellenformen oder Frequenzen unter ihren Passbandnennwerten. Achten Sie unbedingt
darauf, dass die niedrigen und mittleren Bänder einer elektronischen Frequenzweiche an die korrekten Verstärker und Treiber und nicht versehentlich an die für ein Band mit höherer Frequenz angeschlossen werden. Der Clipping-Punkt eines Verstärkers ist seine maximale Spitzenausgangsleistung,
und einige der Hochleistungsverstärker der Crest Audio CC Series können eine höhere Leistung
bringen, als viele Lautsprecher ohne Schäden bearbeiten können. Achten Sie darauf, dass das
Spitzenleistungsvermögen des Verstärkers Ihr Lautsprechersystem nicht überlastet.
Um sicherzugehen, dass die Leistung die Fähigkeiten der Lautsprecher nie übersteigt und amVerstärker
kein Clipping auftritt, muss ein korrekt angepasster externer Limiter (oder ein Kompressor mit einem
Verhältnis von 10:1) zur Leistungsregelung eingesetzt werden. In Systemen mit aktiven elektronischen
Frequenzweichen wird einer für jedes Frequenzband eingesetzt. Der Clipping-Limiter begrenzt
automatisch die Dauer kontinuierlicher Rechteckwellen, die die Lautsprecher erreichen könnten. Der
Verstärker lässt jedoch normale Spannungsspitzen der Musik durch. Einige Lautsprechersysteme sind
mit Prozessoren ausgestattet, die über Leistungsbegrenzungsschaltungen verfügen; sie dürften keine
externe Begrenzung erfordern.
Sicherungen können ebenfalls verwendet werden, um die Leistungszufuhr zu den Lautsprechertreibern
zu begrenzen. Da sie den Strom anstatt die Spannung begrenzen, sind sie aber eine unzureichende
Lösung.Als schwächstes Glied können sie nur einmal eingesetzt werden,danach müssen sie ausgetauscht
werden. Einige Sicherungen schlechter Qualität verfügen über einen beträchtlichen Reihenwiderstand,
der die Dämpfung der Lautsprecherbewegung durch den Verstärker beeinträchtigen und sogar die
Klangqualität des Systems verschlechtern kann. Sollten Sie Sicherungen einsetzen wollen, erfragen Sie
bitte beim Lautsprecherhersteller die geeigneten Stromnennwerte und die erforderliche Trägheit.
Treiben Sie eine niederfrequente Lautsprecherbox nie mit Frequenzen, die unter ihrer jeweiligen
abgestimmten Frequenz liegen. Aufgrund der verringerten Schalldämpfung könnte eine auf eine
bestimmte Resonanz abgestimmte Box selbst bei mäßiger Leistung völlig absacken.Die Frequenzgrenzen
eines Lautsprechersystems finden Sie unter den jeweiligen technischen Daten.
Wartung des Verstärkers und Verantwortung des Anwenders
Eine regelmäßige Wartung der Verstärker der CC Series ist nicht erforderlich, und eine interne
Justierung sollte während ihrer gesamten Lebensdauer überflüssig sein. Ihr Verstärker der CC Series
ist äußerst leistungsfähig und kann sowohl für Lautsprecher als auch für Personen Gefahren bergen.
Lesen Sie sich als verantwortlicher Nutzer den Abschnitt Wichtige Sicherheitshinweise vorne in
dieser Anleitung durch, und achten Sie darauf, dass Installation,Anschluss und Betrieb des Verstärkers
korrekt erfolgen. Viele Lautsprecher können durch übermäßige Verstärkerleistung, insbesondere
bei gebrückten Hochleistungsverstärkern, beschädigt oder zerstört werden. Lesen Sie sich den
Abschnitt Lautsprecherschutz durch, und beachten Sie immer Dauer- und Spitzenleistungsvermögen
des Lautsprechers.
p. 32
Kundendienst und Unterstützung 7
Unterstützung
Sollte bei Ihrem Verstärker tatsächlich einmal ein Problem auftreten, muss
er zur Wartung zu einem autorisierten Kundendienstzentrum oder direkt in
unser Werk geschickt werden.
Für Kundendienstleistungen wenden Sie sich bitte an das nächste CrestAudio-Kundendienstzentrum, den nächsten Vertrieb oder Händler oder
eines der weltweiten Crest-Audio-Büros. Wenn Sie über Internetzugang
verfügen, besuchen Sie bitte die Webseite von Crest Audio.
+
Aufgrund der komplexen
Konstruktion und der Gefahr
eines elektrischen Schlags
dürfen alle Reparaturen
nur von qualifizierten
Technikern ausgeführt
werden. Falls das Gerät ins Werk
eingeschickt werden soll, muss es in
der Originalverpackung verschickt
werden. Bei unsachgemäßer
Verpackung kann Ihr Verstärker
beschädigt werden..
a
Kontakt
Kundendienst
Tel.
866.812.7378 USA
Fax
601.486.1380 USA
E-Mail [email protected]
Technische Unterstützung
Tel.
866.812.7378 USA
Fax
601.486.1380 USA
E-Mail [email protected]
Webseite
www.crestaudio.com
Für Ersatzverpackung
wenden Sie sich bitte
an den Kundendienst
von Crest Audio..
+
Anschrift
Crest Audio Inc.
711 A Street
Meridian, MS 39301 USA
p. 33
a
Technische Daten
CCTM Series
1800
Nennleistung gebrückt 4 Ohm
1850 Watt bei 1 kHz bei <0,1% Klirrfaktor
Nennleistung (2 x 2 Ohm)
900 Watt pro Kanal bei 1 kHz bei <0,05% Klirrfaktor, beide Kanäle getrieben
Nennleistung (2 x 4 Ohm)
700 Watt pro Kanal bei 1 kHz bei <0,05% Klirrfaktor, beide Kanäle getrieben
Nennleistung (2 x 8 Ohm)
450 Watt pro Kanal bei 1 kHz bei <0,05% Klirrfaktor, beide Kanäle getrieben
Nennleistung (1 x 2 Ohm)
950 Watt bei 1 kHz bei <0,05% Klirrfaktor
Nennleistung (1 x 4 Ohm)
775 Watt bei 1 kHz bei <0,05% Klirrfaktor
Nennleistung (1 x 8 Ohm)
475 Watt bei 1 kHz bei <0,05% Klirrfaktor
Mindestlastimpedanz
2 ohms
Max. RMS-Spannungsimpuls
73 volts
Frequenzverhalten
10 Hz bis 100 kHz; +0, -3 dB bei 1 Watt
Leistungsbereich
10 Hz bis 50 kHz; +0, -3 dB bei Nennleistung von 4 Ohm
Klirrfaktor (2 x 2 Ohm)
<0,2% bei 700 W pro Kanal von 20 Hz bis 20 kHz
Klirrfaktor (2 x 4 Ohm)
<0,1% bei 600 W pro Kanal von 20 Hz bis 20 kHz
Klirrfaktor (2 x 8 Ohm)
<0,1% bei 425 W pro Kanal von 20 Hz bis 20 kHz
Eingangs-CMRR
>-75 dB bei 1 kHz
Spannungsverstärkung
x40 (32 dB)
Crosstalk
>-55 dB bei 1 kHz bei Nennleistung 8 Ohm
Brummen und Rauschen
>-106 dB, „A“-gewichtet, bezogen auf 8 Ohm Nennleistung
Anstiegsgeschwindigkeit
> 35V/us
Dämpfungsfaktor (8 Ohm)
>150:1 bei 20 Hz bis 1 kHz
Phasenfrequenzgang
+6 bis -12 Grad von 20 Hz bis 20 kHz
Eingangsempfindlichkeit (x40)
1,32 Volt +/- 3% für 1 kHz, 4 Ohm Nennleistung, 1,06 Volt +/- 3% für 1 kHz, 2 Ohm Nennleistung
Eingangsimpedanz
15 kOhm, symmetriert
Stromaufnahme bei 1/8 Leistung
1.000 Watt an 2 Ohm, 685 Watt an 4 Ohm, 400 Watt an 8 Ohm
Stromaufnahme bei 1/3 Leistung
2.340 Watt an 2 Ohm, 1.650 Watt an 4 Ohm, 1.000 Watt an 8 Ohm
Kühlung
Ein temperaturabhängiger Gleichstromlüfter mit variabler Drehzahl, 80 mm, auf der Rückseite
Regler
2 Dämpfer vorne, Moduswahlschalter hinten
LED-Anzeigen
2 ACLTM (Automatic Clip Limiting), 2 Signalpräsenz, 2 Active-Status, 2 Temp
Schutzfunktionen
Überhitzung, Gleichstrom, Einschaltspitzen, Unterschall, Fehllast
Anschlüsse
Kombi-XLR- und 6,3-mm-Kopfhörereingangs-, Speakon- und Fünfwege-AnschlussklemmenLautsprecherausgangs-, IEC-Netzbuchsen (15 A)
BauweiseStahl
(Stärke 16), mit Gussfront
Abmessungen
88,9 mm x 482,6 mm x 377,8 mm; 31,8 mm für Montageösen und Stecker hinten
Nettogewicht
14,8 kg
Bruttogewicht
15,9 kg
x20 (26 dB)
Alle Messungen erfolgten bei 120 VAC mit kaltem Leistungstrafo. 2 Ohm Leistung zeitbegrenzt durch Magnetschutzschalter.
p. 34
CCTM Bedienungsanleitung
Technische Daten a
2800
Nennleistung gebrückt 4 Ohm
2.800 Watt bei 1 kHz bei <0,1% Klirrfaktor
Nennleistung (2 x 2 Ohm)
1.400 Watt pro Kanal bei 1 kHz bei <0,05% Klirrfaktor, beide Kanäle getrieben
Nennleistung (2 x 4 Ohm)
965 Watt pro Kanal bei 1 kHz bei <0,05% Klirrfaktor, beide Kanäle getrieben
Nennleistung (2 x 8 Ohm)
595 Watt pro Kanal bei 1 kHz bei <0,05% Klirrfaktor, beide Kanäle getrieben
Nennleistung (1 x 2 Ohm)
1.850 Watt bei 1 kHz bei <0,1% Klirrfaktor
Nennleistung (1 x 4 Ohm)
1.150 Watt bei 1 kHz bei <0,05% Klirrfaktor
Nennleistung (1 x 8 Ohm)
665 Watt bei 1 kHz bei <0,05% Klirrfaktor
Mindestlastimpedanz
2 ohms
Max. RMS-Spannungsimpuls
82 volts
Frequenzverhalten
10 Hz bis 100 kHz; +0, -2,0 dB bei 1 Watt
Leistungsbereich
10 Hz bis 35 kHz; +0, -3 dB bei Nennleistung von 4 Ohm
Klirrfaktor (2 x 2 Ohm)
<0,15% bei 1.150 Watt pro Kanal von 20 Hz bis 20 kHz
Klirrfaktor (2 x 4 Ohm)
<0,1% bei 880 Watt pro Kanal von 20 Hz bis 20 kHz
Klirrfaktor (2 x 8 Ohm)
<0,1% bei 560 Watt pro Kanal von 20 Hz bis 20 kHz
Eingangs-CMRR
>-65 dB bei 1 kHz
Spannungsverstärkung
x40 (32 dB)
Crosstalk
>-65 dB bei 1 kHz bei Nennleistung 8 Ohm
Brummen und Rauschen
>-111 dB, „A“-gewichtet, bezogen auf 8 Ohm Nennleistung
Anstiegsgeschwindigkeit
> 15V/us
Dämpfungsfaktor (8 Ohm)
>500:1 bei 20 Hz bis 1 kHz
Phasenfrequenzgang
+5 bis -15 Grad von 20 Hz bis 20 kHz
Eingangsempfindlichkeit (x40)
1,7 Volt +/- 3% für 1 kHz, 4 Ohm Nennleistung, 1,36 Volt +/- 3% für 1 kHz, 2 Ohm
Nennleistung
Eingangsimpedanz
15 kOhm, symmetriert
Stromaufnahme bei 1/8 Leistung
1.250 Watt an 2 Ohm, 880 Watt an 4 Ohm, 570 Watt an 8 Ohm
Stromaufnahme bei 1/3 Leistung
2.905 Watt an 2 Ohm, 2.220 Watt an 4 Ohm, 1.355 Watt an 8 Ohm
Kühlung
wei temperaturabhängige Gleichstromlüfter mit variabler Drehzahl, 80 mm, auf der Rückseite
Regler
2 Dämpfer vorne, Moduswahlschalter hinten
LED-Anzeigen
2 ACLTM (Automatic Clip Limiting), 2 Signalpräsenz, 2 Active-Status, 2 Temp
Schutzfunktionen
Überhitzung, Gleichstrom, Einschaltspitzen, Unterschall, Fehllast
Anschlüsse
Kombi-XLR- und 6,3-mm-Kopfhörereingangs-, Speakon- und Fünfwege-AnschlussklemmenLautsprecherausgangs-, IEC-Netzbuchsen (15 A)
Bauweise
Stahl (Stärke 16), mit Gussfront
Abmessungen
88,9 mm x 482,6 mm x 377,8 mm; 31,8 mm für Montageösen und Stecker hinten
Nettogewicht
18,05 kg
Bruttogewicht
19,23 kg
x20 (26 dB)
Alle Messungen erfolgten bei 120 VAC mit kaltem Leistungstrafo. 2 Ohm Leistung zeitbegrenzt durch Magnetschutzschalter.
p. 35
a
Technische Daten
CCTM Bedienungsanleitung
CCTM Series
4000
Nennleistung gebrückt 4 Ohm
4.000 Watt bei 1 kHz bei <0,1% Klirrfaktor
Nennleistung (2 x 2 Ohm)
2.000 Watt pro Kanal bei 1 kHz bei <0,1% Klirrfaktor, beide Kanäle getrieben
Nennleistung (2 x 4 Ohm)
1.350 Watt pro Kanal bei 1 kHz bei <0,05% Klirrfaktor, beide Kanäle getrieben
Nennleistung (2 x 8 Ohm)
800 Watt pro Kanal bei 1 kHz bei <0,05% Klirrfaktor, beide Kanäle getrieben
Nennleistung (1 x 2 Ohm)
2.550 Watt bei 1 kHz bei <0,1% Klirrfaktor
Nennleistung (1 x 4 Ohm)
1.600 Watt bei 1 kHz bei <0,05% Klirrfaktor
Nennleistung (1 x 8 Ohm)
900 Watt bei 1 kHz bei <0,05% Klirrfaktor
Mindestlastimpedanz
2 ohms
Max. RMS-Spannungsimpuls
93 volts
Frequenzverhalten
10 Hz bis 100 kHz; +0, -2 dB bei 1 Watt
Leistungsbereich
10 Hz bis 30 kHz; +0, -3 dB bei Nennleistung von 4 Ohm
Klirrfaktor (2 x 2 Ohm)
<0,2% bei 1.475 W pro Kanal von 20 Hz bis 20 kHz
Klirrfaktor (2 x 4 Ohm)
<0,1% bei 1.150 W pro Kanal von 20 Hz bis 20 kHz
Klirrfaktor (2 x 8 Ohm)
<0,1% bei 700 W pro Kanal von 20 Hz bis 20 kHz
Eingangs-CMRR
>-65 dB bei 1 kHz
Spannungsverstärkung
x40 (32 dB)
Crosstalk
>-65 dB bei 1 kHz bei Nennleistung 8 Ohm
Brummen und Rauschen
>-112 dB, „A“-gewichtet, bezogen auf 8 Ohm Nennleistung
Anstiegsgeschwindigkeit
> 15V/us
Dämpfungsfaktor (8 Ohm)
>500:1 bei 20 Hz bis-1 kHz
Phasenfrequenzgang
+5 bis -15 Grad von 20 Hz bis 20 kHz
Eingangsempfindlichkeit (x40)
1,88 Volt +/- 3% für 1 kHz, 4 Ohm Nennleistung, 1,62 Volt +/- 3% für 1 kHz, 2 Ohm
Nennleistung
Eingangsimpedanz
15 kOhm, symmetriert
Stromaufnahme bei 1/8 Leistung
1.825 Watt an 2 Ohm, 1.185 Watt an 4 Ohm, 720 Watt an 8 Ohm
Stromaufnahme bei 1/3 Leistung
4.535 Watt an 2 Ohm, 2.975 Watt an 4 Ohm, 1.835 Watt an 8 Ohm
Kühlung
wei temperaturabhängige Gleichstromlüfter mit variabler Drehzahl, 80 mm, auf der
Rückseite
Regler
2 Dämpfer vorne, Moduswahlschalter hinten
LED-Anzeigen
2 ACLTM (Automatic Clip Limiting), 2 Signalpräsenz, 2 Active-Status, 2 Temp
Schutzfunktionen
Überhitzung, Gleichstrom, Einschaltspitzen, Unterschall, Fehllast
Anschlüsse
Kombi-XLR- und 6,3-mm-Kopfhörereingangs-, Speakon- und Fünfwege-AnschlussklemmenLautsprecherausgangs-, IEC-Netzbuchsen (15 A)
Bauweise
Stahl (Stärke 16) mit Gussfront und Gussgriffen
Abmessungen
88,9 mm x 482,6 mm x 377,8 mm; 31,8 mm für Montageösen und Stecker hinten
Nettogewicht
19,64 kg
Bruttogewicht
20,8 kg
x20 (26 dB)
Alle Messungen erfolgten bei 120 VAC mit kaltem Leistungstrafo. 2 Ohm Leistung zeitbegrenzt durch Magnetschutzschalter.
p. 36
Drahtdicke b
Drahtdicke
Länge verseiltes Kabel
2
5
meters
meters
10
meters
30
Leistungsverlust
8 Ω Last
4 Ω Last
0.3mm2
2.9%
5.6%
10.8%
0.5
1.74
3.4
6.7
0.75
1.16
2.3
4.5
1.5
0.58
1.16
2.3
2.5
0.35
0.70
1.39
4.0
0.22
0.44
0.87
0.5mm2
4.3%
8.2%
15.5%
0.75
2.9
5.6
10.8
1.5
1.45
2.9
5.6
2.5
0.87
1.74
3.4
4
0.55
1.09
2.2
6
0.37
0.73
1.45
0.5mm2
8.24%
5.5%
28%
0.75
5.6
10.8
19.9
1.5
2.9
5.6
10.8
2.5
1.74
2.9
6.7
4
1.09
1.74
4.3
6
0.73
1.09
2.9
15.5%
0.73%
45%
1.5
8.2
15.5
28
2.5
5.1
9.8
18.2
4
3.2
6.3
12.0
6
2.2
4.3
8.2
10
1.31
2.6
5.1
meters 0.75mm2
2 Ω Last
p. 37
b
Drahtdicke
Drahtdicke
Länge verseiltes Kabel
5
feet
10
40
80
p. 38
4 Ω Last
16
0.51
1.02
2.0
14
0.32
0.64
1.28
12
0.20
0.40
0.80
10
0.128
0.25
0.51
18 AWG
1.61%
3.2%
6.2%
16
1.02
2.0
4.0
14
0.64
1.28
2.5
12
0.40
0.80
1.60
10
0.25
0.51
1.01
18 AWG
6.2%
11.9%
22%
16
4.0
7.7
14.6
14
2.5
5.0
9.6
12
1.60
3.2
6.2
10
1.01
2.0
4.0
8
0.60
1.20
2.4
18 AWG
11.9%
22%
37%
16
7.7
14.6
26
14
5.0
9.6
17.8
12
3.2
6.2
11.8
10
2.0
4.0
7.7
8
1.20
2.4
4.7
18 AWG
feet
feet
feet
Leistungsverlust
8 Ω Last
0.81%
1.61%
2 Ω Last
3.2%
Précautions importantes
1
Conserver le carton et les éléments
d’emballages! Si vous devez transporter
l’unité, veuillez utiliser l’emballage d’usine.
¡
Ne pas faire de connection en
parallèle ou en série entre les
sorties de deux amplificateurs.
Pour le remplacement de l’emballage,
appellez directement le service client de
Crest Audio..
2
3
4
5
6
7
8
Lire toute la documentation
avant d’utiliser votre équipement.
Conserver toute la documentation pour
de futures références.
Dans ce cas, Crest Audio décline toute
responsabilité en cas de dommage aux
haut-parleurs.
Ô
Pour un usage adéquat suivre
toutes les instructions notées sur
le chassis.
Ne jamais maintenir en position
“on” l’interrupteur ou le coupe
circuit, si l’alimentation doit être
coupée.
Ne pas utiliser l’unité si le câble
d’alimentation est coupé ou
éfiloché.
Les câbles d’alimentation doivent
être placés et orientés de manière à
éviter tout écrasement ou pincement
d’appareils placés dessus ou contre.
Faire toujours fonctionner l’unité
en utilisant le branchement de la
prise terre (masse) du système
électrique. Prendre les précautions
nécéssaires afin de vous assurer que la
masse de votre installation électrique
fonctionne correctement.
Tous dommages causés par un
problème de voltage impropre
n’est couvert par la garantie. Le
voltage principal utilisé doit respecter celui
indiqué à l’arrière de l’unité.
Ne pas mettre de bornes
positives à la masse. (rouge)
Ne jamais connecter une borne de
sortie positive à une masse ou une
autre borne de sortie positive.
9
Eteindre et débrancher le courant
de l’unité avant d’effectuer les
connections.
0
Ne pas utiliser les entrées avec
un signal de volume supérieur
au niveau recommandé pour
atteindre pleinement le niveau
de sortie.
Ne pas utiliser les canaux de sorties
d’un autre amplificateur pour
alimenter votre unité.
£
Ne pas connecter les entrées
ou sorties de votre unité à une
alimentation électrique quelle que
soit la position de l’interrupteur marche/
arrêt.
Connecter
les
sorties
de
l’amplificateur à un oscilloscope
ou autre appareil de test lorsque
l’amplificateur est en mode pont
risque d’endommager votre unité
ou votre équipement de test.
¢
Ne pas renverser d’eau ou autres
liquides dans ou sur votre unité.
Par ailleurs ne pas utiliser l’unité
si celle ci repose sur du liquide.
ˆ
Ne pas bloquer les ventilateurs ou
obstruer les ouies de ventilation.
§
Si l’unité est utilisée dans un
environnement extrèmement
poussiéreux ou enfumé: l’unité doit
être régulièrement dépoussierée ou
néttoyée de tous corps étrangers.
¶
Ne pas utiliser l’unité près de
radiateurs ou de toutes autres
sources de chaleur.
ƒ
Le câble d’alimentation de
l’équipement doit être débranché
de la prise si l’appareil ne doit pas
fonctionner pendant une longue
période.
FRANÇAIS
Informations services
Ne pas enlever le capot!
Enlever le capot vous exposerait à des
risques électriques dangereux. Il n’y a
aucune pièce à l’intérieur que vous pourrez réparer ou remplacer par des composants électroniques courants
L’équipement doit être réparé
par un technicien qualifié quand:
A. Le câble d’alimentation est endommagé.
B. L’équipement a été exposé à la pluie.
C. L’équipement semble ne pas fonctionner
normalement, ou manifeste une différence
perceptible avec les performances
normales.
D. L’équipement est tombé, ou le boîtier est
endommagé.
Pour obtenir notre service:
Contactez votre centre de maintenance
(revendeur, distributeur) Crest Audio
le plus proche ou contactez nous au
201.909.8700 USA ou visitez nous
sur www.crestaudio.com por toutes
informations supplémentaires.
Email [email protected]
Ce symbole est utilisé pour
prévenir l’opérateur de suivre
impérativement la procédure et
les précautions détaillées dans la
documentation.
Ce symbole est employé pour alerter
l’opérateur que de dangereuses
charges électriques non isolées
sont possibles à l’intérieur du
boîtier qui pourraient causer des
risques de chocs électriques.
ATTENTION
L'INTERRUPTEUR D'ALIMENTATION NE COUPE PAS
CELLE-CI AUX DEUX BORNES ET DE L'ENERGIE
ELECTRIQUE PEUT ETRE PRESENTE DANS CERTAINS
COMPOSANTS APRES LA MISE HORS-TENSION.
Table des matières
CCTM owner’s manual
utiliser ce manuel
1 Comment
introduction
2 installation
déballage
p.41
p.42
p.43
montage
connection d’alimentation
refroidissement requis
précautions d’usage
connection des entrées
connection des sorties
générales
3 caractéristiques
panneau avant
p.45
panneau arrière
modes d’opérations
4 stéréo
p.48
parallèle
pont (Bridge)
Table des Matières
de protection
5 systèmes
limiteur d’écrêtage automatique
p.49
capteur d’impédance IGM™
thermique
courts cicuits
courant continu
allumage
contrôle du signal AUTORAMP™
6 sécurité
protection des haut-parleurs
p.51
responsabilités utilisateurs
et aide technique
7 Service
aide technique
p.52
contactez nous
p. 40
a
spécifications
b
tableau de distances de câblage
p.53
appendices
p.56
Comment utiliser ce manuel 1
conventions
termes
Les caractéristiques officielles de Crest Audio et chaques indicateurs ou contrôles
apparaitront en temps que termes.
actions
les actions spécifiques ou sélections que l’usager peut exécuter apparaitront en tant
qu’actions.
Tâches
Elles sont découpées en étapes
1
2
3
Alertes
Procédures à éviter.
Eventualités ou risques à
prendre en compte avant
d’utiliser le matériel.
a
Indicateurs
Les témoins d’affichage à
surveiller.
Alertes, indicateurs, ou
illuminations de LED.
®
Conseils
+
Méthodes
recommandées
rappels pratiques
Possibilités et capacités
voir
Se réfère à d’autres sections du manuel contenant des informations supplémentaires relatives
à la partie en cours.
note
Informations supplémentaires
p. 41
1 introduction
Bienvenue
Félicitations d’avoir choisi un amplificateur de puissance Crest Audio de la
série CC™. Ces unités sont concues pour durer et vous permettre une
utilisation intensive sans problème de fiabilité ou d’utilisation. D’une grande
compacité, ils proposent une supériorité sonore et un fiabilité inégalable qui
ont fait la renommée de Crest Audio. L’avance technologique et le nombre
de circuits de protections permettent une utilisation efficace quelles que
soient les conditions d’alimentations. L’un d’entre eux, l’ACL™ (limitation
automatique d’écrêtage) permet des opérations sans problèmes a des
charges aussi faibles que 2 ohms. L’ACL™ est un circuit qui assure que
l’intégrité sonore soit maintenue même en cas de surcharges extrêmes. La
conception optimum du système de refroidissement Crest Audio utilise
un tunnel dévié de ventilation forcée, et un système de ventilateurs à
vitesse variable. Cette méthode de refroidissement permet de garder une
température adéquate et il en résulte un longévité accrue des transistors
de sortie.
Les modèles CC4000, CC2800 et CC1800 utilisent le nouveau système
de circuiterie et de chassis Crest Audio “Power Density”.
p. 42
CCTM owner’s manual
Pour votre propre
securite et celle de
votre materiel, lisez
attentivement ce
manuel.
a
installation2
déballage
Suite au déballage, inspectez l’amplificateur. Si vous trouvez le moindre dommage,
prévenez immédiatement votre revendeur. Il est le seul capable d’instituer une
réclamation pour un dommage occasionné pendant le transport. Assurez vous de
bien garder le carton et tous les éléments de l’emballage. En cas de renvoi de l’unité
à Crest Audio, un de ses bureaux, centre de réparation, ou revendeur, veuillez utilisez
impérativement l’emballage d’origine. Si celui-ci est endommagé ou inutilisable,
contactez Crest pour obtenir un remplacement.
+
Pour le
remplacement
de l’emballage, appelez
directement le service
clientèle de Crest Audio.
Voir-service après-vente
montage
Les amplificateurs de la série CC sont au standard rack de 19”. Les oreilles de montage
arrière sont également prévues pour un support additionel, qui est recommandé pour
des installations non permanentes comme des sonos mobiles ou des systèmes de
tournées ou concerts. Du fait des câbles et des connections du panneau arrière un
tournevis angle droit ou déporté ou une clé Allen faciliteront le montage sur les rails.
connecter l’alimentation
Les puissances requises pour les amplificateurs de la série CC sont mesurées à 1/8
des capacités (signal musical normal) et à 1/3 des capacités (signal musical fort). La
mesure maximale de la consommation électrique n’est limitée que par le coupe circuit
du panneau avant. Consutez les spécifications dans la section Appendices pour voir
la consommation requise pour chaque amplificateur. Assurez-vous que le voltage du
courant principal soit correct et semblable à celui imprimé à l’arrière de l’amplificateur.
Tout dommage causé par un problème de voltage impropre n’est couvert par aucune
garantie. Mise à part toute demande de modification spécifique lors de la commande,
les amplificateurs Crest Audio sont livrés au client selon la configuration suivante.
a
Toujours éteindre et
débrancher l’amplificateur
du voltage principal avant de
faire les connections audio. Il
est également important de
mettre les potentiomètres
de la façade avant en
position minimum avant la
mise sous tension.
Option 1 Amérique du Nord120VAC / 60 Hz
Option 2 Europe, Asie
230VAC / 50 Hz
Option 3 Australie
240VAC / 50 Hz
Option 4 Amérique du Sud 120VAC / 60 Hz ou 240VAC / 50 Hz
p. 43
installation 2
Refroidissement nécéssaire
Les amplificateurs de la série CC™ utilisent un système de refroidissement à air forcé
pour maintenir une température minimale quel que soit la température ambiante. L’air
est attiré dans l’amplificateur par des ventilateur(s) disposé(s) à l’arrière, passe le long
des radiateurs en formes de tunels (pour le meilleur échange thermique possible) et
est expulsé par le panneau avant. Si le radiateur atteint des températures élevées, une
protection disconnectera la charge du côté concerné. Le CC 1800 utilise un tunnel
de refroidissement et un ventilateur commun, tout en maintenant une séparation des
circuits.
a
Il est primordial d’avoir
un excellent système
de refroidissement. Si
vous utilisez vos unités
en Rack, ne jamais les
faire fonctionner avec le
couvercle avant fermé.
suggestion: si l’arrière
du rack est fermé,
prévoyez au moins un
espace libre toutes les 3
unités.
+
Précautions d’emploi
Assurez vous que le voltage du courant principal soit correct et semblable à celui
imprimé à l’arrière de l’amplificateur. Tous dommages causés par un problème de
voltage impropre n’est couvert par aucune garantie. Reportez vous à la section
alimentation pour plus d’informations sur les voltages requis.
Bien que les amplificateurs de la série CC disposent du circuit de montée en volume
contrôlée AUTORAMP™, positionnez les gains au minimum à la mise en route est
toujours une précaution intelligente. Que vous les achetiez ou les assembliez vousmême, utilisez toujours des câbles et des connecteurs de bonne qualité, et portez
un soin tout particulier aux soudures si nécessaires. La plupart des problèmes
intermittents en diffusion sonore proviennent des cables!
Consultez la charte de dimensions des cables pour vous assurer de ne pas gaspiller
une grande quantité de la puissance. Assurez vous également que le mode de
fonctionnement de votre amplificateur est approprié à votre situation. Reportez-vous
aux sections plus loin dans ce manuel (modes stéréo, Parallèles et Pont) pour plus
d’informations.
Toujours éteindre
et débrancher
l’amplificateur du voltage
principal avant de
faire les connections
audio. Il est également
important de mettre les
potentiomètres de la
façade avant en position
minimum avant la mise
sous tension.
a
Connecter les entrées de votre unité (Inputs)
Les connexions d’entrées sont des combo XLR / 1/4” Jack (acceptent les 2 standarts
sur la même connexion). Les entrées sont activement symétrisées. Vérifiez que vos
autres unités partagent la même norme de connexion (annotées sur l’arrière de votre
unité). La sensibilité d’entrée de votre CS lui permettra de s’accomoder à la plupart
des signaux.
Connecter les sorties de votre unité (Outputs)
Tous les modèles ont 2 bornes par canal pour les sorties. Ces bornes vous permettent
d’utiliser des connecteurs bananes, fils dénudés, brochés ou borniers. La méthode de
connection recommandée est via les connecteurs Speakon®.
p. 44
Caractéristiques générales 3
2
3 5
1
4 6
-6
-10
CCPROFESSIONAL
1800
1800 WATT
POWER AMPLIFIER
-6
-3
-10
ACL
SIGNAL
-15
ON
-15
-1
-1
TEMP
-30
-80
ch A
0dB
-30
POWER
-80
ACTIVE
2
2800 WATT
POWER AMPLIFIER
-10
ACL
-15
-3
ON
-15
-1
-1
TEMP
-30
ch A
0dB
-30
POWER
-80
ACTIVE
2
ch B
0dB
1
3 5
4 6
-6
-10
4000 WATT
POWER AMPLIFIER
0dB
-6
-3
SIGNAL
-80
CCPROFESSIONAL
4000
ch B
3 5
1
4 6
-6
-10
CCPROFESSIONAL
2800
-3
-6
-3
-10
ACL
SIGNAL
-15
-3
ON
-15
-1
-1
TEMP
-30
-80
ch A
0dB
ACTIVE
-30
POWER
-80
ch B
0dB
p. 45
3 Caractéristiques générales
panneau avant
sélecteurs et contrôles
1 Disjoncteur/Coupe circuit
Votre unité dispose d’un système de disjoncteurs en façe avant. Si le disjoncteur
saute pendant une utilisation normale, remettez le en position enfonçée. Si il ne
reste pas en position enfonçée, l’amplificateur a besoin d’une réparation.
2 Atténuateurs d’entrées
A chaque fois que cela est possible, tournez les potentiomètres à fond pour
maintenir un système optimal. Les contrôles vous permettent d’ajuster le niveau
d’entrée de chaque canal. Ils déterminent la ‘puissance’ du canal correspondant
pour un signal d’entrée donné. Le gain augmente quand vous tournez horairement
ce contrôle. Positionnez ces contrôles en position minimum (sens contre horaire)
pour les mises sous et hors tension dans le but de protéger vos haut-parleurs.
Reportez vous aux spécifications à la fin du manuel pour les informations de
voltages, gains et sensibilités d’entrée.
Indicateurs,témoins
Les unités de la série CC sont munies de quatres Leds d’indication par canal: ACL™
(limiteur d’écrêtage automatique), Signal,Temp et Active. Ces Leds vous informent de
l’état de fonctionnement de chaque canal et vous préviennent d’éventuels problèmes.
3 Led ACL
Le Led ACL s’illuminera en début d’écrêtage. Si le Led s’illumine de manière rapide
et intermittante, le signal sur ce canal atteint le seuil d’écrêtage. Dans le cas d’une
illumination continue ceci indique que l’amplificateur réduit le gain pour éviter
qu’un signal écrêté atteigne les haut-parleurs.
Pour plus d’informations, reportez vous à la section Limitation Automatique
d’écrêtage .
Pendant l’allumage initial, le LED ACL s’illuminera pour indiquer que le circuit de
réduction de gain AUTORAMP™ est activé. Ceci préviendra contre les charges de
signaux lorsque les relais de haut-parleurs sont fermés.
4 Led Signal
Cette Led s’illumine losqu’un signal de plus de 4 V est détecté en sortie (0.1 volt
ou plus en entrée, avec 0dB d’atténuation et un gain standard x40).
C’est utile pour vous confirmer la présence d’un signal à l’entrée de votre
amplificateur.
5 Led Temp
Le Led Temp s’illumine pour indiquer que le relai de sortie est ouvert, déconnectant
les les haut-parleurs du fait d’une condition de surchauffe. Quand la température du
canal revient au niveau correct pour un fonctionnement sans risque la LED s’éteint
et le relai de protection des sorties se ferme, reconnectant les haut-parleurs.
6 Led Activité
La LED d’activité indique que les relais de sortie des canaux sont opérationnels. Elle
s’illumine lors d’opérations normales et elle reste illuminée au cas ou le canal est en
limitation d’écrêtage automatique ou en réduction de gain (ACL).
Des systèmes de protection sont intégrés pour maintenir les relais de sorties
fermés.
Si le led d’activité s’éteint, il n’y a pas de signal aux connecteurs de sorties.
p. 46
CCTM owner’s manual
Le disjoncteur ne coupe qu’une
borne du circuit d’alimentation.
Une énergiedangereusement
importante peut être présente
dans le boîtier lorsque
l’interrupteur est sur la position
OFF.
Lorsque vous opérez en mode
pont, les deux potentiomètres
doivent être sur la même position
de manière à ce que la charge
reçue par les haut-parleurs
soit équilibrée entre les deux
canaux. Reportez vous à la
section du mode pont pour plus
d’informations et précautions.
a
a
Caractéristiques générales 3
2
3
1
INPUT
CLASS 2 WIRING
OUTPUT
MOUNT IN RACK ONLY INSTALLER SUR SUPPORT
DE MONTAGE SEULEMENT
GAIN
IN=x20
SELECT OUT=x40
WWW.CRESTAUDIO.COM
ch A
MADE IN CHINA
BRIDGE
PARALLEL
STEREO
ch B
This info will be on sticker
A PRODUCT OF
CREST AUDIO CORP.
FAIR LAWN, NJ
120 VAC
60 Hz 1000 WATTS
UL Sticker
Légende panneau
arrière
Panneau arrière
1 Câble d’alimentation IEC
Accepte un câble d’alimentation standard IEC.
2 Sélecteur de mode
Le sélecteur de mode du panneau arrière determine si l’amplificateur
est en mode stéréo, parallèle, ou pont. Ne pas manipuler le sélecteur
de mode lorsque l’amplificateur est sous tension. Reportez vous à la
section mode stéréo et pont pour plus d’informations.
3 Sélecteur de gain
Le sélecteur de gain du panneau arrière détermine le gain général
de l’amplificateur soit de x40 (32dB) ou de x20 (26dB). La position
sortie correspond à la valeur x40 alors que pour les entrées on
sélectinnera x20.
connections entrées
polarités connecteurs XLR
polarités connecteurs TRS
mode pont
mode parallèle
mode stéréo
connections sorties
sorties Speakon®
canal A stéréo/parallèle
canal B stéréo/parallèle
mode pont
bornier 5 conducteurs
canal A stéréo/parallèle
mode pont
canal B stéréo/parallèle
p. 47
4 Modes Opératoires
CCTM owner’s manual
stéréo
Pour le mode stéréo (double canal), mettre votre unité hors-tension et
positionnez le sélecteur de mode en position stéréo. Dans ce mode, les
contrôles de gain affectent leurs canaux respectifs. Le signal à l’entrée A sera
récupéré amplifié à la sortie A, et de même pour le canal B.
Parallèle
Pour le mode parallèle (deux canaux utilisant le même signal d’entrée), les
deux canaux recoivent le signal de l’entrée A. Mettre votre unité hors-tension
avant de positionner le sélecteur de mode en position Parallèle.Aucun cable
de connection entre les canaux n’est nécessaire. Les sorties sont identiques
au mode stéréo. L’entrée du canal B devient une sortie dupliquant le signal de
l’entrée du canal A pour faciliter la connexion à d’autres étages de puissance.
Les spécifications de puissance et de performances générales sont identiques
au mode stéréo.
mode pont (bridge)
Deux canaux de votre unité peuvent être combinés comme un seul
amplificateur mono de forte puissance (canaux A et B ). Prétez une grande
attention en mode Pont de part les voltages plus importants présents en
sortie. Mettre votre unité hors-tension avant de positionner le sélecteur
de mode en position Pont. Envoyer le signal à l’entrée A et connectez le
système de haut-parleurs entre les deux points chauds des sorties (les
bornes “1+POS” et “2+NEG” du connecteur Speakon® du canal A). L’entrée
du canal B devient une sortie dupliquant le signal de l’entrée du canal A pour
faciliter la connexion à d’autres étages de puissance.
Contrairement aux modes stéréo et Parallèle, où la borne négative est à
la terre, les deux bornes utilisées en mode Pont possèdent des potentiels
importants. La sortie A est en phase avec l’entrée, alors que le canal B
engendrera un signal électriquement opposé. L’impédance de la charge
d’enceinte ne doit pas descendre en dessous de 4 Ohms (2 Ohms par
côté), ou la protection ACL se mettra en route pour réduire la puissance
disponible.
p. 48
a
Lorsque vous travaillez
en mode pont, les deux
potentiomètres doivent
être réglés identiquement
pour que la charge
vers les enceintes soit
équilibrée.
systèmes de protection 5
Les amplificateurs de la série CC incorporent de nombreux circuits d’autoprotection et de
protection des haut-parleurs pour presques tous les cas de figures.
Crest Audio a pour devise de fabriquer des amplificateurs aussi fiables que possible en les
immunisant contre tout courts-circuit ou choc électrique, charge incorrecte, problème de voltages
ou de surchauffe. Si un canal passe à travers le limiteur d’écrêtage automatique ou alors à travers
le mode limiteur de gain ACL™, la charge des enceintes reste connectée, mais le gain du signal ou
la puissance de sortie sont sysématiquements réduit. Lorsque survient un problème impliquant la
mise en mode de protection d’un canal, la Led temp de ce canal s’allumera.Voltage sur les sorties
ou fréquences subsoniques excéssives et surcharges thermiques conduisent automatiquement à la
déconnection du relai de sortie concernées j’usqu’à la correction du problème ou refroidissement
de l’amplificateur.
Limiteur d’écrêtage automatique
Dès qu’un canal est poussé trop fort, l’ACL réduira automatiquement le gain du signal pour
le maintenir en deça du seuil d’écrêtage (clipping), protégeant vos enceintes de recevoir un
signal écrêté. L’ACL s’activera pour les situations suivantes : effet de Larsen important, mauvais
réglages (gain trop haut) ou un problème en amont de l’amplification de puissance. Un signal
normal ne devrait pas engager l’ACL. Seul un dépassement excessif de la limite des capacités
verra la LED s’illuminer de façon brillante et continuelle.
IGM™ Capteur d’impédance
Les amplificateurs de la série CC contiennent une circuiterie innovante qui permet un
fonctionnement sécurisé quelle que soit la charge. Lorsque l’amplificateur détecte une charge
pouvant surmener les étages de sorties, le système de modulation de gain instantané ajuste le
gain à un niveau normal. Cette méthode de protection des haut-parleurs est de loin supérieure
aux systèmes limiteurs conventionnels que l’on trouve sur les autres amplificateurs. Le circuit
IGM est soniquement transparent en usage normal et il n’obstrue pas le signal en s’activant.
Protection thermique
Les ventilateurs internes de votre unité sont prévus pour garder les radiateurs dans les limites
de fonctionnement de l’amplificateur. Si l’un d’eux atteint 75°C, ce qui résulte certainement
d’une obstruction du conduit de ventilation, le canal correspondant se déconnectera de
la charge de sortie jusqu’à atteindre une température acceptable. Durant cette période, la
Led ACTIVE du canal s’éteindra, la Led TEMP s’illuminera et les ventilateurs tourneront à
leur vitesse maximale. Le CC1800 utilise un tunel et un ventilateur commun , cependant la
séparation des circuits demeure.
Court circuit
Si une sortie est mise en court-circuit (problème d’enceinte!), l’IGM et la protection thermique
s’engageront. Le LFC détectera tout d’abord le problème et le traitera comme une impédance
très faible (réduction drastique du gain). Si le problème persiste, la protection thermique
déconnectera les sorties du canal correspondant.
Courant continu
Si un courant continu ou charge subsonique est détecté sur un canal, le relai de sortie
disconnectera les sorties correspondantes pour éviter d’endommager les enceintes. La Led
DC s’illumine pour indiquer cette situation.
p. 49
5 systèmes de protection
CCTM owner’s manual
Protection de Mise Sous/Hors Tension
A l’allumage, votre unité se mettra toujours en mode de protection, avec les sorties
déconnectées pour a peu près six secondes (temps de stabilisation des composants). Le gain
du signal est graduellemnt augmenté jusqu’à la valeur du contrôle du canal correspondant. En
cas de mise hors tension, les sorties se disconnectent immédiatement pour éviter tout bruit
parasite dans les enceintes.
Système AUTORAMP™ (contrôle de montée en puissance)
Dès que votre unité est mise sous tension ou après qu’une protection se désengage, le
circuit AUTORAMP est activé. Le gain du signal est graduellement augmenté jusqu’à la valeur
du contrôle du canal correspondant. Ce système présente le majeur avantage d’éviter les
soudaines montées en puissance:
1. si un signal est déjà présent à la mise sous tension
2. en évitant toute décharge résiduelle, et prolongeant ainsi la durée de vie de votre
système d’enceintes.
p. 50
Sécurité 6
Protection des Haut-Parleurs
Tous les haut-parleurs ont des limites de fonctionnement, thermiques et physiques qu’il faut
respecter. Trop de puissance, signal non-étudié pour le dit haut-parleur (non respect des
fréquences admissibles), ondes limitées (clip) causant un effet d’écrètage et courant continu
peuvent leur causer des dommages irrémédiables. Les unités CC protègent automatiquement
les enceintes d’un courant continu ou d’une sub-fréquence trop prononcée. Les enceintes
médium et aigues, particulièrement les moteurs de compression sont très sensibles aux
surpuissances occasionnelles, ou aux fréquences trop graves, qui peuvent les endommager
très facilement. Prétez une attention toute particulière aux connections quand vous travaillez
sur ces matériels. Assurez vous que la capacité de puissance (puissance peak) de votre
amplificateur ne dépasse pas la puissance admissible de vos composants.
Pour vous assurer que votre unité n’écrête pas le signal et que les haut-parleurs ne reçoivent
jamais de charges excessives, utilisez un limiteur externe approprié (ou un compresseur
avec un ratio de 10:1 ou plus pour contrôler le niveau de sortie). Dans les systèmes avec
filtres actifs, utilisez en un pour chaques bandes de fréquences. Le limiteur d’écrêtage limitera
automatiquement la durée des formes d’ondes carrées vers les enceintes.
Un système de fusible peut être utilisé pour limiter la puissance délivrée à une enceinte. Ils
ne représentent pas la solution idéale car ils sont à remplacer après chaque dépassement,
et contrôle plus l’intensité que le voltage d’un signal. De nombreux fusibles ont de plus
des valeurs de résistance non négligeables et risquent donc de détériorer le signal de part
l’énergie perdue (qui ne sera certainement pas uniforme sur les fréquences). Si vous optez
pour un système de protection d’enceintes à fusibles, consultez le fabricant des enceintes pour
connaitre les meilleures valeurs de fusibles (temps de réponse,…) à utiliser.
Maintenance et responsabilité de l’usager
Les amplificateurs de la série CC n’ont pas besoins d’êtres révisés et ne nécéssitent aucune
intervention interne durant leur durée de vie. Votre amplificateur de la série CC est très
puissant et peut être potentiellement dangereux pour les enceintes et les humains. Il est de
votre responsabilité de lire la section des précautions importantes au début du manuel, et
de vous assurer que l’amplificateur est installé, branché et utilisé correctement. Beaucoup
de haut-parleurs peuvent facilement être détruits ou endommagés par le phénomène de
surpuissance et spécialement par la puissance disponible en mode pont. Pour les differentes
capacités des haut-parleurs reportez vous à la section protection des haut-parleurs.
p. 51
7 Réparation et service après-vente
CCTM owner’s manual
Dépannage
Dans le cas improbable où votre unité serait défectueuse, celle -ci doit être
retournée à un centre technique agréé, le distributeur ou directement à nos
locaux.
Pour obtenir un service de révision ou de réparation contactez votre centre
agréé Crest Audio le plus proche, revendeur, distributeur ou n’importe quel
autre bureau Crest Audio a travers le monde.
Pour ceux avec un accès Internet, veuillez visiter le site de Crest Audio.
+
De par la complexité de votre unité
et les risques encourus d’électrocution,
il important que toute réparation soit
effectuée par un technicien agréé. Au
moindre problème, notifiez-le à votre
revendeur immédiatement. Assurezvous de garder les emballages de votre unité,
ils vous seront nécessaires si jamais vous devez
envoyer votre unité à un centre technique
ou distributeur. Il est de votre responsabilité
à veiller au conditionnement de votre unité
lors d’un éventuel retour. Si vous ne possédez
plus les emballages d’origine, contactez votre
revendeur/ditributeur/installateur pour vous en
fournir en remplacement.
Nous contacter:
Service client
Téléphone
Fax
email
866.812.7378 USA
601.486.1380 USA
[email protected]
Service technique
Téléphone
Fax
email
866.812.7378 USA
601.486.1380 USA
[email protected]
web site
www.crestaudio.com
Courrier
Crest Audio Inc.
711 A Street
Meridian, MS 39301 USA
p. 52
Pour remplacer
l’emballage contactez
le service client Crest
Audio..
+
a
Spécifications a
CCTM Series
1800
Puissance mesurée mode pont 4 ohms
1850 watts @ 1 kHz à <0.1% T.H.D.
Puissance mesurée (2 x 2 ohms)
900 watts par canal @ 1 kHz <0.05% T.H.D. Utilisation des 2 canaux
Puissance mesurée (2 x 4 ohms)
700 watts par canal @ 1 kHz at <0.05% T.H.D. Utilisation des 2 canaux
Puissance mesurée (2 x 8 ohms)
450 watts par canal @ 1 kHz at <0.05% T.H.D. Utilisation des 2 canaux
Puissance mesurée (1 x 2 ohms)
950 watts @ 1 kHz à <0.05% T.H.D.
Puissance mesurée (1 x 4 ohms)
775 watts @ 1 kHz à <0.05% T.H.D.
Puissance mesurée (1 x 8 ohms)
475 watts @ 1 kHz à <0.05% T.H.D.
Charge d’impédance minimum
2 ohms
Variation de voltage maximum RMS
73 volts
Réponse en fréquence
10 Hz - 100 kHz; +0, -3 dB à 1 watt
Plage de puissance
10 Hz - 50 kHz; +0, -3 dB à la puissance mesurée de 4 ohm
T.H.D. (2 x 2 ohms)
<0.2% @ 700 watts par canal de 20 Hz à 20 kHz
T.H.D. (2 x 4 ohms)
<0.1% @ 600 watts par canal de 20 Hz à 20 kHz
T.H.D. (2 x 8 ohms)
<0.1% @ 425 watts par canal de 20 Hz to 20 kHz
Entrées CMRR
> - 75 dB @ 1 kHz
Gain de voltage
x40 (32 dB) x20 (26 dB)
Influence intercanal
> -55 dB @ 1 kHz at rated power @ 8 ohms
Bruit
> -106 dB, “A” référence pondérée à la puissance de 8 ohms
Temps de réponse
> 35V/us
Facteur d’amortissement (8 ohms)
> 150:1 @ 20 Hz - 1 kHz à 8 ohms
Phase de réponse
+6 to - 12 degrees de 20 Hz à 20 kHz
Sensibilitée d’entrée (x40)
1.32 volts +/- 3% for 1 kHz, 4 ohm à la puissance mesuée de, 1.06 volts +/- 3% à 1 kHz,
puissance 2 ohm
Impédance d’entrée
15 k ohms, symétrisée
Consommation électrique @ 1/8 de la puissance
1,000 watts @ 2 ohms, 685 watts @ 4 ohms, 400 watts @ 8 ohms
Consommation électrique @ 1/3 de la puissance
2,340 watts @ 2 ohms, 1,650 watts @ 4 ohms, 1,000 watts @ 8 ohms
Refroidissement
Un ventilateur de 80 mm à vitesse variable selon la température
Contrôles
atténuateur sur panneau avant ,sélecteur de mode à l’arriére
Indicateurs LED
2 ACL™ (limiteur d’écrêtage automatque), 2 Signal de presence, 2 temoin d’activité, 2
Température
Protection
Thermique, DC, allumage, charges incorrectes et courts circuits, subsonique
Connections
Combi XLR & 6.3 mm entrée casque, Speakon® bornier 5 voies connecteus de sorties par bornier
15 amp connecteurs principaux IEC
Construction
Acier 16 ga. Avec panneau avant moulé
Dimensions
88.9 mm x 482.6 mm x 377.8 mm + 31.8 mm pour support arrière , oreilles et connecteurs
(3.5” x 19” x 14.875” + 1.25”)
Poids Net
14.8 kg (32.6 lbs.)
Poids
15.9 kg (35 lbs.)
Toutes les mesures sont faites à 120 VAC, transformateur froid. La puissance sous 4 ohm est limitée dans le temps par un disjoncteur magnétique.
p. 53
a
Spécifications
CC™ owner’s manual
2800
Puissance mesurée mode pont 4 ohms
2,800 watts @ 1 kHz à <0.1% T.H.D.
Puissance mesurée (2 x 2 ohms)
1,400 watts per channel @ 1 kHz à <0.05% T.H.D. Utilisation des 2 canaux
Puissance mesurée (2 x 4 ohms)
965 watts per channel @ 1 kHz à <0.05% T.H.D. Utilisation des 2 canaux
Puissance mesurée(2 x 8 ohms)
595 watts per channel @ 1 kHz à <0.05% T.H.D. Utilisation des 2 canaux
Puissance mesurée (1 x 2 ohms)
1,850 watts @ 1 kHz à <0.1% T.H.D.
Puissance mesurée (1 x 4 ohms)
1,150 watts @ 1 kHz à <0.05% T.H.D.
Puissance mesurée (1 x 8 ohms)
665 watts @ 1 kHz à <0.05% T.H.D.
Charge d’impédance minimum
2 ohms
Variation de voltage maximum RMS
82 volts
Réponse en fréquence
10 Hz - 100 kHz; +0, -2.0 dB à 1 watt
Plage de puissance
10 Hz - 35 kHz; +0, -3 dB à la puissance mesurée de 4 ohm
T.H.D. (2 x 2 ohms)
<0.15 @ 1,150 watts par canal de 20 Hz à 20 kHz
T.H.D. (2 x 4 ohms)
<0.1% @ 880 watts par canal de 20 Hz à 20 kHz
T.H.D. (2 x 8 ohms)
<0.1% @ 560 watts par canal de 20 Hz à 20 kHz
Entrées CMRR
> - 65 dB @ 1 kHz
Gain de Voltage
x40 (32 dB)
Influence intercanal
> -65 dB @ 1 kHz à la puissance mesurée de 8 ohms
bruit
> -111 dB, “A” référence pondérée à la puissance @ 8 ohms
Temps de réponse
> 15V/us
Facteur d’amortissement (8 ohms)
> 500:1 @ 20 Hz - 1 kHz
Phase de réponse
+5 to - 15 degrees from 20 Hz to 20kHz
Sensibilitée d’entrée (x40)
1.7 volts +/- 3% for 1 kHz, 4 ohm à la puissance, 1.36 volts +/- 3% pour 1 kHz, mesure à 2 ohm
impédance d’entrée
15 k ohms, symétrisée
Consommation électrique @ 1/8 de la puissance
1,250 watts @ 2 ohms, 880 watts @ 4 ohms, 570 @ 8 ohms
Consommation électrique @ 1/3 de la puissance
2,905 watts @ 2 ohms, 2,220 watts @ 4 ohms, 1,355 watts @ 8 ohms
Refroidissement
2 ventilateurs de 80mm à 2 vitesses
Controles
2 atténuateurs sur panneau avant ,sélecteur de mode à l’arrière
Indicateurs LEDs
2 ACL™ (automatic clip limiting), 2 Signal presence, 2 Active status, 2 Temp
Protection
Thermique, DC, allumage, charges incorrectes et courts circuits, subsonique
Connecteurs
Combi XLR & 6.3 mm entrée casque, Speakon bornier 5 voies connecteus de sorties par
bornier 15 amp connecteurs principaux IEC
Construction
Acier 16 ga. Avec panneau avant moulé
Dimensions
88.9 mm x 482.6 mm x 377.8 mm + 31.8 mm pour support arrière , oreilles et connecteurs
(3.5” x 19” x 14.875” + 1.25”)
Poids Net
18.05 kg (39.8 lbs.)
Poids
19.23 kg (42.4 lbs.)
x20 (26 dB)
Toutes les mesures sont faites à 120 VAC, transformateur froid. La puissance sous 4 ohm est limitée dans le temps par un disjoncteur magnétique.
p. 54
Spécifications a
CCTM Series
4000
Puissance mesurée mode pont 4 ohms
4,000 watts @ 1 kHz à <0.1% T.H.D.
Puissance mesurée (2 x 2 ohms)
2,000 watts par canal @ 1 kHz à <0.1% T.H.D. Utilisation des 2 canaux
Puissance mesurée (2 x 4 ohms)
1,350 watts per channel @ 1 kHz à <0.05% T.H.D. Utilisation des 2 canaux
Puissance mesurée (2 x 8 ohms)
800 watts per channel @ 1 kHz à <0.05% T.H.D. Utilisation des 2 canaux
Puissance mesurée (1 x 2 ohms)
2,550 watts @ 1 kHz à <0.1% T.H.D.
Puissance mesurée (1 x 4 ohms)
1,600 watts @ 1 kHz à <0.05% T.H.D.
Puissance mesurée (1 x 8 ohms)
900 watts @ 1 kHz à <0.05% T.H.D.
Charge d’impédance minimum
2 ohms
Variation de voltage maximum RMS
93 volts
Réponse en fréquence
10 Hz - 100 kHz; +0, -2 dB à 1 watt
Plage de puissance
10 Hz - 35 kHz; +0, -3 dB à la puissance mesurée de 4 ohm
T.H.D. (2 x 2 ohms)
<0.2% @ 1,475 watts par canal de 20 Hz à 20 kHz
T.H.D. (2 x 4 ohms)
<0.1% @ 1,150 watts par canal de 20 Hz à 20 kHz
T.H.D. (2 x 8 ohms)
<0.1% @ 700 watts par canal de 20 Hz à 20 kHz
Entrées CMRR
> -65 dB @ 1 kHz
Gain de Voltage
x40 (32 dB)
Influence intercanal
> -65 dB @ 1 kHz à la puissance mesurée @ 8 ohms
Bruit
> -112 dB, “A” référence pondérée à la puissance @ 8 ohms
Temps de réponse
> 15V/us
Facteur d’amortissement (8 ohms)
> 500:1 @ 20 Hz - 1 kHz
x20 (26 dB)
Phase de réponse
+5 to - 15 degrees from 20 Hz to 20 kHz
Sensibilité d’entrée (x40)
1.88 volts +/- 3% for 1 kHz, 4 ohm puissance mesurée 1.62 volts +/- 3% for 1 kHz, mesuré
à 2 ohm
impédance d’entrée
15 k ohms, symétrisée
Consommation électrique@ 1/8 de la puissance
1,825 watts @ 2 ohms, 1,185 watts @ 4 ohms, 720 @ 8 ohms
Consommation électrique@ 1/3 de la puissance
4,535 watts @ 2 ohms, 2,975 watts @ 4 ohms, 1,835 watts @ 8 ohms
refroidissement
2 ventilateurs de 80mm à 2 vitesses
Contrôles
2 atténuateurs sur panneau avant ,sélecteur de mode à l’arrière
Indicateurs LEDs
2 ACL™ (automatic clip limiting), 2 Signal presence, 2 Active status, 2 Temp
Protection
Thermique, DC, allumage, charges incorrectes et courts circuits, subsonique
Connecteurs
Combi XLR & 6.3 mm entrée casque, Speakon bornier 5 voies connecteus de sorties par
bornier 15 amp connecteurs principaux IEC
Construction
Acier 16 ga. Avec panneau avant moulé
Dimensions
88.9 mm x 482.6 mm x 377.8 mm + 31.8 mm pour support arrière , oreilles et connecteurs
(3.5” x 19” x 14.875” + 1.25”)
Poids Net
19.64 kg (43.3 lbs.)
Poids
20.8 kg.(45.8 lbs.)
Toutes les mesures sont faites à 120 VAC, transformateur froid. La puissance sous 4 ohm est limitée dans le temps par un disjoncteur magnétique.
p. 55
b
Diamètres de câbles
diamètres des câbles
longueur des câbles
2
5
meters
meters
10
meters
30
p. 56
CCTM owner’s manual
système 8 ohms
perte de puissance
système 4 ohms
système 2 ohms
0.3mm2
2.9%
5.6%
10.8%
0.5
1.74
3.4
6.7
0.75
1.16
2.3
4.5
1.5
0.58
1.16
2.3
2.5
0.35
0.70
1.39
4.0
0.22
0.44
0.87
0.5mm2
4.3%
8.2%
15.5%
0.75
2.9
5.6
10.8
1.5
1.45
2.9
5.6
2.5
0.87
1.74
3.4
4
0.55
1.09
2.2
6
0.37
0.73
1.45
0.5mm2
8.24%
5.5%
28%
0.75
5.6
10.8
19.9
1.5
2.9
5.6
10.8
2.5
1.74
2.9
6.7
4
1.09
1.74
4.3
6
0.73
1.09
2.9
15.5%
0.73%
45%
1.5
8.2
15.5
28
2.5
5.1
9.8
18.2
4
3.2
6.3
12.0
6
2.2
4.3
8.2
10
1.31
2.6
5.1
meters 0.75mm2
Diamètres de câbles b
diamètres des câbles
longueur des câbles
5
système 8 ohms
feet
10
feet
40
80
feet
feet
perte de puissance
système 4 ohms
système 2 ohms
18 AWG
0.81%
1.61%
3.2%
16
0.51
1.02
2.0
14
0.32
0.64
1.28
12
0.20
0.40
0.80
10
0.128
0.25
0.51
18 AWG
1.61%
3.2%
6.2%
16
1.02
2.0
4.0
14
0.64
1.28
2.5
12
0.40
0.80
1.60
10
0.25
0.51
1.01
18 AWG
6.2%
11.9%
22%
16
4.0
7.7
14.6
14
2.5
5.0
9.6
12
1.60
3.2
6.2
10
1.01
2.0
4.0
8
0.60
1.20
2.4
18 AWG
11.9%
22%
37%
16
7.7
14.6
26
14
5.0
9.6
17.8
12
3.2
6.2
11.8
10
2.0
4.0
7.7
8
1.20
2.4
4.7
p. 57
Precauciones importantes
1
Guarde la caja y los materiales de
embalaje! Si tuviera que enviar la unidad,
use sólo el empaquetado original de la
fábrica.
¡
No conecte en paralelo o en
serie la salida de un amplificador
con cualquier otra salida de
amplificador.
Para conseguir un embalaje de reemplazo,
llame al Servicio de Atención al Cliente
de Crest Audio directamente.
2
Lea todas las instrucciones en
el chasis de la unidad para una
utilización apropiada.
4
Nunca mantenga pulsado un
interruptor de encendido o un
breaker de circuito en la posición
“on”, si el mismo no se quedara
en esta posición!
5
6
Crest Audio no se hace responsable
del daño causado a los altavoces por
cualquier razón.
Lea toda la documentación antes
de usar su equipo. Guarde toda la
documentación para futuras referencias.
3
No use la unidad si el cable
de alimentación está roto o
deshilachado.
Los cables de alimentación deberían
estar colocados para que sea improbable
el que sean pisados o pinchados por
objetos situados sobre o contra ellos.
Opere siempre la unidad con el
cable AC a tierra conectado a
la tierra del sistema eléctrico. Se
deben tomar precauciones para que la
conexión a tierra de una unidad del
equipo no esté desconectada.
7
El daño causado por cualquier
conexión realizada a un voltaje AC
inapropiado no está cubierto por
ninguna garantía. El voltaje principal
debe ser correcto e igual al que está
impreso en el panel trasero de la unidad.
8
No aterrice ningún terminal caliente
(rojo).
Nunca conecte una salida caliente
(roja) a tierra o a otra salida caliente
(roja)!
9
Apague y desconecte las unidades
del voltaje principal antes de hacer
cualquier conexión.
0
No envíe a las entradas señal de
nivel más alto del requerido para
permitir al equipo conseguir una
salida completa.
No envíe la salida de cualquier
canal de amplificador a la entrada
de canal de cualquier amplificador.
Ô
No conecte las entradas o salidas
de los amplificadores a otra fuente
de voltaje: como una batería, fuente
principal, o alimentador de potencia,
ya esté el amplificador encendido o
apagado.
£
Si conecta las salidas del amplificador
a osciloscopios u otro equipo de
prueba mientras el amplificador
está en modo bridged mono puede
dañar tanto el amplificador como el
equipo de prueba!
¢
No vierta agua u otros líquidos
dentro de la unidad o sobre la
unidad, tampoco opere la unidad
si está puesta sobre líquido.
ˆ
No bloquee la toma de ventilador
o los puertos de escape.
No opere el equipamiento en una
superficie o en un ambiente que
pueda impedir el flujo normal
de aire alrededor de la unidad:
por ejemplo una cama, alfombra,
manta, moqueta, o un rack totalmente
cerrado.
§
Si usa la unidad en un ambiente
extremadamente polvoriento o
lleno de humo: la unidad debe ser
limpiada periódicamente de cualquier
partícula extraña.
¶
No utilize la unidad cerca de
estufas, generadores de calor,
radiadores, u otros objetos
reproductores de calor.
ƒ
El cable de alimentación debe ser
desenchufado del enchufe cuando
no se use durante un largo periodo
de tiempo.
ESPAÑOL
Información de asistencia técnica
No retire la cubierta!
Si quita la cubierta se expondrá a
voltajes potencialmente peligrosos. No
hay componentes reemplazables por el
usuario dentro.
El equipo debe ser reparado por
personal cualificado cuando:
A. El cable de alimentación o el enchufe hayan
sido dañados.
B. El equipo haya sido expuesto a la lluvia.
C. El equipo no parezca operar normalmente,
o tenga un destacado cambio en su
funcionamiento.
D. El equipo se haya caido, o la caja haya sido
dañada.
Para obtener servicio técnico:
contacte su Servicio Técnico Crest
Audio más cercano, Distribuidor,
Establecimiento, o Crest Audio
en el 201.909.8700 USA o visite
www.crestaudio.com para obtener
infromación adicional.
Email [email protected]
Este símbolo se usa para
alertar al operador de que siga
procedimientos importantes y
precauciones detalladas en la
documentación.
Este símbolo se usa para advertir
al operador de que “voltajes
peligrosos” no aislados están
presentes en la caja del equipo
que pueden ser causa del riesgo
de shock eléctrico.
ADVERTENCIA
EL INTERRUPTOR ON/OFF DE ESTE APARATO NO
ROMPE AMBOS LADOS DEL CIRCUITO. ENERGÍA
PELIGROSA PUEDE ESTAR PRESENTE DENTRO DE LA
CAJA CUANDO EL INTERRUPTOR DE ENCENDIDO
ESTÉ EN LA POSICIÓN OFF.
Tabla de contenidos
Como usar este manual
1 Introducción
2 Instalación
Desempaquetado
p.60
p.61
p.62
Montage
Suministrando alimentación
Requisitos de enfriamiento
Precauciones al operar
Conectando entradas
Conectando salidas
de las características
3 Repaso
Panel Frontal
p.64
Panel Trasero
Modos de operación
4 Estéreo
p.67
Paralelo
Bridged mono
Contenidos
de protección
5 Características
Limitación automática de la saturación
p.68
Sensibilidad de Impedancia IGM™
Protección térmica
Corto circuito
Protección de voltaje de DC
Protección de encendido/apagado
Control de señal AUTORAMP™
6 Seguridad
Protección de altavoces
p.70
Responsabilidad del usuario
y soporte
7 Asistencia
Soporte
p.71
Contáctenos
a
Especificaciones
b
Tablas de calibre de cable
p.72
Apéndices
p.75
p. 59
1 Cómo usar este manual
Convenciones
Términos
Las caractersiticas Crest Audio y cada indicador
o control del amplificador aparecerán como: términos
Acciones
Acciones específicas o selecciones que el usuario puede realizar aparecerán como: acciones
Tareas
Están separadas en pasos
1
2
3
Advertencias
Procedimientos que no se
deben llevar a cabo.
Asuntos o peligros que
se deben tener en cuenta
cuando.
se opere el equipo.
a
Indicadores
Qué buscar en los
paneles del equipo.
®
Alertas, indicadores, o
apuntes que pueden
aparecer.
Consejos
Métodos preferibles.
Consejos útiles.
Caractersiticas de uso.
+
Ver
Ver : Rrefiere a otras secciones del manual que contienen información suplementaria sobre el tema
tratado o un asunto relacionado
Nota
Nota: Infromación suplementaria sobre las características
p. 60
CCTM Manual de usuario
Introducción 1
Bienvenido
Felicidades por su adquisición de una etapa de Potencia de la Serie CC™
de Crest Audio. Diseñada para operar con seguridad e impecabilidad
durante años en un rendimiento riguroso. La Serie CS de amplificadores
ofrece superioridad de sonido y una fiabilidad insuperable por las que
Crest Audio es famosa, en una unidad compacta. La tecnología avanzada y
la protección de circuito extensiva permiten una operación muy eficiente,
incluso bajo cargas y condiciones de potencia dif’íciles. El circuito ACL™
(Limitación de Saturación Automática) asegura un funcionamiento sin
problemas en cargas tan bajas como 2 ohmios. Los circuitos de Limitación
de Saturación Automática protegen los drivers y aseguran que se
mantenga la integridad en el sonido, incluso bajo condiciones de carga
extremas. Los diseños de alta eficiencia de Crest Audio usan tanques de
calor enfriados por túneles y ventiladores DC de velocidad variable. Esta
topología de enfriamiento mantiene una temperatura de funcionamiemto
más baja, resultando en una vida más larga para los transistores de salida.
Los modelos CC 4000, CC 2800 y CC 1800 de etapas de potencia usan la
innovadora circuitería y empaquetado “Power Density” de Crest Audio.
Para su seguridad,
lea tanto la sección
de precauciones
importantes, como
las secciones de
entrada, salida y
conexiones de
potencia.
a
p. 61
2 Instalación
CCTM Manual de usuario
Desempaquetado
Tras el desempaquetado, inspeccione el amplificador. Si encuentra algún daño, notifíquelo al
establecimiento inmediatamente. Sólo el consignatario puede reclamar al transportista por
un daño realizado durante el transporte. Asegúrese de que conserva tanto la caja como
todos los materiales del embalaje. En el caso de que tuviera que enviar la unidad a Crest
Audio, una de sus oficinas, servicios técnicos o el establecimiento de venta, use sólo el
empaquetado original de fábrica. Si la caja original no está disponible, contacte Crest para
obtener un reemplazo.
+
Para un embalaje
de reemplazo, llame
al Departamento de
Atención al Cliente de
Crest Audio directamente.
ver—asistencia y soporte
Montaje
Las etapas de potencia se pueden montar en racks estándar de 19”. También se incluyen
orejas de instalación traseras para soporte adicional, que es recomendable en instalaciones
no permanentes como giras o discotecas móviles. Dado que las conexiones y cables se
encuentran en el panel trasero, un destornillador en ángulo o llave hex pueden facilitar la
montura de las orejas traseras a los rieles.
Suministrando alimentación
Los requisitos de corriente del amplificador de la Serie CS se han medido a 1/8 de potencia
(condiciones de música típicas) y 1/3 de potencia (condiciones de música extremas). La
máxima necesidad de corriente es limitada sólo por el breaker en el panel frontal. Consulte
las especificaciones en la sección de Apéndices para ver cúanta corriente demandará cada
amplificador. Asegúrese de que el voltaje principal es correcto y es el mismo que está
impreso en el panel trasero del amplificador. La garantía no cubrirá ningún daño causado al
conectar voltaje AC inapropiado.A menos que se especifique lo contrario, los amplificadores
Crest que salen de fábrica cuentan con la siguiente configuración:
Opción 1 Norte América 120VAC / 60 Hz
Opción 2 Europa, Asia
230VAC / 50 Hz
Opción 3 Australia
240VAC / 50 Hz
Opción 4 SudAmérica
120VAC / 60 Hz or 240VAC / 50 Hz
p. 62
a
Siempre apague y
desconecte el amplificador
del alimentador principal
de corriente antes de
realizar cualquier conexión
de audio. Como precaución
extra, tenga los atenuadores
apagados mientras enciende
el aparato..
Instalación 2
Requisitos de enfriamiento
Los amplificadores de la Serie CC™ usan un sistema de enfriamiento de aire forzado
que mantiene una temperatura de operación baja y uniforme. El aire se mete en el
amplificador por medio de un/unos ventilador/es en el panel trasero y viaja por las
aletas de enfriamiento del tanque de calor en forma de túnel de canal, y luego sale por
la rejilla del panel frontal. Si la parrilla de enfriamiento se llegara a calentar demasiado,
su circuito de seguridad abrirá el relé de salida, desconectando la carga para ese canal.
El CC 1800 utiliza un tanque de calor común y un único ventilador, pero mantiene la
circuitería separada. Es importante tener una salida en la parte trasera de la unidad y
suficiente espacio alrededor del frontal del amplificador para que el aire frío pueda salir
libremente. Si el amplificador está instalado en un rack, no use puertas o cubiertas en
la parte trasera del rack; la entrada del aire debe fluir sin resistencia. Si usa racks con
partes traseras cerradas, use ventiladores en los paneles traseros para presurizar el
rack y asegurar un amplio suministro de aire.
Precauciones de operación
Hay que asegurarse de que el voltaje utilizado es el mismo impreso en la parte trasera
del amplificador. Los daños que resulten del uso de voltaje AC equivocado no están
cubiertos por ninguna garantía.Vea la sección de Conexión de Corriente para obtener
más información sobre los requisitos de corriente.
Aunque la Serie CC de etapas de potencia tienen circuitería AUTORAMP™, que eleva
gradualmente el nivel de señal después de que el relé de salida se cierre, siempre es
una buena idea el tener los controles de ganancia girados a la izquierda durante el
encendido para prevenir el daño al altavoz si hay una señal de alto nivel en las entradas.
Tanto si las hace usted mismo como si las compra, use conexiones de alta calidad, input
cables de entrada y cables de altavoz, además de una buena técnica de soldadura, para
asegurar una operación sin problemas. Los cables defectuosos son la causa de muchos
problemas intermitentes.
a
Asegúrese de que
hay suficiente espacio
alrededor del panel fronal
y trasero del amplificador
para permitir que el aire
caliente escape.
sugerencia: En racks
con partes traseras
cerradas deje al menos
un espacio estandar
de rack por cada 4
amplificadores.
Siempre apague
y desconecte el
amplificador de la
fuente de corriente
antes de llevar a cabo
cualquier conexión de
audio. También, como
precaución adicional, se
recomienda tener los
atenuadores hasta abajo
durante el encendido.
+
a
Consulte las Tablas de Calibre del Cable para determinar el calibre apropiado según las
diferentes cargas de Impedancia y longitudes de cable. Recuerde que la resistencia del
cable resta potencia al amplificador de dos maneras: pérdida de potencia directa según
la resistencia (pérdida de I2R) e incrementando la Impedancia de la carga presentada al
amplificador, lo que disminuye la potencia exigida al amplificador. Asegúrese además de
que el interruptor de modo está correctamente situado para la aplicación deseada.Vea
las secciones Stereo, Parallel, y Operación Bridged Mono para más información.
Conectando entradas
Las conexiones de entrada se llevan a cabo por medio del conector XLR de 3 agujas
(aguja 2+) o conectores de 6.3 mm “Combi” en la parte trasera del amplificador. Las
entradas están activamente balanceadas y el punto de sobrecarga es suficientemente
alto para aceptar el máximo nivel de salida de cualquier fuente de sonido.
Conectando salidas
Todos los modelos poseen dos conexiones de salida (de altavoz) por canal. Los cables
se pueden conectar mediante conectores banana, orejas en pala o cable pelado a las
patillas de cinco posiciones. El método de conexión preferible es el de los conectores
Speakon®.
p. 63
3 Repaso de las características
CCTM Manual de usuario
2
3 5
1
4 6
-6
-10
CCPROFESSIONAL
1800
1800 WATT
POWER AMPLIFIER
-6
-3
-10
ACL
SIGNAL
-15
ON
-15
-1
-1
TEMP
-30
-80
ch A
0dB
-30
POWER
-80
ACTIVE
2
2800 WATT
POWER AMPLIFIER
-10
ACL
-15
ON
-15
-1
TEMP
ch A
0dB
-30
POWER
-80
ACTIVE
ch B
0dB
1
3 5
4 6
-6
-10
-6
-3
-10
ACL
SIGNAL
-15
-3
ON
-15
-1
-1
TEMP
-30
-80
p. 64
-3
-1
-30
2
4000 WATT
POWER AMPLIFIER
0dB
-6
-3
SIGNAL
-80
CCPROFESSIONAL
4000
ch B
3 5
1
4 6
-6
-10
CCPROFESSIONAL
2800
-3
ch A
0dB
ACTIVE
-30
POWER
-80
ch B
0dB
panel frontal
Repaso de las características 3
interruptores y controles
1 Interruptor de Encendido AC/ Circuito Breaker
La Serie CC de amplificadores poseen una combinación de interruptor AC/
breaker de circuito en el panel frontal. Si el interruptor se dispara durante un uso
normal, póngalo otra vez en la posición ON una sola vez. Si el interruptor no se
quedara en la posición ON, tendrá que llevar el amplificador a un servicio técnico.
La alimentación sólo rompe
un lado del AC principal.
Energía peligrosa puede estar
presente dentro de la caja
cuando el interruptor está en
la posición off.
a
2 Atenuadores de Entrada
Cuando sea posible, coloque los atenuadores totalmente girados a la derecha
para obtener un headroom óptimo en el sistema. Los controles atenuadores de
entrada (uno para el canal A, otro para el canal B) situados en el panel frontal
ajustan la ganancia para los respectivos canales del amplifcador en todos los
modos.Vea las especificaciones al final de este manual para obtener información
sobre la sensibilidad de Entrada y la ganancia de voltaje standard.
indicadores
Cuando opere en modo
bridged, ambos atenuadores
deben estar en la misma
posición para que la carga
de altavoz sea compartida
igualmente entre los canales. Vea
la sección de Operación Bridged
Mono para más información y
precauciones.
a
Los amplificadores de la Serie CC poseen cuatro LEDs indicadores por canal en
el panel frontal: ACL™ (Automatic Clip Limiting), Señal,Temp, y Actividad. Estos
indicadores LED informan al usuario del estado de operación de cada canal y
advierten de condiciones anormales posibles.
3 LED ACL
El LED ACL de un canal se iluminará cuando empiece a saturar. Si los LEDs
se iluminan rápida e intermitentemente, el canal está justo en el umbral de
saturación, mientras que si están iluminados contínuamente, significa que el
amplificador está limitando la saturación, o reduciendo la ganancia para prevenir
que formas de onda severamente saturadas lleguen a los altavoces.Vea la
sección Limitación Autómatica de Limitación para más información. Durante el
encendido inicial, el LED ACL se iluminará indicando que el circuito de reducción
de ganancia AUTORAMP está activado. Esto prevendrá chorros repentinos de
señal cuando los relés de altavoz están cerrados.
4 LED de Señal
Este LED se ilumina cuando su canal produce una señal de salida de alrededor
de 4 voltios RMS o más (0.1 voltios o más en la entrada, con 0 dB de atenuación
y voltaje de ganancia estandar x40). Es útil para determinar si una señal está
llegando al amplificador y está siendo amplificada.
5 LED Temp
El LED Temp se ilumina para indicar que el relé de salida de canal está abierto,
desconectando el/los altavoz/es debido a una condición de sobre temperatura.
En cuanto la temperatura de canal haya vuelto a unas condiciones de operación
seguras, el LED se apagará, el relé de salida del canal se cerrará, y el/los altavoz/es
se conectarán de nuevo.
6 LED Active
El LED Active indicaque el relé de salida del canal está cerrado y el canal está
operacional. Se ilumina bajo operación normal y permanece encendido incluso
cuando el canal está en Automatic Clip Limiting o reducción de ganancia ACL. Estas
son características de protección que dejan el relé de salida cerrado. Si el LED
Active de apaga, no habrá señal en los conectores de salida.
p. 65
3 Repaso de las características
2
CCTM Manual de usuario
3
1
INPUT
CLASS 2 WIRING
OUTPUT
MOUNT IN RACK ONLY INSTALLER SUR SUPPORT
DE MONTAGE SEULEMENT
GAIN
IN=x20
SELECT OUT=x40
WWW.CRESTAUDIO.COM
ch A
MADE IN CHINA
BRIDGE
PARALLEL
STEREO
ch B
This info will be on sticker
A PRODUCT OF
CREST AUDIO CORP.
FAIR LAWN, NJ
120 VAC
60 Hz 1000 WATTS
UL Sticker
Leyenda del panel trasero
Panel trasero
1 Conector de alimentación IEC
Acepta cable de alimentación estandar terminado en IEC
2 Interruptor Selector de Modo
El Interruptor Selector de Modo del panel trasero determina si el
amplificador está en modo stereo, parallel, o bridged mono. No opere
el Interruptor Selector de Modo con el amplificador encendido. Vea
las secciones sobre Modo Stereo y Modo Bridged Mono para más
información.
3 Interruptor Selector de Ganancia
El Interruptor Selector de Ganancia del panel trasero determina si el
amplificador tiene una ganancia general de 40 (32 dB) o una ganancia
de 20 (26 dB). La posición hacia afuera selecciona x40 mientras que la
posición hacia adentro selecciona x20.
conexión de entrada
polaridad del conector XLR
polaridad del conector TRS
modo bridged mono
modo paralelo
modo stereo
conexión de salida
salida Speakon®
canal A stereo/parallel
canal B stereo/parallel
bridged mono
patillas de 5 vías
canal A stereo/parallel
bridged mono
canal B stereo/parallel
p. 66
Modos de operación 4
Stereo
Para la operación en estéreo (doble canal), apague el amplificador y coloque
los interruptores de selección de modo del panel trasero en la posición
estéreo. En este modo, ambos canales operan independientemente el uno
del otro, con sus atenuadores de entrada controlando sus respectivos
niveles.Así, una señal en la entrada del canal A produce una señal amplificada
en la salida del canal A, mientras que una señal en la entrada del canal B
produce una señal amplificada en la salida del canal B.
Parelelo
Para operación en paralelo (doble canal/una entrada única), apague el
amplificador y coloque el interruptor en la posición parallel; ambos canales
del amplificador están entonces alimentados por la señal de entrada del canal
A. No necesita ningún cableado. La sconexiones de salida son las mismas que
en modo stereo. Los conectores de entrada del Canal A y el canal B están
unidas para permitir la conexión a otro amplificador. Ambos atenuadores
de entrada permanecen activos, permitiéndole situar diferentes niveles para
cada canal. La potencia y otras características de funcionamiento son las
mismas que en el modo stereo.
bridged mono
Ambos canales del amplificador se pueden puentear para dar lugar a un
amplificador monaural de un solo canal muy potente. Tenga una precaución
extrema cuando opere en el modo bridge; voltaje potencialmente letal puede
estar presente en los terminales de salida. Para puentear el amplificador,
apague el amplificador y coloque el interruptor selector de modo del panel
trasero en la posición bridge. Direccione la señal a la entrada del canal A
y conecte los altavoces a través de las salidas calientes que son cualquiera
de las patillas “+” de los canales A y B. Alternativamente intercambie las
patillas “1+POS” y “2+NEG” del canal A del conector Speakon®. Como en
la operación en paralelo, ambos conectores de entrada están unidos juntos
para manejar la entrada de otro amplificador.
A diferencia del modo estéreo y el modo paralelo, en el que un lado de cada
salida es a Tierra, ambos lados son calientes en modo bridge. El lado del canal
A tiene la misma polaridad que la de la entrada. La mínima carga de impedancia
nominal es de 4 ohmios (equivalente a usar ambos canales a 2 ohmios) en
modo bridge. Si conecta cargas de menos de 4 ohmios en modo puenteado
la circuitería ACL se activará, dando lugar a una pérdida de potencia, además
de poder causar una sobrecarga térmica (sobretemperatura).
Cuando opere en el
modo bridged, ambos
atenuadores deben estar
en la misma posición
para que la carga de
altavoz sea compartida
igualmente por los
canales.
a
p. 67
5 Características de protección
CCTM Manual de usuario
La Serie CC de amplificadores incorpora numerosos circuitos que protegen tanto al amplificador
como a los altavoces bajo virtualmente cualquier situación. Peavey ha fabricado este amplificador
lo más infalible posible haciéndolo inmune a los corto-circuitos y a los circuitos abiertos, cargas
descompensadas, voltaje DC y sobrecalentamiento. Si un canal se pone en el modo de reducción
de ganancia ACL™, la carga del altavoz permanecerá conectada, pero el porcentaje de saturación
o la potencia de salida se reduce instantáneamente. Cuando ocurre un problema que hace que el
canal vaya al modo de protección, el LED Temp de ese canal se encenderá. Tanto un Voltaje DC
en la salida, frecuencias subsónicas excesivas o una sobre carga térmica causarán que el relé de
salida de ese canal desconecte la carga del altavoz hasta que el problema se haya corregido o el
amplificador se haya enfriado.
Limitación automática de la saturación (ACL)
Si a cualquier canal se le aplica una saturación fuerte y contínua, el circuito limitador reducirá
automáticamente la ganancia del canal a un nivel levemente saturado, protegiendo a los
altavoces contra el daño que ondas cuadradas contínuas y de alta potencia puedan producir.
Las posibles situaciones que pueden activar el limitador de saturación son un feedback
descontrolado, oscilaciones, una configuración inapropiada del equipo o una malfunción
anterior al amplificador en la cadena de audio. Los picos normales de programa no dispararán
el limitador de saturación; sólo una excesiva y contínua saturación lo hará. El LED ACL se
iluminará continuamente cuando la limitación esté actuando.
Sensibilidad de impedancia IGM™
La Serie de amplificadores CC posee circuitería innovadora para una operación segura bajo
cualquier carga. Cuando un amplificador es sometido a una carga que sobrecarga la etapa de
salida, el circuito de Modulación de Ganancia Instantánea (IGM) ajusta la ganancia de canal a
un nivel seguro. Este método de protección de la etapa final es mucho más efectivo que la
limitación estándar convencional encontrada en otros amplficadores. El circuito IGM no afecta
al sonido y es discreto cuando se activa.
Protección térmica
Los ventiladores internos mantendrán al amplificador en una buena operación en su rango
de temperatura bajo condiciones normales. Si la parrilla de calor de un canal alcanza los
75°C, lo cual podría indicar un suministro de aire obstruido, dicho canal se protegerá
independientemente desconectando su carga y cerrándose hasta que la unidad se haya
enfriado. Durante este tiempo, el LED Temp se iluminará, el LED Active se apagará, los LEDs
ACL permanecerán encendidos y los ventiladores continuarán operando a alta velocidad. El
CC 1800 utiliza una parrilla de calor única y un solo ventilador, pero mantiene la circuitería
separada.
Corto circuito
Si una salida se corta, tanto el circuito IGM como el térmico protegerán automáticamente el
amplificador. El circuito IGM percibe el cortocircuito como una condición extremadamente
forzada de carga y atenúa la señal, protegiendo los transistores de salida de canal de un
esfuerzo de sobre carga. Si el cortocircuito permanece, el canal se protegerá térmicamente
de manera eventual desconectando la carga.
Protección de voltaje DC
Si un canal del amplificador detecta voltaje DC o frecuencias subsónicas en sus terminales de
salida, su relé de salida se abrirá inmediatamente para prevenir el daño a los altavoces.
p. 68
Características de protección 5
Protección encendido/apagado
Al encenderse, el amplificador permanece en modo Protect, con las salidas desconectadas,
durante aproximadamente seis segundos mientras el alimentador de potencia se carga y se
estabiliza. Mientras los relés de salida están abiertos, los LEDs ACL se iluminan. Cuando se
quita la alimentación, las cargas de altavoz se desconectan inmediatamente para que no se
escuchen ni ruidos ni pops.
Control de señal AUTORAMP™
En el momento en el que un amplificador de la Serie CC se enciende o sale del modo
protect, el circuito AUTORAMP circuit se activa. Mientras los altavoces están desconectados,
la circuitería AUTORAMP circuit atenúa totalmente la señal. Después del cierre del relé de
salida, la señal sube lenta y gradualmente a su nivel seleccionado. El circuito AUTORAMP
de Control de Señal tiene algunas ventajas importantes sobre circuitos convencionales de
encendido instantáneo:
1. Si hay una señal presente durante el encendido (o cuando se está saliendo de protect),
los altavoces son sacudidos con un repentino chorro de potencia sonora, potencialmente
dañino.
2. Debido a que la ganancia es reducida después de que el relé de salida se cierre, los
contactos no son arqueados, lo cual extiende su vida útil.
p. 69
6 Seguridad
CCTM Manual de usuario
Protección del altavoz
Todos los altavoces cuentan con límites eléctricos, térmicos y físicos que deben ser tomados en
cuenta para prevenir daños o fallos. Demasiada potencia, frecuencias graves aplicadas a drivers de
frecuencias agudas, ondas severamente saturadas, y voltaje DC pueden ser fatales para el cono y los
drivers de compresión. La Serie de etapas de potencia CC de Crest protege los altavoces de voltajes
DC y señales sub-graves de manera automática.Altavoces de frecuencias medias y altas, especialmente
motores de compresión, son muy susceptibles de ser dañados al ser abusados con potencia excesiva,
formas de onda cuadradas o frecuencias por debajo de la estimada. Sea extremadamente cuidadoso
al conectar las bandas grave y media de un filtro activo a los amplficadores y altavoces correctos
y no a otros de una banda d frecuencia más alta. El punto de saturación de un amplificador es su
pico máximo de potencia de salida, y algunos de los amplificadores de alta potencia de la Serie CC
de Crest Audio pueden generar mucha más potencia de la que muchos altavoces pueden manejar.
Asegúrese de que el pico de potencia del amplificador no es excesivo para su sistema de altavoces.
Asegúrese de que los altavoces nunca reciban una potencia excesiva y de que el amplificador nunca
satura, use un limitador externo apropiadamente ajustado (o un compresor con un ratio de 10:1 o
mayor) para controlar la salida de potencia. En sistemas con crossovers activas, use uno para cada
banda de frecuencia. El limitador de saturación limitará automáticamente la duración de formas de
onda contínuas of continuous aplicadas a los altavoces. Sin embargo, el amplificador permitirá pasar
picos musicales normales. Algunos sistemas de altavoces están equipados con procesadores que
poseen circuitos limitadores y no deberían requerir limitación externa adicional.
También puede usar fusibles para limitar la potencia enviada a los drivers de los altavoces, aunque
como limitadores de corriente y no limitadores de voltaje, son una solución imperfecta, y como los
eslabones más débiles, sólo limitan una vez antes de necesitar ser reemplazados. Algunos fusibles
de baja calidad cuentan con una resistencia considerable que puede degradar la capacidad del
amplificador de controlar el movimiento del altavoz y pueden hasta llegar a deteriorar la calidad de
sonido del sistema. Si decide usar fusibles, verifique con el fabricante del altavoz para determinar las
especificaciones de corriente y retardo de tiempo requeridas.
No alimente ningún altavoz de frecuencias graves con frecuencias por debajo de las frecuencias a
la que ha sido afinado. El damping acústico reducido puede causar que un altavoz reviente incluso a
niveles relativamente bajos de operación. Consulte las especificaciones del sistema de altavoces para
determinar sus límites de frecuencias.
Mantenimiento del amplficador y responsabilidad del usuario
Un amplificador de la Serie CC no requiere mantenimiento regular y no debe requerir ningún
ajuste interno durante su vida. Su amplificador es muy potente y puede ser potencialmente
peligroso para los altavoces y humanos por igual. Es su responsabilidad leer la Sección de
Precauciones Importantes y asegurarse que el amplificador es instalado, cableado y operado
apropiadamente y de acuerdo con este manual. Muchos altavoces pueden sufrir daños fácilmente
o ser destruidos por niveles elevados de potencia, especialmente con la cantidad de potencia que
produce un amplificador puenteado. Lea la Sección de Protección de Altavoces y siempre tome en
cuenta la capacidad pico y continua del altavoz.
p. 70
Asistencia y soporte 7
Soporte
Si su amplificador desarrollara un problema, cosa improbable, debe ser
devuelto a un distribuidor autorizado, servicio técnico o enviado directamente
a nuestra fábrica.
Para obtener servicio, contacte el Servicio Técnico Oficial de Crest Audio,
su Distribuidor, Establecimiento, o cualquiera de las oficinas de Crest Audio
repartidas por el mundo. Si tiene acceso a Internet, visite por favor la página
web de Crest Audio.
+
Debido a la complejidad
del diseño y al riesgo de
electrocución, todas las
reparaciones deben ser
realizadas por porsonal
técnicamente cualificado.
Si tuviera que enviar la unidad de
vuelta a la fábrica, use solamente
el empaquetado original. Si no
empaqueta de manera inapropiada,
su amplificador puede ser dañado.
a
Contáctenos
atención al cliente
teléfono
fax
email
866.812.7378 USA
601.486.1380 USA
[email protected]
Para un embalaje de
reemplazo, contacte
la atención al cliente
de Crest Audio
+
soporte técnico
teléfono
fax
email
866.812.7378 USA
601.486.1380 USA
[email protected]
página web
www.crestaudio.com
correo
Crest Audio Inc.
711 A Street
Meridian, MS 39301 USA
p. 71
a
Especificaciones
CCTM Series
CC™ Manual de usuario
1800
Potencia tasada 4 ohmios bridged
1850 vatios a 1 kHz a <0.1% T.H.D.
Potencia tasada (2 x 2 ohmios)
900 vatios por canal a 1 kHz <0.05% T.H.D. Usando ambos canales
Potencia tasada (2 x 4 ohmios)
700 vatios por canal a 1 kHz a <0.05% T.H.D. Usando ambos canales
Potencia tasada (2 x 8 ohmios)
450 vatios por canal a 1 kHz a <0.05% T.H.D. Usando ambos canales
Potencia tasada (1 x 2 ohmios)
950 vatios a 1 kHz a <0.05% T.H.D.
Potencia tasada(1 x 4 ohmios)
775 vatios a 1 kHz a <0.05% T.H.D.
Potencia tasada (1 x 8 ohmios)
475 vatios a 1 kHz a <0.05% T.H.D.
Carga Mínima de Impedancia
2 ohmios
Máxima Oscilación de Voltaje RMS
73 voltios
Respuesta en Frecuencia
10 Hz - 100 kHz; +0, -3 dB a 1 vatio
Ancho de banda y potencia
10 Hz - 50 kHz; +0, -3 dB a una potencia a 4 ohmios
T.H.D. (2 x 2 ohmios)
<0.2% a 700 vatios por canal de 20 Hz a 20 kHz
T.H.D. (2 x 4 ohmios)
<0.1% a 600 vatios por canal de 20 Hz a 20 kHz
T.H.D. (2 x 8 ohmios)
<0.1% a 425 vatios por canal de 20 Hz a 20 kHz
Entrada CMRR
> - 75 dB a 1 kHz
Ganancia de Voltaje
x40 (32 dB)
Interferencia
> -55 dB a 1 kHz a una potencia tasada a 8 ohmios
Zumbido y Ruido
> -106 dB, a una referencia “A” de potencia a 8 ohmios
Tasa Slew
> 35V/us
Factor Damping (8 ohmios)
> 150:1 a 20 Hz - 1 kHz a 8 ohmios
Respuesta de fase
+6 a - 12 grados de 20 Hz a 20 kHz
Sensibilidad de entrada (x40)
1.32 volts +/- 3% para 1 kHz, potencia tasada a 4 ohmios, 1.06 voltios +/- 3% para 1 kHz, potencia
tasada a 2 ohmios
Impedancia de Entrada
15 k ohmios, balanceado
Esquema de Corriente a 1/8 de Potencia
1,000 vatios a 2 ohmios, 685 vatios a 4 ohmios, 400 vatios a 8 ohmios
Esquema de Corriente a 1/3 de Potencia
2,340 vatios a 2 ohmios, 1,650 vatios a 4 ohmios, 1,000 vatios a 8 ohmios
Enfriamiento
Un ventilador DC de 80 mm de velocidad variable dependiendo de la temperatura en el panel trasero
Controles
2 atenuadores en el panel frontal, interruptores de Modo en el panel trasero
LEDs Indicadores
2 ACL™ (limitación de saturación automática ), 2 de presencia de Señal, 2 de Actividad , 2 de Temp
Protección
Térmica, DC, chorros de encendido, subsónicos, cargas incorrectas
Conectores
Entrada Combi XLR & y jack 6.3 mm, salidas de altavoz Speakon y patillas de 5 Posiciones, conector
de aimentación de 15 amp IEC
Construcción
Acero de 16 ga. Con panel frontal moldeado
Dimensiones
88.9 mm x 482.6 mm x 377.8 mm + 31.8 mm para las orejas de soporte traseras y los conectores
(3.5” x 19” x 14.875” + 1.25”)
Peso Neto
14.8 kg (32.6 lbs.)
Peso Bruto
15.9 kg (35 lbs.)
x20 (26 dB)
Todas las medidas hechas a 120 VAC, transformador de potencia frío, potencia a 2 ohmios está limitada en el tiempo por el breaker del circuito magnético.
p. 72
Especificaciones a
2800
Potencia tasada Bridge 4 ohmios
2,800 vatios a 1 kHz a <0.1% T.H.D.
Potencia tasada (2 x 2 ohmios)
1,400 vatios por canal a 1 kHz <0.05% T.H.D. Usando ambos canales
Potencia tasada (2 x 4 ohmios)
965 vatios por canal a 1 kHz a <0.05% T.H.D. Usando ambos canales
Potencia tasada (2 x 8 ohmios)
595 vatios por canal a 1 kHz a <0.05% T.H.D. Usando ambos canales
Potencia tasada (1 x 2 ohmios)
1,850 vatios a 1 kHz a <0.1% T.H.D.
Potencia tasada (1 x 4 ohmios)
1,150 vatios a 1 kHz a <0.05% T.H.D.
Potencia tasada (1 x 8 ohmios)
665 vatios a 1 kHz a <0.05% T.H.D.
Mínima Carga de Impedancia
2 ohmios
Máxima Oscilación de Voltaje RMS
82 voltios
Respuesta en Frecuencia
10 Hz - 100 kHz; +0, -2.0 dB a 1 vatio
Ancho de Banda y Potencia
10 Hz - 35 kHz; +0, -3 dB a potencia tasada a 4 ohmios
T.H.D. (2 x 2 ohmios)
<0.15 a 1,150 vatios por canal de 20 Hz a 20 kHz
T.H.D. (2 x 4 ohmios)
<0.1% a 880 vatios por canal de 20 Hz a 20 kHz
T.H.D. (2 x 8 ohmios)
<0.1% a 560 vatios por canal from 20 Hz to 20 kHz
Entrada CMRR
> - 65 dB a 1 kHz
Ganancia de Voltaje
x40 (32 dB)
Interferencia
> -65 dB a 1 kHz a una potencia tasada a 8 ohmios
Zumbido y Ruido
> -111 dB, a una referencia “A” de potencia a 8 ohmios
Tasa Slew
> 15V/us
Factor Damping (8 ohmios)
> 500:1 a 20 Hz - 1 kHz
Respuesta de Fase
+5 a - 15 grados de 20 Hz a 20kHz
Sensibilidad de Entrada (x40)
1.7 voltios +/- 3% para 1 kHz, potencia tasada a 4 ohmios, 1.36 voltios +/- 3% para 1 kHz,
potencia tasada a 2 ohmios
Impedancia de Entrada
15 k ohmios, balanceado
Esquema de Corriente a 1/8 de Potencia
1,250 vatios a 2 ohmios, 880 vatios a 4 ohmios, 570 a 8 ohmios
Esquema de Corriente a 1/3 de Potencia
2,905 vatios a 2 ohmios, 2,220 vatios a 4 ohmios, 1,355 vatios a 8 ohmios
Enfriamiento
Dos ventiladores DC de 80 mm de velocidad variable dependiendo de la temperatura en el
panel trasero
Controles
2 atenuadores en el panel frontal, interruptores de Modo en el panel trasero
LEDs Indicadores
2 ACL™ (limitación de saturación automática ), 2 de presencia de Señal, 2 de Actividad ,
2 de Temp
Protección
Térmica, DC, chorros de encendido, subsónicos, cargas incorrectas
Conectores
Entrada Combi XLR & y jack 6.3 mm, salidas de altavoz Speakon® y patillas de 5 Posiciones,
conector de aimentación de 15 amp IEC
Construcción
Acero de 16 ga. Con panel frontal moldeado
Dimensiones
88.9 mm x 482.6 mm x 377.8 mm + 31.8 mm para las orejas de soporte traseras y conectores
(3.5” x 19” x 14.875” + 1.25”)
Peso Neto
18.05 kg (39.8 lbs.)
Peso Bruto
19.23 kg (42.4 lbs.)
x20 (26 dB)
Todas las medidas hechas a 120 VAC, transformador de potencia frío, potencia a 2 ohmios está limitada en el tiempo por el breaker del circuito
magnético.
p. 73
a
Especificaciones
CCTM Manual de usuario
CCTM Series
4000
p. 74
Potencia tasada Bridge 4 ohmios
4,000 vatios a 1 kHz a <0.1% T.H.D.
Potencia tasada (2 x 2 ohmios)
2,000 vatios per canal a 1 kHz <0.1% T.H.D. Usando ambos canales
Potencia tasada (2 x 4 ohmios)
1,350 vatios per canal a 1 kHz at <0.05% T.H.D. Usando ambos canales
Potencia tasada (2 x 8 ohmios)
800 vatios per canal a 1 kHz at <0.05% T.H.D. Usando ambos canales
Potencia tasada (1 x 2 ohmios)
2,550 vatios a 1 kHz a <0.1% T.H.D.
Potencia tasada (1 x 4 ohmios)
1,600 vatios a 1 kHz a <0.05% T.H.D.
Potencia tasada (1 x 8 ohmios)
900 vatios a 1 kHz a <0.05% T.H.D.
Mínima Carga de Impedancia
2 ohmios
Máxima Oscilación de Voltaje RMS
93 voltios
Respuesta En Frecuencia
10 Hz - 100 kHz; +0, -2 dB a 1 vatio
Ancho de Banda y Potencia
10 Hz - 35 kHz; +0, -3 dB a una potencia tasada a 4 ohmios
T.H.D. (2 x 2 ohmios)
<0.2% a 1,475 vatios por canal de 20 Hz a 20 kHz
T.H.D. (2 x 4 ohmios)
<0.1% a 1,150 vatios por canal de 20 Hz a 20 kHz
T.H.D. (2 x 8 ohmios)
<0.1% a 700 vatios por canal de 20 Hz a 20 kHz
Entrada CMRR
> -65 dB a 1 kHz
Ganancia de voltaje
x40 (32 dB)
Interferencia
> -65 dB a 1 kHz a una potencia tasada a 8 ohmios
Zumbido y Ruido
> -112 dB, “A” weighted referenced to rated power a 8 ohmios
Tasa Slew
> 15V/us
Factor Damping (8 ohmios)
> 500:1 a 20 Hz - 1 kHz
Respuesta de Fase
+5 a - 15 grados de 20 Hz a 20 kHz
Sensibilidad de Entrada (x40)
1.88 voltios +/- 3% para 1 kHz, potencia tasada a 4 ohmios, 1.62 voltios +/- 3% para 1
kHz, potencia tasada a 2 ohmios
Impedancia de Entrada
15 k ohmios, balanceado
Esquema de Corriente a 1/8 de potencia
1,825 vatios a 2 ohmios, 1,185 vatios a 4 ohmios, 720 a 8 ohmios
Esquema de Corriente a 1/3 de potencia
4,535 vatios a 2 ohmios, 2,975 vatios a 4 ohmios, 1,835 vatios a 8 ohmios
Enfriamiento
Two back panel temperature dependant variable speed 80 mm DC fans
Controles
2 atenuadores en el panel frontal, rear panel Mode switches
LEDs Indicadores
2 ACL™ (limitación de saturación automática), 2 de presencia de Señal, 2 de Actividad,
2 de Temp
Protección
Térmica, DC, chorros de encendido, subsónicos, cargas incorrectas
Conectores
Entrada Combi XLR & y jack 6.3 mm, salidas de altavoz Speakon® y patillas de 5
Posiciones, conector de aimentación de 15 amp IEC
Construcción
Acero de 16 ga. Con panel frontal moldeado y asas moldeadas
Dimensiones
88.9 mm x 482.6 mm x 377.8 mm + 31.8 mm para las orejas de soporte traseras y los
conectores
(3.5” x 19” x 14.875” + 1.25”)
Peso Neto
19.64 kg (43.3 lbs.)
Peso Bruto
20.8 kg.(45.8 lbs.)
x20 (26 dB)
Todas las medidas hechas a 120 VAC, transformador de potencia frío, potencia a 2 ohmios está limitada en el tiempo por el breaker del circuito
magnético.
Calibre de cable b
longitud de cable estirado
2
5
meters
meters
10
meters
30
calibre de cable
pérdida de potencia
carga de 8 Ω
carga de 4 Ω
carga de 2 Ω
0.3mm2
2.9%
5.6%
10.8%
0.5
1.74
3.4
6.7
0.75
1.16
2.3
4.5
1.5
0.58
1.16
2.3
2.5
0.35
0.70
1.39
4.0
0.22
0.44
0.87
0.5mm2
4.3%
8.2%
15.5%
0.75
2.9
5.6
10.8
1.5
1.45
2.9
5.6
2.5
0.87
1.74
3.4
4
0.55
1.09
2.2
6
0.37
0.73
1.45
0.5mm2
8.24%
5.5%
28%
0.75
5.6
10.8
19.9
1.5
2.9
5.6
10.8
2.5
1.74
2.9
6.7
4
1.09
1.74
4.3
6
0.73
1.09
2.9
15.5%
0.73%
45%
1.5
8.2
15.5
28
2.5
5.1
9.8
18.2
4
3.2
6.3
12.0
6
2.2
4.3
8.2
10
1.31
2.6
5.1
meters 0.75mm2
p. 75
b
Calibre de cable
longitud de cable estirado
5
feet
10
feet
40
80
p. 76
feet
feet
calibre de cable
pérdida de potencia
carga de 8 Ω
carga de 4 Ω
carga de 2 Ω
18 AWG
0.81%
1.61%
3.2%
16
0.51
1.02
2.0
14
0.32
0.64
1.28
12
0.20
0.40
0.80
10
0.128
0.25
0.51
18 AWG
1.61%
3.2%
6.2%
16
1.02
2.0
4.0
14
0.64
1.28
2.5
12
0.40
0.80
1.60
10
0.25
0.51
1.01
18 AWG
6.2%
11.9%
22%
16
4.0
7.7
14.6
14
2.5
5.0
9.6
12
1.60
3.2
6.2
10
1.01
2.0
4.0
8
0.60
1.20
2.4
18 AWG
11.9%
22%
37%
16
7.7
14.6
26
14
5.0
9.6
17.8
12
3.2
6.2
11.8
10
2.0
4.0
7.7
8
1.20
2.4
4.7
http://www.crestaudio.com
CCTM Owner's Manual
©2005