1
MODEL
Connections and Setup
PG-A10X
PG-A10S
Introduction
OPERATION MANUAL
Basic Operation
SHARP CORPORATION
Easy to Use Functions
LCD PROJECTOR
Appendix
Printed in Japan
TINS-A505WJN1
03P02-JWM
A10X_A10S#E_Print#H1+4.p65
1
03.2.4, 1:59 PM
IMPORTANT
For your assistance in reporting the loss or theft of your
Projector, please record the Serial Number located on
the bottom of the projector and retain this information.
Before recycling the packaging, please be sure that
you have checked the contents of the carton thoroughly
against the list of “Supplied accessories” on page 14.
Model No.:
Serial No.:
This equipment complies with the requirements of Directives 89/336/EEC and 73/23/EEC as amended by 93/68/
EEC.
Dieses Gerät entspricht den Anforderungen der EG-Richtlinien 89/336/EWG und 73/23/EWG mit Änderung 93/
68/EWG.
Ce matériel répond aux exigences contenues dans les directives 89/336/CEE et 73/23/CEE modifiées par la
directive 93/68/CEE.
Dit apparaat voldoet aan de eisen van de richtlijnen 89/336/EEG en 73/23/EEG, gewijzigd door 93/68/EEG.
Dette udstyr overholder kravene i direktiv nr. 89/336/EEC og 73/23/EEC med tillæg nr. 93/68/EEC.
Quest’ apparecchio è conforme ai requisiti delle direttive 89/336/EEC e 73/23/EEC, come emendata dalla
direttiva 93/68/EEC.
Este equipamento obedece às exigências das directivas 89/336/CEE e 73/23/CEE, na sua versão corrigida
pela directiva 93/68/CEE.
Este aparato satisface las exigencias de las Directivas 89/336/CEE y 73/23/CEE, modificadas por medio de la
93/68/CEE.
Denna utrustning uppfyller kraven enligt riktlinjerna 89/336/EEC och 73/23/EEC så som kompletteras av 93/68/
EEC.
Dette produktet oppfyller betingelsene i direktivene 89/336/EEC og 73/23/EEC i endringen 93/68/EEC.
Tämä laite täyttää direktiivien 89/336/EEC ja 73/23/EEC vaatimukset, joita on muutettu direktiivillä 93/68/EEC.
A10X_A10S#E_Print#pii_iv.p65
1
03.2.4, 2:40 PM
SPECIAL NOTE FOR USERS IN THE U.K.
The mains lead of this product is fitted with a non-rewireable (moulded) plug incorporating a 5A fuse. Should
or
and of the same rating as
the fuse need to be replaced, a BSI or ASTA approved BS 1362 fuse marked
above, which is also indicated on the pin face of the plug, must be used.
Always refit the fuse cover after replacing the fuse. Never use the plug without the fuse cover fitted.
In the unlikely event of the socket outlet in your home not being compatible with the plug supplied, cut off the
mains plug and fit an appropriate type.
DANGER:
The fuse from the cut-off plug should be removed and the cut-off plug destroyed immediately and disposed of
in a safe manner.
Under no circumstances should the cut-off plug be inserted elsewhere into a 5A socket outlet, as a serious
electric shock may occur.
To fit an appropriate plug to the mains lead, follow the instructions below:
IMPORTANT:
The wires in the mains lead are coloured in accordance with the following code:
Blue: Neutral
Brown: Live
As the colours of the wires in the mains lead of this product may not correspond with the coloured markings
identifying the terminals in your plug, proceed as follows:
• The wire which is coloured blue must be connected to the plug terminal which is marked N or coloured black.
• The wire which is coloured brown must be connected to the plug terminal which is marked L or coloured red.
Ensure that neither the brown nor the blue wire is connected to the earth terminal in your three-pin plug.
Before replacing the plug cover make sure that:
• If the new fitted plug contains a fuse, its value is the same as that removed from the cut-off plug.
• The cord grip is clamped over the sheath of the mains lead, and not simply over the lead wires.
IF YOU HAVE ANY DOUBT, CONSULT A QUALIFIED ELECTRICIAN.
A10X_A10S#E_Print#pii_iv.p65
2
03.2.4, 2:40 PM
The supplied CD-ROM contains operation instructions in English, German, French, Swedish, Spanish, Italian,
Dutch, Portuguese, Chinese (Traditional Chinese and Simplified Chinese) and Korean. Carefully read through
the operation instructions before operating the projector.
Die mitgelieferte CD-ROM enthält Bedienungsanleitungen in Englisch, Deutsch, Französisch, Schwedisch, Spanisch,
Italienisch, Niederländisch, Portugiesisch, Chinesisch (Traditionelles Chinesisch und einfaches Chinesisch) und
Koreanisch. Bitte lesen Sie die Bedienungsanleitung vor der Verwendung des Projektors sorgfältig durch.
Le CD-ROM fourni contient les instructions de fonctionnement en anglais, allemand, français, suédois,
espagnol, italien, néerlandais, portugais, chinois (chinois traditionnel et chinois simplifié) et coréen. Veuillez lire
attentivement ces instructions avant de faire fonctionner le projecteur.
Den medföljande CD-ROM-skivan innehåller bruksanvisningar på engelska, tyska, franska, svenska, spanska,
italienska, holländska, portugisiska, kinesiska (traditionell kinesiska och förenklad kinesiska) och koreanska. Läs
noga igenom bruksanvisningen innan projektorn tas i bruk.
El CD-ROM suministrado contiene instrucciones de operación en inglés, alemán, francés, sueco, español,
italiano, holandés, portugués, chino (chino tradicional y chino simplificado) y coreano. Lea cuidadosamente las
instrucciones de operación antes de utilizar el proyector.
Il CD-ROM in dotazione contiene istruzioni per l’uso in inglese, tedesco, francese, svedese, spagnolo, italiano,
olandese, portoghese, cinese (cinese tradizionale e cinese semplificato) e coreano. Leggere attentamente le
istruzioni per l’uso prima di usare il proiettore.
De meegeleverde CD-ROM bevat handleidingen in het Engels, Duits, Frans, Zweeds, Spaans, Italiaans,
Nederlands, Portugees, Chinees (Traditioneel Chinees en Vereenvoudigd Chinees) en Koreaans. Lees de
handleiding zorgvuldig door voor u de projector in gebruik neemt.
O CD-ROM fornecido contém instruções de operação em Inglês, Alemão, Francês, Sueco, Espanhol, Italiano,
Holandês, Português, Chinês, (Chinês Tradicional e Chinês Simplificado) e Coreano. Leia cuidadosamente
todas as instruções de operação antes de operar o projetor.
A10X_A10S#E_Print#pii_iv.p65
3
03.2.4, 2:40 PM
Before using the projector, please read this operation manual carefully.
Introduction
Introduction
ENGLISH
There are two important reasons for prompt warranty registration of your new SHARP Projector, using
the REGISTRATION CARD packed with the projector.
1. WARRANTY
This is to assure that you immediately receive the full benefit of the parts, service and labor
warranty applicable to your purchase.
2. CONSUMER PRODUCT SAFETY ACT
To ensure that you will promptly receive any safety notification of inspection, modification, or
recall that SHARP may be required to give under the 1972 Consumer Product Safety Act, PLEASE
READ CAREFULLY THE IMPORTANT “LIMITED WARRANTY” CLAUSE.
U.S.A. ONLY
WARNING:
High brightness light source. Do not stare into the beam of light, or view directly. Be especially
careful that children do not stare directly into the beam of light.
WARNING: To reduce the risk of fire or electric shock, do not expose this product to
rain or moisture.
See bottom of projector.
CAUTION
RISK OF ELECTRIC SHOCK.
DO NOT REMOVE SCREWS
EXCEPT SPECIFIED USER
SERVICE SCREW.
CAUTION: TO REDUCE THE RISK OF ELECTRIC SHOCK,
DO NOT REMOVE COVER.
NO USER-SERVICEABLE PARTS EXCEPT LAMP UNIT.
REFER SERVICING TO QUALIFIED SERVICE
PERSONNEL.
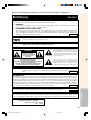
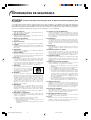
WARNING:
The lightning flash with arrowhead symbol,
within an equilateral triangle, is intended to
alert the user to the presence of uninsulated
“dangerous voltage” within the product’s
enclosure that may be of sufficient magnitude
to constitute a risk or electric shock to
persons.
The exclamation point within a triangle is
intended to alert the user to the presence of
important operating and maintenance
(servicing) instructions in the literature
accompanying the product.
FCC Regulations state that any unauthorized changes or modifications to this equipment not
expressly approved by the manufacturer could void the user’s authority to operate this equipment.
U.S.A. ONLY
INFORMATION
This equipment has been tested and found to comply with the limits for a Class A digital device,
pursuant to Part 15 of the FCC Rules. These limits are designed to provide reasonable protection
against harmful interference when the equipment is operated in a commercial environment. This
equipment generates, uses, and can radiate radio frequency energy and, if not installed and used in
accordance with the operation manual, may cause harmful interference to radio communications.
Operation of this equipment in a residential area is likely to cause harmful interference, in which case
the user will be required to correct the interference at his own expense.
U.S.A. ONLY
The enclosed computer cable must be used with the device. The cable is provided to ensure that the device
complies with FCC Class A verification.
U.S.A. ONLY
WARNING:
This is a Class A product. In a domestic environment this product may cause radio interference in
which case the user may be required to take adequate measures.
1
A10X_A10S#E_Print#p01_03.p65
1
03.2.4, 2:00 PM
WARNING:
The cooling fan in this projector continues to run for about 90 seconds after the projector is turned off. During
normal operation, when turning the power off always use the POWER OFF button on the projector or on the remote
control. Ensure the cooling fan has stopped before disconnecting the power cord.
DURING NORMAL OPERATION, NEVER TURN THE PROJECTOR OFF BY DISCONNECTING THE POWER CORD.
FAILURE TO OBSERVE THIS WILL RESULT IN PREMATURE LAMP FAILURE.
PRODUCT DISPOSAL
This projector utilizes tin-lead solder, and a pressurized lamp containing a small amount of mercury. Disposal of
these materials may be regulated due to environmental considerations. For disposal or recycling information,
please contact your local authorities or, if you are located in the United States of America, the Electronic Industries
Alliance: www.eiae.org .
Caution Concerning Lamp Replacement
See “Replacing the Lamp” on page 57.
LAMP REPLACEMENT CAUTION
BEFORE REMOVING THE SCREW, DISCONNECT POWER CORD.
HOT SURFACE INSIDE. ALLOW 1 HOUR TO COOL BEFORE
REPLACING THE LAMP. REPLACE WITH SAME SHARP LAMP UNIT
TYPE BQC-PGA10X//1 ONLY.
UV RADIATION : CAN CAUSE EYE DAMAGE. TURN OFF LAMP
BEFORE SERVICING.
HIGH PRESSURE LAMP : RISK OF EXPLOSION. POTENTIAL
HAZARD OF GLASS PARTICLES IF LAMP HAS RUPTURED.
HANDLE WITH CARE. SEE OPERATION MANUAL.
PRECAUTIONS A OBSERVER LORS
DU REMPLACEMENT DE LA LAMPE.
DEBRANCHER LE CORDON D’ALIMENTATION AVANT DE RETIRER
LA VIS. L’INTERIEUR DU BOITIER ETANT EXTREMEMENT CHAUD,
ATTENDRE 1 HEURE AVANT DE PROCEDER AU REMPLACEMENT
DE LA LAMPE. NE REMPLACER QUE PAR UNE LAMPE SHARP DE
TYPE BQC-PGA10X//1.
RAYONS ULTRAVIOLETS : PEUVENT ENDOMMAGER LES YEUX.
ETEINDRE LA LAMPE AVANT DE PROCEDER A L’ENTRETIEN.
LAMPE A HAUTE PRESSION : RISQUE D’EXPLOSION. DANGER
POTENTIEL DE PARTICULES DE VERRE EN CAS D’ECLATEMENT
DE LA LAMPE. A MANIPULER AVEC PRECAUTION, SE REPORTER
AU MODE D’EMPLOI.
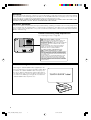
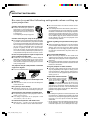
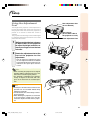
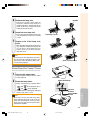
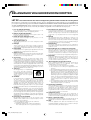
When Attaching the “QUICK GUIDE” Label
Attaching the “QUICK GUIDE” Label (supplied) on the
projector will help you check the setup procedure. When
you attach the “QUICK GUIDE” Label on the projector,
be sure to align the label bottom and the upper part of
the “Notevision” logo on the top cabinet of the projector
as shown in the drawing on the right. Do not attach the
“QUICK GUIDE” Label anywhere else.
“QUICK GUIDE” Label
2
A10X_A10S#E_Print#p01_03.p65
2
03.2.4, 2:00 PM
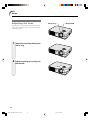
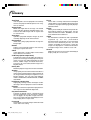
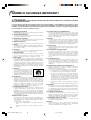
Outstanding Features
Introduction
1. Light and Compact Design
• A4 / letter size projector weighing only 2.9 kg / 6.4 lbs can be easily
transported from room to room or location to location.
2. Comfortable Operation, Classroom and Meeting Room Friendly
• Low fan noise and front directed exhaust outlet insure minimal disturbance to your audience seated adjacent to the projector.
• Short throw lens allows for image size of 100" at just 3.2 meters (10' 6").
3. Simply and Easy Operation
• Color-coded connections allows for hassle-free set-up.
• Frequently used buttons, lens placement are positioned for easy operation.
4. High Brightness Despite Compact Size
• Use of 165 W SHP lamp achieves excellent color uniformity and high
brightness.
• The Eco mode function reduces noise levels and power consumption
while also extending lamp life.
5. Wide Input Signal Compatibility
• Video systems compatible (NTSC3.58, PAL, SECAM,
PAL-N, PAL-M, PAL-60 and NTSC4.43)
• HD input compatible (1080I, 720P and 480P)
• Computer input compatible (VGA, SVGA, XGA, SXGA and SXGA+)
6. Anti-Theft and Keylock
• The Anti-Theft function renders the projector useless to prevent unauthorized
use until a keycode is entered.
• The Keylock function allows you to easily lock the operation buttons on the projector to prevent unauthorized adjustment.
3
A10X_A10S#E_Print#p01_03.p65
3
03.2.4, 2:00 PM
Contents
Introduction
Easy to Use Functions
Outstanding Features ......................................... 3
Contents ............................................................... 4
IMPORTANT SAFEGUARDS ............................... 6
How to Access the PDF Operation Manuals ..... 9
Part Names ........................................................ 10
Picture Display Mode ........................................ 40
Projector (Front and Top View) ................................ 10
Projector (Rear View) .............................................. 11
Remote Control (Front View) ................................... 12
Keylock Function .............................................. 43
Using the Remote Control ................................ 13
Using the “Options” Menu ................................ 44
Usable Range ......................................................... 13
Inserting the Batteries ............................................. 13
Lamp Timer (Life) (Checking the Lamp Life
Status) .................................................................... 44
OSD Display (Setting On-screen Display) ............... 44
Video System (Setting the Video System) ............... 45
Background (Selecting a Startup and
Background Image) ................................................ 45
Eco Mode (Setting the Eco Mode) .......................... 45
Auto Power Off (Auto Power Off Function) ............. 46
Menu Position (Selecting the Menu Screen
Position) .................................................................. 46
Menu Color (Selecting the Menu Color) ................. 46
Password (Setting a Password) .............................. 47
If You Forget Your Password ................................... 47
Anti-Theft (Setting the Anti-Theft) ............................ 48
Accessories ....................................................... 14
Connections and Setup
Connecting the Projector to Other Devices .... 15
Before Connecting .................................................. 15
This projector can be connected to: ....................... 15
Connecting the Power Cord ................................... 15
Connecting the Projector to a Computer .............
Connecting to Video Equipment ..........................
Controlling the Projector Using a Computer ........
Setup ..................................................................
16
18
20
21
Using the Adjustment Feet ..................................... 21
Adjusting the Lens .................................................. 22
Setting up the Screen .............................................. 23
Screen Size and Projection Distance ...................... 24
Projecting a Reversed/Inverted Image ................... 25
Switching the Picture Display Mode ........................ 40
Still and Zoom Image ........................................ 42
Freezing a Moving Image ....................................... 42
Displaying an Enlarged Portion of an Image ........... 42
Locking the operation Buttons ................................ 43
Taking the Keylock off .............................................. 43
Reversing /Inverting Projected Images ........... 50
Setting the Projection Mode ................................... 50
Basic Operation
Image Projection ............................................... 26
Basic Procedure ...................................................... 26
Selecting the On-screen Display Language ........... 28
Keystone Correction
(Correcting Trapezoidal Distortion) ........... 29
Menu Items ........................................................ 30
Using the Menu Screen .................................... 32
Menu Selections (Adjustments) .............................. 32
Menu Selections (Settings) ..................................... 34
Picture Adjustment ........................................... 36
Adjusting the Image ................................................ 36
CLR Temp (Adjusting the Color Temperature) ........ 36
Gamma (Gamma Correction) .................................. 37
sRGB (sRGB Setting) .............................................. 37
Signal Type (Signal Type Setting) ............................ 37
Memory (Storing and Selecting the Adjustment
Settings) .................................................................. 37
Computer Image Adjustment ........................... 38
Adjusting the Computer Image .............................. 38
Special Modes (Special Mode Settings) ................. 38
Signal Info (Checking the Input Signal) ................... 39
4
A10X_A10S#E_Print#p04_05.p65
4
03.2.4, 2:01 PM
Introduction
Italiano
Appendix
Carrying the Projector ...................................... 51
How to Use the Carrying Case ................................ 51
Maintenance ...................................................... 52
Replacing the Air Filter ..................................... 53
Cleaning and Replacing the Air Filter ..................... 53
Maintenance Indicators .................................... 55
Regarding the Lamp ......................................... 57
Lamp ...................................................................... 57
Caution Concerning the Lamp ................................ 57
Replacing the Lamp ................................................ 57
Removing and Installing the Lamp Unit ................. 58
Resetting the Lamp Timer ....................................... 59
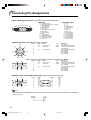
Connecting Pin Assignments .......................... 60
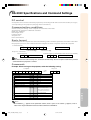
RS-232C Specifications and
Command Settings ...................................... 61
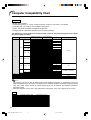
Computer Compatibility Chart ......................... 62
Troubleshooting ................................................ 63
For SHARP Assistance ..................................... 65
Specifications .................................................... 66
Dimensions ........................................................ 67
Glossary ............................................................. 68
Index ................................................................... 69
Introduzione ....................................................... 87
NORME DI SICUREZZA IMPORTANTI .............. 88
Per accedere ai manuali di istruzioni nel
formato PDF ................................................. 90
Nederlands
Inleiding ............................................................. 91
BELANGRIJKE VEILIGHEIDSVOORSCHRIFTEN ... 92
Toegang krijgen tot de PDFgebruiksaanwijzingen ................................. 94
Português
Introdução .......................................................... 95
INFORMAÇÕES DE SEGURANÇA ................... 96
Como Aceder os Manuais de Operação PDF ... 98
99
100
102
103
104
108
109
This operation manual includes “Introduction”,
“IMPORTANT SAFEGUARDS” and “How to
Access the PDF Operation Manuals” in German,
French, Swedish, Spanish, Italian, Dutch,
Portuguese, Chinese (Traditional Chinese) and
Korean on pages 71 to 109.
Deutsch
Einführung ......................................................... 71
WICHTIGE SICHERHEITSHINWEISE ............... 72
Zugriff auf die PDF-Bedienungsanleitungen ... 74
Français
Introduction ....................................................... 75
MESURES DE SÉCURITÉ IMPORTANTES ...... 76
Comment accéder aux modes d’emploi PDF ... 78
Svenska
Introduktion ....................................................... 79
VIKTIGA SÄKERHETSFÖRESKRIFTER .......... 80
Hur du läser PDF-bruksanvisningarna ............ 82
Español
Introducción ...................................................... 83
IMPORTANTES MEDIDAS DE SEGURIDAD .... 84
Cómo acceder a los manuales de manejo en
formato PDF ................................................. 86
5
A10X_A10S#E_Print#p04_05.p65
5
03.2.4, 2:01 PM
IMPORTANT SAFEGUARDS
CAUTION: Please read all of these instructions before you operate this product and save these
instructions for later use.
Electrical energy can perform many useful functions. This product has been engineered and manufactured to
assure your personal safety. BUT IMPROPER USE CAN RESULT IN POTENTIAL ELECTRICAL SHOCK OR
FIRE HAZARDS. In order not to defeat the safeguards incorporated in this product, observe the following basic
rules for its installation, use and servicing.
1. Read Instructions
11. Power Sources
All the safety and operating instructions should be read
before the product is operated.
2. Retain Instructions
The safety and operating instructions should be
retained for future reference.
3. Heed Warnings
All warnings on the product and in the operating
instructions should be adhered to.
4. Follow Instructions
All operating and use instructions should be followed.
5. Cleaning
Unplug this product from the wall outlet before cleaning.
Do not use liquid cleaners or aerosol cleaners. Use a
damp cloth for cleaning.
6. Attachments
Do not use attachments not recommended by the
product manufacturer as they may cause hazards.
7. Water and Moisture
Do not use this product near water–for example, near
a bath tub, wash bowl, kitchen sink, or laundry tub; in a
wet basement; or near a swimming pool; and the like.
8. Accessories
Do not place this product on an unstable cart, stand,
tripod, bracket, or table. The product may fall, causing
serious injury to a child or adult, and serious damage
to the product. Use only with a cart, stand, tripod,
bracket, or table recommended by the manufacturer,
or sold with the product. Any mounting of the product
should follow the manufacturer’s instructions, and
should use a mounting accessory recommended by
the manufacturer.
This product should be operated only from the type of
power source indicated on the marking label. If you
are not sure of the type of power supply to your home,
consult your product dealer or local power company.
For products intended to operate from battery power,
or other sources, refer to the operating instructions.
12. Grounding or Polarization
This product is provided with one of the following types
of plugs. If the plug should fail to fit into the power outlet,
please contact your electrician.
Do not defeat the safety purpose of the plug.
a. Two-wire type (mains) plug.
b. Three-wire grounding type (mains) plug with a
grounding terminal.
This plug will only fit into a grounding type power
outlet.
13. Power-Cord Protection
Power-supply cords should be routed so that they are
not likely to be walked on or pinched by items placed
upon or against them, paying particular attention to
cords at plugs, convenience receptacles, and the point
where they exit from the product.
14. Lightning
For added protection for this product during a lightning
storm, or when it is left unattended and unused for long
periods of time, unplug it from the wall outlet and
disconnect the cable system. This will prevent damage
to the product due to lightning and power-line surges.
15. Overloading
Do not overload wall outlets, extension cords, or integral
convenience receptacles as this can result in a risk of
fire or electric shock.
16. Object and Liquid Entry
9. Transportation
A product and cart combination
should be moved with care. Quick
stops, excessive force, and
uneven surfaces may cause the
product and cart combination to
overturn.
10.Ventilation
Slots and openings in the cabinet are provided for
ventilation to ensure reliable operation of the product
and to protect it from overheating, and these openings
must not be blocked or covered. The openings should
never be blocked by placing the product on a bed,
sofa, rug, or other similar surface. This product should
not be placed in a built-in installation such as a bookcase or rack unless proper ventilation is provided or
the manufacturer’s instructions have been adhered to.
Never push objects of any kind into this product through
openings as they may touch dangerous voltage points
or short-out parts that could result in a fire or electric
shock. Never spill liquid of any kind on the product.
17. Servicing
Do not attempt to service this product yourself as
opening or removing covers may expose you to dangerous voltage or other hazards. Refer all servicing to
qualified service personnel.
6
A10X_A10S#E_Print#p06_14.p65
6
03.2.4, 2:01 PM
Unplug this product from the wall outlet and refer
servicing to qualified service personnel under the
following conditions:
a. When the power-supply cord or plug is damaged.
b. If liquid has been spilled, or objects have fallen
into the product.
c. If the product has been exposed to rain or water.
d. If the product does not operate normally by
following the operating instructions. Adjust only
those controls that are covered by the operating
instructions, as an improper adjustment of other
controls may result in damage and will often
require extensive work by a qualified technician
to restore the product to normal operation.
e. If the product has been dropped or damaged in
any way.
f. When the product exhibits a distinct change in
performance, this indicates a need for service.
Introduction
18. Damage Requiring Service
19. Replacement Parts
When replacement parts are required, be sure the
service technician has used replacement parts
specified by the manufacturer or have the same
characteristics as the original part. Unauthorized
substitutions may result in fire, electric shock, or other
hazards.
20. Safety Check
Upon completion of any service or repairs to this
product, ask the service technician to perform safety
checks to determine that the product is in proper
operating condition.
21. Wall or Ceiling Mounting
This product should be mounted to a wall or ceiling
only as recommended by the manufacturer.
22. Heat
This product should be situated away from heat sources
such as radiators, heat registers, stoves, or other
products (including amplifiers) that produce heat.
• Microsoft and Windows are registered trademarks of Microsoft Corporation in the United States and/or
other countries.
• PC/AT is a registered trademark of International Business Machines Corporation in the United States.
• Adobe Acrobat is a trademark of Adobe Systems Incorporated.
• Macintosh is a registered trademark of Apple Computer, Inc. in the United States and/or other countries.
• All other company or product names are trademarks or registered trademarks of their respective companies.
7
A10X_A10S#E_Print#p06_14.p65
7
03.2.4, 2:01 PM
IMPORTANT SAFEGUARDS
Be sure to read the following safeguards when setting up
your projector.
Caution concerning the lamp unit
■ Potential hazard of glass particles if
lamp ruptures. In case of lamp rupture,
contact your nearest Sharp Authorized
Projector Dealer or Service Center for
a replacement.
See “Replacing the Lamp” on page 57.
Caution concerning the setup of the projector
■ For minimal servicing and to maintain high image quality, SHARP recommends that this projector be installed
in an area free from humidity, dust and cigarette smoke.
When the projector is subjected to these environments,
the lens must be cleaned more often. As long as the
projector is regularly cleaned, use in these environments will not reduce the overall operation life of the
unit. Internal cleaning should only be performed by a
Sharp Authorized Projector Dealer or Service Center.
Do not set up the projector in places exposed to
direct sunlight or bright light.
■ Be sure that the intake vent and the exhaust vent are
not obstructed.
■ If the cooling fan becomes obstructed, a protection circuit will automatically turn off the projector. This does
not indicate a malfunction. Remove the projector power
cord from the wall outlet and wait at least 10 minutes.
Place the projector where the intake and exhaust vents
are not blocked, plug the power cord back in and turn
on the projector. This will return the projector to the
normal operating condition.
Caution regarding transportation of the projector
■ When transporting the projector, be sure not to subject
it to hard impact and/or vibration, as this can result in
damage. Take extra care with the lens. Before moving
the projector, be sure to unplug the power cord from
the wall outlet, and disconnect any other cables connected to it.
Other connected equipment
■ Position the screen so that it is not in direct sunlight or
room light. Light falling directly on the screen washes
out the colors, making viewing difficult. Close the curtains and dim the lights when setting up the screen in a
sunny or bright room.
■ When connecting a computer or other audio-visual
equipment to the projector, make the connections AFTER turning off the projector and the equipment to be
connected.
■ Please read the operation manuals of the projector and
the equipment to be connected for instructions on how
to make the connections.
The projector may be safely tilted to a maximum
angle of 12 degrees.
Using the projector in other countries
■ Placement should be within ±12 degrees of horizontal.
■ The power supply voltage and the shape of the plug
may vary depending on the region or country you are
using the projector in. When using the projector overseas, be sure to use an appropriate power cord for the
country you are in.
Temperature monitor function
Do not subject the projector to hard impact and/
or vibration.
■ Take care with the lens so as not to hit or damage the
surface of the lens.
Rest your eyes occasionally.
■ Continuously watching the screen for long hours will
cause eye strain. Be sure to occasionally rest your eyes.
Avoid locations with extremes of temperature.
■ The operating temperature of the projector is from 41°F
to 95°F (+5°C to +35°C).
■ The storage temperature of the projector is from
–4°F to 140°F (–20°C to +60°C).
Do not block the exhaust and intake vents.
■ Allow at least 7 7/8 inches (20 cm) of space between
the exhaust vent and the nearest wall or obstruction.
■ If the projector starts to overheat
due to setup problems or blockage of the air vents, “
” and
“
” will illuminate in the lower left corner of the
picture. If the temperature continues to rise, the lamp
will turn off, the temperature warning indicator on the
projector will blink, and after a 90-second cooling-off
period the power will be shut off. Refer to “Maintenance
Indicators” on page 55 for details.
Info
• The cooling fan regulates the internal temperature, and
its performance is automatically controlled. The sound
of the fan may change during projector operation due
to changes in the fan speed. This does not indicate
malfunction.
• Do not unplug the power cord during projection or cooling fan operation. This can cause damage due to rise
in internal temperature, as the cooling fan also stops.
8
A10X_A10S#E_Print#p06_14.p65
8
03.2.4, 2:01 PM
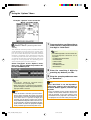
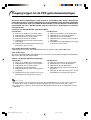
How to Access the PDF Operation Manuals
Introduction
PDF operation manuals in several languages are included in the CD-ROM, so that you can
work with the projector, even if you do not have this manual. To utilize these manuals, you
need to install Adobe Acrobat Reader on your PC (Windows or Macintosh). If you have not
installed Acrobat Reader yet, you can install it from the CD-ROM.
To install Acrobat Reader from the CD-ROM
For Windows:
1 Insert the CD-ROM in the CD-ROM drive.
2 Double click the “My Computer” icon.
3 Double click the “CD-ROM” drive.
4 Double click the “ACROBAT” folder.
5 Double click the language (name of the folder)
that you want to view.
6 Double click the installation program and
follow the instructions on the screen.
For Macintosh:
1 Insert the CD-ROM in the CD-ROM drive.
2 Double click the “CD-ROM” icon.
3 Double click the “ACROBAT” folder.
4 Double click the language (name of the folder)
that you want to view.
5 Double click the installation program and
follow the instructions on the screen.
For other operating systems:
Please download Acrobat Reader from the Internet (http://www.adobe.com).
For other languages:
If you prefer using Acrobat Reader for languages other than those included in the CD-ROM, please
download the appropriate version from the Internet.
Accessing the PDF Manuals
For Windows:
1 Insert the CD-ROM in the CD-ROM drive.
2 Double click the “My Computer” icon.
3 Double click the “CD-ROM” drive.
4 Double click the “MANUALS” folder.
5 Double click the language (name of the
folder) that you want to view.
6 Double click the “A10” pdf file to access the
projector manuals.
For Macintosh:
1 Insert the CD-ROM in the CD-ROM drive.
2 Double click the “CD-ROM” icon.
3 Double click the “MANUALS” folder.
4 Double click the language (name of the
folder) that you want to view.
5 Double click the “A10” pdf file to access the
projector manuals.
Note
• If the desired pdf file cannot be opened by double clicking the mouse, start Acrobat Reader first, then
specify the desired file using the “File”, “Open” menu.
• See the “readme.txt” file on the CD-ROM for important information not included in this operation manual.
9
A10X_A10S#E_Print#p06_14.p65
9
03.2.4, 2:01 PM
Part Names
Numbers in
refer to the main pages in this operation manual where the topic is explained.
Projector (Front and Top View)
Power indicator
26
55
Illuminates red when the
projector is in standby.
When the power is turned
on, this indicator will
illuminate green.
Power ON/OFF
buttons
Illuminates green indicating
normal function. Replace
the lamp when the indicator
illuminates red.
26
55
27
For entering the Keystone
Correction mode.
AUTO SYNC button
29
38
For automatically
adjusting images when
connected to a computer.
Remote control
sensor
13
Exhaust vent
52
Foot release
(on the side of
the projector)
Temperature warning
indicator
When the internal
temperature rises, this
indicator will illuminate red.
For turning the power on or off.
KEYSTONE button
Lamp replacement
indicator
INPUT button
For switching input mode
1, 2 or 3.
27
Volume buttons
For adjusting the speaker
sound level or the
Keystone Correction.
21
22
Zoom knob
22
Focus ring
Speaker
Front adjustment foot
21
Attaching and removing the lens cap
• Press on the two buttons of the lens cap
and attach it to the lens, then release the
buttons to lock it in place.
• Press on the two buttons of the lens cap
and remove it from the lens.
10
A10X_A10S#E_Print#p06_14.p65
10
03.2.4, 2:01 PM
21
Foot release
21
Front adjustment
foot
53
Air filter/cooling
fan (Intake vent)
(on the bottom of
the projector)
Introduction
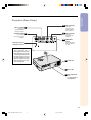
Projector (Rear View)
18
INPUT 1 terminal
Terminal for
computer RGB and
component signals.
RS-232C terminal
INPUT 2 terminal
Terminal for
connecting video
equipment with an
S-video terminal.
16
18
20
INPUT 3 terminal
Terminal for
connecting video
equipment.
For controlling
the projector using a
computer.
16
AUDIO INPUT
terminal
Shared audio input
terminal for INPUT
1, 2 and 3.
Kensington Security
Standard connector
Using the Kensington Lock
• This projector has a
Kensington Security Standard connector for use with
a Kensington MicroSaver
Security System. Refer to
the information that came
with the system for instructions on how to use it to secure the projector.
52
Intake vent
15
AC socket
21
Rear adjustment
foot
(on the bottom of
the projector)
11
A10X_A10S#E_Print#p06_14.p65
11
03.2.4, 2:01 PM
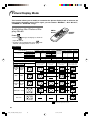
Part Names
Numbers in
refer to the main pages in this operation manual where the topic is explained.
Remote Control (Front View)
Power ON/OFF buttons
26
For turning the power on or off.
KEYSTONE button
32
For displaying adjustment and
setting screens.
29
For entering the Keystone
Correction mode.
MENU button
32
Adjustment buttons
(', ", \, |)
For selecting menu items.
UNDO button
29
For undoing an operation or
returning to the previous display.
FORWARD/BACK buttons
42
27
38
For switching to the respective
input modes.
27
AV MUTE button
For temporarily displaying the
black screen and turning off the
sound.
42
40
RESIZE button
For switching the screen size
(NORMAL, BORDER, etc).
For automatically adjusting images
when connected to a computer.
INPUT buttons
FREEZE button
For freezing images.
For enlarging or reducing part of
the image.
AUTO SYNC button
ENTER button
For setting items selected or
adjusted on the menu.
Same function as the [Page Down]
and [Page Up] keys on a computer
keyboard when using the Remote
Receiver (optional).
ENLARGE (Enlarge/Reduce)
buttons
35
27
Volume buttons
For adjusting the speaker sound
level.
12
A10X_A10S#E_Print#p06_14.p65
12
03.2.4, 2:01 PM
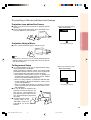
Using the Remote Control
Introduction
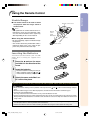
Usable Range
■ The remote control can be used to control
the projector within the ranges shown in
the illustration.
Remote control sensor
45°
Note
• The signal from the remote control can be reflected off a screen for easy operation. However, the effective distance of the signal may
differ depending on the screen material.
When using the remote control:
• Be sure not to drop, expose to moisture or high
temperature.
• The remote control may malfunction under a
fluorescent lamp. In this case, move the projector away from the fluorescent lamp.
30°
Remote
control
signal
transmitters
30°
23' (7 m)
Remote control
Inserting the Batteries
The batteries (two R-6 batteries (“AA” size, UM/
SUM-3, HP-7 or similar)) are supplied in the
package.
1
Press the ▲ mark on the cover
and slide it in the direction of the
arrow.
2
Insert the batteries.
3
Attach the cover and slide it until it clicks into place.
• Insert the batteries making sure the polarities correctly match the
and
marks inside the battery compartment.
Incorrect use of the batteries may cause them to leak or explode. Please follow the precautions below.
Caution
• Insert the batteries making sure the polarities correctly match the
and
marks inside the battery compartment.
• Batteries of different types have different properties, therefore do not mix batteries of different types.
• Do not mix new and old batteries.
This may shorten the life of new batteries or may cause old batteries to leak.
• Remove the batteries from the remote control once they have run out, as leaving them in can cause them to leak.
Battery fluid from leaked batteries is harmful to skin, therefore be sure to first wipe them and then remove them
using a cloth.
• The batteries included with this projector may run down in a short period, depending on how they are kept. Be
sure to replace them as soon as possible with new batteries.
• Remove the batteries from the remote control if you will not be using the remote control for a long time.
13
A10X_A10S#E_Print#p06_14.p65
13
03.2.4, 2:01 PM
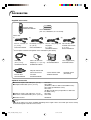
Accessories
Supplied accessories
Remote control
RRMCGA138WJSA
Two R-6 batteries
(“AA” size, UM/SUM-3, HP-7 or similar)
Power cord*
(1)
(2)
For U.S., Canada, etc.
(6' (1.8 m))
QACCDA016WJPZ
(4)
(3)
For Europe, except U.K. For U.K., Hong Kong and
(6' (1.8 m))
Singapore
QACCVA006WJPZ
(6' (1.8 m))
QACCBA015WJPZ
For Australia, New
Zealand and Oceania
(6' (1.8 m))
QACCLA005WJPZ
* Use the power cord that corresponds to the wall outlet in your country.
RGB cable
(9'10" (3.0 m))
QCNWGA012WJPZ
DIN-D-sub RS-232C
adaptor (5 57/64'' (15 cm))
QCNWGA015WJPZ
Extra air filter
PFILDA008WJZZ
Projector manual and
technical reference
CD-ROM
UDSKAA022WJN1
Carrying case
GCASNA006WJSA
“QUICK GUIDE” label
TLABZA191WJZZ
Lens cap (attached)
CCAPHA007WJ01
Operation manual
(this manual)
Optional accessories
■ 3 RCA to 15-pin D-sub cable (9'10'' (3.0 m))
■ Computer RGB cable (32'10'' (10.0 m))
■ 5 BNC to 15-pin D-sub cable (9'10'' (3.0 m))
■ RS-232C serial control cable (32'10" (10.0 m))
AN-C3CP
AN-C10BM
(for IBM-PC, NEC PC-9821 and PC-98NX series)
AN-C10MC (for Macintosh series)
AN-C10PC
(for NEC PC-98 series (Except NEC PC-9821 and
PC-98NX series))
AN-C3BN
AN-C10RS
■ Remote receiver
AN-MR1EL
Note
• Some of the cables may not be available depending on the region. Please check with your nearest Sharp
Authorized Projector Dealer or Service Center.
14
A10X_A10S#E_Print#p06_14.p65
14
03.2.4, 2:01 PM
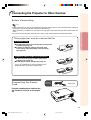
Connecting the Projector to Other Devices
Before Connecting
Note
Connections and Setup
• Before connecting, be sure to turn off both the projector and the devices to be connected. After making all
connections, turn on the projector and then the other devices.
When connecting a computer, be sure that it is the last device to be turned on after all the connections are
made.
• Be sure to read the operation manuals of the devices to be connected before making connections.
This projector can be connected to:
A computer using:
■ An RGB cable and a ø3.5 mm audio cable (commercially
available) (See page 16.)
■ A DIN-D-sub RS-232C adaptor and an RS-232C
serial control cable (AN-C10RS) (sold separately)
(See page 20.)
Component video or audio-visual equipment:
■ A VCR, Laser disc player or other audio-visual
equipment (See page 18.)
■ A DVD player or DTV* decoder (See page 19.)
*DTV is the umbrella term used to describe the new
digital television system in the United States.
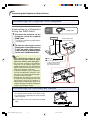
Connecting the Power
Cord
Supplied
accessory
Power cord
Plug the supplied power cord into the
AC socket on the rear of the projector.
15
A10X_A10S#E_Print#p15_20.p65
15
03.2.4, 2:02 PM
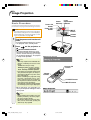
Connecting the Projector to Other Devices
Connecting the Projector to a Computer
Connecting to a Computer
Using the RGB Cable
1
Connect the projector to the
computer using the supplied
RGB cable.
Supplied
accessories
RGB cable
Computer
To RGB output terminal
• Secure the connectors by tightening the
thumbscrews.
2
To audio output terminal
To input an audio signal, connect
the projector to the computer using
a ø3.5 mm audio cable (commercially available or available as Sharp
service part QCNWGA013WJPZ).
Note
• When connecting the projector to a computer in this way, select “RGB” for “Signal
Type” in the “Picture” menu. See page 37.
• See page 62 “Computer Compatibility
Chart” for a list of computer signals compatible with the projector. Use with computer
signals other than those listed may cause
some of the functions to not work.
• A Macintosh adaptor may be required for
use with some Macintosh computers. Contact your nearest Sharp Authorized Projector Dealer or Service Center.
• Depending on the computer you are using,
an image may not be projected unless the
signal output setting of the computer is
switched to the external output. Refer to the
computer operation manual for switching the
computer signal output settings.
1 RGB cable
2 ø3.5 mm audio cable
(commercially available or
available as Sharp service
part QCNWGA013WJPZ)
Connecting the thumbscrew cables
■ Connect the thumbscrew cable making sure that it
fits correctly into the terminal. Then, firmly secure
the connectors by tightening the screws on both
sides of the plug.
■ Do not remove ferrite cores attached to the RGB
cable.
Ferrite core
16
A10X_A10S#E_Print#p15_20.p65
16
03.2.4, 2:02 PM
“Plug and Play” function (when connecting to a 15-pin terminal)
■ This projector is compatible with VESA-standard DDC 1/DDC 2B. The projector and a VESA DDC
compatible computer will communicate their setting requirements, allowing for quick and easy setup.
■ Before using the “Plug and Play” function, be sure to turn on the projector first and the connected
computer last.
Connections and Setup
Note
• The DDC “Plug and Play” function of this projector operates only when used in conjunction with a VESA
DDC compatible computer.
17
A10X_A10S#E_Print#p15_20.p65
17
03.2.4, 2:02 PM
Connecting the Projector to Other Devices
Connecting to Video Equipment
Connecting to Video
Equipment Using an
S-video, a Composite
Video or an Audio Cable
VCR or other audio-visual equipment
To S-video output terminal
To video output terminal
To audio output terminal
Using an S-video, video, or audio cable, a VCR,
laser disc player or other audio-visual equipment
can be connected to INPUT 2, INPUT 3 and AUDIO input terminals.
1
Connect the projector to the
video equipment using an Svideo cable or a composite video
cable (both commercially available).
2 ø3.5 mm minijack to RCA audio cable
2
(commercially available)
Connect the projector to the
video equipment using a ø3.5
mm minijack to RCA audio cable
(commercially available).
1 Composite video cable
(commercially available)
1 S-video cable
(commercially available)
Note
• The INPUT 2 (S-VIDEO) terminal uses a
video signal system in which the picture is
separated into color and luminance signals
to realize a higher-quality image. To view a
higher-quality image, use a commercially
available S-video cable to connect the INPUT 2 terminal on the projector and the Svideo output terminal on the video equipment.
• A ø3.5 mm minijack to RCA audio cable
(commercially available) is required for audio input.
18
A10X_A10S#E_Print#p15_20.p65
18
03.2.4, 2:02 PM
Connecting to
Component Video
Equipment
*DTV is the umbrella term used to describe the
3RCA to 15-pin D-sub cable
Type: AN-C3CP
(9'10" (3.0 m))
To analog component output terminal
Connections and Setup
Use a 3 RCA to 15-pin D-sub cable when connecting to the INPUT 1 terminal, component
video equipment such as DVD players and DTV*
decoders.
Optional
cable
To audio output terminal
DVD player or
DTV* decoder
new digital television system in the United
States.
1
Connect the projector to the
video equipment using the 3
RCA to 15-pin D-sub cable.
2
Connect the projector to the
video equipment using a ø3.5
mm minijack to RCA audio cable
(commercially available).
1 3 RCA to 15-pin D-sub cable
(sold separately)
2 ø3.5 mm minijack to RCA audio cable
(commercially available)
Note
• When connecting the projector to the
video equipment in this way, select
“Component” for “Signal Type” in the
“Picture” menu. See page 37.
• A ø3.5 mm minijack to RCA audio cable
(commercially available) is required for audio input.
19
A10X_A10S#E_Print#p15_20.p65
19
03.2.4, 2:02 PM
Connecting the Projector to Other Devices
Controlling the Projector Using a Computer
Connecting to a
Computer Using a DIN-Dsub RS-232C Adaptor
and an RS-232C Serial
Control Cable
When the RS-232C terminal on the projector is
connected to a computer with a DIN-D-sub RS232C adaptor and an RS-232C serial control
cable (cross type, sold separately), the computer can be used to control the projector and
check the status of the projector. See page 61
for details.
1
2
Supplied
accessory
Optional
cable
DIN-D-sub
RS-232C adaptor
RS-232C serial control cable
Type: AN-C10RS (32'10" (10.0 m))
Computer
Connect the supplied DIN-D-sub
RS-232C adaptor to an RS-232C
serial control cable (sold separately).
Use the above cables to connect
the projector and the computer.
DIN-D-sub
RS-232C
adaptor
To RS-232C terminal
Note
• Do not connect or disconnect an RS-232C
serial control cable to or from the computer
while it is on. This may damage your computer.
• The RS-232C function may not operate if
your computer terminal is not correctly set
up. Refer to the operation manual of the
computer for details.
• See page 60 for connection of an RS-232C
serial control cable.
20
A10X_A10S#E_Print#p15_20.p65
20
03.2.4, 2:02 PM
RS-232C serial
control cable
(sold separately)
Setup
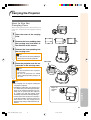
Using the Adjustment
Feet
Rear adjustment foot
(on the bottom)
The height of the projector can be adjusted using the adjustment feet at the front and rear of
the projector when the surface the projector is
placed on is uneven or when the screen is
slanted.
The projection of the image can be made higher
by adjusting the projector when it is in a lower
place than the screen.
While pressing the foot releases
on both sides, lift the projector
to adjust its height and then remove your fingers from the foot
releases.
2
Rotate the adjustment feet at the
front of the projector for fine
adjustment.
Connections and Setup
1
Foot release
(on the other side of
the projector as well)
Front adjustment feet
• You can adjust the projection by using
the rear adjustment foot on the bottom
of the projector when the projector is positioned at the higher place than the
screen.
Note
• When returning the projector to its original
position, hold the projector firmly, press the
foot releases and then gently lower it.
• The projector is adjustable up to approximately 12 degrees at the front and 3 degrees at the back from the standard position.
Info
• Do not press the foot releases when the adjustment feet are extended without firmly
holding the projector.
• Do not hold the lens when lifting or lowering the projector.
• When lowering the projector, be careful not
to get your fingers caught in the area between the adjustment foot and the projector.
21
A10X_A10S#E_Print#p21_25.p65
21
03.2.4, 2:02 PM
Setup
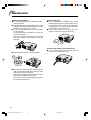
Adjusting the Lens
Focus
Focusring
ring
Zoomknob
knob
Zoom
The image is focused and adjusted to the desired size using the focus ring or zoom knob
on the projector.
1
Adjust the focus by rotating the
focus ring.
2
Adjust zooming by moving the
zoom knob.
ut
mo
Zoo
m in
Zoo
22
A10X_A10S#E_Print#p21_25.p65
22
03.2.4, 2:02 PM
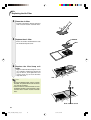
Setting up the Screen
Position the projector perpendicular to the screen with all feet flat and level to achieve an optimal image.
Note
Connections and Setup
• The projector lens should be centered in the middle of the screen. If the horizontal line passing through the
lens center is not perpendicular to the screen, the image will be distorted, making viewing difficult.
• For an optimal image, position the screen so that it is not in direct sunlight or room light. Light falling directly
on the screen washes out the colors, making viewing difficult. Close the curtains and dim the lights when
setting up the screen in a sunny or bright room.
• A polarizing screen cannot be used with this projector.
Standard Setup (Front Projection)
■ Place the projector at the required distance from
the screen according to the desired picture size.
(See page 24.)
Example of standard setup
• The distance from the screen to the projector
Side View
may vary depending on the size of the screen.
P.24
90°
• The default setting can be used, when placing the
Audience
projector in front of the screen. If the projected image is reversed or inverted, readjust the setting to
“Front” in the “PRJ Mode” menu.
P.50
Top View
• Place the projector so that an imaginary horizon-
tal line that passes through the center of the lens
is perpendicular to the screen.
90°
23
A10X_A10S#E_Print#p21_25.p65
23
03.2.4, 2:02 PM
Setup
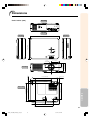
Screen Size and Projection Distance
Base line:
Horizontal line passing through the lens center
Screen
Lens center
H
L:Projection distance
NORMAL Mode (4:3)
Picture (Screen) size
Diag. (χ)
Width
Projection distance (L)
Height
300" (762 cm) 240" (610 cm) 180" (457 cm)
Maximum (L1)
Minimum (L2)
38' 9" (11.8 m)
32' 2" (9.8 m)
Distance from the lens center
to the bottom of the image (H)
18 3/16" (46.2 cm)
250" (635 cm) 200" (508 cm) 150" (381 cm)
32' 2"
(9.8 m)
26'11" (8.2 m)
15
5/32"
200" (508 cm) 160" (406 cm) 120" (305 cm)
25'11"
(7.9 m)
21' 4" (6.5 m)
12
1/8"
150" (381 cm) 120" (305 cm) 90" (229 cm)
19' 4"
(5.9 m)
16' 1" (4.9 m)
9 3/32" (23.1 cm)
100" (254 cm) 80" (203 cm) 60" (152 cm)
12'10"
(3.9 m)
10' 6" (3.2 m)
6 1/16" (15.4 cm)
84" (213 cm) 67" (170 cm) 50" (128 cm)
10'10"
(3.3 m)
8'10" (2.7 m)
5 3/32" (12.9 cm)
72" (183 cm) 58" (147 cm) 43" (110 cm)
9' 2"
(2.8 m)
7' 7" (2.3 m)
4 23/64" (11.1 cm)
60" (152 cm) 48" (122 cm) 36" (91 cm)
7' 7"
(2.3 m)
6' 3" (1.9 m)
3 41/64"
(9.2 cm)
40" (102 cm) 32" (81 cm)
4'11"
(1.5 m)
4' 3" (1.3 m)
2 27/64"
(6.2 cm)
24" (61 cm)
(38.5 cm)
(30.8 cm)
The formula for picture size and
projection distance
[Feet/inches]
L1 (ft) = (0.0396χ – 0.0546) / 0.3048
L2 (ft) = (0.0330χ – 0.0546) / 0.3048
H (in) = 0.0606χ
[m/cm]
L1 (m) = 0.0396χ – 0.0546
L2 (m) = 0.0330χ – 0.0546
H (cm) = 0.0606χ × 2.54
χ: Picture size (diag.) (in/cm)
L: Projection distance (ft/m)
L1: Maximum projection distance (ft/m)
L2: Minimum projection distance (ft/m)
H: Distance from the lens center to
the bottom of the image (in/cm)
STRETCH Mode (16:9)
Picture (Screen) size
Diag. (χ)
Width
Projection distance (L)
Height
Maximum (L1)
Minimum (L2)
Distance from the lens center
to the bottom of the image (H)
(8.9 m)
–4 33/64" (–11.5 cm)
26' 3"
(8.0 m)
–4 1/16" (–10.3 cm)
23' 3"
(7.1 m)
–3 39/64" (–9.2 cm)
17' 5"
(5.3 m)
–2 45/64" (–6.9 cm)
15' 5"
(4.7 m)
–2 13/32" (–6.1 cm)
(4.5 m)
12' 6"
(3.8 m)
–1 59/64" (–4.9 cm)
(4.3 m)
11' 6"
(3.5 m)
–1 13/16" (–4.6 cm)
12'10"
(3.9 m)
10' 10"
(3.3 m)
–1 21/32" (–4.2 cm)
11'10"
(3.6 m)
9' 10"
(3.0 m)
–1 33/64" (–3.9 cm)
72" (183 cm) 63" (159 cm) 35" (90 cm)
10' 2"
(3.1 m)
8' 2"
(2.5 m)
–1 19/64" (–3.3 cm)
60" (152 cm) 52" (133 cm) 29" (75 cm)
8' 2"
(2.5 m)
6' 11"
(2.1 m)
–1 5/64" (–2.8 cm)
40" (102 cm) 35" (89 cm)
5' 7"
(1.7 m)
4' 7"
(1.4 m)
– 23/32" (–1.8 cm)
250" (635 cm) 218" (553 cm) 123" (311 cm)
35' 1" (10.7 m)
225" (572 cm) 196" (498 cm) 110" (280 cm)
31'10"
(9.7 m)
200" (508 cm) 174" (443 cm) 98" (249 cm)
28' 3"
(8.6 m)
150" (381 cm) 131" (332 cm) 74" (187 cm)
21'
(6.4 m)
133" (338 cm) 116" (294 cm) 65" (166 cm)
18' 8"
(5.7 m)
106" (269 cm) 92" (235 cm) 52" (132 cm)
14' 9"
100" (254 cm) 87" (221cm)
49" (125 cm)
14' 1"
92" (234 cm) 80" (204 cm) 45" (115 cm)
84" (213 cm) 73" (186 cm) 41" (105 cm)
20" (50 cm)
29' 2"
The formula for picture size and
projection distance
[Feet/inches]
L1 (ft) = (0.04314χ – 0.0546) / 0.3048
L2 (ft) = (0.03595χ – 0.0546) / 0.3048
H (in) = – 0.01807χ
[m/cm]
L1 (m) = 0.04314χ – 0.0546
L2 (m) = 0.03595χ – 0.0546
H (cm) = – 0.01807χ × 2.54
Note
• There may be an error of ± 3% in the above values.
• Values with a minus (–) sign indicate the distance from the lens center below the bottom of the image.
24
A10X_A10S#E_Print#p21_25.p65
24
03.2.4, 2:02 PM
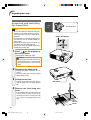
Projecting a Reversed/Inverted Image
Projection from behind the Screen
■ Place a translucent screen between the projector and the
audience.
■ Reverse the image by setting “Rear” in the “PRJ Mode” menu.
See page 50 for use of this function.
Connections and Setup
Projection Using a Mirror
When using the default setting.
▼On-screen Display
The image is reversed.
■ Place a mirror (normal flat type) in front of the lens.
Info
• When using a mirror, be sure to carefully position both the
projector and the mirror so the light does not shine into the
eyes of the audience.
Ceiling-mount Setup
■ It is recommended that you use the optional Sharp ceilingmount bracket for this installation.
Before mounting the projector, contact your nearest Sharp
Authorized Projector Dealer or Service Center to obtain the
recommended ceiling-mount bracket (sold separately.)
• AN-PGCM95 ceiling-mount bracket, its AN-EP101B
extension tube and AN-JT299 universal bracket, adaptor
for non-level ceiling installation (for U.S.A.).
• BB-A10T ceiling adaptor, its BB-NVHOLDER280, BBNVHOLDER550, BB-NVHOLDER900 ceiling mount
systems (for GERMANY).
• AN-A10T ceiling-mount bracket, its AN-TK201 and ANTK202 extension tubes (for countries other than the U.S.A.
and GERMANY).
■ Be sure to adjust the position of the
projector to match the distance (H)
from the lens center position (see
page 24) to the lower edge of the image, when mounting the projector on
the ceiling.
■ Invert the image by setting
“Ceiling+Front” in the
“PRJ Mode” menu. See
page 50 for use of this
function.
When using the default setting.
▼On-screen Display
The image is inverted.
25
A10X_A10S#E_Print#p21_25.p65
25
03.2.4, 2:02 PM
Image Projection
Basic Procedure
Connect the required external equipment to the projector before carrying out the following procedures.
Info
Lamp
Power
replacement
indicator indicator
Power ON
button
Power OFF
button
INPUT
button
• The language preset at the factory is English.
If you want to change the on-screen display to
another language, reset the language according to the procedure on page 28.
1
Volume
buttons
Plug the power cord into the wall
outlet.
• The power indicator illuminates red, and
the projector enters standby mode.
2
Press
on the projector or
on the remote control.
• The power indicator illuminates green.
After the lamp replacement indicator illuminates and the warming up message
on the display disappears, the projector
is ready to start operation.
▼Warming up message
Note
• The lamp replacement indicator illuminates, indicating the status of the
lamp.
Green: The lamp is ready.
Blinking in green: The lamp is warming
up and shutting down.
Red: The lamp should be replaced.
• If the power is turned off and immediately switched on again, the lamp replacement indicator may take some
time to illuminate.
• When controlling the projector using
RS-232C commands from a computer, wait for at least 30 seconds after the power has been turned on, and
then transmit the commands.
• The projector cannot be operated while
the warming up message is displayed.
• When “Anti-Theft” (see page 48) is set,
the keycode input box will appear. Enter
the keycode.
Power ON
button
Volume
buttons
AV MUTE button
INPUT buttons
▼Keycode input box
Note
• When entering the keycode, press the
buttons previously set on the projector or the remote control.
• For details about the Anti-Theft function, refer to “Anti-Theft (Setting the
Anti-Theft)” on page 48.
26
A10X_A10S#E_Print#p26_31.p65
26
03.2.4, 2:04 PM
"On-screen Display (Example)
Press
,
or
on the
remote control to select the INPUT mode.
• After pressing
use
Using RGB
once on the projector,
to select the desired input mode.
Note
INPUT 2 mode
Using S-Video
INPUT 3 mode
Using Video
➝
Basic Operation
About the INPUT mode
INPUT 1 Used for projecting im(RGB/
ages from equipment that
Component) sends RGB signals or
component signals connected to the RGB input
terminal.
INPUT 2 Used for projecting im(S-Video) ages from equipment
connected to the SVIDEO input terminal.
INPUT 3 Used for projecting im(Video)
ages from equipment
connected to the VIDEO
input terminal.
Using
Component
➝
• When no signal is received, “NO SIGNAL” will be displayed. When a signal
that the projector is not preset to receive is received, “NOT REG.” will be
displayed.
• The INPUT mode is not displayed
when “OSD Display” is set to “OFF”.
(See page 44.)
4
INPUT 1 mode
➝
3
Press
or
on the remote
control to adjust the volume.
Note
• Pressing
will lower the volume.
Pressing
will raise the volume.
• On the projector, the volume can be
or
.
adjusted by pressing
5
Press
on the remote control to temporarily display a
black screen and turn off the
sound.
Note
• Pressing
again will turn the projected image and sound back on.
27
A10X_A10S#E_Print#p26_31.p65
27
03.2.4, 2:04 PM
Image Projection
6
Press
on the projector or
on the remote control, then
press that button again while the
confirmation message is displayed, to turn off the projector.
Power OFF
button
ENTER
button
MENU button
', ", \, |
buttons
Note
• If you accidentally pressed
or
and do not want to turn off the
power, wait until the confirmation
message disappears.
• The projector cannot be operated
while a message “Shutting down.
Please wait.” is displayed.
Info
• Do not unplug the power cord during
projection or cooling fan operation.
This can cause damage due to rise
in internal temperature, as the cooling fan also stops.
Selecting the On-screen
Display Language
The on-screen display language of the projector can be set to English, German, Spanish,
Dutch, French, Italian, Swedish, Portuguese,
Chinese, Korean or Japanese. For operating the
menu screen, see pages 32 to 35.
1
Press
trol.
on the remote con-
• The “Picture” menu will be displayed.
2
“Language” menu icon
Press \ or | to select the “Language” menu icon.
• The “Language” menu will be displayed.
3
Press ' or " to select the desired language, and then press
.
4
Press
.
• The desired language will be set as the
on-screen display.
28
A10X_A10S#E_Print#p26_31.p65
28
03.2.4, 2:04 PM
Keystone Correction (Correcting Trapezoidal Distortion)
Correcting Trapezoidal
Distortion
This function allows for Keystone (On-screen
Trapezoidal Distortion) Correction.
KEYSTONE
button
UNDO
button
', ", \, |
buttons
Note
• When the image is projected either from the
top or from the bottom towards the screen
at an angle, the image becomes distorted
trapezoidally.
The function for correcting trapezoidal distortion is called Keystone Correction.
• The Keystone Correction can be adjusted up
to an angle of approximately ±35 degrees.
1
.
• You can also use
on the projector.
Press ', ", \ and | to adjust
the Keystone correction.
Basic Operation
2
Press
Compresses
upper side.
• You can also adjust the Keystone correction using the
or
buttons on the projector.
Note
• Since the trapezoidal distortion of the
image can be corrected up to an angle
of approximately ±35 degrees, the actual screen can be diagonally set up
to that angle as well.
Compresses
lower side.
to make the default set• Press
ting.
• Straight lines or the edges of images
may appear jagged while adjusting
the image.
3
Press
.
• You can also use
on the projector.
Note
• You can use the same settings used
in NORMAL mode 4:3 for 16:9.
29
A10X_A10S#E_Print#p26_31.p65
29
03.2.4, 2:04 PM
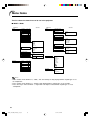
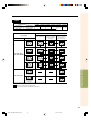
Menu Items
This list shows the items that can be set in the projector.
■ INPUT 1 Mode
Main menu
Picture
Page 36
Sub menu
Contrast
−30
+30
Bright
−30
+30
Color
−30
+30
Tint
−30
+30
Sharp
−30
+30
Red
−30
+30
Blue
−30
+30
Main menu
Options
Page 44
Sub menu
Lamp Timer (Life)
OSD Display [ON/OFF]
Background
Eco Mode [Eco/Standard]
Auto Power Off [ON/OFF]
Menu Position
Reset
CLR Temp
5500 K
6500 K
7500 K
8500 K
9300 K
10500 K
Gamma
Standard
Presentation
Cinema
Game
Signal Type
RGB
Component
Memory
Memory 1
Memory 5
Memory OFF
Clock
−30
+30
Phase
−15
+15
H-Pos
−30
+30
V-Pos
−30
+30
Center
Upper Right
Lower Right
Upper Left
Lower Left
Menu Color
[Opaque/Translucent]
Password
Old Password
New Password
Reconfirm
Anti-Theft
Old Code
New Code
Reconfirm
sRGB [ON/OFF]
Fine Sync
Page 38
Sharp
Blue
None
Language
Page 28
English
Deutsch
Español
Nederlands
Français
Italiano
Svenska
Português
Reset
Special Modes
PRJ Mode
Page 50
Signal Info
Front
Ceiling+Front
Rear
Ceiling+Rear
Note
• In the “Picture” menu of INPUT 1, “Color”, “Tint” and “Sharp” are only displayed when “Signal Type” is set
to “Component”.
• In the “Picture” menu of INPUT 1, “sRGB” is only displayed when “Signal Type” is set to “RGB”.
• In the “Fine Sync” menu of INPUT 1, “Signal Info” can only be selected when “Signal Type” is set to
“Component”.
30
A10X_A10S#E_Print#p26_31.p65
30
03.2.4, 2:04 PM
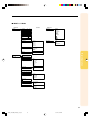
■ INPUT 2 / 3 Mode
Main menu
Picture
Page 36
Sub menu
Contrast
−30
+30
Bright
−30
+30
Color
−30
+30
Tint
−30
+30
Sharp
−30
+30
Red
−30
+30
Blue
−30
+30
Main menu
Language
Page 28
English
Deutsch
Español
Nederlands
Français
Italiano
Svenska
Português
Reset
Page 44
5500 K
6500 K
7500 K
8500 K
9300 K
10500 K
Gamma
Standard
Presentation
Cinema
Game
Memory
Memory 1
Memory 5
Memory OFF
PRJ Mode
Page 50
Front
Ceiling+Front
Rear
Ceiling+Rear
Basic Operation
Options
CLR Temp
Lamp Timer (Life)
OSD Display [ON/OFF]
Video System
Auto
PAL
NTSC3.58
SECAM
NTSC4.43
PAL-M
PAL-N
PAL-60
Background
Sharp
Blue
None
Eco Mode [Eco/Standard]
Auto Power Off [ON/OFF]
Menu Position
Center
Upper Right
Lower Right
Upper Left
Lower Left
Menu Color
[Opaque/Translucent]
Password
Old Password
New Password
Reconfirm
Anti-Theft
Old Code
New Code
Reconfirm
31
A10X_A10S#E_Print#p26_31.p65
31
03.2.4, 2:04 PM
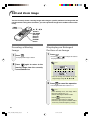
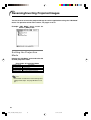
Using the Menu Screen
The menu screens allow you to adjust the image and various projector settings.
You can operate the menus from the remote control using the following procedure.
Example: “Picture” menu screen for
INPUT 1 (RGB) mode
Menu Selections
(Adjustments)
1
Press
.
• The “Picture” menu screen for the selected input mode is displayed.
ENTER
button
UNDO
button
MENU button
', ", \, |
buttons
Note
• The on-screen display shown on the
right is displayed when the INPUT 1
(RGB) mode is selected.
2
Press \ or | to display the other
menu screens.
Menu icons
• The menu icon for the selected menu
screen is highlighted.
Menu icon
Menu screen
Picture
Fine Sync
Options
Language
PRJ Mode
Note
• The “Fine Sync” menu is not available
for INPUT 2 or 3.
• For details on the menus, see the tree
charts on pages 30 and 31.
32
A10X_A10S#E_Print#p32_39.p65
32
03.2.4, 2:05 PM
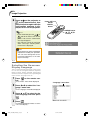
3
Press ' or " to select the item
you want to adjust.
• The selected item is highlighted.
Note
• To display a single adjustment item,
press
after selecting the item.
Only the selected adjustment item will
be displayed.
Then if you press ' or ", the following item (“Red” after “Bright”) will be
displayed.
• Press
to return to the previous
screen.
4
Basic Operation
Press \ or | to adjust the item
selected.
• The adjustment is stored.
5
Press
.
• The menu screen will disappear.
33
A10X_A10S#E_Print#p32_39.p65
33
03.2.4, 2:05 PM
Using the Menu Screen
Menu Selections
(Settings)
1
Press
.
• The “Picture” menu screen for the selected input mode is displayed.
ENTER
button
UNDO
button
MENU button
', ", \, |
buttons
Note
• The on-screen display shown on the
right is displayed when INPUT 1 (RGB)
mode is selected.
Menu icons
2
Press \ or | to display the other
menu screens.
• The menu icon for the selected menu
screen is highlighted.
Menu icon
Menu screen
Picture
Fine Sync
Options
Language
PRJ Mode
Note
• The “Fine Sync” menu is not available
for INPUT 2 or 3.
• For details on the menus, see the tree
charts on pages 30 and 31.
34
A10X_A10S#E_Print#p32_39.p65
34
03.2.4, 2:05 PM
3
Press ' or " to select the
item you want to set, and then
press | to display the sub menu.
• The selected item is highlighted.
Note
• Press
or \ to return to the previous screen.
• For some items, press \ or | to se”.
lect the icon using “
Sub menu
Press ' or " to select the setting of the item displayed in the
sub menu.
5
Press
6
Press
Basic Operation
4
.
• The item selected is set.
.
• The menu screen will disappear.
35
A10X_A10S#E_Print#p32_39.p65
35
03.2.4, 2:05 PM
Picture Adjustment
You can adjust the projector’s picture to your preferences using the “Picture” menu. For
operation of the menu screen, see pages 32 to 35.
Example: “Picture” screen menu for
INPUT 1 (RGB) mode
Adjusting the Image
Select the item on the “Picture” menu and
adjust the image.
Description of Adjustment Items
Selectable items
Contrast
Bright
Color
Tint
Sharp
Red
Blue
Press \
Press |
for less contrast.
for less brightness.
for less color intensity.
for making skin tones purplish.
for less sharpness.
for weaker red.
for weaker blue.
for more contrast.
for more brightness.
for more color intensity.
for making skin tones greenish.
for more sharpness.
for stronger red.
for stronger blue.
Note
• “Color”, “Tint” and “Sharp” are not displayed
when selecting INPUT 1 and setting the “Signal Type” to “RGB”.
• “Sharp” can be adjusted when 480I, 480P, 540P,
580I, 580P, 720P, 1035I or 1080I signals are
detected while “Signal Type” for INPUT 1 is set
to “Component”.
• To reset all adjustment items, select “Reset” and
press
CLR Temp
(Adjusting the
Color Temperature)
Select “CLR Temp” on the “Picture” menu
and the desired color temperature setting.
Description of Color Temperature Settings
Selectable settings
5500K
6500K
7500K
8500K
9300K
10500K
Description
For lower color temperature for warmer,
reddish incandescent-like images.
For higher color temperature for cooler, bluish, fluorescent-like images.
Note
• Values for “CLR Temp” are only approximations.
.
36
A10X_A10S#E_Print#p32_39.p65
36
03.2.4, 2:05 PM
Gamma (Gamma Correction)
Gamma is an image quality enhancement function
that offers a richer image by brightening the darker
portions of the image without altering the brightness of the brighter portions.
When you are displaying images with frequent dark
scenes, such as a film or concert, or when you are
displaying images in a bright room, this feature
makes the dark scenes easier to see and gives the
impression of greater depth in the image.
Select “Gamma” on the “Picture” menu and
the desired gamma mode.
Description of Gamma Modes
Note
• Gamma is not available for INPUT 1 when
“sRGB” on the “Picture” menu is set to “ON”.
Setting)
Select “Signal Type” on the “Picture” menu
and set it to “RGB” or “Component” for INPUT 1.
Description of Signal Type Settings
Selectable settings
Description
RGB
Set when RGB signals are received.
Component Set when Component signals are
received.
Memory (Storing and Selecting the
Adjustment Settings)
Use this function to store the adjustment settings
on the “Picture” menu. No matter which input mode
or signal type is selected, you can select and apply
the settings you have stored in a memory location.
Select “Memory” on the “Picture” menu and
the memory location where you want to store
the settings. Then adjust the setting items
on the “Picture” menu.
Description of Memory Positions
Selectable
settings
sRGB
(sRGB Setting)
Select “sRGB” on the “Picture” menu and set
it to “
(ON)” when you want to display
the image in a natural tint based on an original image.
Note
• When “sRGB” is set to “ON”;
• Gamma is not available.
• “Red”, “Blue” or “CLR Temp” on the “Picture”
menu cannot be adjusted.
• For additional information about the sRGB function, visit “http://www.srgb.com/”.
Info
(Signal Type
Basic Operation
Selectable settings
Description
Standard
For standard image
Presentation
Brightens darker portions of image for
more enhanced presentations.
Cinema
Gives greater depth to darker portions
of image for a more exciting theater
experience.
Game
For natural color gradation for playing
a game, etc.
Signal Type
Memory
Memory
Memory
Memory
Memory
Description
1
2
3
4
5
Settings of all items on the “Picture”
menu can be stored in memory location.
The stored settings can be selected in
any input mode.
Memory OFF Besides “Memory 1” to “Memory 5”, other
settings on the “Picture” menu can be
stored for each input mode. The settings
stored in “Memory OFF” cannot be applied
when another input mode is selected.
If you want to apply the stored settings on
the “Picture” menu, select “Memory” on the
“Picture” menu and the memory location
where you have stored the settings.
Note
• When “sRGB” is set to “ON”, the projected image may become dark, but this does not indicate a malfunction.
• You can change the stored settings after selecting the memory location for those settings.
37
A10X_A10S#E_Print#p32_39.p65
37
03.2.4, 2:05 PM
Computer Image Adjustment
Using the “Fine Sync” menu, you can adjust the computer image, match the computer display mode, and check the input signal. For operation of the menu screen, see pages 32 to 35.
Example: “Fine Sync” menu screen for
INPUT 1 mode
Adjusting the Computer
Image
In case of irregularities such as vertical stripes or
flickering in portions of the screen, adjust “Clock”,
“Phase”, “H-Pos” or “V-Pos” to obtain an optimal
computer image.
Select the item on the “Fine Sync” menu
and adjust the computer image.
Special Modes
(Special
Mode Settings)
Ordinarily, the type of input signal is detected and
the correct resolution mode is automatically selected.
However, for some signals, the optimal resolution
mode in “Special Modes” on the “Fine Sync” menu
may need to be selected to match the computer display mode.
Select “Special Modes” on the “Fine Sync”
menu and the appropriate resolution.
Description of Adjustment Items
Selectable items
Use \ and | to
Clock
adjust vertical noise.
Phase
adjust horizontal noise (similar to tracking
on your VCR).
H-Pos
center the on-screen image by moving it to
the left or right.
V-Pos
center the on-screen image by moving it up
or down.
Note
Note
• Avoid displaying computer patterns which repeat
every other line (horizontal stripes).
(Flickering may occur, making the image hard to
see.)
• When a DVD player or Digital Video is connected,
select 480P as the input signal.
• See “Signal Info (Checking the Input Signal)” on
the next page for information on the currently selected input signal.
• You can automatically adjust the computer image by pressing
on the projector or
on the remote control.
• To reset all adjustment items, select “Reset” and
press
.
38
A10X_A10S#E_Print#p32_39.p65
38
03.2.4, 2:05 PM
Signal Info
(Checking the
Input Signal)
Select “Signal Info” on the “Fine Sync” menu
to check the current input signal information.
Note
• The projector will display the number of
scanned lines available from audio-visual
equipment such as a DVD player or Digital
Video.
Basic Operation
39
A10X_A10S#E_Print#p32_39.p65
39
03.2.4, 2:05 PM
Picture Display Mode
This function allows you to modify or customize the picture display mode to enhance the
input image. Depending on the input signal, you can choose “NORMAL”, “DOT BY DOT”,
“BORDER” or “STRETCH” image.
Switching the Picture Display Mode
Press
UNDO
button
RESIZE
button
.
• Pressing
changes the display as shown on
pages 40 and 41.
• To return to the standard image, press
“RESIZE” is displayed on the screen.
while
COMPUTER
DOT BY DOT
BORDER
PG-A10X
PG-A10S
PG-A10X
PG-A10S
800 × 600
—
—
1024 × 768
800 × 600
768 × 576
600 × 450
1280 × 960 1280 × 960
1400 × 1050 1400 × 1050
750 × 600 1280 × 1024 1280 × 1024 720 × 576
562 × 450
—
—
—
—
—
NORMAL
PG-A10X
PG-A10S
4:3 aspect ratio
Other aspect ratios
SVGA (800 × 600)
XGA (1024 × 768)
SXGA (1280 × 960)
SXGA+ (1400 × 1050)
SXGA (1280 × 1024)
1280 × 720
Input Signal
Computer
PG-A10X
PG-A10S
Image type
1024 × 768
960 × 768
—
1024 × 576
800 × 450
960 × 576
1024 × 576
750 × 450
800 × 450
Output screen image
NORMAL
Projects a full screen
image while maintaining
the aspect ratio.
*
Resolution Resolution
lower than lower than
XGA
SVGA
STRETCH
PG-A10X
PG-A10S
DOT BY DOT
Projects the original
resolution signal of
the image.
*
BORDER
STRETCH
Projects 4:3 image fully
Projects 16:9 image
in STRETCH (the following evenly over entire screen
column) image.
(top/bottom blank bands).
*
4:3 aspect ratio
XGA
*
*
*
*
*
*
SVGA
4:3 aspect ratio
Resolution Resolution
higher than higher than
XGA
SVGA
4:3 aspect ratio
SXGA (1280 × 1024)
5:4 aspect ratio
*
1280 × 720
16:9 aspect ratio
*
Mode for projecting an image with the original aspect ratio without cutting any portions.
: Cutout area on which images cannot be projected.
: Area where the signals are off screen.
40
A10X_A10S#E_Print#p40_50.p65
40
03.2.4, 3:02 PM
VIDEO
NORMAL
PG-A10X
PG-A10X
480I, 480P, 540P,
NTSC, PAL, SECAM
720P, 1080I
4:3 aspect ratio.
Letter box, squeeze
16:9 aspect ratio
BORDER
PG-A10X
PG-A10S
STRETCH
PG-A10X
PG-A10S
1024 × 768
800 × 600
768 × 576
600 × 450
—
—
—
—
1024 × 576
800 × 450
• “STRETCH” is fixed when 720P or 1080I signals are entered.
Output screen image
Input Signal
DVD / Video
NORMAL
BORDER
STRETCH
Projects a full screen image.
Projects 4:3 image fully in
STRETCH (the following
column) image.
Projects 16:9 image evenly
over entire screen
(top/bottom black bands).
Image type
*
*
*
*
4:3 aspect ratio
480I, 480P, 540P,
NTSC, PAL, SECAM
Letter box
*
Squeezed 16:9 image
*
Squeezed 4:3 image
Easy to Use Functions
*
16:9 aspect ratio
720P, 1080I (16:9)
*
16:9 aspect ratio
(4:3 aspect ratio in
16:9 screen)
* Mode for projecting an image with the original aspect ratio without cutting any portions.
: Cutout area on which images cannot be projected.
: Area on which the image is not included in the original signals.
41
A10X_A10S#E_Print#p40_50.p65
41
03.2.4, 2:06 PM
Still and Zoom Image
You can instantly freeze a moving image and enlarge a specific portion of an image with the
remote control. Using these functions, you can explain the image to the audience more effectively.
UNDO
button
', ", \, |
buttons
ENLARGE
(Enlarge/
Reduce)
buttons
FREEZE
button
Freezing a Moving
Image
1
Press
Displaying an Enlarged
Portion of an Image
1
.
Press
.
• Pressing
or
the projected image.
• The projected image is frozen.
enlarges or reduces
Note
2
Press
again to return to the
moving image from the currently
connected device.
×1 ×2 ×3 ×4 ×9 ×16 ×36 ×64
• You can change the location of the enlarged image using ', ", \ and |.
2
Press
to cancel the operation.
• The magnification then returns to ×1.
Note
In the following cases, the image will return to the normal size (×1).
• When switching the INPUT mode.
has been pressed.
• When
• When the input signal is changed.
• When the input signal resolution and refresh rate (vertical frequency) change.
42
A10X_A10S#E_Print#p40_50.p65
42
03.2.4, 2:06 PM
Keylock Function
Use this function to lock the operation buttons on the projector.
Power ON button
Locking the Operation
Buttons
Hold down
on the projector for
about 3 seconds while the projector is
being turned on.
Note
Taking the Keylock off
Hold down
on the projector for
about 3 seconds while the projector is
being turned on.
• You can take the keylock off by holding down
on the projector for about 3 seconds while the projector is in standby mode.
• The keylock function does not affect the operation with the remote control buttons.
• You cannot use the keylock function while the
projector is warming up.
Easy to Use Functions
43
A10X_A10S#E_Print#p40_50.p65
43
03.2.4, 2:06 PM
Using the “Options” Menu
You can use the “Options” menu to enhance the usage for the projector. For operation of the
menu screen, see pages 32 to 35.
Example: “Options” menu screen for
INPUT 2 (S-Video) mode
Lamp Timer (Life)
(Check-
OSD Display
(Setting On-
ing the Lamp Life Status)
screen Display)
You can confirm the cumulative lamp usage time
and the remaining lamp life (percentage).
This function allows you to turn the on-screen messages on or off.
Display the “Options” menu to check the
lamp life status.
Select “
” (ON) or “
” (OFF) in “OSD Display” on the “Options” menu.
Description of Lamp Life
Lamp usage condition
Used with only “ ”
(Eco mode) in “Eco
Mode”
Used with only “ ”
(Standard mode) in
“Eco Mode”
Remaining lamp life
100%
5%
about
4,500 hours 225 hours
about
3,000 hours 150 hours
Description of “OSD Display” Settings
Description
Selectable settings
ON
All On-screen Displays are displayed.
OFF
INPUT/VOLUME/AV MUTE/FREEZE/
AUTO SYNC/ENLARGE/ “An invalid button
has been pressed.” / “All buttons on
Projector are locked.” are not displayed.
Note
• It is recommended that the lamp be changed
when the remaining lamp life becomes 5%.
For lamp replacement, contact your nearest
Sharp Authorized Projector Dealer or Service
Center.
• The table above indicates rough estimates in the
case of using only in each mode shown. Remaining lamp life changes within the range of the values shown depending on the frequency at which
” (Eco mode) and
“Eco Mode” is switched to “
” (Standard mode) (see page 45).
“
44
A10X_A10S#E_Print#p40_50.p65
44
03.2.4, 2:06 PM
Video System
(Setting the
Background
(Selecting a
Video System)
Startup and Background Image)
The video input system mode is preset to “Auto”;
however, a clear picture from the connected audiovisual equipment may not be received, depending
on the video signal difference. In that case, switch
the video signal.
Select “Background” on the “Options” menu
and the image displayed upon the projector’s
startup and when no signal is being sent to
the projector.
Select “Video System” on the “Options” menu
and the appropriate video system.
Sharp
Blue
None
Description of Background Images
Selectable settings
Description
Sharp SHARP default image
Blue
Blue screen
None
Black screen
Note
Description of Video Systems
Selectable settings
PAL
SECAM
NTSC4.43
• If the input signal has interference, the screen
will be displayed during interference.
Eco Mode
(Setting the Eco
Mode)
Easy to Use Functions
NTSC3.58
Description
When connected to PAL video
equipment.
When connected to SECAM video
equipment.
When reproducing NTSC signals in
PAL video equipment.
When connected to NTSC video
equipment.
Select “ ” (Eco Mode) or “ ” (Standard
Mode) in “Eco Mode” on the “Options” menu.
Note
• The video signal can only be set in INPUT 2 or
INPUT 3 mode.
• In “Auto”, images are displayed in PAL even if
PAL-N or PAL-M input signals are received.
Description of Eco Mode
Power consumption
Selectable settings Brightness (When using AC 100V)
(Eco mode)
(Standard mode)
Lamp life
80%
190 W
4,500 hours
100%
240 W
3,000 hours
Note
• Although lamp life and noise are improved when
“Eco Mode” is set to “
” (Eco mode), brightness decreases by 20%.
”
• “Eco Mode” mode is factory preset to “
(Standard mode).
45
A10X_A10S#E_Print#p40_50.p65
45
03.2.4, 2:06 PM
Using the “Options” Menu
Example: “Options” menu screen for
INPUT 2 (S-Video) mode
Auto Power Off
(Auto
Menu Position
(Selecting
Power Off Function)
the Menu Screen Position)
When no input signal is detected for more than 15
minutes, the projector will automatically power off
if set to “ON”.
The Auto Power Off function will be disabled if it
has been set to “OFF”.
Select “Menu Position” on the “Options”
menu and the desired position for the menu
screen.
Select “
” (ON) or “ ” (OFF) in “Auto
Power Off” on the “Options” menu.
Note
• When the Auto Power Off function is set to “ON”,
5 minutes before the power turns off, the message “Power OFF in X min.” will appear on the
screen to indicate the remaining minutes before power off.
Description of Menu Positions
Selectable settings
Center
Upper Right
Lower Right
Upper Left
Lower Left
Description
Displayed on the center of the image.
Displayed on the upper right of the image.
Displayed on the lower right of the image.
Displayed on the upper left of the image.
Displayed on the lower left of the image.
Menu Color
(Selecting the
Menu Color)
Select “
” (Opaque) or “
” (Translucent)
in “Menu Color” on the “Options” menu.
Description of Menu Colors
Selectable settings
Description
Opaque
The menu is displayed opaquely.
Translucent The menu is displayed translucently.
The part of the menu on the image
becomes transparent.
46
A10X_A10S#E_Print#p40_50.p65
46
03.2.4, 2:06 PM
Password
1
Press ', " and | to enter the password in “Old Password” and press
.
2
Press ', " and | to set the new
.
password and press
3
Enter the new 4-digit password
again in “Reconfirm” and press
(Setting a Pass-
word)
A password must be set to activate the “Anti-Theft”
function (Page 48).
There is no factory preset for the password or the
“Anti-Theft” settings. In this way, anyone can freely
set a new password and “Anti-Theft” settings. It is
therefore recommended that even if you do not want
to use the “Anti-Theft” function, you at least set a
password to prevent others from setting the “AntiTheft” function.
A password can only be set by using the remote
control.
Select “Password” on the “Options” menu,
then press
and follow the procedure below to enter the password.
1
3
Enter the 3 remaining digits and
.
press
Note
• If you do not want to set a password, leave the
fields in steps 2 and 3 blank and press
.
• To cancel the password settings, press
.
If You Forget Your Password
If you forget the password, delete it using the following procedure and set a new password.
Easy to Use Functions
2
Press ' or " to select the desired
number and then press |.
.
Press
Enter the password again in “Recon.
firm” and press
Note
Note
• When a password is set, you need to enter the
password to change the “Anti-Theft” setting.
If you want to change the password, follow
the procedure below.
• You can only use the buttons on the projector
to delete the password.
• The password cannot be deleted using the
above described procedures while the “AntiTheft” function is set. If you forget your password while the “Anti-Theft” function is activated,
you will need to contact your nearest Sharp Authorized Projector Dealer or Service Center (see
page 65). You may need to bring your projector
to them to restore the projector to original factory condition (password and keycode reset).
47
A10X_A10S#E_Print#p40_50.p65
47
03.2.4, 2:06 PM
Using the “Options” Menu
Example: “Options” menu screen for
INPUT 2 (S-Video) mode
Anti-Theft
1
(Setting the Anti-
Theft)
The anti-theft function prevents unauthorized use
of the projector. You can choose to use this function or not. If you do not want to use this function,
just do not enter the keycode. Once the anti-theft
function is activated, users will need to enter the
correct keycode each time the projector is turned
on. Failure to enter the correct keycode will cause
images to not be projected. The following procedures explain how to use this function.
Press any button you like on the remote control or projector to set the
first digit in “New Code”.
Note
• The following buttons on the remote control and projector cannot be set as
keycodes:
• POWER ON/OFF buttons
• ENTER button
• UNDO button
• MENU button
• FORWARD button
• BACK button
Select “Anti-Theft” on the “Options” menu,
then press
and follow the procedure below to enter the keycode.
2
Enter the remaining 3 digits by
pressing any buttons you like.
3
Enter the same keycode once more
in “Reconfirm”.
Note
• “Anti-Theft” cannot be selected unless
“Password” is set. (See page 47.)
• When “Anti-Theft” is selected, the password input box will appear. Enter the keycode after the
right password is entered.
Info
• Once the function is activated, you must remember the correct keycode. We suggest you record
the keycode in a safe place where only authorized
users have access. If you lose or forget your
keycode, you will need to contact your nearest
Sharp Authorized Projector Dealer or Service Center (see page 65). You may need to bring your projector to them to restore the projector to original
factory condition (password and keycode reset).
Info
When “Anti-Theft” is set, the keycode inputting box appears after the power is
turned on. When it appears, enter the right
keycode.
• Press the buttons on the remote control if the
buttons on the remote control are used for setting the keycode. In the same manner, press
the buttons on the projector if the buttons on
the projector are used for setting the keycode.
48
A10X_A10S#E_Print#p40_50.p65
48
03.2.4, 2:06 PM
If you want to change the keycode, follow
the procedure below.
Note
• When “Anti-Theft” is selected, the password input box will appear. After the password has been
entered, you can change the keycode.
1
Press the buttons on the remote
control or the projector to enter the
preset 4-digit keycode in “Old
Code”.
2
Press any button you like on the remote control or the projector to enter the new keycode.
3
Enter the same 4-digit keycode in
“Reconfirm”.
Easy to Use Functions
Note
• If you do not want to set a keycode, leave the
keycode field blank in steps 2 and 3 and press
.
49
A10X_A10S#E_Print#p40_50.p65
49
03.2.4, 2:06 PM
Reversing/Inverting Projected Images
You can reverse or invert the projected image for various applications using the “PRJ Mode”
menu. For operation of the menu screen, see pages 32 to 35.
Example: “PRJ Mode” menu screen for
INPUT 1 (RGB) mode
Setting the Projection
Mode
Display the “PRJ Mode” menu and select the
desired projection mode.
Description of Projection Modes
Selectable settings
Front
Ceiling+Front
Rear
Ceiling+Rear
Description
Normal image
Inverted image
Reversed image
Reversed and inverted image
Note
• This function is used for the reversed image and
ceiling-mount setups. See page 25 for these setups.
50
A10X_A10S#E_Print#p40_50.p65
50
03.2.4, 2:06 PM
Carrying the Projector
How to Use the
Carrying Case
When carrying the projector, attach the lens cap
to the lens, and place it in the supplied carrying
case.
1
Open the cover of the carrying
case.
2
Remove the inner padding from
the carrying case, and fold it in
the direction of the arrows.
3
Reinsert the inner padding into
the carrying case.
Info
• Be sure to insert the inner padding to
protect the lens and the projector.
4
Lens cap
Place the projector and the accessories in the carrying case.
Info
• Be sure to attach the lens cap to protect the lens.
• Be sure the projector has cooled
down sufficiently before placing it in
the case.
Info
Adjust the
shoulder
strap.
Appendix
• This carrying case is only for storing and
carrying the projector.
• Sending the projector in the carrying case
as a parcel may cause damage to the projector. If you send the projector in the carrying case as a parcel, be sure to place it
in a sturdy case and with enough shock
absorbing material to avoid any damage.
• Do not expose the carrying case or projector to direct sunlight, near heat sources, or
leave them in a car. The carrying case or
projector may change color or become deformed.
51
A10X_A10S#E_Print#p51_62.p65
51
03.2.4, 2:06 PM
Maintenance
Cleaning the projector
Cleaning the lens
■ Be sure to unplug the power cord before cleaning the projector.
■ The cabinet as well as the operation panel is made
of plastic. Avoid using benzene or thinner, as these
can damage the finish on the cabinet.
■ Do not use volatile agents such as insecticides
on the projector.
Do not attach rubber or plastic items to the projector for a long time.
The effects of some of the agents in the plastic
may cause damage to the quality or finish of the
projector.
■ Use a commercially available blower or lens
cleaning paper (for glasses and camera lenses)
for cleaning the lens. Do not use any liquid type
cleaning agents, as they may wear off the coating film on the surface of the lens.
■ As the surface of the lens can easily get damaged, be sure not to scrape or hit the lens.
Wax
Cleani
Paper ng
Thinner
Cleaning the exhaust and intake vents
■ Wipe off dirt gently with a soft flannel cloth.
■ Use a vacuum cleaner to clean dust from the
exhaust vent and the intake vent.
nt
rge
ete
dd
Mil
Mild detergent
diluted with water
■ When the dirt is hard to remove, soak a cloth in a
mild detergent diluted with water, wring the cloth
well and then wipe the projector.
Strong cleaning detergents may discolor, warp or
damage the coating on the projector.
Make sure to test on a small, inconspicuous area
on the projector before use.
52
A10X_A10S#E_Print#p51_62.p65
52
03.2.4, 2:06 PM
Replacing the Air Filter
• This projector is equipped with air filters to ensure the optimal operating
condition of the projector.
• The air filters should be cleaned every
100 hours of use. Clean the filters more
often when the projector is used in a
dusty or smoky location.
• Ask your nearest Sharp Authorized Projector Dealer or Service Center to exchange the filter (PFILDA008WJZZ)
when it is no longer possible to clean.
" Bottom view
" Rear view
Air filter
(not removable)
Air filter
(not removable)
Air filter
Cleaning and Replacing
the Air Filter
1
Power
OFF
button
Turn off the power and disconnect the power cord.
• Press
on the projector or
on the remote control. Wait until the cooling fan stops.
2
Power OFF button
Remove the filter/lamp unit
cover.
• Turn the projector over. Loosen the user
service screw (1) that secures the filter/lamp unit cover. Pressing the tab
(2), remove the filter/lamp unit cover
(3).
1
3
User service screw
2
3
Tab
Remove the air filter.
• Pick the air filter up with your fingers and
lift it out of the filter/lamp unit cover.
Appendix
53
A10X_A10S#E_Print#p51_62.p65
53
03.2.4, 2:07 PM
Replacing the Air Filter
4
Clean the air filter.
5
Replace the air filter.
6
Replace the filter/lamp unit
cover.
• Clean the dust off the air filter and cover
with a vacuum cleaner extension hose.
• Place the air filter underneath the tabs
on the filter/lamp unit cover.
• Align the tab on the filter/lamp unit cover
(1) and place it while pressing the tab
(2) to close it. Then tighten the user
service screw (3) to secure the filter/
lamp unit cover.
1
2
Tab
Note
• Be sure the filter/lamp unit cover is securely
installed. The power will not turn on unless
it is correctly installed.
• If dust or dirt has collected inside the rear
and bottom air filters (not removable), clean
the filter with a vacuum cleaner extension
hose.
3
User service screw
54
A10X_A10S#E_Print#p51_62.p65
54
03.2.4, 2:07 PM
Maintenance Indicators
■ The warning lights on the projector indicate problems inside the projector.
■ If a problem occurs, either the temperature warning indicator or the lamp replacement indicator will
illuminate red, and the power will turn off. After the power has been turned off, follow the procedures given below.
Power indicator
Lamp replacement indicator
Temperature warning indicator
About the temperature warning indicator
If the temperature inside the projector increases, due to blockage
of the air vents, or the setting location, “
” will illuminate in
About the lamp
replacement indicator
■ The lamp life becomes 0%, when used
for approximately 4,500 hours with “Eco
Mode” or when used for approximately
3,000 hours with “Standard Mode” (see
page 45).
■ When the remaining lamp life becomes
5% or less, “
” (yellow) will be displayed
on the screen. When the percentage becomes 0%, “
the lower left corner of the picture.
If the temperature keeps on rising,
the lamp will turn off and the temperature warning indicator will
blink, the cooling fan will run for a
further 90 seconds, and then the
power will be shut off. After
” appears, be sure to per“
” will change to “
” (red),
the lamp will automatically turn off and
then the projector as well. At this time,
the lamp replacement indicator will illuminate in red.
■ If you try to turn on the projector a fourth
time without replacing the lamp, the projector will not turn on.
form the following measures.
Maintenance indicator
Abnormal
Normal
Condition
Problem
Possible Solution
• Relocate the projector to an area
with proper ventilation.
The internal
•
Cooling
fan
break•
Take
the projector to your nearest
temperature is
down
Sharp Authorized Projector Dealer
abnormally high.
• Internal circuit failure or Service Center (see page 65)
• Clogged air intake
for repair.
• Blocked air intake
Temperature
warning
indicator
Lamp
replacement
indicator
Green on
Green
blinks
when the
lamp is
active.
Green on/
Red on
Red on/
Power off
Red on
Time to change
the lamp
Red on/
Power off
The lamp does
not illuminate.
Red blinks
The power
indicator blinks
in red when the
projector is on.
• Remaining lamp life • Carefully replace the lamp. (See
becomes 5% or less. page 58)
• Take the projector to your nearest
Sharp Authorized Projector Dealer
or Service Center (see page 65)
• Burnt-out lamp
for repair.
• Lamp circuit failure • Please exercise care when
replacing the lamp.
• The filter/lamp unit
cover is open.
Appendix
Power
indicator
Off
• Securely install the cover.
• If the power indicator blinks even
when the filter/lamp unit cover is
securely installed, contact your
nearest Sharp Authorized Projector Dealer or Service Center for
advice.
55
A10X_A10S#E_Print#p51_62.p65
55
03.2.4, 2:07 PM
Maintenance Indicators
Info
• If the temperature warning indicator illuminates, and the power turns off, follow the above possible solutions
and then wait until the projector has cooled down completely before plugging in the power cord and turning
the power back on. (At least 5 minutes.)
• If the power is turned off and then turned on again, as during a brief test, the lamp replacement indicator may
be triggered, preventing the power from going on. Should this occur, disconnect the power cord from the wall
outlet and plug it back in again.
• If you want to clean the air vents during projector operation, be sure to first press
on the projector or
on the remote control and after the power has turned off and the cooling fan has stopped, then clean the
vents.
• Do not unplug the power cord after the power has been turned off and while the cooling fan is running. The
cooling fan runs for about 90 seconds.
56
A10X_A10S#E_Print#p51_62.p65
56
03.2.4, 2:07 PM
Regarding the Lamp
Lamp
■ It is recommended that the lamp (sold separately) be replaced when the remaining lamp life becomes 5% or less, or when you notice a significant deterioration in the picture and color quality. The
lamp life (percentage) can be checked with the on-screen display. See page 44.
■ For lamp replacement, please consult your nearest Sharp Authorized Projector Dealer or Service
Center.
IMPORTANT NOTE TO U.S. CUSTOMERS:
The lamp included with this projector is backed by a 90-day parts and labor limited warranty. All service
of this projector under warranty, including lamp replacement, must be obtained through a Sharp Authorized Projector Dealer or Service Center. For the name of the nearest Sharp Authorized Projector Dealer
U.S.A. ONLY
or Service Center, please call toll-free: 1-888-GO-SHARP (1-888-467-4277).
Caution Concerning the Lamp
■ This projector utilizes a pressurized mercury lamp. A loud sound may indicate lamp failure. Lamp
failure can be attributed to numerous sources such as: excessive shock, improper cooling, surface
scratches or deterioration of the lamp due to a lapse of usage time. The period of time up to failure
largely varies depending on the individual lamp and/or the condition and the frequency of use. It is
important to note that failure can often result in the bulb cracking.
■ When the lamp replacement indicator and on-screen display icon are illuminated, it is recommended
that the lamp be replaced with a new one immediately, even if the lamp appears to be operating
normally.
■ Should the lamp break, the glass particles may spread inside the lamp cage or gas contained in the
lamp may be vented into the room from the exhaust vent. Because the gas in this lamp includes
mercury, ventilate the room well if the lamp breaks and avoid all exposure to the released gas. In
case of exposure to the gas, consult a doctor as soon as possible.
■ Should the lamp break, there is also a possibility that glass particles may spread inside of the
projector. In such a case, it is recommended you contact your nearest Sharp Authorized Projector
Dealer or Service Center to remove the damaged lamp and assure safe operation.
Replacing the Lamp
Caution
• Do not remove the lamp unit immediately after operation of the projector. The lamp will be hot and touching
it can lead to burn or injury.
• Wait at least one hour after the power cord is disconnected to allow the surface of the lamp unit to fully cool
before removing the lamp unit.
■ If the new lamp does not light after replacement, take your projector to the nearest Sharp Authorized Projector Dealer or Service Center for repair. Purchase a replacement lamp unit of type BQCPGA10X//1 from your nearest Sharp Authorized Projector Dealer or Service Center. Then carefully
change the lamp by following the instructions described in this section. If you wish, you may have
the lamp replaced at your nearest Sharp Authorized Projector Dealer or Service Center.
Appendix
57
A10X_A10S#E_Print#p51_62.p65
57
03.2.4, 2:07 PM
Regarding the Lamp
Removing and Installing
the Lamp Unit
Lamp
unit
BQC-PGA10X//1
Info
• Be sure to remove the lamp unit using the
handle. Be sure not to touch the glass surface of the lamp unit or the inside of the
projector.
• To avoid injury to yourself and damage to
the lamp, be sure to carefully follow the
steps below.
• Do not loosen other screws except for the
filter/lamp unit cover and lamp unit.
• Please refer to the installation manual included with the lamp unit.
1
Power OFF button
Press
on the projector to
turn off the power.
• Wait until the cooling fan stops.
Warning!
• Do not remove the lamp unit from the
projector right after use. The lamp will
be very hot and may cause burn or
injury.
2
Disconnect the power cord.
3
Change the air filter.
4
• Unplug the power cord from the AC
socket.
• Leave the lamp until it has fully cooled
down (about 1 hour).
• Change the air filter whenever you install the lamp unit (see pages 53 and
54).
AC socket
Remove the filter/lamp unit
cover.
• Turn the projector over. Loosen the user
service screw (1) that secures the filter/lamp unit cover. Pressing the tab
(2), remove the filter/lamp unit cover
(3).
1
3
User
service
screw
2
58
A10X_A10S#E_Print#p51_62.p65
58
03.2.4, 2:07 PM
Tab
5
Remove the lamp unit.
6
Insert the new lamp unit.
7
Replace the filter/lamp unit
cover.
Handle
• Loosen the securing screws from the
lamp unit. Hold the lamp unit by the
handle and pull it in the direction of the
arrow. At this time, keep the lamp unit
horizontal and do not tilt it.
• Press the lamp unit firmly into the lamp
unit compartment. Fasten the securing
screws.
Securing screws
• Align the tab on the filter/lamp unit cover
(1) and place it while pressing the tab
(2) to close it. Then tighten the user
service screw (3) to secure the filter/
lamp unit cover.
3
1
Info
• If the lamp unit and filter/lamp unit cover
are not correctly installed, the power will
not turn on, even if the power cord is connected to the projector.
2
User service screw
Resetting the Lamp Timer
Reset the lamp timer after replacing the lamp.
1
2
Connect the power cord.
• Plug the power cord into the AC socket
of the projector.
Reset the lamp timer.
AC socket
Power ON button
• While simultaneously holding down
and
on the projector, press
and
on the projector.
• “LAMP 0000H” is displayed, indicating
that the lamp timer is reset.
Volume
buttons
Info
Appendix
AUTO SYNC
button
• Make sure to reset the lamp timer only
when replacing the lamp. If you reset the
lamp timer and continue to use the same
lamp, this may cause the lamp to become
damaged or explode.
59
A10X_A10S#E_Print#p51_62.p65
59
03.2.4, 2:07 PM
Connecting Pin Assignments
INPUT 1 RGB Signal Terminal: 15-pin Mini D-sub female connector
RGB Input
5
10
15
1
6
11
1.
2.
3.
4.
5.
6.
7.
8.
9.
10.
11.
12.
13.
14.
15.
Component Input
Video input (red)
Video input (green/sync on green)
Video input (blue)
Not connected
Not connected
Earth (red)
Earth (green/sync on green)
Earth (blue)
Not connected
GND
Not connected
Bi-directional data
Horizontal sync signal
Vertical sync signal
Data clock
1.
2.
3.
4.
5.
6.
7.
8.
9.
10.
11.
12.
13.
14.
15.
PR (CR)
Y
PB (CB)
Not connected
Not connected
Earth (PR)
Earth (Y)
Earth (PB)
Not connected
Not connected
Not connected
Not connected
Not connected
Not connected
Not connected
RS-232C Terminal: 9-pin Mini DIN female connector
8
9
7
6
3
Pin No.
1
2
3
4
5
6
7
8
9
Signal
Name
RD
SD
Receive Data
Send Data
SG
Signal Ground
I/O
Input
Output
Reference
Not connected
Connected to internal circuit
Connected to internal circuit
Not connected
Connected to internal circuit
Not connected
Not connected
Not connected
Not connected
4
5
2
1
6
1
9-pin D-sub male connector of the DIN-D-sub RS-232C adaptor
Pin No.
1
2
3
4
5
6
7
8
9
5
9
Signal
Name
RD
SD
Receive Data
Send Data
SG
Signal Ground
I/O
Input
Output
Reference
Not connected
Connected to internal circuit
Connected to internal circuit
Not connected
Connected to internal circuit
Not connected
Not connected
Not connected
Not connected
RS-232C Cable recommended connection: 9-pin D-sub female connector
5
9
Pin No.
1
2
3
4
5
6
7
8
9
1
6
Signal
CD
RD
SD
ER
SG
DR
RS
CS
CI
Pin No.
1
2
3
4
5
6
7
8
9
Signal
CD
RD
SD
ER
SG
DR
RS
CS
CI
Note
• Depending on the controlling device used, it may be necessary to connect Pin 4 and Pin 6 on the controlling
device (e.g. PC).
Projector
Pin No.
4
5
6
PC
Pin No.
4
5
6
60
A10X_A10S#E_Print#p51_62.p65
60
03.2.4, 2:07 PM
RS-232C Specifications and Command Settings
PC control
A computer can be used to control the projector by connecting an RS-232C serial control cable (cross type,
sold separately) to the projector. (See page 20 for connection.)
Communication conditions
Set the serial port settings of the computer to match that of the table.
Signal format: Conforms to RS-232C standard.
Baud rate: 9,600 bps
Data length: 8 bits
Parity bit: None
Stop bit: 1 bit
Flow control: None
Basic format
Commands from the computer are sent in the following order: command, parameter, and return code. After
the projector processes the command from the computer, it sends a response code to the computer.
Command format
C1 C2 C3 C4 P1 P2 P3 P4
Command 4-digit
Response code format
Normal response
O
K
Return code (0DH)
Parameter 4-digit
Problem response (communication error or incorrect command)
E
Return code (0DH)
R
Return code (0DH)
R
Info
• When more than one code is being sent, send each command only after the response code for the previous
command from the projector is verified.
Commands
Example: When turning on the projector, make the following setting.
Computer
P
O
W
R
_
_
1
COMMAND PARAMETER
Projector
O
K
RETURN
Power Off (Standby)
P O W R _ _ _ 0 OK or ERR
Power On
P O W R _ _ _ 1 OK or ERR
INPUT1
I R G B _ _ _ 1 OK or ERR
INPUT2
I V E D _ _ _ 1 OK or ERR
INPUT3
I V E D _ _ _ 2 OK or ERR
Lamp Usage Time (hour)
Remaining Lamp Life (Percentage)
T L T T _ _ _ 1 0~9999
T L T L _ _ _ 1 0~100
Lamp Status
T L P S _ _ _ 1 0:Off, 1:On, 2:Retry, 3:Waiting, 4:Lamp Error
Unit Status
T A B N _ _ _ 1 0:Normal, 1:Temp High, 2:Fan Err,
4:Filter Cover Err, 8:Lamp 100 hours,
16:Lamp Burnt-out, 32:Lamp Not Lit,
64:Temp Abnormally High
Model Name Check
T N A M _ _ _ 1 PROJECTOR NAME
AV Mute Off
I M B K _ _ _ 0 OK or ERR
AV Mute On
I M B K _ _ _ 1 OK or ERR
Auto Sync Start
A D J S _ _ _ 1 OK or ERR
Appendix
BUTTONS & REMOTE CONTROL KEY
CONTROL CONTENTS
_
→
←
Note
• If an underbar (_) appears in the parameter column, enter a space. If an asterisk (*) appears, enter a
value in the range indicated in brackets under CONTROL CONTENTS.
61
A10X_A10S#E_Print#p51_62.p65
61
03.2.4, 2:07 PM
Computer Compatibility Chart
Computer
• Multiple signal support
Horizontal Frequency: 15–70 kHz, Vertical Frequency: 43–85 Hz, Pixel Clock: 12–108 MHz
• Compatible with sync on green and composite sync signals
• SXGA+ and SXGA compatible in intelligent compression
• Intelligent Compression and Expansion System resizing technology
The following is a list of modes that conform to VESA. However, this projector supports other signals
that are not VESA standards.
PC/MAC/WS
Resolution
Horizontal Frequency
(kHz)
640 × 350
640 × 400
720 × 350
VGA
720 × 400
640 × 480
PC
MAC
MAC
MAC
MAC
13"
16"
19"
21"
SVGA
800 × 600
XGA
1,024 × 768
SXGA
1,152 × 864
1,280 × 1,024
SXGA+ 1,400 × 1,050
640 × 480
VGA
832 × 624
SVGA
1,024 × 768
XGA
SXGA 1,152 × 870
Vertical Frequency
VESA Standard
(Hz)
60
70
85
60
70
85
60
70
60
70
85
50
60
70
72
75
85
50
56
60
70
72
75
85
43
50
60
70
75
85
60
70
75
60
60
67
75
75
75
27.0
31.5
37.5
27.0
31.5
37.9
27.0
31.5
27.0
31.5
37.9
26.2
31.5
34.7
37.9
37.5
43.3
31.4
35.1
37.9
46.6
48.1
46.9
53.7
35.5
40.3
48.4
56.5
60.0
68.7
55.0
66.2
67.5
64.0
64.0
34.9
49.7
60.2
68.7
Display
✔
✔
✔
✔
Upscale
✔
✔
✔
✔
✔
✔
✔
✔
✔
✔
✔
✔
✔
✔
True
Intelligent Compression
Upscale
True
Intelligent Compression
Note
• This projector may not be able to display images from notebook computers in simultaneous (CRT/LCD)
mode. Should this occur, turn off the LCD display on the notebook computer and output the display data in
“CRT only” mode. Details on how to change display modes can be found in your notebook computer’s
operation manual.
• When this projector receives 640 × 350 VESA format VGA signals, “640 × 400” appears on the screen.
DTV
Signal
Horizontal Frequency (kHz)
Vertical Frequency (Hz)
480I
480P
540P
580I
580P
720P
1035I
1035I
1080I
1080I
15.7
31.5
33.8
15.6
31.3
45.0
28.1
33.8
28.1
33.8
60
60
60
50
50
60
50
60
50
60
62
A10X_A10S#E_Print#p51_62.p65
62
03.2.4, 2:07 PM
Troubleshooting
Problem
No picture and no sound
or projector does not start.
Check
• Projector power cord is not plugged into the wall outlet.
• Power to the external connected devices is off.
• The selected input mode is wrong.
• The AV MUTE function is working.
• Cables incorrectly connected to rear panel of the projector.
• Remote control batteries have run out.
• External output has not been set when connecting notebook computer.
• The filter/lamp unit cover is not installed correctly.
• Cables incorrectly connected to the rear panel of the projector.
• “Bright” is set to minimum position.
Page
15
—
27
27
16-20
13
16
54,59
16-20
36
Sound is heard but no
picture appears.
• Picture adjustments are incorrectly set.
(Video Input only)
• Video input system is incorrectly set.
(INPUT 1 only)
• Input signal type (RGB/Component) is incorrectly set.
36
• Adjust the focus.
• The projection distance exceeds the focus range.
(Computer Input only)
• Perform “Fine Sync” Adjustments (“Clock” Adjustment)
• Perform “Fine Sync” Adjustments (“Phase” Adjustment)
• Noise may appear depending on the computer.
22
24
• Cables incorrectly connected to rear panel of projector.
• Volume is set to minimum.
16-20
27
45
37
Color is faded or poor.
Picture is blurred;
noise appears.
38
38
—
Picture appears but no
sound is heard.
—
55
Appendix
An unusual sound is
• If the picture is normal, the sound is due to cabinet shrinkage
occasionally heard
caused by room temperature changes. This will not affect
from the cabinet.
operation or performance.
Maintenance
• See “Maintenance Indicators”.
indicator illuminates.
Power cannot be turned • The keylock is set.
on or off using the power
If the keylock is set to ON, all the buttons are locked.
buttons on the projector.
43
63
A10X_A10S#E_Print#p63_70.p65
63
03.2.4, 2:07 PM
Troubleshooting
Problem
Check
• Change the input signal type setting.
Picture is green on
INPUT 1 COMPONENT.
Picture is pink (no green)
on INPUT 1 RGB.
• The lamp replacement indicator is illuminating in red. Replace
Picture is dark.
the lamp.
Picture is too bright and • Picture adjustments are incorrectly set.
whitish.
64
A10X_A10S#E_Print#p63_70.p65
64
03.2.4, 2:07 PM
Page
37
55
36
For SHARP Assistance
If you encounter any problems during setup or operation of this projector, first refer to the
“Troubleshooting” section on pages 63 and 64. If this operation manual does not answer
your question, please contact the SHARP Service departments listed below.
U.S.A.
Sharp Electronics Corporation
1-888-GO-SHARP (1-888-467-4277)
[email protected]
http://www.sharplcd.com
Canada
Sharp Electronics of Canada Ltd.
(905) 568-7140
http://www.sharp.ca
Mexico
Sharp Electronics Corporation Mexico
Branch
(525) 716-9000
http://www.sharp.com.mx
Latin America
Sharp Electronics Corp. Latin American
Group
(305) 264-2277
[email protected]
http://www.siempresharp.com
Germany
U.K.
Italy
France
Benelux
SHARP Electronics Benelux BV
0900-SHARPCE (0900-7427723)
Nederland
9900-0159 Belgium
http://www.sharp.nl
http://www.sharp.be
http://www.sharp.lu
Australia
Sharp Corporation of Australia
Pty. Ltd.
1300-135-022
http://www.sharp.net.au
New Zealand
Sharp Corporation of New Zealand
(09) 634-2059, (09) 636-6972
http://www.sharpnz.co.nz
Singapore
Sharp Electronics (Europe) GMBH
01805-234675
http://www.sharp.de
Sharp-Roxy Sales (S) Pte. Ltd.
65-226-6556
[email protected]
http://www.sharp.com.sg
Hong Kong
Sharp Electronics (U.K.) Ltd.
0161-205-2333
[email protected]
http://www.sharp.co.uk
Sharp-Roxy (HK) Ltd.
(852) 2410-2623
[email protected]
http://www.sharp.com.hk
Taiwan
Sharp Electronics (Italy) S.P.A.
(39) 02-89595-1
http://www.sharp.it
Sharp Corporation (Taiwan)
0800-025111
http://www.sharp-scot.com.tw
Malaysia
Sharp-Roxy Sales & Service Co.
(60) 3-5125678
U.A.E.
Sharp Middle East Fze
971-4-81-5311
[email protected]
Sharp Electronics France
01 49 90 35 40
[email protected]
http://www.sharp.fr
Sharp Electronica Espana, S.A.
93 5819700
[email protected]
http://www.sharp.es
Thailand
Sharp Thebnakorn Co. Ltd.
02-236-0170
[email protected]
http://www.sharp-th.com
Switzerland
Sharp Electronics (Schweiz) AG
0041 1 846 63 11
[email protected]
http://www.sharp.ch
Korea
Sharp Electronics Incorporated of
Korea
(82) 2-3660-2002
[email protected]
http://www.sharpkorea.co.kr
Sweden
Sharp Electronics ( Nordic ) AB
(46) 8 6343600
[email protected]
http://www.sharp.se
India
Sharp Business Systems (India)
Limited
(91) 11- 6431313
[email protected]
Austria
A10X_A10S#E_Print#p63_70.p65
Sharp Electronics Austria (Ges.m.b.H.)
0043 1 727 19 123
[email protected]
http://www.sharp.at
65
Appendix
Spain
65
03.2.4, 2:07 PM
Specifications
Product type LCD Projector
Model PG-A10X / PG-A10S
Video system NTSC3.58/NTSC4.43/PAL/PAL-M/PAL-N/PAL-60/SECAM/
DTV480I/DTV480P/DTV540P/DTV580I/DTV580P/DTV720P/DTV1035I/DTV1080I
Display method LCD panel × 3, RGB optical shutter method
LCD panel Panel size: 0.79" (20.0 mm) (12 [H] × 16 [W] mm)
No. of dots: [PG-A10X] 786,432 dots (1,024 [H] × 768 [V])
[PG-A10S] 480,000 dots (800 [H] × 600 [V])
Standard lens 1–1.2 × zoom lens, F1.9–2.2, f = 26–31 mm
Projection lamp SHP 165 W lamp
Component input signal 15-pin mini D-sub connector
(INPUT1) Y: 1.0 Vp-p, sync negative, 75 Ω terminated
PB: 0.7 Vp-p, 75 Ω terminated
PR: 0.7 Vp-p, 75 Ω terminated
Horizontal resolution [PG-A10X] 700 TV lines (DTV720P)
[PG-A10S] 520 TV lines (DTV720P)
Computer RGB input signal 15-pin mini D-sub connector
(INPUT 1) RGB separate/sync on green type analog input: 0–0.7 Vp-p, positive, 75 Ω terminated
HORIZONTAL SYNC. SIGNAL: TTL level (positive/negative)
VERTICAL SYNC. SIGNAL: Same as above
S-video input signal 4-pin mini DIN connector
(INPUT 2) Y (luminance signal): 1.0 Vp-p, sync negative, 75 Ω terminated
C (chrominance signal): Burst 0.286 Vp-p, 75 Ω terminated
Video input signal RCA connector: VIDEO, composite video, 1.0 Vp-p, sync negative, 75 Ω
(INPUT 3) terminated
Computer control signal (RS-232C) 9-pin mini DIN connector
Pixel clock 12–108 MHz
Vertical frequency 43–85 Hz
Horizontal frequency 15–70 kHz
Audio input signal ø3.5 mm minijack: AUDIO, 0.5 Vrms, more than 47 kΩ (stereo)
Audio output 1.0 W (monaural)
Speaker system 2.8 cm round × 1
Rated voltage AC 100–240 V
Input current 2.4 A
Rated frequency 50/60 Hz
Power consumption 240 W (Standard mode)/190 W (Eco mode) with AC 100 V
226 W (Standard mode)/182 W (Eco mode) with AC 240 V
Power consumption (standby) 5 W (AC 100 V) – 8 W (AC 240 V)
Heat dissipation 900 BTU/hour (Standard mode)/710 BTU/hour (Eco mode) with AC 100 V
850 BTU/hour (Standard mode)/680 BTU/hour (Eco mode) with AC 240 V
Operating temperature 41°F to 95°F (+5°C to +35°C)
Storage temperature –4°F to 140°F (–20°C to +60°C)
Cabinet Plastic
I/R carrier frequency 38 kHz
Dimensions (approx.) 11 45/64" × 3 13/64" × 9 1/32" (297 (W) × 81 (H) × 229 (D) mm) (main body only)
11 45/64" × 3 33/64" × 9 1/32" (297 (W) × 89 (H) × 229 (D) mm) (including adjustment foot
and projecting parts)
Weight (approx.) 6.4 lbs. (2.9 kg)
Supplied accessories Remote control, Two R-6 batteries, Power cord for U.S., Canada etc. (6', 1.8 m), Power cord
for Europe, except U.K. (6', 1.8 m), Power cord for U.K., Hong Kong and Singapore (6', 1.8
m), Power cord for Australia, New Zealand and Oceania (6', 1.8 m), RGB cable (9'10",
3.0 m), DIN-D-sub RS-232C adaptor (5 57/64", 15 cm), Carrying case, Lens cap (attached),
Extra air filter, Projector manual and technical reference CD-ROM, “QUICK GUIDE” label,
Operation manual
Replacement parts Lamp unit (Lamp/cage module) (BQC-PGA10X//1), Remote control (RRMCGA138WJSA),
Two R-6 batteries (“AA” size, UM/SUM-3, HP-7, or similar), Power cord for U.S., Canada etc.
(QACCDA016WJPZ), Power cord for Europe, except U.K. (QACCVA006WJPZ), Power cord
for U.K., Hong Kong and Singapore (QACCBA015WJPZ), Power cord for Australia, New
Zealand and Oceania (QACCLA005WJPZ), RGB cable (QCNWGA012WJPZ), DIN-D-sub
RS-232C adaptor (QCNWGA015WJPZ), Carrying case (GCASNA006WJSA), Lens cap
(CCAPHA007WJ01), Air filter (PFILDA008WJZZ), Projector manual and technical reference
CD-ROM (UDSKAA022WJN1), “QUICK GUIDE” label (TLABZA191WJZZ), Operation manual
(TINS-A505WJN1)
This SHARP projector uses an LCD (Liquid Crystal Display)
This unit has some inactive pixels within acceptable tolerpanel. This very sophisticated panel contains 786,432 (PGances which may result in inactive dots on the picture screen.
A10X) / 480,000 (PG-A10S) pixels (× RGB) TFTs (Thin Film
This will not affect the picture quality or the life expectancy
Transistors). As with any high technology electronic equipof the unit.
ment such as large screen TVs, video systems and video
cameras, there are certain acceptable tolerances that the
equipment must conform to.
Specifications are subject to change without notice.
66
A10X_A10S#E_Print#p63_70.p65
66
03.2.4, 2:07 PM
Dimensions
Units: inches (mm)
Rear View
Top View
11 45/64 (297)
Side View
9 1/32 (229)
Side View
ø 66
25/32
(19.5)
Front View
10 13/64 (258.8)
1
59/64
(48.5)
6
21/32
49/64
3 33/64 (89)
3 13/64 (81)
1 35/64 (39.2)
3 9/64 (79.5)
(19.1)
(169)
M4
7 3/32 (180)
7 7/64 (180.5)
Appendix
7 53/64 (198.5)
Bottom View
M4
M4
13/64
5 55/64 (148.5)
(5)
7 11/16 (195)
67
A10X_A10S#E_Print#p63_70.p65
67
03.2.4, 2:07 PM
Glossary
Anti-Theft
Phase
If the “Keycode” set in the projector is not correctly
entered, the projector will not operate even if signals are entered.
Aspect Ratio
Width and height ratio of an image. The normal
aspect ratio of a computer and video image is 4:3.
There are also wide images with an aspect ratio
of 16:9 and 21:9.
Auto Sync
Optimizes projected computer images by automatically adjusting certain characteristics.
Background
Initial setting image projected when no signal is
being output.
Border
Projects a 4:3 image fully within a 16:9 screen by
keeping the aspect ratio at 4:3.
Clock
Clock adjustment is used to adjust vertical noise
when clock level is incorrect.
Phase shift is a timing shift between isomorphic
signals with the same resolution. When phase level
is incorrect, the projected image typically displays
horizontal flicker.
Resize
Allows you to modify or customize the picture display mode to enhance the input image. You can
select four different modes: NORMAL, DOT BY
DOT, BORDER and STRETCH.
sRGB
An international standard of color reproduction
regulated by the IEC (International
Electrotechnical Commission). As the fixed color
area has been decided by the IEC, the color
changes according to LCD features, so that the
images are displayed in a natural tint based on
an original image, when “sRGB” is set to “ON”.
Stretch
Mode that stretches the 4:3 image horizontally to
display it fully on a 16:9 screen.
CLR Temp (Color temperature)
Function that can be used to adjust the color temperature to suit the type of image input to the projector. Decrease the color temperature to create
warmer, reddish images for natural flesh tones,
or increase to create cooler, bluish images for a
brighter picture.
Dot by dot
Mode that projects images in their native resolution.
Gamma
Image quality enhancement function that offers a
richer image by brightening the darker portions of
the image without altering the brightness of the
brighter portions. You can select four different
modes: STANDARD, PRESENTATION, CINEMA
and GAME.
Intelligent compression
High quality resizing of lower and higher resolution images to fit the projector’s native resolution.
Keylock
Mode that can lock the operation of projector buttons to prevent unauthorized adjustment.
Keystone correction
Function to digitally correct a distorted image
when the projector is set up at an angle, smoothens out jaggies on keystone images and compresses the image not only horizontally but vertically keeping the 4:3 aspect ratio.
Password
A password is set so that changes cannot be made
in the “Anti-Theft” setting.
68
A10X_A10S#E_Print#p63_70.p65
68
03.2.4, 2:07 PM
Index
AC socket ............................................................. 15
Adjusting the Lens ............................................... 22
Adjustment buttons .............................................. 32
Adjustment feet .................................................... 21
Air filter ................................................................. 53
Anti-Theft ............................................................. 48
Aspect ratio .......................................................... 40
AUDIO INPUT terminal ........................................ 16
Auto Power off ...................................................... 46
Auto Sync adjustment .......................................... 38
AUTO SYNC button ............................................. 38
AV MUTE button .................................................. 27
BACK button ........................................................ 12
Background .......................................................... 45
Batteries ............................................................... 13
Blue ...................................................................... 36
BORDER .............................................................. 40
Bright .................................................................... 36
Carrying case ...................................................... 51
Ceiling-mount setup ............................................. 25
Clock .................................................................... 38
CLR Temp (Color Temperature) ........................... 36
Color .................................................................... 36
Computer Image Adjustment ............................... 38
Contrast ............................................................... 36
DIN-D-sub RS-232C adaptor .............................. 20
DOT BY DOT ....................................................... 40
Eco Mode ............................................................. 45
ENLARGE buttons ............................................... 42
ENTER button ...................................................... 35
Exhaust vent ........................................................ 52
Fine Sync ............................................................. 38
Focus ring ............................................................ 22
Foot release ......................................................... 21
FORWARD button ............................................... 12
FREEZE button .................................................... 42
Memory ................................................................ 37
MENU button ....................................................... 32
Menu Color .......................................................... 46
Menu Position ...................................................... 46
NORMAL .............................................................. 40
Optional accessories ........................................... 14
Options ................................................................. 44
OSD Display ........................................................ 44
Password ............................................................. 47
PDF ........................................................................ 9
Phase ................................................................... 38
Picture Adjustment .............................................. 36
Power buttons ...................................................... 26
Power cord ........................................................... 15
Power indicator .................................................... 26
PRJ mode (Reversing/Inverting Projected Images) .... 50
Red ...................................................................... 36
Remote control .................................................... 12
Remote control sensor ........................................ 13
Replacing the lamp .............................................. 57
RESIZE button ..................................................... 40
RGB cable ............................................................ 16
RS-232C terminal ................................................ 20
Sharp ................................................................... 36
Signal Info ............................................................ 39
Signal Type .......................................................... 37
Special Modes ..................................................... 38
sRGB ................................................................... 37
STRETCH ............................................................ 40
Supplied accessories ........................................... 14
Temperature warning indicator ............................ 55
Tint ....................................................................... 36
UNDO button ....................................................... 29
Gamma ................................................................ 37
Video System ....................................................... 45
Volume buttons .................................................... 27
V-Pos .................................................................... 38
H-Pos ................................................................... 38
Zoom knob ........................................................... 22
INPUT 1 terminal ................................................. 16
INPUT 1 – 3 modes ............................................. 27
INPUT 2 terminal ................................................. 18
INPUT 3 terminal ................................................. 18
INPUT button ....................................................... 27
Intake vent ........................................................... 52
Appendix
Kensington Security Standard connector ............ 11
Keylock ................................................................. 43
KEYSTONE button .............................................. 29
Keystone correction ............................................. 29
Lamp .................................................................... 57
Lamp replacement indicator ................................ 55
Lamp Timer (Life) ................................................. 44
Language (on-screen display language) ............. 28
Lens cap .............................................................. 10
69
A10X_A10S#E_Print#p63_70.p65
69
03.2.4, 2:07 PM
MEMO
70
A10X_A10S#E_Print#p63_70.p65
70
03.2.4, 2:07 PM
Bitte lesen Sie diese Bedienungsanleitung vor der Verwendung des Projektors sorgfältig durch.
Einführung
DEUTSCH
Es gibt zwei wichtige Gründe für die baldige Garantie-Registrierung dieses neuen Projektors von SHARP
mit Hilfe der dem Projektor beiliegenden REGISTRIERUNGS-KARTE:
1. GARANTIE
Hierdurch wird sichergestellt, dass Sie sofort den vollständigen Anspruch auf die Garantie auf Bauteile,
Service und Personalkosten dieses Gerätes haben.
2. CONSUMER PRODUCT SAFETY ACT
Um sicherzustellen, dass Sie sofort über Sicherheitshinweise zu Inspektionen, Modifizierungen oder
einen Rückruf benachrichtigt werden, die von SHARP aufgrund des Consumer Product Saftey Act von
1972 durchgeführt werden müssen, LESEN SIE BITTE DEN WICHTIGEN ABSCHNITT ÜBER DIE
“EINGESCHRÄNKTE GARANTIE” DURCH.
NUR USA
WARNUNG:
Helle Lichtquelle. Nicht in den Lichtstrahl schauen oder ihn direkt anschauen. Besonders Kinder
sollten nicht direkt in den Lichtstrahl schauen.
WARNUNG: Um das Risiko von elektrischem Schlag zu verringern, sollte dieses Gerät nicht
Regen oder Feuchtigkeit ausgesetzt werden.
Siehe Unterseite des Projektors.
VORSICHT
RISIKO VON ELEKTRISCHEM
SCHLAG. NICHT DIE SCHRAUBEN
ENTFERNEN, AUSGENOMMEN
DIE BESONDERS AUSGEWIESENEN
SERVICESCHRAUBEN FÜR
DEN BENUTZER.
VORSICHT: ZUR VERRINGERUNG DES RISIKOS VON
ELEKTRISCHEM SCHLAG NICHT
DIE ABDECKUNG ENTFERNEN.
KEINE DURCH DEN BENUTZER ZU WARTENDEN BAUTEILE
AUSSER DER LAMPENEINHEIT.
DIE WARTUNG SOLLTE NUR DURCH QUALIFIZIERTES
WARTUNGSPERSONAL AUSGEFÜHRT WERDEN.
WARNUNG:
Der Blitz mit dem Pfeilsymbol innerhalb eines
gleichseitigen Dreiecks warnt den Benutzer vor
dem Vorhandensein unisolierter, potentiell
gefährlicher Stromspannung im Geräteinneren,
die ein Risiko darstellt bzw. elektrische Schläge
verursachen kann.
Das Ausrufezeichen innerhalb eines
gleichseitigen Dreiecks macht den Benutzer
auf wichtige Anweisungen zu Bedienung und
Wartung (Service) des Gerätes in der
mitgelieferten Dokumentation aufmerksam.
Die FCC-Vorschriften besagen, dass jede nicht durch den Hersteller genehmigte Änderung oder
Modifizierung des Gerätes zu einer Annullierung der Betriebsgenehmigung des Gerätes führen
kann.
NUR USA
INFORMATION
Dieses Gerät wurde getestet und entspricht den Einschränkungen bei den Anforderungen für ein digitales Klasse A-Gerät, wie sie in
Teil 15 der FCC-Regelung beschrieben werden. Diese Einschränkungen wurden erstellt, um einen sinnvollen Schutz gegen schädliche
Interferenzen zu gewährleisten, wenn das Gerät in einer kommerziellen Umgebung betrieben wird. Dieses Gerät entwickelt, verwendet
und strahlt Radiofrequenz-Energie ab und kann unter Umständen - wenn es nicht in Übereinstimmung mit dem Benutzerhandbuch
aufgestellt und betrieben wird - schädliche Interferenzen bei der Radiokommunikation verursachen. Der Betrieb dieses Gerätes in
einem Wohnbereich führt aller Wahrscheinlichkeit nach zu schädlichen Interferenzen; in einem solchen Fall liegt es beim Benutzer, auf
eigene Kosten geeignete Maßnahmen zur Beseitigung der Interferenzen zu ergreifen.
NUR USA
Das mitgelieferte Computer-Kabel muss mit diesem Gerät verwendet werden. Das Kabel wird mitgeliefert
um sicherzustellen, dass das Gerät den FCC-Vorschriften der Klasse A entspricht.
NUR USA
Appendix
WARNUNG:
Dies ist ein Gerät der Klasse A. Dieses Gerät kann im Wohnbereich Funkstörungen verursachen; in diesem Fall
kann vom Betreiber verlangt werden, angemessene Gegenmaßnahmen durchzuführen und dafür aufzukommen.
Geräuschpegel
NORMALBETRIEB: < 70 dB (A)
gemessen nach DIN 45635
EN 27779
71
A10X_A10S#D_Print#p71_74.p65
71
03.2.4, 2:08 PM
WICHTIGE SICHERHEITSHINWEISE
ACHTUNG: Vor der ersten Inbetriebnahme dieses Gerätes sollten Sie diese Bedienungsanleitung
durchlesen und für die Bezugnahme gut aufbewahren.
Elektrische Energie kann viele nützliche Funktionen ausführen. Dieses Gerät wurde so konstruiert, dass es die
Sicherheit von Personen gewährleistet. FALSCHE VERWENDUNG KANN ZU ELEKTRISCHEN SCHLÄGEN
ODER ZU EINEM BRAND FÜHREN. Damit die in diesem Gerät eingebauten Sicherheitsfunktionen nicht
umgangen werden, sollten die folgenden Hinweise für Installation, Gebrauch und Wartung befolgt werden.
1. Lesen Sie die Anleitungen
Alle Sicherheitshinweise und Bedienungsanleitungen sollten vor der
Verwendung des Gerätes gelesen werden.
2. Bewahren Sie die Anleitungen auf
Die Sicherheitshinweise und Bedienungsanleitungen sollten für zukünftige
Bezugnahme aufbewahrt werden.
3. Beachten Sie die Warnungen
Alle Warnungen auf dem Gerät und in der Bedienungsanleitung sollten
beachtet werden.
4. Folgen Sie den Anleitungen
Alle Bedienungs- und Gebrauchsanleitungen sollten befolgt werden.
5. Reinigung
Den Stecker dieses Gerätes vor dem Reinigen von der Steckdose
abtrennen. Keine flüssigen Reinigungsmittel oder Sprühreiniger
verwenden. Zum Reinigen ein angefeuchtetes Tuch verwenden.
6. Zubehör
Vom Geräte-Hersteller nicht empfohlenes Zubehör sollte nicht
verwendet werden, da es eine Gefahrenquelle darstellen kann.
7. Wasser und Feuchtigkeit
Dieses Gerät nicht in der Nähe von Wasser verwenden - z.B. in
der Nähe einer Badewanne, eines Waschbeckens, einer
Küchenspüle oder einer Waschmaschine, in einem feuchten
Keller oder in der Nähe eines Schwimmbeckens usw.
8. Zubehör
Das Gerät nicht auf einen instabilen Wagen, einem Ständer,
einem Stativ, einer Halterung oder auf einem Tisch aufstellen.
Das Gerät kann herunterfallen und es können ernsthafte
Körperverletzungen bei Kindern oder Erwachsenen auftreten
oder es kann zu Beschädigungen des Gerätes kommen. Nur
Wagen, Ständer, Stativ, Halterung oder einen Tisch verwenden,
der vom Hersteller empfohlen wird oder zusammen mit dem
Gerät verkauft wird. Bei Befestigung an einer Wand oder in einem
Regal den Anleitungen des Herstellers folgen und einen vom
Hersteller empfohlenen Befestigungssatz verwenden.
9. Transport
Das auf einem Regal aufgestellte Gerät
sollte zusammen mit dem Regal vorsichtig
bewegt werden. Ein schnelles Anhalten,
übermäßige Gewalt und unebene
Oberflächen können zum Umstürzen des
Gerätes oder des Regals führen.
10. Belüftung
Schlitze und Öffnungen im Gehäuse sind für die Belüftung
vorgesehen, stellen den Betrieb des Gerätes sicher und schützen
vor Überhitzen. Diese Öffnungen sollten niemals blockiert werden,
indem das Gerät auf einem Bett, Sofa, Teppich oder einer ähnlichen
Oberfläche aufgestellt wird. Das Gerät sollte nur in einem anderem
Gehäuse, z.B. einem Bücherregal oder Schrank eingebaut werden,
wenn eine ausreichende Belüftung sichergestellt ist oder den
Anleitungen des Herstellers Folge geleistet wurde.
11. Stromversorgung
Dieses Gerät sollte nur mit der auf dem Aufkleber bezeichneten
Stromquelle betrieben werden. Falls Fragen über die Art der
Stromversorgung auftreten, wenden Sie sich an den Händler
oder das örtliche Energieversorgungsunternehmen. Bei
Geräten, die mit Batterien oder anderen Stromquellen betrieben
werden, siehe die Bedienungsanleitung.
12. Erdung oder Polarisierung
Dieses Produkt ist mit einer der folgenden Arten von Steckern ausgestattet.
Sollte es nicht möglich sein, den Stecker in die Netzsteckdose
einzustecken, lassen Sie sich bitte von Ihrem Elektriker beraten.
Umgehen Sie jedoch auf keinen Fall den Sicherheitszweck des Steckers.
a. Zweidraht (Netz)-Stecker.
72
A10X_A10S#D_Print#p71_74.p65
72
b. Dreidraht-Erde (Netz)-Stecker mit einem
Erdungsanschluss.
Dieser Stecker passt ausschließlich in eine Erdungs-Netzsteckdose.
13. Schutz des Netzkabels
Netzkabel sollten nicht im Durchgangsbereich von Personen
verlegt werden oder an Orten, an denen Gegenstände auf sie
gestellt oder gelegt werden. Besondere Beachtung sollten die
Stecker der Kabel, Verlängerungskabel mit Steckdosen und die
Stellen finden, an denen die Kabel aus dem Gerät austreten.
14. Blitzschlag
Als zusätzlicher Schutz dieses Gerätes während eines Gewitters,
oder wenn es für längere Zeit unbeaufsichtigt steht und nicht
verwendet wird, sollte der Netzstecker von der Steckdose abgetrennt
werden. Dadurch wird eine Beschädigung des Gerätes durch
Blitzschlag und Spannungsstöße in der Stromleitung vermieden.
15. Überladung
Nicht die Netzsteckdosen, die Verlängerungskabel oder
Verlängerungskabel mit Steckdosen überladen, da dies Feuer
oder elektrischen Schlag verursachen kann.
16. Eindringen von Gegenständen und Flüssigkeiten
Niemals Gegenstände durch die Öffnungen in das Gerät
einführen, da dies zum Kontakt mit stromführenden Teilen und zu
Kurzschlüssen führen und Feuer oder elektrischen Schlag zur
Folge haben kann. Keine Flüssigkeiten auf dem Gerät verschütten.
17. Wartung
Nicht versuchen, das Gerät selbst zu warten, da beim Öffnen
oder Entfernen der Abdeckungen gefährliche Stromspannungen
oder anderen Gefahren vorhanden sind. Alle Wartungsarbeiten
dem Kundendienst überlassen.
18. Wartung durch den Kundendienst
Das Gerät sofort von der Steckdose abtrennen und den
Kundendienst benachrichtigen, falls folgende Situationen eintreten:
a. Wenn das Netzkabel oder der Netzstecker beschädigt ist.
b. Wenn Flüssigkeit in das Gerät eingedrungen ist oder
Gegenstände hineingefallen sind.
c. Wenn das Gerät mit Regen oder Wasser in Kontakt gekommen ist.
d. Wenn das Gerät nicht normal betrieben werden kann, selbst wenn
die Bedienungsanweisungen befolgt werden. Nur diejenigen Regler
einstellen, die in der Bedienungsanleitung beschrieben werden,
da die falsche Einstellung anderer Regler eine Beschädigung zur
Folge haben kann, und umfangreiche Reparaturarbeiten durch
einen qualifizierten Techniker zur Wiederherstellung des Gerätes
für einen normalen Betrieb notwendig werden.
e. Wenn das Gerät fallengelassen und beschädigt wurde.
f. Wenn eine Änderung des normalen Betriebs festgestellt
wird, die eine Wartung notwendig macht.
19. Austauschteile
Falls Austauschteile benötigt werden, ist sicherzustellen, dass
der Wartungstechniker die vom Hersteller vorgeschriebenen
Bauteile verwendet, welche die gleichen Eigenschaften wie die
Original-Bauteile aufweisen. Die Verwendung von anderen als
Original-Bauteilen kann Feuer, elektrischen Schlag oder andere
Gefahren zur Folge haben.
20. Sicherheitsprüfung
Nach Beendigung einer Wartung oder Reparatur dieses Gerätes
den Wartungstechniker mit der Durchführung einer
Sicherheitsprüfung beauftragen und überprüfen lassen, dass
das Gerät in einem sicheren Betriebszustand ist.
21. Wand- oder Deckenmontage
Dieses Gerät sollte nur so an eine Wand oder Decke montiert
werden, wie es vom Hersteller empfohlen wird.
22. Wärmequellen
Dieses Gerät sollte nicht in der Nähe von Wärmequellen wie
Heizkörpern, Heizern, Öfen oder anderen Geräten (einschließlich
Verstärkern) aufgestellt werden, die Wärme produzieren.
03.2.4, 2:08 PM
Lesen Sie beim Setup Ihres Projektors unbedingt die
folgenden Sicherheitshinweise.
Vorsichtsmaßnahmen bei der Handhabung
der Lampeneinheit
■ Wenn die Lampe zerspringt, kann es zu
Verletzungen durch Glassplitter kommen. Falls
die Lampe zerspringt, sollten Sie die Lampe
von einem von SHARP autorisierten Händler
für Projektoren oder vom Kundendienst
austauschen lassen.
Vorsichtsmaßnahmen bei der Aufstellung des Projektors
■ Im Hinblick auf möglichst wenig Wartungsintervalle und
Aufrechterhaltung der Bildqualität empfiehlt SHARP, den Projektor
nicht in Räumen mit hoher Luftfeuchtigkeit, Staub und
Zigarettenrauch aufzustellen. Wenn der Projektor in dieser
Umgebung verwendet wird, muss das Objektiv öfter gereinigt werden.
Wenn der Projektor regelmäßig gereinigt wird, wird die Betriebsdauer
bei Verwendung des Gerätes in einer solchen Umgebung nicht
reduziert. Eine interne Gerätereinigung darf nur von einem von
SHARP autorisierten Händler für Projektoren oder vom Kundendienst
durchgeführt werden.
Stellen Sie den Projektor nicht dort auf, wo er direktem
Sonnenlicht oder hellem Licht ausgesetzt ist.
■ Positionieren Sie die Bildwand so, dass sie nicht direktem Sonnenlicht
oder Raumbeleuchtung ausgesetzt ist. Licht, das direkt auf die
Bildwand einfällt, schwächt die Farben und macht das Betrachten
schwierig. Schließen Sie die Vorhänge und dämpfen Sie das Licht,
wenn die Bildwand in einem sonnigen oder hellen Raum aufgestellt
wird.
Der Projektor kann gefahrlos auf den Maximalwinkel von 12
Grad geneigt werden.
■ Eine Platzierung sollte innerhalb von ±12 Grad horizontal erfolgen.
Setzen Sie den Projektor keinen harten Stößen und/oder
Vibrationen aus.
■ Handhaben Sie das Objektiv vorsichtig und schlagen Sie nicht gegen
das Objektiv bzw. beschädigen Sie die Objektivoberfläche nicht.
Gönnen Sie Ihren Augen gelegentlich eine Pause.
Vermeiden Sie Aufstellungsorte, an denen extreme
Temperaturen herrschen.
■ Halten Sie mindestens 7 7/8 Inches (20 cm) Abstand zwischen der
Luftaustrittöffnung und der nächsten Wand oder einem Gegenstand
ein.
■ Vergewissern Sie sich, dass die Einsaugöffnung und die
Luftaustrittöffnung nicht blockiert ist.
■ Wenn der Kühlventilator blockiert wird, schaltet die Schutzschaltung
den Projektor automatisch aus. Dies zeigt keine Fehlfunktion an.
Stellen Sie den Projektor dort auf, wo die Einsaug- und
Austrittöffnungen nicht blockiert werden, stecken Sie das Netzkabel
wieder und schalten Sie den Projektor. Dadurch wird der Projektor
wieder auf den normalen Betrieb eingestellt.
Vorsichtsmaßnahmen beim Transport des Projektors
■ Beim Transport des Projektors darf er keinen Erschütterungen und/
oder Vibrationen ausgesetzt werden, da er anderenfalls beschädigt
werden könnte. Handhaben Sie das Objektiv besonders vorsichtig.
Trennen Sie vor dem Transport des Projektors unbedingt das
Netzkabel von der Steckdose und andere Anschlusskabel ab.
Andere angeschlossene Geräte
■ Wenn ein Computer oder ein anderes audiovisuelles Gerät an den
Projektor angeschlossen wird, führen Sie die Anschlüsse NACH
Ausschalten des Projektors und des anzuschließenden Gerätes aus.
■ Bitte lesen Sie für die Anschlussausführung die Bedienungsanleitung
des Projektors und des anzuschließenden Gerätes.
Verwendung des Projektors in anderen Ländern
■ Die Stromspannung und die Steckerform kann je nach Region oder
Land, in dem Sie den Projektor verwenden, unterschiedlich sein.
Verwenden Sie, wenn der Projektor in Übersee verwendet wird,
unbedingt das für das jeweilige Land zu verwendende Netzkabel.
Temperatur-Überwachungsfunktion
■ Wenn der Projektor aufgrund von
Problemen bei der Aufstellung oder wegen
eines Blockierens der Luftöffnungen zu
warm wird, leuchtet “ ” und “
” in der unteren linken Ecke
des Bildes. Wenn die Temperatur weiterhin ansteigt, wird die Lampe
ausgeschaltet und die TEMPERATURWARN-Anzeige auf dem
Projektor blinkt. Nach einer Abkühlzeit von 90 Sekunden wird das
Gerät ausgeschaltet.
Info
• Der Kühlventilator reguliert die interne Temperatur; seine Leistung
wird automatisch geregelt. Das Ventilatorgeräusch kann sich während
des Projektorbetriebes entsprechend der Ventilatordrehzahl ändern.
Dies zeigt keine Fehlfunktion an.
• Trennen Sie das Netzkabel nicht während der Projektion oder des
Kühlventilatorbetriebs ab. Dies kann eine Beschädigung durch einen
Anstieg der internen Temperatur hervorrufen, da auch der
Kühlventilatorbetrieb stoppt.
Appendix
■ Ununterbrochenes Betrachten der Bildwand über Stunden
überanstrengt Ihre Augen. Gönnen Sie Ihren Augen unbedingt
gelegentlich eine Pause.
Blockieren Sie nicht die Luftaustritt- und Einsaugöffnungen.
■ Die Betriebstemperatur für den Projektor liegt bei 41°F bis 95°F
(+5°C bis +35°C).
■ Die Lagertemperatur für diesen Projektor liegt bei –4°F bis 140°F
(–20°C bis +60°C).
73
A10X_A10S#D_Print#p71_74.p65
73
03.2.4, 2:08 PM
Zugriff auf die PDF-Bedienungsanleitungen
Die CD-ROM beinhaltet Bedienungsanleitungen im PDF-Format in mehreren Sprachen, damit
Sie auch dann mit dem Projektor arbeiten können, wenn Sie dieses Handbuch nicht vorliegen
haben. Zur Verwendung dieser Anleitungen muss der Adobe Acrobat Reader auf Ihrem PC
(Windows oder Macintosh) installiert sein. Sollten Sie Acrobat Reader noch nicht installiert
haben, können Sie das Programm von der CD-ROM herunterladen.
Installation von Acrobat Reader von der CD-ROM
Für Windows:
1 Die CD-ROM in das CD-ROM-Laufwerk einlegen.
2 Das Symbol “Arbeitsplatz” doppelt anklicken.
3 Das “CD-ROM”-Laufwerk doppelt anklicken.
4 Den “ACROBAT”-Ordner doppelt anklicken.
5 Die einzusehende Sprache (Ordnername) doppelt
anklicken.
6 Das Installationsprogramm doppelt anklicken und
die Anweisungen auf dem Bildschirm befolgen.
Für Macintosh:
1 Die CD-ROM in das CD-ROM-Laufwerk einlegen.
2 Das Symbol “CD-ROM” doppelt anklicken.
3 Den “ACROBAT”-Ordner doppelt anklicken.
4 Die einzusehende Sprache (Ordnername) doppelt
anklicken.
5 Das Installationsprogramm doppelt anklicken und
die Anweisungen auf dem Bildschirm befolgen.
Für andere Betriebssysteme:
Bitte laden Sie Acrobat Reader aus dem Internet (http://www.adobe.com) herunter.
Für andere Sprachen:
Wenn Acrobat Reader für andere nicht auf dieser CD-ROM enthaltenen Sprachen verwendet werden
soll, kann die entsprechende Version aus dem Internet heruntergeladen werden.
Zugriff auf die PDF-Bedienungsanleitungen
Für Windows:
1 Die CD-ROM in das CD-ROM-Laufwerk einlegen.
2 Das Symbol “Arbeitsplatz” doppelt anklicken.
3 Das “CD-ROM”-Laufwerk doppelt anklicken.
4 Den “MANUALS”-Ordner doppelt anklicken.
5 Die einzusehende Sprache (Ordnername) doppelt
anklicken.
6 Die PDF-Datei “A10” doppelt anklicken, um auf die
Bedienungsanleitung des Projektors zuzugreifen.
Für Macintosh:
1 Die CD-ROM in das CD-ROM-Laufwerk einlegen.
2 Das Symbol “CD-ROM” doppelt anklicken.
3 Den “MANUALS”-Ordner doppelt anklicken.
4 Die einzusehende Sprache (Ordnername) doppelt
anklicken.
5 Die PDF-Datei “A10” doppelt anklicken, um auf die
Bedienungsanleitung des Projektors zuzugreifen.
Hinweis
• Wenn die gewünschte PDF-Datei nicht durch das doppelte Anklicken mit der Maus geöffnet werden kann,
sollte zuerst Acrobat Reader gestartet und dann die gewünschte Datei mit den Menüs “Datei”, “Öffnen”
bestimmt werden.
• Die Datei “readme.txt” auf der CD-ROM enthält wichtige Informationen, die nicht in der vorliegenden
Bedienungsanleitung enthalten sind.
74
A10X_A10S#D_Print#p71_74.p65
74
03.2.4, 2:08 PM
Avant d’utiliser ce projecteur, veuillez lire attentivement ce mode d’emploi.
Introduction
FRANÇAIS
Il y a au moins deux raisons valables pour enregistrer sans retard l’acquisition de ce projecteur SHARP en retournant
la carte de garantie que contient l’emballage du projecteur.
1. GARANTIE
Vous êtes assuré de bénéficier pleinement des pièces et services attachés à la garantie aussitôt que la
carte nous est retournée.
2. ACTE SUR LA SÉCURITÉ DE L’UTILISATEUR D’UN PRODUIT
Vous serez promptement informé de toute question concernant la sécurité, de toute modification nécessaire
et de tout rappel en usine que SHARP serait tenu d’offrir dans le cadre de l’Acte de 1972 sur la sécurité de
l’utilisateur d’un produit. VEUILLEZ LIRE ATTENTIVEMENT LE PARAGRAPHE IMPORTANT “GARANTIE
LIMITÉE”.
Etats-Unis uniquement
AVERTISSEMENT :
Source de lumière de grande intensité. Ne pas fixer les yeux sur le faisceau lumineux, ne pas le
regarder directement. S’assurer tout spécialement que les enfants ne fixent pas les yeux directement
sur le faisceau.
AVERTISSEMENT : Pour réduire les risques d’incendie et d’électrocution, ne pas exposer cet
appareil à la pluie ou à l’humidité.
Voir le dessous du projecteur.
ATTENTION
RISQUE D’ÉLECTROCUTION.
NE PAS RETIRER LES VIS À
L’EXCEPTION DE LA VIS
RÉSERVÉE À L’ENTRETIEN.
ATTENTION : AFIN D’ÉVITER LES RISQUES D’ÉLECTROCUTION,
NE PAS RETIRER LE CAPOT SUPÉRIEUR.
L’APPAREIL NE CONTIENT AUCUNE PIÈCE QUE L’UTILISATEUR
PUISSE REMPLACER, À L’EXCLUSION DE LA LAMPE. CONFIER
TOUTE RÉPARATION À UN PERSONNEL QUALIFIÉ.
AVERTISSEMENT :
Le symbole de l’éclair inscrit dans un triangle
équilatéral est un avertissement à l’attention de
l’utilisateur sur la présence, à l’intérieur du produit,
de pièces non isolées soumises à une “très haute
tension” pouvant provoquer une électrocution.
Le symbole du point d’exclamation, inscrit dans
un triangle équilatéral, a pour objet d’appeler
l’attention de l’utilisateur sur la présence, dans la
documentation accompagnant le produit,
d’importantes instructions concernant son mode
opératoire et son entretien (réparation).
Les règles FCC stipulent que toute modification et transformation apportées à cet appareil qui ne
seraient pas expressément approuvées par le fabricant peuvent entraîner, pour l’utilisateur, la perte
du droit de faire fonctionner cet appareil.
Etats-Unis uniquement
INFORMATIONS
Cet appareil a été testé et reconnu conforme aux limites prescrites pour le matériel numérique de Classe A, selon les
spécifications de la 15ème partie des Règles de la Commission Fédérale des Communications (FCC). Ces règles sont
conçues pour assurer une protection suffisante contre des interférences nuisibles dans une zone résidentielle. Cet
appareil génère, utilise et peut émettre des signaux radioélectriques et, s’il n’est pas installé et employé conformément
aux prescriptions de son mode d’emploi, il peut provoquer des interférences de communications radio. Etant donné
que cet appareil risque de provoquer effectivement des interférences nuisibles dans une zone résidentielle, l’utilisateur
sera tenu d’y remédier et d’éliminer les interférences à son propre compte.
Etats-Unis uniquement
Le câble d’ordinateur fourni doit être utilisé avec l’appareil. Ce câble garantit la conformité de l’appareil avec les règles
FCC concernant la Classe A.
Etats-Unis uniquement
AVERTISSEMENT :
Ce produit appartient à la Classe A. Dans un environnement résidentiel, il peut provoquer des interférences radio et, dans ce
cas, l’utilisateur peut être obligé de prendre les mesures nécessaires.
Appendix
75
A10X_A10S#F_Print#p75_78.p65
75
03.2.4, 2:08 PM
MESURES DE SÉCURITÉ IMPORTANTES
ATTENTION : Veuillez lire toutes ces instructions avant de faire fonctionner ce produit et les conserver pour
toutes consultations ultérieures.
L’électricité peut être utilisée pour beaucoup de fonctions utiles. Ce produit a été conçu et fabriqué pour assurer une
utilisation en toute sécurité. CEPENDANT, TOUTE UTILISATION INCORRECTE PEUT CAUSER UNE ÉLECTROCUTION OU
DÉCLENCHER UN INCENDIE. Pour éviter de contourner les dispositifs de sécurité incorporés à ce produit, veuillez respecter
les règles de base suivantes pour son installation, utilisation et entretien.
1. Lire les instructions
13. Protection du câble d’alimentation
Avant d’utiliser l’appareil, veuillez lire les instructions de sécurité
et d’emploi.
2. Conservez les instructions
Les instructions de sécurité et d’emploi doivent être
soigneusement conservées pour référence ultérieure.
3. Respectez les avertissements
Tous les avertissements apposés sur l’appareil ou notés dans
le mode d’emploi doivent être respectés.
4. Suivre les instructions
Toutes les instructions de fonctionnement et d’emploi doivent
être scrupuleusement suivies.
5. Nettoyage
Débranchez la prise secteur de l’appareil avant de le nettoyer.
N’utilisez pas de liquides ou aérosols de nettoyage. Utilisez
uniquement un chiffon humide pour nettoyer l’appareil.
6. Options
N’utilisez pas d’option non conseillée par le fabricant de
l’appareil qui pourrait présenter le moindre risque.
7. Eau et humidité
N’utilisez pas cet appareil près d’un point d’eau, —à proximité
d’une baignoire, d’un lavabo, d’un évier ou dans un sous-sol
humide par exemple.
8. Accessoires
Ne déposez pas l’appareil sur un support instable. L’appareil
risque de tomber et de causer des blessures graves à un enfant
ou un adulte et d’être sérieusement endommagé. Utilisez
uniquement les types de support conseillés par le fabricant ou
vendus avec l’appareil. La fixation de l’appareil à un accessoire
doit être conforme aux instructions du fabricant et doit être
réalisée au moyen des pièces conseillées par le fabricant.
9. Transport
L’ensemble appareil et chariot doit être
manoeuvré avec soin. Tout arrêt brutal,
effort excessif ou inégalilé du sol risque
d’entraîner le renversement du chariot et
la chute de l’appareil.
10. Ventilation
Les orifices et découpes pratiqués sur le coffret sont destinés à
assurer la ventilation de l’appareil afin d’obtenir un
fonctionnement fiable et d’éviter les surchauffes. Ces ouvertures
ne doivent pas être obstruées en plaçant par exemple l’appareil
sur un lit, un canapé, un tapis et toute autre surface similaire.
L’appareil ne doit pas être installé dans un meuble, bibliothèque
ou étagères si la ventilation adéquate ne peut être assurée et
les instructions du fabricant respectées.
11. Sources d’alimentation
Cet appareil ne doit être alimenté qu’à partir du type de source
indiqué sur la plaquette signalétique. Au moindre doute
concernant le type de source disponible, contactez le revendeur
de l’appareil ou la compagnie d’électricité. Dans le cas
d’appareils fonctionnant sur batterie ou autre source que le
secteur, reportez-vous au mode d’emploi.
12. Mise à la terre et polarisation
Ce produit est équipé d’un des types de prise suivant. Si la
prise mâle du câble d’alimentation ne correspondant pas à celle
du secteur, contactez un électricien pour la remplacer.
N’utilisez la prise sans la sécurité supplémentaire offerte par ce
type de prise.
a. Type de prise à deux fils (secteur).
b. Type de prise à trois fils (secteur) avec une borne de mise
à la masse.
Cette dernière ne s’enfiche que dans une prise du secteur
adéquate.
Faites passer le câble d’alimentation de façon à ce qu’il ne
puisse abîmé, piétiné, écrasé par un meuble ou tout objet lourd ;
examinez soigneusement le cheminement du câble
d’alimentation entre la prise du secteur et l’entrée de l’appareil.
14. Orage
Par mesure de protection complémentaire, débranchez le câble
d’alimentation de la prise du secteur dès que survient un orage
ou encore lorsque l’appareil ne va pas être utilisé pendant une
longue période. Ainsi, l’appareil ne sera pas exposé à une
surtension éventuelle du secteur due à la foudre.
15. Surcharge
Evitez de surcharger les prises du secteur murales ou intégrées
ainsi que les rallonges car cela risque de provoquer un incendie
ou une électrocution.
16. Introduction d’objets étrangers ou de liquide
N’essayez pas d’introduire des objets dans les ouvertures de
l’appareil car ceux-ci risquent d’enter en contact avec les
composants soumis à des hautes tensions et provoquer un
incendie ou une électrocution. Eviter d’asperger ou de renverser
le moindre liquide sur l’appareil.
17. Réparation
Ne tentez aucune réparation de cet appareil par vous-même
car l’ouverture ou le retrait du boîtier expose des composants
soumis à des hautes tensions qui présentent des risques
importants d’électrocution. S’adresser à un technicien qualifié
pour toute réparation.
18. Dégâts entraînant une réparation
Dans les cas suivants, débranchez le câble d’alimentation et
faites vérifier ou réparer l’appareil par du personnel qualifié :
a. Le câble d’alimentation ou sa fiche est endommagé.
b. Un liquide a été renversé sur l’appareil ou un objet étranger
a été introduit dans l’appareil.
c. L’appareil a été exposé à la pluie ou à l’eau.
d. L’appareil ne fonctionne pas normalement bien que les
instructions du mode d’emploi aient été respectées.
N’utilisez pas d’autres commandes que celles mentionnées
dans ce document car toute action risque d’endommager
l’appareil et d’entraîner, le plus souvent, l’intervention
coûteuse d’un technicien qualifié afin de rétablir les
conditions normales de fonctionnement.
e. L’appareil est tombé ou a été endommagé d’une manière
ou d’une autre.
f. Les performances de l’appareil se sont nettement
dégradées et un entretien semble nécessaire.
19. Pièces de rechange
Si une pièce doit être remplacée, assurez-vous auprès du
service de réparation que le remplacement sera effectué avec
une pièce prescrite par le fabricant ou ayant des caractéristiques
identiques. Des pièces de rechange non autorisées pourraient
causer un incendie, une électrocution ou d’autres dangers.
20. Contrôle de sécurité
A la fin de toute intervention d’entretien ou de réparation,
demandez au technicien d’effectuer les vérifications de sécurité
pour déterminer si le produit est en état de fonctionnement
correct.
21. Montage mural ou au plafond
Ce produit doit être monté sur un mur ou au plafond uniquement
de la manière recommandée par le fabricant.
22. Chaleur
Cet appareil doit être placé loin des sources de chaleur telles
que les radiateurs, accumulateurs de chaleur, poêles et autres
appareils produisant de la chaleur (y compris les amplificateurs).
76
A10X_A10S#F_Print#p75_78.p65
76
03.2.4, 2:08 PM
Assurez-vous de lire les mesures de sécurité suivantes lors
de la mise en route de votre projecteur.
Mise en garde concernant l’ensemble
lampe
■ Prenez les précautions nécessaires
en raison des risques potentiels
présentés par les particules de verre
en cas de rupture de la lampe. En cas
de rupture, contactez le revendeur ou
SAV agréé Sharp le plus proche pour
effectuer son remplacement.
Précautions concernant la mise en route du projecteur
■ Pour réduire l’entretien au minimum et maintenir une haute
qualité d’image, SHARP recommande que ce projecteur soit
installé dans un endroit à l’abri de l’humidité, de la poussière
et de la fumée de cigarette. Lorsque le projecteur est exposé
à ces éléments, l’objectif doit être nettoyé plus souvent. Tant
que le projecteur est nettoyé régulièrement, son utilisation dans
cet environnement ne réduira pas sa durée de fonctionnement.
Le nettoyage interne doit être effectué uniquement par un
revendeur ou SAV agréé Sharp.
N’installez pas le projecteur dans les endroits exposés
au soleil ou à un fort éclairage.
Ne pas obstruer les orifices d’entreé ou d’évacuation d’air.
■ Laissez un espace d’au moins 7 7/8'' (20 cm) entre l’orifice
d’évacuation d’air et le mur ou l’obstacle le plus proche.
■ Assurez-vous que les arrivées ou les évacuations d’air ne
sont pas obstrués.
■ Si le ventilateur de refroidissement est obstrué, un circuit de
protection arrêtera automatiquement le projecteur. Cela n’est
pas un signe de dysfonctionnement. Débranchez le câble
d’alimentation au niveau de la prise du secteur et attendez
au moins 10 minutes. Placez le projecteur dans un endroit
où les orifices d’entrée ou d’évacuation d’air ne sont pas
obstrués, puis rebranchez le câble d’alimentation et mettez
le projecteur en marche. Cette opération remettra le projecteur
en état normal de fonctionnement.
Précautions à prendre pour le transport du projecteur
■ Lorsque vous transportez le projecteur, prenez garde de ne
pas le soumettre à des chocs et / ou à des vibrations car les
chocs risquent de l’endommager. Faites extrêmement attention à l’objectif. Avant de déplacer le projecteur, débranchez
le câble d’alimentation de la prise du secteur ainsi que tout
autre câble de raccordement.
■ Positionnez l’écran de façon à ce qu’il ne soit pas exposé
directement au soleil ou à l’éclairage de la pièce. Toute lumière
directe sur l’écran délave les couleurs et rend le visionnage
difficile. Fermez les rideaux et diminuez l’éclairage lorsque vous
installez l’écran dans une pièce ensoleillé ou très éclairée.
Autres équipements connectés
Le projecteur peut sans risques être incliné à un angle
maximum de 12 degrés.
Utilisation du projecteur dans d’autres pays
■ Le placement doit être de +/- 12 degrés par rapport à l’horizontale.
■ Avant de raccorder au projecteur un ordinateur ou tout autre
équipement audiovisuel, veillez à tous les éteindre d’abord.
■ Veuillez lire les modes d’emploi du projecteur et des
équipements à connecter avant de procéder au raccordement.
■ La tension et la forme de la prise du secteur peuvent varier
suivant la région ou le pays où vous souhaitez utiliser le
projecteur. Quand le projecteur est utilisé dans un autre pays,
assurez-vous d’utiliser le câble d’alimentation approprié.
Fonction de surveillance de la température
N’installez pas le projecteur dans les endroits où il
pourrait être soumis à des chocs ou à des vibrations.
■ Prenez garde à ne pas cogner ou endommager la lentille
de l’objectif.
Reposez vos yeux de temps en temps.
■ Le visionnage continu de l’écran pendant des heures
fatigue les yeux. Assurez-vous de reposer vos yeux.
■ La température de fonctionnement du projecteur doit être
comprise entre 41°F et 95°F (+5 et +35°C).
■ La température de stockage du projecteur doit être comprise
entre –4°F et 140°F (–20°C et +60°C).
Info
• Le ventilateur de refroidissement régule la température
intérieure du projecteur et son fonctionnement est contrôlé
automatiquement. Le bruit du ventilateur peut changer en
cours de projection à cause de la modification de sa vitesse.
Cela n’est pas un signe de dysfonctionnement.
• Ne pas débrancher le câble d’alimentation pendant la projection ou le fonctionnement du ventilateur de refroidissement.
L’appareil risque d’être endommagé par l’augmentation de
sa température interne conséquente à l’arrêt du ventilateur
qui ne peut assurer le cycle de refroidissement prévu.
Appendix
Evitez les endroits où règnent des conditions de température extrêmes.
■ Si le projecteur commence à
surchauffer à cause de problèmes
d’installation ou d’obstruction des ouies
de ventilation, “
” et “
” se
mettent à s’allumer dans le coin
inférieur gauche de l’image. Si la température continue
d’augmenter, la lampe s’éteindra, le voyant d’alarme de
température elevée sur le projecteur se mettra à clignoter et
après une période de refroidissement de 90 secondes,
l’alimentation sera coupée.
77
A10X_A10S#F_Print#p75_78.p65
77
03.2.4, 2:08 PM
Comment accéder aux modes d’emploi PDF
Les manuels techniques au format PDF et en plusieurs langues sont inclus dans le CD-ROM afin que
vous puissiez travailler avec le projecteur même si vous ne possédez pas ce manuel. Pour utiliser ces
manuels, le progamme Adobe Acrobat Reader doit être installé sur votre PC (Windows ou Macintosh).
Si Acrobat Reader n’est pas encore installé sur votre machine, vous pouvez l’installer à partir du CDROM.
Pour installer Acrobat Reader à partir du CD-ROM
Sous Windows :
1 Placez le CD-ROM dans le lecteur.
2 Double-cliquez sur l’icône “Poste de travail”.
3 Double-cliquez sur le lecteur de CD-ROM.
4 Double-cliquez sur le dossier “ACROBAT”.
5 Double-cliquez sur la langue (nom du dossier) que
vous souhaitez utiliser.
6 Double-cliquez sur le programme d’installation et
suivez les instructions qui s’affichent à l’écran.
Sur Macintosh :
1 Placez le CD-ROM dans le lecteur.
2 Double-cliquez sur l’icône “CD-ROM”.
3 Double-cliquez sur le dossier “ACROBAT”.
4 Double-cliquez sur la langue (nom du dossier) que
vous souhaitez utiliser.
5 Double-cliquez sur le programme d’installation et
suivez les instructions qui s’affichent à l’écran.
Pour les autres systèmes d’exploitation :
Veuillez télécharger Acrobat Reader sur le site Internet (http://www.adobe.com).
Pour les autres langues :
Si vous préférez utiliser Acrobat Reader dans une autre langue que celles incluses sur le CD-ROM, veuillez
télécharger la version appropriée sur le site Internet.
Accès aux modes d’emploi PDF
Sous Windows :
1 Placez le CD-ROM dans le lecteur.
2 Double-cliquez sur l’icône “Poste de travail”.
3 Double-cliquez sur le lecteur de CD-ROM.
4 Double-cliquez sur le dossier “MANUALS”.
5 Double-cliquez sur la langue (nom du dossier) que
vous souhaitez utiliser.
6 Double-cliquez sur le fichier pdf “A10” pour accéder
aux manuels du projecteur.
Sur Macintosh :
1 Placez le CD-ROM dans le lecteur.
2 Double-cliquez sur l’icône “CD-ROM”.
3 Double-cliquez sur le dossier “MANUALS”.
4 Double-cliquez sur la langue (nom du dossier) que
vous souhaitez utiliser.
5 Double-cliquez sur le fichier pdf “A10” pour accéder
aux manuels du projecteur.
Remarque
• Si le fichier PDF souhaité ne peut être ouvert par un double clic de souris, lancez d’abord Acrobat Reader, spécifiez
ensuite le fichier souhaité en utilisant le menu “Fichier”, “Ouvrir”.
• Reportez-vous au fichier “readme.txt” sur le CD-ROM pour obtenir des informations importantes n’apparaissant pas
dans ce manuel technique.
78
A10X_A10S#F_Print#p75_78.p65
78
03.2.4, 2:08 PM
Läs noga denna bruksanvisning innan projektorn tas i bruk.
Introduktion
SVENSKA
Det finns två viktiga anledningar till att snabbt registrera garantin för din SHARP-projektor med hjälp av
registreringskortet som medföljer projektorn.
1. GARANTI
Denna är till för att försäkra att du erhåller alla förmåner ifråga om reservdelar, service och arbete som
garanteras för enheten vid inköpet.
2. SÄKERHETSLAG FÖR KONSUMENTPRODUKT
För att försäkra att du snabbt erhåller säkerhetsbesked om inspektion, modifiering eller återkallning som
SHARP är förpliktad att ge enligt 1972 års Säkerhetslag för Konsumentprodukter, BÖR DU NOGA LÄSA DEN
VIKTIGA KLAUSULEN “BEGRÄNSAD GARANTI”.
ENBART USA
VARNING: Väldigt skarp ljuskälla. Titta inte rakt in i strålen. Var speciellt noga med att barn inte tittar direkt in i ljusstrålen.
VARNING: För att begränsa risken för brand eller elstötar skall enheten hållas borta från regn och fukt.
Se projektorns undersida.
OBSERVERA
RISK FÖR ELSTÖTAR. AVLÄGSNA
INTE NÅGRA SKRUVAR UTÖVER
DE SPECIFIKT ANGIVNA
SERVICESKRUVARNA.
OBSERVERA: FÖR ATT REDUCERA RISKEN FÖR ELSTÖTAR
FÅR LOCKET INTE TAS AV.
UTÖVER LAMPENHETEN FINNS DET INGA DELAR SOM
KONSUMENTEN KAN REPARERA. ÖVERLÅT ALLT
SERVICEARBETE TILL KVALIFICERAD PERSONAL.
VARNING:
Symbolen med en blixt inuti en liksidig triangel är
avsedd att varna användaren för närvaron av
oisolerad “farlig spänning” inuti enheten som är
tillräcklig kraftig för att orsaka elstötar.
Utropstecknet inuti en triangel gör användaren
uppmärksam på viktiga föreskrifter för drift och
underhåll (service) i dokumentationen som
medföljer enheten.
De amerikanska FCC-bestämmelserna fastslår att ändringar eller modifieringar utan särskilt tillstånd från
tillverkaren kan häva användarens rätt att använda enheten.
ENBART USA
INFORMATION
Denna utrustning har testats och funnits uppfylla gränserna för digitala produkter av klass A, i enlighet med
del 15 i de amerikanska FCC-reglerna. Dessa gränser är fastställda för att erbjuda rimligt skydd mot skadliga
störningar i en kommersiell miljö. Denna utrustning alstrar, använder sig av och kan avge radiofrekvensenergi
och kan störa radiomottagning om den inte installeras eller används i enlighet med anvisningarna i denna
bruksanvisning. Användning av denna utrustning i en hemmiljö kommer sannolikt att orsaka störningar, i
vilket fall kunden själv måste lösa problemet på egen hand.
ENBART USA
Den medlevererade datorkabeln måste användas med enheten. Denna kabel försäkrar att enheten uppfyller FCC:s
godkännande av produkten för klass A.
ENBART USA
VARNING:
Appendix
Detta är en produkt av klass A. I hemmiljö kan produkten störa radiomottagning, i vilket fall användaren kan behöva vidta
motåtgärder.
79
A10X_A10S#Sw_Print#p79_82.p65
79
03.2.4, 2:08 PM
VIKTIGA SÄKERHETSFÖRESKRIFTER
OBSERVERA: Läs dessa föreskrifter innan du använder produkten för första gången och spara dem för
framtida bruk.
Man kan använda elektricitet till många praktiska saker. Denna produkt har utvecklats och tillverkats för att kunna säkerställa
din personliga säkerhet. FELAKTIG HANTERING KAN MEDFÖRA RISK FÖR ELEKTRISKA STÖTAR ELLER BRAND. För att
inte sätta de säkerhetsanordningar som byggts in i denna produkt ur spel, måste följande grundregler beaktas vid installation,
användning och underhåll.
1. Läs anvisningarna
13. Skydd av nätkabeln
Läs noga alla föreskrifter om säkerhet och drift innan produkten
tas i bruk.
2. Bevara anvisningarna
Alla föreskrifter om säkerhet och drift bör förvaras på ett säkert
ställe för framtida referens.
3. Iaktta varningarna
Iaktta samtliga varningar som förekommer i bruksanvisningen
och på själva produkten.
4. Följ anvisningarna
Följ noga samtliga instruktioner om säkerhet och
tillvägagångssätt.
5. Rengöring
Koppla loss enheten från el-uttaget före rengöring. Använd inte
flytande rengöringsmedel eller sådana av sprejtyp. Rengör med
en fuktig trasa.
6. Anordningar
Använd inte anordningar som inte specifikt rekommenderas av
tillverkaren då sådana kan orsaka problem.
7. Vatten och fukt
Använd inte enheten i närheten av vatten – t.ex. nära ett badkar,
tvättställ, diskbänk eller tvättmaskin, och ej heller i en fuktig
källare, nära en simbassäng e.dyl.
8. Tillbehör
Placera inte enheten på en ostadig vagn, ställning, stativ, hållare
eller bord. Enheten kan falla och skadas eller utsätta någon för
personskador. Använd endast en vagn, ställning, stativ, hållare
eller bord som rekommenderas av tillverkaren eller säljs
tillsammans med enheten. Montering av enheten bör utföras
enligt tillverkarens anvisningar och med monteringstillbehör som
rekommenderas av tillverkaren.
9. Transport
En kombination av denna enhet och en
vagn bör flyttas med största försiktighet.
Hastiga stopp, kraftiga stötar och ojämna
underlag kan göra att ekipaget välter och
skadas.
10. Ventilation
Skåror och öppningar är avsedda att förse enheten med
ventilation som försäkrar felfri drift och skyddar mot överhettning.
Dessa öppningar bör aldrig täckas över eller blockeras genom
att placera enheten på en säng, soffa, tjock matta eller liknande
underlag. Enheten bör ej heller placeras på inneslutna ställen
såsom i en bokhylla eller ställning såvida inte lämplig ventilation
kan försäkras enligt tillverkarens anvisningar.
11. Strömkällor
Denna produkt får endast drivas med den typ av strömkälla
som anges på märketiketten. Kontakta din återförsäljare eller
det lokala elkraftbolaget om du är osäker på vilken spänning
som används i hemmet. För produkter som skall drivas med
batterier eller någon annan strömkälla bör du anlita
bruksanvisningen som medföljer denna.
12. Jordning och polarisation
Till denna produkt medföljer en av de följande typerna av
stickproppar. Om stickproppen inte kan stickas in i eluttaget,
skall du kontakta en elektriker. Koppla inte ur jorden i
stickproppen. Upphäv inte stickproppens säkerhetssyfte.
a. Tvåtrådig (nät-) stickpropp.
b. Tretrådig jordad (nät-) stickpropp med jorduttag.
Denna stickpropp passar endast i ett jordat eluttag.
Alla nätkablar skall dras så att det inte finns risk att någon
trampar på dem eller att de kläms av möbler eller andra föremål.
Var speciellt försiktig med kablarnas kontakter,
förlängningsledningar nätintaget på enheten.
14. Åskväder
Koppla för säkerhets skull loss nätkabeln från både eluttaget
och nätintaget på enheten vid åskväder och inför perioder då
enheten inte skall användas under en längre tid. Detta förhindrar
skador på enheten som kan orsakas av blixtnedslag eller
strömrusning.
15. Överbelastning
Akta dig för att överbelasta vägguttag, förlängningskablar och
stickproppsadatprar då detta kan skapa risk för brand och
elstötar.
16. Intrång av föremål och vätskor
Stick aldrig in föremål av något slag i öppningarna på enheten
då de kan vidröra delar med högspänning eller kortsluta kretsar
och därmed skapa risk för brand och elstötar. Var också noga
med att inte spilla vätskor på enheten.
17. Servicearbete
Försök aldrig att reparera produkten på egen hand då öppning
eller borttagning av locken kan utsätta dig för hög spänning
eller andra faror. Överlåt alla servicearbeten till en kvalificerad
servicetekniker.
18. Skador som kräver service
Koppla loss enheten från eluttaget och kontakta kvalificerad
servicepersonal om något av det följande inträffar:
a. Nätkabeln eller dess stickpropp har skadats.
b. Vätska har spillts på eller föremål har trängt in i produkten.
c. Produkten har utsatts för regn eller vattenstänk.
d. Om produkten uppträder onormalt trots att den hanteras
enligt bruksanvisningen. Använd endast de reglage som
specifikt anges i bruksanvisningen då felaktig justering med
övriga reglage kan leda till svåra skador, som kan kräva
omfattande reparationer av en kvalificerad tekniker.
e. Produkten har tappats eller på något sätt utsatts för skador.
f. Service kan också behövas när bild- och ljudkvalitet skiljer
sig märkbart från den normala.
19. Reservdelar
Om några delar behöver bytas skall du försäkra att teknikern
använder delar som specifikt anges av tillverkaren eller som
har samma egenskaper som den ursprungliga delen. Delar som
ej godkänts kan medföra risk för brand, elektriska stötar eller
annan fara.
20. Säkerhetskontroll
Efter avslutad service eller reparationsarbete skall du be
teknikern att utföra en fullständig säkerhetskontroll för att försäkra
att produkten är i fullgod driftskondition.
21. Tak- eller väggmontering
Vid montering av enheten på en vägg eller hängande i taket
skall tillverkarens rekommendationer noggrant följas.
22. Värme
Produkten bör hållas på behörigt avstånd från värmekällor som
element, värmeutsläpp, spisar och andra föremål (inklusive
förstärkare) som avger värme.
80
A10X_A10S#Sw_Print#p79_82.p65
80
03.2.4, 2:08 PM
Observera följande säkerhetsföreskrifter vid projektorns
uppställning.
Observera angående lampenheten
Blockera inte ventilationsöppningarna.
■ Det föreligger risk för skärsår om lampan
råkar spricka. Kontakta närmaste
auktoriserade Sharp-projektorhandlare
eller en serviceverkstad för att köpa en
byteslampa om detta inträffar.
■ Lämna ett utrymme på minst 7 7/8'' (20 cm) mellan luftuttaget
och närmaste vägg eller annat föremål.
■ Se till att luftintaget och ventilationsöppningarna inte
blockeras.
■ En skyddsanordning slår automatiskt av projektorlampan om
kylfläkten blockeras. Detta tyder inte på något fel. Koppla loss
projektorns nätkabel från eluttaget och vänta i minst 10 minuter. Se till att projektorn står på en plats där luftintaget och
ventilationsöppningarna inte blockeras, anslut nätkabeln igen
och sätt på projektorn. Projektorn bör då fungera som vanligt.
Observera angående projektorns uppställning
■ För att reducera behovet för servicearbete och försäkra en
fortsatt hög bildkvalitet rekommenderar SHARP att projektorn
installeras på ett ställe som ej utsätts för fukt, damm och
cigarrettrök. Objektivet måste rengöras oftare om projektorn
används i en sådan miljö. Användning i dessa slags miljöer
förkortar dock inte projektorns livslängd så länge den
rengörs regelbundet. Intern rengöring bör endast utföras av
en auktoriserad Sharp-projektorhandlare eller en
serviceverkstad.
Placera inte projektorn på en plats som utsätts för
direkt solljus eller mycket stark belysning.
■ Placera duken så att den inte utsätts för direkt solljus eller
rummets belysning. Ljus som träffar duken direkt orsakar
bleka färger och försvårar tittningen. Dra för gardinerna och
dämpa belysningen i rummet om visningen görs i ett rum
med mycket solljus eller annan stark belysning.
Projektorn kan lutas till en vinkel på högst 12
grader.
■ Placeringen ska vara inom ±12 grader horisontellt.
Observera angående transport av projektorn
■ Se till att projektorn inte utsätts för hårda stötar och/eller
skakningar när den ska transporteras, eftersom detta kan
orsaka skador. Var mycket försiktig med objektivet. Innan
projektorn flyttas, ska du koppla loss dess nätkabel från
eluttaget samt andra kablar som anslutits till den.
Annan ansluten utrustning
■ Vid anslutning till en dator eller annan audio-visuell utrustning
ska dessa anslutningar göras EFTER att strömmen slagits
av på projektorn samt på den utrustning som ska anslutas.
■ Läs bruksanvisningarna för projektorn och den andra
utrustningen som ska anslutas för information om hur
anslutningarna görs rätt.
Användning av projektorn i andra länder
■ Strömförsörjningen och stickkontaktens utformning kan vara
annorlunda i andra länder där projektorn ska användas. Om
projektorn ska användas i ett annat land, ska du anskaffa en
korrekt nätkabel för det land du tänker besöka.
Temperaturövervakningsfunktion
Utsätt inte projektorn för hårda stötar och/eller
skakningar.
■ Se upp så att objektivet inte utsätts för stötar eller att linsytan
skadas.
Låt dina ögon vila med jämna mellanrum.
■ Kontinuerligt tittande på skärmen under flera timmar är
ansträngande för ögonen. Ta därför paus in emellan för
att vila ögonen.
Försiktig
• Kylfläkten reglerar den interna temperaturen och dess
funktion kontrolleras automatiskt. Ljudet från fläkten kan
variera under användning p.g.a. växlingar i fläkthastigheten.
Detta är normalt och tyder inte på något fel.
• Koppla inte loss nätkabeln under bildvisning eller när
kylfläkten är igång. Detta kan orsaka skador i projektorn
som följd av överhettning, eftersom kylfläkten då stannar.
Appendix
Undvik platser med extrema temperaturer.
■ Projektorns arbetsmiljö är från 41°F till 95°F (+5°C till +35°C).
■ Projektorns förvaringstemperatur är från –4°F till 140°F
(–20°C till +60°C).
■ “ ” och “
” visas i bildens
nedre vänstra hörn, om projektorn
börjar överhettas på grund av felaktig
installation eller blockerade
ventilationsöppningar. Om temperaturen därefter fortsätter att
stiga slocknar lampan, temperaturvarningsindikatorn (TEMP.)
på projektorn börjar blinka och strömmen slås sedan av efter
en kylperiod på 90 sekunder.
81
A10X_A10S#Sw_Print#p79_82.p65
81
03.2.4, 2:08 PM
Hur du läser PDF-bruksanvisningarna
På CD-ROM-skivan finns bruksanvisningar i PDF-format på flera olika språk så att du kan använda
projektorn även om du inte har denna bruksanvisning. För att kunna använda dessa anvisningar måste
du installera Adobe Acrobat Reader i din persondator (Windows eller Macintosh). Om du inte redan
har installerat Acrobat Reader, kan du göra det från CD-ROM-skivan.
Installation av Acrobat Reader från din CD-ROM-skiva
För Windows:
1 Sätt in CD-ROM-skivan i din CD-ROM-enhet.
2 Dubbelklicka på ikonen “Den här datorn”.
3 Dubbelklicka på “CD-ROM-enhet”.
4 Dubbelklicka på mappen “ACROBAT”.
5 Dubbelklicka på det språk (mappnamn) som du vill
se.
6 Dubbelklicka på installationsprogrammet och följ
anvisningarna på skärmen.
För Macintosh:
1 Sätt in CD-ROM-skivan i din CD-ROM-enhet.
2 Dubbelklicka på ikonen “CD-ROM”.
3 Dubbelklicka på mappen “ACROBAT”.
4 Dubbelklicka på det språk (mappnamn) som du vill
se.
5 Dubbelklicka på installationsprogrammet och
följ anvisningarna på skärmen.
För andra operativsystem:
Nerladda Acrobat Reader från Internet (http://www.adobe.com).
För andra språk:
Om du vill använda Acrobat Reader för språk utöver de som inkluderas på CD-ROM-skivan, kan du ladda ner
lämplig version från Internet.
Hur du läser PDF-bruksanvisningarna
För Windows:
1 Sätt in CD-ROM-skivan i din CD-ROM-enhet.
2 Dubbelklicka på ikonen “Den här datorn”.
3 Dubbelklicka på “CD-ROM-enhet”.
4 Dubbelklicka på mappen “MANUALS”.
5 Dubbelklicka på det språk (mappnamn) som
För Macintosh:
1 Sätt in CD-ROM-skivan i din CD-ROM-enhet.
2 Dubbelklicka på ikonen “CD-ROM”.
3 Dubbelklicka på mappen “MANUALS”.
4 Dubbelklicka på det språk (mappnamn) som
du vill se.
6 Dubbelklicka på pdf-filen “A10” för att öppna
projektorns bruksanvisningar.
5 Dubbelklicka på pdf-filen “A10” för att öppna
du vill se.
projektorns bruksanvisningar.
Anm
• Om den önskade pdf-filen inte kan öppnas genom att dubbelklicka med musen, ska du först starta Acrobat Reader
och sedan specificera önskad fil med menyn “Fil”, “Öppna”.
• I “readme.txt”-filen på CD-ROM-skivan finns viktig information som inte finns i denna bruksanvisning.
82
A10X_A10S#Sw_Print#p79_82.p65
82
03.2.4, 2:08 PM
Antes de emplear el proyector, lea con atención este manual de manejo.
Introducción
ESPAÑOL
Hay dos razones importantes por las que debe registrar rápidamente la garantía de su nuevo proyector
SHARP, empleando para ello la TARJETA DE REGISTRO entregada con el proyector.
1. GARANTÍA
Ésta es para asegurar que usted reciba inmediatamente todos los beneficios relacionados con la
garantía de los componentes, servicio y mano de obra aplicables a su adquisición.
2. ACTA DE SEGURIDAD DE PRODUCTOS DEL CONSUMIDOR
Para asegurar que usted reciba rápidamente cualquier aviso de inspección de seguridad, modificación o retirada
del mercado que SHARP tenga que llevar a cabo cumpliendo con el Acta de Seguridad de Productos del
Consumidor, bajo de la ley 1972 LEA CON ATENCIÓN LA IMPORTANTE CLÁUSULA DE “GARANTÍA LIMITADA”.
EE.UU. solamente
ADVERTENCIA: Fuente de iluminación intensa. No mire fija ni directamente al haz de luz. Tenga especial cuidado
de que los niños no miren fijamente hacia el haz de luz.
ADVERTENCIA: Para reducir el riesgo de que se produzca una descarga eléctrica,
no exponga este producto a la lluvia ni a la humedad.
Vea la parte inferior del proyector.
PRECAUCIÓN
RIESGO DE DESCARGA ELÉCTRICA.
NO RETIRE LOS TORNILLOS, EXCEPTO AQUELLOS
ESPECIFICADOS PARA QUE EL USUARIO PUEDA
REALIZAR EL MANTENIMIENTO
PRECAUCIÓN: PARA REDUCIR EL RIESGO DE DESCARGA
ELÉCTRICA NO RETIRE LA TAPA. A EXCEPCIÓN DE LA
LÁMPARA, NO HAY COMPONENTES QUE PUEDA REPARAR
EL USUARIO. SOLICITE LAS REPARACIONES A PERSONAL DE
SERVICIO CUALIFICADO.
El signo del rayo con punta de flecha en el interior
de un triángulo equilátero, tiene la finalidad de
avisar al usuario de la presencia de una tensión
peligrosa sin aislar dentro de la caja del producto
que puede ser de suficiente magnitud como para
constituir un riesgo de descarga eléctrica para
las personas.
El signo de exclamación en el interior de un
triángulo tiene la finalidad de avisar al usuario
de la presencia de importantes instrucciones
de operación y mantenimiento (servicio) en
los documentos que acompañan al producto.
ADVERTENCIA: Las normas de la FCC estipulan que cualquier cambio o modificación realizado en este equipo
sin la aprobación expresa del fabricante podrá anular la autoridad que el usuario tiene para
utilizar este equipo.
EE.UU. solamente
INFORMACIÓN
Este equipo ha sido probado y ha demostrado cumplir con las limitaciones para dispositivos digitales de la Clase A, de
conformidad con el apartado 15 de las Normas de la FCC. Estas limitaciones han sido designadas para proporcionar
una protección razonable contra interferencias perjudiciales cuando el equipo se opera en una instalación comercial.
Este equipo genera, utiliza y puede radiar energía de radiofrecuencia, y, si no se instala y utiliza según las instrucciones
del manual de manejo, puede causar interferencias perjudiciales en las comunicaciones de radio. Es probable que el
funcionamiento de este equipo en un área residencial cause interferencias perjudiciales, en tal caso se requerirá de la
intervención del usuario para corregir la interferencia por su cuenta.
EE.UU. solamente
El cable de ordenador suministrado deberá ser utilizado con el dispositivo. Este cable se suministra para
asegurar que el dispositivo cumpla con las indicaciones de la Clase A de la FCC.
EE.UU. solamente
Appendix
ADVERTENCIA:
Éste es un producto Clase A. En un entorno doméstico, este producto puede causar interferencias, en cuyo caso,
el usuario deberá tomar las medidas adecuadas.
83
A10X_A10S#Es_Print#p83_86.p65
83
03.2.4, 2:09 PM
IMPORTANTES MEDIDAS DE SEGURIDAD
PRECAUCIÓN: Lea completamente estas instrucciones antes de usar el producto y consérvelas
para poder consultarlas en el futuro.
La energía eléctrica puede tener muchas aplicaciones útiles. Este producto ha sido diseñado y fabricado para
garantizar la seguridad del usuario. SIN EMBARGO, EL USO INCORRECTO DEL PRODUCTO PUEDE OCASIONAR
DESCARGAS ELÉCTRICAS E INCENDIOS. A fin de no anular los dispositivos de seguridad incorporados en este
producto, observe las siguientes reglas básicas para la instalación, uso y mantenimiento del producto.
1. Lectura de instrucciones
Antes de utilizar el producto deberán leerse todas las
instrucciones de seguridad y funcionamiento.
2. Conservación de las instrucciones
Las instrucciones de seguridad y funcionamiento deberán
conservarse para poder utilizarlas como referencia en el futuro.
3. Cumplimiento de advertencias
Deberán cumplirse todas las advertencias que aparecen en el
producto y en el manual de instrucciones.
4. Seguimiento de las instrucciones
Deberán seguirse todas las instrucciones de funcionamiento y
utilización.
5. Limpieza
Desenchufe este producto de la toma de corriente antes de
limpiarlo. No emplee limpiadores líquidos ni aerosoles. Para la
limpieza, utilice un paño húmedo.
6. Aditamentos
No utilice aditamentos que no hayan sido recomendados por
el fabricante del producto porque podrán causar peligros.
7. Agua y humedad
No utilice este producto cerca del agua como, por ejemplo,
próximo a una bañera, lavabo, fregadero o lavadora; ni en un
sótano húmedo, al lado de una piscina o lugares similares.
8. Accesorios
No coloque este producto encima de un carrito, soporte, trípode,
ménsula o mesa inestable porque podría caerse y estropearse
seriamente o causar lesiones graves a un niño o a un adulto.
Utilícelo solamente con un carrito, soporte, trípode, ménsula o
mesa que sea recomendado por el fabricante o que se venda
con el producto. Al montar el producto deberán seguirse
siempre las instrucciones del fabricante, y deberán utilizarse
los accesorios de montaje recomendados por él.
9. Transporte
La combinación del producto y el carrito
deberá moverse con cuidado. Las
paradas repentinas, la fuerza excesiva
y las superficies desniveladas podrían
hacer que la combinación del producto
y el carrito volcase.
10. Ventilación
Las ranuras y aberturas de la caja tienen la finalidad de que el
aparato pueda ventilarse; para asegurar así su buen
funcionamiento y protegerlo contra el recalentamiento. Las
aberturas no deberán cubrirse ni bloquearse nunca colocando
el producto en una cama, sofá, alfombra u otra superficie similar.
Este producto no deberá colocarse en una instalación
empotrada como, por ejemplo, una librería o estantería para
libros, a menos que se disponga de la ventilación apropiada o
se hayan seguido las instrucciones del fabricante.
11. Fuentes de alimentación
Este producto sólo deberá funcionar con el tipo de alimentación
indicado en la etiqueta de características. Si no está seguro del
tipo de alimentación empleado en su hogar, consulte al distribuidor
del producto o a la compañía eléctrica local. Para los productos
diseñados para funcionar con la alimentación de pilas o baterías,
u otras fuentes, consulte las instrucciones de uso respectivas.
12. Conexión a tierra o polarización
Este producto está equipado con uno de los tipos siguientes
de enchufe. Si su enchufe no se adapta a la toma de corriente,
por favor contacte a un electricista para dar solución al
problema. No anule la característica de seguridad del enchufe.
a. Enchufe (principales) de tipo bifilar
b. Enchufe (principales) de tipo trifilar con un terminal a tierra.
Este enchufe solo se ajustara dentro de una toma de corriente a tierra.
13. Protección de los cables de alimentación
Los cables de alimentación deberán colocarse de forma que no
sean pisados por personas ni aplastados por los objetos que se
pongan sobre o contra ellos, y deberá tenerse mucho cuidado en
los puntos donde las clavijas se unen a los cables, en las tomas
de alimentación y en los puntos por donde salen del producto.
14. Tormentas eléctricas
Para mayor protección de este producto durante tormentas
eléctricas o cuando se deje sin atender durante un periodo de
tiempo prolongado, desenchufe el cable de alimentación de la
toma de corriente y desconéctelo del proyector. Esto impedirá
que se estropee el producto debido a las tormentas eléctricas
y a la sobretensión de la línea.
15. Sobrecarga
No sobrecargue las tomas de corriente, cables de extensión o
receptáculos de alimentación integrales porque esto puede
causar un riesgo de incendio o descarga eléctrica.
16. Entrada de objetos sólidos y líquidos
No introduzca nunca objetos de ninguna clase en este producto
a través de las aberturas porque podrán tocar puntos peligrosos
de alta tensión o crear cortocircuitos, lo que a su vez podría
producir un incendio o una descarga eléctrica. No derrame
nunca ningún tipo de líquido sobre el producto.
17. Reparaciones
No intente reparar este producto usted mismo ya que al abrir o
retirar las cubiertas podrá exponerse a una tensión peligrosa o
a otros peligros. Solicite cualquier reparación a personal de
servicio cualificado.
18. Daños que requieren reparaciones
Desenchufe este producto de la toma de corriente y solicite el
servicio de reparaciones a personal cualificado cuando se
produzcan las condiciones siguientes:
a. Si el cable o el enchufe de alimentación está estropeado.
b. Si se han derramado líquidos o han caído objetos en el
interior del producto.
c. Si el producto ha estado expuesto a la lluvia o al agua.
d. Si el producto no funciona normalmente a pesar de haberse
seguido las instrucciones de uso. Ajuste solamente los
controles indicados en este manual de instrucciones, ya
que un ajuste mal hecho en otros controles podría causar
daños y tal vez requiera el trabajo laborioso de un técnico
cualificado para que el producto vuelva a funcionar
normalmente.
e. Si el producto se ha caído o estropeado de cualquier otra forma.
f. Si el producto muestra un cambio patente en su funcionamiento,
esto indicará la necesidad de tener que repararlo.
19. Reemplazo de componentes
Cuando sea necesario reemplazar componentes, asegúrese de
que el técnico de servicio utilice los componentes de reemplazo
especificados por el fabricante o que posean las mismas
características que los originales. Las sustituciones no autorizadas
pueden ocasionar incendios, descargas eléctricas u otros peligros.
20. Comprobación de seguridad
Al terminar cualquier trabajo de mantenimiento o reparación en
este producto, solicite al técnico de servicio que realice
comprobaciones de seguridad para determinar si el producto
se encuentra en buenas condiciones de funcionamiento.
21. Instalación en la pared o en el techo
Este producto debe montarse en una pared o techo sólo de la
forma indicada por el fabricante.
22. Calor
Este producto deberá instalarse lejos de fuentes de calor tales
como radiadores, salidas de aire caliente, estufas y otros
productos (incluidos amplificadores) que produzcan calor.
84
A10X_A10S#Es_Print#p83_86.p65
84
03.2.4, 2:09 PM
Al instalar el proyector, asegúrese de leer y observar las
siguientes medidas de seguridad.
Advertencia acerca de la lámpara
No bloquee las aberturas de entrada y salida de aire.
■ Si la lámpara se rompe las partículas de
cristal pueden ser un peligro. Si la lámpara
se rompe, solicite el reemplazo de la
misma en el centro de servicio o
distribuidor Sharp autorizado más
cercano.
■ Deje un espacio de al menos 7 7 / 8" (20 cm) entre la
abertura de ventilación y la pared u objeto más cercano.
■ Asegúrese de que las aberturas de entrada y de
ventilación de aire no estén obstruidas.
■ Si se obstruye el ventilador de enfriamiento, un circuito de
protección apaga automáticamente el proyector. Esto no indica
mal funcionamiento. Retire el cable de alimentación del proyector
desde el tomacorriente y espere por lo menos 10 minutos. Instale
el proyector en un lugar donde las aberturas de entrada y de
ventilación de aire no queden bloqueadas, enchufe el cable de
alimentación y encienda el proyector. Esto restablecerá la
condición normal de funcionamiento del proyector.
Precauciones a tener en cuenta para la instalación del proyector
■ Para minimizar la necesidad de mantenimiento y mantener una
alta calidad de imagen, SHARP recomienda instalar este
proyector en un lugar que esté libre de humedad, polvo y humo
de cigarrillo. Si se instala el proyector en un ambiente expuesto
a estas condiciones, será necesario limpiar el objetivo con mayor
frecuencia de lo normal. Siempre que el proyector sea limpiado
periódicamente, el uso del mismo en estos ambientes no reducirá
su vida útil. La limpieza interna sólo debe ser realizada por un
centro de servicio o distribuidor Sharp autorizado.
No instale el proyector en lugares expuestos a
la luz directa del sol o a luz intensa.
Precauciones al transportar el proyector
■ Al transportar el proyector, asegúrese de no someterlo a
impactos fuertes y/o vibración, ya que éstos pueden dañarlo.
Tenga especial cuidado con el objetivo. Antes de trasladar el
proyector, asegúrese de desenchufar el cable de alimentación
de la toma de corriente mural, y desconecte todos los demás
cables conectados al proyector.
Conexión de otros equipos
■ Sitúe la pantalla de modo que no quede expuesta a la luz directa
del sol o a la iluminación de la habitación. La luz que incide
directamente en la pantalla atenúa los colores, lo cual dificulta la
visualización de la imagen. Si instala la pantalla en una habitación
soleada o luminosa, cierre las cortinas y baje la intensidad de las
luces.
■ Al conectar un ordenador u otro equipo audiovisual al
proyector, haga las conexiones DESPUÉS de apagar
el proyector y el equipo que va a conectar.
■ Para instrucciones sobre cómo hacer las conexiones,
lea los manuales de manejo del proyector y del equipo
que va a conectar.
El proyector puede inclinarse hasta un máximo
de 12 grados.
Uso del proyector en otros países
■ El proyector debe instalarse dentro de un ángulo ±12
grados respecto del plano horizontal.
■ La tensión de alimentación y la forma del enchufe pueden
variar dependiendo de la región o país en que vaya a usar
el proyector. Al usar el proyector en el extranjero,
asegúrese de utilizar el cable de alimentación apropiado
para el país en que se encuentre.
Función de monitor de temperatura
No someta el proyector a impactos fuertes y/o
vibración.
■ Tenga cuidado de no golpear o dañar la superficie del objetivo.
Descanse la vista ocasionalmente.
Evite los lugares con temperaturas demasiado altas o bajas.
■ La temperatura de funcionamiento del proyector es de
41°F a 95°F (+5°C a +35°C).
■ La temperatura de almacenamiento del proyector es de
–4°F a 140°F (–20°C a +60°C).
Información
Appendix
■ Si mira continuamente la pantalla durante horas, se le
cansará la vista.
■ Si el proyector comienza a recalentarse
debido a problemas de configuración u
obstrucción de las aberturas de ventilación,
“
”y“
” se iluminarán en la
esquina inferior izquierda de la imagen. Si la temperatura sigue
aumentando, la lámpara se apagará, el indicador de advertencia de
temperatura parpadeará en el proyector y la alimentación eléctrica
se desconectará tras un período de enfriamiento de 90 segundos.
• El ventilador de enfriamiento regula la temperatura interna del proyector,
y su funcionamiento se controla de forma automática. El sonido del
ventilador puede variar durante el funcionamiento del proyector debido a
cambios en la velocidad del ventilador. Esto no indica mal funcionamiento.
• No desenchufe el cable de alimentación durante la proyección de
imágenes o mientras el ventilador de enfriamiento está en funcionamiento.
Esto podría causar daños debido al aumento de la temperatura interna,
ya que en este caso el ventilador de enfriamiento dejará de funcionar.
85
A10X_A10S#Es_Print#p83_86.p65
85
03.2.4, 2:09 PM
Cómo acceder a los manuales de manejo en formato PDF
El CD-ROM incluye los manuales de manejo en varios idiomas en formato PDF, para que pueda utilizar
el proyector aunque no tenga el presente manual. Para poder usar estos manuales debe tener instalado
Adobe Acrobat Reader en su PC (Windows o Macintosh). Si todavía no tiene instalado el programa
Acrobat Reader, puede hacerlo desde el CD-ROM.
Para instalar Acrobat Reader desde el CD-ROM
Para Windows:
1 Inserte el CD-ROM en la unidad de CD-ROM.
2 Haga doble clic en el icono “Mi PC”.
3 Haga doble clic en el icono de la unidad “CD-ROM”.
4 Haga doble clic en la carpeta “ACROBAT”.
5 Haga doble clic en el idioma (nombre de la
carpeta) que desea ver.
6 Haga doble clic en el programa de instalación
y siga las instrucciones en pantalla.
Para Macintosh:
1 Inserte el CD-ROM en la unidad CD-ROM.
2 Haga doble clic en el icono “CD-ROM”.
3 Haga doble clic en la carpeta “ACROBAT”.
4 Haga doble clic en el idioma (nombre de la
carpeta) que desea ver.
5 Haga doble clic en el programa de instalación
y siga las instrucciones en pantalla.
Para otros sistemas operativos:
Descargue Acrobat Reader desde Internet (http://www.adobe.com).
Para otros idiomas:
Si desea usar Acrobat Reader para un idioma distinto de aquellos incluidos en el CD-ROM, descargue
la versión apropiada desde Internet.
Cómo acceder a los manuales de uso en formato PDF
For Windows:
1 Inserte el CD-ROM en la unidad de CD-ROM.
2 Haga doble clic en el icono “Mi PC”.
3 Haga doble clic en el icono de la unidad “CD-ROM”.
4 Haga doble clic en la carpeta “MANUALS”.
5 Haga doble clic en el idioma (nombre de la
carpeta) que desea ver.
6 Haga doble clic en el archivo “A10” en formato
PDF para acceder a los manuales del proyector.
For Macintosh:
1 Inserte el CD-ROM en la unidad CD-ROM.
2 Haga doble clic en el icono “CD-ROM”.
3 Haga doble clic en la carpeta “MANUALS”.
4 Haga doble clic en el idioma (nombre de la
carpeta) que desea ver.
5 Haga doble clic en el archivo “A10” en formato
PDF para acceder a los manuales del proyector.
Nota
• Si no puede abrir el fichero PDF deseado haciendo doble clic con el ratón, inicie primero Acrobat Reader
y luego especifique el fichero deseado seleccionando el comando “Abrir” en el menú “Archivo”.
• Véase el archivo “readme.txt” en el CD-ROM para leer información importante no incluida en este manual
de manjo.
86
A10X_A10S#Es_Print#p83_86.p65
86
03.2.4, 2:09 PM
Prima di utilizzare il proiettore, leggere con attenzione il presente manuale di istruzioni.
Introduzione
ITALIANO
Vi sono due ragioni di rilievo per registrare rapidamente la garanzia del nuovo proiettore SHARP appena
acquistato servendosi della CARTOLINA DI REGISTRAZIONE contenuta nella sua confezione.
1. GARANZIA
La prima consiste nell’assicurarsi la possibilità di ricevere immediatamente tutti i vantaggi della
garanzia su componenti, assistenza e manodopera applicabili all’acquisto effettuato.
2. LEGGE SULLA SICUREZZA DEI PRODOTTI PER I CONSUMATORI
La seconda consiste nell’assicurarsi la possibilità di ricevere immediatamente qualunque notifica di sicurezza relativa a controlli, modifiche
o ritiri che SHARP sia eventualmente tenuta a fornire ai sensi della legge 1972 sulla sicurezza dei prodotti per i consumatori. LEGGERE
ATTENTAMENTE L’IMPORTANTE CLAUSOLA RELATIVA AI “LIMITI DI GARANZIA”.
SOLTANTO NEGLI USA
ATTENZIONE:
Sorgente di luce ad elevata brillantezza. Non fissare lo sguardo sul fascio di luce e non guardarlo direttamente.
Prestare particolare attenzione per evitare che i bambini guardino direttamente nella direzione del fascio luminoso.
ATTENZIONE: Per ridurre il rischio di incendi o di scosse elettriche, non esporre questo
prodotto alla pioggia o all’umidità.
Vedere sotto al proiettore.
ATTENZIONE
RISCHIO DI SCOSSE ELETTRICHE. NON
RIMUOVERE LE VITI, SALVO QUELLE INDICATE
PER L’EFFETTUAZIONE
DELL’ASSISTENZA DA PARTE DELL’UTENTE.
ATTENZIONE: PER RIDURRE IL RISCHIO DI SCOSSE ELETTRICHE,
NON RIMUOVERE IL COPERCHIO. AD ECCEZIONE DELL’ UNITÀ
LAMPADA, NESSUN COMPONENTE PUÒ ESSERE SOTTOPOSTO
ALL’ASSISTENZA TECNICA DA PARTE DELL’UTENTE. PER
L’ASSISTENZA TECNICA, RIVOLGERSI A PERSONALE QUALIFICATO.
ATTENZIONE:
Il simbolo con il fulmine con la punta a freccia
all’interno di un triangolo equilatero serve per
avvertire l’utente della presenza di “tensione
pericolosa” non isolata, all’ interno dell’
involucro del prodotto; essa risulterà essere
di entità sufficiente a dare luogo a rischi di
scosse elettriche per le persone.
Il simbolo con il punto esclamativo all’interno
di un triangolo equilatero serve per avvertire
l’utente della presenza di istruzioni di rilievo
per il funzionamento e la manutenzione
(l’assistenza tecnica) nella documentazione
fornita unitamente al prodotto.
In base alle normative FCC, tutte le variazioni o le modifiche non autorizzate apportate alla presente
attrezzatura senza l’approvazione esplicita del fabbricante possono annullare la facoltà dell’utente
di utilizzare tale attrezzatura.
SOLTANTO NEGLI USA
NOTA INFORMATIVA
Questo componente è stato sottoposto a vari test che hanno provato la sua conformità con I limiti per I
dispositive digitali della Classe A, giusto la Parte 15 delle norme FCC. Questi limiti sono stati stabiliti per
fornire una protezione ragionevole contro interferenze dannose quando il componente viene usato in un
ambiente commerciale. Questo componente genera, utilizza e può irradiare l’energia di frequenze radio e,
se non viene installato ed usato in conformità con il manuale delle istruzioni, può causare interferenze dannose
alle comunicazioni radio. L’uso di questo componente in un’area residenziale può causare interferenze dannose
e in tal caso, l’utente dovrà correggere queste interferenze a sue spese.
SOLTANTO NEGLI USA
Utilizzare il cavo per computer in dotazione con il dispositivo. Il cavo viene fornito per garantire la conformità
del dispositivo con le norme di verifica della Classe A FCC.
SOLTANTO NEGLI USA
Appendix
ATTENZIONE:
Questo è un prodotto Classe A. In un ambiente domestico questo prodotto può causare interferenze radio, nel
qual caso l’utilizzatore può essere tenuto a prendere provvedimenti adeguati.
87
A10X_A10S#It_Print#p87_90.p65
87
03.2.4, 2:09 PM
NORME DI SICUREZZA IMPORTANTI
ATTENZIONE: Leggete queste istruzioni prima di usare il prodotto e poi conservate le istruzioni
per ogni riferimento futuro.
L’energia elettrica può effettuare molte funzioni utili. Questo prodotto è stato prodotto per assicurare la vostra
sicurezza personale. MA L’USO ERRATO PUO’ CAUSARE POTENZIALI SCOSSE ELETTRICHE O RISCHI DI
INCENDI. Per non disabilitare le protezioni incorporate in questo prodotto, osservate le seguenti regole principali
per l’installazione, l’uso e il lavoro di servizio.
1. Leggere le di istruzioni
13. Protezione del cavo di alimentazione
Prima di utilizzare il prodotto, occorre leggere tutte le istruzioni
di sicurezza e di funzionamento.
2. Conservare le istruzioni
Occorre conservare le istruzioni di sicurezza e di funzionamento
per potervi fare riferimento in futuro.
3. Rispettare le avvertenze
Occorre seguire scrupolosamente tutte le avvertenze presenti
sul prodotto e nelle istruzioni per il funzionamento.
4. Seguire le istruzioni
Occorre seguire tutte le istruzioni per l’uso e per il funzionamento.
5. Pulizia
Prima di effettuare la pulizia, scollegare il prodotto dalla presa
di corrente. Per la pulizia, non usare detergenti liquidi o aereosol.
Usare un panno umido.
6. Accessori
Non utilizzare accessori non consigliati dal fabbricante del
prodotto poiché essi possono causare pericoli.
7. Acqua e umidità
Non utilizzare il prodotto in prossimità di acqua, ad esempio
presso una vasca da bagno, un lavabo, un lavandino o un
lavatoio, in cantine umide, presso una piscina e così via.
8. Collocazione
Non collocare il prodotto su carrelli, supporti, cavalletti, staffe o
tavoli instabili. Il prodotto potrebbe cadere causando gravi lesioni
a bambini o adulti e danneggiandosi gravemente. Utilizzare
esclusivamente carrelli, supporti, cavalletti, staffe o tavoli
consigliati dal fabbricante o venduti unitamente al prodotto. Il
prodotto deve sempre essere installato seguendo le istruzioni
del fabbricante e utilizzando accessori di montaggio consigliati
da quest’ultimo.
9. Trasporto
La combinazione di prodotto e carrello
deve essere spostata con attenzione. Le
fermate brusche, l’applicazione di una
forza eccessiva e gli spostamenti su
superfici accidentate possono provocare
il ribaltamento del prodotto e del carrello.
10. Ventilazione
L’involucro è dotato di fessure e aperture di ventilazione volte a
garantire un funzionamento affidabile del prodotto e a
proteggerlo dal surriscaldamento. Non coprire o ostruire le
aperture collocando il prodotto su letti, divani, tappeti o altre
superfici simili. Il prodotto non deve essere collocato in strutture
incassate come librerie o rastrelliere, a meno che non venga
fornita una ventilazione adeguata o che siano comunque
rispettate rigorosamente le istruzioni del fabbricante.
11. Sorgenti di alimentazione
Questo prodotto deve essere alimentato esclusivamente da
sorgenti di alimentazione del tipo indicato sull’etichetta di
identificazione. Se non si è sicuri del tipo di alimentazione
disponibile, rivolgersi al rivenditore del prodotto o all’azienda
elettrica locale. Per i prodotti progettati per funzionare a batterie
o con alimentazione di altro genere, fare riferimento alle istruzioni
per il funzionamento.
12. Messa a terra o polarità
Questo prodotto è stato dotato di uno dei seguenti tipi di spine.
Se la spina non dovesse entrare nella presa murale, rivolgetevi
ad un elettricista. Non modificate la spina togliendo la spina di
messa a terra.
a. Spina a due cavi (principale).
b. Spina a tre cavi (principale) con un terminale di messa a
terra.
Questa spina entra solo nelle prese murali con messa a
terra.
Il percorso dei cavi di alimentazione deve essere scelto in modo
che sia improbabile calpestarli o schiacciarli collocando oggetti
sopra o contro di essi; occorre prestare particolare attenzione
ai cavi in corrispondenza delle spine, delle prese multiple e dei
punti di uscita dal prodotto.
14. Fulmini
Per una maggiore protezione del prodotto durante i temporali,
o nei periodi in cui esso non è sotto sorveglianza o rimane
inutilizzato a lungo, scollegarlo dalla presa di rete e staccare il
cavo di alimentazione. Ciò previene eventuali danni al prodotto
dovuti a fulmini e a sbalzi della tensione di alimentazione.
15. Sovraccarico
Non sovraccaricare le prese di corrente, le prolunghe o le prese
multiple integrate, poiché ciò può causare rischi di incendi o
scosse elettriche.
16. Penetrazione di oggetti e liquidi
Non spingere oggetti di alcun tipo all’interno del prodotto
attraverso le aperture, poiché essi possono venire a contatto
con punti in cui è presente una tensione pericolosa o mettere in
corto circuito componenti che possono dare luogo a incendi o
scosse elettriche. Non versare sul prodotto liquidi di alcun
genere.
17. Assistenza tecnica
Non tentare di effettuare personalmente interventi di assistenza
tecnica sul prodotto, poiché l’apertura o la rimozione dei
coperchi può comportare l’esposizione a tensioni pericolose o
ad altri pericoli. Rivolgersi esclusivamente a personale
qualificato.
18. Problemi che richiedono assistenza tecnica
Qualora si verifichino le seguenti condizioni, scollegare il
prodotto dalla presa di corrente e rivolgersi a personale
qualificato per l’assistenza tecnica:
a. se il cavo o la spina di alimentazione sono danneggiati.
b. se nel prodotto sono penetrati liquidi o corpi estranei.
c. se il prodotto è stato esposto alla pioggia o all’acqua.
d. se il prodotto non funziona in modo normale quando si
seguono le istruzioni per il funzionamento. Regolate
esclusivamente i comandi descritti nelle istruzioni per il
funzionamento, poiché una regolazione errata di altri
comandi può provocare danni e comporta spesso lunghi
interventi dei tecnici qualificati per ripristinare il
funzionamento normale del prodotto.
e. se il prodotto è caduto o è stato danneggiato in qualunque
modo.
f. se il prodotto presenta chiare variazioni delle prestazioni.
19. Ricambi
Accertarsi che i tecnici che effettuano gli interventi di assistenza
tecnica utilizzino i ricambi specificati dal fabbricante o ricambi
con caratteristiche identiche a quelle dei componenti originali.
L’uso di pezzi di ricambio impropri può causare incendi, scosse
elettriche o altri pericoli.
20. Controlli per la sicurezza
Al termine di qualsiasi intervento di assistenza tecnica o di
riparazione di questo prodotto, richiedere al tecnico addetto
all’assistenza di effettuare i controlli per la sicurezza per verificare
che il prodotto sia in condizioni di funzionamento adeguate.
21. Montaggio a parete o a soffitto
Questo prodotto va montato a parete o a soffitto nel modo
raccomandato dal fabbricante.
22. Calore
Questo prodotto deve essere collocato lontano da sorgenti di
calore come radiatori, riscaldatori, fornelli o altri prodotti
(compresi gli amplificatori) che dissipano calore.
88
A10X_A10S#It_Print#p87_90.p65
88
03.2.4, 2:09 PM
Assicuratevi di leggere le seguenti norme di sicurezza
prima di impostare il proiettore.
Precauzioni riguardanti l’unità lampada
Non bloccate le valvole di aspirazione e scarico.
■ Se si rompe la lampada si possono verificare
dei danni causati dai frammenti di vetro. In caso
si dovesse rompere la lampada, rivolgetevi al
più vicino rivenditore autorizzato dalla Sharp o
al centro di servizio per una sostituzione.
■ Lasciate uno spazio di almeno 7 7/8 pollici (20 cm) tra la
valvola di scarico e la parete o un’altra superficie.
■ Assicuratevi che non siano bloccate la valvola di
aspirazione e la valvola di scarico.
■ Se il ventilatore di raffreddamento è bloccato, scatta un circuito di
protezione che spegne il proiettore automaticamente. Questo non è segno
di malfunzionamento. Rimuovete il cavo di alimentazione del proiettore
dalla presa murale ed attendere almeno 10 minuti. Posizionate il
proiettore in una posizione dove le valvole di aspirazione e scarico
non sono bloccate, ricollegate il cavo di alimentazione ed accendete
il proiettore. Il proiettore ritorna alla condizione operativa normale.
Precauzioni riguardanti l’impostazione del proiettore
■ Per un minimo di lavori di servizio e per mantenere un’alta
qualità dell’immagine, la SHARP raccomanda di installare
questo proiettore in un’area priva di umidità, polvere e fumo
di sigarette. Quando il proiettore viene esposto a tali
ambienti, bisogna pulire l’obiettivo più spesso. Se il
proiettore viene pulito regolarmente, l’uso dello stesso in
tali ambienti non riduce la durata operativa generale
dell’unità. La pulizia interna va eseguita solo da un
rivenditore autorizzato dalla Sharp o presso un centro di
servizio.
Non installate il proiettore in luoghi dove potrebbe
essere esposto alla luce diretta del sole o ad una forte
illuminazione.
■ Posizionate lo schermo in modo tale che non sia esposto alla luce
diretta del sole o esposto a fonti di illuminazione. Se la luce dovesse
colpire lo schermo direttamente, i colori saranno sbiaditi e sarà
difficile vedere le immagini correttamente. Chiudete le tende e
diminuite le luci se dovete installare lo schermo in una stanza
assolata o illuminata.
Il proiettore può essere inclinato in modo sicuro
ad un angolo massimo di 12 gradi.
■ Il posizionamento deve avvenire entro ±12 gradi rispetto
alla posizione orizzontale.
Non esponete il proiettore ad urti violenti e/o
vibrazioni.
■ Fate attenzione all’obiettivo per non colpire o
danneggiare la superficie dell’obiettivo.
■ Se fissate lo schermo per delle ore vi stancherete gli
occhi. Assicuratevi di riposare gli occhi ogni tanto.
Evitare luoghi con temperature estreme.
■ La temperatura operativa del proiettore va da 41°F a
95°F (da +5°C a +35°C).
■ La temperatura di immagazzinaggio del proiettore va da
–4°F a 140°F (da –20°C a +60°C).
■ Quando trasportate il proiettore, assicuratevi di non esporre lo stesso
ad urti violenti e/o vibrazioni, altrimenti si possono verificare dei
danni. Fate particolare attenzione all’obiettivo. Prima di spostare il
proiettore, assicuratevi di scollegare il cavo di alimentazione dalla
presa murale e scollegate eventuali cavi connessi alla stessa.
Altri componenti collegati
■ Quando collegate un computer o un altro componente
Audio/Video al proiettore, fate i collegamenti DOPO aver
spento il proiettore e il componente da collegare.
■ Leggete il manuale di istruzioni del proiettore e del
componente da collegare per ulteriori informazioni su
come effettuare i collegamenti.
Utilizzo del proiettore in altre nazioni
■ Il voltaggio di alimentazione e la forma della spina
possono variare secondo la regione e la nazione in cui
usate il proiettore. Quando usate il proiettore oltremare,
assicuratevi di usare il cavo di alimentazione appropriato
per la nazione in cui vi trovate.
Funzione monitoraggio temperatura
■ Se inizia il surriscaldamento del
proiettore per via dei problemi di
impostazione o per il bloccaggio
delle valvole dell’aria, “
”e
“
” si illuminano nell’angolo inferiore sinistro
dell’immagine. Se continua ad aumentare la temperatura, la
lampada si spegne, l’indicatore avvertimento temperatura
lampeggia sul proiettore e dopo un periodo di raffreddamento
di 90 secondi, si spegne la corrente.
Informazioni
• Il ventilatore di raffreddamento regola la temperatura
interna e le prestazioni sono controllate automaticamente.
Il suono del ventilatore può cambiare durante il
funzionamento del proiettore per via dei cambiamenti della
velocità del ventilatore. Questo non è segno di
malfunzionamento.
• Non scollegate il cavo di alimentazione durante la
proiezione o il raffreddamento. Altrimenti si possono
verificare dei danni dovuti all’aumento della temperatura
interna ed inoltre si ferma il ventilatore di raffreddamento.
Appendix
Riposatevi gli occhi ogni tanto.
Precauzioni riguardante il trasporto del proiettore
89
A10X_A10S#It_Print#p87_90.p65
89
03.2.4, 2:09 PM
Per accedere ai manuali di istruzioni nel formato PDF
Nel CD-ROM sono disponibili i manuali d’uso in formato PDF in più lingue, in modo da poter
utilizzare il proiettore anche senza questo manuale. Per usare questi manuali, bisogna
installare Adobe Acrobat Reader nel PC (Windows o Macintosh). Se non è stato ancora
installato Acrobat Reader, è possibile installarlo dal CD-ROM.
Per installare Acrobat Reader dal CD-ROM
Per Windows:
1 Inserite il CD-ROM nel drive CD-ROM.
2 Cliccate due volte sull’icona “Risorse del computer”.
3 Cliccate due volte sul drive “CD-ROM”.
4 Cliccate due volte sulla cartella “ACROBAT”.
5 Cliccate due volte sulla lingua (nome della
cartella) da visualizzare.
6 Cliccate due volte sul programma d’installazione
e seguire le istruzioni a video.
Per Macintosh:
1 Inserite il CD-ROM nel drive CD-ROM.
2 Cliccate due volte sull’icona “CD-ROM”.
3 Cliccate due volte sulla cartella “ACROBAT”.
4 Cliccate due volte sulla lingua (nome della
cartella) da visualizzare.
5 Cliccate due volte sul programma d’installazione
e seguire le istruzioni a video.
Per gli altri sistemi operativi:
Scaricate Acrobat Reader da Internet (http://www.adobe.com).
Per le altre lingue:
Se preferite usare Acrobat Reader per lingue diverse da quelle incluse nel CD-ROM, scaricate la
versione appropriata da Internet.
Accesso ai manuali PDF
Per Windows:
1 Inserite il CD-ROM nel drive CD-ROM.
2 Cliccate due volte sull’icona “Risorse del computer”.
3 Cliccate due volte sul drive “CD-ROM”.
4 Cliccate due volte sulla cartella “MANUALS”.
5 Cliccate due volte sulla lingua (nome della
cartella) da visualizzare.
6 Cliccate due volte sul file pdf “A10” per
accedere ai manuali del proiettore.
For Macintosh:
1 Inserite il CD-ROM nel drive CD-ROM.
2 Cliccate due volte sull’icona “CD-ROM”.
3 Cliccate due volte sulla cartella “MANUALS”.
4 Cliccate due volte sulla lingua (nome della
cartella) da visualizzare.
5 Cliccate due volte sul file pdf “A10” per
accedere ai manuali del proiettore.
Nota
• Se il file PDF desiderato non si apre quando cliccate due volte con il mouse, avviate Acrobat Reader, poi
specificate il file desiderato usando il menù “File”, “Apri”.
• Consultare il file “readme.txt” disponibile sul CD-ROM per informazioni importanti non incluse in questo
manuale di istruzioni.
90
A10X_A10S#It_Print#p87_90.p65
90
03.2.4, 2:09 PM
Lees deze gebruiksaanwijzing zorgvuldig door voordat u de projector in gebruik neemt.
Inleiding
NEDERLANDS
Er zijn twee belangrijke redenen om de garantie van uw nieuwe SHARP-projector onmiddellijk in orde te brengen
met de REGISTRATIEKAART die verpakt zit bij de projector.
1. GARANTIE
U komt meteen in aanmerking voor de volledige garantie op onderdelen, service en reparatiewerkzaamheden
die van toepassing is op dit product.
2. CONSUMENT-VEILIGHEIDSWETGEVING
U wordt onmiddellijk op de hoogte gesteld van eventuele veiligheidsbepalingen betreffende inspecties,
modificaties of het terugroepen van producten die door SHARP moeten worden uitgevoerd op basis van de
1972 Consumer Product Safety Act. LEES ZORGVULDIG DE BELANGRIJKE “BEPERKTE GARANTIE”
CLAUSULE.
ALLEEN VOOR DE VERENIGDE STATEN
WAARSCHUWING:
Zeer sterke lichtbron. Kijk niet rechtstreeks in de lichtbundel. Let er vooral op dat kinderen niet
rechtstreeks in de lichtbundel kijken.
WAARSCHUWING: Stel het apparaat niet bloot aan regen of vocht om brand of een gevaarlijke
elektrische schok te voorkomen.
Zie onderkant van projector.
LET OP
GEVAARLIJKE SPANNINGEN.
GEEN SCHROEVEN VERWIJDEREN,
BEHALVE DE VOORGESCHREVEN
GEBRUIKER-ONDERHOUDSSCHROEVEN.
LET OP: OM DE KANS OP EEN ELEKTRISCHE SCHOK TE VERMINDEREN, MAG DE
BEHUIZING NIET WORDEN GEOPEND.
ER ZIJN GEEN DOOR DE GEBRUIKER REPAREERBARE ONDERDELEN IN HET
APPARAAT, BEHALVE DE LAMPEENHEID.
LAAT ONDERHOUD EN REPARATIE OVER AAN BEVOEGD ONDERHOUDSPERSONEEL.
WAARSCHUWING:
Een bliksemsymbool in een gelijkzijdige driehoek
maakt de gebruiker attent op de aanwezigheid
van niet-geïsoleerde “gevaarlijke spanningen” in
het inwendige van het apparaat, die zo groot
kunnen zijn dat zij een ernstige elektrische schok
kunnen veroorzaken.
Een uitroepteken in een gelijkzijdige driehoek
maakt de gebruiker attent op belangrijke
bedienings- en onderhoudsinformatie in de
documentatie die bij het apparaat wordt geleverd.
De FCC-bepalingen schrijven voor dat wijzigingen of modificaties in de apparatuur die niet uitdrukkelijk
door de fabrikant zijn goedgekeurd tot gevolg kunnen hebben dat het gebruik van de apparatuur
niet meer toegestaan is.
ALLEEN VOOR DE VERENIGDE STATEN
INFORMATIE
Deze apparatuur is getest en bleek te voldoen aan de eisen en limieten voor Klasse A digitale apparatuur, overeenkomstig
Deel 15 van de FCC-bepalingen, die ontworpen zijn om redelijke bescherming te verlenen tegen dergelijke storingen bij
gebruik in een commerciële omgeving. In deze apparatuur worden radiogolven opgewekt en verwerkt, en deze golven
kunnen uitgestraald worden. Als bij de installatie en/of het gebruik de instructies in de gebruiksaanwijzing niet strikt
opgevolgd worden, kan de apparatuur storing in radio-ontvangst veroorzaken. Gebruik van deze apparatuur in een
woongebied zal waarschijnlijk storingen veroorzaken. In dat geval dient de gebruiker op zijn/haar eigen kosten alle
maatregelen te nemen die nodig kunnen zijn om de storing op te heffen.
ALLEEN VOOR DE VERENIGDE STATEN
Gebruik met deze apparatuur de meegeleverde computerkabel. Deze kabel zorgt ervoor dat de apparatuur voldoet
aan de voorschriften van FCC Klasse A.
ALLEEN VOOR DE VERENIGDE STATEN
Appendix
WAARSCHUWING:
Dit is een Klasse A-product. Het is mogelijk dat dit product in de huiselijke omgeving radiostoringen veroorzaakt waartegen de
gebruiker afdoende maatregelen dient te nemen.
91
A10X_A10S#Nl_Print#p91_94.p65
91
03.2.4, 2:09 PM
BELANGRIJKE VEILIGHEIDSVOORSCHRIFTEN
LET OP: Lees al deze instructies door alvorens dit apparaat in gebruik te nemen en bewaar ze voor later gebruik.
Met elektrische energie kunt u heel wat nuttige functies uitvoeren. Dit apparaat is zodanig ontworpen en vervaardigd dat uw
persoonlijke veiligheid wordt gevrijwaard. ONJUIST GEBRUIK KAN EVENWEL LEIDEN TOT EEN EVENTUELE ELEKTRISCHE
SCHOK OF BRANDGEVAAR. Om de ingebouwde veiligheidsvoorzieningen van dit apparaat niet teniet te doen, dient u de
volgende basisregels goed in acht te nemen bij de installatie, het gebruik en het onderhoud van de projector.
1. Lees de gebruiksaanwijzing
Lees alle veiligheids- en bedieningsinstructies in de
gebruiksaanwijzing voordat u het apparaat gebruikt.
2. Bewaar de gebruiksaanwijzing
Bewaar de gebruiksaanwijzing voor het geval u deze in de
toekomst nogmaals nodig heeft.
3. Neem alle waarschuwingen in acht
Neem alle waarschuwingen op het product en in de
gebruiksaanwijzing in acht.
4. Volg alle instructies op
Alle bedieningsinstructies e.d. moeten nauwgezet worden
opgevolgd.
5. Reinigen
Trek de stekker uit het stopcontact voordat u begint met
schoonmaken. Gebruik geen vloeibare reinigingsmiddelen of
sprays. Reinig het apparaat uitsluitend met een vochtige doek.
6. Hulpstukken
Voorkom problemen en gebruik geen hulpstukken die niet door
de fabrikant van het apparaat worden aanbevolen.
7. Water en vocht
Gebruik het apparaat niet in de buurt van water; bijvoorbeeld in
de buurt van een bad, wastafel, aanrecht, wasmachine,
zwembad of in een vochtige kelder enz.
8. Accessoires
Plaats het apparaat niet op een wankel rek, karretje, statief,
steunbeugel of tafel. Het apparaat zou kunnen vallen en een
kind of volwassene ernstig kunnen verwonden, en tevens kan
het apparaat zelf zwaar worden beschadigd. Gebruik uitsluitend
een rek, karretje, statief, steunbeugel of tafel die door de fabrikant
wordt aanbevolen of die bij het apparaat wordt verkocht. Volg
voor eventuele montagewerkzaamheden altijd de instructies van
de fabrikant op en gebruik ook uitsluitend montage-accessoires
die door de fabrikant worden aanbevolen.
9. Transport
Als het apparaat op een verplaatsbaar
rek is gezet, dient dit voorzichtig te
worden verplaatst. Het rek kan namelijk
omvallen bij plotseling stoppen, te hard
duwen of rijden over een ongelijke
ondergrond.
10. Ventilatie
In de behuizing van het apparaat zijn gleuven en openingen
die dienen voor de ventilatie. Voor een veilige werking
en bescherming tegen oververhitting mogen de ventilatieopeningen nooit worden geblokkeerd of afgedekt door het
apparaat op een bed, divan, dik vloerkleed e.d. te zetten. Het
apparaat mag ook niet in een afgesloten ruimte, zoals een
boekenkast, worden geplaatst, tenzij voor een goede ventilatie
wordt gezorgd of alle instructies van de fabrikant zijn opgevolgd.
11. Voeding
Het apparaat mag uitsluitend op de stroomvoorzieningsbron
worden gebruikt die op het typelabel is vermeld. Raadpleeg
uw dealer of het plaatselijke elektriciteitsbedrijf indien u niet zeker
bent van het type stroomvoorziening in uw huis. Voor apparaten
die gebruikt worden op batterijen of op andere stroombronnen
wordt verwezen naar de gebruiksaanwijzing die bij het apparaat
wordt geleverd.
12. Uitvoering van de netstekker
Dit apparaat is uitgerust met één van de volgende soorten
stekkers. Als de stekker niet in het stopcontact past, neemt u
contact op met uw elektricien.
Negeer de veiligheidsvoorziening van de stekker niet.
a. Tweedraads (net) stekker.
b. Driedraads geaarde (net) stekker met aardingspen.
Deze stekker past alleen in een geaard stopcontact.
13. Bescherming van het netsnoer
Leg het netsnoer zodanig dat er niet gemakkelijk iemand op
gaat staan of dat het snoer door een voorwerp wordt platgedrukt.
Let hier vooral goed op in de buurt van de stekkers, bij het
stopcontact en op de plaats waar het snoer uit het apparaat
komt.
14. Bliksem
Om veiligheidsredenen dient u bij bliksem of wanneer u het
apparaat langere tijd niet denkt te gebruiken, de stekker van
het netsnoer uit het stopcontact te trekken. Dit om beschadiging
van het apparaat te voorkomen als gevolg van blikseminslag of
plotselinge stroompieken in de stroomleiding.
15. Overbelasting
Zorg dat de stopcontacten, verlengsnoeren en stekkerdozen
niet overbelast worden, want dit kan resulteren in brand of een
elektrische schok.
16. Binnendringen van voorwerpen en vloeistoffen
Duw nooit voorwerpen via de openingen in de behuizing van het
apparaat naar binnen, omdat deze dan onderdelen die onder
hoogspanning staan kunnen raken of kortsluiting kunnen
veroorzaken, met brand of een elektrische schok tot gevolg. Let
tevens op dat er nooit vloeistof op het apparaat wordt gemorst.
17. Reparaties
Probeer het apparaat nooit zelf te repareren. Bij het openen of
verwijderen van de afdekplaten stelt u zich bloot aan een
ernstige elektrische schok en andere gevaren. Laat reparatie
over aan erkend onderhoudspersoneel.
18. Beschadigingen die reparatie vereisen
Bij de volgende omstandigheden moet u de stekker uit het
stopcontact trekken en het apparaat door erkend
onderhoudspersoneel laten repareren:
a. Als het netsnoer of de netstekker is beschadigd.
b. Als er vloeistof of een voorwerp in het apparaat terecht is
gekomen.
c. Als het apparaat blootgesteld is geweest aan regen of water.
d. Als de normale aanwijzingen worden opgevolgd, maar het
apparaat niet juist functioneert. Gebruik alleen de
bedieningsorganen die in de gebruiksaanwijzing worden
aangegeven. Bij een onjuiste instelling van andere
bedieningsorganen kan het apparaat mogelijk beschadigd
worden, met tot gevolg dat reparatiewerkzaamheden voor
een juiste werking van het apparaat door erkend
onderhoudspersoneel moeilijker en duurder kunnen
worden.
e. Als het apparaat is gevallen of de behuizing is beschadigd.
f. Als het apparaat duidelijk minder goed functioneert. Dit
duidt erop dat het tijd is voor onderhoud.
19. Vervangingsonderdelen
Wanneer onderdelen vervangen moeten worden, zorg er dan
voor dat het onderhoudspersoneel uitsluitend onderdelen
gebruikt die door de fabrikant worden aanbevolen of die
dezelfde eigenschappen hebben als de originele onderdelen.
Het gebruik van andere onderdelen kan brand, een elektrische
schok of andere problemen veroorzaken.
20. Veiligheidscontrole
Vraag het onderhoudspersoneel om na de onderhouds- of
reparatiewerkzaamheden een veiligheidscontrole uit te voeren,
zodat u zeker weet dat het apparaat juist en veilig functioneert.
21. Wand- of plafondmontage
Dit apparaat mag uitsluitend volgens de aanbevelingen van de
fabrikant aan een wand of het plafond worden bevestigd.
22. Hitte
Houd het apparaat uit de buurt van warmtebronnen zoals
verwarmingsradiators, haarden, kachels en andere voorwerpen
(inclusief versterkers) die warmte afgeven.
92
A10X_A10S#Nl_Print#p91_94.p65
92
03.2.4, 2:09 PM
Lees de volgende veiligheidsvoorschriften voordat u uw
projector opstelt.
Voorzichtig met de lampeenheid
■ Als de lamp gesprongen is, kunnen
glassplinters gevaar veroorzaken. Indien
de lamp gesprongen is, neemt u contact
op met de dichtstbijzijnde erkende Sharp
projector dealer of servicecentrum om de
lamp te laten vervangen.
Voorzichtig bij het opstellen van de projector
■ Met het oog op een minimaal onderhoud en het behoud
van een hoge beeldkwaliteit beveelt SHARP aan deze
projector te installeren in een ruimte die vrij is van vocht,
stof en sigarettenrook. Wanneer de projector aan vocht,
stof of rook wordt blootgesteld, moet de lens vaker dan
normaal worden gereinigd. Gebruik van de projector in
dit soort ruimten zal de levensduur van de projector
niet verkorten mits u de projector regelmatig laat
reinigen. Het reinigen van het inwendige gedeelte van
de projector mag uitsluitend door een erkende Sharp
projector dealer of servicecentrum worden uitgevoerd.
Stel de projector niet op in ruimten die blootstaan
aan direct zonlicht of fel licht.
■ Plaats het scherm zo dat het zich niet in direct zonlicht
of kamerverlichting bevindt. Licht dat direct op het
scherm valt, zal de kleuren doen verbleken en het kijken
bemoeilijken. Doe de gordijnen dicht en dim de
verlichting wanneer u het scherm opstelt in een zonnige
of fel verlichte ruimte.
De projector kan veilig worden gekanteld tot een
hoek van maximaal 12 graden.
■ Plaats de projector binnen een hoek van ±12 graden
ten opzichte van de horizontale stand.
Blokkeer de uitlaat- en inlaatopeningen niet.
■ Laat tenminste 7 7/8" (20 cm) ruimte tussen de uitlaatopening
en de dichtstbijzijnde wand of ander obstakel.
■ Controleer of de inlaatopening en de ventilatiegleuven
niet geblokkeerd zijn.
■ Als de koelventilator geblokkeerd wordt, zal een
veiligheidsvoorziening automatisch de projector
uitschakelen. Dit duidt niet op een defect. Haal de stekker
van het netsnoer van de projector uit het stopcontact en wacht
minstens 10 minuten. Plaats de projector zodanig dat de
inlaat- en uitlaatopeningen niet zijn geblokkeerd, steek dan
de stekker weer in het stopcontact en zet de projector aan.
De projector zal vervolgens weer normaal functioneren.
Voorzichtig bij het vervoeren van de projector
■ Tijdens het vervoer moet u ervoor zorgen dat de projector niet
onderhevig is aan sterke schokken en/of trillingen, aangezien
dit beschadiging kan veroorzaken. Wees bijzonder voorzichtig
met de lens. Alvorens de projector te verplaatsen, trekt u het
netsnoer uit het stopcontact en maakt u alle kabels die op de
projector aangesloten zijn los.
Andere aangesloten apparatuur
■ Bij het aansluiten van een computer of andere
audiovisuele apparatuur op de projector brengt u de
aansluitingen tot stand NADAT u de projector en de
aan te sluiten apparatuur hebt uitgeschakeld.
■ Lees de gebruiksaanwijzingen van de projector en de
aan te sluiten apparatuur door en volg de instructies
betreffende de aansluitingen.
Gebruik van de projector in andere landen
■ De voedingsspanning en de vorm van de stekker
kunnen verschillen afhankelijk van de streek of het land
waar u de projector gebruikt. Wanneer u de projector in
het buitenland gebruikt, dient u het juiste netsnoer te
gebruiken voor het land waar u zich bevindt.
Temperatuur-verklikkerfunctie
Stel de projector niet bloot aan sterke schokken
en/of trillingen.
■ Wees voorzichtig met de lens en vermijd dat het
oppervlak ervan wordt geraakt of beschadigd.
Gun uw ogen af en toe wat rust.
Vermijd plaatsen met extreme temperaturen.
■ De bedrijfstemperatuur voor de projector ligt tussen
41°F en 95°F (+5°C en +35°C)
■ De opslagtemperatuur voor de projector ligt tussen
–4°F en 140°F (–20°C en +60°C)
Info
• De koelventilator regelt de binnentemperatuur automatisch.
Daarom kan het geluid van de ventilator veranderen tijdens
het gebruik van het apparaat. Dit duidt niet op een defect.
• Trek de stekker van het netsnoer niet uit het stopcontact tijdens
de projectie of de werking van de koelventilator. Dit kan beschadiging veroorzaken door het stijgen van de binnentemperatuur,
aangezien de koelventilator eveneens uitgeschakeld wordt.
Appendix
■ Het gedurende langere tijd ononderbroken kijken naar
het scherm is zeer.
■ Wanneer de projector oververhit
raakt vanwege een verkeerde
instelling of geblokkeerde
ventilatiegleuven, lichten “ ”
en “
” linksonder
in het beeld op. Als de temperatuur blijft stijgen, gaat de
lamp uit, begint de temperatuurindicator op de projector te
knipperen en wordt de projector na een afkoelperiode van
90 seconden automatisch uitgeschakeld.
Bij dit produkt zijn batterijen geleverd.
Wanneer deze leeg zijn, moet u ze niet
weggooien maar inleveren als KCA.
93
A10X_A10S#Nl_Print#p91_94.p65
93
03.2.4, 2:10 PM
Toegang krijgen tot de PDF-gebruiksaanwijzingen
De cd-rom bevat handleidingen in PDF-formaat in verscheidene talen zodat u de projector
kunt bedienen, zelfs als u deze handleiding niet tot uw beschikking heeft. Om deze handleiding
te kunnen gebruiken, moet eerst Adobe Acrobat Reader op uw PC (Windows of Macintosh)
geïnstalleerd zijn. Als u Acrobat Reader nog niet heeft, kunt u dit programma installeren
vanaf de cd-rom.
Installeren van Acrobat Reader vanaf de CD-ROM
Voor Windows:
1 Plaats de CD-ROM in het CD-ROM-station.
2 Dubbelklik op het pictogram “Deze Computer”.
3 Dubbelklik op het “CD-ROM”-station.
4 Dubbelklik op de map “ACROBAT”.
5 Dubbelklik op de taal (naam van de map) die u
wilt bekijken.
6 Dubbelklik op het installatieprogramma en volg
de instructies op het scherm.
Voor Macintosh:
1 Plaats de CD-ROM in het CD-ROM-station.
2 Dubbelklik op het “CD-ROM”-pictogram.
3 Dubbelklik op de map “ACROBAT”.
4 Dubbelklik op de taal (naam van de map) die u
wilt bekijken.
5 Dubbelklik op het installatieprogramma en volg
de instructies op het scherm.
Voor andere besturingssystemen:
Download de juiste versie van Acrobat Reader van het internet (http://www.adobe.com).
Voor andere talen:
Als u liever Acrobat Reader wilt hebben in een versie of in een taal die niet op de CD-ROM staat,
dan kunt u deze van het internet halen.
Openen van de PDF-gebruiksaanwijzingen
Voor Windows:
1 Plaats de CD-ROM in het CD-ROM-station.
2 Dubbelklik op het pictogram “Deze Computer”.
3 Dubbelklik op het “CD-ROM”-station.
4 Dubbelklik op de map “MANUALS”.
5 Dubbelklik op de taal (naam van de map) die u
wilt openen.
6 Dubbelklik op het PDF-bestand “A10” om de
handleidingen van de projector te openen.
Voor Macintosh:
1 Plaats de CD-ROM in het CD-ROM-station.
2 Dubbelklik op het “CD-ROM”-pictogram.
3 Dubbelklik op de map “MANUALS”.
4 Dubbelklik op de taal (naam van de map) die u
wilt openen.
5 Dubbelklik op het PDF-bestand “A10” om de
handleidingen van de projector te openen.
Opmerking
• Als u het gewenste PDF-bestand niet kunt openen door te dubbelklikken met de muis, dient u eerst Acrobat Reader op te starten en daarna het gewenste bestand op te geven via het menu “File”, “Open”.
• Lees het bestand “readme.txt” op de cd-rom voor belangrijke informatie die niet is opgenomen in deze
handleiding.
94
A10X_A10S#Nl_Print#p91_94.p65
94
03.2.4, 2:10 PM
Antes de utilizar este projetor, leia atentamente este Manual de Operação.
INTRODUÇÃO
PORTUGUÊS
Existem duas boas razões para que você faça, sem demora, o registro de garantia do seu novo
Projetor SHARP, usando o CARTÃO DE REGISTRO que acompanha o aparelho.
1. GARANTIA
Para assegurar que você receba imediatamente todos os benefícios de garantia para peças,
assistência técnica e mão de obra especializada a que você tem direito.
2. ESTATUTO DE SEGURANÇA PARA PRODUTOS DE CONSUMO
Para assegurar que você receba, prontamente, todas as notificações relativas a segurança, tais
como inspeções, modificações ou recolha, que a SHARP poderá ser requerida a executar com
base no Estatuto de Segurança para Produtos de Consumo de 1972. RECOMENDA-SE UMA
LEITURA CUIDADOSA DA IMPORTANTE CLÁUSULA “GARANTIA LIMITADA”. Somente para OS E.U.A.
ATENÇÃO:
Fonte de iluminação intensa. Não olhe direta nem fixamente o feixe de luz. Tenha muito cuidado
com crianças, não permitindo que olhem fixamente o feixe de luz.
ATENÇÃO: Para reduzir riscos de incêndios ou choques elétricos, não exponha este aparelho à
chuva ou umidade.
Veja o fundo do projetor.
CUIDADO
RISCO DE CHOQUE ELÉTRICO. NÃO RETIRE
OS PARAFUSOS, EXCETO AQUELES
DEVIDAMENTE ESPECIFICADOS PARA
MANUSEIO PELO USUÁRIO.
CUIDADO: PARA REDUZIR O RISCO DE CHOQUES ELÉTRICOS,
NÃO RETIRE A TAMPA. NÃO HÁ PEÇAS QUE POSSAM SER
CONSERTADAS PELO USUÁRIO NA PARTE INTERNA, EXCETO A
LÂMPADA. ENCAMINHE OS CONSERTOS A UM POSTO DE
ASSISTÊNCIA TÉCNICA QUALIFICADA.
ATENÇÃO:
O símbolo do raio com a extremidade em
forma de flecha dentro de um triângulo
equilátero destina-se a alertar o usuário sobre
a presença de “voltagens perigosas” e sem
isolamento dentro do produto, que podem
ser de magnitude suficiente para constituir
perigo de choque elétrico para pessoas.
O ponto de exclamação dentro de um
triângulo equilátero destina-se a alertar o
usuário sobre a existência de instruções de
operação e manutenção (assistência
técnica) importantes na literatura que
acompanha o produto.
Os regulamentos FCC declaram que qualquer alteração ou modificação efetuada neste aparelho,
que não seja expressamente aprovada pelo fabricante, poderá anular o direito de operação do
equipamento pelo usuário.
SOMENTE PARA OS E.U.A.
INFORMAÇÃO
Este equipamento foi testado e aprovado de acordo com os limites Classe A para dispositivos digitais, em
conformidade com a Parte 15 das Normas FCC. Estes limites são designados a fim de prover uma proteção
razoável contra interferências nocivas quando o equipamento for operado em ambientes comerciais. Este
equipamento gera, usa e pode irradiar energia em frequência de rádio e, caso não seja instalado e utilizado
de acordo com o manual de operação, pode causar interferências prejudiciais a comunicações de rádio.
Entretanto, não há nenhuma garantia que não ocorrerão interferências em uma instalação em particular. A
operação deste equipamento numa área residencial é susceptível de causar interferências prejudiciais, e
nesse caso o utilizador será obrigado a corrigir a interferência a suas próprias custas. SOMENTE PARA OS E.U.A.
Appendix
O cabo de computador incluso deve ser usado com este aparelho. O cabo é fornecido a fim de assegurar
que o aparelho esteja de acordo com os requerimentos das normas FCC Classe A. SOMENTE PARA OS E.U.A.
ATENÇÃO:
Este aparelho é um produto de classe A. Ele poderá causar interferências de rádio em ambientes residenciais,
sobre as quais o usuário poderá ser requerido a tomar as devidas providências por conta própria.
95
A10X_A10S#P_Print#p95_98.p65
95
03.2.4, 2:10 PM
INFORMAÇÕES DE SEGURANÇA
ATENÇÃO: Leia por favor todas estas instruções antes de operar este produto e guarde-as para
uso posterior.
A energia elétrica pode realizar muitas funções úteis. Este produto foi concebido e fabricado para garantir a
sua segurança pessoal. MAS A UTILIZAÇÃO INCORRETA PODERÁ RESULTAR EM POTENCIAL CHOQUE
ELÉTRICO OU PERIGO DE INCÊNDIO. A fim de não neutralizar as seguranças incorporadas neste produto,
observe as seguintes regras básicas para a sua instalação, uso e assistência.
1. Leia as instruções
13. Proteção do cabo de alimentação
Todas as instruções de segurança e de operação devem ser
lidas antes de utilizar o aparelho.
2. Guarde as instruções
Todas as instruções de segurança e de operação devem ser
guardadas para consultas futuras.
3. Observe as advertências
Todas as advertências e as instruções de operação devem ser
observadas.
4. Siga as instruções
Todas as instruções de uso e de operação devem ser seguidas.
5. Limpeza
Desligue o aparelho da tomada elétrica antes de limpá-lo. Não
utilize produtos de limpeza líquidos ou em aerosol, apenas um
pano úmido.
6. Adaptadores
Utilize somente os adaptadores recomendados pelo fabricante
para não danificar o aparelho.
7. Água e umidade
Não utilize o aparelho perto da água. Por exemplo: perto de
uma banheira, pia da cozinha ou tanque de lavar roupa, de um
porão úmido ou perto de uma piscina, etc.
8. Acessórios
Não coloque este aparelho sobre um carrinho, suporte, tripé
ou mesa instáveis. Ele pode cair, causando ferimentos graves
a alguém ou ficar bastante danificado. Use somente os
acessórios recomendados pelo fabricante ou vendidos junto
com o aparelho. A fixação do aparelho e o acessório a ser
utilizado devem seguir as recomendações do fabricante.
9. Transporte
Caso o aparelho esteja colocado sobre
uma mesa com rodas, o conjunto deve
ser movido com cuidado. Paradas
repentinas, força excessiva e superfície
desnivelada podem derrubá-lo.
10. Ventilação
Os furos e aberturas no gabinete foram projetados para
proporcionar ventilação e garantir o funcionamento adequado
do aparelho, protegendo-o contra superaquecimento. As
aberturas não devem ser obstruídas, e assim sendo, não
coloque o aparelho sobre uma cama, sofá, tapete ou qualquer
outra superfície semelhante. Não o instale em um móvel
fechado, como uma estante ou um “rack”, a não ser que
disponha de ventilação adequada e que as instruções do
fabricante sejam cumpridas.
11. Alimentação
Este aparelho deve ser operado apenas com o tipo de
alimentação indicado na etiqueta. Se não tiver certeza acerca
do tipo de alimentação na sua casa, consulte um revendedor
autorizado ou a companhia elétrica local. Consulte o manual
de instruções para aparelhos que irão funcionar com pilhas ou
outras fontes de energia.
12. Aterramento ou polarização
Este produto está equipado com um dos seguintes tipos de
plugues. Se o plugue não servir na tomada de força, por favor
contate o seu eletricista.
Não anule a característica de segurança do plugue.
a. Plugue de tipo de dois fios (corrente).
b. Plugue de tipo de três fios com terra (corrente) com um
terminal de aterramento.
Este plugue apenas servirá numa tomada de força de tipo
com terra.
Os fios de alimentação devem ser instalados em locais que
não possam ser pisados, nem posicionados sob objetos que
possam pressioná-los. Preste atenção especial ao encaixe dos
fios nos plugues, nas réguas de tomada e nos pontos onde
saem do aparelho.
14. Relâmpagos
Para maior proteção deste equipamento durante tempestades,
ou quando o mesmo não vá ser usado por um longo período,
aconselha-se desligá-lo da tomada. Isto irá prevenir danos ao
aparelho, causados por raios ou por sobretensão na energia
elétrica.
15. Sobrecarga
Não sobrecarregue as tomadas elétricas, fios de extensão ou
réguas de tomada pois podem causar incêndios ou choques
elétricos.
16. Entrada de líquidos ou objetos
Nunca introduza nenhum tipo de objeto nas aberturas do
aparelho porque este pode tocar pontos perigosos de tensão
ou causar curto-circuito, provocando incêndio ou choque
elétrico. Nunca derrame qualquer líquido no equipamento.
17. Assistência técnica
Não tente consertar o aparelho por conta própria, pois ao abrir
ou retirar as tampas, você ficará exposto a altas tensões e outros
perigos. Caso necessário, solicite sempre o serviço de técnicos
qualificados.
18. Danos que necessitam assistência
Desligue o aparelho da tomada elétrica e solicite o serviço de
técnicos qualificados nas seguintes circunstâncias:
a. Quando o cabo de alimentação ou o plugue estiverem
danificados.
b. Se algum líquido ou objetos caírem dentro do equipamento.
c. Se o equipamento for exposto à chuva ou à água.
d. Se o equipamento não estiver funcionando normalmente,
mesmo depois de verificadas as instruções de uso. Ajuste
somente os controles indicados no manual já que o ajuste
incorreto de outros controles pode causar danos outros
que, muitas vezes, podem requerer o trabalho intenso de
um técnico qualificado para que o equipamento volte a
funcionar devidamente.
e. Se o equipamento tiver caído ou sofrido algum dano.
f. Quando o equipamento apresentar uma alteração brusca
no desempenho, indicando a necessidade de conserto.
19. Reposição de peças
Quando houver necessidade de reposição de alguma peça,
certifique-se de que o técnico use peças indicadas pelo
fabricante ou que possuem as mesmas características das
peças originais. Substituições por peças não autorizadas
podem causar incêndio, choque elétrico ou outros perigos.
20. Inspeção de segurança
Após o término ou reparo de qualquer serviço, peça ao técnico
que realize inspeções de segurança para determinar se o
equipamento está em perfeitas condições de uso.
21. Montagem na Parede ou no Teto
Este aparelho só deve ser montado no teto ou na parede
conforme recomendação do fabricante.
22. Calor
Este aparelho deve ficar longe de qualquer fonte de calor, como
radiadores, saídas de calor, aquecedores ou outros produtos
geradores de calor (incluindo amplificadores).
96
A10X_A10S#P_Print#p95_98.p65
96
03.2.4, 2:10 PM
Leia cuidadosamente as seguintes informações de
segurança quando instalar o seu projetor.
Cuidados relativos à lâmpada
■ Perigo de ferimentos com partículas de
vidro caso a lâmpada se quebre. Caso
a lâmpada venha a quebrar, contatar
um Revendedor Autorizado de
Projetores Sharp ou um Centro de
Assistência para trocar a lâmpada.
Cuidados relativos à instalação do projetor
■ Para um mínimo de assistência e para manter uma elevada
qualidade de imagem, a SHARP recomenda que este
projetor seja instalado em uma área isenta de umidade,
poeira e fumo de tabaco. Caso o projetor seja sujeito a
estes ambientes, a lente deverá ser limpa mais
frequentemente. Desde que o projetor seja limpo
regularmente, a utilização nesses ambientes não reduzirá
o tempo total de vida da unidade. A limpeza interna deverá
ser efetuada apenas por um Revendedor Autorizado de
Projetores Sharp ou um Centro de Assistência.
Não instale o projetor em locais expostos à luz
solar direta ou a luzes fortes.
Não bloqueie as grelhas de ventilação de entrada e de saída.
■ Deixe um espaço de pelo menos 7 7/8" unidades (20
cm) entre a grelha de ventilação e a parede ou
obstáculo mais próximos.
■ Confira se a grelha de ventilação de entrada e de saída
não estão obstruídas.
■ Se a ventoinha de esfriamento ficar obstruída, um
circuito de proteção desligará automaticamente o
projetor. Isto não indica uma avaria. Desconecte o cabo
de alimentação do projetor da rede elétrica e espere
pelo menos 10 minutos. Coloque o projetor onde as
grelhas de ventilação de entrada e saída não estejam
bloqueadas, ligue novamente o plugue do cabo de força
e ligue o projetor. Isto fará voltar o projetor ao modo de
funcionamento normal.
Cuidados relativos ao transporte do projetor
■ Quando transportar o projetor, tenha o cuidado de não
o sujeitar a pancadas fortes esfriamento, dado que isso
poderá originar danos. Tome cuidado especial com a
lente. Antes de deslocar o projetor, retire o plugue do
cabo de força da tomada, e desligue quaisquer outros
cabos a ele ligados.
Outro equipamento conectado
■ Posicione a tela de forma a que esta não fique sob a luz
solar ou luz ambiente diretas. A luz incidindo diretamente
na tela esvanece as cores, dificultando a visualização.
Feche as cortinas e reduza a iluminação quando instalar
a tela em uma sala exposta ao sol ou muito iluminada.
■ Quando conectar um computador ou outro
equipamento audio-visual ao projetor, efetue as
conexões APÓS desligar o projetor e o equipamento a
ser conectado.
■ Leia por favor os manuais de operação do projetor e o
equipamento a ser conectado para instruções sobre
como efetuar as conexões.
O projetor pode ser inclinado com segurança em
um ângulo máximo de 12 graus.
Utilização do projetor em outros países
■ A colocação deve estar dentro de ± 12 graus da horizontal.
■ A tensão de força de alimentação e a forma do plugue
poderão variar dependendo da região ou país no qual
você está utilizando o projetor. Quando utilizar o projetor
no estrangeiro, certifique-se que usa o cabo de força
apropriado para o país no qual se encontra.
Função de monitorização de temperatura
Não sujeite o projetor a pancadas fortes e/ou
vibrações.
■ Tome cuidado para não atingir nem danificar a
superfície da lente.
Repouse seus olhos de vez em quando.
Evite locais com temperaturas extremas.
■ A temperatura de operação para o projetor é de 41°F a
95°F (+5°C a +35°C)
■ A temperatura de armazenagem para o projetor é de
–4°F a 140°F (–20°C a +60°C).
Informação
• A ventoinha de esfriamento regula a temperatura interna, e
o seu funcionamento é controlado automaticamente. O som
da ventoinha poderá variar durante a operação de projeção
devido a alterações da velocidade da ventoinha. Isto não indica uma avaria.
• Não retire o plugue do cabo de força durante a projeção ou o
funcionamento da ventoinha de esfriamento. Isto poderá
originar danos devido à subida da temperatura interna,
quando a ventoinha de esfriamento parar.
Appendix
■ Olhar continuamente para a tela durante longas horas
cansará seus olhos. Não deixe de descansar seus olhos
de vez em quando.
■ Se o projetor começar aquecendo
devido a problemas de instalação
ou bloqueamento das grelhas de
ventilação, “
” e “
”
iluminar-se-á no canto inferior
esquerdo da imagem. Se a temperatura continuar
aumentando, a lâmpada apagará, o indicador de Aviso
de Temperatura no projetor piscará, e após um período
de esfriamento de 90 segundos a força será desligada.
97
A10X_A10S#P_Print#p95_98.p65
97
03.2.4, 2:10 PM
Como Aceder os Manuais de Operação PDF
O CD-ROM inclui os manuais de operação (em formato PDF) em vários idiomas, para que você
possa trabalhar com o projetor, mesmo que você não possua este manual. Para utilizar estes
manuais, você precisará instalar Adobe Acrobat Reader no seu PC (Windows ou Macintosh).
Mesmo que você não tenha instalado o Acrobat Reader, você poderá instalá-lo desde o CD-ROM.
Para instalar Acrobat Reader a partir do CD-ROM
Para Windows:
1 Insira o CD-ROM no compartimento do CD-ROM.
2 Dê um duplo clique no ícone “Meu Computador”.
3 Dê um duplo clique no “CD-ROM”.
4 Dê um duplo clique na pasta “ACROBAT”.
5 Dê um duplo clique no idioma (nome da pasta)
que você deseja visualizar.
6 Dê um duplo clique no programa de instalação
e siga as instruções na tela.
Para Macintosh:
1 Insira o CD-ROM no compartimento do CD-ROM.
2 Dê um duplo clique no ícone “CD-ROM”.
3 Dê um duplo clique na pasta “ACROBAT”.
4 Dê um duplo clique no idioma (nome da pasta)
que você deseja visualizar.
5 Dê um duplo clique no programa de instalação
e siga as instruções na tela.
Para outros sistemas operacionais:
Instale Acrobat Reader pela Internet (http://www.adobe.com).
Para outros idiomas:
Se você prefere usar Acrobat Reader em um idioma que não esteja incluído no CD-ROM, favor
obter a versão adequada pela Internet.
Para acessar os manuais PDF
Para Windows:
1 Insira o CD-ROM no compartimento do CD-ROM.
2 Dê um duplo clique no ícone “Meu Computador”.
3 Dê um duplo clique no “CD-ROM”.
4 Dê um duplo clique na pasta “MANUAIS”.
5 Dê um duplo clique no idioma (nome da pasta)
que você deseja visualizar.
6 Dê um duplo clique no arquivo PDF “A10” para
acessar os manuais do projetor.
Para Macintosh:
1 Insira o CD-ROM no compartimento do CD-ROM.
2 Dê um duplo clique no ícone “CD-ROM”.
3 Dê um duplo clique na pasta “MANUAIS”.
4 Dê um duplo clique no idioma (nome da pasta)
que você deseja visualizar.
5 Dê um duplo clique no arquivo PDF “A10” para
acessar os manuais do projetor.
Nota
• Se o arquivo PDF desejado não puder ser aberto fazendo clique duplo com o mouse, inicie primeiro
Acrobat Reader, e então especifique o arquivo desejado utilizando o menu “Arquivo”, “Abrir”.
• Consulte o arquivo “readme.txt” no CD-ROM para importantes informações não inclusas neste manual de
operação.
98
A10X_A10S#P_Print#p95_98.p65
98
03.2.4, 2:10 PM
MEMO
110
A10X_A10S#Memo_Print#p110.p65
110
03.2.4, 2:10 PM