1
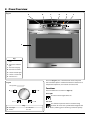
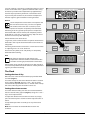
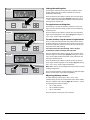
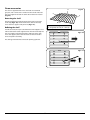
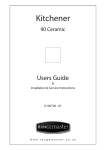
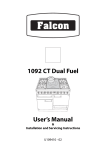
R604 Electric Oven User Guide & Installation & Service Instructions U109905 - 03 Contents 1. Before You Start... 1 2. Oven Overview 2 3. Cooking Tips 6 4. Cooking Table 7 5. Cleaning Your Oven 8 6. Troubleshooting 10 7. Installation 11 8. Circuit Diagram 14 9. Technical Data 15 10. Warranty/After Sales Service 16 1. Before You Start... DocNo.014-0001 - Introduction - BI oven Personal Safety Thank you for buying a Rangemaster oven. It should give you many years trouble-free cooking if installed and operated correctly. It is important that you read this section before you start, particularly if you have not used an electric oven before. Accessible parts will become hot during use and will retain heat even after you have stopped cooking. Keep babies and children away from the oven. When the oven is not in use, ensure that the control knobs are in the OFF position. To minimise the possibility of burns, always be certain that the controls are in the OFF position and that the entire oven is cool before attempting to clean. Use dry oven gloves when applicable – using damp gloves might result in steam burns when you touch a hot surface. Never operate the oven with wet hands. Do not use a towel or other bulky cloth in place of a glove – it might catch fire if it touches a hot surface. Always allow the oven to cool and then switch it off at the mains before cleaning or carrying out any maintenance work, unless otherwise specified in this guide. Always keep combustible wall coverings or curtains, etc., a safe distance away from your oven, and never wear loose-fitting or hanging clothes while using the appliance. Do not store or use aerosols, or any other potentially combustible or flammable materials, in the vicinity of the oven. Before First Use Care should be taken to avoid touching the heating elements inside the main oven. Whole chickens and large joints of meat should be defrosted thoroughly in the refrigerator. Do not defrost in a warm oven or while the adjoining oven is in operation or still warm. Cooking high moisture content foods can create a ‘steam burst’ when the oven door is opened. When opening the oven stand well back and allow any steam to disperse. When the oven is on, DO NOT leave the oven door open for longer than necessary. Never heat unopened food containers. Pressure build-up may cause the containers to burst and cause injury. Do not use aluminium foil to cover shelves, linings or the oven roof. This appliance is heavy, so take care when moving it. This appliance is designed for domestic cooking only. Using it for any other purpose could invalidate any warranty or liability claim. In particular, the oven should NOT be used for heating the kitchen – besides invalidating claims, this wastes fuel and may overheat the control knobs. Installation and Maintenance The electrical installation should be in accordance with BS 7671, or with the relevant national and local regulations. Have the installer show you the location of the oven control switch and mark it for easy reference. Only a qualified service engineer should service the oven, and only approved spare parts should be used. Make sure that the oven is wired in and switched on. Before using the oven for the first time clean it thoroughly. Switch off the unit at the isolator or mains supply. Remove all packing materials and accessories. Using hot water and a mild detergent, wipe the oven interior and then rinse carefully with a damp cloth. Wash the oven shelves and accessories in a dishwasher or using hot water and a mild detergent and dry thoroughly. Slide the oven shelves into the oven and close the door. To dispel any manufacturing smells, turn the oven to 200°C and run for an hour. Before using the grill for the first time you should also turn on the grill and run for 30 minutes with the grill pan in position, pushed fully back, and the grill door open. Cleaning In the interests of hygiene and safety, the oven should be kept clean at all times as a build up in fats and other foodstuffs could result in a fire. Clean only the parts listed in this guide. Clean with caution. If a wet sponge or cloth is used to wipe spills on a hot surface, be careful to avoid steam burns. Some cleansers can produce noxious fumes if applied to a hot surface. 1 2. Oven Overview Fig.2-1 ArtNo.024-0001 - Overview - R604 oven � � � � � � 0 50 100 MAX 250 150 200 � ArtNo.325-0009 - BI oven R604 Key A Temperature control knob B Temperature indicator light C Clock & timer display D Clock & timer controls E Function indicator light F Function selector knob G 4 function oven The oven (Fig.2-1) has a multi-function oven cavity with two retractable push-in controls for function selection and temperature operation, and a touch sensitive timer. Fig.2-2 ������������ 0 Functions � � The oven functions are shown in (Fig.2-2): Oven light The oven interior light comes on. ArtNo.030-0006 9-function oven symbols � ArtNo.030-0006 9-function oven symbols Fan oven This function operates the fan and the heating element. An even heat is produced throughout the oven, allowing you to cook large amounts quickly. ArtNo.030-0006 9-function oven symbols ArtNo.030-0006 9-function oven symbols 2 ArtNo.030-0006 9-function oven symbols C Fan oven D Grill ArtNo.030-0006 9-function oven symbols A Oven light B Defrost ArtNo.030-0006 9-function oven symbols ArtNo.030-0006 9-function oven symbols Key ArtNo.030-0006 9-function oven symbols ArtNo.030-0006 9-function oven symbols � ArtNo.030-0006 9-function oven symbols ArtNo.030-0006 9-function oven symbols ArtNo.030-0006 9-function oven symbols ArtNo.325-0016 - BI oven R604 functions 030-0006 tion oven mbols 0-0006 n oven ols Fan oven cooking is particularly suitable for baking on several shelves at one time and is a good ‘all-round’ function. It may be necessary to reduce the temperature by approximately 10°C for recipes previously cooked in a conventional oven. Fig.2-3 If you wish to preheat the oven, wait until the temperature indicator light has gone out before inserting the food. Defrost ArtNo.303-0001 Setting the clock 1 Set the temperature control to 0°C. This operates the fan to circulate cold air only, so no heat is applied. This enables small items such as desserts, cream cakes and pieces of meat, fish and poultry to be defrosted. Defrosting in this way speeds up the process and protects the food from flies. Pieces of meat, fish and poultry should be placed on a rack, over a tray to catch any drips. Be sure to wash the rack and tray after defrosting. Fig.2-4 Defrost with the oven door closed. Large items, such as whole chickens and joints should not be defrosted in this way. We recommend this be carried out in a refrigerator. ArtNo.303-0002 Setting the clock 2 Defrosting should not be carried out in a warm oven or when an adjoining oven is in use or still warm. Ensure that dairy foods, meat and poultry are completely defrosted before cooking. Fig.2-5 Grill ArtNo.030-0006 9-function oven symbols This function operates the top element. The temperature control should be set to between 50°C and 250°C and the grill preheated for 5-10 minutes. ArtNo.030-0006 9-function oven symbols ArtNo.030-0006 9-function oven symbols ArtNo.030-0006 9-function oven symbols ArtNo.030-0006 9-function oven symbols Grilling must always take place with the oven door closed to ensure correct performance of this function. Check your food regularly to avoid overcooking. ArtNo.303-0003 Setting the minute timer The Clock Setting the time of day When the oven is first connected the display will flash ‘Auto’ and ‘0:00 ’ (Fig.2-3). To set the clock, press the central button for about 3 seconds until [] appears (Fig.2-4). Use the ‘+’ and ‘–‘ keys to set the correct time of day. Remember this is a 24-hour clock. A beep will sound, indicating that the clock has been set. Setting the minute counter To set the minute minder, press the central timer button for about 3 seconds until [] appears (Fig.2-5). Using the ‘+’ and ‘–‘ keys, set the required time. To adjust the duration once the timer has been set, simply press the timer key for 3 seconds and then adjust the time as above. To stop the beeper when it sounds, press any of the clock buttons. Note: The oven does not switch off after the alarm has sounded. 3 Setting the cooking time Fig.2-6 This function allows the oven to be set to cook for a fixed length of time. Once the time has elapsed the oven will switch off automatically. Press the timer key for about 3 seconds. Press the key again until ‘dur’ appears in the display (Fig.2-6). Using the ‘+’ and ‘–‘ keys, set the required ‘cook time’. After a few seconds the settings will be memorised. To stop the oven cooking time This function is used to set the time at which an oven is to stop. It can be set to turn off at any time over the following 24-hour period. ArtNo.303-0004 Setting the cooking time Fig.2-7 Press the timer key for about 3 seconds. Press the key twice again until ‘End’ appears in the display (Fig.2-7). Using the ‘+’ and ‘–‘ keys, set the required ‘stop time’. To start and then stop the oven using the timer This is a semi-automatic function that allows you to set the ‘cook time’, which is the duration you want the oven to cook for and the ‘stop time’, which is the time of day at which you want the oven to stop cooking. You cannot set a start time directly – this is set by a combination of the ‘cook time’ and ‘stop time’. ArtNo.303-0005 Setting the end time Press the timer key for about 3 seconds. Press the key again until ‘dur’ appears in the display (Fig.2-6). Using the ‘+’ and ‘–‘ keys, set the required ‘cook time’. Wait a few seconds for the settings to be memorised. Fig.2-8 Press the timer key for about 3 seconds, then press the key twice again until ‘End’ appears in the display (Fig.2-7). Using the ‘+’ and ‘–‘ keys, set the required ‘stop time’. Note: Make sure to set the temperature control to the correct cooking temperature. The oven will beep when it stops cooking. To stop the beeper when it sounds, press any of the clock buttons. ArtNo.303-0006 Adjusting the beep volume Adjusting the beep volume To adjust the beep volume, press the ‘+’ and ‘–‘ keys simultaneously, then press and hold the central timer button until ‘ton 1’ flashes in the display (Fig.2-8). Press the ‘–‘ key to scroll through the volume settings: • • • Ton 1: High volume Ton 2: Medium volume Ton 3: Low volume Press the central timer key to set the volume. 4 Oven accessories � The oven is supplied with a wire shelf and an enamelled grill pan, with a trivet and a handle. The wire shelf slides into the wire supports located on either side of the oven interior (Fig.2-9). Fig.2-9 � � Removing the shelf ArtNo.325-0033 Oven BI shelf Pull the shelf forward until the back of the shelf is up to the shelf stop (Fig.2-10). Lift the front of the shelf so the stop clears the wire support and pull clear (Fig.2-11). � Key Refitting the shelf A – Shelf guard, B – Front, C – Shelf stop To refit the shelf, line up the shelf with the shelf supports and slide it between the two support wires until the shelf stop hits the wire support. Lift the front of the shelf so that the stop clears the support, then lower the front so that the shelf is level and push it back fully. Fig.2-10 The shelf guard should be at the back pointing upwards. ArtNo.320-0011 Removing the shelf 1 Fig.2-11 ArtNo.320-0012 Removing the shelf 2 5 3. Cooking Tips DocNo.030-0001 - Cooking tips Tips on Cooking with the Timer General Oven Tips If you want to cook more than one dish, choose dishes that require approximately the same cooking time. However, dishes can be ‘slowed down’ slightly by using small containers and covering them with aluminium foil, or ‘speeded up’ slightly by cooking smaller quantities or placing them in larger containers. The wire shelves should always be pushed firmly to the back of the oven. Baking trays with food cooking on them should be placed level with the front edge of the oven’s wire shelves. Other containers should be placed centrally. Keep all trays and containers away from the back of the oven, as overbrowning of the food may occur. Very perishable foods such as pork or fish should be avoided if a long delay period is planned, especially in hot weather. For even browning, the maximum recommended size of a baking tray is 340mm (13½”) by 340mm (13½”). DO NOT place warm food in the oven to be timed. DO NOT use a timed oven that is already warm. When the oven is on, do not leave the door open for longer than necessary, otherwise the knobs may get very hot. DO NOT use the timed oven if the adjoining oven is already warm. • Whole poultry must be thoroughly defrosted before being placed in the oven. Check that meat and poultry are fully cooked before serving. • • • • • 6 Always leave a ‘fingers width’ between dishes on the same shelf. This allows the heat to circulate freely around them. To reduce fat splashing when you add vegetables to hot fat around a roast, dry them thoroughly or brush lightly with cooking oil. Where dishes may boil and spill over during cooking, place them on a baking tray. The Cook & Clean oven liners (see ‘Cleaning Your Cooker’) work better when fat splashes are avoided. Cover meat when cooking. Sufficient heat rises out of the oven while cooking to warm plates in the grill compartment. If you want to brown the base of a pastry dish, preheat the baking tray for 15 minutes before placing the dish in the centre of the tray. DocNo.031-0002 - Cooking table 4. Cooking Table The oven control settings and cooking times given in the table below are intended to be used AS A GUIDE ONLY. Individual tastes may require the temperature to be altered to provide a preferred result. Top Centre Food is cooked at lower temperature in a fan oven than in a conventional oven. When using recipes, reduce the fan oven temperature by 10°C and the cooking time by 5-10 minutes. The temperature in the fanned oven does not vary with height in the oven so you can use any shelf. ArtNo.050-0007 Oven shelf positions Base Oven Shelf Positions Conventional Oven Fan Oven Temperature Shelf Temperature Food ArtNo.050-0003A - Cooking table - electric & fan °C position °C 160 C 150 200 C 190 160 C 150 200 C 190 160 C 150 200 C 190 160 C 150 20-25 minutes per 500g +20-25 minutes. 200 C 190 15-20 minutes per 500g +15-20 minutes. 160 C 150 20 minutes per 500g +20 minutes. 200 C 190 15 minutes per 500g +15 minutes. 160 C 150 25-30 minutes per 500g. 200 C 190 20 minutes per 500g. 140-150 C 130-140 220 T 210 Large tins 30-35 minutes; individual 10-20 minutes. Fillet 190 C/B 180 15-20 minutes. Whole 190 C/B 180 15-20 minutes per 500g. Steak 190 C/B 180 Steaks according to thickness. 140 C/B 130 45-50 minutes per 500g of mixture. Fruit 180 mm tin 150 C/B 140 2-2½ hours. Fruit 230 mm tin 150 C/B 140 Up to 3½ hours. Madeira 180 mm 160 C 150 80-90 minutes. Queen cakes 190 C 180 15-25 minutes. Scones 220 C 210 10-15 minutes. 180 mm tin 180 C 170 20-30 minutes. 210 mm tin 180 C 170 30-40 minutes. Shortcrust tarts 200 C 190 20-30 minutes on a preheated tray. Fruit pies 200 C 190 35-45 minutes. Tartlets 200 C 190 10-20 minutes according to size. Puff pastry 230 C 220 20-40 minutes according to size. Meringues 100 C 90 2-3 hours. Baked egg custard 160 C 150 45-60 minutes. 40-45 minutes. Meat Approximate cooking time ArtNo.050-0001 Gas cooking table Beef (no bone) Lamb Pork Poultry Chicken Turkey Duck Casserole Yorkshire pudding 30-35 minutes per 500g +30-35 minutes. Thoroughly thaw frozen joints before cooking. Meat may be roasted at 20-25 minutes per 500g +20-25 minutes. 220°C (210°C for fan oven) and the 30-35 minutes per 500g +30-35 minutes. cooking time adjusted accordingly. 25-30 minutes per 500g +25-30 minutes. For stuffed and rolled meats, add approximately 10 minutes per 500g, 35-40 minutes per 500g +35-40 minutes. or cook at 200°C (190°C) for 20 25-30 minutes per 500g +25-30 minutes. minutes then 160°C (150°C) for the remainder. 2-4 hours according to recipe. For stuffed poultry, you could cook at 200°C (190°C) for 20 minutes then 160°C (150°C) for remainder. Do not forget to include the weight of the stuffing. For fresh or frozen prepacked poultry, follow instructions on the pack. Thoroughly thaw frozen poultry before cooking. Fish Cake Very rich fruit - Christmas, wedding, etc. Victoria sandwich Using the conventional oven: when two tier cooking leave at least one runner space between shelves. Position the baking tray with the front edge along the front of the oven shelf. Up to three tiers can be cooked in a fan oven at the same time but make sure to leave at least one runner space between each shelf being cooked on. Desserts Baked sponge pudding Milk pudding Bread 190 C 180 140-150 C/B 130-140 220 C/T 210 2 to 3 hours. 20-30 minutes. 7 Using the conventional oven: for even browning the maximum size of baking tray recommended is 340mm x 340mm. This ensures free heat circulation. If cooking a two tier load, the trays should be interchanged approximately halfway though the cooking time. 5. Cleaning Your Oven ArtNo.044-0004 - Cleaning - BI oven: no liner, no frame Essential Information Fig.5-1 Allow the oven to cool and isolate the electricity supply before carrying out any thorough cleaning. Never use paint solvents, washing soda, caustic cleaners, biological powders, bleach, chlorine based bleach cleaners, coarse abrasives or salt. Do not mix different cleaning products – they may react together with hazardous results. ������������������������������������� All parts of the oven can be cleaned with hot soapy water – but take care that no surplus water seeps into the appliance. Remember to switch on the electricity supply before reusing the oven. We have developed a range of cleaning products that give maximum performance without damaging the oven surface. More information is available in the Cookware Collection brochure supplied with your oven and on our website, www. rangemastercookshop.co.uk. Fig.5-2 Regular cleaning is recommended. For easier cleaning, wipe away any spillages immediately. Control Panel and Doors Avoid using any abrasive cleaners, including cream cleaners, ������������������������������������������� on brushed stainless steel surfaces. For best results use a liquid detergent. The control panel, knobs and doors should only be cleaned with a soft cloth wrung out in clean, hot soapy water. After cleaning, polish with a dry cloth. Removing the Oven Door To aid cleaning and to make access to the oven cavity easier, the oven door can be removed. Open the door fully. Swivel the locking ‘U’ clips forwards to the locking position (Fig.5-1). To remove the oven door, grip the sides of the door, lift it upwards and then slide it forwards (Fig.5-2). Refitting the Oven Door To refit the door, slide the hinges back into their slots. Rotate the locking ‘U’ clips back to fit onto the hinges. 8 Grill Wash the grill pan and grid in hot, soapy water. After grilling meats or any foods that soil, leave the pan to soak for a few minutes immediately after use. Remove stubborn particles from the grid using a nylon brush. Alternatively, the grill pan can be washed in a dishwasher. Before you remove any of the grill parts for cleaning, ensure that they are cool, or use oven gloves. Oven Wash the oven interior with any proprietary oven cleaner that is suitable for enamel. CAUTION: If using corrosive/caustic oven cleaners always follow the manufacturer’s instructions. DO NOT allow contact with the oven elements. DO NOT use steel wool, oven cleaning pads, or any other materials that will scratch the surface. 9 6. Troubleshooting DocNo.054-0001 - Troubleshooting BI oven Steam is coming from the oven. Check that the door seal is not damaged and that the door is held firmly against the seal. When cooking foods with a high water content (e.g. oven chips) there may be some steam visible at the top of the door. Take care when opening the oven door, as there may be a momentary puff of steam when the door is opened. Stand well back and allow any steam to disperse. A dish of water when placed on the shelf should be the same depth all over. (For example, if it is deeper at the back, then the back of the cooker should be raised up or the front lowered). If the cooker is not level arrange for your supplier to level it for you. The oven fan is noisy. Oven temperature getting hotter as the cooker gets older. The note of the fan may change as the oven heats up – this is perfectly normal. If turning the temperature down using the oven control knob has not worked, or has only worked for a short time, then you may need a new thermostat. This should be fitted by a service person. Grill not cooking properly. Are you using the pan and trivet supplied with the cooker? Is the pan being used on the runners, not the floor of the compartment? Is the grill tray pushed fully back to stop? The oven light is not working. The bulb has probably blown. You can buy a replacement bulb (which is not covered under the guarantee) from most electrical stores. Ask for a 25W standard E14 connection lamp, FOR OVENS. It must be a special bulb, heat resistant to 300°C. See the HELP leaflet for spares by mail order. The knobs get hot when I use the oven or the grill. Can I avoid this? Yes, this is caused by heat rising from the oven or the grill and heating them up. Do not leave the oven door open. Make sure that the grill pan is pushed right back to the ‘back stop’ when grilling. Always grill with the compartment door closed. Before removing the existing bulb, turn off the power supply and ensure that the oven is cool. Open the oven door and remove the oven shelves. If there is an installation problem and I don’t get my original installer to come back to fix it, who pays? Locate the bulb cover and unscrew it by turning it anticlockwise (it may be very stiff ). You do. Service organizations will charge for their callouts if they are correcting work carried out by your original installer. Therefore, it is in your own interest to keep track of this installer so that you can contact them as required. Now unscrew the existing bulb anti-clockwise, taking care to protect your fingers with a glove in case the bulb should shatter. Screw in the new bulb clockwise and then screw the bulb cover back on. Turn on the electricity supply and check that the bulb now lights. Power failure. In the event of a failure in the electrical supply remember to reset the clock to ensure that the timed oven continues to operate. Food is cooking too slowly, too quickly, or burning. Cooking times may differ from your previous oven. Check that you are using the recommended temperatures and shelf positions – see the ‘Oven Cooking Guide’ – then adjust the settings according to your own individual tastes. The oven is not cooking evenly. Do not use a baking tray with dimensions larger than those specified in the section, ‘General Oven Tips’. If you are cooking a large item, be prepared to turn it round during cooking. If two shelves are used, check that space has been left for the heat to circulate. When a baking tray is put into the oven, ensure that it is placed centrally on the shelf. 10 INSTALLATION Check the appliance is electrically safe when you have finished. 7. Installation ArtNo.064-0001 - Installation - R604 oven Dear Installer Location of the Oven Before you start your installation, please complete the details BELOW. The oven may be installed in a kitchen/kitchen diner but NOT in a room containing a bath or shower. This appliance is designed for domestic cooking only. Use for any other purpose could invalidate any warranty or liability claim. ���������������� ������������������� This appliance should not be installed in a boat or caravan. The hob must be installed in accordance with the relevant Building regulations and IEE regulations. You will need the following tools and equipment to complete the oven installation satisfactorily: ArtNo.050-0011 - Installer information table ���������������������������� 1. 2. 3. 4. 5. ����������������������� Electric drill Steel tape measure Cross head screwdriver Pencil Multimeter (for electrical checks) Checking the Parts The oven is supplied with the following parts: • • If your customer has a problem relating to your installation they will be able to contact you easily. You must be aware of the following safety requirements & regulations: This appliance shall be installed in accordance with the regulations in force and in a well-ventilated space. Read the instructions before installing or using this appliance. The cooker must be installed in accordance with: • All relevant British Standards / Codes of Practice • The relevant Building / IEE regulations 11 Wire shelf x2 Grill pan and trivet INSTALLATION Check the appliance is electrically safe when you have finished. Fig.7-1 ������� ��� ������� ������ ��� ��� ��� ������� �� ������ ��� ��� �������������������������������� ��� ��� All dimensions in mm Positioning the Oven use of the appliance to any material that de-laminates or discolours at temperatures less than 65°C above room temperature. The oven can be installed under a worktop (Fig.7-1) or at high level in a tall kitchen unit and is designed to fit into a standard 600mm wide oven housing. When placing the oven in the housing, do not use the oven door as a lever for lifting the oven as damage may result. Once the oven is in position in the housing, use suitable screws to secure in place. The oven is 594mm across the trims and an unrestricted opening of 535mm minimum depth is needed, as measured from the front of the cabinet door to the rear of the housing. The worktop and any associated hob should be fitted BEFORE installing this oven. Provision for Ventilation The appliance housing used must provide adequate ventilation. It is recommended that if installing a built-in oven directly under the hob then there should be a minimum air gap of 20mm between the oven and the bottom of the hob. Failure to maintain a suitable clearance may impair the performance of the hob. For built-in installation, a minimum ventilation space of 85 – 90mm must exist between the rear of the appliance and the back of the housing or an adjacent wall. Surfaces of furniture and walls adjacent to the appliance should be heat, splash and steam resistant. All cabinet doors must be at least 8mm from the oven at all points. If a tall housing is to be installed flush with the ceiling, a 20cm² ventilation cut-out must be provided at the top of the housing. Certain types of vinyl or laminate kitchen furniture are particularly prone to heat damage and discolouration. We cannot accept responsibility for damage caused by normal 12 INSTALLATION Check the appliance is electrically safe when you have finished. Electrical Connection ���� This appliance must be installed by a qualified electrician to comply with the relevant Institute of Electrical Engineers (I.E.E.) regulations and also the local electricity supply company requirements. � � WARNING: THIS APPLIANCE MUST BE EARTHED �� � � � � � � � � Note: The appliance must be connected to the correct electrical supply as stated on the voltage label on the appliance, through a suitable cooker control unit incorporating a double pole switch having a contact separation of at least 3mm in all poles. This appliance must not be connected to an ordinary domestic power point. � The mains terminal is situated on the back of the oven (Fig.7-2). Fig.7-2 ���������������������������������������������������� Connect the cable to the correct terminals. Check that the links are correctly fitted and that the terminal screws are tight. Secure the mains cable using the cable clamp. Ensure the cable route avoids the risk of trapping or touching hot surfaces. Current Operated Earth Leakage Breakers Where the installation is protected by a 30mA sensitivity residual current device (RCD), the combined use of your appliance and other domestic appliances may occasionally cause nuisance tripping. In these instances the kitchen circuit may need to be reconfigured. This work should be carried out by a qualified electrician. Levelling The worktop should already be fitted and levelled, and the cabinets mounted 90° to the worktop. It is only necessary to ensure the top front edge of the appliance unit supports the front edge of the worktop and line up the appliance trims with the doors. Customer Care Please complete your contact details in the front of this section. Please inform the user how to operate the appliance and hand over the instruction pack. Thank you. 13 14 A B C D E F G H I Supply terminal Electronic timer Selector Oven thermostat Earth Fan motor Pilot lamp selector Oven light Cooling fan motor Key to circuit diagram � � � � � � �� �� � J K L M N O P Q � � � �� X1 X2 X3 X4 X5 X6 �� T � �� �� � �� � Earth appliance Earth fan motor Earth rotating spit motor (optional) Earth grill heating element Earth lamp holder Earth thermostat ArtNo.080-0017 - R604 circuit diagram M Thermostat start cooling fan Pilot lamp thermostat Live Circular heating element Neutral Grill heating element Thermal cut-out Rotating spit motor (optional) M � � � � � M �� �� � � � 8. Circuit Diagram DocNo.094-0001 - Circuit diagram R604/R609 oven ArtNo.104-0001 - Technical data - R604 oven 9. Technical Data INSTALLER: Please leave these instructions with the user. DATA BADGE LOCATION: Back of the oven. COUNTRY OF DESTINATION: GB/IE Dimensions Overall height 594 mm Overall width 594 mm Overall depth 535 mm Connections Electric 220 – 240V 50Hz Ratings Oven Multi-function Energy efficiency class on a scale of A (more efficient) to G (less efficient) Usable volume (litres) A 57.2 Size Medium Maximum total electric load at 230V 50Hz: 2.4kW 15 10. Warranty/After Sales Service If consultation or technical assistance is needed, please provide the local authorised service agent with the purchase invoice and the product code/serial number. The 2 years free maintenance for the operation of the appliance started from the date of purchase of this product. Any cosmetic damage to the appliance must be reported within 90 days of delivery. For in-warranty service please call: 0845 6035312. For general enquiries please call: 0870 7895107. 16 DocNo.111-0003 Warranty No.10 17 DocNo.000-0001 - Back cover Rangemaster ���������������������������������������� ArtNo.000-0003 CE logo www.rangemaster.co.uk