1
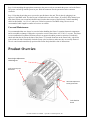
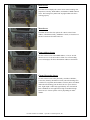
 3
User Manual
RevEAL Studio3 User Manual – April 2013 - Prism Projection, Inc.
Product Specifications and Warnings
Please read this manual prior to use.
•
•
•
•
•
•
This product is intended for professional use only.
This product is designed for damp conditions, but is not suitable for wet locations.
Due to risk of injury the safety cable MUST be attached while the product is suspended.
The product requires the appropriate power supply. (90-264 VAC, 47-63 Hz)
It is not intended for use on dimming circuits.
Contact Prism Projection Service and Support prior to any service work or the product warranty may be
voided.
Basic Installation
Before installing this product please make sure that you have read all warnings and safety information provided
in this manual.
The product must be installed in a suitable manner to support the product weight and with the safety cable
attached in such a way that it cannot be removed without releasing the clip. The safety cable should be attached
at all times during both installation and removal of the product.
Safe Mounting
Always install the safety cable provided when mounting the product overhead. To install, loop the safety cable
through the yoke and the support structure and clip the carabineer to the safety cable. Make sure that the loop
cannot slip off the support structure.
Attaching Data and Power Cables
Note: This lighting fixture can be used individually or modules can be daisy chained. In a chain of fixtures each
module can be individually addressed, or each can have its own address wherein each fixture is independent of
the others.
Step 1: If needed attach an appropriate connector to the end of the power cord included with the product. Any
connector you attach to the end of the product must be rated for 15 Amperes and 250VAC, and of the grounding
type. The conductors in the power cable are color coded for ease of assembly.
Wire Color
Green or Green with Yellow Stripe
Blue or White
Brown or Black
Conductor Function
GROUND
NEUTRAL
LINE
RevEAL Studio3 User Manual – April 2013 - Prism Projection, Inc.
Step 2: After attaching the appropriate connector to the power cord you can attach the power cord to the fixture.
The power cord will go into the power-in port. Slide the connector into the port and twist the connector
clockwise.
Step 3: Now that the unit has power you need to provide data to the unit. This is done by plugging in an
approved 5 pin DMX cable. The data-in port is found on the rear of the fixture. If you have daisy chained your
units, data-in from your second unit should come from the data-out port of the first unit. Continue attaching
cables in this fashion, 1 to 2, 2 to 3, and so on. Follow best practices for DMX wiring. Do not exceed
recommended cable lengths or number of receivers on a chain.
Care and Maintenance
It is recommended that care always be exercised when handling the fixture. It contains electronic components
and is susceptible to damage if dropped or exposed to excessive heat (above 105° F/40° C) or water. The fixture
is not recommended for outdoor locations unless in an approved outdoor protective enclosure. Periodically
check and clean the air filter at the base of the fixture. To clean the front lens on the fixture body, wipe down
with a clean soft cloth. Periodically check the fixture yoke hex bolts to make sure they are securely fastened.
The air vents located around the top portion of the fixture body should be clear of obstructions.
.
Product Overview
Beam Angles Adjustment 10‐90 Degrees 9 5/8” Accessory Slot Barn Doors Yoke Slide Adjustment Screw (2) Set Knob Yoke Position Knob RevEAL Studio3 User Manual – April 2013 - Prism Projection, Inc.
User Interface
All connections, settings and control options are located on the rear of the fixture, as illustrated below. The
Navigation Buttons can be used to access control settings and display fixture status on the Navigation Screen.
Intensity or CCT Adjustment Knob Air Filter – Remove screws (4) to clean Navigation Buttons
Power O
Switch (Con
LCD Menu Screen R36 Ethernet Jack DMX 5‐Pin In and Out
PowerCon connector power in and out. RevEAL Studio3 User Manual – April 2013 - Prism Projection, Inc.
Home Screen
The Home Screen displays the current fixture status including color
temperature, intensity, DMX address, and number of DMX channels
in use. The rotating fan symbol at the top right indicates the fan is
working properly.
Menu Screen
The Menu Screen offers four options for control. Select Fixture
Address, Channel Personality, Standalone Control, or TrueSource to
advance to the desired control feature set.
Fixture Address Screen
Use this screen to select either DMX address (1-512) or Art-Net
universe (0-0 to 15-15) and to choose either 8 or 16 bit encoding.
The screen displays the fixture IP and MAC address at the bottom.
Channel Personality Screen
Use this screen to select color personality (Variable, Full White,
Correction), Intensity (Standard or Linear), Advanced Settings (Eco
or Full Power, Algorithm, Refresh Rate) or Factory Reset. Eco Mode
under Advanced Settings puts the fixture in a low power fan-less
state. Light output is reduced by approximately 40%. Set Refresh
Rate to Medium for most applications. High is intended for high
frame rate uses. Fixture options will vary depending on model
number.
RevEAL Studio3 User Manual – April 2013 - Prism Projection, Inc.
Standalone Control Screen
For operation without DMX or Art-Net in a standalone setting. Use
this screen to adjust the intensity and in some fixture models the
CCT value. Powering off the fixture from this screen will save the
last fixture settings including intensity and color.
TrueSource Screen
This screen displays the CIE value of the color of the light being
produced by the fixture. The screen shows both the target and actual
color value in X,Y coordinate values to assure TrueSource active
color calibration is active and monitoring performance.
Yoke Bolt – Detaches
yoke from housing
Yoke Slide – Loosen hex
screws to adjust position
RevEAL Studio3 User Manual – April 2013 - Prism Projection, Inc.
RevEAL Studio3
DMX Chart
Variable White
Menu Settings:
Channel Personality>
Channel Personality>
Channel Personality>
Channel Personality>
White (Full White, Variable White)
Intensity (Linear, Standard)
Advanced Settings > Energy (Full, Eco)
Advanced Settings > Refresh Rate
Advanced Settings > Algorithm
Advanced Settings > Algorithm
1
2
Chan
n
n+1
Control
Item
CCT
Intensity
Default
0
0
Range
0, 255
0, 255
Function
2800K-5600K
0% - 100%
1
2
3
Chan
n
n+1
n+2
Control
Item
CCT
CCT
Intensity
Default
0
0
0
Range
0, 255
0, 255
0, 255
Function
2800K-5600K Course Adj.
2800K-5600K Fine Adj.
0% - 100%
8 Bit
16 Bit
7
RevEAL Studio3
DMX Chart
Fixed White
Menu Settings:
Channel Personality>
Channel Personality>
Channel Personality>
Channel Personality>
White (Full White)
Intensity (Linear, Standard)
Advanced Settings > Energy (Full, Eco)
Advanced Settings > Refresh Rate
Advanced Settings > Algorithm
8 Bit
1
Chan
n
Control
Item
Intensity
8
Default
0
Range
0, 255
Function
0% - 100%
RevEAL Studio3
DMX Chart
Variable White + Correction
Menu Settings:
Channel Personality>
Channel Personality>
Channel Personality>
Channel Personality>
White (Variable CCT, CCT + Correction)
Intensity (Linear, Standard)
Advanced Settings > Energy (Full, Eco)
Advanced Settings > Refresh Rate
Advanced Settings > Algorithm
1
Chan
n
Control
Item
CCT
Default
0
Range
0, 255
2
3
n+1
n+2
Correction
Intensity
127
0
0, 255
0, 255
1
2
Chan
n
n+1
Control
Item
CCT
CCT
Default
0
0
Range
0, 255
0, 255
3
n+2
Correction
127
0, 255
4
5
n+3
n+4
Correction
Intensity
127
0
0, 255
0, 255
8 Bit
16 Bit
9
Function
2800K-5600K
+10 Magenta, +10 Green,
127 – No Correction
0% - 100%
Function
2800K-5600K Course Adj.
2800K-5600K Fine Adj.
+10 Magenta, +10 Green,
Course Adj.
+10 Magenta, +10 Green,
Fine Adj.
0% - 100%
RevEAL Studio3
DMX Chart
Color + Variable White + Correction
Menu Settings:
Channel Personality>
Channel Personality>
Channel Personality>
Channel Personality>
Channel Personality>
Color (X,Y)
White (Variable CCT, CCT + Correction)
Intensity (Linear, Standard)
Advanced Settings > Energy (Full, Eco)
Advanced Settings > Refresh Rate
Advanced Settings > Algorithm
1
2
3
Chan
n
n+1
n+2
Control
Item
X
Y
CCT
Default
0
0
0
Range
0, 255
0, 255
0, 255
4
5
n+3
n+4
Correction
Intensity
127
0
0, 255
0, 255
1
2
3
4
5
6
Chan
n
n+1
n+2
n+3
n+4
n+5
Control
Item
X
X
Y
Y
CCT
CCT
Default
0
0
0
0
0
0
Range
0, 255
0, 255
0, 255
0, 255
0, 255
0, 255
7
n+6
Correction
127
0, 255
4
8
n+7
n+8
Correction
Intensity
127
0
0, 255
0, 255
8 Bit
16 Bit
10
Function
X coordinate color value
Y coordinate color value
2800K-5600K
+10 Magenta, +10 Green,
127 – No Correction
0% - 100%
Function
X color value, coarse adj.
X color value, fine adj.
Y color value, coarse adj.
Y color value, fine adj.
2800K-5600K Course Adj.
2800K-5600K Fine Adj.
+10 Magenta, +10 Green,
Course Adj.
+10 Magenta, +10 Green,
Fine Adj.
0% - 100%
Modes and DMX Channels
Operating modes are set by using the button pad to navigate to the Personality and Fixture Address Menus. The
menu allows the user to adjust; Color Mode, Color Temperature, Intensity (dimmer curve) and select Advanced
Features such as power control. Remote power setting permits the user to control ECO and FULL power setting
via DMX.
NOTE: If the advanced feature power mode is set to REMOTE the first DMX channel on the instrument will be
assigned to it and all the channels listed below will be shifted up by one channel.
Color Modes
RevEAL Profile Junior offers a calibrated color mode and the option to only use white (CCT). Use the up and
down buttons to select “Color” then use the left and right buttons to choose between no color and XY mode.
While RevEAL instruments contain 5 base colors of LEDs, they are controlled within calibrated color systems.
This ensures that the TrueSource optical sensor is actively monitoring and calibrates color.
Color Mode - CIE x,y
CIE x,y allows the user to select color from the CIE 1931 2° Observer color space.
To determine the DMX decimal values for a given coordinate, simply multiply the coordinate by 255. For
example 3200K white light has an x value of 0.4254 and a y of 0.4044.
x value: 0.4254 x 255 = 108 (42%)
y value: 0.4044 x 255 = 103 (40%)
In 16 bit mode, the multiplier is 65535;
x value: 0.4254 x 65535 = 27878 (42%)
y value: 0.4044 x 65535 = 26502 (40%)
If the Color Temperature channel is enabled, the color temperature channel will “take over” color control from the color
channels. Generating white light in the Kelvin value specified by the Color Temperature channel.
CIE x,y DMX Map (8 bit control):
1st Color Channel
x coordinate
2nd Color Channel
y coordinate
CIE x,y DMX Map (16 bit control):
1st Color Channel
x course
2nd Color Channel
x fine
3rd Color Channel
y course
4th Color Channel
y fine
White (CCT) Available Options: Enabled, Disabled, Correction
When enabled the White setting creates a Correlated Color Temperature (CCT)Channel. If the CCT channel is
at any value other than 0, white colors will be produced by the instrument. At full the color generated will be
8000K white, at 11% the color generated will be ~3200K white. As the channel value is raised the color
temperature will go up.
11
If CCT is at any value other than 0 and the Color Mode is any setting other than None, the instrument will
ignore the color channels and only create white light. Moving the CCT channel to 0 will bump the instrument to
wherever the color channels are set.
If the Correction option is selected, a channel will be added following the CCT channel that allows for the
adjustment of green and magenta in the CCT output. The Correction channel should be defaulted to 50%
(127) for no correction. Raising the Correction channel will add up to 5 units of green. While lowering the
Correction channel will add up to 5 units of magenta. This feature is important of the user is attempting to
balance to sources that may have color shift towards green or magenta, such has fluorescents or only white LED
devices.
If using the Correction option, ensure that Color is selected for the Algorithm found in Advanced Settings.
If enabled, in 8 bit mode 1 channel will be added after the color channels, 2 channels will be added if 16 bit
control is being used.
If Correction is selected, in 8 bit mode 2 channels will be added after the color channels, 4 channels will be
added if 16 bit control is being used. CCT channel(s) then Correction channel(s).
Intensity Available Options: Linear, Standard
Users may select either from a linear dimming curve or square law dimming. Square law dimming is frequently
used in television production with the low end and top end of the dimming curve are smoothed out.
RevEAL instruments always use an intensity channel, in 16 bit operation 2 channels are used.
Full and Eco Power Modes Available Options: Full Power, Remote, ECO
Full Power
With Full Power Selected the instrument will use all active cooling including the fan and operate at the highest
lumen output of approximately 9700 lumens.
Remote
If Remote is selected a control channel will added at the beginning of the DMX address block. At full this
channel will turn off the fan, output of the instrument will be diminished. The amount that output will be
diminished is dependent on the color being produced. In general it is between 40-50%. A value other than full
will put the fixture in full power mode.
ECO
ECO mode turns off the fan and the instrument will operate virtually silently, with diminished output. ECO
mode will run the instrument with incredibly high efficiency. The total wattage draw of the instrument will be
significantly reduced by 50% and the lumen output will be reduced 40%.
12
Standalone Control
Navigating to Standalone Control allows the user to create light without DMX present. To ensure there is no
change in the light being produced it is recommended that DMX cables be removed while using standalone
control.
Use the up and down arrows to select the parameter to change, then use the left right arrows to change the
parameter.
Pressing the X button will return to the previous screen.
To ensure that the light settings established in the Standalone Control mode are maintained through
power cycles, always power off the unit from the Standalone Control screen display.
13
Prism Projection, Inc. 8228 East 124th Street South Sully, IA 50251 +1 (641) 594‐3356 [email protected] To receive an electronic copy of this user manual, please scan the QR code below. 14