1
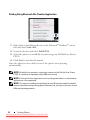
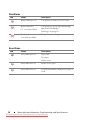
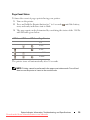
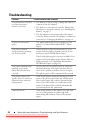
Dell™ Ink-Free Printer PZ310
With ZINK™ Zero Ink™ Printing Technology
User’s Guide
Model PZ310
Downloaded from ManualsPrinter.com Manuals
w w w. d e l l . c o m | s u p p o r t . d e l l . c o m
Notes, Notices, and Cautions
NOTE: A NOTE indicates important information that helps you make better use of
your printer.
NOTICE: A NOTICE indicates either potential damage to hardware or loss of data
and tells you how to avoid the problem.
CAUTION: A CAUTION indicates a potential for property damage, personal injury,
or death.
____________________
Information in this document is subject to change without notice.
© 2008 Dell Inc. All rights reserved.
Reproduction of these materials in any manner whatsoever without the written permission of Dell
Inc. is strictly forbidden.
Trademarks used in this text: Dell and the DELL logo are trademarks of Dell Inc.;
Microsoft and Windows are registered trademarks of Microsoft Corporation; Bluetooth is a registered
trademark owned by Bluetooth SIG, Inc. and used by Dell Inc. under license; ZINK and Zero Ink are
trademarks of Zink Imaging, LLC.
Other trademarks and trade names may be used in this document to refer to either the entities claiming
the marks and names or their products. Dell Inc. disclaims any proprietary interest in trademarks and
trade names other than its own.
Model PZ310
September 2008 Rev. A00
Downloaded from ManualsPrinter.com Manuals
Contents
1
Your Dell™ Mobile Printer
About Your Mobile Printer
2
3
. . . . . . . . . . . .
5
. . . . . . . . . . . . . . . .
6
Installing and Charging the Battery
. . . . .
7
Installing the Battery
. . . . . . . . . . . . . . . . . . .
7
Charging the Battery
. . . . . . . . . . . . . . . . . . .
8
Loading the ZINK™ Photo Paper
Important Information: ZINK Photo Paper
4
Printing Photos
. . . . . . .
. . . . . . .
10
. . . . . . . . . . . . . . . . . . . .
11
Turning On Your Printer
. . . .
15
. . . . . . . . . . . . . . . . . . .
16
Status Indicator Information,
Troubleshooting, and Specifications
Status Indicator Information
Power Status
12
. . . . . . . . . . . . .
Sending and Printing Photos Using PictBridge
Reprinting a Photo .
11
. . . . . . . . . . . . . . . . .
Sending and Printing Photos
Using Bluetooth® Technology
5
9
. . .
17
. . . . . . . . . . . . . .
17
. . . . . . . . . . . . . . . . . . . .
17
Battery Status
. . . . . . . . . . . . . . . . . . .
Contents
Downloaded from ManualsPrinter.com Manuals
17
3
Print Status
. . . . . . . . . . . . . . . . . . . . .
18
Error Status
. . . . . . . . . . . . . . . . . . . . .
18
. . . . . . . . . . . . . . . . .
19
. . . . . . . . . . . . . . . . . . . . .
20
. . . . . . . . . . . . . . . . . . . . . .
21
Page Count Status
Troubleshooting
Specifications
6
Contacting Dell
. . . . . . . . . . . . . . . . . . . .
4
Contents
Downloaded from ManualsPrinter.com Manuals
22
Your Dell™ Mobile Printer
1
Unpack your printer and verify the contents of the package. If any of the items shown
below are missing, contact Dell (see "Contacting Dell" on page 22).
Package Contents
Dell Ink-Free Printer PZ310
AC adapter and power cord
Battery
NOTE: The power cord that shipped
with your printer may be different
depending on your country/region.
Quick Setup Guide and CD
Media Pack
Dell™ Ink-Free Mobile Printer PZ310
Contents:
User’s manual
Product Information Guide
Dell™ Ink-Free Mobile Printer
Ma
de i
n
Chin
a
|
.com
dell
www.
de
rt.
po
20
08
0
om
ll.c
77
30
20
37
42
P0
A
su p
Information Disc
©
De
ll
9
Inc
L3
. A
9A
ll r
P/N
ig h
00
ts re
serve
ev: A
d. Dell CD P/N: C636J R
0
-A
-0
00
Contains 12 ZINK™ Photo Papers and
1 ZINK™ Smart Sheet
NOTE: It is recommended that you use
original Dell-branded ZINK Photo Paper
for optimal print quality.
Your Dell™ Mobile Printer
Downloaded from ManualsPrinter.com Manuals
5
About Your Mobile Printer
1
4
3
1
Media cover
2
PictBridge & power
connector cover
3
Battery cover
4
Paper exit
1
Media tray
2
Battery indicator
3
Lanyard hook
4
Media cover latch
5
Reprint button
6
Power button
7
Error indicator
8
Ready indicator
2
1
2
8 7 6 5
4
3
6
Your Dell™ Mobile Printer
Downloaded from ManualsPrinter.com Manuals
2
Installing and Charging the Battery
Installing the Battery
CAUTION: Use only the battery that shipped with your printer. Using any other
batteries may result in product damage or malfunction.
1 Remove the battery cover.
2 Insert the battery. Ensure that the battery is inserted in the correct
orientation as shown above.
NOTICE: Inserting the battery incorrectly can result in potential loss of data or
damage to hardware.
3 Replace the battery cover.
Installing and Charging the Battery
Downloaded from ManualsPrinter.com Manuals
7
Charging the Battery
1.5
hours
Connect the AC adapter to the printer and a power source.
NOTICE: Charge the battery for 1.5 hours in order to ensure that the battery is fully
charged before you use the printer. If the battery has not been fully charged,
potential damage to hardware or loss of data might happen.
8
Installing and Charging the Battery
Downloaded from ManualsPrinter.com Manuals
Loading the ZINK™ Photo Paper
3
1 Slide the media cover latch to open the Media cover.
2 Load the Dell-branded ZINK Photo Paper into the media tray. Ensure
that ZINK Smart Sheet is at the bottom of pack with the barcode facing
down when loading.
3 Close the media cover. The Smart Sheet is ejected automatically.
Loading the ZINK™ Photo Paper
Downloaded from ManualsPrinter.com Manuals
9
NOTE: The ZINK Smart Sheet cleans and calibrates the print head, ensuring
optimal print quality.
NOTICE: Only use the Dell-branded ZINK Photo Paper on your mobile printer.
NOTICE: The media tray must be empty before you reload the photo paper. Do not
load the printer with more than 1 pack of ZINK Photo Paper (maximum tray capacity
is 12 photo papers and 1 Smart Sheet).
NOTE: Retain the ZINK Smart Sheet for use in calibrating and cleaning the print
head.
Important Information: ZINK Photo Paper
• Do not bend the ZINK Photo Paper.
• Hold the ZINK Photo Paper only by its edges. Do not touch the printing surface.
• Store the ZINK Photo Paper in a cool and dry place. Do not expose the photo paper
to direct sunlight for prolonged periods.
• The ZINK Photo Paper should be stored in environments where temperature
ranges between 5o C to 32o C ( 41o F to 90o F) and humidity ranges between
20% to 80% RH.
• Ensure to use the media pack within its valid date.
10
Loading the ZINK™ Photo Paper
Downloaded from ManualsPrinter.com Manuals
4
Printing Photos
Turning On Your Printer
Press the power button to turn on the printer.
The Ready indicator
is ready for printing.
lights up immediately and indicates that the printer
Printing Photos
Downloaded from ManualsPrinter.com Manuals
11
Sending and Printing Photos Using Bluetooth®
Technology
From a Cell Phone
NOTE: The steps for using Bluetooth transmission may be different for each cell
phone. See the documentation of your cell phone for specific details on how to
send photos using Bluetooth.
You can send photos from a Bluetooth-enabled cell phone to your
Dell Ink-Free Printer PZ310 for printing.
1 Select the photo you would like to print from the stored photos on your
cell phone.
2 Select the Bluetooth transmission option on your cell phone’s menu list.
For example, "Send via Bluetooth", "Copy", or "Beam".
3 Search for devices and select Dell PZ310.
4 Confirm the transmission on your cell phone and begin sending the photo
to the printer.
The printer automatically begins printing once the photo has been fully
received. It takes approximately a minute to send and complete printing via
Bluetooth transmission (based on a JPEG image taken from a 2 mega pixel
camera phone).
12
Printing Photos
Downloaded from ManualsPrinter.com Manuals
From a Bluetooth-Enabled Computer
You can send photos from a Bluetooth-enabled computer to your
Dell Ink-Free Printer PZ310 for printing.
Printing Using File Browser
1 Browse and select the photo you would like to print using your Dell InkFree Printer PZ310.
2 Right-click the selected picture and select Send To.
3 Search for devices and select Dell PZ310.
4 Click Next to start the file transfer.
Once the photo has been fully received, the printer starts printing
automatically.
Printing Photos
Downloaded from ManualsPrinter.com Manuals
13
Printing Using Bluetooth File Transfer Application
1 Right click on the Bluetooth icon on the Microsoft® Windows® system
tray and select Send a File.
2 Search for devices and select Dell PZ310.
3 Select the photo you would like to print using your Dell Ink-Free Printer
PZ310.
4 Click Next to start the file transfer.
Once the photo has been fully received, the printer starts printing
automatically.
NOTE: By default, no passkey is required to connect to the Dell Ink-Free Printer
PZ310. If a passkey is requested, enter 0000 (four zeroes).
NOTE: Printing a file from applications such as image/text editors or presentation
applications is not supported.
NOTE: The steps for sending and printing from your Bluetooth-enabled computer
may vary based on the operating system. However, the principle is the same across
different operating systems.
14
Printing Photos
Downloaded from ManualsPrinter.com Manuals
Sending and Printing Photos Using PictBridge
NOTE: The steps for using PictBridge may be different for each digital camera. See
the documentation of your digital camera for specific details on how to send photos
using PictBridge.
NOTE: USB cable is not shipped with your printer.
You can also print photos directly from a digital camera that supports
PictBridge.
NOTICE: Do not disconnect the USB cable until the entire printing process is
complete.
NOTICE: Do not turn off the printer while printing is in progress.
NOTICE: Do not open the media cover while printing is in progress.
1 Use the USB cable supplied with the digital camera. Connect one end of
the USB cable to your camera and the other end to the printer’s
PictBridge connector.
2 Select the desired photo on your digital camera and follow the instructions
on the digital camera's screen to print.
Printing Photos
Downloaded from ManualsPrinter.com Manuals
15
Reprinting a Photo
Press the Reprint button to print another copy of the last photo printed.
NOTICE: The printer’s memory of the last photo printed is cleared once the printer
is turned off.
NOTICE: After 3 to 4 continuous prints (depending on the operating temperature),
the printer will automatically cool down its internal temperature. Wait for the Ready
indicator
to stop blinking before printing again.
16
Printing Photos
Downloaded from ManualsPrinter.com Manuals
5
Status Indicator Information,
Troubleshooting, and Specifications
Status Indicator Information
Power Status
LED
x3
Status
Description
Ready indicator: on
The power is on
Ready indicator: blinks
3 times before shut
down
Manual or auto power off (after
5 minutes of idle time)
Battery Status
LED
x3+
Status
Description
Battery indicator: blinks
3 times and turns off;
The charge in the battery is low.
Ready indicator: on
Battery indicator:
(Power available for 1 print)
Low battery
1 second per blink
+
Battery indicator: on;
Charging the battery
Ready indicator: on
Ready indicator: on
The battery is fully charged
Status Indicator Information, Troubleshooting, and Specifications
Downloaded from ManualsPrinter.com Manuals
17
Print Status
LED
Status
Description
Ready indicator: on
The printer is ready to receive data
Ready indicator:
0.5 second per blink
The printer is receiving data through
Bluetooth /PictBridge
Ready indicator:
The printer is cooling
Printing is in progress
2 seconds per blink
Error Status
LED
Status
Description
Error indicator: on
Paper jam
No paper
Other errors
Error indicator: on
Media cover open
Error indicator: on
Non Dell-branded ZINK photo paper is
used
18
Status Indicator Information, Troubleshooting, and Specifications
Downloaded from ManualsPrinter.com Manuals
Page Count Status
To know the count of pages printed using your printer:
1 Turn on the printer.
2 Press and hold the Reprint button for 7 to 8 seconds
error, and ready indicators start to blink.
until the battery,
3 The page count can be determined by correlating the status of the 3 LEDs
with the table given below:
LED 1
LED 2
LED 3
Page Count
<13
<250
<500
<=1000
>1000
The printer turns off automatically after 30 seconds.
NOTE: Printing cannot be performed in the page count status mode. Turn off and
then turn on the printer to revert to the normal mode.
Status Indicator Information, Troubleshooting, and Specifications
Downloaded from ManualsPrinter.com Manuals
19
Troubleshooting
Problem
Possible Causes and Solutions
The printer does not turn
on when the power
button is pressed.
1 The battery is out of charge. Charge the battery or
connect to the AC adapter.
2 The battery is not inserted correctly. Ensure that
the battery is inserted correctly (see "Installing the
Battery" on page 7).
3 The AC adapter is not connected to the printer
correctly. Ensure that the AC adapter is connected
correctly (see "Charging the Battery" on page 8).
Unable to load photo
paper.
The photo papers may not be suitable for your
printer. Use only Dell-branded ZINK™ Photo
Papers.
The paper jammed
before printing (nothing
has been ejected).
Check if there is paper in the media tray. If so,
ensure that the paper is loaded correctly. If not,
load a new pack of ZINK Photo Paper.
Check if the photo paper is bent or wrinkled. If so,
replace with a new photo paper. Ensure that it is
loaded correctly (see "Important Information:
ZINK Photo Paper" on page 10).
The paper jammed while
printing (part of the
photo has already been
ejected).
Do not pull out the photo paper. It will cause
hardware damage and expire warranty. Please
turn off the printer, and then turn it on again.
The photo paper will be automatically ejected.
The printed photo has
streaks (lines or marks of
different color from the
background).
Turn off the printer. Open the media cover and
remove the photo paper. Place the ZINK Smart
Sheet in the paper tray with its barcode facing
down. Close the media cover and turn on the
printer. The Smart Sheet will be automatically
ejected and cleans the print head.
Other problems
Turn off the printer. If the printer does not turn
off, reset the printer by removing and
reinserting the battery. Turn on the printer
again.
20
Status Indicator Information, Troubleshooting, and Specifications
Downloaded from ManualsPrinter.com Manuals
Specifications
Photo size
640 x 960 pixels
Image file type
JPEG
Media paper used
2'' x 3 '' Dell-branded ZINK™ Photo Papers
Media paper storage
environment
Temperature: 5o C to 32o C (41o F to 90o F)
Humidity: 20% to 80% RH
Display
Power status
Ready status
Error status
Control buttons
Power button
Reprint button
Communication
Bluetooth® 2.0 EDR (supported profiles: FTP, BIP,
and OPP)
External connector
PictBridge (USB 2.0 high speed)
Battery life
Lithium polymer rechargeable battery 450 mAh
USB (PictBridge)
(May be charged up to 300 times)
Maximum 15 prints per charge
Power supply
450 mAh Polymer Lithium-ion rechargeable battery
9V 3A AC adapter
Dimensions
Width: 75 mm
Depth: 122.5 mm
Height: 24.2 mm
Weight
225 g
Status Indicator Information, Troubleshooting, and Specifications
Downloaded from ManualsPrinter.com Manuals
21
Contacting Dell
6
For customers in the United States, call 1-800-WWW-DELL
(1-800-999-3355).
Dell provides several online and telephone-based support and service options.
Availability varies by country and product, and some services may not be
available in your area. To contact Dell for sales, technical support, or
customer service issues:
1 Visit support.dell.com.
2 Verify your country or region in the Choose A Country/Region drop-down
menu at the bottom of the page.
3 Click Contact Us on the left side of the page.
4 Select the appropriate service or support link based on your need.
5 Choose the method of contacting Dell that is convenient for you.
22
Contacting Dell
Downloaded from ManualsPrinter.com Manuals