1
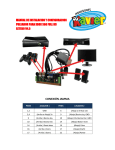
DVI-GS3-2 1080p on DVI monitor User’s Guide © 2007 Avenview™ Inc. All rights reserved. The contents of this document are provided in connection with Avenview Inc. (“Avenview”) products. Avenview makes no representations or warranties with respect to the accuracy or completeness of the contents of this publication and reserves the right to make changes to specifications and product descriptions at any time without notice. No license, whether express, implied, or otherwise, to any intellectual property rights is granted by this publication. Except as set forth in Avenview Standard Terms and Conditions of Sale, Avenview assumes no liability whatsoever, and disclaims any express or implied warranty, relating to its products including, but not limited to, the implied warranty of merchantability, fitness for a particular purpose, or infringement of any intellectual property right. Reproduction of this manual, or parts thereof, in any form, without the express written permission of Avenview Inc. is strictly prohibited. Disclaimer While every precaution has been taken in the preparation of this document, Avenview Inc. assumes no liability with respect to the operation or use of Avenview hardware, software or other products and documentation described herein, for any act or omission of Avenview concerning such products or this documentation, for any interruption of service, loss or interruption of business, loss of anticipatory profits, or for punitive, incidental or consequential damages in connection with the furnishing, performance, or use of the Avenview hardware, software, or other products and documentation provided herein. Avenview Inc. reserves the right to make changes without further notice to a product or system described herein to improve reliability, function or design. With respect to Avenview products which this document relates, Avenview disclaims all express or implied warranties regarding such products, including but not limited to, the implied warranties of merchantability, fitness for a particular purpose, and non-infringement. www.avenview.com 1 Table of Contents Getting Started ....................................................................................................................................... 3 Key Features ........................................................................................................................................... 4 Minimum System Requirements............................................................................................................ 4 Panel Description ................................................................................................................................... 5 DVI-GS3-2 ........................................................................................................................................... 5 Installation and Operation ..................................................................................................................... 7 Scenario 1: First Time Installation ...................................................................................................... 7 Scenario 2: Move from LCD TV (HDMI Interface) to DVI Monitor ..................................................... 8 Scenario 3: Move from TV (AV Interface) to DVI Monitor ................................................................. 9 Step 1: Game Console Setup .............................................................................................................. 9 Step 2: Switch Basic Operation ........................................................................................................ 11 Specifications ....................................................................................................................................... 12 www.avenview.com 2 Getting Started DVI-GS3-2 GameSwitch allows you play over a DVI monitor in High-Definition resolutions of 720p / 1080p for ultimate HD multimedia experience. Now you can experience High Definition Gaming at maximum resolution. GameSwitch enables you to play console games on a regular DVI monitor. With only one monitor, DVI GameSwitch is perfect solution for watching high definition contents. Switching between two machines as easy as a click of a button. GameSwtich gives you ultimate visual experience on your DVI monitor. www.avenview.com 3 Key Features Play latest consoles games on DVI monitor at high definition One monitor for two devices Minimal wiring required Simultaneous connection from two of the following; a. Game console b. PCs with graphic output c. DVD players with HDMI output d. Blue-Ray/HD-DVD player e. DV camcorder Easy screen switching via select button Plug & Play Supports HD resolution of up to 1080p Compliant with HDMI 1.2, HDCP, and DVI 1.0 High quality audio to setero speaker or monitor with built-in speaker LED status to indicate the source displayed Equipped with magnetic pad and metal plate for easy installation Minimum System Requirements Monitor with DVI input port Stereo Speaker If connection to DVD Player or other digital multimedia device is required, ensure that it has HDMI or DVI output. www.avenview.com 4 Panel Description DVI-GS3-2 Port 2 audio has higher priority than Port 3 audio source. Port 3 audio will override if Port 2 is plugged in. Similarly, Port 5 audio has higher priority than Port 4 audio source. Port 5 audio will override if Port 4 is plugged in. www.avenview.com 5 www.avenview.com 6 Installation and Operation GameSwitch can use one DVI monitor to display DVI based PC and HDMI based game console. You can change the display source manually or configure it Auto. Scenario 1: First Time Installation a. If booting up the game console for the first, it should start in default settings. However, if you have configured the game console previously, then ensure to reset the it to factory default settings. Follow Figure 1 to connect the system. PC and DVI monitor are connected with DVI cable provided with your monitor. Other cables needed are included in the device package. Figure 1: Connection Diagram of GameSwitch www.avenview.com 7 b. Place the selected button under your DVI monitor. Use the button to switch channels between game console and PC. During switching the display, there will be little waiting time due to re-initialization of HDCP. Figure 2: Place the Selected Button under DVI monitor c. You may connect optional speaker to GameSwitch to have better audio effects. d. Go to Step 1 for further setup. Scenario 2: Move from LCD TV (HDMI Interface) to DVI Monitor a. Before moving the game console from LCD TV to DVI monitor, change the Video Output Settings (Figure 3)from game console and change the displayed resolution as 720p to make sure the image can be displayed on your DVI monitor (go to Video Output Settings – HDMI – Manual – 720p) or set “Automatic” mode. Figure 3: Options under Video Output Settings www.avenview.com 8 b. Refer to Figure 1 to connect the system. c. Refer to Figure 2 to place the selected button under your DVI monitor. d. Go to Step 1 for further setup. Scenario 3: Move from TV (AV Interface) to DVI Monitor a. Before connecting the game console to GameSwitch, reset the game console to default settings (Figure 4). All settings (DVD, Music, Chat, System, Date and Time) will be set to Factory Default value when game console is reset. b. While game console is being set to factory default, DO NOT turn off the system. After restore is completed, press to restart, and you will see a screen as illustrated in Figure 5. Figure 4: Restore Default Settings c. You can now turn off your game console and move it to your DVI monitor. d. Go to Step 1 for further setup. Step 1: Game Console Setup a. Use the selected button to switch the displayed channel to GAME port (Blue lit on GameSwitch). b. If you just finished restoring game console, a Welcome Message should appear to remind you to connect your controller using USB cable. Follow on-screen instructions to setup language, set output video and audio using HDMI. www.avenview.com 9 c. Display Settings: To change display resolutions go to Settings – Display Settings – Video Output Settings – HDMI. Select the maximum supported resolution by your DVI monitor. Figure 6: A 17” DVI monitor displaying at 1080p resolution (1920x1080@60Hz) d. Sound Settings: To change audio settings, go to Settings – Sound Settings – Audio Output Settings, and then change the setup as “Audio Input Connector or AV MULTI”. Figure 7: Sound Settings e. Now you are ready to play your Game Console on DVI monitor. www.avenview.com 10 Step 2: Switch Basic Operation a. Auto Switching: GameSwitch will switch to the first device activated. If you turn off one of the displayed sources, it will automatically switch to the other active channel. b. Optional Power Adapter: If your PC doesn’t have USB port or the USB power is not sufficient for GameSwitch, you may use optional DC 5V, 2A power adapter with USB type A output port. Figure 8: Optional Power Adapter General Troubleshooting Problem Possible Solution Screen Defects Appear Off-Center Screen Image, Odd Colors or No Picture No Image Check that DVI resolution and frequency is not over the limit of monitor display. Check your current resolution, refresh rate and color depth settings in the Settings and Monitor tabs in your Display Properties dialog. Try adjusting the brightness, sharpness, contrast, and color balance controls of your monitor. Try adjusting the centering and positioning controls of your monitor to position the picture on the screen. For first timing installation ensure to reset the game console to factory default Ensure that the monitor cable is securely fastened to the DVI and Monitor port. Check to see if your DVI monitor supports desired resolution Check if the GameSwitch is getting sufficient power. www.avenview.com 11 Specifications Model Connector Input Cable Output Supported Resolution Audio Channel Switching Method Supported Signal Power Consumption Housing Dimension (LxWxH) Operating Temperature Storage Temperature Humidity Connector Cable GameSwitch DVI-GS3-2 Game: DVI Female x 1, Audio Female x 1 PC: DVI Female x 1, Audio Female x 1 Game: HD & AV to DVI Cable PC: Use monitor’s DVI and Audio cable DVI Female x 1, Audio Female x 1 DVI to DVI + Select Button + Audio cable 480i, 480p, 720p, 1080i, 1080p Stereo Auto or Manual Select Button HDMI 1.2, HDCP, DVI 1.0 DC 5V, 700mA Metal Compact Size: 62 x 113 x 29 mm 0 ~ 50° -20 ~ 60° 10 ~ 90% www.avenview.com 12 www.avenview.com 13