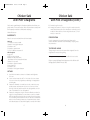
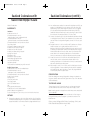
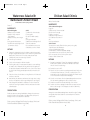
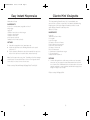
1
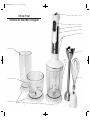
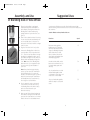
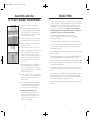
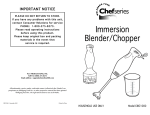
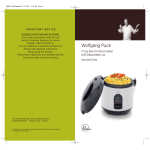
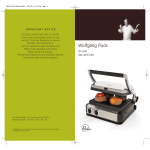
2020ImmBlderManual
2/19/10
4:28 PM
Page 1
I M P O R TA N T N OT I C E
PLEASE DO NOT RETURN TO STORE.
If you have any problems with this unit,
contact Consumer Relations for service
PHONE: 1-800-275-8273 or
visit our website at www.wphousewares.com
Please read operating instructions
before using this product.
Please keep original box and packing materials
in the event that service is required.
W.P. APPLIANCES, INC. Toll Free (800) 275-8273
Model BIBC2020 Printed in China REV 2.0
All trademarks, service marks and trade names (collectively the “Marks”) are proprietary
to Wolfgang Puck World Wide.
Wolfgang Puck
Immersion Blender/Chopper
Use and Care
2020ImmBlderManual
2/19/10
4:28 PM
Page 1
IMPORTANT SAFEGUARDS
When using electrical appliances, basic safety precautions should always
be followed, including the following:
1
Read all instructions carefully.
2 To protect against risk of electrical shock, do not put Motor Base,
cord or plug of the appliance in water or other liquid.
3 This appliance should not be used by children and care should be
taken when used near children.
4 Turn unit off and unplug from outlet when not in use, before putting
on or taking off parts, and before cleaning. To disconnect, turn unit
off, grasp plug, and pull from the wall. Never yank on cord.
5 Avoid contact with moving parts. Keep hands and utensils out
of the container while blending to prevent severe injury or damage
to the unit. A scraper may be used but must be used only when unit
is not running.
6 Caution: Sharp blades - handle carefully - unplug before inserting
or removing parts and do not put motor end in water.
7 Do not operate any appliance with a damaged cord or plug or after
the appliance malfunctions or is dropped or damaged in any manner.
Return the appliance to an authorized service facility for examination, repair, or electrical or mechanical adjustment.
16 To reduce the risk of injury, never place cutting blade on base
without first putting bowl properly in place. A spatula may be used
but only when the unit is not running.
17 Be certain cover is securely locked in place before
operating appliance.
SAVE THESE INSTRUCTIONS
HOUSEHOLD USE ONLY
Additional Safety Information
This appliance has a polarized plug (one blade is wider than the other).
As a safety feature, this plug will fit in a polarized outlet only one way. If the
plug does not fit fully in the outlet, reverse the plug. If it still does not fit,
contact a qualified electrician. Do not attempt to defeat this safety feature.
8 The use of attachments not recommended or sold by the appliance
manufacturer may cause fire, electric shock, or injury.
9 The maximum electrical rating occurs when using chopper
cup assembly, the electrical rating may be less when using
other attachments.
10 Do not use outdoors.
Before Your First Use
13 When mixing liquids, especially hot liquids, use a tall container, or
make small quantities at a time to reduce spillage.
Carefully unpack the blender and accessories, and remove all packaging
materials. Wash the chopping bowls, chopping blades, bowl covers,
blending rod, wire whisk and mixing beaker in warm, soapy water to
remove any dust that may have accumulated during packaging. Do not
immerse the motor base, cord or plug in water. Wipe the motor base
with a damp cloth.
14 Do not use this appliance for other than intended use.
CAUTION: The blades are very sharp. Use care when handling.
11
Do not let cord hang over edge of table or counter or touch hot
surfaces, including the stove.
12 Mixing flammable non-food substances can be harmful.
15 Do not operate in the presence of explosive and/or flammable fumes.
1
2
2020ImmBlderManual
2/19/10
4:28 PM
Page 3
Table of Contents
Important Safeguards
1
Before Your First Use
2
About Wolfgang Puck
3
Know Your Immersion Blender/Chopper
5
Assembly and Use of Blending Rod
or Wire Whisk
7
Suggested Uses
8
Assembly and Use of
Food Chopper Attachments
9
Helpful Hints
Wolfgang Puck,
owner of the famous
Spago restaurants and
one of the most influential
chef-restauranteurs in
America, is credited with
reviving California’s rich
culinary heritage. His
cooking innovations, a
result of blending fresh
California ingredients with his classical French techniques, are
enjoyed by world leaders, stars and fellow chefs alike. He established
other trend-setting restaurants like Postrio, Chinois on Main in Santa
Monica, Trattoria del Lupo, Cut, and his latest creation, Jai, an Asian
fusion restaurant in San Diego. Home chefs can also share Mr. Puck’s
talents through his cookbooks, cutlery, cookware and, of course,
through his appliances!
3
10
Care and Cleaning
11
Beverages
12
Appetizers, Soups, Salads & Dressings
16
Main Dishes, Sides Dishes
Sauces & Toppings
31
Desserts
39
Limited Warranty
42
Contact Information
back
2020ImmBlderManual
2/19/10
4:28 PM
Page 5
Know Your
Immersion Blender/Chopper
Speed Selector
Pulse Button
Turbo Button
Motor Base
Release Buttons
Mixing Beaker
Blending Rod
Large
Chopping
Bowl
Wire Whisk
Small Chopping Bowl
Nonskid Base/Cover
5
6
2020ImmBlderManual
2/19/10
4:28 PM
Page 7
Assembly and Use
of Blending Rod or Wire Whisk
figure 1
1
2
figure 2
Ensure the Motor Base is unplugged.
Attach Blending Rod or Wire Whisk to
Motor Base by inserting Motor Base into
Blending Rod or Whisk and pressing
straight down until you hear a click. (see
figure 1)
Place food in suitable container for mixing.
You can use the beaker provided with this
unit or a suitable bowl, or stockpot. For
best results solid foods should be no larger
than 1/2" cubes.
3
Plug into 120-volt 60 Hz AC only outlet.
4
Immerse the Blending Rod or Whisk into
your ingredients. Turn the speed selector
to “1”, press the top Pulse Button to begin
blending; then gradually increase speed,
as needed. (see figure 2) Slowly move the
Rod up, down and sideways through the
food . Note: Never lift the Blending Rod
attachment out of your ingredients while
the unit is running to avoid splatter of
your food.
Note: At any time during the blending
process, you can press the Turbo Button
(bottom black button) to increase the
blender to its maximum speed. You cannot
adjust the speed using the Turbo Button.
Speed adjustment is accomplished only
when using the top Pulse Button.
6
Do not operate the motor continuously
for more than one minute when using
the Blending Rod or Wire Whisk, simply
pulse the selected speed to your
desired consistency.
7
When you are finished, simply release the
Pulse Button, unplug the Motor Base and
press the two release buttons on the Motor
Base to remove the selected attachment.
7
Suggested Uses
Your Immersion Blender comes with a fixed multi-purpose blade,
and an extra long shaft which allows the unit to be used in deep pots, or
tall containers.
Caution: Blades are sharp. Handle with care.
Functions
Speed
Beat cream, whip egg whites,
puddings, sauces, frostings and
other airy, foamy mixtures. When
using, move Blending Rod up and
down to draw air in. Use a tall,
narrow container for best results
when foaming milk, making cream
and whipping egg whites.
1-3
Mix and stir shakes, drinks, omelet
batters, sauces and emulsions. Use
for pancake batter, gravies and
dressings.
3-4
Cut, chop, and crush raw or cooked
meat and hard vegetables.Grind
cooked meat for use in recipes such
as casseroles or chicken salad.
5
Chop, crush, and mash vegetables,
and fruit for baby food, soups and
sauces.
3-5
8
2020ImmBlderManual
2/19/10
4:28 PM
Page 9
Assembly and Use
of Food Chopper Attachments
figure 1
1
Ensure the Motor Base is unplugged.
2
Assemble Chopper Bowl by first placing
the Chopping Blade onto the Blade Shaft
in the Chopper Bowl. Then place food in
bowl. For best results, solid foods should
be no larger than 1/2" cubes.
3
Attach the Motor Base onto the Chopper
Lid by pressing down until you hear a click.
4
Attach Motor Base to top of Bowl Cover
by turning clockwise.
5
Plug into 120-volt 60 Hz AC only outlet.
6
Attach the assembled Motor Base with Lid
to the Chopping Bowl Cover as follows:
Line up the tab on the Cover with the
groove on the Chopper Bowl (see figure 1).
Insert cover tab into groove of Bowl and
turn clockwise until it locks in place (see
figure 2).
figure 2
7
Set the speed selector to 5. Always ensure
your hand is placed firmly on the Bowl
Cover. Use a pulse action when chopping
by pressing and releasing the Pulse Button
until desired consistency.
Helpful Hints
•
The hand blender can be used in hot liquids. Always use care when
using in hot liquids. To avoid splashing when using the hand blender
in a saucepan, insert the hand blender into the pan first, set the
speed dial to “1”, and then press the Pulse Button. Slowly increase
the speed to your desired setting. Caution: Do not tilt or lift the
Immersion Blender out of the pan while the motor is running, as a
serious burn or injury can occur from food splatter.
•
To puree foods, a certain amount of liquid is needed.
Add cooking liquid, broth, juice, milk, or cream, until desired
consistency is reached.
•
For thorough blending, move blade up and down in mixture until smooth.
•
You will achieve better mixing results if you use deep, tall containers.
•
For easy cleanup, unplug blender and rinse under running water
immediately after using.
•
Place liquid ingredients into the beaker first unless recipe specifically
states otherwise.
•
Before turning the appliance on, immerse the hand blender attachment
into the prepared ingredients, thus ensuring they will not spill over.
•
For greater efficiency, move the appliance in small outward spiraling
circles while mixing, without touching the bottom of the beaker with
the hand blender attachment.
•
The hand blender attachment cannot blend hard or fibrous ingredients unless they are in less than 1/2" pieces, soft ones into 1/2 - 1"
pieces.
8
Do not operate the motor continuously for
more than 15 seconds when using chopper
attachment, otherwise food will be too
finely chopped.
•
Some foods require a small amount of liquid to allow them to move
freely around the blades. Soft or wetter foods require less liquid,
while dry ingredients require more liquid. Add the liquid a little at a
time until the mix gains the required consistency.
9
When you are finished, simply release the
Pulse Button and unplug the Motor Base.
To remove the lid, turn the Motor Base
counter clockwise and lift straight up.
•
When using the hand blender, ensure the blades are covered to avoid
splashing.
10 Assembly of Nonskid Base/Cover:
The nonskid base also serves as a cover
for your chopping bowls and beaker.
Simply remove the nonskid base from the
bottom of the container and snap into
place on top for storage.
9
10
2020ImmBlderManual
2/19/10
4:28 PM
Page 11
Care & Cleaning
1
Unplug the unit from the outlet and remove any attached accessory.
Clean the Blending Rod in warm, soapy water. Caution: Blades are
sharp. Handle with care. Do not immerse the Bowl Cover, Motor
Base, cord or plug in water. Wipe the Motor Base and Bowl Cover
with a damp cloth only.
2
If food particles are not easily rinsed off the Blender Rod or
attachment, place a drop of dish detergent in a mixing container
with one cup of warm water. Plug cord into outlet. Immerse the
blade portion and metal rod and operate the unit for about 10
seconds. Unplug, rinse under hot water, then dry.
3
Simply wipe the Motor Base clean with a damp cloth. Never hold the
Motor Base under running water or immerse it in any liquid.
4
Do not use pointed or sharp objects to remove food particles.
5
To clean the Food Chopper Attachments, remove the Bowl Cover
first, then the Chopping Blade. Do not immerse the Chopper Bowl
cover in water. Wipe with a damp cloth using dishwashing liquid if
necessary. The Chopper Bowl and Chopping Blade can be washed in
warm, soapy water or in the top rack of the dishwasher. Be sure to
remove the dual use nonskid Base/Cover before placing in
dishwasher. Do not to use abrasive or harsh cleansers.
Beverages
Important: Do not try to sharpen the cutting edges of any blades.
They have been precision honed at the factory and will be damaged
by any attempted sharpening.
11
12
2020ImmBlderManual
2/19/10
4:28 PM
Page 13
Banana Blueberry Smoothie
Florida Sunshine
Breakfast Smoothie
Makes 4 servings
Makes about 2 quarts
INGREDIENTS
2 cups plain yogurt
2 cups fresh blueberries
2 cups frozen unsweetened strawberries
3 ripe bananas, peeled
2 cups ice cubes
2 tablespoons honey
1/2 teaspoon pure vanilla extract
METHOD
1
Combine all ingredients in a serving pitcher. Blend using Immersion
Blender until as smooth as desired. Serve immediately.
INGREDIENTS
3 oranges, peeled and quartered
1 medium papaya, peeled, seeded and cut into chunks
2 bananas, peeled
2 cups frozen peaches
1 cup plain yogurt, preferably Greek
2 tablespoons honey (more or less as desired)
2 cups ice cubes
2 cups fresh tangerine or orange juice (more or less as needed)
METHOD
1
Recipe courtesy Marian Getz
Layer all ingredients in an attractive serving pitcher and add half of
the orange juice. Use the Immersion Blender Wand to puree to
desired smoothness and thickness. If too thick, add remaining juice,
too thin, add ice cubes and/or more frozen peaches.
Recipe courtesy Marian Getz
13
14
2020ImmBlderManual
2/19/10
4:28 PM
Page 15
Hot Summer Mojitos
For A Crowd
Makes 8 servings
INGREDIENTS
1/2 cup fresh mint leaves, tightly packed
Zest from 4 limes
1 1/3 cups granulated sugar
Juice from 10 limes, (include the 4 limes from above with zest removed)
4 - 6 cups ice cubes
2 cups excellent quality white rum, more or less or omit as desired
3 cups club soda, cold
Garnish
8 long sprigs fresh mint
8 lime wedges or wheels
Appetizers, Soups,
Salads & Dressings
METHOD
1
Combine mint leaves, lime zest and sugar in Immersion Chopper
Bowl. Attach lid and pulse till zest and mint are finely chopped. Now
the sugar is infused with flavor.
2
In a 2-quart serving pitcher add sugar mixture and top with lime
juice, ice and rum. Blend using immersion wand till mixed. Add club
soda and pour (strain first if desired) into tall, chilled glasses. Garnish
with mint sprigs and lime wedges.
Note: To juice limes more easily, roll them under your palm on a counter
using firm pressure. Then, place them in a microwave for 10-15 seconds.
Recipe courtesy Marian Getz
15
16
2020ImmBlderManual
2/19/10
4:28 PM
Page 17
Chicken Satè
with Mint Vinaigrette
Satès can be readied early in the day and grilled or broiled as your
guests arrive. These satè recipes can be increased as necessary and
are frequently served at cocktail parties at Spago.
Makes 24 skewers
Chicken Satè
with Mint Vinaigrette (cont.)
5
Preheat the grill or broiler.
6
Arrange the skewers of chicken on the grill or under the broiler,*
careful that the bare ends of the skewers are not directly over (or
under) the flame. Grill the chicken until golden brown, 1 1/2 to 2
minutes on each side.
INGREDIENTS
About 10 ounces boned and skinned chicken breasts
PRESENTATION
Pour the vinaigrette into a small serving bowl. Arrange the
skewers around the bowl and serve immediately. Let your guests
help themselves.
Marinade
1 1/2 teaspoons curry powder
1 teaspoon freshly ground pepper
1/2 teaspoon salt
1/2 teaspoon ground cumin
1 1/2 to 2 tablespoons peanut oil
TO PREPARE AHEAD
Mint Vinaigrette
2 egg yolks
1/4 cup rice wine vinegar
2 tablespoons (about 1/2 bunch)
plus 2 teaspoons finely chopped mint leaves
1 tablespoon soy sauce
1/2 teaspoon ground coriander
1/2 cup peanut oil
1/4 teaspoon salt
1/4 teaspoon freshly ground pepper
Through step 4, remove the chicken and the vinaigrette from the
refrigerator 15 minutes before grilling.
*Bring your broiler tray directly under the flame for best results.
Recipe courtesy Wolfgang Puck, Adventures in the Kitchen with
Wolfgang Puck (Random House, 1991)
METHOD
1
Soak 24 6-inch bamboo skewers in cold water and refrigerate
for 1 hour.
2
Cut the chicken breast into 24 3- x 1-inch strips. Stick one skewer
into each chicken strip, lengthwise, and arrange on a large platter
or baking tray.
3
Prepare the marinade: In a small cup or bowl, combine the curry
powder, pepper, salt and cumin. Spoon the oil over the chicken,
turning to coat well, and then sprinkle the dry ingredients on both
sides. Let marinate for 1 hour, refrigerated.
4
Prepare the vinaigrette: Using the Immersion Blender, combine the
egg yolks, vinegar, 2 tablespoons mint leaves, soy sauce, coriander
and oil and blend until smooth. With the motor running, slowly pour
in the remaining oil and blend until smooth. Transfer to a small bowl
and stir in the remaining 2 teaspoons chopped mint leaves. Season
with salt and pepper to taste and refrigerate, covered, until needed.
17
18
2020ImmBlderManual
2/19/10
4:28 PM
Page 19
Sautèed Crabcakes with
Sweet Red Pepper Sauce
Makes 12 crabcakes
Sautèed Crabcakes (cont’d.)
2
In a small saucepan, reduce the cream with the jalapeno until 1/2 cup
remains. Cool and add to the onion mixture. Stir in the chives, dill,
Italian parsley, thyme, salt and cayenne pepper. Stir in the egg and
1/2 cup each bread crumbs and almond meal. Gently fold in the
crabmeat. Mixture will be lumpy. Correct seasonings to taste. Divide
the mixture into 12 crabcakes, about 2 1/2 ounces each.
3
Combine the remaining 1/2 cup each breadcrumbs and almond meal
on a flat plate. Dip both sides of each crabcake into the mixture and
coat well. Place on a tray and refrigerate, covered, 2 to 3 hours, up to
6 hours.
4
Prepare the sauce: In a 10-inch skillet, melt 3 tablespoons of butter.
Sautè the pepper, onion, garlic and thyme until the onion is
translucent, about 10 minutes. Deglaze with the wine and cook until
3 tablespoons liquid remain. Remove from heat and puree using the
Immersion Blender until smooth. Strain, return to a clean pan and
reheat. Whisk in the remaining 2 tablespoons of butter and the
lemon juice and season to taste with salt and pepper. Keep warm.
5
Scrape the contents of the skillet into a blender and purèe until
smooth. Strain, return to a clean pan and reheat. Whisk in the
remaining 2 tablespoons of butter and the lemon juice and season to
taste with salt and pepper. Keep warm.
6
When ready to serve, in 1 or 2 skillets, melt the 2 tablespoons butter
with the vegetable oil. Over medium-high heat, sauté the crabcakes
until golden brown, about 4 minutes on each side, using additional
oil as necessary. Drain on paper towels.
INGREDIENTS
Crabcakes
2 tablespoons olive oil
1/2 medium (about 4 ounces)
red bell pepper, cored, seeded and diced
1/2 medium (about 4 ounces)
yellow bell pepper, cored, seeded and diced
1/2 medium (about 4 ounces) red onion, diced
1 cup heavy cream
1/2 teaspoon jalapeno pepper, diced
2 teaspoons fresh chives, chopped
2 teaspoons fresh dill, chopped
2 teaspoons Italian parsley, chopped
2 sprigs fresh thyme
1/2 teaspoon salt
1/8 teaspoon cayenne pepper
1 extra large egg, lightly beaten
1 cup fresh bread crumbs
1 cup almond meal*
1 1/4 pounds fresh crabmeat, any shells removed
Red Bell Pepper Sauce
5 tablespoons (2 1/2 ounces) unsalted butter
1/2 medium (about 4 ounces)
red pepper, cored, seeded and diced
1/2 medium (about 4 ounces) red onion, diced
2 garlic cloves, mashed
2 sprigs thyme
1/2 cup dry white wine
1 cup heavy cream
juice of 1/2 medium lemon
salt
freshly ground white pepper
2 tablespoons (1 ounce) unsalted butter
about 2 tablespoons vegetable oil
3 cups mixed greens of your choice, cut or torn into bite-size pieces
METHOD
1
Prepare the crabcakes: In a 10-inch skillet, heat the olive oil. Sautè the
red and yellow peppers and the onion until the onion is translucent and the
peppers are tender, 10 to 15 minutes. Transfer to a large bowl and let cool.
19
PRESENTATION
Divide the salad greens among 6 large plates. Arrange 2 crabcakes on
the greens, drizzle sauce around the greens and on top of the crabcakes.
Serve immediately.
TO PREPARE AHEAD
Through step 4. In step 5, return the sauce to a clean pan but reheat
over a low flame and continue with the recipe when ready to serve.
Note: Coarsely ground or chopped uncooked shrimp can be substituted
for the crabmeat.
*To make the almond meal, grind blanched almonds in food chopper,
being careful that you don’t overgrind – you want the texture of fine
bread crumbs.
Recipe courtesy Wolfgang Puck, Recipes from Spago, Chinois, and
Points East and West (Random House, 1986)
20
2020ImmBlderManual
2/19/10
4:28 PM
Page 21
Aioli
Fresh Tomato Salsa
(Salsa Mexicana or Pico De Gallo)
This classic Provençal mayonnaise takes its name from the French
word for its key ingredient, garlic. If you have health concerns about
making mayonnaise from raw eggs, consider this statement from the
American Egg Board: “There have been warnings against consuming
raw or lightly cooked eggs on the grounds that the egg may be
contaminated with Salmonella, a bacteria responsible for a type of
foodborne illness. Healthy people need to remember that there is
a very small risk and treat eggs and other raw animal foods
accordingly. Use only properly refrigerated, clean, sound-shelled,
fresh, grade AA or A eggs. Avoid mixing yolks and whites with the
shell.” Alternatively, start with about 1 1/2 cups of good-quality
bottled mayonnaise and blend into it pureed garlic, Dijon mustard,
and lemon juice.
Makes 2 cups
INGREDIENTS
1 pound or 8 Campari tomatoes (or other very ripe, fragrant tomatoes)
Juice of 1 lime
3 Serrano chiles
1/3 cup loosely packed cilantro leaves
1/2 teaspoon kosher salt or 1/4 teaspoon iodized salt
1/2 of a small white onion, peeled and quartered
1 green onion, cut into 2 inch lengths
METHOD
1
Makes about 2 cups
INGREDIENTS
1 tablespoon chopped garlic
1/4 cup chopped basil
2 extra-large raw egg yolks
Salt
Freshly ground white pepper
1 tablespoon Dijon mustard
1 1/2 to 2 cups safflower oil
1 tablespoon lemon juice
Combine all ingredients into Immersion Chopper Bowl cutting any
of the tomatoes that are too big to fit. Add top and motor. Pulse to
chop as chunky or smooth as you like it. Serve immediately. Salsa
should be eaten within an hour or so or the onions get too strong
and the perfume of the cilantro dissipates.
Recipe courtesy Marian Getz
METHOD
1
Combine all ingredients in beaker and blend using Immersion
Blender pressing the TURBO button.
Recipe courtesy Wolfgang Puck
21
22
2020ImmBlderManual
2/19/10
4:28 PM
Page 23
Chino Farm Carrot
and Ginger Soup
Tortilla Soup
This is our version of the tortilla soups typical of the American Southwest.
Serves 6 to 8
INGREDIENTS
Makes about 8 cups
INGREDIENTS
1 pound orange carrots
1 pound yellow carrots
1 pound white carrots
1/4 cup peanut oil
1 tablespoon garlic, minced
1 tablespoon ginger, minced
1 tablespoon green onion, minced
Pinch red pepper flakes
1 tablespoon salt
1/2 teaspoon freshly ground white pepper
1/2 teaspoon turmeric
1 tablespoon honey, or to taste
8 cups vegetable stock
1 cup heavy cream
4 ounces butter
Oil, for deep-frying
1/2 cup julienne ginger
2 tablespoons corn oil
2 corn tortillas,
cut into 1-inch squares
2 tablespoons fresh garlic, chopped
1/4 medium onion
1 small jalapeno pepper
1 pound ripe fresh tomatoes,
peeled, seeded, and diced.
(If tomatoes are out of season, use an
equal portion of canned tomatoes.)
2 tablespoons tomato paste
2 to 3 teaspoons ground cumin
2 quarts double-strength chicken stock
METHOD
1
In a large soup pot, heat the oil, add the tortillas and cook them
over low heat until they are slightly crisp.
2
Using the Immersion Blender Chopper Bowl attachment, chop the
garlic, onion, corn and jalapeno pepper together and add the
mixture to the tortillas. Simmer until the vegetables are tender.
3
Add the tomatoes to the pot with the tomato paste and simmer
the mixture for 10 minutes to bring out the flavor. Add the cumin and
mix well.
4
Slowly whisk in the stock, then simmer the soup until it is reduced by
one third.
5
Purèe the soup using the Immersion Blender until it is very smooth,
then pass it through a fine strainer into a clean pot.
6
Add salt, pepper and cumin to taste.
7
Prepare the garnish: Preheat the oven to 350°. Cut the tortillas into
julienne strips, place them on a baking sheet and bake them for 10 to
15 minutes, or until they are crisp. Peel and dice the avocado, cut the
chicken into julienne strips, grate the cheese and chop the cilantro.
Place each garnish in a separate bowl.
8
At serving time, reheat the soup. Add the chicken and avocado to
the soup and heat. Pour the soup into a warm tureen, then ladle it
into hot shallow soup bowls. Garnish with the cheese, tortilla strips
and chopped cilantro. Serve immediately.
METHOD
1
Peel the carrots and slice thinly.
2
In a stockpot, heat the oil and sauté the garlic, minced ginger, green
onions and pepper flakes for 1 to 2 minutes or just until glossy. Do
not allow to develop color. Add the carrots, salt, pepper, turmeric
and honey. Sauté for 2 minutes, stirring constantly. Add the stock
and bring to a boil. Lower to a simmer and add the cream. Cook for
40 minutes or until carrots are tender.
3
Remove pot from heat, add the butter and puree using Immersion
Blender. Strain soup into a new stockpot. If the soup is too thick, add
extra stock. Taste and adjust seasoning with salt, pepper and honey.
Keep warm.
4
Preheat oil to 300 degrees F.
5
Deep-fry the ginger and drain on plate lined with paper towel.
Ladle 1 cup of soup into heated bowls. Garnish with fried ginger.
Serve immediately.
Recipe courtesy Deborah Murray, Wolfgang Puck, Food Stylist
Garnish:
2 corn tortillas
1 avocado
1 large chicken breast,
cooked
1/2 cup grated cheddar
cheese
1/3 cup fresh cilantro,
coarsely chopped
Recipe courtesy Wolfgang Puck, Recipes from Spago, Chinois, and
Points East and West (Random House, 1986)
23
24
2020ImmBlderManual
2/19/10
4:28 PM
Page 25
Gulf Shrimp Salad
with Spicy Jalapeno Sauce
Gulf Shrimp Salad (cont’d)
Serves 4
INGREDIENTS
PRESENTATION
1 pound large shrimp
salt
freshly ground pepper
2 tablespoons peanut oil
4 large radicchio leaves
3 cups assorted greens (mache, watercress, etc.), in bite-size pieces
1/3 cup vinaigrette
4 Belgian endive leaves
4 stems garlic chives
Assorted peppers, cut into julienne strips
Set the radicchio leaves on one half of a large serving platter. Toss
the greens with the vinaigrette and spoon equal amounts into each of
the radicchio leaves. Place the endive attractively around the radicchio.
Spoon the sauce over the remaining half of the platter and arrange
the shrimp on the sauce. Garnish with the garlic chives and julienne of
peppers. Serve immediately. (You can also do this on individual platters,
placing one radicchio leaf on each plate, dividing the remaining
ingredients equally.)
Sauce
About 1 pound (8 to 10) Italian plum tomatoes,
cored and cut into chunks
2 jalapeno peppers, cored and seeded
2 to 3 garlic cloves
1 teaspoon tomato paste
1/2 bunch cilantro, leaves only
salt
freshly ground pepper
TO PREPARE AHEAD
Through step 1. In step 2, peel the shrimp and refrigerate, covered, until
needed. Continue with the recipe at serving time.
Recipe courtesy Wolfgang Puck, Adventures in the Kitchen with
Wolfgang Puck (Random House, 1991)
METHOD
1
Prepare the sauce: Use the Immersion Blender Chopper Bowl to
puree the tomatoes, jalapeno peppers, garlic and tomato paste.
You will need to do this in 2 batches. Transfer to a medium bowl.
Chop the cilantro leaves very fine and fold into the sauce. Season
with salt and pepper to taste and set aside.
2
Peel the shrimp, leaving the tails intact. Season lightly with salt and
pepper. In a large skillet, heat the peanut oil. Without crowding the
pan, cook the shrimp, about 1 1/2 minutes on each side. If necessary,
do it in batches.
25
26
2020ImmBlderManual
2/19/10
4:28 PM
Page 27
Watercress Salad with
Barbecued Chicken Breast
An ideal luncheon dish for spring or summer.
Chicken Salad Chinois
Makes 2 entrée salads
INGREDIENTS
Serves 5
INGREDIENTS
Mustard Vinaigrette:
1 tablespoon Dijon mustard
1 teaspoon finely chopped
fresh tarragon
1 tablespoon sherry wine vinegar
salt
freshly ground white pepper
1 cup almond or extra-virgin olive oil
(or a mixture of both)
Salad:
3 small whole chicken breasts
15 cloves garlic
1/4 cup fresh Italian parsley
salt
freshly ground pepper
3 tablespoons extra-virgin olive oil
3 bunches watercress
1/2 pound mushrooms such as
chanterelles, porcini or shiitake
METHOD
Chinese Mustard Vinaigrette:
1 egg yolk
2 teaspoons dry Chinese mustard
1/4 cup rice wine vinegar
1 teaspoon soy sauce
2 tablespoons light sesame oil
2 to 3 tablespoons peanut oil
salt
freshly ground pepper
Chicken Salad:
3-pound chicken, cavity filled with celery, carrot, onion, garlic,
bay leaf, thyme, salt and pepper
2 ounces unsalted butter, melted
2 small heads or 1 medium head Napa cabbage
1 cup romaine lettuce, cut into 1/4-inch julienne strips
8 to 10 snow peas, cut into 1/4-inch julienne strips
1 teaspoon black sesame seeds
1
Prepare the vinaigrette: In a bowl or beaker, combine the mustard,
tarragon, vinegar, salt and pepper. Use the immersion blender whisk
attachment to blend in the oil in a slow, steady stream. Taste
carefully and correct the seasonings. Set aside.
2
Preheat a grill or barbeque.
METHOD
3
Cut the chicken breasts in half and set aside.
1
4
Peel the garlic, place it in a saucepan with water to cover and bring
the water to a boil. Drain and slice the garlic thin. Mix the garlic with
the parsley and spread it underneath the skin of the chicken. Season
the chicken with freshly ground pepper and salt, then brush it with
olive oil.
Prepare the vinaigrette: Place all the vinaigrette ingredients in
beaker or tall container; use Immersion Blender to blend until
smooth. Correct the seasonings.
2
Preheat the oven to 425°.
3
Place the chicken on a rack in a roasting pan and baste it with some
of the butter. Roast for about 1 1/2 hours, or until just done. (The
meat near the joints should still be very slightly pink.) Baste every 15
or 20 minutes with the butter and the drippings.
5
Place the chicken, skin side down, on the grill and cook it for about 6
minutes on each side.
6
Wash and dry the watercress and remove the tough stems. In a big
bowl toss the watercress with enough vinaigrette to coat it lightly.
4
Select 4 to 8 nice leaves from the Napa cabbage and reserve them.
Slice the remaining cabbage into 1/4-inch julienne strips.
7
Heat a large skillet and add 1 to 2 tablespoons olive oil. Sauté the
mushrooms over high heat about 4 minutes and season them with
salt and pepper.
5
Shred the meat from the breasts and thighs of the chicken.
6
Combine the chicken, cabbage, romaine and snow peas in a bowl
and toss with enough of the vinaigrette to coat the salad nicely.
PRESENTATION
PRESENTATION
Divide the watercress among 6 salad plates. Arrange the mushrooms
around it. Cut each chicken breast on the diagonal into 6 slices and
arrange the slices over each plate of watercress.
Recipe courtesy Wolfgang Puck, Recipes from Spago, Chinois, and
Points East and West (Random House, 1986)
27
Arrange the reserved Napa cabbage leaves around the edge of a large
serving plate. Mound the salad in the center and sprinkle it with the
sesame seeds.
Recipe courtesy Wolfgang Puck, Recipes from Spago, Chinois, and
Points East and West (Random House, 1986)
28
2020ImmBlderManual
2/19/10
4:28 PM
Page 29
Easy Instant Mayonnaise
Makes about 2 cups
INGREDIENTS
2 cups oil, i.e. canola, peanut, vegetable or olive oil
2 large eggs
1 egg yolk
1 teaspoon lemon juice or white vinegar
1 teaspoon dry mustard
1 teaspoon kosher salt
pinch cayenne (optional)
1 tablespoon fresh herb (optional)
METHOD
1
Place all the ingredients into a 1 quart mason jar.
2
Attach the Motor Base to the Blending Rod and set the speed
selector to “5”.
3
Put the Immersion Blender into jar, with the wand all the way to the
bottom of the jar. Press the power switch, and pull up slowly.
Note: Perfect mayonnaise every time. Try adding a few fresh tarragon
or basil leaves for a wonderful flavor. Store in the refrigerator with a
secure lid, do not keep for more then a week.
Recipe courtesy Deborah Murray, Wolfgang Puck, Food Stylist
Cilantro Mint Vinaigrette
This is an amazing, flavorful sauce. Use it as a marinade, as a
sauce for fish or chicken or seafood. It is a fantastic salad dressing.
Keeping a jar of this in the fridge will make it possible to create
quick and very flavorful foods at any time.
Makes 2 1/2 cups
INGREDIENTS
1 egg yolk
Juice and zest from 2 limes
1 clove garlic
1 cup rice vinegar
1/2 teaspoon Chinese chili sauce
1 bunch cilantro, stems removed
1 bunch mint, stems removed
1/2 teaspoon kosher salt
Pinch of black pepper
1 1/2 tablespoons packed brown sugar
1 1/2 cups peanut oil
2 teaspoons dark sesame oil
METHOD
1
Combine all ingredients in a tall, narrow container such as a quart
mason jar. Use your immersion wand. Place wand at the bottom of
the container. Press TURBO and pull up to start emulsion, then move
wand up and down to chop ingredients and blend thoroughly. Store
airtight in fridge for up to 5 days.
Recipe courtesy Wolfgang Puck
29
30
2020ImmBlderManual
2/19/10
4:28 PM
Page 31
Pizza Dough
Serves 2 to 4
INGREDIENTS
1 1/2 cups all purpose flour
1 teaspoon kosher salt or 1/2 teaspoon iodized salt
1 1/2 teaspoons honey
1 tablespoon olive oil
1/2 cup lukewarm water
1 1/2 teaspoons yeast
Main Dishes, Side Dishes,
Sauces & Toppings
METHOD
1
Combine flour and salt in Immersion Chopper Bowl. Set aside.
2
In a small bowl, combine the honey, oil, water and yeast. Stir to
dissolve. Pour all of the yeast mixture into the Chopper Bowl
containing the flour and salt. Attach top and hold the TURBO button
down for 15 seconds. Remove dough ball and knead by hand for a
minute. If it is very sticky, add a bit of flour. Cover with a towel and
let rest for 40 minutes, or cover and refrigerate up to 24 hours.
Knead briefly to deflate and form into 1 or 2 balls. Let it rest for 15
minute to relax dough.
3
Shape as desired, your pizza does not have to be round. Have fun
with it and shape it thick or thin, football shaped or round and neat.
It will be delicious. Top your pizza with your favorite toppings. Bake
in a very hot, 500°F preheated oven for 15 - 20 minutes or until
brown and crispy. Serve hot.
Note: Vary the dough by adding fresh herbs before mixing. Toppings
are endless. I love basil pesto, mozzarella and Parmesan or ricotta with
sliced garlic, parmesan and tomatoes.
Recipe courtesy Marian Getz
31
32
2020ImmBlderManual
2/19/10
4:28 PM
Page 33
Lobster Ravioli
with Fresh Dill Sauce
Serves 6 to 8
Lobster Ravioli
with Fresh Dill Sauce (cont.)
3
On a floured surface, roll the pasta as thin as possible. Brush half of
the dough with the egg wash. Place 30 mounds of the mousse, on
the pasta, 3 inches apart. Cover the mounds with the uneggwashed
pasta sheet and press the dough together around each ravioli. With
a ravioli cutter or a large, sharp knife cut the ravioli apart. Dust a tray
with semolina and place the ravioli on the tray. Refrigerate.
Mousse
1 pound fresh sea scallops, side muscles removed
1 egg
1 cup very cold heavy cream
1/2 teaspoon cayenne pepper
1 tablespoon chopped fresh dill
1 teaspoon salt
1 teaspoon freshly ground white pepper
1 small lobster, cooked
4
At dinnertime, while you make the sauce, bring a large pot of water
to a boil with a little oil.
5
Prepare the sauce: In a saucepan, reduce the wine with 1 sprig of the
dill and the minced shallot until 1/4 cup liquid remains. Add the
cream and reduce it by half. Slowly whisk in the butter, a little at a
time, until all of it is incorporated. Season to taste with salt, pepper
and lemon juice. Set the sauce aside and keep it warm.
6
Chop the remaining dill sprigs into 1/4 inch pieces, reserving 6 small
sprigs for the final garnish. Set aside.
Sauce
2 cups dry white wine
1 bunch fresh dill
2 large shallots, minced
1 cup heavy cream
1 pound unsalted butter
salt
freshly ground white pepper
fresh lemon juice
7
Prepare the vegetables: Heat a sauté pan over medium heat and
add the butter. When it foams, add the julienne strips of vegetables
and sauté them until al dente. Season to taste with salt and pepper
and reserve.
8
Add a little salt to the water, then the ravioli, and cook for 5 to 6
minutes. Cut 1 ravioli open to see if the mousse is done. It should be
barely cooked through as it will continue to cook in the sauce. Drain
the ravioli.
9
Add the ravioli to the sauce with the vegetables and the reserved
lobster meat and the chopped dill and heat just to the boiling point.
INGREDIENTS
1 1/2 pounds fresh pasta dough
1 or 2 eggs, beaten lightly, for egg wash
Semolina
Vegetables
2 tablespoons unsalted butter
1 carrot, cut into julienne strips
1 stalk celery, cut into julienne strips
1 leek, white part only, cut into julienne strips
salt
freshly ground white pepper
reserved dill and lobster meat
PRESENTATION
Divide the ravioli among heated dinner plates. Spoon the sauce over
them and garnish each plate with a small sprig of dill in the center. Serve
immediately.
Recipe courtesy Wolfgang Puck, Recipes from Spago, Chinois, and
Points East and West (Random House, 1986)
METHOD
1
Prepare the mousse: In a deep 2 quart bowl, puree the scallops and
egg using the Immersion Blender. With the motor running, slowly
pour in the cream, then add the cayenne, dill, salt and pepper. Cover
bowl and chill.
2
Remove the meat from the lobster tail and claws and dice it fine.
Fold 1/4 of the meat into the mousse. Reserve the remaining meat
for the sauce.
33
34
2020ImmBlderManual
2/19/10
4:28 PM
Page 35
Artichoke Mousse
Fresh Basil Pesto
Serves 4
Makes 1 1/2 cups
INGREDIENTS
INGREDIENTS
4 or 5 very large artichokes
2 lemons, halved
4 tablespoons (2 ounces) unsalted butter, at room temperature
about 2 tablespoons heavy cream
salt
freshly ground pepper
1 tablespoons garlic cloves
2 tablespoons toasted pine nuts
2 tablespoons fresh grated Parmesan cheese
Juice from half a lemon
1/2 teaspoon kosher salt
1 cup packed whole basil leaves
1 cup excellent quality fruity olive oil
METHOD
1
Trim away the leaves from the artichokes to expose the bottoms.
Rub the cut surfaces with lemon to prevent oxidation.
2
Bring a large pot of salted water to a boil. Add the juice of half a
lemon and the artichoke bottoms, cover with a linen towel or several
sheets of paper towels and cook until the artichokes are tender,
40 to 50 minutes.
3
Remove the artichokes and drain. Remove and discard the fiber from
the center of the chokes.
4
Use the Immersion Blender to purée the artichoke bottoms with the
butter. Pass the purée through a tamis or fine strainer into a heavy
saucepan and heat through. Stir in the cream and correct the
seasonings with salt, pepper and lemon juice.
PRESENTATION
METHOD
1
Combine everything but oil in the Immersion Chopper Bowl.
Pulse to chop. Add 1/2 of the olive oil and puree till smooth adding
more oil as needed. Carefully taste and correct seasoning. Store
airtight for a few days or freeze to preserve color and fresh taste
for up to 1 month..
Note: Having pesto on hand is a wonderful way to add a huge boost of
flavor to whatever you are making. I love it on sandwiches, pasta, pizza,
salad dressings, crostinis, even on crackers and raw veggies. You can use
all the same ingredients listed here, swap out the basil for something
else and create many great pestos. I love sun-dried tomatoes, or ricotta
cheese, black olives, beets, even other herbs like sage.
Recipe courtesy Marian Getz
Serve as a side dish to accompany lamb or chicken or use as a bed
for sliced meats and poultry.
Note: To reheat, place the mousse in a heavy saucepan, add 1
tablespoon each of unsalted butter and heavy cream. Heat slowly,
stirring constantly.
Recipe courtesy Wolfgang Puck, Recipes from Spago, Chinois, and
Points East and West (Random House, 1986)
35
36
2020ImmBlderManual
2/19/10
4:28 PM
Page 37
Fresh Homemade
Peanut Butter
Baby Food Peas
Makes 1 1/2 cups
Makes about 1 cup
INGREDIENTS
INGREDIENTS
2 cups fresh or frozen peas, preferably organic, thawed
1/2 cup liquid such as water, breast milk, formula
1 cup roasted peanuts
1 1/2 teaspoons kosher salt (or 3/4 teaspoon iodized salt)
1 tablespoon light corn syrup or honey
3 tablespoons peanut oil
1 tablespoon water
METHOD
1
Combine all ingredients into the Immersion Chopper Bowl. Add lid
and motor and puree using the TURBO button for 15 seconds. Mix a
little longer if a smoother texture is desired.
METHOD
1
Combine in beaker and puree with Immersion Blender pressing the
TURBO button till mixture is as smooth as desired. Remove and
store airtight for 1 day or spread mixture out in an ice cube tray and
freeze. When solidly frozen, pop out of tray into zip to bag. Keep for
no more than 1 month, frozen.
VARIATIONS
Note: Use the same amounts but vary the ingredients to suit your tastes.
Cashews and almonds are wonderful too.
Most foods can be pureed for your baby using your Immersion Blender.
Most fruits do not need added liquid. Meats and starchy vegetables
usually do.
Recipe courtesy Marian Getz
Recipe courtesy Marian Getz
37
38
2020ImmBlderManual
2/19/10
4:28 PM
Page 39
Chocolate Mousse-In-A-Minute
Serves 2
INGREDIENTS
1 1/2 cups heavy whipping cream
1 tablespoon powdered sugar
1/4 teaspoon excellent quality pure vanilla extract
1/3 cup melted and cooled chocolate,
or very high-quality chocolate sauce
METHOD
Desserts
1
Combine all ingredients into the immersion beaker. Using the wand
and speed setting number 4, mix moving blender up and down to
help incorporate air. Watch carefully for the texture to change.
When the mousse seems fairly thick, stop. This will take about 20
seconds. Scoop mousse into pretty dessert glasses and garnish with
more melted and cooled chocolate, fresh berries or chocolate curls
if desired.
VARIATIONS
For raspberry mousse, omit chocolate and add 1/3 cup pureed
raspberries. Top with additional raspberries.
Recipe courtesy Marian Getz
39
40
2020ImmBlderManual
2/19/10
4:28 PM
Page 41
Whipped Cream
Instant Ice Cream
INGREDIENTS
Makes 2 cups
1 cup heavy cream
1/4 cup sugar
1 teaspoon vanilla
INGREDIENTS
8 ounces frozen fruit, i.e. blueberries, raspberries, bananas, cherries
1 cup heavy cream, or other desired cold liquid
1 package instant pudding mix, preferably sugar free
METHOD
1
Place all ingredients into the beaker or a liquid measuring cup.
METHOD
2
Secure the motor base with the blending rod.
1
3
Place the immersion blending rod into the heavy cream, with the
speed set to five.
4
In a slow and steady fashion while the immersion blender is on, pull
the rod up and down in the cream mixture. If the cream is very cold,
this should only take 3 or 4 strokes. Be careful not to overwhip or
you will have butter.
Combine all ingredients into Immersion Chopper bowl and blend
using the turbo button for 15 seconds.
Recipe courtesy Marian Getz
Recipe courtesy Deborah Murray, Wolfgang Puck, Food Stylist
41
42
2020ImmBlderManual
2/19/10
4:28 PM
Page 43
Recipe Notes
Recipe Notes
43
44
2020ImmBlderManual
2/19/10
4:28 PM
Page 45
Recipe Notes
Limited Warranty
This warranty covers all defects in workmanship or materials in the
mechanical and electrical parts, arising under normal usage and care, in
this product for a period of 12 months from the date of purchase
provided you are able to present a valid proof-of-purchase. A valid
proof-of-purchase is a receipt specifying item, date purchased, and
cost of item. A gift receipt with date of purchase and item is also an
acceptable proof-of-purchase. Product is intended for household use only.
Any commercial use voids the warranty.
This warranty covers the original retail purchaser or gift recipient. During
the applicable warranty period within normal household use,we will
repair or replace, at our discretion, any mechanical or electrical part
which proves defective, or replace unit with a comparable model.
To obtain service under the terms of this warranty,
call Toll Free (800) 275-8273.
THIS LIMITED WARRANTY COVERS UNITS PURCHASED AND USED
WITHIN THE UNITED STATES AND DOES NOT COVER:
•
•
•
•
Damages from improper installation.
Defects other than manufacturing defects.
Damages from misuse, abuse, accident, alteration, lack of proper
care and maintenance, or incorrect current or voltage.
Damage from service by other than an authorized dealer or
service center.
This warranty gives you special legal rights and you may also
have other rights to which you are entitled which may vary from
state to state.
45
46