1
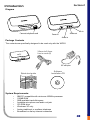
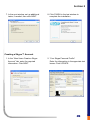
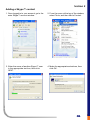
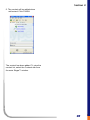
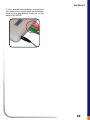
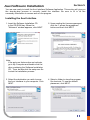
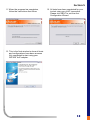
®
WIP20S
Skype™ Telephone Adapter
Instruction Manual
Designed
for
Skype™
www.auvivoip.com
www.auvivoip.com
Table of Contents
Section 1: Notices
Regulatory Compliance
01
Trademarks
02
Section 2: Introduction
WIP20 Diagram
03
Package Contents
03
System Requirements
03
Section 3: Skype™ Software
Installing Skype™
04
Creating a Skype™ Account
05
Adding a Skype™ Contact
06
SkypeIn
08
SkypeOut
08
Section 4: Hardware Connection
Connecting the WIP20
09
Section 5: Auvi Software Installation
Installing the Auvi Interface
11
Section 6: Operations
Using the WIP20 with Skype™
14
Basic Operations Guide
15
Section 7: Troubleshooting
16
Section 8: Limited Warranty
17
Notices
Section 1
Regulatory Compliance Notice
This equipment has been tested and found to comply with the limits for a Class B digital device,
pursuant to Part 15 of the FCC Rules. These limits are designed to provide reasonable
protection against harmful interference in a residential installation. This equipment generates,
uses, and can radiate radio frequency energy and, if not installed and used in accordance with
the instructions, may cause harmful interference to radio communications. However, there is
no guarantee that interference will not occur in a particular installation. If this equipment does
cause harmful interference to radio or television reception, which can be determined by turning
the equipment off and on, the user is encouraged to try to correct the interference by one or
more of the following measures:
•
Reorient or relocate the receiving antenna;
•
Increase the separation between the equipment and receiver;
•
Connect the equipment into an outlet on a circuit different
from that to which the receiver is connected;
•
Consult the dealer or an experienced radio/TV
technician for help.
Modifications
The FCC requires the users to be notified that any changes or modifications made to this
device that are not expressly approved by the party responsible for compliance may void the
user’s authority to operate this device.
This device complies with Part 15 of the FCC Rules. Operation is subject to the following two
conditions:
(1) This device may not cause harmful interference;
(2) This device must accept any interference received, including interference that may cause
undesired operation.
01
Section 1
Trademarks
© 2006 Auvi Electronics N.A., LLC. All rights reserved.
Auvi Electronics N.A. “Auvi” shall not be liable for any errors contained herein or for any
damages arising out of or related to this document or the information contained herein, even if
Auvi has been advised of the possibility of such damages. This document is intended for
informational and instructional purposes only. Auvi reserves the right to make changes in the
specifications and other information contained in this document without prior notification. Auvi
disclaims any obligation to update the information contained herein.
Auvi Technologies, Auvi Electronics N.A.,
Auvi logo and Vision Beyond Sound
are trademarks or registered trademarks of Auvi Technologies, LLC in the United States and/or
other countries. Windows is a trademark or registered trademark of Microsoft Corporation in
the United States and/or other countries. Skype and the Skype logo are trademarks or
registered trademarks of Skype Technologies, S.A. in the United States and/or other countries.
All other product names may be trademarks of the companies with which they are associated.
Warning: To reduce risk of electric shock, do not directly or indirectly (through a phone)
connect the device to a PSTN wall outlet.
Technical Support
For more information regarding the WIP20, please visit our online technical support site at
http://www.auvivoip.com or contact us directly at:
Auvi Electronics N.A.
5988 Mid Rivers Mall Drive
Saint Charles, MO 63304
Telephone: 636-447-4005
02
Section 2
Introduction
Diagram
Connect telephone cord
Audio out
Power in
Mic in
Audio in
Package Contents
The contents are specifically designed to be used only with the WIP20.
3.5mm-to-3.5mm
line-in cords (2)
WIP20
AC adapter
Quick start guide
Software
Installation CD
System Requirements:
•
•
•
•
•
•
•
•
IBM PC compatible with minimum 400MHz processor
128MB RAM
5MB available hard disk space
Available microphone and audio out jack
CD-ROM drive
Windows® XP only
Analog traditional or cordless telephone
Broadband or dial-up Internet connection
03
Section 3
Skype™ Software
The first step to using the WIP20 is to install Skype™ on the computer. This section describes
how to download and install Skype™, create a Skype™ account and add contacts.
Installing Skype™ Software
If you already have the latest version of Skype™ on your computer, go to the next section. If
you don’t have the latest version, please follow the steps below.
1. Access the web and go to:
http://www.skype.com.
2. Double-click the download button for
Windows®.
3. Once downloaded, double-click the
setup icon to start the installation.
4. Choose a language.
SkypeSetup
5. If you agree to the License Agreement,
click in the circle next to “I accept the
agreement”, then click NEXT.
6. Save Skype™ on your hard drive.
04
Section 3
7. In the next window, set up additional
tasks, if needed, then click NEXT.
8. Click FINISH in the last window to
complete the installation.
Creating a Skype™ Account
1. In the “New Users Create a Skype
Account” tab, enter the required
information. Click NEXT.
2. “Your Skype Personal Profile”
Enter the information in the approiate text
boxes. Click UPDATE.
05
Section 3
Adding a Skype™ contact
1. Once logged-in to your account, go to the
main Skype™ account window.
2. From the menu at the top of the window,
select Tools, and then Add a Contact.
3. Enter the name of another Skype™ user
in the appropriate text box, then click
NEXT.
4. Make the appropriate selections, then
click OK.
06
Section 3
5. The contact will be added when
authorized. Click FINISH.
The contact has been added. To view the
contact list, select the Contacts tab from
the main Skype™ window.
07
Section 3
SkypeIn
SkypeIn is a paid service provided by Skype™. This service allows your Skype™ account to
be called from any traditional landline phone or mobile phone. When you are signed up with
SkypeIn and your phone rings, simply pick up the handset and answer like you would normally
do with a traditional home phone.
To learn more about SkypeIn, please visit http://www.skype.com.
SkypeOut
SkypeOut is a paid service provided by Skype™. It is a low cost way to make calls from Skype
to family and friends who still use traditional landlines or mobile phone. Also, SkypeOut offers
great international rates to stay connected with anyone worldwide, 24/7. Before using
SkypeOut, please go to http://www.skype.com to purchase SkypeOut credits.
Once your SkypeOut account is activated and it has a positive credit balance, you will be able
to use the telephone connected to the WIP20 to make domestic and international calls.
To make a SkypeOut call, you must enter the number in the following way (even for local calls):
"country code" + "number" + “#”. You can also use "00" or "011" before the country code.
Example (U.S. Phone Number):
Dial: 1-555-555-5555#
Example (Hong Kong Phone Number):
Dial: 852-1234-5678#
08
Section 4
Hardware Connection
This section explains how to physically connect the WIP20 to your computer.
Connecting the WIP20
1. Connect the line-in cables to your sound
card on the back of your computer.
Pink = MIC jack
Green = SPKR jack
2. Connect the line-in cables to the WIP20.
Pink = Mic in
Green = Audio in
3. Connect the AC adapter to the “Power in”
jack on the back of the WIP20.
4. Connect a traditional or cordless phone to
the RJ-11 jack on the front of the WIP20.
NOTE: Do not plug use a power cord other
than the one supplied with the WIP20.
Doing so could cause severe damage to
the unit and will void its warranty.
NOTE: Do not plug the WIP20 directly into
a wall jack. Doing so could cause severe
damage to the unit and will void the
warranty.
09
Section 4
5. If you already have speakers connected to
your sound card, unplug them and reconnect
them into the jack labeled “Audio out” on the
back of the WIP20.
10
Auvi Software Installation
Section 5
You are now ready to install the Auvi Interface Software Application. This section will give you
the step-by-step process to correctly install the interface. Be sure to fill in all the
necessary information to access and run the program.
Installing the Auvi Interface
1. Insert the Software Installation CD
in the CD-ROM tray. When the
“Welcome” window appears, click NEXT.
2. Upon reading the license agreement,
click the “I accept the agreement”
button and then click NEXT.
Note:
If the auto-run feature does not activate,
go to My Computer and double-click the
drive containing the Software Installation
CD. Then, double-click the setup.exe file
to start the installation process.
3. Select the destination you wish to save
the Auvi Interface to your computer. Click
NEXT.
4. Select a folder to store the program
file shortcuts. To use the default
placement, click NEXT.
11
Section 5
5. If you want a desktop icon, check the box
and click NEXT.
6. To make changes, click BACK. If not,
proceed by clicking INSTALL.
7. This window asks to run the application
immediately after install has completed.
To approve, click NEXT.
8. This step is your cautions and warning
window. You must click NEXT to move
forward. Clicking cancel will terminate
installation.
9. This window is testing your connections.
Once the bar completes, click NEXT.
10. Check the telephone number and
symbol buttons in this window. Upon
completion, click NEXT.
Note: Please make sure that the
microphone volume on the PC is
set to the highest level and that the
speaker volume is NOT on mute.
12
Section 5
11. When the progress bar completes,
follow the instructions that follow.
12. All tests have been completed for your
to start using your VoIP connection.
Please click NEXT to exit the Auvi
Configuration Wizard.
13. This is the final window to show all tests
and configurations have been success
fully completed to start using your
WIP20S VoIP adapter.
13
Section 6
Operations
This section will describe how to use the Auvi Interface application with Skype™. You will learn
how to assign a speed-dial number to a Skype™ contact, and dial using the speed-dial
function.
1. After logging into Skype™, double-click
the Auvi Interface Shortcut Icon on the
desktop to launch the program.
2. The Auvi Interface program should
appear on the desktop.
Skype_ID
Skype_ID
3. To set up speed-dial using the phone
connected to the WIP20, click
CONTACTS.
John Doe
Jane Doe
Jackie Doe
Jennie Doe
Skype_ID-00
Skype_ID-01
Skype_ID-02
Skype_ID-03
5. To place a call using the speed-dial
function, lift the phone and dial the
designated speed-dial number followed
by “#”.
Example: John_Doe
Dial: 22#
4. To add a contact click NEW. Fill out
the required text forms and assign a
speed-dial (between 00-99), click
SAVE.
John Doe
Jane Doe
Jackie Doe
Jennie Doe
Skype_ID-00
Skype_ID-01
Skype_ID-02
Skype_ID-03
6. To quit Auvi Interface program, click
OPTIONS, then EXIT.
Skype_ID
14
Section 6
Basic Operations Guide
Below are the basic operations to make and receive calls from the phone connected to the WIP20.
Assign a Skype™ user
name to a speed-dial
using Auvi Interface
1. Open the Auvi Interface and click “Contacts”.
2. Click New and fill in the necessary text fields.
3. Click Save.
Call a Skype™ user
name using speed-dial
1. Pick up telephone handset connected to the WIP20.
2. Listen for the dial-tone.
3. Dial the two-digit speed-dial number, followed by “#”.
Example: 00#
Receive incoming calls
Pick up telephone handset connected to the WIP20.
End a call
When you wish to end a call, simply hang up the
handset.
Put call on hold
To place a caller on “Hold”, simply locate and press the “Flash” button
on your telephone. To continue the call, press the “Flash” button
again.
Make a call to an
ordinary phone number
This option requires
SkypeOut, a paid
service from
Skype™.
1. Pick up telephone handset connected to the WIP20.
2. Listen for the dial-tone.
3. Dial country code + area code + seven digit phone number + “#”.
Example (U.S. phone number): 15555555555#
Example (Hong Kong phone number): 852123456789#
NOTE: The “#” key must be pressed to connect the call.
Other Skype™ software
features not using a
telephone connected to
WIP20
Visit www.skype.com.
NOTE:
Calls can be initiated and received through the Skype software and transfered to the phone
handset.
Double-click the contact to call or after answering an incoming call, pick up the handset. You will
hear a background tune (this is the dial tone if placing a call through the phone). Simply push the *
button to cancel the tune and start/continue your conversation.
15
Troubleshooting
Section 7
My computer will not verify the phone keys during installation It normally takes two (2) or three (3) cycles for all the keys to be
recognized. After each cycle, hang up the telephone and wait for the
program to reset. Also, depending on the type of phone you have
connected to the WIP20, you may need to press each key for one (1)
second during the cycle phase.
Skype™ is running but I do not hear a dial-tone -
Make sure the speaker levels are not muted and adjust appropriately.
Confirm the Auvi Interface application is running. Also check all hardware
is connected correctly.
When listening to music through the audio out jack, I hear music
when I answer an incoming call Turn off or pause the music program you are using.
The person on the other end of the conversation cannot hear me Open up the mic sound level and make sure that the mic is not muted. If
you have multiple soundcards on your computer, make sure that the
soundcard sekected is the correct one connected to the WIP20.
I cannot hear anything when others speak -
If you are using external speakers, check to see they are plugged in
correctly and/or turned on. Also check all hardware is connected correctly.
The Auvi Interface won’t run on my computer after the installation
has completed If this occurrs, go to http://www.microsoft.com/download. Get and install
the latest version of the “.Net Framework Version 1.1”. Upon installation of
this update, the application will run correctly.
For additional troubleshooting issues and Frequently Asked Questions on the
WIP20, visit the Support page at www.auvivoip.com.
For Skype™ software inquiries, visit www.skype.com.
16
Limited Warranty
Section 8
Auvi Technologies warrants this product for the original purchaser to be free from
defects in material and workmanship, under normal conditions, for a period of 90 days
for parts and labor and 1 year for parts only from the date of original purchase.
Auvi Technologies agrees at our option during the warranty period to repair any defect
in material or workmanship or to furnish an equal product in exchange without repair
charges during the first 90 days. After 90 days, a flat labor rate* will be charged and
needs to be sent along with the product. ALl warranty services are to be performed
strictly by Auvi Technologies.
To obtain service, return the unit in a PREPAID package to:
Auvi Electronics N.A.
5988 Mid Rivers Mall Drive
St. Charles, MO 63304
Attention: Warranty Services
To ensure proper service, follow these steps:
1. Pack the unit in a well-padded sturdy carton.
2. Enclose a copy of your sales receipt to validate the date of purchase.
3. Auvi Technologies will elect to repair or replace the product, free of
repair charges during the first 90 days. After 90 days, a flat labor rate*
will be charged and needs to be sent along with the product.
*Call warranty services at 636-447-4005
NOTE: This warranty does not cover any product which has been subject to damage due to an
act of God, misuse, neglect, accident, abuse, commercial use, mishandling,
misapplication, maladjustments of consumer controls, power surges, lightning damage,
any presence of sand, humidity or liquids, rental use of product, faulty installation, set-up
adjustments, or modification to any part of the product. Normal wear and tear is also not
covered. damage incurred in shipping the unit for warranty repair is also not covered.
Under no circumstances shall Auvi Technologies be liable for any loss (direct, indirect,
incidental, foreseen, unforeseen, special, or consequential) or for any damage arising out
of, or in connection with, the use of this product. Failure to include all necessary paper
work will result in the customer being charged for the repair.
This warranty does not cover damage due to improper operation or maintenance,
connection to improper voltage supply, or attempted repair by anyone other than Auvi
Technologies, St.Charles, MO.
This warranty does not cover products sold AS IS or re-manufactured units. This
warranty is valid only in the United States.
This warranty gives you specific legal rights and you may also have other rights which
vary from state to state.
IMPORTANT NOTICE: DO NOT RETURN THIS UNIT TO THE RETAIL STORE FOR
SERVICE.REFER TO THE ABOVE WARRANTY SERVICE INSTRUCTIONS.
17