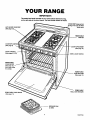
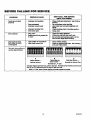
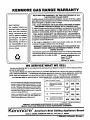
1
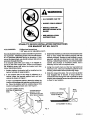
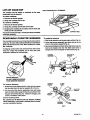
SEARS
CONTENTS
SAFETY
Kenmore
USEANDCARE
Your Range and Its Features .....................................
5
Cooktop Controls .......................................................
Oven Controls .............................................................
6
6
Burner ignition ............................................................
Wok Cooking ...............................................................
Oven Vent ....................................................................
6
6
7
Oven Cooking .............................................................
7
Broiling ........................................................................
8
Cleaning Tips ........................................................
9, 10
Removal ol Packaging Tape .................................... 11
Removable Range Parts ..................................... 11-13
BEFORE
CALLING
FOR SERVICE
What to Do Before Calling for Service.............. 14, 15
Temperature Adjustments .......................................16
WARRANTY
MODEL
71381
USE • CARE • SAFETY
MANUAL
• ALL RANGES
• INJURY
CAN TIP
COULD
RESULT
• INSTALL ANTI-TIP
DEVICE PACKED WITH
RANGE
• SEE INSTALLATION
INSTRUCTIONS
STABILITY
DEVICE
FOR
TOOLS NEEDED:
INSTALLATION
BRACKET
KIT
NO.
INSTRUCTIONS
342473
Phillips head screwdriver
1 3/8" open end or adjustable wrench
Bracket attachesto floor or wallto hold either right or left
rear leg leveler. If fastening to floor, be sure that screws
do not penetrate electrical wiring or plumbing. If this
cannot be determined, use shorter screws that will not
penetrate through flooring.
If the bracket came with your range, It is shipped attached to the lower range back. Remove and discard
the shipping screw that holds the bracket and then
follow Instructions below.
3. Determine whet her you will anchor t he bracket to the
floor or wall. Fasten the bracket securely with the
screws provided. Screws are self-drilling In wood,
plywood, particle and chip board, and most metal
framing. Ifattachlngtomasonry, youcanbuysultable
screws and anchors at hardware stores. Use a
masonry drill to drill the required holes.
4. Using the wrench, back out the four leg levelers at
least two turns. See your installation guide for more
1. Decide whether the bracket will be installed on the
right or left side of range location.
leveling information before positioning range.
5,
2. If the bracket side of the range is adjacent to a
cabinet, place the bracket against back wall and
cabinet as shown in Figure 1.
If there is no adjacent cabinet, determine where the
location of the range side (painted outside panel) will
be. Place the bracket with its outside edge at this
location and against back wall. See Figure 1.
ADJACENT CABINET OR FINAL
LOCATION OF RANGE SIDE
PANEL
Slide the range into place. Be sure rear leg leveler
fully engages slot in bracket. If range cannot be
moved back far enough for rear leg leveler to enter
bracket, move bracket forward as required and attach
to floor in new location.
BRACKET
OUTSIDE EDGE OF
BRACKET TO BE
FLUSH WITH LEFT OR
RIGHT SIDE OF RANGE
WALL
PLATE
/
SCREWMUST ENTER_
WOOD OR METAL |
\
/
WALL BEHIND
RANGE
"_=_".__
""r_._
•
_
ATTACHMENT TO WALL
Fig. 2
Fig, 1
1
NCINS01-1
IMPORTANT
INSTRUCTIONS
FOR YOUR SAFETY
SAVE
Read
appliances,
all instructions
basic
safety
before
THESE
INSTRUCTIONS
using
precautions
this appliance.
should
be followed,
When
using
including
electrical
the following:
I
If the Information In this manual is I
not followed exactly, a fire or explosion may result
causing property damage, personal Injury ordeath.
WARNING:
I
-- Do not store or use gasoline or other
flammable vapors and liquids in the vicinity
of this or any other appliance.
-- WHAT TO DO IF YOU SMELL GAS
• Do not tryto light any appliance!
• Do not touch any electrical switch; Do not
use any phone in your building!
Teach children not to play with control knobs or any
other part of the range.
Never leave children alone or unattended where a
range is In use.
• Immediately call your gas supplier from a
neighbor's phone. Follow t he gas supplier's
instructions!
• if you cannot reach your gas supplier, call
the fire department.
-- Installation and service must be performed
by a qualified Installer, service agency or the
gas supplier.
WARNING:
The adjustments In the Installation Instructions
must be made before you try to use your range. If
you are using Liquefied Petroleum Gas (bottled
gas) all L.P. adjustments in the installation instructio ns must be made before use. Ifyour range is not
properly adjusted, flames may be too high, the
range may use too much fuel, release toxic fumes
or cook poorly.
Never leave the oven door open when you are not
watching the range.
Never let anyone climb, sit or stand on the open
oven door or any other part of the range. Their weight
might cause the range to tip over.
WARNING:
To prevent accidental tipping of the
range from abnormal usage, Including excess loading of the oven door, attach it to the wall or floor by
installing the anti-tip bracket supplied. If the range is
moved for cleaning, servicing or any reason, be sure
the anti-tip device is re-engaged properly when the
range is replaced. Failure to take this precaution
could result in tipping of the range and cause injury.
NGSAF12-1
To insure safety for yourself and your home, please read your Owner's Manual
carefully.
Keep it handy for quick easy reference.
safety sections
looking for the
of your manual.
Pay close attention to the
You can recognize the safety sections by
symbol or the word "Safety".
Never leave cooktop elements/
burners unwatched at high heat
settings. Boilovers cause smoking and greasy spillovers could
catch fire.
Never use a towel or other bulky
cloth as a potholder, Such cloths
could catch fire.
Always keep the range area clear
and free from things that will burn.
CAUTION.
Never store things in an oven or
near cooktop elements/burners.
These things may catch fire and
plastic items could melt.
Never wear loose clothing when
using your range. Such clothing
could catch fire,
CAUTION:
Never use your range for warming or heating a room. You could
be burned or seriously injured.
Such misuse could also cause
damage to the range,
Never let pot handles stick out over
the front of the range. Turn handles
in so that they cannot be bumped
into, Keep the handles away from
other hot surface elements/burners.
3
Do Not store items of interest to
children above a range or on the
backguard of a range.
Children climbing on a range to
reach such items could be seriously injured.
NGSAF06
IMPORTANT
SAFETY
INSTRUCTIONS
Always follow cleaning Instructions in this book.
Never block the flow of combustion and ventllstlon air
through oven vents and cooktop burners.
Be sure your range Is Installed and grounded properly
by a qua,fled tnchniclan.
Never try to move a pan of hot fat, especially a deep fat
fryer. Wait until the fat has cooled.
Always keep the range area clear and free from things
that will burn, gasollne and other flammable vapors and
liquids.
Only some kinds of glass or ceramic pans can be used
for cooktop cooking. Be sure that the pan you use will
not break when heated on the cooktop burners.
Always keep the range and oven clean by foiiowlng
Instructions In thls book. Food and grease are easy to
Ignite. Clean the range, oven and vent hood regularly.
Keep this book for later use.
After broiling, always take the broiler pan out of the
oven and clean it. Leftover grease In the broiler pan can
catch on fire next time you use the pan.
Always use dry potholders when removing pans from
the oven or cooktop. Moist or damp potholders can
cause steam burns.
Always use care when opening oven dour. Let hot air
and steam out before moving food.
Never try to repair or replace any part of the oven
unless instructions are given in this book. All other
work should be done by a qualified technician.
Never heat unopened food containers. Pressure buildup
may make container burst and cause Injury.
Never leave jars or cans of fat or drippings on or near
the oven. Never let grease build up on your oven. You
can keep grease fires from starting If you Clean up
grease and spills after each oven use.
Never use aluminum foil to line oven bottoms. Improper use of foil could start a fire and cause Incomplete
combustion.
Always keep combustible wall coverings, curtains or
drapes, wooden utensils, plastic utensits or canned
food a safe distance away from your range.
Place oven racks In deelred poslUo nwhile oven Is cool.
Never clean cooktop surface when It Is hot. Some
cleaners produce noxious fumes and wet cloths could
cause steam burns If used on a hot surface.
Always
use care when touching the cooktop.
Always keep dish towels, dish cloths, potholdera and
other linens a safe distance away from your range.
Never store such Items on your range.
Do not use a wok on the cooklng surface If the wok has
a round metal ring which Is placed over the burner grate
to support the wok. This ring acts as a heat trap which
may damage the burner grate and burner head. Also, it
may cause the burner to work improperly. This may
cause a carbon monoxide level above that allowed by
current standards, resulting In a health hazard. Exposure to carbon monoxide may cause birth defects or
other reproductive harm according to the California
safe Drinking Water and Toxic Enforcement Act.
COOKTOP
Be sure everyone
in case of fire!!
in your home knows what to do
GREASE
FIRE
Never pick up a flaming pan...Instead:
1. Turn off the burner.
2.
Read and understand
this informtion
NOW!
Should you ever need it, you will not have time for
reading.
Never use water on a grease
spread the flames.
fire -- it will only
IMPORTANT
NOTICE
SAFETY
OVEN
FIRE
Do not try to move the pan.
1. Close oven door and turn controls off.
2.
The California Safe Drinking Water and Toxic Enforcement Act requires the Governor of California to publish
a list of substances known to the state to cause cancer,
birth defects, or other reproductive harm and requires
businesses to warn customers of potential exposure to
such substances. Gas appliances can cause minor
exposure to four of these substances, namely benzene,
Smother the fire with a UghUy fitting pan lid, baking
soda or with a dry chemical foam or halon type
extinguisher.
If fire continues, throw baking suda on the fire or
use a dry chemical
foam or halon type
extinguisher.
carbon monoxide, formaldehyde and soot, caused primarily by the Incomplete combustion of natural gas or
L.P. fuels. Properly adjusted ranges, Indicated by a
bluish rather than a yellow flame, will minimize Incomplete combustion. Exposure to these substances can be
minimized further by venting with an open window or
using a ventilation fan or hoed.
NGSAF14-1
YOUR
RANGE
IMPORTANT:
The model and serial number of your oven can be found on a tag,
on the left side of the front frame. Pull out broiler drawer to locate.
OVEN VENT (may get hot
during oven use; DO NOT
block vent)
LIFT-UP/OFF COOKTOP
REMOVABLE
GRATES
(See page 6)
BURNER
(See page 13)
OVEN CONTROL
(See pages 6 & 15)
OVEN LIGHT SWITCH
REMOVABLE
OVEN RACKS
(See page 12)
(with _oplocks
_rsaf_y)
REMOVABLE
OVEN BOTTOM
(Seepage12)
REMOVABLE
ROL_OUTBROILER
REMOVABLE OVEN DOOR
(Sea page 11)
BROILER PAN
& GRID
NGFSF06
TO START
THINGS
OVEN
COOKING
COOKTOP
The sign near each cooktop control knob shows which
burner Is turned on by that knob.
eO
O0
Left
Rear
O0
eO
Left
Front
Oe
O0
Right
Rear
To use your oven or broiler.
1. Push in and set the OVEN CONTROL to desired
temperature or to BROIL. When broiling, be sure to
set the knob to the mark In the BROIL section of the
knob.
2. When finished, turn OVEN CONTROL
O0
Oe
to 0FF.
Right
Front
OVEN CONTROL
To operate cooktop controls:
1. Push to turn knob left to LITE.
2. After the burner lights, turn knob to desired flame
setting.
COOKTOP
CONTROL
BURNER
IGNITION
COOKTOP SPARK IGNITION---When
you turn the
cooktop knob to LITE, the spark igniter makes a series
of electric sparks (ticking sound)which lightsthe burner.
After the burner lights, turn knob to desired setting.
During a power failure the burners will not light autOmatically. In an emergency, a cooktop burner may be lit
with a match by following the steps below.
If a cooktop burner fails to light within five seconds, turn
the knob to OFF and wait one minute before trying
again.
Lighting gas burners with a match
is dangerous.
You should match
light the cooktop burners only in
emergency,
If the burner still will not light, check the service section
in this manual.
As a safety precaution you should set
controls so flame heats pan bottom
only and does not lick pan sides.
Flames licking pan sides are unsafe
and waste heat.
1.
2.
Light a match and hold the flame near the burner
you want to light. Wooden matches work best.
Push in and turn the control knob slowly. Be sure
you are turning the correct knob for the burner you
are lighting.
WOK COOKING
We recommend that you use only a flat-bottomed wok.
Flat-bottomed woks are available at your local retail
store.
Do not use woks which have support rings. Use ofthese
types of woks, with or without the ring In place, can be
dangerous. Placing the ring over the burner grate may
damage t he burner grate and burner head. Also, placing
the ring over the burner grate may cause the burner to
work improperly resulting In carbon monoxide levels
above allowable current standards. This could be dangerous to your health. See the Safety Section of this
manual. Do not try to use such woks without the ring.
You could be seriously burned if the wok tipped over.
¸
NOTE:
If the burner does not light within five
seconds, turn the knob off and wait one minute
before trying again.
OVEN
IGNITION
When you turn the Oven Control on, the oven spark
igniter makes a series of electric sparks (ticking sound)
which light the pilot light. About I minute after the pilot
light Is lit, the burner witt light.
During a power failure the oven burner will not light
automatically.
I
During a power failure the oven
burner cannot be lit and you should
not try to do so. Doing so could
severely injure you.
!
NGMTC18-2
OVEN
COOKING
Be sure the underside of the pan Is shiny, too.
Darkened undersides will absorb the heat and may
cause over browning on the bottom of your food.
When cooking a fond for the first time In your new
oven, use time given on recipes as a guide.
Your new oven has been set correctly at the factory
and Is more apt to be accurate then the oven It
replaced.
After you have used your oven for awhile, If you feel
your oven should be hotter or cooler, you can adjust
It yourself. See TEMPERATURE ADJUSTMENTS In
this manual.
Always follow recipe carefully.
Measure Ingredients properly.
Use proper pan placement.
Oven temperatures should be reduced 25 degrees
below recommended temperatures If exterior of pan
is predarkened, darkened by age or oven proof
glass.
Place pans on the oven racks with 1" to I 1/2" of air
space on all sides of each pan. Avoid overcrowding
the oven.
Pans too close to each other, to oven walls or to the
oven bottom, block the free movement of air. Improper air movement causes uneven browning and
cooking.
There may be some odor when the oven is first used.
This Is caused by the heating of new parts and
Insulation.
Do not cover an entire oven rack with foil. The foil
can block normal heat flow and cause poor baking
results. Do not place any foil directly on the oven
bottom. Foil used on the oven bottom may damage
the oven surface; therefore, It should not be used.
2 cake layers
Cookies should be baked on flat cookie sheets
without sides to allow the air to circulate properly.
When recipes require preheeUng, have food nearby
before you open the oven door. If the oven door Is
allowed to remain open for more than a brief _lme,
the preheat temperature will be lost.
4 cake layer s
OVEN
VENT
When the oven is on, heated air moves through a vent In
or below the backguard behind the cooktop. On the
cooktop, this hot air may make pot handles hot or melt
plastic Items left too near the vent.
When baking several Items stagger pans so that no
pan Is directly above another.
Let the oven preheat thoroughly before cooking
baked products. Allow 10 minutes for preheating.
The vent Is necessary for proper air circulation In the
oven and good baking results. Do not block this
vent. Doing so my cause cooking failure, fire or
damage to the range.
Opening the door too often to check food during
baking will allow heat loss and may cause poor
baking results.
MOISTURE
Cakes, cookies, muffins, and quick breads should
be baked In shiny pans -- to reflect the heat -because they should have a light golden crust.
Yeast breads and pie crusts should be baked In
glass or dull (non-shiny) pans --to absorb the heat
-- because they should have a brown, crisp crust.
•As your oven heats up,the temperature change of the air
In t he oven may causewater droplatsto form on the door
or door glass. To prevent this, open the oven door for
the first minute of oven heat up to let the moist air out.
7
NGOVC07-3
POSITIONING
BROILING
BROILER
PAN
After placing food on the broiler pan, slide the pan Into
the proper rack position In the lower broiling compart-
Broiling Is cooking by direct heat from the broil
burner. Tender cuts of meat or marinated meat
should be selected for broiling. For best results
steaks and chops should be at least 3/4" thick.
ment.
Be sure the sump (grease wel I) in the pan is to the
front of the range.
After piecing food on the broiler pan, put the pan on
the rack In the lower broiler compartment. The
recommended rack position and cooking time can
be found In the chart at dght.
The closer the food Is to the broil burner, the faster
the meat browns on the outside, yet stays red to pink
Inthecenter. Moving the meat fart her away from the
burner lets the meat cook to the center white brownIng outside. Side one should be cooked I - 2 minutes
longer than side two.
1. BOTTOM RACK PORTION
3. THIRD RACK
PO_qlON
2. SECOND RACK
POSmON
]
(GREASE WELL)
completely
Your ovenandclosed
broilerwhile
doorsbroiling.
should be
I
!
Use only the broiler pan and grid that came with your
range for broiling. They are designed for proper
drainage of fat and liquids and help prevent spatter,
smoke or fire.
Food
Rack
PosiUon
3 = Highest
1 = Lowest
Total Time
(minutes)
Steak - 1" Thick
Do not preheat when broiling. Preheating may
cause the thermostat to cycle the broil burner off
and on. For even broiling on both sides, start the
food on a cold pan.
Trim the outer layer of fat from steaks and chops.
Slit the fatty edges to keep the meat from curling.
For maximum juiciness, salt the first side just before
turning the meat. Salt the second side just before
serving;
Brush chicken and fish with butter several times as
they broil. When broiling fish, grease the grid to
prevent sticking and broil with skin side down. It Is
not necessary to turn fish.
Rare
3
10-12
Medium
3
14-16
Well Done
2
20-22
Medium
3
11-13
Well Done
3
13-15
Lamb Chops - 1" Thlcb
2
16-20
Pork Chops - 1" Thick
2
20.25
Pork Shoulder Steaks
2
15-20
Ham Slice - 1/2" Thick
3
14-16
Fish (Fillets)
2
10.15
Chicken (Halves)
1
40-60
Frankfurters
2
10.15
Bacon
2
5-7
Open-face Sandwiches
2
6-10
Ground Beef Patties
Never leave a soiled broiler pan In the range. Grease
in t he pan may smoke or burn t he next time the oven
is used.
Be sure you know the correct procedure for putting
out a grease fire. See the section on safety.
The removable roll-out broiler drawer should never
be used as a storage compartment. Cookware,
-bakeware, plastics, flammable materials, or any
other Items, could catch fire resulting in serious
burns.
This chart is a general guide. The size, weight, thickness, and starting temperature of the food, as well as
your own personal preference, witl affect the cooking
time. Times in the chart are based on the food being at
refrigerator temperature.
Do not cover the entire broiler grid
with foil. Poor drainage of hot fat
may cause a broiler fire.
if a fire starts, close the oven door
and turn controls off. If fire continues, throw baking soda on the fire.
Do not put water on the fire.
8
NGBRL05-2
CLEANING
TIPS
On the following pages, all removable parts on your range are shown. Refer to those pages when cleenlng.
Warm water, a mild detergent end a soft cloth are safe to use on all cleanable parts of your range. Do not use metal
scouring pads, except where recommended.
Range cooktop finishes will be either porcelain enamel or brushed chrome. Porcelain enamel looks like a painted
surface. Brushed chrome has a metallic appearance.
PART
CLEANING
MATERIALS
REMARKS
Control panel
Detergent, warm water, sort cloth
DO HOT use abrasive cleaners, steel wool
or plsetlc scouring pads. Dry thoroughly
after cleenlng.
Control knobs
Mild soap and water
Pull off knobs. Wash gently but do not
soak. Dry and return controls to unit.
Cooktop burners
Detergent, warm water, plastic or
nylon scouring pad or boll In DipIt@ solution to remove stubborn
soll
Do not use all-purpose cleaners, ammonia, powder cleansers or oven cleaners.
Such products can scratch or discolor
the burners. TO use Dip-It® solution,
remove burners and boll for 20 minutes In
• 2 tbsp. Dip-it® granules per quart of water. Boll with burner head down. Rinse
thoroughly,drain and completely dry burners in a 200°F oven for 1/2 hour. After
cleaning or a splllover, light the burners
and make sure that no ports are clogged
(see removable parts section).
Porcelain Enamel Cooktop
Glass oven door
Cleansing powder, soap, water,
soft cloth
If hot fruit fillings or foods that are acidic
foods such as milk, tomatoes, sauerkraut,
sauces with vinegar or lemon juice should
spill on the cooktop, use a dry paper towel
or cloth to wipe up right away. When the
surface has cooled, wash and rinse. For
other spills, such as fat spatterlngs, wash
with soap and water when cooled and
then rinse. Polish with a dry cloth.
Glass cleaner and paper towels
Remove stubborn soil with paste of baking soda and water. Do not use abrasive
cleaners. Rinse thoroughly.
9
NGCCH19-2
CLEANING
TiPS
PART
Painted surfaces-.-Front of
oven door, sides of range
(CONTINUED...)
CLEANING
MATERIALS
Soap and water, damp cloth,
paper towel, glass cleaner on
door glass
Broiler pan and gdd (rack)
Soap and water, soap-filled
scouring pad, commercisl oven
cleaner on pan only, dishwasher
Removable
porcelain
enamel oven bottom
Soap and water,
scouring pad
Standard oven Interior
(CAUTION: When In use,
light bulbs can become
warm enough to break if
touched with moist cloth
or towel. When cleaning,
avoid touching
warm
lamps with cleaning cloths
if lamp cover Is removed.)
Soap and water, soap-fined
scouring pad, commercial oven
cleaner
Racks/shelves
Soap and water, soap-filled
scouring pad, commercial oven
cleaner
soap-filled
REMARKS
DO NOT USE oven cleaners, clesnslng
powders or harsh abrsslves. These mlgM
scratch the surface. If eclds (marinades,
tomato sauces, basUng materials,...)
should spill on the range while It Is hot,
use a dry paper towel or cloth to wlpa up
dght away. When the surface has cooled,
wash and dnse. For other spills, such as
fat spatterlngs, etc., wash with soap and
waterwhen cooled and then dnee. Polish
with a dry cloth.
Glass cleaner can be used on glass door
fronts.
DO NOT USE commercial oven cleaners
on grid. Drain fat; cool pan and rack
sllgMly. Do not let soiled pan and grid
stand In oven to cool. Sprinkle on detergent. Fill the pan with warm water and
spread cloth or paper towel over the grid.
Let pan and grid stand for a few minutes.
Wash; scour If necessary. Rinse and dry.
OPTION: The broiler pan and rack may
also he cleaned in a dishwasher.
The oven bottom can be removed for
cleaning large spills.
Cool before cleaning.
FOR LIGHT SOIL: Frequent wiping with
mild soap and water (especially after cookIng meat) will prolong the time between
majorclaanlngs. Rinsethoroughly. NOTE:
Soap left on liner causes additional stains
when oven Is reheated.
FOR HEAVY SOIL= Choose an oven
cleaner and follow label Instructions. Use
of rubber gloves Is recommended. Wipe
off any cleaner that gets on thermostat
bulb. When rinsing oven after cleaning,
also wipe thermostat bulb.
Your shelves can be cleaned by using any
and all mentioned materials. Rinse thoroughly to remove all materials after cleanIng.
NOTE: Some commercial oven cleaners cause darkening and dlscolorsUon.
When using for first time, test cleaner on small part of rack and check for
discoloration before completely cleaning.
10
NGCCH20-1
REPLACING
THE OVEN
LIGHT
(some
Do not touch hot oven bulb. Do not touch bulb
with wet hands. Never wipe oven light aroa with
wet cloth.
models)
BULB
Never touch the electrically live metal collar on the bulb
when replacing It.
Electrical power must be shut off if you have to
replace a broken bulb.
Replace the bulb with a 40 watt appliance bulb. An
appliance buIb Is smaller than a standard 40 watt household bulb and Is made to withstand high oven temperatures and have a much longer bulb life.
REMOVAL
OF PACKAGING
TAPE:
The safest way to remove adhesive left from packing tape on new a ppliancos to assure no damage is done to the finish
of the product Is an application of household liquid dish washing detergent, mineral o11,or cooking oil Apply with
soft cloth and allow to soak. Wipe with soft cloth. DO NOT use plastic pad or equivalent. This procedure Is also safe
for the face of microwave doors and other plastic parts.
NOTE: The plastic tape that Is not removed from chrome trim on range parts CANNOT be removed if baked on.
REMOVABLE
OVEN
DOOR
TO remove:
STOP POSITION
1. Open the door to the stop position (see Illustration).
2. Grasp the door st each side and lift up and off the
hinges. Do not lift the door by the handle. Glass
breakage or damage to the door could result.
NOTE: When the door is removed and hinge arms
are at stop position, do not bump or try to move
the hinge arms,
The hinges could snap back
causing an injury to the hands or damage to the
porcelain on the front of the range.
Cover the
hinges with toweling or empty towel rolls while
working in the oven area.
To replace:
1. Hold the door over the hinges with the slots at the
bottom edge of the door lined up with the hinges.
The hinge arms must still be in the stop
position.
2. Sltde the door down onto the hinges as far as It will
go and close the door.
11
NGMN_7-1
REMOVABLE
OVEN
RACKS
Be careful not to scratch the oven finish when
installing or removing oven racks.
BUMP
To install:
GUIDE
1. Set the raised back edge of the rack on a pair of rack
guides.
2. Push the rack In until you reach the bump In the rack
guide, then lift the front of the rack a bit and push the
rack all the way In.
To remove:
1. Pull the oven rack out, then up.
The racks are designed with stop locks so when
placed correctly on the shelf support, they will
step when extended from the oven and will net
tilt when food is removed from or placed on them.
REMOVABLE
OVEN
BOTTOM
The oven bottom In your range can be removed for
easier cleaning.
Be careful not to scratch the oven finish when
removing or replacing
the oven bottom.
SLOTIN
OVEN BACK
To remove:
1. Grasp oven bottom at finger slots on each side.
2. lift the front edge of the oven bottom enough to raise
the tabs from the slots in the front frame.
3. Push the oven bottom back about 1/4" to release the
flange from the front frame, then pull out.
To replace:
1. Slide the oven bottom into the oven so the back tabs
fit Into the slots In the oven back.
RNGER
2. Grasp at finger slots and push the oven bottom back
and then clown to hook the flange under the front
frame.
3. Fit the front tabs Into the slots In the front frame.
REMOVABLE
To remove
ing:
ROLL-OUT
the roll-out
SLOTIN
FRONT FRAME
"FLANGE
BROILER
broiler for easier
cleanROLLER GUIDE
STOP
BROILER
1. Pull broiler out until It stops, then push back in about
1 Inch.
2. Grasp handle, lift, and pull broiler out (lift the rollers
under the broiler over the roller guide stops in the
range).
To replace broiler=.
1. PUt the rollers under the broiler behind the roller
guide stops In the range.
2. Hold broiler In the raised position as you slide it part
way Into the range, then lower broiler and push
12
completely closed.
FRONTFRAME
NGMNT09-2
LIFT-UP
COOKTOP
HOLD COOKTOP FLAT TO REMOVE
The cooktop can be raised or removed so the area
underneath can be cleaned.
To raise cooktop:
1. Remove the burner grates.
2. Grasp the cooktop and lilt up.
To remove cooktop:
1. Remove the burner grates.
2. Grasp the cooktop and lilt the front a little.
3. Grasping the cooktop at the sides, hold It nearly flat
while you lilt It up and off.
Porcelain enamel can chip. Handle porcelain enameled
cooktops carefully.
REMOVABLE
COOKTOP
SUPPORT ROD
BURNERS
To replace bumers:
1. Slip the air shutter over the gas valve orifice (Fig. A).
2. Lower the burner assembly and hook the tab In the
slots In the burner support (Fig. A).
3. Be sure both tabsare Inthelr slots, thet the burner sits
level and stralgnt and that the flash tube forms a
straight line from the Igniter to the burner (Fig. B).
The cooktop burners on your range may be removed for
cleaning. Be sure all cooktop knobs are turned to
OFF and burners are cool, then remove or raise
the cooktop.
If shipping screws were not removed from the burner
when the range was Installed, do so now (sea your
Installation section for Instructions).
BURNER
SUPPORT
GAS VALVE
ORIFICE
TAB
fig. A
IGNITER BRACKET
DO NOT REMOVE SCREWS
FROM IGNITER BRACKET
To remove
AIR
SHUTI'ER
BURNER
PORTS
burners:
1. Grasp the burner head and tilt it to the right to release
the two tabs from the burner support (A In Fig. A).
2. Lift the end of the burner assembly, then pull away
from the front of the range to free the air shutter from
thegas valveorlfice (Fig. B). If theyare clogged, use
a wire or needle to clear them.
FLASH
TUBE
PILOT OR
IGNITER
UGHTER
PORTS
See the Cleaning Chart.
Be careful not to disturb the air shutter setting
while cleaning. If you need to readjust the air shutter,
see the Installation Section.
BURNER
SUPPORT
Fig. B
13
NGMNT28-1
BEFORE
CALLING
FOR SERVICE
Save time and money m Check this list before you cail for service.
To eliminate unnecessary service calls, first, read all the InatrucUons In this manual carefully. Then, If you have a
problem, always check this list of common problems and possible solutions before you call for service.
If you do have a problem you cannot fix yourself, call your nearest Sears Store or Service Center for help. When
calling, have this manual handy with the model number, the Repair Parts list, model number, serial number and
purchase date.
PROBLEM
POSSIBLE
• Cooktop burners and oven
burners do not work
DON'T CALL FOR SERVICE
UNTIL YOU CHECK
CAUSE
• Gas supply not connected or
not turned on. If using L.P.
gas, tank may be empty.
• To check If the gas Is tumad on, light the
cooktop burners wifh s match by followIng the steps In the Ignition section of this
manual. If the burners do not light, check
the shut-off valve below the lift-up
cooktop (see valve to be sure that It Is In
the open position).
If using L.P. gas, isthere any gas In the LP.
tank?
• Cooktop burner
work; oven OK
does not
Foods do not bake properly
• Range not properly grounded
or polarlzad. This can affect
spark Ignition (spark ignition
models only).
• Check InatallaUon Instructions.
• Controls not set correctly
• See the Installation InstrucUons.
• Burners not adjusted properly
• Check Installation
• Soil clogging holes (ports) in
burner or burner assembly
misslignad
• See the removable cooktop burner section and the cleaning tips In thls manual.
• Improper operation of control
• Be sure to push knob In while turning.
• Burners not adjuated properly
• See the Installation Instructions.
• Oven not preheated
enough
• Be sure to preheat:
10 minutes
long
• See burner Ignition secUon In this manual.
Instructions
• Improper rack or pan piecement
• Maintain uniform air space around pans
and utensils; see oven cooking section.
• Oven vent blocked or covered
• Be sure oven vent (in panel
cooktop) is not blocked.
• Improper temperature
ting for utensil used
• Raduce temperature 25 deg rses for glass
or dull/darkened pans.
set-
behind
• Recipe not followed
• Is recipe teated and reliable?
• Improper thennostat calibration
• Check oven temperature adjustment procadures (next page).
• Range and oven rack not
level
• Check the Installation Instructions for leveling Instructions.
• Using Improper cookware
• See oven cooking secUon.
14
NGSER10-2
BEFORE
CALLING
PROBLEM
Foods do not broil
properly
FOR SERVICE
POSSIBLE
CAUSE
Improper rack position
Oven preheated
improper utensil used
Improper broiling time
Oven door open
DON'T CALL FOR SERVICE
UNTIL YOU CHECK
Check broil pen placement; sea Broiling
section.
Do not preheat when broiling.
Use broiler pen and grid supplied with
range.
Check broiling chart In bronlng section.
Close door.
Oven smokes
Dirty oven
Broiler pen full of grease left
in oven
Check for heavy splllover.
Clean pan and grid after each use.
Be sure that sump grease well Is to the
front of the range when broiling.
Oven light or work
light does not work
(if equipped)
Light switch In off position
Light bulb burned out
Check switch setting.
Check or replace light bulb; see cleaning
and care Instructions.
Burners have yellow or
yellow-tipped flames
I
nnnM qMn
A
Yellow flames -Call for service,
B
Yellow tips on
outer cones -Normal for L.P. Gas
C
Soft blue flames -Normal for Natural Gas
If burner flames look like (A), call for service. Normal burner flames should look
like (B) or (C), depending on the type of gas you use.
With L.P. Gas, some yellow tipping on outer cones is normal.
15
NGSER24
"DO-IT-YOURSELF"
TEMPERATURE
ADJUSTMENTS
You may feel that your new oven cooks dlfferenUy than
the oven It replaced. We recommend that you use your
new oven a few weeks to become more familiar with It,
following the times given In your reclpee as a guide.
4. TO make your oven temperature HOTTER, hold the
knob by the handle and turn the knob skirt Sothe tap
screw moves toward the word hotter. As you turn the
skirt you will hear clicks and feel notches or teeth.
Each click or notch will adjust the temperature 15°F
hotter.
If you think your new oven Is too hot (burning foods) or
not hot enough (foods are under-cooked) you can adjust
the temperature yourself. The appearance and texture
of foods are better Indicators of oven accuracy than
leexpenslve oven thermometers, such as those found In
the grocery stores, to check the temperature setting ot
your new oven. These thermometers can vary by 2040°F. In addition, the oven door must be opened to read
these thermometers. Opening the door will change the
temperature of the oven.
TOP SCREWMOVES
TOWARD HO'FfER
To decide how much to change the temperature, set the
oven temperature 25°F lower (If foods are burning) than
the temperature In your recipe, then bake. The result of
this "test" should give you an Idea of how much the
temperature should be changed.
TO MAKE THE TEMPERATURE
5. To make your oven temperature COOLER, hold the
knob by the handle and turn the knob skirt So that the
top screw moves toward the word cooler. As you
turn the skirt you will hear clicks and feel notches or
teeth. Each click or notch will adjust the temperature
15°F cooler.
ADJUSTMENT:
1, Make sure the oven control knob Is In the OFF
position, Remove the knob by pulling It straight off.
TOP SCREW MOVES
TOWARD COOLER
2, Look at the back of the knob. The pointer In the
center Indicates the original temperature setting.
POINTER
KNOB
_
6. When you have made the desired temperature adjustment, re-tighten both screws and return the oven
control knob to your range.
3. Use a screwdriver
to carefully loosen both screws.
16
NGSER25
NOTES
17
RE GAS RANGE
KENMO
f
r
Dear Customer:
Our constant efforts
directed toward
are
making
sure your new Kenmore
Range will arrive st your
home in perfect condition
and will give you i)roper
performance.
As part of
these efforts, we feel It is
our responsibility to provide you with this warranty
for your range.
FULL ONE YEAR WARRANTY ON THE FUNCTIONING
PARTS EXCEPT GLASS PARTS
OF ALL
It, within one year from the date of Installation, any part, other than a glass
part, falls to function properly due to a defect in material or workmanship,
Sears will repair or replace It, free of charge.
FULL 30.DAY WARRANTY ON GLASS PARTS AND FINISH OF PORCE.
LAIN ENAMEL, FAINTED OR BRIGHT METAL FiNiSHED PARTS
If, within 30 days from the date of Installation, any glass part or the finish
on any porcelain enamel, painted or bright metal part Is defective in
material or workmanship, Sears wig replace the part, free of charge.
FULL 90-DAY WARRANTY ON MECHANICAL
ADJUSTMENTS
For 90 days from the date of Installatlo n, Sears will provide, free of charge,
any mechanical adjustments necessary for proper operation of the range,
except for normal maintenance.
If the range Is subjected to other than private family use, the above
warranty coverage is effective for only 90 days.
WARRANTY SERVICE IS AVAILABLE BY CONTACTING
THE
NEAREST SEARS SERVICE CENTER/DEPARTMENT
IN THE
UNITED STATES
This warranty applies only while this product is In use in the United States.
This warranty gives you specific legal rights, and you may also have other
rights which vary from state to state.
SEARS, ROEBUCK and CO.
Dept. 731 CR.W
Sears Tower
Chicago, IL 60684
Q'_b
Recyded
WARRANTY
Paper
J
J
WE SERVICE
WHAT
J
WE SELL
"We Service What We Sell" Is our assurance to you that you can depend on Sears for service because Sears
ssrvIce Is nationwide.
Your Kenmore Range has added value when you consider that Sears has a service unit near you staffed by
Sears trained technicians.., professional technicians specifically trained on Sears appliances, having the
parts, tools and equipment to ensure that we meet our pledge to you -- "We Service What We Sellt"
TO FURTHER ADD TO THE VALUE OF YOUR RANGE, BUY A SEARS MAINTENANCE AGREEMENT,
Years of Ownership Coverage
Kenmore Ranges are deslg ned, manufactured and
tested for years of dependable operstlon. Yet, any
modern appliance may require service from time
to time. The Sears Warranty plus the Sears Malntsnance Agreement provides protection from unexpected repair bills and assures you of enjoying
maximum range efficiency.
Hera's a comparative warranty and Maintenance
Agreement chart showing you the benefits of a
Sears Range Maintenance Agreement.
1
1 st Year
Replacement of Defecdve
Parts other than Porcelaln
2nd Year ! 3rd Year
MA MA
W
or Glass
90 DAYS
2
Mechanical Adjustment
W
3
_or.,.,..n,a,.. P.,s
4
..Ch.ok.,you..q...,
MA
MA
W
MA
MA
MA
MA
MA
30 DAYS
Annual Preventive Malnten-
W - Warranty
MA - Malntm_ancl
Agreement
CONTACT YOUR SEARS SALESPERSON
OR LOCAL SEARS SERVICE
CENTER TODAY AND PURCHASE A SEARS MAINTENANCE
AGREEMENT.
Ke n m o['e
America's
Sold by SEARS, ROEBUCK
Best
Selling
AND CO., Chicago,
Appliance
Brand
IL 60684
m Printed
in LaFayette,
Georgia --