1
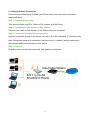
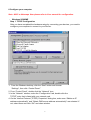
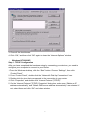
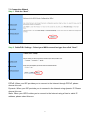
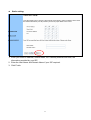
802.11g 54M
Wireless LAN Broadband Router
Quick Install Guide
#4729610AG100
FCC Statement
This equipment generates uses and can radiate radio frequency energy and, if not installed and used
in accordance with the instructions in this manual, may cause interference to radio communications.
This equipment has been tested and found to comply with the limits for a Class B computing device
pursuant to Subpart J of Part 15 of the FCC rules, which are designed to provide reasonable
protection against radio interference when operated in a commercial environment. Operation of this
equipment in a residential area is likely to cause interference, in which case the user, at his own
expense, will be required to take whatever measures are necessary to correct the interference.
WARNING! Any changes or modifications to this product not expressly
approved by the manufacturer could void any assurances of safety or
performance and could result in violation of Part 15 of the FCC Rules.
CE Declaration of conformity
This equipment complies with the requirements relating to electromagnetic compatibility, EN 55022
Class B for ITE and EN 50082-1. This meets the essential protection requirements of the European
Council Directive 89/336/EEC on the approximation of the laws of the Member States relating to
electromagnetic compatibility.
Trademarks
All company, brand and product names are trademarks or registered trademarks of their respective
companies.
2
1. System Requirement
Before you getting started, make sure that you meet the following requirements.
1. An Internet connection through a cable or DSL modem
2. A computer with an Ethernet network card or Wireless LAN Adapter installed
3. Your Windows CD, if your computer is running Windows 95, 98, or ME
4. UTP network cable with RJ-45 connector
5. Microsoft Internet Explorer 4.0 (or version above) or Netscape Navigator 4.0 (or
version above)
2. Package Contents
‧ One WLAN Broadband Router
‧ One Power adapter
‧ One CD-ROM(User Manual on CD)
‧ One Quick Installation Guide
‧ (Optional) One Reverse SMA Antenna
3. Hardware Installation
You can place this Wireless LAN Broadband Router horizontally or hang it on the wall.
(Metel Housing)
(Plastic Housing)
4. Before Installation
Before you start to connect your router to any network device, make sure you get the
following values from your ISP. You will need those values to setup the Router and
configure you networked PCs to accept the IP address the Router chooses to assign them.
‧
PPPoE User Name and Password or Fixed Internet IP Address assigned by your local
ISP
‧ Your Subnet Mask
‧ Your Default Gateway
‧ Your Primary DNS IP address
You are supposed to have all those information mentioned above from your ISP. If not,
contact your ISP and they will be able to supply all the information you need.
3
5. Setting Hardware Connection
Follow the steps listed below to install your Router when you have all the information
mentioned above.
Step 1. Power all devices down.
This should include your PCs, Cable or DSL modem and the Router.
Step 2. Connecting a Cable Modem or DSL Modem.
Connect your Cable or DSL modem to the WAN port on the rear panel.
Step 3. Connect the Wireless Router to your PCs.
Connect computers directly to the Router on ports 1~4 on the rear panel. If you have more
than 4 computers need to be connected, connect a hub or a switch (using its uplink port)
and connect additional computers to that device.
Step 4. Power on.
Plug the power cord into the power jack. And power on computers.
4
6.Configure your computer
Note : MAC or Netscape User please refer to User manual for configuration.
‧
Windows 95/98/ME
Step 1. TCP/IP Configuration
After you have completed the hardware setup by connecting your devices, you need to
configure your computer to connect to your Router.
1. From the Windows desktop, click the “Start” button and choose
“Settings”, then click “Control Panel.”
2. From “Control Panel”, double-click the “Network” icon.
3. In the “Network” window, under the “Configuration” tab, double-click the
TCP/IP” entry that is listed with your network card.
4. On the “Internet Protocol (TCP/IP) Properties” dialog box, make sure “Obtain an IP
address automatically” and “Obtain DNS server address automatically” are selected. If
not, select them and click “OK” and close window.
5
5. Click the “DNS Configuration” tab. Locate the DNS servers listed under “DNS Server
Search Order”. And Click “OK”
6. System may need your Windows 95/98/ME CD to copy some files. After it finishes
copying, please restart your system.
Step. 2 Disable HTTP Proxy
‧ Internet Explorer
1. Open Internet Explorer and click the stop button. Click “Tools” then “Internet Options”
2. In the “Internet Options” window click the “Connections” tab. Then click the “LAN
Settings” button.
6
3. Clear all the checkboxes.
4. Click “OK,” and then click “OK” again to close the “Internet Options” window.
‧ Windows NT/2000/XP
Step 1. TCP/IP Configuration
After you have completed the hardware setup by connecting your devices, you need to
configure your computer to connect to your Router.
1.From the Windows desktop, click the “Start” button. Choose “Settings”, then click
“Control Panel.”
2. From “Control Panel”, double-click the “Network & Dial-Up Connections” icon.
3. Double-click the icon that corresponds to the connection to your router.
4. Click “Properties” and double-click “Internet Protocol (TCP/IP).”
5. On the “Internet Protocol (TCP/IP) Properties” dialog box, make sure “Obtain an IP
address automatically” and “Obtain DNS server address automatically” are selected. If
not, select them and click “OK” and close window.
7
Step. 2 Disable HTTP Proxy
‧ Internet Explorer
1. Open Internet Explorer and click the stop button. Click “Tools” then “Internet Options”
2. In the “Internet Options” window click the “Connections” tab. Then click the “LAN
Settings” button.
3. Clear all the checkboxes.
4. Click “OK,” and then click “OK” again to close the “Internet Options” window.
7. Configure the router
After configuration of your network, you can access the Router via Web browser and type
the IP Address of Router. The default IP address of this Router is http://192.168.1.1
Please note that if you have changed the default IP Address assigned to the Router,
make sure to enter the correct IP Address.
The default “User Name” and “Password” are both “admin”.
8
7.1 Connection Wizard
Step 1. Click the “Next” .
Step 2. Cable/DSL Settings : Select your WAN connection type then click “Next”.
PPPoE: When your ISP provides you to connect to the Internet through PPPoE, please
choose this one.
Dynamic: When your ISP provides you to connect to the Internet using dynamic IP. Please
choose this one.
Static: When your ISP Provides you to connect to the Internet using a fixed or static IP
address, please select this one.
9
z
PPPoE Setting:
1.
2.
3.
Enter your User Name and Password.
Enter the Host Name and Domain Name if your ISP required.
Click Finish.
z
Dynamic Setting:
1. Enter the Host Name and Domain Name if your ISP required.
2. Click Finish.
10
z
Static setting:
1. Enter your WAN IP Address, Subnet Mask, ISP Gateway Address and DNS, the
information provided by your ISP.
2. Enter the Host Name and Domain Name if your ISP required.
3. Click Finish.
11