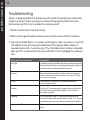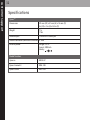
1
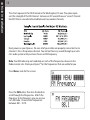
user guide
XMCK-5P
Quick Start
2
Quick Start
1. Install your XpressEZ in your vehicle
2. Activate your XM subscription online at http://activate.xmradio.com or by
phone 1 800 XM RADIO (1-800-967-2346 )
3. Listen to XM*
4. Identify and easily access your favorite channels by using the favorites button
*Hardware and required monthly subscription sold separately. Installation cost and other fees and taxes, including a one-time activation fee,
may apply. Subscription fee is consumer only. XM products, programming, services, and fees are subject to change, at any time, without notice.
Channels with frequent explicit language are indicated with an XL. Channel blocking is available for XM radio receivers by calling 1-800-XMRADIO. Subscriptions subject to Customer Agreement available at xmradio.com. XM service only available in the 48 contiguous United States.
©2007 XM Satellite Radio Inc. All rights reserved.
Introduction .............................................. 4
Features............................................................ 4
Safety Instructions........................................ 5
What’s in the Box .......................................... 7
XpressEZ Controls .......................................... 8
Using this Guide............................................ 9
Vehicle Installation ............................ 10
Mounting the XM Antenna .................... 12
Installing the Vent Mount........................ 13
How to Receive XM Through your Car’s
Stereo ............................................................ 14
Making Your FM Radio an XM Radio .. 15
Activation .................................................. 18
Using your XpressEZ .......................... 20
Listening to Live XM.................................. 21
Search by Category .................................. 21
Favorites ........................................................ 22
Display............................................................ 23
Menu Options ............................................ 24
FM Frequency .............................................. 24
Brightness .................................................... 25
Contrast ........................................................ 25
Backlight Timer .......................................... 25
Audio Level .................................................. 26
Bass and Treble............................................ 26
Antenna Aiming ........................................ 26
Auto Tune Mode ........................................ 27
Auto Off ........................................................ 28
Factory Defaults.......................................... 28
Customer Support .............................. 29
Troubleshooting ........................................ 30
Specifications .............................................. 32
Product Registration ................................ 33
Patent Information .................................... 34
FCC Statement ...................................... 35
Warranty .................................................... 36
Contents
3
introduction
4
Features
Congratulations on your purchase of the Audiovox XpressEZ. Your new
XpressEZ includes:
Built-in FM modulator
Favorites button allows you to program 10 of your favorite channels
Easily view channel, artist, and song title via a bright 3 line display
Move quickly through XM channels with the tune and press knob
Enjoy XM’s 170 channels from coast to coast, with over 80,000 hours of entertainment
each month. XM offers musical choice, variety, and discovery – worlds beyond your
own collection – plus a wide range of news, sports, talk, comedy, kids, and entertainment channels.
We recommend that you read the entire manual before using your XpressEZ.
Safety Instructions
Please read and understand all the instructions to avoid injury to yourself and/or damage
to your XpressEZ. Please be aware that XM claims no responsibility for damage from data
loss due to breakdown, repair, or other causes.
XpressEZ Digital Audio Player
Do not expose to extreme temperatures (above 140°F or below -4°F, or above 60°C
or below -20°C).
Do not expose to moisture. Do not use XpressEZ near or in water.
Do not let any foreign matter spill into XpressEZ.
Do not expose to chemicals such as benzene and thinners. Do not use liquid or
aerosol cleaners. Clean with a soft damp cloth only.
Do not expose to direct sunlight, fire, flame or other heat sources for a prolonged
period.
Do not try to disassemble and/or repair XpressEZ yourself.
Do not drop your XpressEZ or subject it to severe impact.
Do not place heavy objects on XpressEZ.
Do not subject XpressEZ to excessive pressure.
Do not touch the XpressEZ with wet hands.
Do not store in dusty areas.
introduction
5
introduction
6
Caution: Opening the case may result in electric shock.
Caution: The uninsulated parts inside the power adapter and cradle may cause electric
shock or fire. For your safety, please do not open these components. Do not let metallic
objects, such as necklaces or coins, come into contact with the power adapter plugs.
Caution: To avoid electric shock, use the power adapter only with an outlet that
matches the shape of the adapter’s plug.
Caution: Make sure that you insert the adapter’s plug all the way into the outlet.
Caution: Do not plug several devices into the same electrical outlet.
Important: Always read and understand the user guide to prevent problems.
Warning: Use the power adapter and cradle away from water sources to avoid fire or
electric shock.
Environmental Information
Follow local guidelines for waste disposal when discarding packaging and electronic
appliances.
Your Satellite Radio receiver is packaged with cardboard, polyethylene, etc., and does
not contain any unnecessary materials.
Warnings
When using this product it is always important to keep your eyes on the road and
hands on the wheel. Not doing so could result in personal injury, death, and/or damage to your XpressEZ Receiver, accessories, and/or to your vehicle or other property.
XpressEZ should be placed in your vehicle where it will not interfere with the function
of safety features, e.g. deployment of airbags. Failure to correctly place XpressEZ may
result in injury to you or others if the unit becomes detached during an accident
and/or obstructs the deployment of an airbag.
What’s in the Box?
XpressEZ
XM Antenna
Car Cradle
Vent Mount
Car Power Adapter
introduction
7
introduction
8
XpressEZ Functions
Power/Select XM Button
Power button; also confirms selection for channels, categories, and
menu items. Press and hold to
power down.
Knob
Previews channels and navigates
categories and menu options.
Menu
Access advanced features
and configuration options.
Favorites
Store and access up to
10 of your favorite
channels.
Display
Changes the way content is
shown on the display.
Using This Guide
Throughout this guide, you will see instructions such as: Select menu Antenna
Aiming. This tells you to perform the following actions:
1. Press the menu button.
2. Rotate knob to highlight Antenna Aiming, then press the XM button to select it.
Not all of the menu items described in this guide may appear on your XpressEZ display.
Some menu items will only be seen when XpressEZ is used in an accessory home kit or
boombox (both sold separately).
introduction
9
vehicle installation
10
1
vehicle installation
Vehicle installation
Every vehicle is different; for your safety, follow all instructions carefully. Consult a
professional installer if you have questions.
1. To begin, first decide which method of installation is best for your vehicle:
XM SureConnect (Sold Separately): You can listen to your XpressEZ through your car
stereo by using XpressEZ’s built-in FM modulator and the XM SureConnect. Simply find
an unused FM frequency on the stereo and set your XpressEZ to transmit on that same
frequency.
FM Direct Adapter (Sold Separately): If you choose to use the FM Direct Adapter to
transmit XM audio through your car stereo, we recommend professional installation.
Cassette Adapter (Sold Separately): Use the cassette adapter if your vehicle’s audio
system has a built in cassette player. The cassette adapter will provide the best audio
quality.
Audio input: Some vehicles come with an audio input jack. If your vehicle has this
type of input you can simply use a mini audio cable (sold separately).
Note: Separate purchase of one of the above accessories is required in order to install
your XpressEZ
2. Once you have chosen your method of installation, next you can mount your
XpressEZ.
3. Next decide the best location for your XM antenna. Mount this antenna to the
roof or trunk of the vehicle. During installation, make sure you are outdoors and the
antenna is not obstructed by tall buildings.
4. Finally you will connect all of the plugs to the car cradle and dock your XpressEZ into
the cradle. Once in place you can activate your XpressEZ.
Now that you have all of the parts you need, you are ready to begin installing your
XpressEZ.
vehicle installation
11
vehicle installation
12
Step 1: Mounting the XM Antenna
Mount the XM antenna to the roof or trunk of the vehicle. During installation,
make sure you are outdoors and the antenna is not obstructed by tall buildings.
For best results mount the XM antenna to the outside of your vehicle. Below are
the recommended options.
op
t
io
n
op
tio
1
n
2
Keep excess cable
behind or under
the dashboard.
The XM antenna contains a strong magnet, allowing it to
stick to any metal parts of your vehicle.
Magnet
Step 2: Installing the Vent Mount
To install the vent mount, find a horizontal vent that is strong enough to hold your
XpressEZ and car cradle. To remove the vent mount, push it into the vent and lift upwards
slightly to release the mount’s hooks from the vent vane.
Some parts of the vent mount can be
adjusted to better suit your vent.
vehicle installation
13
vehicle installation
14
Step 3: How to receive XM through your car stereo
There are several methods of receiving XM through your car stereo
Option 1
XM SureConnect (Sold Separately): You can listen to your XpressEZ through your car stereo
by using XpressEZ’s built-in FM modulator and the XM SureConnect. Simply find an unused FM
frequency on the stereo and set your XpressEZ to transmit on that same frequency.
Option 2
Professional Wired (Sold Separately): If you choose to use the FM Direct Adapter to transmit XM audio through your car stereo, we recommend professional installation.
Option 3
Cassette Adapter (Sold Separately): Use the cassette adapter if your vehicle’s audio system
has a built in cassette player. The cassette adapter will provide the best audio quality.
Audio input: Some vehicles come with an audio input jack. If your vehicle has this type of
input you can simply use a mini audio cable (sold separately).
ANT IN
DC IN
AUDIO OUT
ANT IN
Plug in your XM antenna here. If
you choose the XM SureConnect
method of install, this is where
you plug it in.
AUDIO OUT
If you choose to use a cassette
adapter or a mini audio cable,
plug it in here.
DC IN
This is where you plug in the
power adapter.
Step 4: Making Your Vehicle’s FM Radio an XM Radio
Your XpressEZ contains a built-in FM modulator that requires the use of either the XM
SureConnect (sold separately) or the FM Direct Adapter (sold separately) to transmit the
XM audio signal to your vehicle’s FM radio.
First, turn on your car stereo. You will need to find a suitable FM frequency in order to
get the best sound. A suitable FM frequency is an unused frequency or weak station
that is not located near a strong FM station in your area. Follow the steps below for
more help:
1. Go to www.xmradio.com/fmlocator for recommended FM frequencies in your area.
2. Enter your local USPS Zip Code.
3. You will see the recommended FM frequencies in your area. Try the “vacant” channels first.
4. Set your vehicle’s FM radio to one of the recommended frequencies. Now set your
XM receiver to the same frequency using the menu settings. For more information,
see FM Frequency on page 24.
5. If the audio quality is not satisfactory, you can repeat these steps by choosing another frequency.
You will see a chart that looks like this:
vehicle installation
15
vehicle installation
16
This chart represents the FM channels in the Washington, DC area. The spikes represent the strength of the FM channel. Someone in DC would choose a “vacant” channel
like 92.9 that is unused and located between two weaker channels.
Next, power on your XpressEZ. Be sure all of your cables are properly connected. Go to
channel 1, this is the preview channel. You will not hear any sound through your vehicle’s audio system until you have chosen an FM Frequency.
Note: Your XM radio may not modulate on each of the frequencies shown on the
Radio-Locator site. Check your XpressEZ for the frequencies that are usable for you.
Press Menu, look for this screen:
Press the XM button, then turn the knob to
scroll through the frequencies. Match the
frequency to the frequency you see on your
car’s FM radio. Choose from frequencies
between 88.1 - 107.9.
If you choose to use a cassette adapter or a mini audio cable (both sold separately) be
sure to turn the FM Modulator off instead of setting it to one of the FM frequencies:
Now you should be able to hear your XpressEZ through your FM stereo. If you can’t hear
any sound please check all of your connections and be sure your XM antenna is not obstructed. Visit Troubleshooting (page 30) for more information.
Now you will learn how to activate and use your XpressEZ.
vehicle installation
17
activation
18
2
activation
Before you can listen to XM content, you must activate your XpressEZ.
1. Set up your XpressEZ, car cradle, power adapter, and antenna (pages 10 -17). Make
sure XpressEZ can receive the XM signal.
2. Find the 8-character XM Radio ID, which is printed on the package or on the back of
your XpressEZ. Or select XM channel 0 to view the Radio ID. Record the Radio ID here
for reference:
The XM Radio ID does not use the letters I, O, S, or F.
3. Activate your XM Satellite Radio service online at http://activate.xmradio.com or by
calling 1 800 XM RADIO (1-800-967-2346 ). You will need a major credit card. The
website will walk you through activation, selecting a service plan, and creating an
XM account.
XM will send a signal from the satellites to activate the full channel lineup. Activation
normally takes 10 to 15 minutes, but during peak busy periods you may need to keep
your XpressEZ on for up to an hour. When you can access the full channel lineup on
your XpressEZ, you’re finished!
activation
19
using your XpressEZ
20
3
using your XpressEZ
Listening to Live XM
Turn on your XpressEZ. Subscribe to XM (page 19) if you haven’t done so already.
Selecting Channels
Rotate the knob to scroll through the list of channels. Press the XM button to select a
channel. You can also set up XpressEZ so that you do not have to press the XM button
to select a channel. See “Auto Tune Mode” on page 27.
- OR –
If you have channels assigned to favorites, press the favorites button several times
until you find the channel you would like to listen to.
- OR –
Press the number keys on the remote (sold separately) that correspond to the channel
number.
Search by Category
XM channels are organized into categories, or genres, such as “Rock,” “Jazz,” or “News.”
To find a channel by category:
1. At any live XM screen, press the XM button and a category name will appear.
2. Rotate the knob to navigate through categories.
3. Press the XM button to select a category.
4. Rotate the knob to navigate through channels within the category.
5. Press XM button to select a channel.
To choose another category, scroll back up to the category name and press the XM
button, scroll to choose another category. Press display to get back to the live XM
screen.
using your XpressEZ
21
using your XpressEZ
22
Favorites
There are 10 user presets that can be stored using the favorites button. To set a channel to your favorites:
1. Tune to desired channel.
2. Press and hold the favorites button for
2 seconds.
The stored location for the channel will appear
across the top of the display.
You can access your favorite channels by pressing the favorites button.
When you attempt to add more than 10 favorite channels, your XpressEZ will give you
the option to replace one of your previously saved favorite channels. To replace a
favorite channel:
1. Tune to desired channel.
2. Press and hold favorites button for 2
seconds. You will receive a message
stating “Favorites Full” then you will be
prompted to “Replace?”.
3. Rotate knob to navigate through your favorite channels.
4. Press XM to replace. You will receive a message confirming the replacement.
Display
Press the display button to change the way you view the content on the display.
There are 3 different display modes. Each time you press display, the display will
change.
View by channel number, channel name,
and artist name.
View by channel number, channel name,
and song title.
View by artist name and song title.
using your XpressEZ
23
using your XpressEZ
24
Menu Options
FM Frequency
You will need to find a suitable FM frequency in order to get the best sound. A suitable
FM frequency is an unused frequency or weak station that is not located near a strong FM
station in your area. To access your FM Frequency menu press menu FM Frequency.
Here you can choose which FM frequency to select for FM modulation. See page 15 for
more information.
Favorite FM Frequencies
To set a Favorite FM frequency:
1. Press menu FM Frequency.
2. Navigate through the list of frequencies
and press the XM button to make your
selection.
The selected FM Frequency is automatically added to your favorites and a number (1 thru
5) to which that frequency is assigned will be displayed. When you attempt to add more
than five FM frequencies to your Favorites, your first FM frequency will be overwritten.
To access a Favorite FM Frequency:
1. Press menu FM Frequency.
2. Press the favorites button until the desired FM Frequency is displayed
Note: pressing menu allows you to back out of any menu.
Brightness
To change the display’s brightness:
1. Press menu Brightness.
2. Rotate the knob to adjust the display’s brightness.
3. Press XM to confirm your selection.
4. Press the menu button to back out.
Contrast
To change the display’s contrast:
1. Press menu Contrast.
2. Rotate the knob to adjust the display’s contrast.
3. Press XM to confirm your selection.
4. Press the menu button to back out.
Backlight Timer
The Backlight Timer feature allows you to set the amount of time the display backlight
remains on. To adjust your backlight timer:
1. Press menu Backlight Timer.
2. Rotate the knob to adjust the Backlight Timer setting.
3. Press XM to confirm your selection.
4. Press the menu button to back out.
using your XpressEZ
25
using your XpressEZ
26
Audio Level
When listening to your XpressEZ, you can adjust its audio level to match other audio
sources (your CD player, other FM stations, or MP3 player).
1. Press menu Audio Level.
2. Rotate the knob to adjust the Audio Level setting.
3. Press XM to confirm your selection.
4. Press the menu button to back out.
Bass and Treble (Audio System Option)*
You can adjust the bass and treble to suit the kind of music you’re listening to.
1. Press menu Bass or Treble
2. Rotate the knob to adjust the Bass or Treble setting.
3. Press the XM button to confirm your selection.
4. Press menu button to back out.
*Audio Systems are sold separately
Aiming the Antenna
For optimal reception of XM’s live satellite signal, your XpressEZ antenna should have an
unobstructed view of the XM satellites in the southern sky. In large cities, XM also has a
network of ground repeaters to help increase the signal coverage.
Your XpressEZ can help you aim the antenna to pull in the strongest possible signal.
1. Press menu Antenna Aiming.
2. As you adjust the antenna the “Satellite”
and “Terrestrial” signal bars will
change. Find the position that gives
the strongest signal strength on either
“Satellite” or “Terrestrial.”
3. The antenna aiming display remains as long as it’s needed to help you position the
antenna. When you’ve found the best position, press menu to back out.
Auto Tune Mode
By default, Auto Tune is set to “Off” meaning, as you scroll through live XM channels
you can preview the channel list before selecting a channel. XpressEZ does not switch
to that channel until you press the XM button. By setting Auto Tune to “On” you can
change this behavior so that XpressEZ automatically tunes to the channel that you’re
previewing.
1. Press menu Auto Tune Mode.
2. Rotate the knob to the “On” option.
3. Press XM to confirm your selection.
4. Press the menu button to back out.
XpressEZ will automatically tune to the channel that you preview.
using your XpressEZ
27
using your XpressEZ
28
Auto Off
Options: OFF, 15 minutes, 30 minutes, 45 minutes, 1 hour, 2 hours, and 3 hours.
If the cigarette lighter is always powered, you can set the XpressEZ to automatically
turn off after a period from 15 minutes to 3 hours.
1. Press menu Auto Off.
2. Rotate the knob to select your desired time period.
3. Press XM to confirm your selection.
4. Press the menu button to back out.
Factory Defaults
This feature erases all of your “favorites”, and resets all other settings to the original
factory configuration.
1. Press menu Factory Default.
2. Rotate knob to display “Yes”.
3. Press the XM button to confirm your selection.
4. Press the XM button one more time at the “Are you sure?” to confirm “Yes” again.
4
Customer Support
customer support
29
customer support
30
Troubleshooting
XpressEZ is designed and built to provide you with trouble-free performance without the
need for servicing. If it does not appear to be functioning properly, follow these troubleshooting steps first to try to remedy the situation yourself:
1. Attach all connections firmly and securely.
2. Make sure the cigarette lighter/auxiliary power socket is clean and free of corrosion.
3. If you have installed XpressEZ in a vehicle and the XpressEZ does not power on, check the
12V adapter fuse by unscrewing the ribbed end of the cigarette lighter adapter. If
required, replace with a 1-amp fuse only. If the 12V adapter does not have a removable
end-cap, it has an internal fuse that resets itself after it is left unplugged for a period of
time.
If you see this on the display:
You should:
No Signal
Something is blocking the XM signal. Move your XM antenna away
from the obstructed area (e.g., an underground garage). Make sure
the XM antenna is mounted outside of the vehicle.
Antenna
Be sure that the antenna cable is fully inserted on the connector.
Make sure the cable is not bent or broken. Turn XpressEZ off, then
on, to reset this message.
Off Air
The channel you’ve selected is not currently broadcasting.
Tune to another channel.
Loading
Your XpressEZ is acquiring audio or program information from the
XM signal. This message should disappear in a few seconds in
good signal conditions.
Updating
XM is updating your XpressEZ with the latest encryption code.
Simply wait a few seconds until the update is done. – OR – You may
be attempting to tune to a channel that is blocked or unavailable.
--- (no artist or title)
No program information, such as artist name, song title, or channel
exists.
If this happens:
You should:
XpressEZ shuts off unexpectedly.
Check whether you have your “Auto Off “function turned on.
Check to be sure all of the cables are connected properly.
You do not receive all the XM channels you
have subscribed to.
Your XpressEZ may not be activated. Contact XM Satellite Radio.
See Page 19.
No audio.
Check all connections between your XpressEZ and your stereo
system.
No song title or artist name is displayed.
Nothing is wrong with your XpressEZ. That information may be in
the process of being updated. Some channels, such as news and
sports, may not have such information.
No audio when listening to XpressEZ through Check that your XpressEZ and your radio are tuned to the same FM
an FM radio.
frequency.
Audio fades or has static when listening.
You might be hearing interference from another FM station. First
check all cables for a proper connection on your XpressEZ car
cradle. If the problem persists, set your XpressEZ and your radio to
a different FM frequency.
Audio sounds too soft.
Raise the FM audio level until the sound quality improves.
XM Instant Traffic and Weather channels
sound different than other channels.
Nothing is wrong with your XpressEZ. These channels use a
different audio technology than the other XM channels.
customer support
31
customer support
32
Specifications
XpressEZ
Dimensions
101 mm (W) x 51 mm (H) x 16 mm (D)
4 in (W) x 2 in (H) x 0.6 in (D)
Weight
77 g
2.7 oz
Audio output
3.5 mm mini-stereo jack
Antenna connector (home and car cradle) RF SMB
External power
Voltage: 5 V DC
Current: 2000 mA
Polarity:
Model Numbers
XpressEZ
XMCK-5P
Xpress home kit
XMH-10A
Xpress car kit
XMC-10A
Product Registration
1. Register your product. We will keep the
details of your purchase on file to help
you refer to this information in the
event of an insurance claim such as
loss or theft.
2. Receive updates on the latest products
and technologies.
3. Download owner’s manuals, order
product catalogues, research new
products, and much more.
IMPORTANT (Serial Number) The serial number of this device is located on the back
of this unit. For your own security and convenience, be sure to record this number for
future warranty claims.
Serial Number:
customer support
33
customer support
34
Patent Information
Technology. It is prohibited to, and you agree that you will not, copy, decompile, disassemble, reverse engineer, hack, manipulate, or otherwise access and/or make available
any technology incorporated in receivers compatible with the XM Satellite Radio system. Furthermore, the AMBE (r) voice compression software included in this product is
protected by intellectual property rights including patent rights, copyrights, and trade
secrets of Digital Voice Systems, Inc. The software is licensed solely for use within this
product. The music, talk, news, entertainment, data, and other content on the Services
are protected by copyright and other intellectual property laws and all ownership
rights remain with the respective content and data service providers. You are prohibited from any export of the content and/or data (or derivative thereof ) except in compliance with applicable export laws, rules and regulations. The user of this or any other
software contained in an XM Radio is explicitly prohibited from attempting to copy,
decompile, reverse engineer, hack, manipulate or disassemble the object code, or in
any other way convert the object code into human-readable form.
FCC Statement
Please note that the power cable that has been supplied with your device is supplied with permanently attached ferrite beads. It is the responsibility of the user to use the power cable with the ferrite beads.
The user is cautioned that changes or modifications not expressly approved by XM Satellite Radio
Inc. can void the user’s authority to operate this device.
This device complies with Part 15 of the FCC Rules. Operation is subject to the following two
conditions:
(1) This device may not cause harmful interference.
(2) This device must accept any interference received, including interference that may cause
undesired operation.
This equipment has been tested and found to comply with the limits for a Class B digital device, pursuant to Part 15 of the FCC Rules. These limits are designed to provide reasonable protection against
harmful interference in a residential installation.
This equipment generates, uses, and can radiate radio frequency energy and, if not installed and
used in accordance with the installation instructions, may cause harmful interference to radio communications. However, there is no guarantee that interference will not occur in a particular installation. If this equipment does cause harmful interference to radio or television reception, which can
be determined by turning the equipment off and on, the user is encouraged to try to correct the interference by one or more of the following measures:
- Reorient or relocate the receiving antenna of the affected receiver.
- Increase the separation between the XM equipment and the affected receiver.
- Connect the XM equipment into an outlet on a circuit different from that to which the affected
receiver is connected.
- Consult the dealer or an experienced radio/TV technician for help.
Warning: The FCC and FAA have not certified this Satellite Radio Receiver for use in any aircraft
(neither portable nor permanent installation). Therefore, XM Satellite Radio cannot support this type
of application or installation
FCC Statement
35
warranty
36
5
Warranty
12 Month Limited Warranty
AUDIOVOX ELECTRONICS CORPORATION (the Company) warrants to the original retail purchaser of this product that should this product or any part thereof, under normal use and
conditions, be proven defective in material or workmanship within 12 months from the
date of original purchase, such defect(s) will be repaired or replaced with new or reconditioned product (at the Company's option) without charge for parts and repair labor.
To obtain repair or replacement within the terms of this Warranty, the product is to be delivered with proof of warranty coverage (e.g. dated bill of sale), specification of defect(s),
transportation prepaid, to an approved warranty station or the Company at the address
shown on the next page.
This Warranty does not extend to the elimination of externally generated static or noise, to
costs incurred for installation, removal or reinstallation of the product, damage to speakers, accessories, or vehicle and home electrical systems, malfunction of satellite transmissions, repeater signal or receiver unit.
This Warranty does not apply to any product or part thereof which, in the opinion of the
Company, has suffered or been damaged through alteration, improper installation, mishandling, misuse, neglect, accident, or by removal or defacement of the factory serial number/bar code label(s).
THE EXTENT OF THE COMPANY'S LIABILITY UNDER THIS WARRANTY IS LIMITED TO THE REPAIR OR REPLACEMENT PROVIDED ABOVE AND, IN NO EVENT, SHALL THE COMPANY'S LIABILITY EXCEED THE PURCHASE PRICE PAID BY PURCHASER FOR THE PRODUCT.
warranty
37
warranty
38
This Warranty is in lieu of all other express warranties or liabilities. ANY IMPLIED WARRANTIES, INCLUDING ANY IMPLIED WARRANTY OF MERCHANTABILITY, SHALL BE LIMITED TO THE DURATION OF THIS WRITTEN WARRANTY. ANY ACTION FOR BREACH OF
ANY WARRANTY HEREUNDER INCLUDING ANY IMPLIED WARRANTY OF MERCHANTABILITY MUST BE BROUGHT WITHIN A PERIOD OF 48 MONTHS FROM DATE OF
ORIGINAL PURCHASE. IN NO CASE SHALL THE COMPANY BE LIABLE FOR ANY CONSEQUENTIAL OR INCIDENTAL DAMAGES FOR BREACH OF THIS OR ANY OTHER WARRANTY,
EXPRESS OR IMPLIED, WHATSOEVER. No person or representative is authorized to assume for the Company any liability other than expressed herein in connection with the
sale of this product.
Some states do not allow limitations on how long an implied warranty lasts or the exclusion or limitation of incidental or consequential damage so the above limitations or
exclusions may not apply to you. This Warranty gives you specific legal rights and you
may also have other rights which vary from state to state.
U.S.A. : AUDIOVOX ELECTRONICS CORPORATION, 150 MARCUS BLVD., HAUPPAUGE, NEW
YORK 11788 1-800-645-4994
CANADA : CALL 1-800-645-4994 FOR LOCATION OF WARRANTY STATION SERVING YOUR
AREA
Notes:
warranty
39
XMCK-5P