1
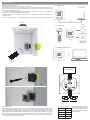
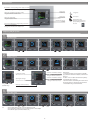
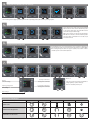
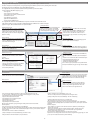
4871, 4871, 4922, 4925, 4924, 4923 -02-021/2014 Rev.: 0 LARA User Guide for Lara / Internet radio Palackého 493 769 01 Holešov, Všetuly,CZ Tel.: +420 573 514 211 Fax: +420 573 514 227 E-mail: [email protected] Web: www.elkoep.com Before you begin! Congratulations on purchasing your LARA device (Internet radio in a switch). The instruction manual provides information on installing and operating the device. The instruction manual is always a part of the supply. Only perform installation after becoming thoroughly familiar with this User Guide and device functions. Problem-free function of the device also depends on the way it was shipped, stored and handled. If you notice any signs of damage, deformation, malfunction or a missing part, do not install this product and return it to the point of sale. At the end of its service life, the product and its parts must be treated as electronic waste. Before starting the installation, make sure that all wires and connected parts are not under voltage. When assembling and performing maintenance, you must uphold safety regulations, standards, directives and special provisions for working with electrical equipment. For successful installation, you will need: LARA Internet radio, a set of speakers, POE power source, UTP cable with RJ45 connector, cable for speakers, PC with the application LARA Configurator. To protect yourself from electrical shock, connect only safety extra-low voltage (SELV) circuits. For example power supplies PoE (SELV) or LAN circuits (SELV circuits). Other power supplies (ELV) and WAN circuits (TNV circuits) should not be connected directly to product. Warning: some LAN and WAN ports use the same connectors RJ-45 so be careful when connecting a product. Charakteristic - A music and Internet radio player - all in the dimension of a switch and a luxurious LOGUS90 design. - When connecting to the Internet, LARA can play a stream created from a file on an NAS server (network storage). You can also connect an external music source (iPhone, MP3 player, telephone) to the audio input via 3.5mm jack. - Control is performed by simply touching the device front panel or by infrared remote control, which is included in the product packaging. - Configuring the device settings is possible using the simple menu controlled from the front cover of the device, with configuration via your PC using the SW LARA Configurator. - LARA has its own built-in amplifier 2x10W, which provides sufficient output for Hi-Fi speakers. For quality listening in the kitchen or bathroom, we recommend the LOGUS90 21581, which can be installed into a triple frame together with LARA. - Using the Internet radio, you gain easy access to countless radio broadcasting stations from the entire world without needing a computer. - Complies with standards IEEE 802.3u (100BASE-Tx). - Automatic cable crossing detection of Ethernet cable - MDIX - 100Base Ethernet, auto-detection - Powering by PoE – maximum voltage 27V / 1000mA max. consumption. - Firmware update via the SW Configurator. - Design LARA in Logus90. Accessories Power / network elements Proč si zákazník vybral 2N® Helios IP Vario? 2N® Helios IP Vario je dveřní interkomunikační zařízení, které představuje spojení nejvyspělejší technologie a jedinečného designu. Jedná se o variabilní komunikační systém, který podporuje přenos hlasu i videa. To vše v IP prostředí za pomoci protokolu SIP. Systém lze používat v domácnosti nebo v kancelářských prostorách a díky rozsáhlému příslušenství, které zahrnuje displej, čtečku karet, systém evidence docházky a klávesnici, je k dispozici široká řada možností použití. Celý interkomunikační systém a jeho ovládací prvky lze snadno ® power PoE switch with 5 ports (to power 5x LARA) PoE adapter with WiFi bridge (to 1x LARA)IP Vario? PoE adapter (to power 1x LARA) Proč si zákazník vybral přizpůsobit vašim potřebám. Veškeré nastavení a ovládání lze také řídit2N vzdáleněHelios prostřednictvím internetového připojení. Technické parametry 2N® Helios IP Vario je dveřní interkomunikační zařízení, které představuje spojení nejvyspělejší technologie a jedinečného designu. Jedná se o variabilní komunikační systém, který podporuje přenos hlasu i videa. To vše v IP prostředí za pomoci protokolu SIP. LARA IP Intercoms PoE switch with 8 ports (to power 8x LARA) Speaker 2" 32 Ohm Systém lze používat Široké možnosti použití: p v domácnosti nebo v kancelářských prostorách a díky rozsáhlému příslušenství, které zahrnuje displej, čtečku karet, systém with mounting into an installation box evidence docházky a klávesnici, je k dispozici široká řada možností použití. Celý interkomunikační systém a jeho ovládací prvky lze snadno INTERNET RADIO přizpůsobit vašim potřebám. Veškeré nastavení a ovládání lze také řídit vzdáleně prostřednictvím internetového připojení. 3x 2buttons mp3, ogg, acc Supported data transfer formats: 1 camera CONTROL/SETTINGS touchscreen buttons Front panel: Široké možnosti použití: p IR remote control (part of supply) Remote control: via PC setting up and communicating SW LARA configurator Communication Ethernet: restart product / reset product to factory settings Button RESET: INTERFACE ETHERNET 0/100 Mbps Communications interface: RJ45 ® Connector: Proč si zákazník vybral 2N 50m Helios IP Vario? Max. cable length UTP with power: DISPLAY 2N Helios IP Vario je dveřní interkomunikační zařízení, které představuje spojení nejvyspělejší technologie a jedinečného designu. Jedná se o variabilní komunikační systém, který podporuje přenos hlasu i videa. To vše v IP prostředí za pomoci protokolu SIP. color OLED Type: Systém lze používat v domácnosti nebo v kancelářských prostorách a díky rozsáhlému příslušenství, které zahrnuje displej, čtečku karet, systém 3x 2 buttons pixels Resolution: evidence docházky a klávesnici, je k dispozici široká řada128x128 možností použití. Celý interkomunikační systém a jeho ovládací prvky lze snadno 1 keyboard přizpůsobit vašim potřebám. Veškeré nastavení a ovládání lze26 také řídit vzdáleně prostřednictvím internetového připojení. x 26 mm Visible surface: 1 camera POWER SUPPLY PARAMETERS POE 24 V DC/1.25 A Supply: p 1.4 W Min. input: Široké možnosti použití: ® Průběh instalace 2N Helios elios IP Vario 26W (peak at maximum playback performance) Max. input: AMPLIFIER PARAMETERS stereophonic class D with digital output control Amplifier: 2 x10 W/8 Ohm Max. amplifier output Průběh instalace 2N® Helios elios IP Vario INPUTS / OUTPUTS 3.5 stereo jack Audio input: terminals LINE OUT (used for external amplifier)* Audio output 1: terminals OUT L/OUT R (speaker output from int. amplifier) Audio output 2: 3x 2 buttons CONNECTION 1 keyboard 0.5 - 1 mm2 ( audio outputs) Terminal block: 1 camera OTHER DATA 1 display 0 .. + 55 °C Working temperature: IP20 Overvoltage category: II. Pollution degree: 2N TELEKOMUNIKACE a.s. 2 Installation: Modřanská 621, 143 01 Praha 4 Česká Republika in an installation box Dimensions: www.2n.cz 85 x 85 x 46 mm Frame - plastic: Complete range of IP Intercoms Helios Více2N informací na can be found on www.2n.cz xelios 94 x 46 mm IP Vario Průběh instalace 2N® 94Helios Frame - metal, glass, wood, granite: + 420 261 301 400 nebo na 2N TELEKOMUNIKACE a.s. 87 g (plastic frame) [email protected]. ® * The cable from the LINE OUT terminals must be shielded, max. length should not exceed 5m. Modřanská 621, 143 01 Praha 4 Česká Republika www.2n.cz Více informací na + 420 261 301 400 nebo na [email protected]. -1- Cover colors: White Ivory Ice Pearl Grey Alluminium Speaker 5" 32 Ohm - with ceiling mounted White Speaker 5" 16 Ohm - with ceiling mounted White Speaker 5" 8 Ohm - with ceiling mounted White Ivory Ivory Ivory 2 way speaker 32 Ohm - mounting on a wall or ceiling White 2 way speaker 16 Ohm - mounting on a wall or ceiling White 2 way speaker 8 Ohm - mounting on a wall or ceiling White dimension (mm): 270 x 183 x 37 Square 2-way speaker 32 Ohm - with ceiling mounting White Square 2-way speaker 16 Ohm - with ceiling mounting Wtite Square 2-way speaker 8 Ohm - with ceiling mounting White dimension (mm): 204 x 204 x 92 NAS: Synology DiskStation DS213j - the storage of data (music, movies, photos) connected to the LAN - 2.000 gigabytes storage size - enables intelligent management and backup Ivory Ivory Ivory Hardware installation: Requirements for installation environment: The product cannot be placed where it is exposed to moisture or excessive heat. - Place the product at a spot where it can be connected to the Ethernet network. The Ethernet cable with Poe supply should have a short a distance as possible between the player and Poe source due to voltage drop occurring as the distance grows. Also use quality cables and connectors of a renowned brand for installation. - Never install the player without its installation box, and it is prohibited to mount it directly into the wall, e.g. into drywall partitions, where the device chassis would be directly wrapped in insulation material. - Distributing individual elements of the installation must be defined prior to actual installation, prior to interference (cutting) into walls or installation of boxes. Connect LARA and switch WiFi router with PoE LARA PoE (Power over Ethernet) is fed along a data network cable, without the need to provide power to the machine by another separate cable. LAN Ceiling Speakers Speaker (8, 16, 32 Ω) Connect speakers to LARA External music source LARA Speaker in design LOGUS90 21581 Setting of LARA through LARA configurator Installation Box LARA LARA IR controller Notebook / PC External amplifier left speaker Description of installation: Install the bottom part of the LARA player into the box KU, we recommend a box that enables mounting devices with greater depth. Connect the speaker cables into the terminals OUT L +/- OUT R +/-. You can connect the input to an external amplifier into the terminals LINE OUT L, LINE OUT R, GND. Snap the Ethernet cable into the RJ45 connector. Secure the device using the installation box screws. Snap the upper part of the player into the design frame LOGUS 90. Snap the upper part of the player with the frame to the lower part of the player. Connection of these two parts must be performed with care to avoid damaging the connectors. Connect the other end of the Ethernet cable to the POE switch or via the POE adapter to the Wi-Fi router, switch. After providing power, the display shows the system information, then after around five seconds the main display of the player. -2- Output of speakers, audio cables Speaker output (W) 2x 4 ohm 2x 20 W 2x 8 ohm 2x 10 W 2x 16 ohm 2x 5 W 2x 32 ohm 2x 2,5 W right speaker When installing the speakers, use quality audio cables with minimum diameter 0.5 mm, with maximum length of 30 m. It is best to have the same cable length for the right and left channels. Description of player Reset button - In the opening (in the upper part of the cover), for pressing use a thin object, i.e. a paper clip Short press - Volume up Short press (sound from speakers on/off ); Long press switches off the device Long press Short press Short press - Volume down Short press (play/stop); Long press input to menu Repeated pressing Return to the main screen by repeatedly pressing on the icon IR sensor of remote control A short press while play is stopped lets you scroll in the list of assigned Radios; A long press of both arrows - button lock Configuration, putting into operation 1. Selecting a language 01.01.2013 12:54 Stations 2. 01.01.2013 12:54 01.01.2013 Settings 12:54 Language 01.01.2013 12:54 01.01.2013 English 12:54 English English 12:54 01.01.2013 12:54 01.01.2013 12:54 01.01.2013 12:54 01.01.2013 12:54 IP ADRESS: SUBNET MASK: 255.255.255.0 255.255.255.0 GETEWAY: 01.01.2013 12:54 Save all changes? << NO >> Settings 01.01.2013 Locking the change 10.10.3.171 SUBNET MASK: 255.255.255.0 10.10.3.254 Exiting the menu after performed changes 3. 61695 61695 LAN parameters: - For changing the network connection parameters of the LARA player, write in the text field the new IP address, subnet mask and Epsnet port. - IP address - enter a new address in decimal format separated by periods (default setting: 192.168.1.10). - Subnet mask - address code determining the size of the network: The value 255.255.255.0 is commonly used for the subnet mask. - Firewall: default settings of local network firewall. Moving in numerical values Audio output settings 01.01.2013 Stations note: Selection of IP address settings; Subnet mask; Firewall change in numerical value to - PORT: PORT: 61695 GETEWAY: Opening the change 10.10.3.254 PORT: Selection of IP address settings; Subnet mask; Firewall change in numerical value to + 12:54 IP ADRESS: GETEWAY: 10.10.3.254 LAN Language 12:54 10.10.3.171 SUBNET MASK: Stations 01.01.2013 IP ADRESS: 10.10.3.171 12:54 Setting up a network 01.01.2013 01.01.2013 12:54 01.01.2013 12:54 Settings 01.01.2013 Language selection of the PA output to speakers connected to terminals OUT L, OUT R selection Output link to terminals Line OUT L, Line OUT R designed for an external amplifier selection PA+Link output to both terminals simultaneously -3- 12:54 01.01.2013 12:54 Audio OUT 01.01.2013 12:54 PA 01.01.2013 12:54 PA+Line 4. Settings of the active illumination time of the OLED display 01.01.2013 12:54 01.01.2013 12:54 01.01.2013 12:54 01.01.2013 12:54 01.01.2013 12:54 DISPLAY OFF: Settings << Display Language 12:54 DISPLAY OFF: 2 minutes Stations 01.01.2013 >> 5 minutes << >> Concerns how long the device display stays illuminated; when this time is up the display shuts off, and reactivates upon touching any button. 5. Device restart 01.01.2013 12:54 01.01.2013 Stations 6. Settings 01.01.2013 12:54 7. 12:54 Language 12:54 AUX IN Stations 01.01.2013 01.01.2013 12:54 Factory rst Via the settings menu or by shortly pressing (around 1s) the RESET button located on the device cover in the status when the product is connected to the supply voltage, the product will restart. This restart neither changes nor deletes settings. RESET to factory settings occurs after pressing and holding the RESET button for 1 min. and 10s. This restart returns the product to its factory settings, i.e. the IP address is set to 192.168.1.10, and stored stations are erased Activation/deactivation of input AUX IN 01.01.2013 12:54 01.01.2013 12:54 AUX IN 100% The input AUX IN is used to connect external audio devices such as a mobile phone, mp3 player and others. A 3.5 mm jack provides connection. In this mode, the player functions as an audio amplifier. When activating the input, the volume on the player is set (fixed) at 100%. Volume can thus be controlled only on the connected external audio device Alarm setting 01.01.2013 12:54 01.01.2013 12:54 01.01.2013 SET TIME: 12:54 00:00 STATIONS: Stations Alarm 01.01.2013 SET TIME: 12:54 07:00 STATIONS: 01.01.2013 SET TIME: 12:54 07:00 STATIONS: 01.01.2013 SET TIME: 12:54 07:00 STATIONS: Alarm Alarm Alarm Alarm VOLUME: 30% VOLUME: 30% VOLUME: 30% VOLUME: 30% STATUS: OFF STATUS: OFF STATUS: OFF STATUS: REPEAT Button lock: 01.01.2013 SET TIME: Return/ Save time settings Scroll up in the menu/ Setting the hour-minute 12:54 00:00 A long press of both arrows locks the touchpad buttons. Locking is signaled by a symbol on the display. The device is unlocked by the same process. STATIONS: Alarm Opening change at the time settings Scroll down in the menu/ Setting the hour-minute VOLUME: 30% STATUS: OFF Data settings/ Switching hours-minutes at the time settings Options of design of the LARA player Description Radio Music LARA radio LARA home videophone LARA iNELS multimedia -4- Videophone Intercom Audio zone Configuring the device LARA Radio: Configuring the LARA network music player is performed using the software („SW“) LARA Configurator via Ethernet connection. SW enables setting the basic network parameters, a change in login data, update of firmware („FW“) of the device, and editing the list of web radios. Configuring the device LARA Radio using SW LARA Configurator: The configuration SW can be freely downloaded from the website http://www.elkoep.cz/ke-stazeni/software/ Using the configuration SW (LARA Configurator), you can: - set the login data - set the network connection parameters - set the parameters for automatic synchronization of time - edit the Internet radios list - set the IMM audio zone parameters - update FW of the LARA Radio device - remotely control the LARA Radio device The configuration SW communicates with the LARA Radio device by means of the Ethernet network. This SW can be run simply without installation in operating systems Microsoft Windows XP, Windows 7 and Windows 8. A condition to running the application is support of Microsoft .NET Framework 4 or its possible installation LAN parameters: You must enter in the dialog box the IP address and Administrator login: number of network port of the connected LARA In the login window dialog box, enter the set administrator Radio device. These parameters can be checked on login data. The factory settings of this data are the user: the device display in the menu Settings -> LAN „admin“ and the password: „elkoep“. If the entered data is invalid, it will not possible to continue in reading the LARA Radio device settings About the device: The window „About the device“ indicates the connection status, login and version of SW and HW in the LARA Radio device. The connection status is not dependent on successful login. The „Connected!“ status occurs under the condition of a correct network connection, login „Successful!“ occurs after login data is correctly entered. Read settings: The button „Read settings“ serves to read all settings stored in the device LARA Radio. Reading occurs only in the event of successful connection and login. About the device: Information about the device and program including hypertext links to the product manual and catalog list. Save settings: The button „Save settings“ is used to save the complete settings stored in the LARA Radio device. Remote control: By using the remote control in the LARA Configurator program, you can simply and quickly check the function of your configured device. Device settings: LAN parameters: - To change the network connection parameters of the LARA device, enter in the text fields the new IP address, subnet mask and Epsnet port. - IP address - enter a new device IP address in decimal format separated by periods (default setting: 192.168.1.10). - Subnet mask: default value 255.255.255.0. - Firewall: local network firewall settings. Port: use the factory preset port 61695. In case of problems with the firewall, we recommend choosing ports in a range of 49152 to 65535. Administrator login: To change the login data, enter the new login name and password into the text fields. You must confirm the password. Date and time: - SNTP server: if needed, enter the IP address of another time server supporting the SNTP protocol. - Time zone: Select the time zone in the place of installation of the LARA Radio device for correct display of time. - You can switch from winter to summer time using the control element „Summer time“ List of stations: List of stations: The tab „List of stations“ is used for complete management of the list of Internet radio stations stored in the LARA device List of stations: It is possible to store up to 40 presets into the list for music network streams. LARA Radio in its current version supports streams in the formats SHOUTcast and Icecast with audio formats MP3, AAC and OGG, which are used in most cases of Internet broadcasting. Edit stations*: In the section Edit stations, you can use the buttons to add new or modify existing stations in the list Control elements: After successful reading of stations along with overall device settings, you can browse the list of streams and change their order. For sorting and removing items from the list, use the relevant control elements on the right side of the list. (example 2: www.jmenoserveru.cz/hudba.mp3 - port no. = 80) - File name: not always used and not a required parameter for storing the station. In the section Station editing, use the buttons to add new or modify existing stations in the list. - To add a new station, you must know its source address, which is usually given in a variety of forms: - http://www.jmenoserveru.cz:cisloportu/nazevsouboru - http://135.111.258.333:8000/nazevsouboru - http://www.jmenoserveru.cz:8000/nazevsouboru - http://www.jmenoserveru.cz:8000 - http://135.111.258.333:8000 - http://www.jmenoserveru.cz/nazevsouboru (example 3: www.jmenoserveru.cz:8000/hudba.mp3 - file name = hudba.mp3) After pressing the „add“ button, you begin entering the stream parameters into the relevant fields: Manual completion: - Name of station: name of preselection displayed on the OLED display. - IP address: server address where the stream is being broadcast. The server address must be entered in decimal format separated by periods. If it is an address with a domain name (www.jmenoserveru.cz), use the automatic completion option, see below. - Port number: this is entered as a number in decimal format. (example 1: www.jmenoserveru.cz:8000/hudba.mp3 - port number = 8000) If this port number is not listed in the address, enter port number 80 -5- (example 4: www.jmenoserveru.cz:8000 - do not enter file name) - After entering all necessary data, store the station in the list by pressing „Save“. Note: If the file name has the extension *.m3u, it is not the music stream address , but a playlist address containing the address (or multiple addresses) in the music stream. In this case, use the option of automatic completion. Automatic completion: - For most addresses, it is possible to use the function of automatic completion by the following steps: - Enter any name of a station. - Click the option „Automatic completion“ and after entering the address, confirm by pressing „OK“. - An information message will inform you of the result of the automatic processing of the link. - Enter the station in the list by pressing „Save“. Note: The automatic completion function requires an active Internet connection. Important note: Store the prepared list of stations into the device along with settings by pressing „Save“. Until you do so, the list is elaborated and stored only in the SW memory! Audio zone: Audio zone: The tab Audio zone is used to activate and set the IMM audio zone function The control element enables activation and deactivation of the IMM audio zone function Name of zone: displayed in the IMM environment IP server: enter the IP address of the IMM server in decimal format separated by periods Updating FW: Updating FW: To update the FW in the LARA Radio device, it is first necessary to download the update file with the extension „*.lfw“ from the address http://www.elkoep.cz/ke-stazeni/ software/ Select file: Pressing „Select file“ brings up a dialog window for searching and selecting the update file. After opening the selected file, its contents are checked, and the user is then informed of the result. If the correct file has been selected, the FW version number is displayed. Updating FW: Pressing the button starts the update, the progress of which is illustrated graphically. Reading a damaged or invalid file prevents the following updating steps, and it is necessary to repeat the process with the correct update file Troubleshooting - The product is not communicating, the display is not illuminated Solution: Check the power supply: Check to see if the product is connected to the power supply and if the RJ45 connector is connected to the product. Check if the power source Poe is connected to the network. - The product is illuminated but the radio does not play. Solution: Check the Ethernet network connection. Disconnect and reconnect the RJ45 Ethernet connector. After repeated connection, the product displays system information; if within five seconds the player display does not appear, there must be some network connection issues, check the network settings. - Restart the product. If there is no problem with the above-mentioned points and all settings are correctly set, perform a restart by briefly pressing the RESET button or by disconnecting and reconnecting the power supply. - Interrupted playing, frequent reading of the radio. Probably insufficient Internet connection speed. Maintaining the device The device front panel and frame can be cleaned using a dry or slightly moistened rag with a mild soap solution. Avoid use of other cleaning agents The company ELKO EP, as the manufacturer, is entitled to make technical modifications to the product, in the technical specification and product manual, without prior notification. ELKO EP bears no liability for possible incompleteness and mistakes in this document. -6-