1
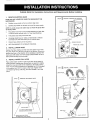
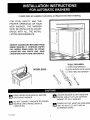
IN,=;TALLATI()N IN,c;TRUCTIONS
FOR AUTOMATIC WASHERS
PLEASE READ All Installation Instructions and Requirements Before Installing.
FOR YOUR SAFETY AND THE
PROPER OPERATION OF YOUR
NEW WASHER, THE WASHER
MUST BE INSTALLED IN ACCORDANCE WITH ALL THE INSTALLATION REQUIREMENTS.
REMOVE CARDBOARD RETAINER FROM
INSIDE WASHER. IT CONTAINS WATER
FILL HOSES, DRAIN HOSE, TIE STRAP,
LITERATURE AND PARTS BAG. SAVE
LITERATURE FOR FUTURE REFERENCE.
TOOLS REQUIRED:
_4"OPEN END WRENCH
PLIERS AND/OR VICE GRIPS
%8"HEX HEAD NUTDRIVER
RETAPE DOOR.
CAUTIONS
_1_
OPERATING
READ OPERATIONS
WASHER.
MANUAL BEFORE
_I_DO
NOT CONNECT WASHER TO POWER
SOURCE
UNTIL INSTALLATION IS
COMPLETED.
P/N 35-4833-2
__
_
LOCATEAREA
PROOF
WASHER
THATINCAN
DRYSUPPORT
WEATHERWEIGHT OF FULL WASHER.
_
POWER
MUST
GROUNDED
120V
AC OUTLET
60 HZ. DO
NOT BE
USE
AN
EXTENSION CORD.
INSTALLATION INSTRUCTIONS
PLEASE READ ._11Installation Instructions and Requirements Before Installing.
1, REMOVESHIPPING BASE
NOTE; DO NOT LOWER OR RAISETHE WASHER BYTHE
BACKGUARD.
a.
STEP ___ INSTALL WATER FILL HOSES
Position corner posts on floor as shown (step one).
b. Carefully lay washer on its back on top of the corner posts.
NOTE: A small amount of water may run from the pump due
to factory tests.
c.
Pop plastic loose from screw located between the back feet,
or remove screw entirely with a _," Hex Head Nutdriver.
d.
Pull plastic base away from back feet.
e.
Grasping plastic base on sides pull downward to release
front feet from slots and toward you to remove base.
f.
g.
_'_1
WATER
CONNECTIONS--
-..
COLDWATERINLET
Discard base. (Base can be recycled.)
RETURN WASHER TO UPRIGHT POSITION.
RUBBER
,_,_,__ /
Position the Hose Clamp over the end of the Drain Hose. Push
the Drain Hose on to the Pump Outtet of the Washer. Be sure to
position the hose in the direction of the standpipe, squeeze the
clamp ears with pliers and move clamp toward washer so as to
clamp hose securely to pump outlet.
INSTALL
WASHER
WATERFILLHOSES
2. INSTALL DRAIN HOSE
3.
="
- _r_------_
HOTWATERINLET
WATER FILL HOSE
Place a flat rubber washer in one end of each of the water fill
hoses provided, making sure the washers are pushed in tightly.
Attach the hose end with the flat washers to the water connections. Hot and cold connections are identified by H & C stamped
in the cabinet, and "HOT" printed on the hose. Tighten hose
connections by hand, until snug, and then another % turn with
sTEP _
DRAIN
INSTALL DRAIN HOSE
HOSE
O
STEP _ REMOVE SHIPPING BASE
FRONT FEET
=
BACKGUARD
CARTON
(STACKED
T
COR
ON
EACH
jf
OST
OTHER)
(I)CARTeN
_
CORNER
B
(ONLY
,_pONETOAWASHER)
:.
/
Y
PUMP OUTLET
POST_
2.
IN;TALLATION INSTRUCTIONS
PLEASE READ All Installation
4. ADJUST LEVELING FEET
Instructions
b.
Make sure rear feet move up and down freely,
c.
d.
as possible.
Place washer in final operating position,
Tilt machine forward until rear of cabinet is approximately 4
inches off the floor, turn the machine loose letting it fall on
FINAL CHECKOUT
y_
•
,OCKW,S,E,
w,r,,,,os
rOC.ECK,_
s_e_E
Proceed as follows:
Position your washer as close to its final operating location
Before Installing.
STEP_
I,AOJUSTtEVEUNGFEET
Your washer is equipped with self stabilizing legs on the rear
which automatically stabilize the unit.
The front legs are threaded and can be adjusted up and down to
level your unit.
a.
and Requirements
tooK,u,
root_A°
the rear feet. This operation will cause the rear stabilizing feet
to conform to the contour of the floor and seat them solidly,
Rock washer with hands on opposite corners to check
stability.
-
_'_
_1 LeG"
•
•
'_i_ -_
.
_,,I__IE__
s_L_.w,
_=,
._
••
Plug
the
Are any
•
A protective plastk
film may cover
•
This should be
removed.
"
Start the washer in
control
panel.as per
wash cycle,
..
t,O,O_TUB
_
5. DRAIN HOSETO STANDPIPE
C.
While
holding
the adjusting
STYLE
A: Push
thefoot
cuffstill,
on turn
the gooseneck
endlockout
of the clockwise
drain hose
into the standpipe as far as possible. Do not seat drain hose and
standpipe as an airtight seal will cause siphoning (fill problems).
_.
power
cor,
water lea_'
into an outlet?
s_Lc...-
SE_',CE
u,,_
until the _ocknut is tightened firmly against base. Repeat step
4d above.
T,_
Operating
Instructions.
STEP_
AIIo-_
water to fill in
machine until it
reaches the bottom
HOT AND GOLD FAUCETS
_>._
c>-.__
"-_1_:::___._/_
must be used.
wash basket.
_
I
I
•
provided.
_
i(_
w_,s.E,
NOTE: BE SURE THE DRAIN HOSE IS NOT TWISTED OR
KINKED.
6. HOT AND COLD FAUCETS
_
_--_
t
.....
Push the screens and washers (provided in the parts bag) into
the remaining ends of the water hoses. Attach the water hoses to
the hot and cold faucets. BE SURE ROT WATER INLET IS CONNECTED TO HOT WATER FAUCET. Tighten by hand until snug,
and then a _ turn with pliers. DO NOT OVERTIGHTEN. Turn on
faucets and check for leaks. Tighten to stop leaks, if necessary.
Are there any kink.,
in hoses?
eveident?
(IF MACHINE IS NOT STABLE)
freely on the threads.
a. Loosen the locknuts on each leg, making sure they turn
b. When the machine is in place, screw front feet out of base
against the floor until the washer is acceptably level across
the front.
BOTH:
prevent
dislodging,
the drainbreak
hose kit
NOTE: To
If you
mustaccidental
make an airtight
seal, secure
an anti-siphon
to the standpipe, laundry tub or inlet hose with the TIE STRAP
both front feet
been tightened
Have locknuts on
and are foot pads
in place?
StEP_ D_A_N
HOSE
TODRA_
FRONT FOOT ADJUSTMENT FOR SIDETO SIDE LEVELING.
STYLE B: Put the gooseneck end of the drain hose into the
standpipe or laundry tub. The drain hose should fit loosely in your
standpipe as there is a possibility of siphoning if it fits too tightly.
Have all installadol
requirements been
observed?
I
row of holes in the
To stop washer, pu
in onwater
timeris knob.
the
not levl
with the bottom ra
of holes all around
the basket, readjus
i
...........
•
•
the leveling feet as
required to level.
Remove the water
Putting washer int_
spin cycle.
During spin check
drain system for
leaks and proper
operation.
IN,c;TALLATI()N REC!UIREMENTS
PLEASE READ All Installation
Instructions
and Requirements
Before Installing.
GENERAL INFORMATION
most plumbingcodes. In most cases where a tight connec-
It is recommendedthat a qualified service technician install
your washer,
LOCATION
INSTALLWASHERON A SOLID FLOOR,
lion
is demanded,an
anti-siphon
valve
should be
placed
the drain
hose to preventwater
from
siphoning
from
the in
washer or facility during agitation. If required, an anti-siphon
valve Part No.33-4294N is availablefrom your dealer or
store.
Woodfloor constructionsmay sometimes need to be reinforced to minimizevibration from unbalancedload situations.
Carpetsand soft tile surfaces are also contributing factors in
vibrationand/or tendency for a washer to moveslightly during spin cycle.
Never install washer on a platform or weak support
structure.
DO NOTINSTALLTHEWASHERON A CARPETEDFLOOR.
DO NOTINSTALL OR STORETHEWASHERwhere it will
ELECTRICALREQUIREMENTS
1. Provide an individual 120 volt, 60 HZ, branch circuit
with groundfor the washer.This circuit must be rated
for 15 or 20 amperes,
2. Protect the washer's electrical circuit with a 15 or 20
ampere time delay fuse or circuit breaker.
3. Install in accordance with National ElectricalCode ant
all local codes and ordinances.
GROUNDINGINSTRUCTIONS
be exposedto the weather.If it is ever exposed to water,
have a qualifiedtechniciancheckit before using,
Insta}}ationin any locationsubjectto freezingtemperatures
is not recommended.If the washer must be installed in such
a location,it should be thoroughly drained after each use as
follows:
The washer must be grounded.In the event of a malfunctior
of breakdown, groundingwill reduce the risk of electrical
shock by providinga path of least resistance for electric cu_
rent.
The washer is equippedwith a power supply cord which ha
a groundingconductor and three-pronggrounding plug. For
proper grounding, the three-prong groundingplug must be
plugged in an appropriatethree-prong grounded receptacle
or outlet. See Figure #1. The receptacle must be properly
installedand grounded in accordancewith the National
Electrical Cocleand all local codes and ordinances.
a. Turn off hot and cold water faucets,
b. Disconnectboth water fillconnections at the faucets,
Lowerthem to the floor,
c. With the service cord connectedto the electrical outlet,
rotatethe timer to the normal start of fill position and
pull timer knob to start washer.Turnwater temperature
selector switch to warm.
FIG. 1
d. When water stops draining form the hoses, disconnect
service cord.
THREE
PRONG
GROUNDINGPLUG
POWERSUPPLYCORD.
e. Lowerthe drain hose to the floor and allow it to drain
into a floor drain or shallow pan.
,
In below freezing temperatures,ice may form in the "fill"
to melt before using the washer.
flume.
Raise the room temperature and allow time for the
WATERSUPPLYREQUIREMENTS
_"
_
ice
1. Hot and cold water must be availableat a pressure
between 25 and 125 P.S.I.at the machine, if less, it will
take longer to fill and complete the cycle.
2. Shut-offfaucets with standard hose connectors should
be available in both hot and cold water lines so that the
water can be turned off when the washer is not in use.
WARNING
OREQUIVALENT
(NEMA
NO.5 15R)
ELECTRICALHAZARD
Improperconnection of the grounding conductor or the
three-pronggrounding plug of the power supply cord
may result in an electrical shock hazard.If there is any
doubt as to whether the washer is properly grounded,
have the installationchecked by a qualified electrician
or service technician,
DO NOTMODIFY THE PLUG PROVIDEDWITH THE
WASHER - If the plug will not fit the outlet, have a
proper outlet installed by a qualified electrician.
Always turn the water off the washer is not in use,
especially when vacationing,
3. The installation should be in accordancewith local
plumbingcode requirements.
DRAIN REQUIREMENTS
A drain that will permit 23 gpm flow is requiredto evacuate
the washer.The standpipe should have a 172in. minimum
internal diameter
APPROVED
GROUNDlik
TYPEWALLRECEPTACL
to prevent siphoning.
BEFORE OPERATING YOUR WASHER READ ALL SAFETY
Tight connectionsbetween the drain hose and the drain
(standpipe,etc.) are not recommendedsince they violate
PRECAUTIONS
LISTEDINTHEOPERATING
INSTRUCTIONS
't