1
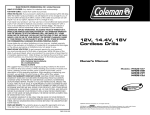
Instruction Manual Cordless Hedge Trimmer HTLI-10 For correct usage, read these instructions carefully and keep in a safe place for future reference. Driven By Solar Inc., Mississauga, ON, L5N 5Z2 www.RechargeTools.com 1 Intended Use This cordless hedge trimmer is designed exclusively for cutting garden hedges in your private domestic gardens. Use for purposes other than those intended qualify as improper use.The manufacturer / supplier is not responsible for any damages that result from improper use, The operator is solely responsible for assuming all risks. Do not overload the machine as it works better and more safely when operated within the specified range of performance. Description Of Parts 1 2 3 4 5 6 7 8 9 Soft grip rear handle On / Off switch on main handle Button for rotary handle Main housing Lock / release button for battery pack Battery pack 10 11 12 13 14 Lock spanner of front handle Hand guard Blade Blade transport guard. Aluminum Bar 15 Impact protection with suspension shackle Charger inlet on battery pack On/ Off switch on front handle 16 (All around switch function) Soft grip front handle 17 Locking bolt of front handle 18 Battery charger LED indicator on charger 3 2 1 4 5 8 7 6 11 10 9 16 14 12 13 17 15 18 2 Safety Precautions Explanation of symbols: Warning notice. Read the instruction manual. Eye protection must be used. Do not expose the tool to rain. Warning! Keep bystanders away. Remove battery before adjusting or cleaning and before leaving the machine unattended for any period. Only use the battery charger indoors. Battery charger contains a safety transformer WARNING! Before cleaning the blades, make sure the machine is first switched off. When in use, keep your hands well away from the moving blades. Use the tool correctly and do not force it to perform jobs for which it was not intended. 3 Read all safety warnings and all instructions. Failure to follow the warnings and instructions may result in electric shock, fire and / or serious injury. The user is responsible for any accidents involving other people or anyone‟s property. Save all warnings and instructions for future reference. The term “power tool” in the warnings refers to your battery operated (cordless) hedge trimmer. Work area Keep the work area clean and well lit, as cluttered and dark areas can result in accidents. Power tools create sparks which may ignite dust or fumes. For this reason, do not operate the tool in explosive atmospheres, such as in the presence of flammable liquids, gases or dust. While operating the power tool, keep children and bystanders away as distractions can cause you to lose control. Electrical Safety Make sure the power rating on the plug matches the outlet. Never modify the plug in any way. Do not use any adaptor plugs with earthed (grounded) power tools. Unmodified plugs and matching outlets will reduce risk of electric shock. To prevent the risk of electric shock, when operating the tool avoid body contact with earthed or grounded surfaces, such as pipes, radiators, ranges, refrigerators and never operate the tool in the rain. You must also never expose the tool to moisture. Never use the power cable for carrying, pulling or unplugging the power tool. Damaged or entangled cables can increase the risk of electric shock. For this reason keep the power cable away from heat, oil, sharp edges or moving parts. Personal safety Stay alert, watch what you are doing and use common sense when operating a power tool. Do not use a power tool while you are tired or under the influence of drugs, alcohol or medication. A moment of inattention while operating power tools may result in serious personal injury. 4 The operation of any power tool can result in foreign objects being thrown into your eyes, which can result in severe eye damage. Before beginning tool operation, always wear safety goggles or safety glasses with side shields and a full-face shield when needed. We recommend the use of a Wide Vision Safety Mask for use over glasses or standard glasses with side shields. Always wear eye protection which conforms to ANSI Z87.1. To prevent the risk of injury, you must also wear non-slip safety shoes, hardhat, earmuffs and dust mask when required. Do not wear loose clothing or jewellery when operating the tool as they could become caught in the moving parts. If you have long hair tie it back above shoulder height. Avoid accidental starting. Ensure the On / Off switch is in the off-position before inserting the battery. Carrying the machine with your finger on the switch or inserting the battery in the machine that has the switch on invites accidents. To maintain full control of the tool, keep a proper footing at all times with your weight evenly balanced over both feet and never overreach. To maintain full control keep the handle dry, clean and free from oil and grease. Power tool use and care Do not force the power tool to do jobs for which it was not intended. The correct power tool will do the job better and safer at the rate for which it was designed. Do not use the power tool if the power switch is faulty. Any power tool that cannot be controlled with the switch is dangerous and must be repaired. To prevent the risk of accidentally starting the tool, remove battery before making any adjustments, changing accessories, or storing the tool. Power tools are dangerous in the hands of untrained users. When not in use store the tool out of the reach of children and do not allow persons unfamiliar with the tool (or these instructions) to operate it. To prevent the risk of accidents, periodically check the tool for misalignment, binding of moving parts, breakage of parts and any other condition that may affect the operation of the power tool. Keep cutting tools clean and sharp. Properly maintained cutting tools with sharp cutting edges are less likely to bind and are easier to control. Use the power tool and accessories in accordance with these instructions, taking into account the working conditions, and the work to be performed. Use of the power tool for jobs for which it was not intended could result in injury. To ensure that the power tool is safe, have it serviced at your authorized service agent using only identical replacement parts. Special safety warning for this product Only use this tool in daylight or good artificial light. When in use, keep all parts of your body away from the cutting blade. Do not remove cut material or hold material to be cut when the blades are moving. Make sure the battery is removed when clearing jammed material. A moment of inattention while operating the machine can result in serious personal injury. Carry the tool by the handle with the cutter blade stopped. When transporting or storing the tool, always fit the blade guard. Proper handling of the machine will reduce possible personal injury from the blades. Only switch the motor on when your hands and feet are away from the cutting blades. Always remove the battery whenever the following conditions apply: 5 Whenever leaving the tool unattended. Before clearing a blockage. Before checking, cleaning or working on the unit. After striking a foreign object. Whenever the tool starts vibrating abnormally. Always ensure that the ventilation openings are kept clear from debris. Battery / Battery charger safety warnings To prevent the risk of electric shock, protect the battery charger from rain and moisture. Recharge the battery only with the charger provided. A charger that is suitable for one type of battery pack may create a risk of fire or explosion when used with another battery pack. The battery may not take a charge when used with another type charger. The supplied battery charger is only suitable for charging the hedge trimmer and to prevent the risk of fire and explosion must not be used for charging any other tool. Before each use, check the battery charger, cable and plug for signs of damage. If the battery charger is damaged, do not use it or attempt to repair it. To prevent the risk of fire, do not operate the battery charger on flammable surfaces (e.g. paper, textiles, etc.) or in combustible environments. If the hedge trimmer is dropped, or subjected to a hard impact, liquid can be ejected from the battery. Should this liquid accidentally contact your skin, immediately flush the area with water as it can cause irritation and even burns. Should the liquid contact your eyes you will also need to seek medical attention. To prevent the risk of short circuit, do not open the battery yourself. To prevent the risk of explosion, protect the battery from heat, such as continuous sunlight or fire. To prevent the risk of explosion, do not short-circuit the battery. If the battery becomes damaged due to improper use, vapor may be emitted. Should this happen get fresh air and consult a doctor should any respiratory complaint develop. Delivered Items Carefully remove the tool from its packaging and check that these contents are included: - Hedge trimmer with blade assembled - Hand guard - affixed - Front handle - Blade transportation guard. (fitted on the hedge trimmer blade) - Lithium-ion Battery Pack - Battery charger - Operating instructions Product Specifications Item Battery pack voltage Battery pack capacity Battery type HTLI-10 DC 18V 1300mAH Lithium-ion 6 No load speed Blade Length Cutting length Tooth spacing: Max cutting capacity Noise power level LWA Noise pressure level LPA Vibration on front handle Vibration on rear handle Charger (adaptor) input Battery Charging time 1100rpm 525mm (20.6”) 508mm (20”) 15 mm (0.60”) 12mm (0.47”) 83.4 dB (A) 63.4dB (A) 0.955m/s2 1.12m/s2 AC110V,60Hz 1 hour Before Use Caution! The charger must only be operated in dry rooms Only use the battery charger indoors. The battery should be fully charged before using for the first time. The charging time is about 1 hour. The battery charger supplied matches the lithium battery pack supplied and you must not use any other charger to recharge the battery pack. The battery may not take a charge when used with another type charger. To protect the lithium battery against deep discharging, when the battery is empty the tool will automatically switch off via a protective circuit. The blades will stop moving and a slight whistling sound will be heard. Do not continue to press the On / Off switch after an automatic shut-off of the machine. The battery can become damaged. Fig1 Fig. 2 Fig. 3 Fig. 4 7 Charging Procedure (Fig. 1,2,3,4) Battery can be charged outside the machine (Fig.1) or on the machine (Fig 2-3). It is recommended to charge the battery pack outside the machine, If charging on the machine, the switch will lose function and machine cannot be started during charging process. 1. Open the rubber cover to see charging inlet (16) on the battery pack. (Fig.4) 2. Insert the charger cable into charging inlet (16). (Fig.3) 3. Making sure the wall outlet in your home is normal household voltage (AC110V, 60Hz) insert the battery charger plug into the mains power supply. 4. There is an LED charging indicator on the battery charger. One is red and the other is green. The red LED charging indicator (18) on the charger lights up to tell you that the battery pack is low on charge. The battery is fully charged when the red LED charging indicator lights up GREEN (18). Use the rubber cover to close the charging inlet.(Fig.4) During the charging process, the surface of the battery will warm up, but this is perfectly normal. When not using the tool for extended periods, disconnect the charger. Only charge the battery between 10º- 45ºC (50˚ – 113˚F) After prolonged use, allow battery to cool down before recharging. Store batteries indoors at room temperature during extreme cold conditions. Assembly For Your Safety Remove battery before any adjusting or cleaning and before leaving the machine unattended for any period. Do not insert the battery until the hedge trimmer is completely assembled. The blades continue to move for a few seconds after the cordless trimmer is switched off. Do not touch the moving blades. Ensure that the cordless trimmer is assembled in the following order: 1. Fitting the Front Handle The front handle must be assembled before use: Make sure the lock spanner (10) is in the unlock position. Unscrew the locking bolt (9) of the front handle with screw driver (not supplied) and pull it out . (Fig.5-6) Fig. 5 Fig. 6 8 Attach the front handle to the main housing as illustrated in Fig.7, Make sure the lock spanner (10) is at the right side before attaching the front handle otherwise the front handle cannot be aligned with the housing. (Fig.7) Check to confirm the front handle is firmly secured. If not, retighten the locking bolt (9). Adjust the front handle to the required position and close the lock spanner (10). Fig. 7 2. Inserting or Removing Battery pack Hold battery pack with one hand and insert the battery pack to the chute and slide the battery pack down as shown in Fig 8; with a “click” the battery pack will be fitted correctly. Make sure the Lock / Release button (5) for the battery pack is at the lock position and that the battery pack is engaged. Release the battery pack by pressing the Lock / Release button (5) with one hand and pull out the battery pack with the other hand as shown in Fig 9. Fig. 8 Fig. 9 Adjustments On This Product 1. Adjustment on the rear handle. (Fig 10-11) The rear handle can be rotated in 5 steps from 90º, 45 º, 0 º to -45 º, -90º to get the desired position. (Fig.10-11): 1. Push the button for rotary handle (3) backwards, 2. Rotate the rear handle into the desired position .(Fig.11 ) 3. Release the button and make sure it engages. Then the handle is fixed. The machine can‟t be switched on during the adjustment of the rear handle. Fig. 10 Fig. 11 9 2.Adjustment of the front handle (Fig.12-13) The front handle can be set in three positions. Release the lock spanner to adjust the front handle to the most comfortable position. Then close the lock spanner to lock it in that position. Caution: Ensure you support the weight of the hedge trimmer before you adjust the front handle. Fig.12 Fig.13 Starting and Stopping 1. Starting and Stopping (Fig.14) Before starting your hedge trimmer, REMOVE blade guard from blade. Starting: Press and hold the On / Off switch on the rear handle and the On / Off switch on the front handle (6) at the same time. Stopping: Release either of the On / Off switches. Fig. 14 10 Operating Instructions This cordless hedge trimmer is designed exclusively for cutting garden hedges in your private domestic gardens. Please note that this tool is not designed for commercial, trade or industrial use. Only use this product for the purpose specified in these instructions. Any other use will void the guarantee. For Your Safety: Warning! Personal Injury and Damage! Keep your hands and feet away from the cutting tool, especially when the products are switched on! Never switch on the product while you are adjusting the handle. Remove battery before adjusting or cleaning and before leaving the machine unattended for any period. Caution! Do not touch the moving blades. Important! Any use which is not expressly permitted in the manual may result in damage to the machine and place the user in serious danger. Please carefully read the restrictions in the safety instructions. Important! Before each use, check for damaged / worn parts and especially check the blade for proper alignment. Cutting hedge Before cutting, check the hedge for foreign objects e.g. wires. When using the too, hold it away from yourself and stand in a secure position with your weight evenly balanced over both feet. Cuts stems up to 15 mm (5/8”) in thickness. When cutting, move steadily along the line of cut so that stems are fed directly into the cutter blades. The double edge cutting blade enables cutting in either direction or with a side to side motion. Cut the sides of the hedge first and then the top. To keep the sides flat, cutting upwards with the growth is recommended. Younger stems tend to move outwards when cutting them from top to bottom, resulting in shallow patches or holes in the hedge. To reach a level finish, fasten a piece of string along the length of the hedge at the required height and use as an alignment guide. Cut the hedge just above the string. After use, replace the blade transport guard. 11 Maintenance Blades can cause injury. Remove battery from the machine during maintenance work. Note: To ensure long and reliable service, regularly carry out the following maintenance: Check for obvious defects such as loose, dislodged or damaged blades, loose fittings and worn or damaged components. Check that covers and guards are undamaged and correctly fitted. Carry out necessary maintenance or repairs before using. If the hedge cutter should happen to fail despite the care taken in manufacturing and testing, repair should be carried out by an authorized service agent. Blade Maintenance Blades can cause injury. Remove battery from the machine during maintenance work. Never clean the hedge blades in water (especially running water), as there is a risk of personal injury and damage to the blades Wear gloves when handling or cleaning the cutting blade To obtain good cutting results, always make sure the blades are sharp and clean them from time to time with a soft, dry cloth. Always clean the cutting blades after operation and lubricate with protective spray. During longer cutting jobs, we recommend periodically lubricating the cutting blade with protective spray. Visually check the condition of the cutting edges of the cutting blades. Check tightness of blade bolts. Ensure that the blade is covered with the blade guard (supplied) when storing. Cleaning / Storage Remove the battery from the machine during storage. Take care not to short the battery terminals with metallic objects. Clean the exterior of the machine thoroughly using a soft brush and cloth. Do not use water, solvents or polishes. Remove all debris, especially from the ventilation slots. Always lubricate the cutting blade with protective spray before storage. After use, cover the blades with the guard provided. Charge the battery 1 hour before storing. 12 During storage, charge the battery at least once every three months to protect it from damage. Store the machine in a dry, secure place out of reach of children. Do not place any other objects on top of the machine. The machine must not be stored over 35ºC (95ºF)or under direct exposure to sunlight. Do not store the machine in places with static electricity. Waste electrical products should not be disposed of with household waste. Please recycle where facilities exist. Check with your Local Authority or retailer for recycling advice. This product contains a lithium-ion battery. Do not dispose battery packs / batteries into household waste, water or fire. Battery packs / batteries must be collected, recycled or disposed of in an environmentally friendly way. Please dispose of them properly at a public recycling Due to continuous product improvement, we reserve the right to change the product specification without prior notice. Colors and contents may vary. Batteries are Li-ION rechargeable batteries and therefore must be disposed of in accordance with waste disposal regulations. Return defective batteries to your dealer for disposal. Batteries must be removed from the appliance before it is scrapped. • Batteries are best suited for battery-powered electric appliances, according to the state of the art. Li-ION batteries are harmful to the environment if disposed of with other household waste. Guarantee terms Please carefully retain the proof of purchase. The company provides a guarantee for 12 months from the date of purchase. This guarantee is in accordance with the relevant state of technology and the utilization purpose / area of application. The consumer„s statutory rights are not affected by the following guarantee guidelines. Pre-conditions for the 12-month guarantee entitlement: - Deployment of the device solely for private use. - Proper handling and observance of all information given in the operating manual, which forms part of our guarantee terms. - Observance of the prescribed maintenance intervals. - No unauthorized alteration of the design. - Installation of original replacement parts / accessories. - Presentation of the proof of purchase. 13 This guarantee does not extend to normal wear and tear on blades or blade mounting components. Any guarantee claim shall be immediately void in the event of unauthorized repairs. Faults and defects which can be traced to material or manufacturing faults will be rectified exclusively by our contracted service agents (the seller has the right to remedy a defect) in your vicinity or by the manufacturer if the latter is closer. Any claims going beyond the provision of a guarantee are ruled out. There is no entitlement to a replacement. Any transport damage should be reported to the shipper. FOR PRODUCT SERVICE UNDER WARRANTY CONTACT: AMERICAN WARRANTY SERVICES AT 1-866-393-3968 14