1
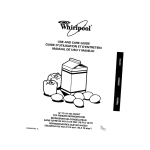
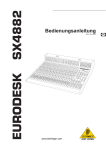
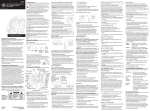
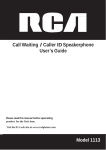
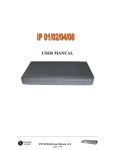
FP1355 Speakerphone Telephone with Answer Machine For more exciting new products please visit our website: Australia: www.uniden.com.au New Zealand: www.uniden.co.nz FP1355 OM.indd 1 22/9/11 9:23:37 AM Important Safety Instructions! CAUTION: WARNING: TO PREVENT FIRE OR ELECTRICAL SHOCK HAZARD, DO NOT EXPOSE THIS PRODUCT TO RAIN OR MOISTURE. RISK OF ELECTRIC SHOCK DO NOT OPEN THE LIGHTNING FLASH AND ARROW HEAD WITHIN THE TRIANGLE IS A WARNING SIGN ALERTING YOU OF “DANGEROUS VOLTAGE” INSIDE THE PRODUCT. CAUTION: TO REDUCE THE RISK OF ELECTRIC SHOCK, DO NOT REMOVE COVER (OR BACK). NO USER SERVICEABLE PARTS INSIDE. REFER SERVICING TO QUALIFIED SERVICE PERSONNEL. THE EXCLAMATION POINT WITHIN THE TRIANGLE IS A WARNING SIGN ALERTING YOU OF IMPORTANT INSTRUCTIONS ACCOMPANYING THE PRODUCT. SEE MARKING ON BOTTOM / BACK OF PRODUCT When using your telephone equipment, always follow basic safety precautions to reduce the risk of fire, electric shock, and injury to persons, including the following: This unit is NOT waterproof. DO NOT expose it to rain or moisture. Do not use this unit near water, for example, near a bath tub, wash bowl, kitchen sink or laundry tub, in a wet basement, or near a swimming pool. Avoid using a telephone (other than a cordless type) during an electrical storm. There may be a remote risk of electric shock from lightning. Do not use the telephone to report a gas leak in the vicinity of the leak. Use only the power cord and batteries indicated in this manual. Do not dispose of batteries in a fire. They may explode. Check with local codes for possible special disposal instructions. Do not place the handset in any charging cradle without the battery installed and the battery cover securely in place. Never install telephone wiring during a lightning storm. Never touch uninsulated telephone wires or terminals unless the telephone line has been disconnected at the network interface. Use caution when installing or modifying telephone lines. Never install telephone jacks in wet locations unless the jack is specifically designed for wet locations. SAVE THESE INSTRUCTIONS! 2 FP1355 OM.indd 2 22/9/11 9:23:38 AM TABLE OF CONTENTS Important Safety Instructions!. . . . . . . . . . . . . . . . . . 2 Before You Begin . . . . . . . . . . . . . . 4 Parts Checklist . . . . . . . . . . . . . . . . . . . . . . . . . 4 Desktop . . . . . . . . . . . . . . . . . . . . . . . . . . . . . . 5 Wall Mount . . . . . . . . . . . . . . . . . . . . . . . . . . . 6 Move the Phone. . . . . . . . . . . . . . . . . . . . . . . . . 6 Phone Layout. . . . . . . . . . . . . . . . . . 7 Front . . . . . . . . . . . . . . . . . . . . . . . . . . . . . . . . 7 Back . . . . . . . . . . . . . . . . . . . . . . . . . . . . . . . . 7 Setup Menu. . . . . . . . . . . . . . . . . . . . . . . . . . . . 8 Set the number of Rings to Answer (Ring to answer) . . . . . . . . . . . . . . . 8 Set Incoming Message or Memo Length (Message Length). . . . . . . . 8 Recording Quality (rec: STD LONG ) . . . . . . . . . . . . . . . . . 9 Security Code (remote access) . . . . 9 Display Contrast (contrast) . . . . . . . . 9 Insert 0 (NZ MODEL ONLY). . . . . . . . . . . . . . . 9 Day of Week (Set day). . . . . . . . . . . . . 10 Time and Date (set time/date). . . 10 Factory Reset . . . . . . . . . . . . . . . . . . . . . . . 10 Using Your Telephone. . . . . . . . . 11 Making Phone Calls. . . . . . . . . . . . . . . . . . . . . 11 Answering Phone Calls . . . . . . . . . . . . . . . . . . 11 Parallel Phone Detect. . . . . . . . . . . . . . . . . . . 11 Redialing a Number . . . . . . . . . . . . . . . . . . . . . 11 Using the Speakerphone . . . . . . . . . . . . . . . . . . 11 FP1355 OM.indd 3 Adjusting the Volume. . . . . . . . . . . . . . . . . . . . 12 Listening Volume. . . . . . . . . . . . . . . . . . . . 12 Muting the Microphone . . . . . . . . . . . . . . . . . . 12 Using the Flash Button . . . . . . . . . . . . . . . . . . 12 Call Waiting. . . . . . . . . . . . . . . . . . . . . . . . . . 12 Using Your Answering Machine. . . . . . . . . . . . . . . . . . . . . . 13 Set Up the Answering Machine . . . . . . . . . . . . . 13 Record the Greeting. . . . . . . . . . . . . . . . . . 13 Review the Greeting . . . . . . . . . . . . . . . . . 14 Auto Disconnect . . . . . . . . . . . . . . . . . . . . . . . 14 Play Messages. . . . . . . . . . . . . . . . . . . . . . . . . 15 Erase Messages . . . . . . . . . . . . . . . . . . . . . . . . 14 Erase a single message. . . . . . . . . . . . . . . 15 erase All Messages. . . . . . . . . . . . . . . . . . . 15 Leave a Memo . . . . . . . . . . . . . . . . . . . . . . . . . 15 Memory Full. . . . . . . . . . . . . . . . . . . . . . . . . . 16 Remote Access. . . . . . . . . . . . . . . . . . . . . . . . . 16 Accessing Your Messages . . . . . . . . . . . . . 17 Message Indicators . . . . . . . . . . . . . . . . . . 17 Using Memory Features. . . . . . . 18 Entering text on your phone . . . . . . . . . . . . . . . 18 Storing a name and Number in Memory . . . . . . . 18 Storing a Redial Number in Memory . . . . . . . . . 19 Erasing a Stored Number . . . . . . . . . . . . . . . . . 19 Copying Caller ID Memories to User Memory. . . 19 Inserting a Pause in the Dialing Sequence . . . . . 20 Changing a Stored Number. . . . . . . . . . . . . . . . 20 3 22/9/11 9:23:38 AM Dialing a Number Stored in Memory . . . . . . . . . 20 if you are On Hook . . . . . . . . . . . . . . . . . . . 20 if you are Off Hook. . . . . . . . . . . . . . . . . . . 20 Reviewing Stored Numbers. . . . . . . . . . . . . . . . 20 Using Caller ID (CID) . . . . . . . . . . 21 Caller ID Display Messages . . . . . . . . . . . . . . . 22 Reviewing CID Records. . . . . . . . . . . . . . . . . . . 22 Dialing Back. . . . . . . . . . . . . . . . . . . . . . . . . . 23 Deleting CID Records. . . . . . . . . . . . . . . . . . . . 23 Storing a Name and Number in Memory . . . . . . 23 Storing a Pause in Memory. . . . . . . . . . . . 24 Changing (DELETING) a Stored Number. . . . . . 24 Copying Caller ID Records to User Memory. . . . 24 Storing a Redial Number to Memory. . . . . . . . . 25 Copying a Redial Number to Memory. . . . . . . . . 25 Dialing Numbers Stored in Memory. . . . . . . . . . 25 Using Chain Dialing. . . . . . . . . . . . . . . . . . . . . 26 Troubleshooting Tips. . . . . . . . . 26 general product care . . . . . . . . 28 One-year Limited Warranty. . . 30 Before You Begin Parts Checklist Make sure your package includes the following items: Base Handset Handset cord Desk stand (might be attached to base) Telephone line AC Power cord Adapter 4 FP1355 OM.indd 4 22/9/11 9:23:39 AM Installing Your Phone If you will be using this unit as a speakerphone, avoid the following locations when selecting an installation location: • Areas with high background noise. The microphone might pick up these sounds and prevent the speakerphone from going into receiving mode when you finish talking. • Surfaces affected by vibration. • Recessed areas such as in a corner, under a cupboard, or next to a cabinet. These locations may cause an echo effect. Desktop CAUTION: To reduce risk of personal injury, fire, or damage, use only the power adaptor supplied with this product. Orient it in a vertical or floor mount position. 1.Plug the coiled cord into the handset. Plug the other end into the jack on the side of the base. 2.Place the handset in the base. 3.Plug the telephone line cord into the LINE jack on the back of the phone. Plug the other end into a wall jack. 4.Connect the small end of the power adaptor into the POWER 9VDC jack on the back of the answering machine. Plug the other end into a standard 240V AC power outlet. The unit announce Press MENU key to set up the unit. The unit is ready for setup or to answer calls with the default greeting and settings. NOTE 1: The unit is properly installed if you pick up the handset and hear a dial tone. Otherwise, recheck all the installation steps. NOTE 2: In the event of a power outage, your phone will still be able to make and receive calls; however, the speakerphone and the answering machine will not be operational. 5 FP1355 OM.indd 5 22/9/11 9:23:41 AM Wall Mount Your speakerphone can also be mounted on a wall plate (not included). NOTE: To prevent the handset from falling out of the cradle while the phone is hanging on the wall, you must switch both the handset hook and the desk stand to their wall-mount positions. 1. On the base front, slide the handset hook out of the slot. Rotate hook 180 degrees and flip it from front to back. Slide it back into the slot. It should extend slightly; this extension fits into a slot on the handset. 2. Turn the base over. Press in on the tabs and remove the desk stand from the base back. 3. Rotate the stand 180 degrees, and insert the hooks marked WALL into the notches marked WALL. Press in on the tabs and snap the stand into place. 4. Connect the telephone line cord to the wall jack and the phone. If desired, wrap any excess cord around the cord hooks. 5. Place the mounting slots over the wall plate pins and slide the base down to lock into place. Move the Phone If you need to move the phone after it has been installed: 1.Disconnect the phone line. 2.Go to the electrical outlet and unplug the power adaptor. 3.Move the unit and phone line to the desired location. 4.Plug the power adaptor into an electrical outlet. 5.The display shows that the messages have not been erased. 6.Connect the phone line. 7.Reset time/date settings or wait for the next call to set them automatically. 6 FP1355 OM.indd 6 22/9/11 9:23:45 AM Phone Layout Front Hook switch Display Speed Dial/Emergency Memory buttons Repeat button (left) Skip button (right) Ringer volume switch Speaker button Play/Stop button Answering machine function keys NOTE: If the key name is spelled out on the key itself, it’s not labeled in this drawing. 12-key dial pad Microphone Back POWER 9VDC LINE 7 FP1355 OM.indd 7 22/9/11 9:23:46 AM Setup Menu When you provide power to the unit, it will announce Press MENU key to set up the unit. An initial setup screen displays with the time and date flashing until they are set. Press MENU to cycle through the following customizable options: 12:00 AM 1/1 00 00 MESSAGES CALLS • Ring to Answer • Contrast • Message Length • Set Day • Recording Quality • Set Time/Date • Remote Access NOTE: To skip to the next setting, press MENU. To exit setup, press EXIT. Set the number of Rings to Answer (Ring to answer) This setting allows you to set the number of rings before the answering machine picks up. You can choose from 2 - 8 rings or Toll Saver. (Default = 4) Toll Saver can save you the cost of a call when you access your messages from another phone. If you have new messages, the phone answers after the 3rd ring. If you have no new messages, the unit answers after the 5th ring. So if the phone rings 4 times (indicating no new messages), you can hang up and avoid any toll charges. 1.Press MENU. The screen displays RING TO ANSWER and announces Setup Menu. Use SKIP to change setting. Press MENU to save settings. 2.Use SKIP or REPEAT to select the number of rings before the answering machine picks up (2-8, Toll Saver). 3.When finished, press MENU to confirm and go to the next setting. Set Incoming Message or Memo Length (Message Length) This option lets you to set the maximum time allowed for an incoming message/memo. You can choose from 1 to 4 minutes. (Default - 2 minutes) 1.Press MENU until the screen displays MESSAGE LENGTH. 2.Use SKIP or REPEAT to select the desired setting (1 - 4). 3.When finished, press MENU to confirm and go to the next setting. 8 FP1355 OM.indd 8 22/9/11 9:23:47 AM m Recording Quality (rec: STD LONG ) This setting allows you to set the recording quality between standard (STD) and long play (LONG). Long play will give more recording time than standard. (Default = Standard) 1. Press MENU until the screen displays REC:4STD LONG. 2. Press SKIP or REPEAT or select the desired setting. 3. When finished, press MENU to confirm and go to next setting. Security Code (remote access) This feature allows you to change the factory default remote access code used for remote access to your answerer. (Default = 123) 1.Press MENU until the screen displays REMOTE ACCESS. 2.The left-most digit or a ( _ ) sign flashes, indicating the unit is ready to accept the security code entry. 3.Use the keypad number to enter a 3-digit security code. 4.After the 3rd and last digit is entered, press MENU to store the security code and go to the next setting. NOTE: If you make a mistake, you can use SKIP or REPEAT to move between 1st to 3rd digit and input a number from keypad again. Display Contrast (contrast) This setting allows you to adjust the display contrast for easier readability. (Default = 3) 1.Press MENU until the screen displays CONTRAST. 2.Use SKIP or REPEAT to select the desired setting (1 - 5). 3.When finished, press MENU to confirm and go to the next setting. INSERT 0 (NZ model only) This setting adds “0” or “00” to the beginning of the number received from Caller ID. (Default = ON) 1.Press MENU until the screen displays INSERT0: 4ON OFF 2.Press SKIP or REPEAT or select the desired setting. 3.When finished, press MENU to confirm and go to next setting. 9 FP1355 OM.indd 9 22/9/11 9:23:48 AM Day of Week (Set day) This setting allows you to set the day of the week. 12:00 1/1 (Default = SUN) 1.Press MENU until the screen displays SET DAY: SUN 00 with SUN flashing. SET DAY: 2.Use SKIP and REPEAT to scroll to the desired day. 3.When finished, press MENU to confirm and go to the next setting. AM 00 SUN Time and Date (set time/date) NOTE: If you have subscribed to the Caller ID feature through your telephone company, the telephone company sends the time and date with the Caller ID information. The unit automatically sets the time and date when the first call is received. This setting lets you set the time of day and the date. (Default = 12:00 AM, 1/1) 1.Press MENU until the screen displays 12:00 AM 1/1 (flashing). 2.Use the keypad to enter the current time in HH:MM 12:00 1/1 format. The curser moves to the AM/PM selection. 3.Press * to indicate AM or # to indicate PM. The curser 00 00 moves to the DATE selection. SET TIME/DATE 4.Use the keypad to enter the date in MM/DD format. 5.When finished, press MENU to confirm and go to the next setting. AM FACTORY RESET This setting resets the unit back to factory settings. 1. Press MENU until the screen displays FACTORY RESET ? YES NO 2. Press SKIP or REPEAT or select the desired setting. 3. When finished, press MENU to confirm. 4. Press EXIT to exit the menu. 10 FP1355 OM.indd 10 22/9/11 9:23:49 AM Using Your Telephone Making Phone Calls 1.Lift the handset or press SPEAKER. Wait for a dial tone. NOTE: When you go off-hook, either through the speakerphone or by picking up the handset, a timer displays. You have 20 seconds to take an action (make a call, press a function key, etc). 2.Dial the telephone number. NOTE: You can also dial the number on the keypad first and then lift the handset/press SPEAKER to dial out. This is called PRE-DIALING. 3.Press + / - to adjust the volume 4.Replace the handset or press SPEAKER to hang up after your conversation. Answering Phone Calls 1.Lift the handset or press SPEAKER to answer the call. 2.Replace the handset or press SPEAKER to hang up. parallel phone detect NOTE: In standby, the display shows LINE IN USE when another phone on the same line is in use. Redialing a Number 1.Press Redial/Pause after you hear a dial tone to redial the last number. NOTE: The Redial feature holds the last number (up to 32 digits) that you dialed in memory. If you pressed any other numbers after dialing the phone number (for example, when accessing a voicemenu system) then those numbers are also dialed. 2.If you get a busy signal, press Redial/Pause again without hanging up. Using the Speakerphone Speakerphone operation is similar to a two-way radio; you can only listen or talk at one time. Stay reasonably close to the phone so that you can be clearly heard by the person to whom you are talking. You can adjust the speaker 11 volume by pressing + or -. FP1355 OM.indd 11 22/9/11 9:23:49 AM When using the handset, press Speaker to activate the speakerphone. The speakerphone indicator light comes on when the speakerphone is in use. Hang up the handset. To return to handset operation, pick up the handset to disconnect the speakerphone (the speakerphone indicator light goes off ). Adjusting the Volume Listening Volume Use the VOL (+ or - ) buttons to adjust the listening volume when playing back messages, reviewing or changing the settings, or listening to calls. These buttons apply to both the speakerphone and handset volume. Ringer Volume Use the switch at the side of the unit to adjust the ringer volume. Muting the Microphone When the phone is off-hook or the speakerphone is on, use MUTE to turn the microphone on and off. 1.Press MUTE. The mute indicator lights up, indicating the microphone is turned off. 2.Press MUTE again. The mute indicator turns off, indicating the microphone is back on. Using the Flash Button Use Flash/Exit to activate special features of your telephone network (such as call transfer), or special services from your local telephone company (such as call waiting). Call Waiting When you get a Call Waiting call, the phone sounds a tone and displays any CID information received for the waiting call. Call Waiting and Caller ID on Call Waiting are services provided by your telephone company. You must subscribe to these services to use these features. 12 FP1355 OM.indd 12 22/9/11 9:23:49 AM For Australian Model: Press FLASH and then press 2 to accept the waiting call. The first caller is put on hold, and you will hear the new caller after a short pause. To return to the original caller, press FLASH and then 2 again. For New Zealand Model: Press FLASH to accept the waiting call. The first caller is put on hold, and you will hear the new caller after a short pause. To return to the original caller, press FLASH again. Using Your Answering Machine When a call comes in, the unit will ring the number of times you determine during initial setup, answer the call and play the greeting, and then record a message from the incoming caller. You can: • Answer the call before the unit answers. • Pick up the phone during the greeting. • Listen to the incoming message to decide if you want to pick up (Call Screening). • Pick up the phone during the incoming message, if desired. • Disconnect the caller by pressing the PLAY/STOP button. • Review your messages from a remote location. Set Up the Answering Machine Personalize your answering machine by recording a greeting for callers. If you don’t record a greeting, callers hear the default greeting: We are unavailable to take your call. Please leave a message. Thank you for your call. Record the Greeting When recording the greeting you should be about 6 inches from the unit. Eliminate as much background noise as possible. 1.Prepare your greeting. Sample Greeting: Hi, this is (your name). I can’t answer the phone right now, 13 FP1355 OM.indd 13 22/9/11 9:23:49 AM so please leave your name, number, and a brief message after the tone, and I’ll call you back. Thanks for calling. 2.Hold down the ANNOUNCE button. The unit announces Record announcement after the tone and the screen displays TO RECORD. After the tone, record a greeting no longer than 1 minute. 3.Release ANNOUNCE when you finish. The phone announces Your announcement is - and plays back your recording. 4.To return to the answering machine’s default greeting after you’ve recorded a greeting, press ANNOUNCE and release it when you hear the tone, or press and hold DELETE when the greeting is playing. Review the Greeting Press and release the ANNOUNCE button to review your outgoing greeting. Auto Disconnect Auto Disconnect is a feature that tells the unit to stop playing the greeting or recording a message when an extension phone is picked up. If the greeting continues to play after picking up an extension phone, press PLAY/STOP. Play Messages Messages can only be played back through the speaker. Use the PLAY/STOP button to play messages. The unit first plays new messages in the order received. If there are no messages, the unit announces You have no messages. If there are no new messages, the old messages are played back. When playing messages, the message number and date-time stamp display. 1.To play messages, press and release PLAY/STOP. 2.To stop playback, press and release PLAY/STOP again. 3.To restart the message that is playing, press the REPEAT button once. 4.To replay the previous message, press the REPEAT button twice. 5.To play skipped messages, press and release SKIP. While playing a message, you can press MESSAGE SPEED to listen to the message playback at a different speed. Each press of the MESSAGE SPEED button changes the message playback speed. The screen displays the current message speed. 14 FP1355 OM.indd 14 22/9/11 9:23:49 AM Erase Messages You can erase either a single message or all the messages, leaving only the Caller ID information. Erase a single message Press and release DELETE while the message is playing,. The unit erases the current message and announces Message erased. erase All Messages You can erase all old messages, leaving new messages and Caller ID information. While the unit is in ready-to-answer mode, press and hold DELETE until the unit announces All old messages erased. NOTE: New messages cannot be erased in this way. To erase new messages, play them and then press DELETE during play back. Leave a Memo Press MEMO to record a specific message for others can access the unit. 1.Press and hold MEMO. The unit announces Record memo after the tone. NOTE: If you press and release MEMO, the unit reminds you to Press and hold MEMO key to record memo. 2.Record your memo after the tone. 3.Release MEMO when you’re finished talking. The unit treats the memo as a message and increases the message counter. The Play/Stop key flashes. NOTE: Memo messages must be longer than 3 seconds. Memo messages shorter than 3 seconds will not be saved. 15 FP1355 OM.indd 15 22/9/11 9:23:49 AM Memory Full When the unit’s memory is full (approximately 45 minutes of messages recorded), it answers after 10 rings and announces Memory is full. A 20-second waiting period follows when you can enter your security code. You can then play your messages and erase some of them to restore memory. If no entry is made during this 20-second period, the phone disconnects the call. Remote Access You can access your answering machine from any touch-tone phone by entering your 3-digit security code. The unit responds with a spoken operations list. Be aware that remote functions do not work with rotary or push-button pulse-dialing phones. Remote Access Commands If you want to Enter this Play messages Repeat messages (during playback) Skip to the next message (during message playback) Erase messages (during message playback) Stop playback (during message playback)ll Turn answering machine on/off Review menu again 2 1 3 0 2 4 7 16 FP1355 OM.indd 16 22/9/11 9:23:49 AM Accessing Your Messages 1.Call your telephone number. 2.Enter your 3-digit security code. You can enter this code any time during the greeting or after the beep. 3.The unit waits for a remote command for 20 seconds after the correct security code has been entered. Menu selections can be made while the menu is playing. NOTE 1: The unit answers on the 10th ring when it is turned off or the memory is full. If memory is full, play messages and erase some of them to restore memory. NOTE 2: After the unit plays the remote menu, it waits 20 seconds for a command and then disconnects. Message Indicators The following display messages indicate message or unit status: 00 CALLS UNKNOWN NUMBER UNKNOWN NAME BLOCKED NUMBER INCOMPLETE DATA START/END MESSAGE Call record log count. The incoming call does not have Caller ID service or their service area is not linked to yours. If UNKNOWN NAME appears along with a calling number, the name information for that number was not available. The name information for that number was not available. The caller is registered as “Private Number” and the Caller ID information is withheld. Caller information has been interrupted during transmission. Indicates you are at the beginning or the end of the call record log. A message has been recorded as a memo. 17 FP1355 OM.indd 17 22/9/11 9:23:49 AM Using Memory Features You can store up to 13 numbers in memory for quick dialing – 3 in the Quick Dial buttons (A, B, and C) and 10 in the keypad numbers (0-9). Each memory location can store up to 32 digits. Entering text on your phone To enter letters on your phone, refer to the letters in the right side of each number key. Press the number key once for the first letter, twice for the second letter, etc. The flashing cursor automatically moves to the next position; you can also press Down to move the cursor to the next position. For example, to enter the name BILL S: 1.Press 2 twice to enter the letter B. 2.Press 4 three times for the letter I. 3.Press 5 three times for the letter L. 4.Press 5 three times for the letter L. 5.To enter the space, press Down twice. 6.Press 7 four times for the letter S. Storing a name and Number in Memory 1. Press STORE. The screen displays LOCATION? 2. Press SKIP or REPEAT to scroll through the memory locations then press 0 - 9, A, B, or C to select one. NOTE: Press DELETE to erase existing entries or if you make a mistake. 3.Press STORE again to confirm the memory location. 4.Use the number keys to enter the telephone number (up to 32 digits) and press STORE to save. (The unit will not dial a phone number in this mode.) The cursor automatically moves to the text line for name entry. 5.Use the number keys to enter the name of the person associated with the telephone number you just entered (up to 12 characters). (Refer to “ENTERING TEXT ON YOUR PHONE.”) 18 FP1355 OM.indd 18 22/9/11 9:23:50 AM 6.Press STORE. To enter another name and number in a different memory location, return to Step 1 and repeat this process. Storing a Redial Number IN Memory 1.Press REDIAL and the screen displays the number. 2.Press STORE. The screen displays LOCATION? 3.Press the desired memory location (0-9, A, B, or C ). 4.Press STORE again to confirm the memory location. 5.Press STORE again to save; you may now enter the contact name. 6. Use the number keys to enter the name of the person associated with the telephone number you just entered (up to 12 characters). (Refer to “ENTERING TEXT ON YOUR PHONE.”) 7.Press STORE to confirm. Erasing a Stored Number 1.Press STORE. 2.Press the memory location (0-9, A, B, or C) to be erased. 3.Press DELETE, then press EXIT or another action key. Copying Caller ID Memories to User Memory 1.Press SKIP or REPEAT to view the caller number and name you want to copy. 2.Press STORE, then press the memory location (0-9, A, B, or C). The number flashes if there is a number already stored in the memory location. 3.Press STORE to enter edit mode; press STORE again to edit the name. NOTE: Select a different memory location by pressing SKIP / REPEAT to scroll through memories or press a number key (0-9) or A, B, or C. 4.Press STORE to confirm and save. NOTE: If the name you want to enter is longer than 12 characters, only the first 12 characters will be copied into memory. 19 FP1355 OM.indd 19 22/9/11 9:23:50 AM Inserting a Pause in the Dialing Sequence Press REDIAL/PAUSE to insert a delay in the dialing sequence of a stored telephone number when a pause is needed to wait for a dial tone (for example, after you dial 9 for an outside line, or to wait for a computer access tone). Each pause is represented as “P” on the display and counts as 1 digit in the dialing sequence. Changing a Stored Number Repeat the storage sequence under “STORING A NAME AND NUMBER IN MEMORY,” but press DELETE to delete old numbers before entering the new number. Dialing a Number Stored in Memory if you are On Hook 1.Press DIAL. 2.To select a stored entry, press any memory location key (0-9, A, B, or C). The number stored in that memory location displays. NOTE: Select a different memory location by pressing SKIP or REPEAT to scroll through the memory locations or press another memory location key (0-9, A, B, or C). 3.When you have found the number you want to dial, press SPEAKER or pick up the handset. if you are Off Hook 1.Press DIAL. 2.To select a stored entry, press any memory location key (0-9, A, B, or C). The number in that memory location displays and is automatically dialed. NOTE: If there are no numbers stored in that location, you must press DIAL again and then another memory location key. Reviewing Stored Numbers 1.Press DIAL. The screen displays LOCATION? 20 FP1355 OM.indd 20 22/9/11 9:23:50 AM 2.Press a memory location key (0-9, A, B, or C ) to review that location’s content. • To dial the displayed number, press SPEAKER or lift the handset. • To exit stored number review, press FLASH/EXIT. • To change the displayed number, press STORE. • Use number keys to enter the telephone number (up to 32 digits) and press STORE to save. (The unit will not dial a phone number in this mode.) The cursor automatically moves to the text line for name entry. • Use number keys to enter the name of the person associated with the telephone number you just entered (up to 12 characters). (Refer to “ENTERING TEXT ON YOUR PHONE”). Using Caller ID (CID) IMPORTANT: To use Caller ID features, you must subscribe to either the standard Name/Number Caller ID Service or Call Waiting Caller ID Service from your telephone service. To know who is calling while you are on a call, you must subscribe to Call Waiting Caller ID Service. This unit receives and displays information transmitted by your local phone company. This information can include the phone number, date, and time; it may also include the caller’s identity. The unit can store up to 75 Caller IDs for later review. When the Caller ID memory is full, a new call automatically replaces the oldest Caller ID information in memory. NEW appears in the display for calls received that have not been reviewed. CID Screen The CID main screen shows the current time, date, and number of new calls (i.e., the number of new calls since the last time the call list was reviewed). It also displays the last incoming phone number. The CID screen displays until any button is pressed. 21 FP1355 OM.indd 21 22/9/11 9:23:50 AM NOTE: The number of new calls displays until all new calls are reviewed. Time Date Status Indicator Message Waiting Area Caller Status (new or repeat) CID Record Number CID Phone Number CID Name Caller ID Display Messages The following messages display for incoming calls. The caller of the incoming call is registered as Private Number and their Caller ID information is withheld. CALL WAITING Indicates a call is waiting on the line. Caller information has been interrupted during transmission INCOMPLETE DATA or the phone line is excessively noisy. NO CALLS The caller memory is empty. NO DATA No Caller ID information was received. START/END You are at the beginning or end of the Caller ID memory log. The incoming call does not have Caller ID service or their UNKNOWN service area is not linked to yours. If UNKNOWN CALLER CALLER appears along with a calling number, the name information for that number was not available. BLOCKED CALL Reviewing CID Records 3.Press SKIP or REPEAT to view the call records. • Press REPEAT (left) to scroll through call records from the oldest to the newest. • Press SKIP (right) to scroll through call records from the newest to the oldest. 2.When all the records have been viewed, START/END appears in the display. 22 FP1355 OM.indd 22 22/9/11 9:23:51 AM Dialing Back When reviewing Caller ID records, you can dial back a displayed number. NOTE: If PICKUP PHONE shows in the display, no other changes to the number can be made (such as adjusting the area code). The information sent from the telephone company is known to be a valid number for dialing back (used only in very limited areas). Once you pick up the phone, the number is automatically dialed. 1.Press either SKIP or REPEAT until the number you want to dial displays. Numbers displaying seven digits (i.e. 555-1234) are within your area code; however, this does not guarantee the call is a local call. A number with 10 or 11 digits (i.e. 1-555-555-1234) is not a local call. NOTE: A timer (10 seconds on-hook and 3 seconds off-hook) located in the upper right side of the display will start, indicating how much time is left until the unit returns to the Summary Screen. 2.Press DIAL. 3.To dial the displayed number while on-hook, pick up the handset or press SPEAKER before the timer reaches 0. Press DIAL. If the phone is off-hook, wait until the timer reaches 0. NOW DIALING displays and the number is dialed. Deleting CID Records 1.To delete the record shown in the display, press Delete once. 2.To delete all records while reviewing, press and hold Delete for about three seconds. DELETE ALL? appears in the display. 3.Press Delete again to complete. Storing a Name and Number in Memory 1.Press Store. LOCATION? displays. 2.Press SKIP or REPEAT to scroll through memory locations (0 to 9 or A, B, or C.) 3.Press STORE again to confirm the memory location. NOTE: Use Delete to erase existing memories or to correct errors. 4.Use the number keys to enter the telephone number (up to 32 digits) and then press STORE to save. (The unit will not dial a phone number in this mode.) The cursor automatically moves to the text line for name entry. 23 FP1355 OM.indd 23 22/9/11 9:23:51 AM 5.Use number keys to enter the name of the person associated with the phone number you just entered. See “ENTERING TEXT ON YOUR PHONE.” NOTE: The flashing cursor automatically moves to the next position or you may press SKIP or REPEAT to move the cursor to the next position 6.Press Store to save the name. 7.To enter another name and number in a different memory location, return to Step 1 and repeat this process. Storing a Pause in Memory The Redial/Pause button has dual functionality and becomes a pause button when pressed in sequence after the Store button. It is valid only when storing a number into memory locations. Use the Redial/Pause button to insert a pause when a delay is needed in an automatic dialing sequence (for example, when you must dial a 9 to get an outside line or when you enter codes to access your long distance company). NOTE: A pause is 3 seconds in length and you can store more than one if a longer pause is needed. Changing (DELETING) a Stored Number To change a stored number, you must delete it and then enter a new number. 1.Press Store. 2.Press the memory location (0 - 9, A, B, or C) to be erased. 3.Press Delete, then press Store. A flashing curser indicates that the unit is ready for you to enter a new number. Follow the steps from Step 4 of “STORING A NAME AND NUMBER IN MEMORY.” Copying Caller ID Records to User Memory 1.Press SKIP or REPEAT to view the caller number and name you want to copy. 2.Press Store. 24 FP1355 OM.indd 24 22/9/11 9:23:51 AM 3.Press a memory location button (0 - 9, A, B, or C). The number flashes if there is a number already stored in that memory location. 4.Press Store to enter Edit mode, and then press Store again to edit the name. NOTE: Select a different memory location by using SKIP and REPEAT to scroll through 0 - 9 or quick call buttons A, B, or C. 5.Press Store to confirm and save. Wait three seconds to exit. NOTE: If the name you want to enter is longer than 12 characters, only the first 12 characters will be copied into memory. Storing a Redial Number to Memory 1.Press Store. 2.Press a memory location button (0 - 9, A, B, or C) for the memory location. If a number is already stored in the memory location, it will appear on the display. Use SKIP or REPEAT to select a different location. 3.Press Store again to confirm. 4.Press Redial/Pause, and then press Store again. 5.Enter the name, if necessary, and then press Store to confirm. Copying a Redial Number to Memory 1.Press Redial/Pause while on-hook. Redial number will display along with PICKUP PHONE. 2.Press Store. 3.Press a memory location button (0 - 9, A, B, or C). If there is a number already stored in the memory location, it will appear on the display. Use the SKIP or REPEAT buttons to select a different location. 4.Press Store twice. 5.Enter name, if necessary, and then press Store again to confirm and save. Dialing Numbers Stored in Memory 1.Whether you are on-hook or off-hook, press Dial. LOCATION? displays. 2.Press a memory location button (0 - 9, A, B, or C) or use SKIP or REPEAT to scroll through stored memory locations to find the desired number. • If you are off-hook, the number is dialed immediately. 25 FP1355 OM.indd 25 22/9/11 9:23:51 AM • If you are on-hook, the number in that location displays along with PICKUP PHONE. Press SPEAKER or pick up the handset to dial the displayed number. Using Chain Dialing This process allows you to dial a succession of stored numbers from separate memory locations. This is useful when you must dial a sequence of numbers, such as with frequent calls via a telephone company long distance provider. Is Stored In The Number For . . . Memory Location . . . Local access number of long distance company 6 Authorization code (ID) 7 Long distance phone number 8 1. Pick up the handset or press SPEAKER. 2.Press Dial, then press 6 for the long distance company access number. 3.Press Dial, then press 7 for the authorization code. 4.Press Dial, then press 8 for the long distance number to be called. 5.The number dials automatically. Troubleshooting Tips Problem Telephone No Dial Tone Phone Does Not Ring Resolution Check all cabling to make sure that all connections are secure and undamaged. Check hook switch: Does it fully extend when handset is lifted from cradle?. Make sure ringer switch is ON. You may have too many phones on one line. Try unplugging some extension phones. Check for dial tone. See Troubleshooting Tips for No Dial Tone. 26 FP1355 OM.indd 26 22/9/11 9:23:51 AM Problem Low Handset or Speaker Volumes Can’t Be Heard by Other Party Resolution Check the volume settings. Verify the phone cord is securely plugged in. Make sure the MUTE function is off. Make sure you entered the numbers correctly. (See Memory Dialing “MEMORY” section.) Are you subscribed to Caller ID service from your local No Information is Shown telephone company? After the Phone Rings Be sure to wait until the second ring before answering. Answering Machine Make sure the answering machine is turned on. Check for a full memory; erase messages if needed. Check AC power and phone line connections. Was an extention phone picked up? Incoming Messages are The caller left a message that is longer than the message Incomplete length you set during setup. Memory is full. Must use a touch-tone phone. Won’t respond to remote Must enter the correct security code. commands Did the unit hang up? If no action is taken over a certain period of time, the unit automatically hangs up. Answering Machine Unplug the power cord from the electrical outlet and plug Won’t Work it back in to reset the unit. Screen displays FLASH Unplug the unit and plug it back in. If this message ERROR after the unit is appears again, it needs servicing. plugged in Can’t Hear Messages Adjust the volume control. Greeting continues This is a normal operation. Auto connect is delayed for playing after extention 1 second after the unit answers a call. If you are near the phone is picked up. unit, press PLAY/STOP to stop the greeting. Doesn’t answer or answers on 10th ring 27 FP1355 OM.indd 27 22/9/11 9:23:51 AM Problem Resolution Wait until after the SECOND ring before answering. Check all cabling to make sure all connections are secure No information is shown and not damaged. after the phone rings. Do you have Caller ID service from your local telephone company? ERROR displays if the unit detects anything other than valid Caller ID information during the silent period after ERROR messge displays the first ring. This message indicates either the presence of noise on the line or that an invalid message has been sent from the telephone company. General Product Care • Do not place near heating appliances or devices that generate electrical noise (for example, motors or fluorescent lamps). • DO NOT expose it to direct sunlight or moisture. • Handle it carefully. • Clean it with a soft cloth. • Never use strong cleaners or abrasive powders: they will damage the finish. • Retain the original packaging in case you need to ship it at a later date. 28 FP1355 OM.indd 28 22/9/11 9:23:51 AM 29 FP1355 OM.indd 29 22/9/11 9:23:51 AM One-year Limited Warranty UNIDEN FP1355 IMPORTANT Satisfactory evidence of the original purchase is required for warranty service Please refer to our Uniden website for any details or warranty durations offered in addition to those contained below. Warrantor The warrantor is either Uniden Australia Pty Limited ABN 58 001 865 498 (“Uniden Aust”) or Uniden New Zealand Limited (“Uniden NZ”) as the case may be. Terms of Warranty Uniden Aust/NZ warrants to the original retail purchaser only that the FP1355 (“the Product”), will be free from defects in materials and craftsmanship for the duration of the warranty period, subject to the limitations and exclusions set out below. Warranty Period This warranty to the original retail purchaser is only valid in the original country of purchase for a Product first purchased either in Australia or New Zealand and will expire one (1) year from the date of the original retail sale. If a warranty claim is made, this warranty will not apply if the Product is found by Uniden to be: (A) Damaged or not maintained in a reasonable manner or as recommended in the relevant Uniden Owner’s Manual; (B) Modified, altered or used as part of any conversion kits, subassemblies or any configurations not sold by Uniden Aust or Uniden NZ; (C) Improperly installed contrary to instructions contained in the relevant Owner’s Manual (D) Repaired by someone other than an authorized Uniden Repair Agent in relation to a defect or malfunction covered by this warranty; or (E) Used in conjunction with any equipment, parts or a system not manufactured by Uniden. Parts Covered This warranty covers the Product and included accessories. User-generated Data This warranty does not cover any claimed loss of or damage to user-generated data (including but without limitation phone numbers, addresses and images) that may be stored on your Product. Statement of Remedy If the Product is found not to conform to this warranty as stated above, the Warrantor, at its discretion, will either repair the defect or replace the Product without any charge for parts or service. This warranty does not include any reimbursement or payment of any consequential damages claimed to arise from a Product’s failure to comply with the warranty. Our goods come with guarantees that cannot be excluded under the Australian Consumer Law. You are entitled to a replacement or refund for a major failure and for compensation for any other reasonably foreseeable loss or damage. You are also entitled to have the goods repaired or replaced if the goods fail to be of acceptable quality and the failure does not amount to a major failure. This warranty is in addition to and sits alongside your rights under either the COMPETITION AND CONSUMER ACT 2010 (Australia) or the CONSUMER GUARANTEES ACT (New Zealand) as the case may be, none of which can be excluded. 30 FP1355 OM.indd 30 22/9/11 9:23:52 AM Procedure for Obtaining Warranty Service Depending on the country in which the Product was first purchased, if you believe that your Product does not conform with this warranty, you should deliver the Product, together with satisfactory evidence of your original purchase (such as a legible copy of the sales docket) to Uniden at the addresses shown below. You should contact Uniden regarding any compensation that may be payable for your expenses incurred in making a warranty claim. Prior to delivery, we recommend that you make a backup copy of any phone numbers, images or other data stored on your Product, in case it is lost or damaged during warranty service. UNIDEN AUSTRALIA PTY LTD Service Division 345 Princes Highway, Rockdale, NSW 2216 Phone number: 1300 366 895 Email address: [email protected] UNIDEN NEW ZEALAND LTD Service Division 150 Harris Road, East Tamaki Auckland 2013 Phone number: (09) 273 8377 Email address: [email protected] 31 FP1355 OM.indd 31 22/9/11 9:23:52 AM © 2011 Uniden Australia Pty Ltd/Uniden New Zealand Limited Printed in PRC FP1355 OM.indd 32 22/9/11 9:23:52 AM