1
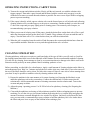
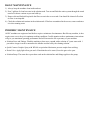
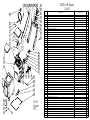
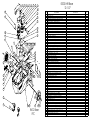
OPERATIONS MANUAL
& PARTS LIST
BX12, BX12H
Fastracts Extractor
IPC Eagle • 3650 Dodd Rd, Eagan MN 55123 • 800.486.2775 • www.ipceagle.com
BEFORE OPERATING THE MACHINE
Read the manual carefully and completely before attempting to operate the unit. This manual has important
information for the use and safe operation of the machine. Keep this manual handy at all times. This machine
will assure years of satisfactory service if operated and maintained according to recommendations in this
manual. If additional information is needed, please contact your local distributor or write to:
IPC EAGLE
3650 Dodd Rd.
Eagan, MN 55123
WARNING
•
The machine was designed for use on carpet, floor and upholstery extraction applications as per instructions
and recommendations written in this manual. Any deviation from its proper use or purpose and the
consequential damage that may occur is the sole responsibility if the end user.
Disconnect the power cord from the outlet before servicing. Do not leave machine connected to an electrical
outlet when unattended.
Do not immerse or use this machine in standing water. Such use may cause electric shock.
This equipment is not designed to handle or use combustible/volatile substances such as gasoline or
kerosene, in, on, or near the machine. The use of such materials will cause extreme hazardous condition.
When using an extension cord, use only a 3-prong conductor grounding cord- 12 ga. wire or heavier.
To avoid electric shock, do not expose the unit to rain. Store it indoors only.
Do not use the machine for dry vacuuming.
Use defoamer at all times to prevent damage to the vacuum motor(s).
Do not use water in excess of 170ºF (76ºC).
To prevent seal damage and chemical build-up to the pump system, run clean water through the solution
lines after each day’s use.
Use only commercially available carpet cleaning solutions and defoamer intended for use with machines of
this type. Do not use dyes, bleaches, ammonia, or other additives. The use of powdered cleaning solution if
not diluted properly may result in damage to the pump. If powdered chemicals are used, premix in a
separate container before placing in the solution tank.
Do not expose machine to freezing temperatures.
All repairs must be done by an authorized IPC repair station.
Do not use replacement parts other than those specified on the parts list.
•
•
•
•
•
•
•
•
•
•
•
•
•
For units with HEAT’N’RUN heater:
•
•
•
•
•
•
•
Read and understand the HEAT’N’RUN owners manual before using the HEAT’N’RUN heater on your
FASTRACT Extractor.
Do not run heater dry.
Water hookups must be in place and water flowing through the heater prior to turning it on. Failure to do so
may cause internal component damage and will void warranty
Heater must be filled with water or water based solutions at all times when in use. Turn off the switch and
unplug the heater from outlet when not in use.
Do not use heater at more than 500 PSI
Do not immerse heater in water
To avoid explosion and / or fire, do not use solvents or any flammable liquid in heater.
FAILURE TO COMPLY WITH THE ABOVE WARNING INSTRUCTIONS WILL VOID THE WARRANTY
GROUNDING INSTRUCTIONS
The120V A/C and the 220V A/C models have been outfitted with the appropriate grounded connectors. Make
sure the machine is connected to a grounded outlet having the same configuration as the grounded plug. No
adapter should be used with this machine. Any modification to the connectors will void the warranty.
PREPARING THE MACHINE (ALL FASTRACT EQUIPMENT)
IMPORTANT: For all FASTRACT equipment, use only the correct IPC high pressure, high heat wands &
upholstery tools. They are designed to deliver and maintain the correct gallons per minute (GPM), pressure
(PSI) and heat when attached to the FASTRACT pump system. Use of other manufacturer wands can cause
over-wetting of carpet, damage to the pump system (including hose & fittings), lack of pressure and heat.
1) Pour clean solution into the solution tank
2) Slide vacuum hose onto the black hose adapter (located at the back of the machine) and the wand or
upholstery tool.
3) Connect the male end of the solution hose to the wand and the female end to the machine by sliding
knurled collar on the female quick disconnect fitting back. Push the male fitting in and release the
knurled collar until it snaps back.
4) Make sure the drain valve is closed by pushing the T-handle all the way in.
5) Previously shampooed carpets usually have a heavy build-up of old shampoo residue which can cause
the vacuum system to ingest foam and result in damage to the vacuum motor. Remember to add
recommended amount of defoamer to the recovery tank every time you fill the solution tank.
Additional Instructions for FASTRACT with a HEATER:
1) Be sure to fill the solution tank with water before plugging in the machine.
2) Water hookups must be in place and water flowing through the heater prior to turning it on. Failure to do
so may cause internal component damage and will void the warranty.
Spray water through the tool / wand before turning on the heater to assure that there is water
flow.
3) Heater must be filled with water or water based solutions at all times when in use.
4) Plug heater power cord and machine power cord into separate outlets on separate circuits.
5) Turn off the switch and unplug the heater from outlet when not in use.
6) Do not use heater at more than 500 PSI.
7) Turn on heater switch when you are ready to clean.
8) CAUTION: When the green light on the heater is on, the heater is heating. When the green light is off,
the water in the heater tank is up to temperature and the thermostat switch in the heater has turned the
heater off. It will automatically turn on again when the water temperature in the heater has cooled.
DELIVER MAXIMUM HEAT by performing the following SYSTEM WARM-UP PROCEDURES at the
start of each day:
1)
2)
3)
4)
5)
6)
7)
8)
Attach the solution hose to the quick disconnect on the machine.
Attach the warm-up quick disconnect with spray tip attached to the other end if the solution hose.
Place warm-up quick disconnect in the solution tank.
Fill solution tank with cleaning solution.
Turn on pump.
When water is flowing out of the warm-up quick disconnect, turn on the heater.
Let the pump and heater run for 4 to 5 minutes.
Remove warm-up quick disconnect. Attach the wand or upholstery tool and begin cleaning.
OPERATING INSTRUCTIONS- CARPET TOOL
1) Turn on the vacuum and solution switches. Slowly pull the tool towards you with the solution valve
trigger engaged. Then make a pass forward and backward with the vacuum only (no spray) over the
cleaned area to remove as much dirt and solution as possible. Do not overwet carpet! Make overlapping
passes to prevent streaking.
2) If the carpet is heavily soiled, squeeze solution valve on the forward pass as well as backwards, allowing
cleaning solution a few seconds longer to work prior to vacuuming. Another method is to raise the wand
8” above the carpet and pre-spray lightly prior to cleaning passes. On extremely soiled carpets, we
recommend using a pre-spray solution.
3) When you run out of solution, turn off the pump. Attach the drain elbow on the drain valve. Place a pail
under the downspout and pull up the drain valve T-handle. Dirty solution will pour out until the tank is
empty. Close the drain valve. Use a clean bucket when you refill the solution tank.
4) When the job is completed, turn the switch off and disconnect the vacuum and solution hoses from the
carpet and the machine. Drain the recovery tank through the drain valve as before.
CLEANING UPHOLSTERY
Cleaning upholstery with success requires a good knowledge of the type of fabric you will work on. Look for
the cleaning instructions label sewn on the underside of the furniture for the recommended method of cleaning.
If it calls for dry cleaning, do not attempt to clean by wet extraction otherwise damage to the fabric could occur.
Extraction works perfectly on most synthetic fabrics including synthetic velvets.
Before proceeding, test the fabric for colourfastness. Apply a small amount of cleaning solution on the fabric in
an inconspicuous spot. Wait 2 to 3 minutes and rub the area with a white terry cloth towel. If no color comes off
the towel, the fabric should be safe to clean. If a little color comes off, there is some risk of colors running when
you clean. It may be possible to stabilize colors by cleaning with an acidic rinse.
1) Prepare the machine in the same manner as for carpet cleaning (see Preparing the Machine) except
attach the upholstery tool to the vacuum hose. Connect the solution hose. Pour hot water into the
solution tank. Add recommended amount of cleaning concentrate into the solution tank. Turn on the
vacuum and pump switches.
2) Adjust the pump “operating pressure” to 50 PSI or below for upholstery cleaning (See Preparing the
Machine).
3) Clean with the upholstery tool using as little solution as possible. Make overlapping passes to prevent
streaking. Go over the area you just cleaned without depressing the lever (vacuum only) and gauge the
amount of moisture extracted through the view window for dryness. On heavily soiled areas like arm
rests, pre-treat with a recommended pre-spray solution or hold the upholstery tool a few inches above
the fabric and press lever to spray on the solution before making a pass.
DAILY MAINTENANCE
1) Always keep the machine clean inside and out.
2) Pour 2 gallons of clean hot water in the solution tank. Turn on and flush the entire system through the wand
nozzles for about a minute to prevent build-up.
3) Remove dirt and lint build-up inside the filter screen in the recover tank. Lint should be cleaned off so that
air flow is not impeded.
4) Check the solution tank strainer in the solution tank. If lint has accumulated in the screen, remove and rinse
it in clear running water.
PERIODIC MAINTENANCE
All IPC machines are engineered and built to require a minimum of maintenance. But like any machine, it does
require some care to keep it in optimum working condition. Careful attention to these maintenance instructions
will give you maximum operating performance and will increase the life expectancy of your machine.
• Solution Lines and Fittings: Flush the machine at least once a month with a solution of 3 parts water with 1
part white vinegar in order to neutralize the alkaline residue left by the cleaning solution.
• Quick Connect Coupler: Spray with WD-40 or equivalent lubricant to prevent coupler from sticking.
• Drain Valve: Apply light oil on gate seals. If machine has to be stored, leave the gate valve open.
• Solution Pump: The same above procedure used on the solution line and fittings applies to the pump.
11 12 13 14 15 16 17 18 19
20
21
22
10
23
24
9
25
8
26
7
27
6
28
5-A
5
5-B
4
5-C
5-D
29
30
3
31
2
32
1
33
34
35
36
50
32
37
38
39
40
41
42
43
48
49
47
46
45
44
BX12
Upper
IPC
ITEM
NO.
1
2
3
4
5
A
B
C
D
6
7
8
9
10
11
12
13
14
15
16
17
18
19
20
21
22
23
24
25
26
27
28
29
30
31
32
33
34
35
36
37
38
39
40
41
42
43
44
45
46
47
48
49
50
2000SX-HR Upper
2-6-08
PART NUMBER
F11787 Solution Tank
F11788 Recovery Tank
F11791 Lid, Solution Tank
E11124 Gasket, Recovery Tank
12904A Stand Pipe Assembly
K11965 Elbow, 180 Deg. Float Ball
K00672 Pvc Pipe, 1.5 X 12 in, Sch 40 Wht
10989-2A Float Ball Screen
K00741 Adapter
F11785 Lid, Recovery Tank
C12039 Washer, 1-4 X 1, SS
C02322 1-4 X 20 Bolt
B11769 Extension Cord, 12-3 SJTW
C11177 Velcro Strap
H02548-2 Label, Important, Cord
B00185-30 Wires, 73 in
B00185-40 Wires, 73 in
B010314 Wire Harness
F11786 Handle
B00177 Terminal Lug, Female, QD, .25 X .032, 16-14 AWG, Fully Insulated
B00185-40 Wire,14 GA Black, UL1015, 5 in
C00295-1 #10 X .75in Pan, Black SMS, Phillips
C00293 #8 X .5in Pan, Black SMS, Phillips
D11168 Cover, Switchplate, Galaxy
B02211-1 Switch, Rocker, Green Light
D010284 Switchplate
E010453 Gasket, Switch Bracket
B00177-1 Terminal Lug, Female, QD, .25 X .032
B00185-30 Wire,14 GA White, UL1015, 5 in
C02315 Lockwasher, #10 Int. Str, SS
C00264 Nut, 10-32
C11141 Screw, Allen Head, 10-24 X 1.25 in
K00665-1 Hose Adapter, 1.5in, Black
E11128 Gasket, Drain Valve
C00313 Hex Bolt, .25 X 20 X .75
C00233 Washer, Flat, .25 in
C02312 Lockwasher, .25 in., Internal Star
D010283 Plate, Heater Mounting
F11804 Heater Mount
C00261 Nut, .25-20, Hex
K00711 Drain Valve, Black
K00710 Elbow, Drain Valve, Black
C00254 Lock Washer, 1-4in Split
C02294 Screw, 1-4 20 X 1.25
K11185 Elbow, 90, 1.5 in, MT-MS, PVC
K00672-1 Pvc Pipe, 1.5 X 2.25 in, Sch 40 Wht
E11129 Gasket, Base
A00060 3-8 Barb X 1-4MP, Brass
A00052 .25 X .375 M-F 90 deg Brass
C11244 Washer, .56 X 1.5 X .05
A00124 Hex Nut, .25 NPT Brass
D00373 Inlet Filter, .25 NPT
C11143 Screw, 1-4 20 X 1.5 in, SS Pan Head, Phillips
S11179 Non-Skid Tape, 1 in. Roll
DESCRIPTION
QTY.
1
1
1
1
1
1
1
1
1
1
2
2
1
1
1
1
1
1
1
2
1
2
2
1
3
1
1
4
1
2
1
8
1
2
6
8
2
1
1
2
1
1
2
2
1
1
1
1
1
1
1
1
2
1
BX12 (UPPER)
ITEM #
1
2
3
4
5
A
B
C
D
6
7
8
9
10
11
12
13
14
15
16
17
18
19
20
21
22
23
24
25
26
27
28
29
30
31
32
33
34
35
36
37
38
39
40
41
42
43
44
45
46
47
48
49
50
PART #
F11275
F11138
F11137
E11124
12904A
K11965
K00672
10989-2A
K00741
F11135
C12039
C02322
B11769
C11177
H02548-2
B00185-30
B00185-40
B010314
F11136
B00177
B00185-40
C00295-1
C00293
D11168
B02211-1
D010284
E010453
B00177-1
B00185-30
C02315
C00264
C11141
K00665-1
E11128
C00313
C00233
C02312
D010283
F11804
C00261
K00711
K00710
C00254
C02294
K11185
K00672-1
E11129
A00060
A00052
C11244
A00124
D00373
C11143
S11179
DESCRIPTION
SOLUTION TANK
RECOVERY TANK
LID, SOLUTION TANK
GASKET, RECOVERY TANK
STAND PIPE ASSEMBLY
ELBOW, 180º FLOAT BALL
PVC PIPE, 1.5 X 12 IN, SCH 40 WHITE
FLOAT BALL SCREEN
ADAPTER
LID RECOVERY TANK
WASHER, 1-4 X 1, SS
1-4 X 20 BOLT
EXTENSION CORD, 12-3 SJTW
VELCRO STRAP
LABEL, IMPORTANT, CORD
WIRES, 73 IN
WIRES, 73 IN
WIRE HARNESS
HANDLE
TERMINAL LUG, FEMALE, QD, .25 X .032, 16-14 AWG, CULLY INSULATED
WIRE, 14 GA, BLACK, UL1015, 5 IN
#10 X .75 IN PAN, BLACK, SMS, PHILIP
#8 X .5 IN PAN, BLACK, SMS, PHILIPS
COVER, SWITCHPLATE, GALAXY
SWITCH, ROCKER, GREEN LIGHT
SWITCHPLATE
GASKET, SWITCH BRACKET
TERMINAL LUG, FEMALE, QD, .25 X .032
WIRE, 14 GA, WHITE, UL1015, 5 IN
LOCKWASHER, #10 INT, STR, SS
NUT, 10-32
SCREW, ALLEN HEAD, 10-24 X 1.25 IN
HOSE ADAPTOR, 1.5 IN, BLACK
GASKET, DRAIN VALVE
HEX BOLT, .25 X 20 X .75
WASHER, FLAT, .25 IN
LOCKWASHER, .25 IN, INTERNAL STAR
PLATE, HEATER MOUNTING
HEATER MOUNT
NUT, .25-20, HEX
DRAIN VALVE, BLACK
ELBOW, DRAIN VALVE, BLACK
LOCKWASHER, 1-4 IN SPLIT
SCREW, 1-4 20 X 1.25
ELBOW, 90, 1.5 IN ST-MS, PVC
PVC PIPE, 1.5 X 2.25 IN, SCH 40 WHITE
GASKET, BASE
3-8 BARB X 1-4MP, BRASS
.25 X .375 M-F 90º BRASS
WASHER, .56 X 1.5 X .05
HEX NUT, .25 NPT, BRASS
INLET FILTER, .25 NPT
SCREW, 1-4 20 X 1.5 IN, SS, PAN HEAD, PHILIPS
NON-SKID TAPE, 1 IN ROLL
QTY
1
1
1
1
1
1
1
1
1
1
2
2
1
1
1
1
1
1
1
2
1
2
2
1
3
1
1
4
1
2
1
8
1
2
6
8
2
1
1
2
1
1
2
2
1
1
1
1
1
1
1
1
2
1
2
1
3
4
5
6
7
8
000SX-HR Base
12-1-07
9
10
66
11
65
12
13
14
15
64
16
63
62
7
20 21 22 23 24 25 26 27
6
61
54
6
56
57
58
59
19
18
60
17
35
34
7
28
22
33
29
30
31
32
15
55
55
36
41 40 39
38
37
42
54
43
53
44
52
46
51
50
7
49 48
47
46 45
BX12 Base
IPC
ITEM
NO.
1
2
3
4
5
6
7
8
9
10
11
12
13
14
15
16
17
18
19
20
21
22
23
24
25
26
27
28
29
30
31
32
33
34
35
36
37
38
39
40
41
42
43
44
45
46
47
48
49
50
51
52
53
54
55
56
57
58
59
60
61
62
63
64
65
66
PART NUMBER
C00297 Screw,#8 X .25 in, Pan Head
J11863 Hose, 3 in
J00639 Screw Clamp, 1.63 - 2.43in.
J00618 Vacuum Hose, 2in Grey, Wire, 22 in lg
F11178-BLK Intercooler, Galaxy, Black
C00273 Locknut, 1-4 X 20, Nylon, SS
C00233 Washer, Flat, .25 in
E00449 Grommet
C00284 Screw, 10-32 X .375 Ground
B11150 Ground Wire, Galaxy
G00537 Vacuum Motor, 82 in, 115 V
J00657 Hose Clamp, 2 inSLDPRT
J00618 Vacuum Hose, 2 in Grey, Wire, 4 in lg
C00254 Lock Washer, 1-4in Split
C00261 Nut, .25-20, Hex
D11134 Vac Plate
C11189 Screw, 1-4 X 20 X 4.5 in, Hex
C11516 Screw, 1-4 X 20 X 4.5 in, Flat Head, Phillips
C02312 Lockwasher, .25 in., Internal Star
G11314 Pressure Regulator, Brass
A00060 3-8 Barb X 1-4MP, Brass
A00052 .25 X .375 M-F 90 deg Brass
A00161 Tee, .25 FP, Brass
A00111 Nipple, .25 in
A00121 Fitting, .25 MP X .25 FP, Brass
C11244 Washer, .5 ID X 1,5 OD
A00104 QD, 1-4 M X 1-4 FP, Brass
A00097A Cap, Inline Filter
A00094E Checkvalve, No Strainer
A00094C Check Valve Body
C02322 Hex Bolt,1-4 X 20 X 1.75 in
D010379 Heater Mounting Plate
C11440 Spacer, Heater Mounting Plate
A00061 3-8 Barb X 1-4FP, Brass
H02564-2 Label, Caution, Motor Housing
C11165, Screw, #8 X 1 in, Pan, Black
F11790 Heater, Tunnel Cover, Blue Granite
B11779 Stub, 12-3 SJTW Yellow
C00293 #8 X .5in Pan, Black SMS, Phillips
B00192 Mount, Nylon Tie
B11606 Strain Relief, Pigtail
K10510 Plug, 1.25 in, Black
H03545 Cover, Serial # Label
H00565-5 Label, Serial Number
C02305 Cap Nut, .5in Push-on
C00240 Washer, Shoulder, Nylon
G11767 Wheel, 10 in
D11170 Axle
F11789 Base
C00314-1 Hex Bolt, 1-4 X 20 X 1in
G03518 Caster, 4 in
J00613B Solution Hose, .375 in, Black
J11508Screw Clamp #6, 7-16 to 7-8in
A00054 Elbow, 90, .375MP X .375B, Nylon
B00191 Nylon Tie, 11in Black
B00190 Nylon Tie, 4in
G00513-100 Pump, 100 PSI, 115 V
D11194 Pump Plate
J00613B Solution Hose, .375 X 26 in, Black
J11154 Solution Hose, .375 X 10 in, Wire Reinforced
A11243 Tee, .375B X .375B X .375B, Nylon
J11154 Solution Hose, .375 X 6 in, Wire Reinforced
J00618 Vacuum Hose, 2 in Grey, Wire, 7 in lg
E11169 Gasket, Vac Motor, Galaxy
B00179-2 Closed End Cntr, 16-3
B00179-1 Closed End Cntr, 16-3
DESCRIPTION
QTY.
1
1
3
1
1
16
26
6
2
2
2
1
1
1
10
1
5
1
1
1
1
3
1
2
1
2
1
1
1
1
4
1
4
1
1
4
1
1
2
1
1
1
1
1
2
4
2
1
1
8
2
1
8
2
4
13
1
1
1
1
1
1
1
2
1
3
BX12 (BASE)
ITEM #
1
2
3
4
5
6
7
8
9
10
11
12
13
14
15
16
17
18
19
20
21
22
23
24
25
26
27
28
29
30
31
32
33
34
35
36
37
38
39
40
41
42
43
44
45
46
47
48
49
50
51
52
53
54
55
56
57
58
59
60
61
62
63
64
65
66
PART #
C00297
J11863
J00639
J00618
F11178-BLK
C00273
C00233
E00449
C00284
B11150
G00537
J00657
J00618
C00254
C00261
D11134
C11189
C11516
C02312
G11314
A00060
A00052
A00616
A00111
A00121
C11244
A00104
A00097A
A00094E
A00094C
C02322
D010379
C11440
A00061
H02564-2
C11165
F11790
B11779
C00293
B00192
B11606
K10510
H03545
H00565-5
C02305
C00240
G11767
D11170
F11139
C00314-1
G03518
J00613B
J11508
A00054
B00191
B00190
G11234
D11194
J00613B
J11154
A11243
J11154
J00618
E11169
B00179-2
B00179-1
DESCRIPTION
SCREW, #8 X .25 IN, PAN HEAD
HOSE, 3 IN
SCREW CLAMP, 1.63-2.43 IN
VACUUM HOSE, 2 IN GRAY, WIRE, 22 IN LG
INTERCOOLER, BLACK
LOCKNUT, 1-4 X 20, NYLON, SS
WASHER, FLAT, .25 IN
GROMMET
SCREW, 10-32 X .375 GROUND
GROUND WIRE
VACUUM MOTOR, 82 IN, 115V
HOSE CLAMP, 2IN SLDPRT
VACUUM HOSE, 2 IN, GRAY, WIRE, 4 IN LG
LOCK WASHER, 1-4 IN SPLIT
NUT, 25-20 HEX
VAC PLATE
SCREW, 1-4 X 20 X 4.5 IN HEX
SCREW, 1-4 X 20 X 4.5 IN, FLAT HEAD, PHILIPS
LOCKWASHER, .25 IN, INTERNAL STAR
PRESSURE REGULATOR, BRASS
3-8 BARB X 1-4MP, BRASS
.25 X .375 M-F 90º BRASS
TEE, .25 FP, BRASS
NIPPLE, .25 IN
FITTING, .25 MP X .25 FP, BRASS
WASHER, .5 ID X 1.5 OD
QD, 1-4 M X 1-4 FP, BRASS
CAP, INLINE FILTER
CHECKVALVE, NO STRAINER
CHECK VALVE BODY
HEX BOLT, 1-4 X 20 X 1.75 IN
HEATER MOUNTING PLATE
SPACER, HEATER MOUNTING PLATE
3-8 BARB X 1-4 FP, BRASS
LABEL, CAUTION, MOTOR HOUSING
SCREW, #8 X 1 IN PAN, BLACK
HEATER, TUNNEL COVER, BLUE GRANITE
STUB, 12-3 SJTW YELLOW
#8 X .5 IN PAN, BLACK SMS, PHILIPS
MOUNT, NYLON TIE
STRAIN RELIEF, PIGTAIL
PLUG, 1.25 IN, BLACK
COVER, SERIAL # LABEL
LABEL, SERIAL NUMBER
CAP NUT, 5 IN PUSH ON
WASHER, SHOULDER, NYLON
WHEEL, 10 IN
AXLE
BASE
HEX BOLT, 1-4 X 20 X 1 IN
CASTER, 4 IN
SOLUTION HOSE, .375 IN, BLACK
SCREW CLAMP #6, 7-16 TO 7-8 IN
ELBOW, .90, .375 MP X .375B, NYLON
NYLON TIE, 11 IN, BLACK
NYLON TIE, 4 IN
PUMP, 100PSI, 115 V
PUMP PLATE
SOLUTION HOSE, .375 X 26 IN, BLACK
SOLUTION HOSE, .375 X 10 IN, WIRE REINFORCED
TEE, .375B X .375B X .375B, NYLON
SOLUTION HOSE, .375 X 10 IN, WIRE REINFORCED
VACUUM HOSE, 2 IN. GRAY, WIRE, 7 IN LG
GASKET, VAC MOTOR
CLOSED END CNTR, 16-3
CLOSED END CNTR, 16-3
QTY
1
1
3
1
1
16
26
6
2
2
2
1
1
1
10
1
5
1
1
1
1
3
1
2
1
2
1
1
1
1
4
1
4
1
1
4
1
1
2
1
1
1
1
1
2
4
2
1
1
8
2
1
8
2
4
13
1
1
1
1
1
1
2
2
1
3