1
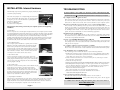
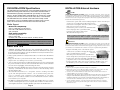
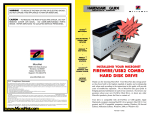
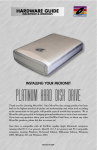
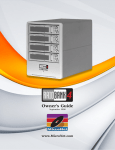
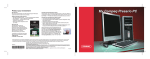
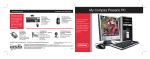
HARDWARE
GUIDE
MACINTOSH & WINDOWS
WARNING - TO REDUCE THE RISK OF FIRE OR ELECTRIC SHOCK,
DO NOT EXPOSE THIS APPLIANCE TO RAIN OR MOISTURE.
CAUTION - TO REDUCE THE RISK OF ELECTRIC SHOCK, DO NOT
REMOVE COVER (OR BACK). NO USER-SERVICEABLE PARTS
INSIDE. REFER SERVICING TO QUALIFIED SERVICE PERSONNEL.
DANGER - THIS DEVICE CONTAINS A CLASS 1 LASER DEVICE.
INVISIBLE LASER RADIATION WHEN OPENED AND INTERLOCK
FAILED OR DEFEATED. AVOID DIRECT EXPOSURE TO BEAM.
GENESIS®
RAID SYSTEMS
P
s X LE!
w
o IB
ind AT
W MP
CO
TM
•
SANCUBE FIREWIRE®
STORAGE AREA
NETWORK
•
RAIDBANK®
RAID TOWERS
•
TM
FIBREFLEX
WORKGROUP
SOLUTIONS
MicroNet
19260 Van Ness Avenue
Torrance, CA 90501
Sales: 310-320-7272
Support: 310-320-0772
•
DATADOCK®
TRANSPORTABLE
STORAGE SYSTEMS
•
www.MicroNet.com
FCC Compliance Statements
MICRONET
ADVANTAGE
SERIES
INSTALLING YOUR MICRONET
ADVANTAGE DUAL RW OPTICAL DRIVE
This equipment has been tested and found to comply with the limits for a Class B digital device, pursuant to Part 15 of the FCC rules. These
limits are designed to provide reasonable protection against harmful interference in residential installation. This equipment generates, uses,
and can radiate frequency energy and, if not installed and used in accordance with the instructions, there is no guarantee that interference
will not occur in a particular installation. If this equipment does cause harmful interference to equipment off and on, the user is encouraged
to correct the interference by one or more of the following measures:
• Reorient or relocate the receiving antenna
• Increase the distance between the equipment and receiver
• Connect the equipment into an outlet on a circuit different from that to which the receiver is connected
• Consult the dealer or an experienced radio/TV technician for help
Thank you for choosing MicroNet! Your MicroNet optical drive has been
built to the highest standard of quality and workmanship and, when used
according to the instructions in this guide, will provide years of troublefree operation. We at MicroNet take great pride in bringing personal satisfaction to each of our customers.
5-27-2003
MNFWUSBCD RevC
The material in this document is for information only and is subject to change without notice. While reasonable efforts have been made in the
preparation of this document to assure its accuracy, MicronetDrives assumes no liability resulting from errors or omissions in this document, or
from the use of the information contained herein.
MicroNet reserves the right to make changes in the product design without reservation and without notification to its users.
MicroNet and the MicroNet logo are registered trademarks of MicroNet. FireWire, the FireWire logo, Macintosh, and the MacOS Logo are trademarks of Apple Computer Inc. Microsoft Windows and the Windows Logo are registered trademarks of Microsoft Corporation.
Your drive is compatible with all FireWire or USB-capable PC-Compatible
computers running Windows 98-Second Edition, Millennium Edition,
Windows 2000, or Windows XP, and include all the necessary software for
your movie and data mastering needs!
Copyright © 1999, 2003 MicroNet. All rights reserved. This publication may not be reproduced, stored in a retrieval system, or transmitted in
any form or by any means, in whole or in part, without the prior written consent of MicroNet, 19260 Van Ness Ave., Torrance CA 90501.
www.MicroNet.com
Revised June 2003
INSTALLATION- Internal Hardware
TROUBLESHOOTING
The following steps must be performed to properly install your drive:
To avoid corruption or loss of data, never disconnect your drive while transferring data
1. Set Drive Jumper Settings
Please Be sure to turn ON your MicroNet Storage Device before connecting it to your computer
The mode select jumpers are 6 straight angle pins located on
the rear of the DVD-R/-RW Combo drive.. By placing a jumper
on the pins, you can select the ATA device operating Mode:
MA: Master, default position
SL: Slave configuration
CS: Cable Select configuration
CSM
S L A
Important Note: Disconnect power from your computer system before beginning
installation.
2. Mount Drive
Remove computer cover and faceplate if required. Refer to your computer system’s manual
for removal information. If the DVD Combo drive is replacing a CD-ROM, remove CD-ROM
presently installed in your system. Place the DVD Combo drive in any free half-height drive
slot at the front of your computer. (It can be mounted horizontally or vertically.)
Carefully start sliding the DVD Combo drive into the opening with the disc tray facing the
front of the computer. Before you push the drive all the way in you will need to connect
the IDE BUS cable, Audio cable and the Power cable on the back of the drive.
3. Attach IDE BUS Cable
Your computer system should have a primary and secondary
IDE BUS, cable with your Hard Drive most likely being the
Master on the primary BUS. Connect BUS cable as follows,
assuring that pin 1 of cable (side with red stripe) is connected
to pin 1 (closest to the power connector) of the DVD Combo
drive's interface connector. Please remember that each BUS
can only have one master and one slave devices.
4. Attach Power Cable
Connect an internal computer power supply cable to the
power socket at the back of the DVD Combo drive. One side
of the plug has chamfered edges, so the power connector fits
only one way. Push plug completely into the socket making
sure the plug fits correctly
5. Attach audio cable
If you have a sound card and speakers, and would like to play
audio CDs on your computer, you will need to install a
CD/DVD audio cable. The sound cable connects to your
sound card at one end and the other end connects to the digital audio connector at the left rear of the DVD Combo drive.
Refer to the instructions that came with your sound card for
details on any sound-driver software required
6. Completing the installation
After you have connected all the necessary cables, push the DVD Combo drive completely
into the computer’s drive slot. Mount drive per your computer’s instructions. The screw
length should not exceed 3±0.5mm (measured from outside surface of side or bottom of
drive to tip of screw). Replace computer cover and all outer screws.
Page 2
My computer will not recognize the drive
Make sure the software for your drive is installed, following the instructions in this manual. Disconnect the drive and power the unit off. Wait 15 seconds, then power your
drive back on. Wait 5 more seconds, then reconnect the drive to your computer system.
When I try to burn CDs, I get a “Sense Key” error or other burning failures
This is usually caused by burning at faster speed than the media allows. Make sure the
media you are writing to is compatible with the speed you are trying to burn. Here are
some suggestions to successful burning: try lowering the burn speed down and if you
are burning to CD-R media; choose “Write CD” option instead of the “Write Session”
option; Increase the Disk buffer size in the CD Burning application.
My DVD burns keep failing. Why?
There are many brands of DVD media, not all of which are compatible with all DVD
mechanisms. Please try a different brand of media, and check with www.MicroNet.com
for the latest compatibility information.
Can I use my USB CDRW/DVD-RW through a USB hub?
Yes, As long as the hub is a powered hub since bus powered hubs do not work with
mass storage devices. For best results, MicroNet recommends running directly off of the
USB port on the computer
The computer will not boot from a FireWire or USB CD
Booting from USB or Firewire is currently supported on some PCs with supported BIOS.
Please check your motherboard’s vendor website for the latest information and updates.
Sonic MediaSuite does not install properly
This could happen for a number of reasons. Try the following solutions:
1. Insufficient permissions on the machine. If you are using a Windows 2000 machine,
you need to have administrative permission to run an InstallShield Professional 6.x
setup. Make sure you have the correct permissions.
2. Check and make sure Ikernel.exe is not in memory. If it is, and setup is not running at the time, end that task.
4. Clean out the Temp directory.
5. Delete the Program Files\Common Files\InstallShield\Engine folder and then rerun the setup.
6. Reinstalling Internet Explorer (IE) 5.x can also repair a number of corrupted/missing core Windows files from your machine, so reinstalling IE 5.x is also suggested.
7. If you are trying to install to a Windows 98 machine, download and run
DCom98.exe from the following site:
http://www.microsoft.com/com/dcom/dcom98/download.asp.
8. Review the readme file on your Sonic MediaSuite CD, located at
\MyDVD\ReadMe\English\Readme.htm
I have a problem not listed on this page
MicroNet offer additional troubleshooting resources on our website at
www.MicroNet.com/support/faqs. If the problem still persists, please call our support
hotline at 310-320-0772.
For additional troubleshooting information please visit our website at
www.MicroNet.com
Page 7
DVD-R/RW+CDRW Specifications
The DVD-RW format is designed as a user recordable format that is compatible with existing DVD environment, which means that data written to
DVD-RW will be physically compatible with your desktop or set-top DVD
players. As with standard DVDs, DVD-RW discs can contain up to 4.7GB
of data per side, and can be used to store video, audio, or user file data.
The DVD-RW format is a member of the DVD Forum’s family of DVD
Specifications, and is a rewriteable medium that allows users to record,
erase, and re-record their own DVD discs more then 1000 times.
Media Support
Media write compatibility:
DVD+/-R 4.7GB Write Once General Use
DVD+/-RW 4.7GB ReWritable General Use
CDR, CDR Media
Read media compatibility:
DVD-ROM single/dual layer
DVD+/-R, DVD+/-RW
CD Media, CDR, CDRW, PhotoCD, VideoCD, CD-Extra, CD-Text.
Important Note: There are many brands of DVD media, not all of which are
compatible with all DVD mechanisms. Please try a different brand of media,
and check with www.MicroNet.com for the latest compatibility information.
DAILY USE TIPS
• Additional application software may have been included with your drive. Please
review the documentation included with this software for information on the operation and support of this software. The documentation can usually be found in an electronic format on the installation CD.
• Always operate your drive on a steady and level surface. Do not move the unit while it is
turned on.
• Plug your drive into a grounded electrical outlet. The use of “ground-defeating”
adapters will cause damage not covered by your warranty.
• You can connect or disconnect your MicroNet Storage Device to your computer while
the power is turned on; however, make sure that no other devices on the connection
are active when “hot-plugging” or disconnecting your device.
• When disconnecting a FireWire drive, always drag its icon to the trash (or select the
“Put-Away” command from the File menu) to remove it from the desktop before
disconnecting the drive.
• MicroNet Hard Disk Drives are compatible with the leading hard disk
repair and defragmentation software. We recommend using this software to maintain peak performance and data-integrity of your drive.
Contact your local software retailer for more information about the software
best suited for your computer.
• The IEEE-1394 standard for FireWire sets a limit of 63 FireWire devices per computer. When connecting directly to your computer, there should be no more than 16
cable lengths between the computer's FireWire port and the last FireWire device.
Page 6
INSTALLATION-External Hardware
USB
ATTENTION WINDOWS 98 USERS: Before connecting your DVD, please insert the
included driver CD Rom and run “TPPINST.EXE”. Please be sure to have your Windows
98 installation CD available as it may be required during installation. Select Complete
Install, and reboot the computer when prompted. This is only required the first time you
install a MicroNet USB Storage Device.
• Connect the square end of the included peripheral cable to the USB port
on the rear of your MicroNet USB Storage Device.
• Connect the rectangular end of the cable to a free Power Switch
Audio Output Jack
USB port on your PC or USB hub.
• Connect the power cable to your USB Hard Disk
Drive and plug it into a grounded outlet. Power Connector
USB2 Port
• Press the power switch to turn on your
MicroNet USB Storage Device.
Note: in order to reach USB 2.0 speeds, you must have a computer or
host adapter that has USB 2.0 support. Your MicroNet storage device
will autosense the highest available connection speed.
Firewire
ATTENTION WINDOWS 98 USERS: Before connecting your DVD, please install the
Microsoft 1394 patch (Microsoft Support Document Q242975.) This update can be downloaded from MicroSoft or from the MicroNet support web page. Please be sure to have
your Windows 98 installation CD available as it may be required during installation.
• Plug the included power cable into the power
connector on your drive and plug the other end Power Switch
Audio Output Jack
Power Connector
into a grounded electrical outlet.
• Press the power switch to turn on your Micronet
Drives storage device, then power-on your computer.
FireWire™ Ports
• Connect one end of the included 6-pin IEEE-1394
peripheral cable to one of the FireWire ports on the rear of your drive.
• Connect the other end to one of your computer’s FireWire ports, or to
the FireWire port on a device already connected to your computer.
Installation
1. Turn on your computer. Wait until startup has completed.
2. Plug in the power on your MicroNet DVD and turn it on. Please make sure that
the Power LED comes on, indicating that the drive is powered up.
3. Connect one end of the IEEE 1394 cable to the drive and the other end to an
available IEEE 1394 port on the computer.
4. Your MicroNet Optical Drive will be automatically detected. If the driver was not installed
during the initial installation (Windows), you may be asked to insert your Windows
installation CD-ROM in your computer’s internal CD/DVD-ROM drive. After Windows is
done with the driver installation, you may be asked to restart your computer.
5. On the Windows desktop, open My Computer. Windows will have assigned a
drive letter and icon for your MicroNet optical drive. Please note the DVD drive
letter for later use.
Page 3
SOFTWARE INSTALLATION
CD/DVD Operation
CD/DVD Controls
Your Fantom Drives optical drive comes with Sonic MyDVD MediaSuite
authoring and archive software included. Sonic MyDVD MediaSuite allows you
master digital video and data alike! In addition to burning video and data, Sonic
MediaSuite supports direct analog and DV video capture with on the fly compression from any WDM compliant capture devices or OHCI IEEE1394 compliant DV capture devices.
Please take a moment to review the Hardware requirements for different mastering applications:
I Want to:
I need:
Create a VCD Movie
A 450 MHz Pentium II or better
Create a DVD Movie
A 700 MHz Pentium III or better
Capture DV in realtime and compress to Mpeg1 A 700 MHz Pentium III or better
Capture DV in realtime and compress to Mpeg2 A 1.7 GHz Pentium 4 or better
Capture DV in realtime and compress to AVI A 450 MHz Pentium II or better
Capture non-real time DV
A 450 MHz Pentium II or better
Sonic MediaSuite consists of:
Sonic MyDVD: The world’s first DVD recording and editing application. It allows you to
record – in real time – from a video source such as a camcorder or VHS deck, and create DVDs or VCDs that will play on set-top and PC-based players. MyDVD also allows
you to create photo slideshows.
ArcSoft Showbiz: Edit videos fully integrated with MyDVD Video Suite. Use the storyboard and timeline editing window to easily add video transitions, special effects and
moving text, even add voice-overs and music to your videos.
Sonic CinePlayer: Truly your ultimate digital theater. It delivers the absolute highest
quality video playback available for your PC in an extremely easy-to-use and intuitive
user-interface. CinePlayer is the first DVD player to support the OpenDVD™ format, making it possible to seamlessly open your OpenDVD project in Sonic MyDVD for further
editing.
Sonic RecordNow: A full featured data archiving and burning software featuring an easy
to use intuitive interface
Installation instructions for Sonic MyDVD Suite are available on the included CD
Page 4
1)
2)
3)
4)
5)
6)
7)
Disc Tray - Auto-loading using the Eject button
Headphone stereo mini-jack
Volume Control
Read/Write Indicator
Ventilation Holes (do not block)
Eject button
Forced Ejection hole
CD/DVD media precautions
• Do not use or store CD/DVD media in dirty or dusty locations; in
locations subject to extreme temperatures; in warm or humid locations where condensation may form; or in locations exposed to
direct sunlight.
• Do not use cracked, warped or damaged CD/DVD media. The
media may break up inside the drive, damaging it and possibly
leading to injury.
• Do not touch or write on the disc surface.
• Do not drop, bend or flex the discs, or place any heavy objects on them.
• Do not apply any labels that may come loose inside the drive.
• Store cartridges in their protective sleeves when they are not being used.
• Do not incinerate CD/DVD media: discs that are no longer used
should be disposed of according to local regulations.
Emergency ejection of DVD and CD media
In the event that a media cannot be ejected with the load/eject button and when no
software is controlling the drive, an emergency eject operation will open the media
tray. Insert a small metal poker, such as an unbent paper clip, into the opening
until it presses against the manual eject mechanism. You will feel the mechanism
eject the media tray. Use this method only when the load/eject button is not working.
Warning! Make sure the drive has been off for a minute or longer, that
the disc has stopped spinning in the drive and that the power is
unplugged before attempting the emergency ejection procedure.
Page 5