1
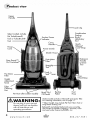
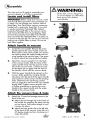
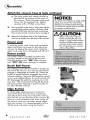
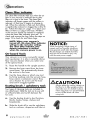
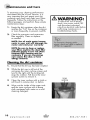
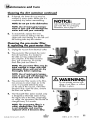
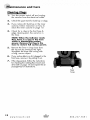
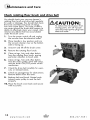
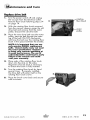
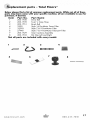
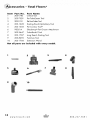
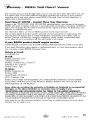
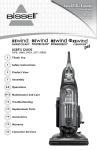
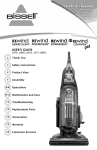
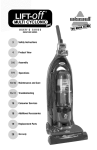
I
|
®
TOTAL FLOORS°
MULTISURFACEJ MULTICYCLONIC
USER'S GUIDE
52C2 SERIES
Thank
You
Safety Instructions
Product View
Assembly
Operations
Maintenance
and Care
Troubleshooting
Replacement
Parts
Accessories
product
images
may vary
Warranty
Product Registration
Consumer
Care
lanks
for
buying
a BISSELL
Total
Floors
® Vacuum
We're glad you purchased a BISSELLTotal Floors ® vacuum. Everything
we know about floor care went into the design and construction
complete,
of this
high-tech home cleaning system.
Your BISSELLTotal Floors ® vacuum is well made, and we back it with a
limited 3-year warranty. We also stand behind it with a knowledgeable,
dedicated Consumer Care department,
so, should you ever have a
problem, you'll receive fast, considerate
My great-grandfather
assistance.
invented the floor sweeper in ] 876. Today, BISSELL
is a global leader in the design, manufacture,
and service of high quality
homecare products like your Total Floors ® vacuum.
Thanks again, from all of us at BISSELL.
Mark J. Bissell
Chairman & CEO
2
www.
b is sell
.com
y_>_,
800.237.7691
SAFETY INSTRUCTIONS
When usingan electricalappliance, basic
precautionsshould be observed, including
the following:
READALL INSTRUCTIONS BEFOREUSING
YOUR UPRIGHTVACUUM.
AWARNING:
T ered. uce the risk. o.f tim,
ctrmcshock, or mnlury:
• Always connectto a polarized outlet(Teflslot is
wider than right).Unplug from outletwhen not
in useand before conductingmaintenance.
• Do not modify the polarized plug to fit a
non-polarizec]outletor extensioncord.
• Do not leavevacuumcleanerunattended
when it is pluggedin.
• Unplugfrom outletwhen not in use and
beforeservicing.
• Unplugbefore attachingthe TurboBrushTool.
• Do not useoutdoorsor on wet surfaces.
• Do not allow childrento operatevacuum
cleaneror useas a toy.
• Closeattentionis necessarywhen usedby
or near children.
• Do not usefor any purposeotherthan
describedin this user'sguide.
• Use only manufacturer's recommended
attachments.
• Do not usewith damagedcord or plug.
• If appliance is not working as it should,has
beendropped, damaged, left outdoors,or
dropped into water, haveit repairedat an
authorizedservicecenter.
• Do not pullor carry by cord, usecord as a
handle,closea door on cord, or pull cord
around sharpedgesor corners.Do not run
appliance overcord. Keepcord away from
heatedsurfaces.
• Do not unplugby pulling on cord. Tounplug,
grasp the plug, not the cord.
• Do not handlevacuumcleaneror plug with
wet hands.
• Do not put any objectinto openings.Do not
usewithany openlng blocked; keepopenings
free of dust,lint, hair, and anythingthatmay
reduceair flow.
• Keephair, looseclothing,fingers,and all parts
of body away from openingsand movingparts.
mTurn off all controlsbeforepluggingor
unpluggingvacuumcleaner.
• Useextracare when cleaning stairs.
• Do not pick up flammablematerials(lighter
fluid, gasoline, kerosene,etc.)or usein the
presenceof explosiveliquids or vapors.
• Do not pick up toxic material (chlorinebleach,
ammonia,drain cleaner,etc.).
• Do not usevacuumcleanerin an enclosed
spacefilledwith vapors given off by oil base
paint, paint thinner,somemothproofing
substances,flammabledust,or otherexplosive
or toxicvapors.
• Do not pick up hard or sharpobjectssuchas
glass,nails, screws,coins, etc.
• Do not pick up anythingthat is burning
or smoking,suchas cigarettes,matches,
or hot ashes.
• Do not usewithoutfiltersin place.
• Useonly on dry, indoor surfaces.
• Keepapplianceon a levelsurface.
• Do not carry the vacuumcleanerwhile
it is running.
SAVE THESE
INSTRUCTIONS.
THISMODELISFORHOUSEHOLDUSEONLY.
Commercial use of this unit voids the
manufacturer's warranty.
THIS APPUANCE
HAS A PO ED
PLUG.
To reduce the risk of electric shock, this
appliance has a polarized plug (one blade
is wider than the other). This plug will fit in
a polarized outlet only one way. If the plug
does not fit fully in the outlet, reverse the
plug. If it still does not fit, contact a qualified
electrician to install a proper outlet. Do not
change the plug in any way.
3
www.bissell.com
_
800.237.7691
view
Upper
Handle
Clip
Select models include
Pet TurboEraserO
Tool or TurboBrush®
Tool
Cord
Combination
Dustinq
Brush/"
Uph.olstery
Tool
Suction Power
PowerSwitch
Quick
Release
®
Cord Wrap
Extension
Handle
Crevice
Tool
Post-Motor
Filter*
Easy
Dirt
;n
Pre-Motor
Filter
Wand Base
Height
Adjustment
Knob
Port
g
Pet Hair Lifter (select models)
J/ WARNING:
Do not plug in your vacuum
cleaner until you are familiar
with all instructions and
operating procedures.
Brust-iOn/
Off Pedal
Recline
Pedal
Foot
Hose
*Select models include a Febreze_ post-motor filter.
For ordering information, turn to page 17.
**Select models may include Pet Hair Fabric Tool or
Long Reach Dusting Tool
Febreze® and related trademarks are owned by
The Procter & Gamble Company, Cincinnati, Ohio
and used under license by BISSELL,Inc.
4
www.
b is sell
.com
_>_,
800.237.7691
;sembly
The only tool you'll need to assemble your
vacuum cleaner is a Phillips screwdriver.
Plastic film can be dangerous.
To avoid danger or suffocation,
keep away from babies
andchildren.
Locate and install filters
IMPORTANT: Before using your vacuum, make
sure that all filters (pre-motorand post-motor)are
in place. Do not operate your vacuum without
these filters. Your Total Floorsvacuum comes preloaded with a post-motorfoam filter. Ifyou wish
to use the post-motorFebreze® filter instead,
locate the FebrezeQ filter in the vacuum carton
and remove the filter from its packaging. Next,
remove the post-motorfoam filter from the filter
door and insert the Febreze® filter in its place as
is shown to the right (A). Do not use your vacuum
without one of these filters in place. Do not use
both filters together.
1,
Attach handle
I.
to vacuum
Locatethe carry handle. Removethe screw
packet taped to the carry handle. Thereare
three screws in thisscrew packet. Two screws
are usedto attach the upper handle and carrying handle to the vacuum base. One screw
is used to attach the hoseguide/tool caddy.
2.
Stand the vacuum upright. From the back
of the vacuum body, slide the base of the
upper handle firmly into the grooves at the
top of the vacuum body. Continue to push
so that there are no gaps and the front of
the handle is flush with the vacuum body.
3.
With the upper handle firmly placed on the
vacuum body, guide the carrying handle
into place onto the back of the upper handle
and insert two of the screws into the existing
holes. (Referencethe rear-facing product
view on page 4 to see how the carry handle
should look). Tighten screws securely with
a Phillipsscrewdriver to anchor the carry
handle to the upper handle and the upper
handle to the vacuum body.
Attach the vacuum
.
3,
hose & tools
Attach the 3 hose/tool storage pieces to the
back of the unit.
a. Attach the tool storage clip to the back of
the handle by snapping the piece into the
unit as shown. Pushpiece straight in until
it snaps into place.
b. Attach the hose guide clip to the left side
of the back of the vacuum. Inserttab at a
45 degree angle and turn clockwise so it
snaps into place.
www.bissell.com
5
800.237.7691
Y
Attach the vacuum
hose & tools continued
€. The hose guide/tool caddy should be
attached at the bottom of the back of
the vacuum. Slide into place and insert
screw into the existing hole. Tighten
securely with a Phillips screwdriver.
0
0
Lineup the tabs of the Twistn' Snap hosewith the
correspondingnotchesand turn clockwise.Slide
the end of the hose into the hosewand base.
Hosewraps on back of unit as shown on page 4.
Place the TurboBrushTool or PetTurboEraser
Tool into its holder from the front of the vacuum.
Power
NOTICE:
Thebrushrollcontinuesto rotatewhile
usingyourvacuumfor abovefloor
cleaning.Topreventcarpetdama_le,
turnthebrushrolloff and do notlean
on vacuumor tiltforward.
/! CAUTION:
Betore usingyour vacuum,
make sure that the dirt container is in the locked position
and that all filters (pre-motor
and post-motor) are in place.
Do not operate your vacuum
without thesefilters.
cord
To store the power cord, wrap cord around the
upper and lower cord wrap on the side of the
vacuum. To release the power cord, rotate the
upper cord wrap down and gently pull off cord.
Power
switch
The power switch is located just below the
carrying handle on the side of the vacuum.
Push the rocker switch "ON"
(I) to vacuum,
and "OFF" (O) when cleaning is complete.
Brush Roll Power
The rotatingbrush ON/OFF pedal is located on
the foot of the vacuum. You can use your foot to
engage or disengage this pedal (A). When the
brush roll pedal has been engaged, the brush
will start rotating. The brush roll should be turned
on for most carpeted floors. To turn the brush roll
off, disengage the pedal by pressing on it with
your foot. We recommendturning off the brush
roll for bare floor cleaning to prevent scatter or
for other delicate surfaces.
A
Eddie Suction
To make edge cleaning more convenient,
remove the hose from the hose wand base
and attach the crevice tool. Insert the crevice
tool into the port on the foot of the vacuum (B).
Suction is now diverted to the front corner of
the vacuum and you can clean along edges
and into corners. It is recommended you turn
off the brush roll when using this feature.
6
www.
b is sell
.com
y_,
(B)
800.237.7691
Handle
Positions
Using your foot, press the handle release pedal,
located on the lower left side of the vacuum to
recline to a cleaning position.
1.
Upright - For storage and above floor
cleaning with tools.
2.
Normal Cleaning - Press handle release
edal once. This position is used for most
ousehold floor cleaning tasks.
Transportin_l
1.
2.
your
2o
cleaner
To move your vacuum cleaner from room
to room, put the handle in the upright
position, tilt the cleaner back on its rear
wheels and push forward.
The vacuum cleaner can also be moved by
using the carry handle on the back.
Hei_lht Adjustments
There are seven height settings available for
various floor surfaces. Turn the dial on the foot
of the cleaner to the desired setting.
ATTENTION:
Some frieze carpets have long, delicate
fibers or threads that may be damaged
by the rotating brush during vacuuming.
It is recommended the rotating brush be
turned OFF when cleaning this lype of
carpet.
Lowest setting - for low pile carpeting
or bare floors. To pick up debris it maybe
necessary to move up one setting.
Medium
setlings - for medium pile carpet.
High setting - for high pile and most
shag/frieze carpet.
NOTE: For optimal carpet cleaning
performance,
adjust to the lowest
p.ractical setting. If your cleaner is
difficult to pusH, adjust to the next
higher setting.
If the dial is difficult to turn, tilt the cleaner
back slightly to take the weight off of the
foot while turning.
7
www.
b i s se II. co m
_,
800.237.7691
Derations
Clean filter indicator
The clean filter indicator tells you when the air
flow in your vacuum is reduced due to dirty
filters or a clog in the hose. The clean filter
indicator will remain green until the airflow is
reduced. At that time, it begins to change to
red. When the indicator is ]Cullyred, the airflow
is significantly reduced or clogged by a dirty filter. Follow the steps on page 11 to clean your
filters or there is a clog in the hose. All filters
in the vacuum should be cleaned or replaced
when the clean filter indicator turns red. To
check and remove the clog, follow the steps on
page 12 to check for and clear clogs.
NOTE: When your vacuum is
turned off, the clean filter indicator
will go to the red color setting.
The c3ean filter indicator only
detects reductions in airflow
when the vacuum power is on.
On-board
Tools
clean filter
indicator
NOTICE:
While vacuuming, certain types of
carpets and Iowhumidity conditions
may generate small static discharges.
The discharges are entirely harmless
and are not associated in any way
with the main power supply
Your vacuum is not only a powerful carpet
and rug cleaner; it is also a versatile above
floor vacuum cleaner when you select one
of the special tools.
1.
Raise the handle to the upright position.
2.
Remove the hose wand from the hose
wand base. This automatically diverts
the suction to the hose.
3.
Use the hose alone or attach any tool
by firmly pushing onto the vacuum hose,
hose wand, or extension wand. They
are a friction fit, so be sure the hose
and tool fit snuggly together
Dustin_l brush / upholstery tool:
Two types of cleaning tools are included in
one altachment. Slide the tool out to use with
or without bristles and switch between the
two
uses.
a.
Use the dusting! brush to dust furniture,
blinds, books,lamps, shelves and
baseboards.
b.
Slide the brush off to use the upholstery
tool on cushions, draperies and fabrics.
8
www.bissell.com
CAUTION:
Always place the vacuumcleaner on
the floor in its fully upright position
and make sureit is locked in place
when using tools. It is recommended
to turn off the brush roll when
using tools.
800.237.7691
Pet Hair Fabric Tool
(select models):
Use this tool on fabrics such as drapes, beds
or anywhere else pet hair may collect.
Long Reach Dusting Tool
(select models):
Use this tool for dusting large surfaces.
TurboBrush Tool
(select models):
Use rotating brush action for small flat areas
such as stair and cushions. Pressgently down
and pull toward you in raking motion; too much
pressure will cause brush to stop rotating.
Pet TurboEraser Tool
(select models):
Use for removing dirt and pet hair from stairs,
upholstery, area rugs, and other small areas.
Pull the tool towards you in a raking motion.
NOTE: The Pet TurboEraser Tool is
designed to remove pet hair from
upholstered or carpeted surfaces.
It should not be used on pets.
Emptyin_l
the dirt container
Empty the dirt container as soon as the dirt
reaches the "fill" line on the front of the cup.
1.
Unplug the vacuum from the electrical outlet.
2.
Slide the Lock 'n Seal lever to the left.
3.
Grasp the handle andpull the dirt cup
straight out to remove trom the vacuum.
4.
Empty dirt into garbage container.
NOTE: Emptying the dirt container
after every use will help prevent
overfilling, and ensure that the
vacuum is ready to go the next
time you clean.
www.bissell.com
_
800.237.7691
9
and
Care
To maximize your cleaning performance
and extend the life of your vacuum, it is
very important that you empty your dirt
container and check and clean your filters
frequently. Follow the instructions on the
following pages, and perform these simple
maintenance steps:
.
Empty the dirt container when the dirt
reaches the "Full" line on the container,
or more frequently, to prevent overfills.
.
Check the pre-motor and post-motor
filter regularly. Clean or replace
as needed.
WARNING:
To reduce the risk of electric
shock, turn power switch OFF
and disconnect polarized
plu_l from electrical outlet before
pertorming maintenance or
troubleshooting checks.
NOTE: Use of moist I_arts/components in
unit will damage the
motor an_°Urid your warranty
NOTE: Be sure to clean or replace
your filters anytime the clean filter
_nrediqaetO
_b_nT
totugnre_
_Aore
necessary if you are vacuuming
new carpet, fine dust, or have
allergy concerns.
Cleanin_l the dirt container
1.
Ensurethat the dirt cup has been emptied.
2
While the dirt cup is still out of the
unit,grasp the inner cyclone screen and
twist to the right until the locking tab
stops the rotation. Pull down the inner
cyclone screen to remove it.
3
Clean the inner cyclone with a cloth or
soft brush to remove dust or debris.
.
10
inner
cyclone
Wipe out the inside of the upper tank
and the inner cyclone with a damp
cloth moistened with water or a mild
cleaning detergent.
www.
b is sell
.com
y_,
800.237.7691
ntenance
and
Care
Cleanin_l the dirt container
5.
continued
If desired, the lower dirt cup may be
washed in warm water. Make sure it is
completely dry before reassembling.
NOTICE:
Select models feature a Febreze@
NOTE: Do not put in the dishwasher.
post-motor filter. For purchasing
information, turn to page 17.
NOTE: Use of moist parts/components in your unit will damage the
motor and void your warranty
.
To reassemble, replace the inner
cyclone screen by sliding it into the
upper tank and rotating it to the left until
the locking tabs stop the rotation.
Cleaning the pre-motor
filter
& replacin_l the post-motor
filter
1.
Unplug the vacuum from electrical outlet.
2.
foam
.
filter
The pre-motor filter protects the motor
from dirt particles. It is located in
the slide out tray underneath the
dirt container. If the filter becomes
dirty, pull out the tray, lift out the
foam filter pad and clean it.
NOTE: The pre-motor
filter may be
hand washed in water with mild
detergent. Rinse well and air dry
thoroughly before replacing.
NOTE: Use of moist parts/components in your unit will damage the
motor and void your warr anty
.
.
The post-motor filter assists in the filtration process to return clean air to the
room. It is located behind the door
on the side of the vacuum. If the filter
becomes dirty, open the door, remove
the filter and replace.
WARNING:
Do not operate vacuum with
damp or wet filters, or without
all filters in place.
3.
.....
_i_!iiiii_
!
The Febreze® filter (select models only)
is designed to eliminate odors during
the regular life of the filter. Depending
on usage, the post-motor filter should]_e
changed every 3-6 months.
NOTE: The post-motor filter is a
white, pleated filter. This filter
is not washable and must be
replaced when it becomes dirty.
www.
b i s se II. co m
_,
800.237.7691
11
and
Care
Clearin_l Clovis
1.
Turn the power switch off and unplug
the vacuum from the electrical outlet.
2.
Check the upper tank for build up or clogs.
3.
If you notice dirt build up in the inner
cyclone, follow instruction on how to
clean the inner cyclone in page 10.
4.
Check for a clog in the foot hose &
edge cleaning port, the wand or in
the hose.
NOTE: When the indicator reads
Red, there is a clog in the hose
which is diminishing suction
power. Remove the clog in the
hose to restore full suction power.
5.
Remove the Twist 'n Snap hose from
the vacuum by turning to the right.
Straighten the hose and unclog with
a long, narrow object.
6.
If you notice debris or dirt clogged in the
foot hose, remove it by pulling it out.
7.
If the clog persists,follow the instructions
for checking the rotating floor brush and
drive belt on _page14 and inspect the air
passageway for obstructions.
foot
hose
12
www.
b is sell
.com
y_.
800.237.7691
ntenance
and
Care
Maintaining the Pet TurboEraser
Tool and TurboBrushTool
The Pet TurboEraser Tool should be checked
regularly for clogs and debris wrapping
around the paddles. Select models include
a TurboBrush Tool that follows the same
maintenance instructions.
1.
Unplug unit from outlet.
2.
Remove tool from hose or vacuum.
5.
°
If clog is present or debris is visible,
unscrew the two screws on the back of
the Pet TurboEraser Tool to remove the
faceplate and clear any obstructions.
°
To clean debris remove the paddles from
the drive belt and clean debris.
°
Reposition the drive belt on the paddle
roll. Place ends of roll in the slots on sides
as shown. Reposition faceplate and secure
with two screws.
NOTE: The Pet TurboEraser Tool is
designed to remove pet hair from
upholstered or carpeted surfaces.
It should not be used on pets.
13
www.
b i s se II. co m
_,
800.237.7691
and
Check rotatin_l
Care
floor brush and drive
You should check your vacuum cleaner's
rotating floor brush and drive belt regularly
for wear or damaqe. You should also clean
the brush and the brush ends of strings,
hair and carpet fibers. This type of debris
can wrap around the brush and hamper its
ability to effectively clean your carpet. Also
remove any debris that has accumulated
under the Brush cover.
1.
Turn the power switch off and unplug
the vacuum from the electrical outlet.
2.
Place handle in low position and turn
the vacuum cleaner over so the bottom
side is facing up.
3.
Unscrew and lift off the brush cover.
4.
Remove the rotating floor brush.
5.
Clean strings, hair and other debris
from the rotating floor brush, paying
particular attention to brush ends.
6.
Clean strings, hair and other debris
from the motorpulley, drive belt areas,
and the brush ON/OFF power switch
mechanism.
belt
TION:
To reducethe risk of injury from
moving parts, turn off vacuum
and disconnectpower plug from
electricaloutlet.
°
7.
Check the drive belt carefully for wear,
cuts, or stressed areas.
8.
Check air passageway for obstructions.
Remove debris from this area.
9.
Replace belt and brush. Rotate brush
toward motor pulley to seat the belt
properly.
4,
10. Place the brush cover back and secure
with its screws.
14
www.
b is sell
.com
y_,
800.237.7691
ntenance
and
Care
Replace drive belt
1.
2.
3.
Turn the power switch off and unplug
the vacuum from the electrical outlet.
Remove floor brush following steps 2-4
on page 14.
2.
With the rotating floor brush removed
from the vacuum cleaner, grasp the old
drive belt and remove from the motor
pulley. Discard the old drive belt.
pulley
Place the new drive belt over the motor
pulley oass the belt through the opening of'the belt ON/OFF mechanism
and loop the belt over the rotating floor
brush in the space between the bristles.
NOTE: It is important that you use
only genuine BISSELL replacement
belts. Generic belts many not meet
the exact specifications required
to keepyour vacuum operating at
its peak performance. The use of .
unbranded belts could lead to early
failure of the vacuum and could
void your warranty.
4.
Place ends of the rotating floor brush
down into the slots on the sides.
Alignment of brush ends is necessary
to ensure the brush is fully inserted. -
5.
Turn the rotatin_ floor brush by hand
several times. 1Tproperly installed,
the drive belt will center itself on the
rotating floor brush crown.
6.
6.
Place the brush cover back and secure
with its screws.
15
www.
b i s se II. co m
_,
800.237.7691
_!)_T_oubleshooting
Vacuum
Possible
Total
cleaner won't
Floors
®
turn on
causes
Remedies
1.
Power
cordnotplugged
in
1. Check
electrical
plug
2.
Blown
fuse/tripped
breaker
2. Check/replace
fuseorreset
breaker
Vacuum cleaner won't
Possible causes
pick up dirt
Remedies
1.
Incorrect
height
adjustment
1. Adjust
po_rfoottocorrect
height
setting
2.
Hose
notattached
tosuction
opening
2. Grasp
quick
reach
handle
andfirmlypush
hose
wandontothesuclion
opening
3.
Crack
orholeinhose
3. Check
hose
andreplace
if needed
4.
Broken
orworndrive
belt
4. Replace
drivebelt,seepage15
5.
Rotating
floorbrush
bristles
worn
5. Replace
brush
6.
Rotating
floorbrush
jammed
6. Remove
brush
andcleandebris
frombrush
ends
7.
Clog
invacuumhose/foot/body
7. Follow
instruclions
onpage12fordeoring
dogs
8.
Dirtcontainer
full
8. Empty
dirtcontainer
9.
Dirtcontainer
orupper
tanknotinstalled
propedy
9. Position
correctly
andlockinplace
10. Filters
oredirty
10. Check
andcleanpre-motor
and
post-motor
filters
Tools won't pick up dirt
Possible causes
Remedies
1.
Crack
orholeinhose
1. Check
hose
andreplace
if needed
2.
Clog
invacuum
2. Follow
instruclions
onpage12fordeoring
dogs
3.
Dirtcontainer
full
3. Empty
dirtcontainer
4.
Dirtcontainer
orupper
tanknotinstalled
propedy
4. Position
correctly
andlockinplace
5.
Filters
oredirty
5. Check
andcleanpre-motor
and
post-motor
filters
Vacuum cleaner is difficult to push
Possible causes
1.
Incorrect
height
adjustment
Remedies
1. Adjust
po_rfoottocorrect
height
setting
Visible dirt escaping from cleaner
Possible causes
Remedies
1.
Dirtcontainer
full
1. Empty
dirtcontainer
2.
Filters
missing
orinstalled
incorrectly
2. Check
pre-motor
andpost-motor
filters
forcorrect
instollolion
Other
maintenance
performed
or service not included
by an authorized
service
in the manual
should be
representative.
Thank you for selecting a BISSELLproduct.
[Please do not return this product to the store.J
For any questions or concerns, BISSELL is happy to be of
serv,'ce. Contact us directly at 1-800-237'-7691.
16
www.
b is sell
.com
y_>_,
800.237.7691
_lacement
parts
- Total
Floors
®
Below please find a list of common replacement parts. While not all of these
parts may have come with your specific machine, all are available to you for
purchase, if desired.
Item
Part No.
Part Name
1
203-1730
Drive Belt
2
3
203-1739
203-1751
Twist 'n Snap Hose
Brush Roll
4
3290
Style 14 Pre-Motor Foam Filter
5
32076
Style 7 & 9 Post-Motor Filter
6
27W8
Style 7 & 9 Post-Motor Febreze® Filter
7
203-1729
Inner Cyclone Assembly
8
203-1733
Pet Strip Left and Right
Not all parts are included with every model.
1
2
5
4
3
7
6
8
i_¸ , _ •
www.
b i s se II. co m
_,
800.237.7691
17
_!iAccessories
- Total
Floors
®
Item
1
Part No.
203-1740
Part Name
Crevice Tool
2
203-7529
Pet TurboEraser Tool
3
203-1741
PetHair FabricTool
4
203-1228
Dusting Brush/Upholstery
5
203-1368
Pet Contour Tool®
6
98Q 1-A
Shedaway _ Pet Groom Attachment
7
203-2447
TurboBrush ® Tool
8
203-1787
Long Reach Dusting Tool
9
203-8296
Furniture Tool
10
203-1768
Extension Wand
Tool
Not all parts are included with every model.
1
2
3
4
6
9
10
18
www.
b is sell
.com
y_>_,
800.237.7691
BISSELL
Total
Floors
® Vacuum
This warranty givesyou specific legal rights, and you may also have other rights which may vary
from state to state. Ifyou need additional instruction regarding this warranty or have questions
regarding what it may cover, please contact BISSELLConsumer Care by E-mail, telephone, or
regular mail as described below.
Total Floors@ 52C2W
- Limited Three Year Warranty
Subect to the *EXCEPTIONSAND EXCLUSIONS identified below, upon receipt of the product
BISSELLwill repair or replace (with new or remanufactured components or products), at BISSELL's
option, free of charge from the date of purchase by the original purchaser, for three years any
defective or malfunctioning part.
See information below on "If your BISSELLproduct should require service".
This warranty applies to product used for personal, and not commercial or rental service. This
warranty does not apply to fans or routine maintenance components such as filters, belts, or
brushes. Damage or malfunction caused by negligence, abuse, neglect, unauthorized repair,
or any other use not in accordance with the user's guide is not covered.
If your BISSELL product
should require
service:
Contact BISSELLConsumer Care to locate a BISSELLAuthorized Service Center in your area.
If you need information about repairs or replacement parts, or if you have questions about
your warranty, contact BISSELLConsumer Care.
Website or E-maih
www.bissell.com
Or Call:
BISSELLConsumer Care
1-800-237-7691
Monday- Friday 8 am - 10 pm ET
Saturday 9 am - 8 pm ET
Sunday lOam - 7pm
Or Write:
BISSELLHomecare, Inc.
PO Box 1888
Grand Rapids, MI 49501
AI-IN: Consumer Care
BISSELL
IS NOT LIABLEFOR INCIDENTALOR CONSEQUENTIALDAMAGES OF ANY NATURE
ASSOCIATEDWITH THE USEOF THISPRODUCT.BISSELL'S
LIABILITYWILLNOT EXCEEDTHE
PURCHASEPRICEOF THE PRODUCT.
Some states do not allow the exclusion or limitation
of incidental or consequential
damages,
so the above limitation
or exclusion may not apply to you.
*EXCEPTIONS AND EXCLUSIONS FROM THE TERMS OF THE LIMITED WARRANTY
THIS WARRANTY IS EXCLUSIVEAND IN LIEUOF ANY OTHER WARRANTIES EITHERORAL OR WRITTEN.
ANY IMPLIED WARRANTIES WHICH MAY ARISE BY OPERATION OF LAW, INCLUDING THE IMPLIED
WARRANTIES OF MERCHANTABILITY AND FITNESSFOR A PARTICULARPURPOSE, ARE LIMITEDTO THE
3 YEAR WARRANTY DURATION FROM THE DATE OF PURCHASE AS DESCRIBEDABOVE.
Some states do not allow warranty limitations on how long an implied warranty
limitation may not apply to you.
last so the above
19 ¸
www.
b i s se II. co m
_,
800.237.7691
consumer
care
For information about repairs or replacementparts, or questionsabout your warranb,, call:
BISSELL Consumer
Care
1-800-237-7691
Monday-Friday
8am-
Saturday
9 am -
Sunday
10 am-
10pmET
8 pm ET
7 pm ET
Or write:
BISSELLHomecare, Inc.
PO Box 3606
Grand Rapids MI 49501
ATTN: Consumer Care
Or visit the BISSELLwebsite - www.bissell.com
When contacting BISSELL,have model number of cleaner available.
Please record your Model Number:
Please record your Purchase Date:
NOTE: Please keep your original sales receipt.
It provides proof of purchase date in the event
of a warranty claim. See Warranty on page
19 for details.
©2013
BISSELL Homecare, Inc
Grand Rapids, Michigan
AIJ rights reserved. Printed in Vietnam
Part Number 160-1956
Rev 09/13
Visit our website at:
www.bisselhcom
2O
www.bissell.com
_
800.237.7691