1
ISears I
MODEL NO.
917.253580
OR
another free manual from www.searstractormanuals.com
917.253590
OW ER'
ANUAL
Assembly
Operation
ainlenance
Repair Parts
42 INCH AND 48 INCH
ROTARY
WER
ATTACHMENT
FOR SEARS
GARDEN TRACTOR
Sears, Roebuck and Co., Chicago . Ill. 60684. U, S.A. and Si.m psons Sears Lirnit ed, Tor onto, C anada
another free manual from www.searstractormanuals.com
CONGRATULATIONS on your purchase of a Sears Rotary
Mower. It has been designed, engineered and manufactured to
give you the best possible dependability and performance.
Should you experience any problem you cannot easily remedy, please contact your nearest Sears, Roebuck and Co. or
Simpsons Sears Limited Store. They have competent, welltrained technicians and the proper tools to service or repair
this unit.
Please read and retain this manual. The instructions will
enable you to assemble, operate and maintain your mower
properly. Always observe the "RULES FOR SAFE OPERA·
TION".
WARRANTY
FULL ONE YEAR WARRANTY
For one year from date of purchase, Sears will repair any defect in material or
workmanship in this tractor attachment, at no charge.
If the tractor attachment is used for commercial or rental purposes, this warranty applies for only thirty days from date of purchase.
Warranty service is available by simply contacting your nearest Sears store
throughout the United States.
This warranty gives you specific legal rights, and you may have other rights
which vary from state to state.
SEARS, ROEBUCK AND CO.
Sears Tower
BSC 41-3
Chicago, I L
60684
TABLE OF CONTENTS
RULES FOR SAFE OPERATION
1
ASSEMBL Y INSTRUCTIONS
2
PRE·USE ADJUSTMENT.
5
OPERATING INSTRUCTIONS
6
MAINTENANCE INSTRUCTIONS
7
REPAIR PARTS.
10
OPTIONAL EQUIPMENT
ASSEMBL Y OF GAUGE WHEELS
15
GAUGE WHEEL REPAIR PARTS.
16
RULES FOR SAFE OPERATION
A
LOOK FOR THIS SYMBOL TO POINT OUT IMPORTANT
SAFETY PRECAUTIONS. IT MEANS--ATTENTION! BECOME
ALERT! YOUR SAFETY IS INVOLVED.
1. Know the controls and how to stop quickly. READ TH E
2.
3.
another free manual from www.searstractormanuals.com
4.
5.
6.
7.
8.
9.
10.
11.
12.
13.
I
14.
15.
16.
17.
18.
19.
20.
21.
22.
23. Use care when pulling loads or using heavy equipment.
a. Use only approved drawbar hitch points.
b. Limit loads to those you can safely control.
c. Do not turn sharply. Use care when backing.
d. Use count~rweights or wheel weights when suggested in
this owner s manual.
24. Watch out for traffic when crossing or near roadways.
25. When using any attachments, never direct discharge of
material toward bystanders nor allow anyone near the vehicle while in operation.
26. Handle gasoline with care - it is highly flammable.
a. Use approved gasoline containers.
b. Never remove the cap of the fuel tank or add gasoline to
a running or hot engine, or fill the fuel tank indoors.
Wipe up spilled gasoline.
c. Open doors if the engine is run in the garage - exhaust
fumes are dangerous. Do not run the engine indoors.
27. Keep the vehicle and attachments in good operating condition, and keep safety devices in place.
28. Keep all nuts, bolts and screws tight to be sure the equipment is in safe working condition.
29. Never store the equipment with gasoline in the tank inside
a building where fumes may reach an open flame or spark.
Allow the engine to cool before storing in any enclosure.
30. To reduce fire hazard, keep the engine free of grass, leaves
or excessive grease.
31. The vehicle and attachments should be stopped and inspected for damage after striking a foreign object, and the damage should be repaired before restarting and operating the
equipment.
32. Do not change the engine governor settings or overspeed
the engine.
33. When using the vehicle with mower, proceed as follows:
a. Mow only in daylight or in good artificial light.
b. Never make a cutting height adjustment while the engine
is running if the operator must dismount to do so.
c. Shut the engine off when removing the grass catcher or
unclogging chute.
d. Check the blade mounting bolts for proper tightness at
frequent intervals.
34. Check the grass catcher bags frequently for wear or deterioration. Replace with new bags for safety protection.
OWNER'S MANUAL.
Do not allow children to operate the vehicle. Do not allow
adults to operate it without proper instruction.
Do not carry passengers. Keep children and pets a safe distance away.
Always wear substantial footwear. Do not wear loose fitting
clothing that could get caught in moving parts.
Keep your eyes and mind on your tractor, mower and the
area being cut. Don't let other interests distract you.
Do ~ot attemPt to operate your Tractor or mower when
not In operator s seat.
Always get on or off your tractor from the operator's left
hand side.
Clear the work area of objects which might be picked up
and thrown.
Disengage all attachment clutches and shift into neutral before attempting to start the engine.
Disengage power to atta9hments and stop the engine before leaving the operator s position.
Disengage power to mower, stop the engine and disconnect
spark plug wire(s) from spark plug(s) before cleaning,
making an adjustment or repairs.
Disengage power to attachments when transporting or not
in use.
Take all possible precautions when leaving the vehicle unattended, such as disengaging the power-take-off, lowering
the attachments, shifting into neutral, setting the parking
brake, stopping the engine, and removing the key.
Do not stop or start suddenly when going uphill or downhill. Mow up and down the face of slopes (not greater than
15 0 ); never across the face.
Reduce speed on slopes and make turns gradually to prevent tipping or loss of control. Exercise extreme caution
when changing direction on slopes.
Do not shift gears while going up or down slopes. Choose
a gear low enough to negotiate the slope without stopping
and shifting gears. To reduce speed, move throttle lever
to slow.
Never mow in wet or slippery grass, when traction is unsure or at a speed which could cause a skid.
Stay alert for holes in the terrain and other hidden hazards.
Do not drive too close to creeks, ditches and public highways.
Exercise special care when mowing around fixed objects
in order to prevent the blades from striking them. Never
deliberately run tractor or mower into or over any foreign
object.
Never shift gears until tractor comes to a stop.
Never place hands or feet under the mower, in the deflector
(discharge chute) or near any moving parts while tractor
or mower are running. Always keep clear of discharge chute.
-1 -
To assemble your Mower you will need:
LEVER
PLUNGER
a 9/16" Wrench and a Hammer
When R.H. (Right Hand) or LH. (Left Hand) is
used, it means from a position behind the
steering wheel as if you were seated on the
tractor seat and facing forward.
ASSEMBLY
another free manual from www.searstractormanuals.com
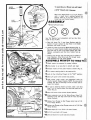
1.lnstall Lift lever using:
two Flat Washers, two Lockwashers and two Hex Nuts
found in bag of parts.
a. Place Lift Lever (Fig. 1) over Lever Quadrant and tilt
bottom of Lever outward to align Bolts in Lift Shaft
Weldment with holes in Lever.
FIGURE 1
b. Install lift Lever to end of
Be sure Lift Lever Bracket
that Lever fits on end of
Washers, Lockwashers and
curely.
Lift Shaft Weldment (Fig. 1).
straddles Lever Quadrant and
Lift Shaft. Secure with Flat
Hex Nuts. Tighten Nuts se·
c. Depress Lever Plunger and move Lift Lever to middle of
Lever Quadrant_ Drive Drive Lock Pin through Lever,
Lever Quadrant and Lift Lever Bracket.
ASSEMBLE MOWER TO TRACT
1. Check tractor tire pressure for proper inflation .
2. Drive
tractor to an area that is smooth and level.
3.Position mower on R.H. side of tractor as shown (Fig. 2).
4.Turn tractor steering wheel to the extreme left.
5. Lock
all four Attaching Plungers in the "OUT" position.
S.Move Lift Lever to the extreme rear position.
7. Slide
mower under tractor until Suspension Arms are
directly beneath Hangar Brackets. NOTE: Be sure end of
Snubber Pull Rod is extending to front of tractor and between front wheels.
8. For
ease in attaching mower to tractor, place a two foot
long 2 x 4 (or similar object) flat wise under each end of
mower (Fig. 3).
9. Move
Lift Lever to the extreme forward position.
10.Grasp suspension arms by the Spring Boxes. Raise R.H.
suspension arms and align with holes in Front and Rear
Hangar Brackets.
11. Release front Plunger so that Plunger enters hole in R .H.
Front Hanger Bracket.
12. Release
rear Plunger so that Plunger enters slot in R .H. Rear
Hanger Bracket .
13 .Repeat steps
14.Pull
10, 11 and 12 for L.H. side of mower.
Lift Lever back to Iift mower.
15 .Remove Blocks from
FIGURE 3
2x4
. . . . . . . . . . . . . . . . . . . . . . . . . . . . . . . . -2-
under each end of mower.
another free manual from www.searstractormanuals.com
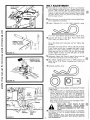
18.Slide Idler Shaft Assembly into Tractor Channel (Fig. 4).
17. Install Spring found in bag of parts.
BELT
GUIDE
FIGURE 4
OFFSET-----.~::~~
LOOP
Hook Offset Loop of Spring into hole in rear of Front
Axle Bracket. Hook other loop of Spring in hole in Idler
Shaft Assembly (Fig. 5).
18.Remove the two Retainer Springs and Engine Belt Guard.
(Fig. 4 - inset).
19.Remove Nut, Lockwasher and Belt Guide (Fig. 6). Place
Belt on Idler Sheaves and on Engine Pulley. NOTE: See Fig.
6 for proper way of installing Belts on Idler Sheaves. Backside (outside) of Belt must be placed in Flat (outside) Idler.
Belt must be placed in largest groove on Engine Pulley.
20.Assemble Adjusting Pin found in bag of parts
o~
FIGURE 5
ENGlr4E _---.l~t.."\.,
PULLEY
to threaded end of Belt Tightener Link (Fig. 5).
Retainer
FLAT
IDLER
BELT
Install Belt Tightener Link through opening in Idler Shaft
Assembly. Attach bent end of Link to rear end of Belt
Tightener Lever Arm. Secure Retainer Spring (Fig. 4 - left
hand inset).
, GUIDE
fI LOCKWASHER
NUT
-3-
FIGURE 6
BELT ADJUSTMENT
1.
Adjust belt by turning Adjusting Pin (Fig. 7) counterclockwise to ti~hteni clockwise to loosen. Engage Mower Clutch
Control ('ON' Position). Belt is properly adjusted when
Belt can be squeezed together with thumb and fore finger
(without undue pressure) midway between Engine Pulley
and Idler Sheaves. After first 2 hours of mowing, recheck
Belt for proper tension.
2. Belt from
center to outside mandrels is spring loaded therefore no adjustment is necessary.
another free manual from www.searstractormanuals.com
3.
Attach
Adjusting
Pin to Idler Shaft Assembly using:
one of the large Retainer Springs found in bag of parts.
4. Assemble
Belt Guide to Idler Shaft. Position Belt Guide
Tab in Idler Arm Notch (Fig. 8).
o
o
FIGURE 7A
Secure Belt Guide with Lockwasher and Nut. Tighten Nut
securely.
Belt Guide must clear belt by 1/16 to 1/8 inch at points
A and B when clutch lever is engaged (belt tight) in both
highest and lowest cutting position of mower. If Belt
Guide does not clear by 1/16 to 1/8 inch, Belt Guide can
be bent slightly at points A and B with pliers or wrench
to achieve the proper clearance.
5. Reassemble
Engine Belt Guard to engine. Secure with the
two Retainer Springs previously removed (Fig. 4) .
.__---MOWER CLUTCH
CONTROL PEDAL
("OFF" POSITION)
6. Place
Mower Clutch Control Lever in "OFF" Position as
shown in Fig. 7A (if Tractor is equipped with Pedal, refer
to Fig. 7B).
7. Complete
assembly using:
o~
FIGURE 7B
remallllllg Retainer Spring, Washer and Adjusting Pin found
in bag of parts.
a. Thread Adjusting Pin on Snubber Pull Rod until Adjusting Pin will enter hole in Idler Shaft Assembly (Fig. 8).
Remove Adjusting Pin from hole. Turn Adjusting Pin
counterclockwise 6 complete turns and slip Washer on
Pin. Insert Pin in Idler Shaft Assembly. NOTE: Mower
Clutch Control can be pushed ahead to assemble. Secure
with Retainer Spring.
When Mower Clutch Control is fully disengaged ("OFF"
Position) blades will stop quickly.
MAKE SURE
THAT BRAKE IS NOT
AGAINST MANDREL
PULLEY WHEN
MOWER IS ENGAGED (LEVER OR PEDAL PUSHED FORWARD TO "ON" POSI~
ADJUSTING PIN
RETAINER_SPRING~IDLER B
TION).
8. If Snubber Pull Rod is ever removed, be sure it is reassembl\ \ /'
SHAFT
SNUBBER
ed as shown in Fig. 9 to Snubber Weldment and secured
ASSEMBLY
PULL
with Cotter Pin.
ROD
NOTE: SNUBBER PULL ROD MUST BE POSITIONED
UNDER MOWER DRIVE BELT WITH SLIGHT BEND IN
..
______________________________
.
.
-4FIGURE 8
ROD DOWNWARD .
BELT
GUIDE
----u
A
PRE-USE ADJUSTMENT
LEVEL MOWER FROM SIDE
TO SIDE
another free manual from www.searstractormanuals.com
PLACE THE MOWER CLUTCH CONTROL
IN THE "OFF" POSITION, LOCK THE
PARKING BRAKE, SHIFT INTO NEUTRAL, SHUT OFF THE ENGINE. MAKE
ABSOLUTELY SURE THE BLADES AND
ALL MOVING PARTS HAVE COMPLETELY STOPPED, REMOVE THE IGNITION
KEY, DISCONNECT THE SPARK PLUG
"WIRE(S) FROM THE SPARK PLUG(S)
AND KEEP WIRE(S) AWAY FROM THE
PLUG(S) TO PREVENT INJURY FROM
ACCIDENTAL STARTING .
II
•
SNUBBER WELDMENT
COTTER PIN
1. Depress
Lift Lever Plunger. Move Lift Lever to approx imately the middle of notched Lever Quadrant.
2. Rotate
outer blades so that they are in line with width of
the tractor.
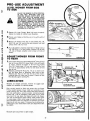
3. Measure
the height of the tips of outer blades (F ig. 10).
Both R .H . and L.H. must be the same distance from level
surface within 1/8 of an inch .
4.1f
an adjl.lstment is required, adjust Nut on Hanger Link at
L.H. side (Fig. 11) to level mower . Shorten Link to raise
L.H . side of mower. Lengthen Link to lower L.H. side of
mower.
I ..
~
hI
-~
~
--------~-
- -~-
LEVEL
SURFACE
ADJUST MOWER FROM FRONT
TO REAR
FIGURE 10
1. Your mower should cut approx imately 3/ 16" lower at front
than at the rear. With R .H. mower blade in line with length
of tractor, measure the height of the front tip of blade
(F ig. 10) . Rotate blade 1/2 turn and measure . The front
tip must be approximately 3/ 16 of an inch lower at front
than at rear .
2.Adjusting Leveling Pin Nuts (F ig. 11) up or down to obtain the above pitch or difference from front to rear.
Adjusting the Nuts up witt raise the rear of the mower.
Lowering Nuts witt lower rear of mower. Tighten the two
Nuts !Securely against Leveling Pin.
LUBRICATION
Mandrels are shipped lubricated , however we suggest each
mandrel be rechecked by applying grease .
Each mandrel should be fitted with grease thru the Grease
Fitting located between mower blade and underside of the
mowe r housing (Fig. 11A). Wipe fitt ing clean before greasing .
Use high performance, extreme pressure lubricating grease,
(Amdex No. 1 EP or equivalent). Add grease until it oozes
out around the cap above the blade and under the sheave.
This witt not damage the grease retainer. Wipe mandrel ctean
of excess grease . Under normal usage the mandrels should require lubrication after every 50 hours of operation and at the
beginning of each new season. This grease may be obtained by
ordering thru your nearest Sears repair parts department. Part
No . 2557R .
FIGURE 11A
Reattach spark plug wire(s) to spark plug(s).
- 5-
-LIFT LEVER PLUNGER
. . l fi
'-- .----t I' . ' I
.
!
'll ---I
!
'-_- _ _ _
'-
I
\.---.....- -
L ----
• -
.
~
~
.
--
I]
I.
i
,
..J
• '-)j
-
-- )
.
•_ _ _ _ _ _ .M._.M.....M.. _...M_ _ ._..... _.
I
.J
,
another free manual from www.searstractormanuals.com
FIGURE 15
OPERATING
INSTRUCTIONS
FIGURE 12
__----MOWER CLUTCH
CONTROL PEDAL
("OFF" POSITION)
FIGURE 12A
READ THE "RULES FOR SAFE OPERA·
TION" CAREFULLY BEFORE OPERAT·
ING YOUR MOWER.
THE MAIN DRIVE BELT (ENGINE TO CENTER MAN·
DREL) MUST BE PROPERLY ADJUSTED BEFORE OPERA·
TING. A DRIVE BELT NOT PROPERLY ADJUSTED CAN
BE RUINED IN JUST A FEW MINUTES OF OPERATION.
REFER TO STEP 1, PAGE 4. THE MOWER MUST BE
LEVELED FROM SIDE TO SIDE, AND FROM FRONT TO
REAR, BEFORE OPERATING. (REFER TO PAGE 5). THIS
IS NECESSARY FOR LEVEL AND EFFICIENT MOWING.
NOTE : Place Gear Shift Lever in neutral and unlock Parkin~
Brake . Depress tractor clutch pedal awl disengage ("OFF
position) Mower Clutch Control (Fig. 12 or 12A).
1. Start
tractor and set engine speed to about 1/ 3 to 1/2 ihrot·
tie before engaging mower. In either case, engage (' ON"
position) or dise ngage ("OF F" position) Mower Clutch
Control slowly. After mower is engaged (liON" position)
set to full throttle.
A
NEVER ENGAGE
("ON"
POSITION)
MOWER EXCEPT WHEN SITTING ON
TRACTOR SEAT.
2.Start mowing in a low range and increase ground speed as
conditions will permit . Average cutting height is approxi·
mately 2 . 1/ 2 to 2 . 3/4 inches. Height of cut can be ad·
justed by means of the Lift Lever (Fig. 13). Moving the lever
forward lowers the mower. Moving it backwards raises the
mower. The lever latch is actuated by depressing the latch
button at the top of the lever handle (Fig. 12). Each notch
changes the height of cut approximately 1/2 inch.
FIGURE 13
3.Should some intermediate height be desired, loosen the two
Nuts at the bottom of the Lift Lever (Fig. 13) . Rotate the
Lever forward or backward relative to the shaft. Forward
movement will raise the height of cut. Rearward movement
will lower the height of cut. This adjustment will raise or
lower the cutting range approximately 1/2 Inch . the
equivalent of one notch on the Lift Lever Quadrant. Re·
tighten Lift Lever Nuts securely.
4.Drive so that clippings are discharged onto the area that has
been cut . See Fig. 14 for line of cut on right hand side of
mower. Have the cut area to the right of the machine . This
will result in a more even distribution of clippings and more
Ufliform cutting . When mowing large areas (Fig. 15). start
by turning to the right so that the clippings will be discharged away from shrubs, fences, driveways, etc. After
two or three rounds, mow in the opposite direction making
left hand turns until finished. If grass is extremely tall, it
should be mowed twice. The first time cut relatively high.
The second time to the desired height. The left hand side of
. FIGURE
.____________________
......... 6 .
14
mower should be used for trimming.
MAINTENANCE
INSTRUCTIONS
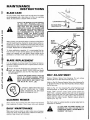
BLADE CARE
another free manual from www.searstractormanuals.com
For best results mower blades must be kept sharp. The blades
can be sharpened with a few strokes of a file or on a grinding
wheel. Do not attempt to sharpen while on mower.
PLACE THE MOWER CLUTCH CONTROL
IN THE "OFF" POSITION, LOCK THE
PARKING BRAKE,SHIFT INTO NEUTRAL
AND SHUT OFF THE ENGINE. MAKE
ABSOLUTEL Y SURE THE BLADES AND
ALL MOVING PARTS HAVE COMPLETE LY STOPPED. REMOVE THE IGNITION
KEY, DISCONNECT THE SPARK PLUG
WIRE(S) FROM THE SPARK PLUG(S)
AND KEEP WIRE(S} AWAY FROM THE
PLUG(S) TO PREVENT INJURY FROM
ACCIDENTAL STARTING.
FIGURE 16
When grinding, care should be taken to maintain blade balance
and the blade should be checked for proper balance before reinstallation on mower. Unbalanced or bent blade will cause excessive vibration when running, and eventual damage to mower
or engine. Replace bent or damaged blades .
To insure satisfactory operation, it is recommended that before the start of each mowing season, the old blades be discarded and replaced with new blades. Mower blades can be
purchased at all Sears retail stores and mail order outlets.
BLADE REPLACEMENT
It is not necessary to remove mower from tractor for blade replacement. Raising mower lift lever to highest position will permit access to blades.
1. Remove the two Hex Head Bolts and Lockwashers (F ig. 16) ..
2.lnstall new blade with SHARP EDGE DOWN and secure
with two Lockwashers and two Hex Head Bolts. TIGHTEN SECURELY.
A
FIGURE 17
BELT ADJUSTMENT
ALWAYS USE GRADE 5 HEAT TREATED
BOLTS TO ATTACH BLADES. CHECK
BOLTS IN BLADES OCCASIONALLY TO
MAKE SURE BOLTS ARE TIGHT. TORQUE BOLTS 45 - 50 FT. LBS.
Remove Retainer Spring from Adjusting Pin and remove
Adjusting Pin from Idler Shaft Assembly (Fig. 17) .
(Refer to Fig. 18). Remove Retainer Spring from Adjusting Pin
on Snubber Pull Rod in Idler Shaft Assembly. Remove Adjusting Pin from hole .
A GRADE 5 HEAT TREATED BOLT
CAN BE IDENTIFIED BY THREE
LINES INDICATED ON THE BOLT
HEAD AS SHOWN AT LEFT.
(Refer to Fig. 17). Turn Adjusting Pin on Belt Tightener link
counterclockwise to tighten belt, clockwise to loosen belt.
Engage ("ON" position) mower clutch control (pushed forward). Belt is properly adjusted when belt can be squeezed
together with thumb and fore finger (without undue pressure)
midway between engine and idler pulleys . After 2 hours use
recheck belt for proper tensi on. Replace retaine.- spring in
Adjusting Pin (Fig. 17).
CLEANING MOWER
Belt from center to outside mandrels is spring loaded and no
adjustment is necessary.
Water pressure from a garden hose will remove fresh clippings
from underside of mower. Clean mower after each mowing .
AT THIS TIME YOU MUST ADJUST THE
SNUBBER PULL ROD. FOLLOW THE INFORMATION UNDER "ADJUSTMENT OfSNUBBER" ON PAGE 8.
DAILY MAINTENANCE
Make sure all nuts on bolts are t ight, cotter pins and retainer
springs are secure. Keep blades sharp_ Observe all safety precautions. Keep mower well lubricated.
-7-
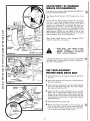
ADJUSTMENT OF SNUBBER
(BRAKE FOR MANDRELSJ
After belt has been properly adjusted, adjust Adjusting Pin on
Snubber Pull Rod as stated below:
another free manual from www.searstractormanuals.com
Place Mower Clutch Control in "OFF" position (Fig . 7A or
7B).
Remove Retainer Spring holding Adjusting Pin on Snubber
Pull Rod in Idler Shaft Assembly. Remove Adjusting Pin
from hole. With the Mower Clutch Control in the "OFF"
position, turn Adjusting Pin on Snubber Pull Rod until
Adjusting Pin will fit freely in hole of Idler Shaft Assembly.
Remove Adjusting Pin from hole . Turn Adjusting Pin counterclockwise 6 complete turns and replace Washer on Pin
against shoulder. Reinsert Pin with Washer in hole of Idler
Shaft Assembly. NOTE : Mower Clutch Control can be pulled
ahead to assemble. Secure with Retainer Spring.
When Mower Clutch Control is fully disengaged ("OFF"
position), blades will stop quickly.
RETAINER
( / IDLER
SPRING
___
SHAFT
ASSEMBLY
MAKE SURE
THAT BRAKE IS NOT
AGAINST MANDREL
PULLEY WHEN
MOWER
IS ENGAGED
(LEVER OR
PEDAL PUSHED FORWARD).
FIGURE 18
If Snubber Pull Rod is ever removed, be sure it is reassembled
with slight bend in Rod downward and under the mower drive
belt. Refer to Fig. 9, page 4.
UPPER
CENTER
MANDREL:
SHEAVE
BELT REPLACEMENT
MOWER MAIN DRIVE BELT
BELT
GUIDE
NUTS
1.
Unhook Spring from rear belt guide bracket of Belt Guide
(Fig. 19).
2.
Remove Belt Guide at center mandrel by removing three (3)
Nuts and Lockwashers.
3.
Remove Nut and Lockwasher from Idler Shaft Assembly
and remove Belt Guide (Fig. 19A). Also remove Engine
Belt Guard and Belt (F ig . 18) .
4.
Install new Belt on Center Mandre l first, then on Idler
Sheaves and on Engine Pulley . NOTE : See Fig. 19A for
proper way of installing Belts on Idler Sheaves. Backside
(outside) of Belt must be placed in flat (outside) Idler. Belt
must be placed in largest groove of Engine Pulley. Repla ce
Belt Guide securely.
5.
Replace Engine Belt Guard (Fig. 18).
6.
Re place Belt Guide and snubber at center mandrel and
adjust so that there is 1/16 to 1/8 inch clearance between
it and the Sheave . Replace Spring (Fig. 19). Adjust drive
belt and snubber refer to page 4, steps 1 thru 8 .
FIGURE 19
ENGINE _ -_
PULLEY
'_
.' ""/h'
11_ "
• I
BELT II/.,"
i,' .{l'N
f;' . •L IDLER SHAFT
I
:\..
. ASSEMBLY
FLAT
IDLER
BELT
"
GUIDE
~ LDCKWASHER
NUT
FIGURE 19A
• A_
t
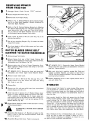
REMOVING MOWER
FROM TRACT OR
CENTER SHEAVE
1.Disengage Mower Clutch Control ("OFF" position).
2.Remove Engine Belt Guard (Fig. 4).
3.Remove belt from Engine Pulley.
4. (Refer to
Fig. 7). Remove:;Retainer Spring holding Adjusting Pin to Idler Shaft Assembly. Remove Adjusting Pin
from Idler Shaft Assembly.
'
another free manual from www.searstractormanuals.com
5. (Refer
to" Fig, 8). Remove Retainer Spring from Adjusting
Pin, Remove Adjusting Pin from Idler Shaft Assembly. Unhook Spring from Idler Frame and Front Axle Bracket.
(Fig, 5), Remove Idler Shaft Assembly from front of tractor and place on ground between front wheels.
FIGURE 20
6.Lower mower by means of the Lift Lever (Fig. 12), to its
extreme low position.
7. Pull
all four Attaching Plungers (Fig. 2) outward to detach
mower from tractor.
8. Turn
front wheels to left and slide mower out from under
R.H. side of tractor.
OUTER BLADES DRIVE BELT
(CENTER TO OUTER MANDRELS)
1. Remove mower from tractor,
2.Unhook Spring from rear of Be!+ Guide. Remove Belt
Guide at center mandrel by removin!,! the 3 Belt Guide Nuts,
Lockwashers, and Flat Washers (Fig. 19).
FIGURE 21
3. Remove cotter pins at front of Lower Suspension Arms,
Move suspension linkage outward and swing to rear--both
R.H. and L.H. sides.
13.48" MOWER ONLY. Reassemble Upper Center Mandrel
Sheave with three caps screws and lockwashers removed in
step four. Tighten securel y.
4.48" MOWER ONLY. Remove the three cap screws and
lockwashers and remove Upper Center Mandrel Sheave.
14.With main drive belt in position, replace Belt Guide and
snubber at Center Mandrel, and adjust so that there is
1/16 to 1/8 inch clearance between it and the Sheave. Ad·
just drive belt and snubber,
5. Remove
mower deck Cover.
6.Remove one bolt in Belt Guide (No, 26, page 10) at L.H.
Mandrel Sheave (Fig. 20), Loosen the other bolt. Swing
Belt Guide to one side.
7.
8. Remove
any dirt and grass which may have accumulated
around sheaves and idler arm.
9.lnstall new belt in groove of L.H. Mandrel Sheave lower
groove of Center Mandrel Sheave and around Flat Idler.
From a position at discharge end of mower, grasp rearmost strand of belt in left hand and pull belt coming from
idler with right hand until it will go into groove of R.H.
Mandrel Sheave (Fig. 20).
10. Rotate
Center Sheave by hand to make sure belt is running
in the grooves properly.
BLADES WILL ROTATE WITH CENTER
SHEAVE.
11. Reassemble
Belt Guide at L.H. Mandrel and adjust so that
there is 1/16 to 3/32 inch clearance between Guide and
the belt all around.
12.
Suspension Arms in their original position and secure with Cotter Pins.
STORAGE
Remove Belt.
A
15. Replace
Reassemble Mower Deck Cover. Fasten nuts securely.
Remove mower from tractor for winter storage. When mower
is to be stored for a period of time, clean it thoroughly, reo
move all dirt, grease, leaves, etc. Give blades and undr>rside of
housing a good coat of grease or rust preventative. Store in a
clean dry area.
Each mandrel should be filled with grease thru the Grease
Fitting located between mower blade and underside of the
mower housing (Fig. 21). Wipe fitting clean before greasing.
Use high performance extreme pressure lubricating grease,
(Amdex No.1 EP or equivalent). Add grease until it oozes out
around the cap above the blade and under the sheave. This
will not damage the grease retainer. Wipe mandrel clean of excess grease. This grease may be obtained by ordering thr'l
your nearest Sears repair parts department, Part No. 2557n,
Sears, Roebuck and Co, or Simpsons-Sears Ltd. in Canada 1"
serves the right to make any changes in design or improvb
ments without imposing any obligation to install the $:'1111'
-9- upon its items heretofore manufactured.
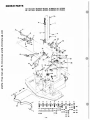
REPAIR PARTS
42" ROTARY MOWER--MODEL NUMBER 917.253580
48" ROTARY MOWER--MODEL NUMBER 917.253590
~1A
another free manual from www.searstractormanuals.com
1
I .AOiIIf..---
22A
~-I-----"~22
~-~--23
~-I--25
J
J
a::D36
a::D36
_
37
1C138
·10·
REPAIR PARTS
another free manual from www.searstractormanuals.com
42" ROTARY MOWER--MODEL NUMBER 917.253580
48" ROTARY MOWER--MODEL NUMBER 917.253590
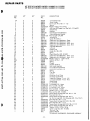
I
KEY
NO.
42"
48"
PART
NO.
lA
1
2
3
4
5
6
7
8
9
10
11
12
13
13
14
14
15
16
17
18
19
20
21
21
22
22A
23
24
25
26
27
27
28
29
30
31
31
32
33
34
34
35
36
37
38
39
40
42
43
44
45
46
47
48
49
50
51
52
X
X
X
X
X
X
X
X
X
X
X
X
X
X
X
X
X
X
X
X
X
X
X
X
X
X
X
9479R
9083R
8540R
2876H
STD551 037
673A61
2895H
280Ml
634A358
9426H
STD541137
9420H
2511P
634A345
634A348
634A344
634A347
634A879
929R
9412H
2505P
9535H
9505H
634A343
634A346
STD551050
9465M
3720R
9416H
9504H
634A334
634A854
634A477
9503H
2083R
8041R
2289R
2290R
3544R
3543R
9422R
9500R
STD551137
STD541037
STD551131
STD541031
STD551031
S rD541237
STD533712
STD523710
STD533710
61P
STD523712
STD533107
STD523715
STD533725
STD533730
STD551037
5394H
9912R
647J
X
X
X
X
X
X
X
X
X
X
X
X
X
X
X
X
X
X
X
X
X
X
X
X
X
X
X
X
X
X
X
X
X
X
X
X
X
X
X
X
X
X
X
X
X
X
X
X
X
X
X
X
X
X
X
X
X
X
X
X
X
X
X
X
X
X
X
X
X
X
X
X
X
X
X
X
X
X
X
X
X
X
X
·11 -
DESCRIPTION
Lever Plunger Cap
Lever Plunger
Drive Lock Pin 3/16 xl· 1/2
Spring
"Washer 13/32 x 7/8 x 14 Ga.
Lift Lever W/Plunger (Inc. Key No's. 1,2 and 3)
Handle Grip
Bushing
Pitch Adjustment Weldment
Pitch Adjustment Bracket
*Hex Nut 3/8 - 24 UNF
Leveling Pin
Cotter Pin 3/16 x 1
Suspension Arm Weldment - Outer
Suspension Arm Weldment - Outer
Suspension Arm Weldment - Inner - R.H.
Suspension Arm Weldment - Inner· R.H.
Lift Shaft Weldment
Lift Link
Hanger Link
Cotter Pin 1/8 x 3/4
Spring
Elastic Stop Nut 3/8 - 24 UNF
Suspension Arm Weldment - Inner - L.H.
Suspension Arm Weldment - Inner - L.H.
"Washer 17/32 x 1 - 1/16 x 13 Ga.
Roll Pin 3/16 x 1 - 1/2
Spring
Plunger
Roll Pin 3/16 x 2
Belt Guide Assembly
Deck Idler Arm Assembly
ueck ILJler Arm Asscif,lJly
Spring
Flat Idler
!Jeari ng
D ischdl ge Cutoff Plate
Discharge Cutoff Plate
Suspension Bracket Front - L.H.
Suspension Bracket - Front - R.H.
Blade Shield
Bldde Shield
"Lockwasher 3/8 - Heavy
"Hex Nut 3/8 - 16 UNC
"Lockwasher 5/16 - Heavy
"Hex Nut 5/16 - 18 UNC
*Washer 11/32 x 11/16 x 16 Ga.
"Hex Jam Nut 3/8 - 16 UNC
*Square Neck Carriage Bolt 3/8 - 16 x 1 - 1/4
"Hex Bolt 3/8 -16 xl
"Square Neck Carriage Bolt 3/8 - 16 x 1
Sq. Nk. Carriage Bolt - Sht. Shoulder 3/8 - 16 x 1 Gr. 5
"Hex Bolt 3/8 - 16 xl - 1/4
"Square Neck Carriage Bolt 5/16 - 18 x 3/4
"Hex Bolt 3/8 - 16 x 1 - 1/2
"Square Neck Carriage Bolt 5/16 . 18 x 2 . 1/2
"Square Neck Carriage Bolt 3/8 . 16 x 3
"Washer 13/32 x 13/16 x 16 Ga.
Center Lock Nut 3/8 - 16 UNC
Warranty Tag
Owners Manual
"STANDARD HARDWARE··PURCHASE LOCALLY
REPAIR PARTS
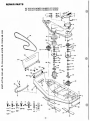
42" ROTARY MOWER--NUMBER 917.253580
48" ROTARY MOWER--NUMBER 917.253590
~1 ~~5
~
1--@
2~
A
~2;-'
3~_ @--3~6
---__
r- -, -
-'-'
~
,
~:o
-
9
~,
I ··
3'fj)'
F
30
Ar
"1
00
-f+
12~"
19
I
1
~C>;
"
~
~26
12
12
~t
9-- 2:"
29
---<E
28
~27
34
25~
~26
~24
~2322
8
I
~~
another free manual from www.searstractormanuals.com
U...,.,....
,
I
10
~11
~ 12
~13
15
.---14
~16
+~~3
15
~17
~2~ ~,.
t'--'9
~+-__
I
I
"B
A
B
C
143 '1
-3
44 143
... 2
..... 2
..... 2
[]) 1
([D 1
E
0
F
45·~1~7
...-40
-
~41
G
l~~
_
2
a::::IJ
1
49
0
[]) 1
- 12-
7
another free manual from www.searstractormanuals.com
REPAIR PARTS
It
42" ROTARY MOWER--MODEL NUMBER 917.253580
4R" ROTARY MOWER--MODEL NUMBER 917.253590
KEY
NO.
1
2
3
4
5
6
6
7
8
8
9
9
10
11
12
13
14
15
16
17
18
19
42"
48"
X
X
X
X
X
X
X
X
X
X
X
20
21
X
X
X
X
X
X
X
X
X
X
X
X
X
X
X
X
21
22
23
24
25
26
27
28
29
30
30
31
32
32
33
34
34
35
35
36
36
37
37
X
X
X
X
X
X
X
X
X
38
X
38
39
40
41
42
43
44
45
46
47
48
49
50
51
52
53
X
X
X
X
X
X
X
X
X
X
X
X
X
X
5951R
634A923
X
634A922
X
X
X
X
X
X
X
X
8330H
1036R
634A426
880R
882R
9494H
888R
634A427
634A926
634A927
2080R
6942R
6943R
643J
634A855
634A895
8063R
8064R
9482R
9536R
9480R
9497R
2070R
2071R
9133R
STD551143
STD551137
9591R
STD533107
STD523110
3204P
6855M
STD523710
STD523110
2557R
9082R
9098R
5846R
5848R
X
X
X
X
X
X
X
X
X
X
X
X
X
X
X
X
X
X
X
X
X
X
X
X
X
X
X
PART
NO.
STD541031
STD551131
STD551031
2629R
3770R
634A590
634A592
STD560907
634A588
634A591
634A856
634A484
4831H
634A417
4539P
881R
1554H
1553H
634A431
9458H
634A315
634A423
X
X
X
X
X
X
X
X
X
X
X
X
X
X
X
X
DESCRIPTION
*Hex Nut 5/16 -18 UNC
* Lockwasher 5/16 - Heavy
*Washer 11/32 x 11/16 x 16 Ga.
Brake Shoe
Spring
Snubber Weldment
Snubber Weldment
*Cotter Pin 3/32 x 3/4
Belt Guide Weldment . Center
Belt Guide Weldment - Center
Deck Drive Cover and Weld Bolts
Deck Drive Cover and Weld Bolts
Elastic Stop Nut 3/4 - 16 UNF
Mandrel Sheave - Outer w/Set Screws (Inc. Key No. 12)
Hex Forged Socket Headless Set Screw C.P. 3/8 - 16 x 5/8
Metallic Seal
Bearing Cone
Bearing Cup
Mandrel Tube and Cups - Outer (Inc. Key No. 15)
Mandrel Cap
Shaft and Flange - Outer
Mandrel Assembly with Sheave - Outer (Inc. Key No's. 10
thru 18 and 46)
MQndrel Shim - L.H.
Mandrel Assembly with Sheave - Center (Inc. Key No's. 10,
12, 23 thru 30 and 46)
Mandrel Assembly with Sheave - Center (Inc. Key No's. 10,
12, 23 thru 30 and 46)
Woodruff Key 1/4 xl H.T.
Mandrel Cap - Center
Shaft and Flange - Center
Woodruff Key 1/4 x 1.7 H.T.
Metallic Seal
Bearing Cone
Bearing Cup
Mandrel Tube and Cup - Center (Inc. Key No. 28)
Mandrel Sheave - Center with Set Screws (Inc. Key No. 12)
Mandrel Sheave - Center with Set Screws (Inc. Key No. 12)
Mandrel Sheave UpPer· Center
V-Belt (Center to Outer Mandrels)
V-Belt (Center to Outer Mandrels)
Deflector - Caution Decal
Deflector Shield Weldment
Deflector Shield Weldment
Runner - R. H.
Runner - R.H.
Mower Housing
Mower Housing
Blade
Blade
Runner - L.H.
Runner - L.H.
Instruction - Caution Decal
* Lockwasher 7/16
* Lockwasher 3/8 - Heavy
Lift Decal
*Carriage Bolt 5/16 - 18 x 3/4
*Hex Bolt 5/16 - 18 x 1 Grade 5
Hex Bolt 7/16 - 14 x 3/4 Grade 5
Grease Fitting
*Hex Bolt 3/8 -16 xl
*Hex Bolt 5/16 - 18 xl
Amdex No.1 E.P. Grease (Not Furnished with Mower)
Deflector Shield Rod
Deflector Shield Bracket
Push Nut
Torsion Spring
*STANDARD HARDWARE--PURCHASE LOCALLY
- 13·
REPAIR PARTS
another free manual from www.searstractormanuals.com
42" ROTARY MOWER--MODEL NUMBER 917.253580
48" ROTARY MOWER --MODEL NUMBER 917.253590
5
4
9
KEY
NO.
42"
48"
PART
NO.
1
2
3
4
5
6
7
8
9
10
11
12
13
14
15
16
17
X
X
X
X
X
X
X
X
X
X
X
X
X
X
X
X
X
X
X
X
X
X
X
X
X
X
X
X
X
X
X
X
X
X
3705R
Belt Tightener Link
4939M
Retainer Spring
3707R
Adjusting Pin
4940M
Retainer Spring
634A619
Idler Shaft Assembly
9503H
Spring
1569P
Washer 9/16 x 15/16 x 11 Ga .
3766R
Snubber Pull Rod
634A565
Inside Idler
5386H
Bushing
634A566
Outside Idler
1519P
Washer 15/32 x 1 x 12 Ga .
STD541143 * Hex Nut 7/16 - 20 UNF
634A618
Belt Guide Weldment - Front
STD551143 * Lockwasher 7/16 - Heavy
6941 R
V-Belt (Engine to Center Mandrel)
2510P
Cotter Pin 5/32 x 1
DESCR IPTION
*STANDARD HARDWARE --PURCHASE LOCALLY
- 14-
OPTIONAL EQUIPMENT
---~·-.".....,.L:-l-:.b:-CARRIAGE BOLTS 5/16 x 3/4
FLAT WASHERS 11/32 x 11/16 x 16 GA.
LOCKWASHERS 5/16
HEX NUTS 5/16
GAUGE WHEEL KIT
CATALOG NO. 25383
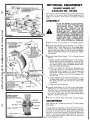
Your mower is of the full floating type and will closely follow
the contours of the ground when using the gauge wheels for
hei ght o f cut position . They prevent so il gouging o n sloping
terrain .
another free manual from www.searstractormanuals.com
ASSEMBLY
PLACE THE MOWER CLUTCH CONTROL
LEVER IN THE "OFF" POSITION, LOCK
THE PARKING BRAKE,
SHIFT INTO
NEUTRAL AND
SHUT OFF THE ENGINE. MAKE ABSOLUTELY SURE THE
BLADES AND ALL
MOVING PARTS
HAVE COMPLETELY STOPPED. REMOVE
THE IGNITION KEY, DISCONNECT THE
SPARK PLUG WIRE(S) FROM THE SPARK
PLUG(S) AND KEEP
WIRE(S) AWAY
FROM THE PLUG(S) TO PREVENT INJURY FROM ACCIDENTAL STARTING.
FIGURE 1
1.Move lift lever so that mower is in its highest position .
(A)CARRIAGE BOLT 5/16 x 1
FLAT WASHER
11/32x11/16x16GA.
LOCKWASHER 5/16
HEX NUT 5/16
--~
GAUGE WHEEL
SUPPORT· R.H.
2.Assemble Gauge Wheel Support Assembly· L.H. to Mower
Housing (F ig. 1) with three 5/16 x 3/4 Carriage Bolts,
11 /32 x 11/16 x 16 Ga. Flat Washers, 5/16 Lockwashers
and 5/ 16 Hex Nuts . Heads of Bolts to inside; Flat Washers
between Gauge Wheel Support and Lockwashers . Tighten
nuts securely .
(C) CARRIAGE BOLT 5/16 x 1
LOCKWASHER 5/16
HEX NUT 5/16
3.Assemble Gauge Wheel Support· R.H. to Mower Housing
(Fig. 2) .
a. Loosely assemble Gauge Wheel Support· R.H. to Mower
Housing using a 5/16 x 1 Carriage Bolt, 11/32 x 11/16 x
16 Ga. Flat Washer, 5/16 Lockwasher and 5/16 Hex
Nut. Head of bolt to inside; Flat Washer between Lock·
washer and Gauge Wheel Support.
b. Remove and d iscard the carriage bolt, lockwasher and
n ut at rear of RUnn l! r . R. H. Position the end of the
Gauge Wheel Bracket Support · R.H . with the larger hole
ove r Runner . Loosely secure with a 5/ 16 x 1 . 1/4 Hex
Bolt (head t o outside as sh own), 5/16 Lockwasher and
5/16 Hex Nut .
c. Loosely asse mble Gauge Wh ee l Bracket Support · R.H.
to Gauge Wheel Support· R.H. with a 5/16 x 1 Carriage
Bo lt, 5/16 Lockwasher and 5/16 He x Nut. Head of bolt
to underside.
---===,
(A)CARRIAGE BOLT 5/16 x 1
FLAT WASHER
~~~_ _--,...
11/32 x 11/16 x 16 GA.
LOCKWASHER 5/16~
RUNNER· R.H.
HEX NUT 5/16
d. T ighten all three Nuts securely .
V
4.Assemble Gauge Wh ee ls to R.H. sid e of each Gauge Wheel
Support (Fig . 3). Use the top hole in each Support. NOTE:
A Bushing must I )(~ inside each whee l hub and a 13/32 x
7/8 x 14 Ga. Washer must be on each side of wheel. Thick·
er portion of wheel hubs must be toward Gauge Wheel
Supports. Tighten nuts securely.
FIGURE 2
THICKER PORTION
OF HUB TOWARD
GAUGE WHEEL SUPPORT
5.Be sure to replace spark plug wire(s) to spark plug(s) .
KWASHER
HEX BOLT - -_ _
EX NUT
WHEEL SUPPOR
GAUGE WHEEL -
_ _~
3
1IiFIGURE
_____________________
•
ADJUSTMENT
After following the "Operating Instructions" on page 6 adjust
gauge wheels.
If gauge wheels are suspended , no tear ing of the turf will occur
on sharp turns by gauge wheels sliding sideways. There are
four holes in the R.H. and L.H. gauge wheel supports. With
lift leve r set to give desired height of cut and with tractor and
mower on level ground , adjust ga uge wheels to one of the
holes
in gauge
wheel
so that they clear the ground
. 15 . by approx
imately
3/4 supports
inch .
REPAIR PARTS
OPTIONAL EQUIPMENT
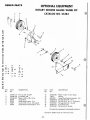
ROTARY MOWER GAUGE WHEEL KIT
CATALOG NO. 25383
4
3
5
another free manual from www.searstractormanuals.com
2
9
8
A
f
a:::IJ
B
11
14
15
i
( [IJ
KEY
NO.
1
2
3
4
5
6
7
PART
NO.
C
12
i
.
13
@) 8
14
15
!OJ
/
6
~
14
15
DESCR IPTION
KEY
NO.
8
9
STD541137 *Hex Nut 3/8 . 24 UNF
STD5.51137 * Lockwasher 3/8
STD551037 *Washer 13/32 x 7/8 x 14 Ga.
9536H
Gauge Wheel
Gauge Wheel Support· R.H.
2073R
3199P
Hex Bolt 3/8 . 24 x 2 . 3/4 Grade 5
Gauge Wheel Bracket Support· R.H.
8133R
10
11
12
13
14
15
PART
NO .
STD551031
7375H
634A480
STD533110
STD523112
STD523107
STD551131
STD541031
DESCRIPTION
*Washer 11/32 x 11/16 x 1Q Ga.
Bushing
Gauge Wheel Support Assembly - L.H.
*Carriage Bolt 5/16 - 18 x 1
*Hex Bolt 5/16 - 18 xl - 1/4 Grade 5
*Carriage Bolt 5/16 - 18 x 3/4
* Lockwasher 5/16
*Hex Nut 5/16 - 18 UNC
*STANDARD HARDWARE--PURCHASE LOCALLY
Catalog No . 25383 includes all of the above items.
- 16-
647J-7.7.77
Printed in U.S.A.
another free manual from www.searstractormanuals.com
ISears]
MODEL NO.
917.253580
OR
another free manual from www.searstractormanuals.com
917.253590
HD TO ORDER
RIP IR P HTS
MODEL NUMBER
The Model Number will be found on a plate attached to the
Rear R.H. side of the Mower Housing. Always mention the
Model Number when requesting service or repair parts for
your Rotary Mower.
REPAI R PARTS
All parts listed herein may be ordered from any SEARS, ROEBUCK AND CO. or SIMPSONS-SEARS LIMITED retail or
cataloQ store.
WHEN ORDERING REPAIR PARTS, ALWAYS GIVE THE
FOLLOWING INFORMATION:
•
•
.,
.,
THE
THE
THE
THE
PART NUMBER
PART DESCRIPTION
MODEL NUMBER
NAME OF MERCHANDISE
If the parts you need are not stocked locally, your order will be
electronically transmitted to a Sears Repair Parts Distribution
Center for "expedited handling" .
-
• 1
Sears, Itoeb u ck and Co. Chicago. IlL 6 0 684 , U S .A .
an d Sirnp sons S ears Li mite d. Toro nto. C anada