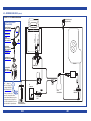
1
RPI Field Service Smart Kit®
(RPI Part #SCK028)
A Guide to Maintaining
The SciCan STATIM ® Cassette Autoclave
Replacement Parts Industries, Inc. is pleased to present this valuable work tool that can help
save you and your customers time and money. Included in this booklet you will find Instructions
on how to use each of the tools in this Kit, plus diagrams, exploded views, PM check lists,
error code listings with troubleshooting service tips and a complete list of RPI parts to fit the
SciCan STATIM Cassette Autoclaves.
For use with these models only:
STATIM 2000, model 101102 (with S/N ending in "A")
STATIM 2000, model 121101
STATIM 5000, model 01-201103
CALL (800) 221-9723 or (818) 882-8611 • FAX (818) 882-7028
• E-MAIL [email protected] • WEBSITE www.rpiparts.com
TABLE OF CONTENTS
Page
1.0 - Theory of Operation ..................................................................................................................................................1
• STATIM 2000 Cycle Time, Temperature & Model Listing........................................................................................1
• STATIM 5000 Cycle Time, Temperature & Model Listing........................................................................................1
• Figure 1 - 2000 & 5000 Keypad Symbols Chart....................................................................................................1
2.0 - RPI Field Service Smart Kit (RPI Part #SCK028) .........................................................................................................2
2.1 - Extension Test Cable (RPI Part #SCT026).........................................................................................................4
2.2 - Start Switch (RPI Part #SCS021) .....................................................................................................................5
2.3 - Pump Tester Bottle (RPI Part #SCK024) ...........................................................................................................6
2.4 - Spanner Nut (RPI Part #RPT364) .....................................................................................................................8
2.5 - Hex Balldriver (5/64") (RPI Part #RPT297) .......................................................................................................9
2.6 - Cassette Seal Removal Tool (RPI Part #RPT372) ............................................................................................10
2.7 - Liquid Soap (RPI Part #RPS287) ....................................................................................................................10
2.8 - Threadlocker 545 (RPI Part #RPA369) ...........................................................................................................11
2.9 - Hex Balldriver (9/64") (RPI Part #RPT836) .....................................................................................................11
2.10 - Alignment Tool (RPI Part #SCT052)..............................................................................................................12
2.11 - Water Quality Tester (RPI Part #RPT820)......................................................................................................14
2.12 - Calibration Solution (RPI Part #RPS821) ......................................................................................................15
3.0 - Exploded View ........................................................................................................................................................16
4.0 - Planned Maintenance (PM) Check List and Installation and Monthly Maintenance for Cassette Seal
• STATIM 2000 (RPI Part #SCK035) .......................................................................................................................18
• STATIM 5000 (RPI Part #SCK036) .......................................................................................................................20
• Installation and Monthly Maintenance for Cassette Seal .....................................................................................22
5.0 - Service Tips ............................................................................................................................................................24
6.0 - LCD Error Codes .....................................................................................................................................................26
• Stage #1 - Warming Up......................................................................................................................................27
• Stage #2 - Conditioning .....................................................................................................................................27
• Stage #3 - Pressurizing......................................................................................................................................28
• Stage #4 - Sterilization.......................................................................................................................................29
• Stage #5 - Venting .............................................................................................................................................31
• Stage #6 - Drying...............................................................................................................................................33
7.0 - LCD Messages........................................................................................................................................................34
8.0 - Troubleshooting Tips ...............................................................................................................................................36
9.0 - Reference Blocks....................................................................................................................................................38
9.1 - Steam Generator/Boiler.................................................................................................................................38
9.2 - Cleaning the Steam Generator/Boiler ............................................................................................................39
9.3 - Steam Generator/ Boiler Calibration Procedures............................................................................................40
9.4 - Solenoid Valve ..............................................................................................................................................41
9.5 - Cassette .......................................................................................................................................................42
9.6 - Pump............................................................................................................................................................43
9.7 - Air Compressor .............................................................................................................................................44
9.8 - Electrical Diagram ........................................................................................................................................46
9.9 - Plumbing Diagram ........................................................................................................................................48
10.0 - RPI Parts List (for Parts to Fit STATIM 2000 & 5000) ..............................................................................................50
11.0 - RPI Tools & Accessories List (for Parts to Fit STATIM 2000 & 5000)........................................................................52
1.0 - THEORY OF OPERATION
The STATIM ® uses a steam generator (also known as a
boiler) to create steam, which is then injected into the cassette, which serves the same purpose as a traditional autoclave chamber. The temperature is then monitored via
thermocouples. One thermocouple monitors the steam
generator/boiler temperature and the other monitors the
cassette temperature, not unlike the traditional steam sensor mounted in the chamber. The autoclave does not monitor the pressure with a device such as a transducer or
gauge. Instead, the pressure reading is a value calculated
by the microprocessor.
steam generator/boiler and converted into steam. The
steam is injected into the cassette. As the steam enters the
cassette, the air is purged out through the vent solenoid
valve. The air is continuously expelled into the waste water
bottle's condensation coil. This allows steam to run through
the cassette to maintain proper steam temperature.
Instruments are loaded into the cassette and the cassette
is placed into the cassette bay. Inserting the cassette will
close the microswitch that activates the vent solenoid
valve. The user selects a cycle and depresses the start button. The steam generator/boiler then heats up to the proper
temperature. The distilled water is then pumped into the
Once the sterilization stage has finished, the vent solenoid
valve will open and remain open. The venting stage will
expel the steam pressure through the exhaust tubing into
the condenser waste bottle. The steam condenses back
into water in the condensation coil. The compressor will
run until the drying stage is complete.
Most autoclaves reuse the same water over and over, but
the STATIM uses fresh distilled water each time. Never use
deionized, demineralized or specialty filtered water. Tap
water must never be used.
STATIM 2000 CYCLE TIME, TEMPERATURE & MODEL LISTING
Unwrapped
Wrapped
Model #
Temp
Time
Temp
Time
101102
135˚C
3.5
135˚C
10
121101
275˚F
minutes
275˚F
minutes
01-122328
135˚C
4.0
135˚C
10
275˚F
minutes
275˚F
minutes
Rubber & Plastics
Temp
Time
121˚C
15
250˚F
minutes
121˚C
20
250˚F
minutes
Air Dry
Time
60
minutes
60
minutes
STATIM 5000 CYCLE TIME, TEMPERATURE & MODEL LISTING
Country
USA
Canada
(And all other countries
except Czech Republic)
Model #
01-201103(-R)
01-201104(-R)
All other
models
Unwrapped
Temp
Time
132˚C
3.5
270˚F minutes
135˚C
3.5
275˚F minutes
Wrapped
Temp
Time
132˚C
6
270˚F
minutes
135˚C
6
275˚F
minutes
Rubber
& Plastics
Temp
Time
121˚C
35
250˚F
minutes
121˚C
15
250˚F
minutes
Heavy Duty
Unwrapped
Temp
Time
132˚C
6
270˚F minutes
135˚C
60
275˚F minutes
FIGURE 1 – STATIM 2000 & 5000 KEYPAD SYMBOLS CHART
Model 2000
Model 5000
Unwrapped
Unwrapped
Wrapped
Rubber
& Plastics
Air Dry
Start
Stop
Wrapped
Rubber
& Plastics
Heavy Duty
Unwrapped
Start
Stop
1
2.0 - RPI FIELD SERVICE SMART KIT®
(RPI PART #SCK028)
Contained in the next several pages are
instructions on how, when, where and why
to use the parts in the RPI Field Service
Smart Kit® (RPI Part #SCK028) to service
and repair the SciCan STATIM Cassette
Autoclave models 2000 and 5000.
TI
LO C
Ad5 45
h es
i ve
E
R
U
P 2O T
H S
TE
IS
THSIDE
UP
2.1 – Extension Test Cable
RPI Part #SCT026
(see page 4)
LE
VE
L
UM
MINIMLINE
FILL
IS
TH E
SID
UP
OP
ST
ST
AR
T
All Parts Shown Are Included In The Kit!
LO5
Ad
h
s
4 T
I
e 5
ive
C
RU
LO N N
C K IN G
SCT052
0
G
IN
N K
N
U C
R LO
29
RPA369
I
SCT026
SCS021
O
2.2 – Start Switch
RPI Part #SCS021
(see page 5)
RPT297
RPT820
RPS821
MINIMUM
FILL LINE
MINIMU
M
FILL LINE
RPT372
2.3 – Pump Tester Bottle
RPI Part #SCK024
(see pages 6 & 7)
SCK024
RPT836
RPT364
RPS287
RPC476
2
3
TH
IS
UP
2.1 - EXTENSION TEST CABLE
(RPI PART #SCT026)
FIGURE 2.1A
LCD Display Board
Connector
When testing, troubleshooting or repairing the STATIM autoclave, install the RPI Extension Test Cable. By attaching
the Extension Test Cable to the cover and main PC board
as instructed below, you will be able to extend the distance between the autoclave and the cover thus allowing
you to place the cover in a horizontal (not vertical) position
for easier viewing of the LCD display and easier access to
the keypad.
Keypad Connector
IS
THSIDEP
U
2.2 - START SWITCH
(RPI PART #SCS021)
STEP #2 - Once the Start Switch is connected, the next
step is to connect the Pump Tester Bottle (see 2.3 “Pump
Tester Bottle” Instructions, page 6). When testing the
pump, press and hold the “momentary” button for
approximately 25 seconds. When decontaminating the
steam generator/boiler, (see Caution note below), press
and slide the “momentary” button into the “hold” (i.e. running lock) position for approximately 3 minutes. (Caution:
When decontaminating the steam generator/boiler, the
reservoir must be full so that the pump does not run dry
during the process thus causing severe damage to the autoclave.) See page 39 - Figure 9.2 for complete steam
generator/boiler cleaning procedure.
When testing the pump or decontaminating the steam
generator/boiler, it is suggested by the OEM to activate the
pump by shorting Pins #18 and #16 together. However,
the RPI Start Switch offers an easier and safer method. By
connecting the RPI Start Switch to the main PC board connector (P1), you control the activation of the pump via a
hand-held switch. In addition, the RPI Start Switch has a
“hold feature” (i.e. running lock) for longer test periods.
IS
TH E
SIDP
U
INSTRUCTIONS
INSTRUCTIONS
STEP #1 - Disconnect the power to the autoclave. Remove
the cover. Disconnect the two cables from the main PC
board - one cable from the LCD display board and the
other from the keypad. Leave the cover in the horizontal
position (see Figure 2.1A).
STEP #2 - Connect the Extension Test Cable mating connector to the LCD display board cable.
STEP #3 - If the OEM keypad is installed, connect the Extension Test Cable mating connector to the keypad cable
connector (see Figure 2.1B).
If the RPI keypad is installed, connect the Extension Test
Cable mating connector to the RPI keypad cable connector - making sure that both connectors have the “This Side
Up” label facing in the upward direction (see Figure 2.1C).
(Note: The RPI keypad cable connector does not have an
alignment key, so it is very important to connect as per instructions and Figure 2.1C).
STEP #4 - Connect the Extension Test Cable mating connectors to the main PC board - making sure that the
Extension Test Cable connector has the “This Side Up”
label facing in the upward direction (see Figure 2.1A).
(Caution: If the Extension Test Cable is connected incorrectly, severe damage may occur to the autoclave.)
Label
“THIS SIDE UP”
FIGURE 2.1B
LCD Display
Board Connector
Extension
Test Cable
IS
THSIDEP
U
STEP #1 - Connect the RPI Start Switch connector to Pins
#18 and #16 on the “20 Pin Connector” (P1) located on the
main PC board. (See Figure 2.2 and note the following: To
guide the Start Switch connector to Pins #18 and #16,
start at the pin labeled “20”, count down one pin, which
is Pin #18, then count down one more pin, which is Pin
#16. Gently guide the Start Switch connector to both Pins
#18 and #16, leaving all other pins exposed.) (Caution: If
the Start Switch is connected to any other pins except #18
and #16, severe damage may occur to the autoclave.) See
“Device Activation Chart”, page 47.
FIGURE 2.2
OEM Keypad
Cable Connector
(with alignment key)
IS
THSIDEP
U
20
Press and hold for
Momentary feature
FIGURE 2.1C
Start Switch
(RPI Part #SCS021)
LCD Display
Board Connector
IS
THSIDEP
U
G
IN
N K
N
U C
R LO
Extension
Test Cable
RPI Keypad
Cable Connector
(without alignment key)
4
IS
THSIDEP
U
ck)
the ng Lo
r
fo nni
lide (Ru
s
e
and tur
ss ” fea
e
r
P old
“H
5
TIP - To guide the Start Switch
Connector to Pins #18 and
#16, start at the pin labeled
“20”, count down one pin,
which is Pin #18, then count
down one more pin, which is
Pin #16. Gently guide the Start
Switch Connector to both Pin
#18 and #16, leaving all other
pins exposed.
2.3 - PUMP TESTER BOTTLE
(RPI PART #SCK024)
7/16” wrench. Connect the metering tube to the Pump
Tester Bottle male connector and tighten.
STEP #2 - PRIME PUMP: Fill reservoir with distilled water
only and activate the pump for 2-3 seconds to purge any
trapped air from the tubing (until water passes through
the pump) (see page 5, 2.2 - Start Switch). Empty the
bottle of any water that may have entered it during the purge
cycle. The bottle must be completely empty before proceeding with the test.
STEP #3 - TEST CYCLE: Before activating the pump for
the Test Cycle, have a stopwatch or another timing device
available for use during the Test Cycle. Activate the pump
and note the amount of time that it takes for the water
level in the bottle to reach the MINIMUM FILL LINE.
• If the water level reaches the MINIMUM FILL LINE within
25 seconds, pump testing is complete and no further
steps are required.
• If the water level does not reach the MINIMUM FILL LINE
within the specified time, proceed to the next step.
The RPI bottle has a “swivel fitting” on the lid that allows
you to control the position and balance of the bottle. In addition, RPI includes 8” of tubing already connected to the
swivel fitting which allows you to move the bottle a safe
distance away from the autoclave during testing.
The OEM now recommends the use of the Reservoir Cap &
Filter (RPI Part #SCK059) along with the In-Line Water Filter
(RPI Part #SCF034) on all units. The mesh filters should be removed and the autoclave should be upgraded to the In-Line
Water Filter (Drain Kit with Pump Filter RPI Part #SCK037).
INSTRUCTIONS
STEP #1 - TO BEGIN: Disconnect the pump outlet metering tube (see Figure 2.3A) from the steam generator/
boiler by using a 3/8” wrench on the compression nut
while supporting the steam generator/boiler fitting with a
STEP #4 - FILTERS:
• If the autoclave has been upgraded with Drain Kit
with Pump Filter (RPI Part #SCK037), be sure to remove the mesh filter from both the inlet and outlet fittings (if they have not already been removed). The ULKA
brand pump does not have the mesh filters. Replace the
Water Filter (In-Line) (RPI Part #SCF034). Repeat Step
#2 - Prime Pump, then if the water level still does not
reach the MINIMUM FILL LINE within 25 seconds, replace the pump.
• If the unit does not have the Drain Kit with Pump
Filter (RPI Part #SCK037) installed, then clamp off the
pump inlet tubing from the reservoir using hemostats or
a tubing clamp (Note: It is important to clamp the tubing
so that the reservoir does not drain). Disconnect the metering tube from the pump. Remove the filtered elbow
outlet fitting and the filtered barb inlet fitting from the
pump. (Caution: Use a wrench on the pump body while
removing filtered fittings). Clean the mesh filter of both
the inlet and the outlet fittings by placing the fittings
under running water, then blow both ends out with an air
hose. Reinstall the filtered fittings using Teflon® tape
(see Figure 2.3B). Be sure to prime the pump in order
to purge trapped air before running a complete cycle. If
the water level still does not reach the MINIMUM FILL
LINE within 25 seconds, replace the pump (see Tip in
Figure 2.3B). For additional information regarding the
pump see page 43 - Figure 9.6.
RELATED RPI PARTS:
• Drain Kit with Pump Filter (RPI Part #SCK037)
• Metering Tube (RPI Part #SCT053)
• Reservoir Cap & Filter (RPI Part #SCK059)
• Teflon® Tape (RPI Part #RPT579)
• Water Filter (In-Line) (RPI Part #SCF034)
FIGURE 2.3A
FIGURE 2.3B
290
Metering Tube (RPI Part #SCT053)
to Steam Generator/Boiler
Mesh Filter
Outlet Fitting
Flow
290
Flow
Reservoir Cap & Filter
(RPI Part #SCK059)
Metering Tube
(RPI Part #SCT053)
Inlet Fitting
Reservoir
I
O
Drain Kit with Pump Filter
(RPI Part #SCK037);
Filter only (RPI Part #SCF034)
Bottle Male Connector
Bottle Inlet Tube (8”)
MINIMUM
FILL LINE
6
Flow
Pump Tester Bottle
(RPI Part #SCK024)
TIP - The OEM now recommends the use
of the Reservoir Cap & Filter (RPI Part
#SCK059) along with the In-Line Water
Filter on all units. The mesh filters should
be removed and the autoclave should be
upgraded to the In-Line Water Filter (Drain
Kit with Pump Filter RPI Part #SCK037).
7
TIP - If the unit does not have the
Drain Kit with Pump Filter (RPI
Part #SCK037) and the Reservoir
Cap & Filter (RPI Part #SCK059),
now is a good time to upgrade. If
time does not permit an upgrade,
remove and clean mesh filters
inside inlet and outlet fittings as
described above and anticipate
an upgrade at the next service.
2.4 - SPANNER NUT
(RPI PART #RPT364)
FIGURE 2.4
TIP - First remove the nut, yoke and
coil to access the flute/bonnet.The
Spanner Nut (RPI Part #RPT364) offers
an easier and safer way to remove
and install the flute/bonnet.
When removing the solenoid flute/bonnet, it is suggested
by the OEM to use a pair of pliers on the welded area of the
flute/bonnet. If done incorrectly, the pliers could collapse
the hollow area of the flute/bonnet, thus preventing the
plunger from moving freely.
However, using the Spanner Nut (RPI Part #RPT364) offers
an easier and safer way to remove and install the
flute/bonnet.
INSTRUCTIONS
STEP #1 - Disconnect the power to the autoclave. Remove
the nut, coil bracket, and coil.
STEP #2 - Place the Spanner Nut over the flute/bonnet
and align the Spanner Nut pins with the holes in the base
of the flute/bonnet (see Figure 2.4).
STEP #3 - Using a wrench on the Spanner Nut; loosen the
flute/bonnet to access the internal parts of the solenoid
valve.
STEP #4 - Service as needed.
Nut
Coil
(RPI Part #SCC005)
Coil Bracket
Spanner Nut
(RPI Part #RPT364)
2.5 - HEX BALLDRIVER (5/64")
(RPI PART #RPT297)
- FOR USE WHEN REPLACING
THE MICROSWITCH
and (2) #2 Split Lockwashers (RPI Part #RPH253). The
screws and lockwashers are also available separately and
can be used with the OEM switch.
Apply Silicone Gasket Maker (RPI Part #RPS639) to side
of switch and mount to probe bracket angle. Apply a sealing bead of gasket maker around switch housing to close
off any leak paths between the switch and bracket. Watch
for steam leaks from the cassette bay as they can cause
damage to the microswitch and other internal components. Verify integrity of cassette seal steam ports and
probe bracket alignment (see page 12, 2.10 - Alignment
Tool (RPI Part #SCT052).
The OEM microswitch is held in place with two small slotted pan head screws which are difficult to access. The
compressor must be removed in order to remove these
screws. The RPI microswitch comes with two socket head
cap screws which are easy to install or remove when
using the Hex Balldriver. The Hex Balldriver is designed to
reach far into the autoclave to easily remove the screws,
even at an angle, and without having to remove the compressor (see Figure 2.5). Caution: Disconnect the power
to the autoclave before servicing and be sure the steam
generator/boiler has completely cooled.
RELATED RPI PARTS:
• Microswitch Kit (RPI Part #SCK007)
• Silicone Gasket Maker (RPI Part #RPS639)
• Socket Head Cap Screw (RPI Part #ADS120)
• Lockwasher (RPI Part #RPH253)
NOTE - Microswitch (RPI Part #SCK007) includes (2) #256 x 1/2" lg. Socket Head Cap Screws (RPI Part #ADS120)
FIGURE 2.5
Flute/Bonnet
Probe Bracket Angle
RELATED RPI PARTS:
• Double Ended Spanner Wrench (RPI Part #RPT501)
• Male Connector (RPI Part #RPF227)
• Push-In Elbow Fitting (RPI Part #RPF363)
• Solenoid Valve Repair Kit (RPI Part #SCK003)
• Solenoid Coil (RPI Part #SCC005)
• Teflon® Tape (RPI Part #RPT579)
For additional information and tips see page 41 - Figure
9.4.
Solenoid - Plunger Kit
(RPI Part #SCK003)
Valve Body
Hex Balldriver (5/64")
(RPI Part #RPT297)
Male Connector
(RPI Part #RPF227)
Socket Head Cap Screw
(RPI Part #ADS120)
Port #2
Port #1
Lockwasher
(RPI Part #RPH253)
Microswitch Kit
(RPI Part #SCK007)
Push-in Elbow Fitting
(RPI Part #RPF363)
8
Probe Bracket Kit
2000 (RPI Part #SCK038); 5000 (RPI Part #SCK042)
Probe Bracket
2000 (RPI Part #SCB039); 5000 (RPI Part #SCB043)
9
TIP - Apply Silicone Gasket Maker (RPI
Part #RPS639) to side of switch and
mount to probe bracket angle. Apply a
sealing bead of Gasket Maker around
switch housing to close off any leak
paths between switch and bracket.
2.6 - CASSETTE SEAL REMOVAL
TOOL (RPI PART #RPT372)
2.7 - LIQUID SOAP (4/PKG)
(RPI PART #RPS287)
2.8 - THREADLOCKER 545
(RPI PART #RPA369)
2.9 - HEX BALLDRIVER (9/64")
(RPI PART #RPT836)
The Cassette Seal Removal Tool was designed to help
remove the cassette seal for either maintenance or
replacement without scratching the cassette lid or damaging the seal.
The Liquid Soap comes in a convenient single-use foil
pouch that’s easy to store and use. It is recommended to
use the soap on the cassette seal for installation and regularly scheduled maintenance every 30 days.
Threadlocker 545 comes in a tube with a slender neck allowing it to reach difficult areas, and the tube has a reuseable lid. It is for use on all pneumatic and hydraulic fittings
requiring a high temperature sealant and threadlocker.
INSTRUCTIONS
INSTRUCTIONS
INSTRUCTIONS
Slip the tip of the tool behind the seal at one of the corners
of the cassette and pry the seal loose (see Figure 2.6).
Once the first corner is free, take hold of the cassette seal
and pull down and out in order to remove it from the cassette groove. The cassette seal and groove can now be inspected and cleaned. For additional information and tips,
see “Installation and Monthly Maintenance Guide”
that is supplied with RPI's Cassette Seals (RPI Part #'s
SCS001 & SCS029) or see page 22.
Open one package of Liquid Soap and lightly lubricate the
cassette seal using entire contents (see Figure 2.7). Dispose of packet after use. The MSDS is available on the RPI
website (www.rpiparts.com).
Clean threads, shake well and use 2-3 drops on the
threaded portion of a fitting to lock and seal. (Note:
Accommodates operating pressures up to 10,000 PSI and
temperatures ranging from -65˚F to 300˚F.) The MSDS is
available on the RPI website (www.rpiparts.com).
The Hex Balldriver is designed to reach far into the autoclave to easily access the probe bracket mounting screws
for alignment or replacement without removing other components. This job, without this long reach Balldriver, may
have required removal of the pump, steam generator/
boiler, and/or solenoid valve. This Balldriver will fit the OEM
or RPI probe bracket mounting hardware. See Figure 2.9.
Caution: Disconnect the power to the autoclave before
servicing and be sure the steam generator/boiler has
completely cooled.
RELATED RPI PARTS:
• Cassette Seal 2000 (RPI Part #SCS001)
• Cassette Seal 5000 (RPI Part #SCS029)
• Sci-Dry™ (2 oz. Spray Bottle) (RPI Part #SCA054)
For additional information and tips, see “Installation and
Monthly Maintenance Guide” that is supplied with RPI's
Cassette Seals (RPI Part #'s SCS001 & SCS029) or see
page 22.
FIGURE 2.8
TIP - lightly lubricate the cassette seal
using liquid soap at time of installation
as well as during regularly scheduled
maintenance every 30 days.
TIP - Use 2-3 drops of Threadlocker 545 on the threaded portion
of a fitting to lock and seal.
STATIM 2000: (RPI Part #SCS001)
STATIM 5000: (RPI Part #SCS029)
FIGURE 2.9
TIP - If realigning existing probe bracket,
loosen (DO NOT REMOVE) 4 mounting screws
and compression fitting connections to allow
repositioning of probe bracket steam ports.
Ad
h
Microswitch Kit
(RPI Part #SCK007)
Installed
Thermocouple
(RPI Part #SCT030)
LO5
I
Liquid Soap
(RPI Part #RPS287)
Cassette Seal
CT
Cassette Seal Removal Tool
(RPI Part #RPT372)
FIGURE 2.7
4
TIP - Slip the tip of the Cassette
Removal Tool behind the seal at
one of the corners of the cassette
and pry the seal loose with ease.
USE WITH RPI PARTS:
• Check Valve (RPI Part #SCK011)
• Male Connector (RPI Part #RPF227)
• Push-in Elbow Fitting (RPI Part #RPF363)
• Push-in Elbow Fitting (RPI Part #RPF377)
• Safety Valve (38 PSI) (RPI Part #SCV027)
• Safety Valve (70 PSI) (RPI Part #SCV004)
es 5
ive
FIGURE 2.6
RELATED RPI PARTS:
• Probe Bracket Kit 2000 (RPI Part #SCK038)
• Probe Bracket Kit 5000 (RPI Part #SCK042)
• Probe Bracket 2000 (RPI Part #SCB039)
• Probe Bracket 5000 (RPI Part #SCB043)
• Probe Bracket Gasket (RPI Part #SCG010)
Probe
Bracket Gasket
(RPI Part #SCG010)
Threadlocker 545
(RPI Part #RPA369)
Reuseable Lid
10
Hex Balldriver (9/64")
(RPI Part #RPT836)
11
Probe Bracket Kit
2000 (RPI Part #SCK038)
5000 (RPI Part #SCK042)
Probe Bracket
2000 (RPI Part #SCB039)
5000 (RPI Part #SCB043)
latched and closed. See Figure 2.10A.
(Caution - Ensure that the Alignment Tool is properly installed before closing the cassette lid or damage can occur.)
STEP #2 - Carefully attach the bottom tray to the cassette
lid and close to properly retain the Alignment Tool. The cassette lid should close normally and retain the Alignment
Tool. DO NOT FORCE IT CLOSED!
STEP #3 - The cassette is now ready to be used to align
probe bracket steam ports.
STEP #4 - If realigning an existing probe bracket, loosen
(DO NOT REMOVE) 4 mounting screws (using 9/64" Hex
Balldriver - RPI Part #RPT836) and compression fitting connections to allow repositioning of probe bracket steam ports.
STEP #5 - Slowly insert the cassette into the cassette bay
(armature). As the cassette approaches the probe bracket
(still loosely installed), position bracket assembly up and
down and sideways until probe bracket steam ports and
cassette engage easily. Once properly inserted, the spring
bar should engage and lock the cassette into position. A
"click" will be heard and felt. See Figure 2.10B.
2.10 – ALIGNMENT TOOL
(RPI PART #SCT052)
When removing or replacing the probe bracket assembly,
the steam ports must be properly aligned. Use this Alignment Tool to easily and accurately set the position of the
steam ports to the cassette.
INSTRUCTIONS
Separate the cassette tray from the cassette lid. Place
the lid on counter top and remove the cassette seal. The
cassette seal must be removed before continuing with
Alignment Tool installation (see page 10 - Figure 2.6).
STEP #1 - Tilt the cassette lid and install Alignment Tool
into steam ports from the inside of the cassette lid as
shown. The square tabs on the tool must engage the
square notches in the cassette lid, and the tool must lay
flat within the cassette seal groove. The Alignment Tool
must be seated correctly to avoid damaging the tray when
STEP #9 - Coat entire inside of cassette with Sci-Dry™
(RPI Part #SCA054).
STEP #6 - Lightly snug the probe bracket mounting screws.
Move the cassette in and out several times to ensure proper
alignment. Leave the cassette in the engaged position. Now
tighten mounting screws to retain bracket position. The
probe bracket assembly is now aligned and ready for use.
STEP #7 - Remove Alignment Tool. Reinstall or replace Cassette Seal (RPI Part #SCS001 fits STATIM 2000 & RPI Part
#SCS029 fits STATIM 5000) using Liquid Soap (RPI Part
#RPS287) included with the probe brackets. See page 10 Figure 2.7. For additional information regarding the care and
maintenance of the cassette seal, see “Installation and
Monthly Maintenence Guide” that is supplied with RPI's Cassette Seals (RPI Part #'s SCS001 & SCS029) or see page 22.
STEP #8 - After successful installation or realignment of
probe bracket, install or realign thermocouple. See RPI Part
#SCT030 Installation Instructions that are available on the
RPI website (www.rpiparts.com).
RELATED RPI PARTS:
• Probe Bracket Kit 2000 (RPI Part #SCK038)
• Probe Bracket Kit 5000 (RPI Part #SCK042)
• Probe Bracket 2000 (RPI Part #SCB039)
• Probe Bracket 5000 (RPI Part #SCB043)
• Probe Bracket Gasket (RPI Part #SCG010)
• Cassette Seal 2000 (RPI Part #SCS001)
• Cassette Seal 5000 (RPI Part #SCS029)
• Microswitch Kit (RPI Part #SCK007)
• Thermocouple (RPI Part #SCT030)
• Liquid Soap (RPI Part #RPS287)
• Hex Balldriver (9/64") (RPI Part #RPT836)
FIGURE 2.10B
TIP - If realigning existing
probe bracket, loosen (DO NOT
REMOVE) 4 mounting screws
and compression fitting connections to allow repositioning
of probe bracket steam ports.
FIGURE 2.10A
Alignment Tool
(RPI Part #SCT052)
TIP - Angle cassette lid as shown, using
gravity to aid in tool positioning while
assembling and closing the cassette.
Microswitch Kit
(RPI Part #SCK007)
Installed
Cassette Lid
square notches
Thermocouple
(RPI Part #SCT030)
Exhaust Steam Port
Probe Bracket Gasket
(RPI Part #SCG010)
Injection Steam Port
Internal View of
Cassette Bay
(Armature)
Spring Bar
Hex Balldriver (9/64")
(RPI Part #RPT836)
Grounding Wire
12
Probe Bracket Kit
2000 (RPI Part #SCK038); 5000 (RPI Part #SCK042)
Probe Bracket
2000 (RPI Part #SCB039); 5000 (RPI Part #SCB043)
13
INSTRUCTIONS
2.11 – WATER QUALITY TESTER
(RPI PART #RPT820)
STEP #1 - Remove cap.
STEP #2 - Turn Water Quality Tester on (slide switch on
top of meter to the “ON” position). See Figure 2.11.
STEP #3 - Rinse sensing probes (see Figure 2.11) in distilled water by submersing and stirring gently.
STEP #4 - Immerse Tester in a water sample without exceeding the max level line and without bottoming out the
meter. Stir gently and wait for the reading to stabilize.
STEP #5 - The reading should be ≤5 ppm.
The Water Quality Tester (RPI Part #RPT820) is a meter designed to measure water quality. This meter determines
the total amount of dissolved solids (TDS) present in the
water being used for sterilization. SciCan states the total
dissolved solids (TDS) allowable in the water reservoir to
be a maximum of 5 Parts Per Million (ppm) or a conductivity of less than 10 Micro Siemens (µs/cm). RPI’s Water
Quality Tester displays its readings in “Parts Per Million”
(ppm) and will automatically compensate for temperature
variations.
The Calibration Solution is certified traceable to NIST Standard Reference Material Potassium Chloride (7447-40-7)
and will provide a reading on the Tester of 800 ppm when
tested at room temperature (77°F). Consult temperature
chart on Calibration Solution pouch for ppm values vs.
temperature condition. MSDS sheet available on the RPI
website (www.rpiparts.com).
2.12 – CALIBRATION SOLUTION
(RPI PART #RPS821)
CALIBRATION – Check calibration of the Water Quality
Tester (RPI Part #RPT820) approximately every 4 months
using Calibration Solution (RPI Part #RPS821). Check calibration by immersing the Tester in a container of Calibration Solution (the solution is supplied in a single use pouch
and can serve as the container - see Figure 2.12) without
exceeding the max level line and without bottoming out
the meter. Stir gently and wait for the reading to stabilize.
If calibration reading is outside of the solution’s rated ppm
value, adjust Calibration Trimmer by inserting screwdriver
(supplied with Tester) through hole in the side of Tester and
adjust potentiometer until the value matches the specified
ppm value from the chart on the pouch (see Figure 2.12).
BATTERIES - Expected battery life should be approximately 150 hours. Batteries should be replaced when the
display will not turn on or fades. The Tester uses (4) 1.5V
coin cells (Type LR44 or 357).
FIGURE 2.11
FIGURE 2.12
Water Quality Tester (RPI Part #RPT820)
FRONT
BACK
Battery
Compartment
ON/OFF
Switch
TIP - Check calibration by
immersing the Tester in a
container of Calibration Solution (the solution is supplied
in a single use pouch and
can serve as the container).
Water Quality Tester
(RPI Part #RPT820)
Liquid
Crystal
Display
TIP - If calibration reading is outside of
the solution’s rated ppm value, adjust
Calibration Trimmer by inserting screwdriver (supplied with Tester) through hole
in the side of Tester and adjust potentiometer until the value matches the
specified ppm value from the chart on
the pouch.
Pocket
Clip
Calibration
Trimmer
Calibration Solution
(RPI Part #RPS821)
Maximum
Immersion
Level
Minimum
Immersion
Level
Water Quality Tester
(RPI Part #RPT820)
MAX
LEVEL
Calibration Solution
(RPI Part #RPS821)
14
Calibration
Trimmer
Screwdriver
Temperature Chart
Sensing
Probes
TD
S
1
15
Cassette Seal
(Internal) 1
T
O
ST
P
35
AR
ST
2
Item
LEV
EL
3.0 – EXPLODED VIEW
STATIM 2000 Shown
Cassette Bay
(Armature)
34
4
3
5
6
7
8
Drain
Tube
FLOW
33
10
13
FOR USE WITH 5000
SERIES STELIZER
REMOVE THIS LABEL
36
FOR USE WITH 2000
SERIES STERILIZER
LEAVE THIS LABEL ON
9
37
32
29
14
22
11
31
20
21
12
30
29
15
16
Item
17
18
22
I
N
C O
A US
E
H
28
AR
!C
A U T IO N !
M
IF
K
AU T I O N !
cp
!C
c
H
ING
C K
LO
L
PR O
P E R
S E
A
enser
Cond
25
19
W
n
EN
Q
O
C
U I
Waste
23
ILY
22
TIO
ERA
OP
DA
for
a
, listen
ect
in place
k conn
If
.
quic
ng ...
e harm
re
n locki
caus
ensu
r ...
Whe " to
may
n wate.
"click
...and
whe Line
lizer Fill
r ...
steri mum
wate
ate Mini
lled
r oper...the
h diste
Neve
widt
voir
reser
le.
l the
bott
Refil
the
t ...
d on
icate
le mus
...ind
e bott
!
r wastlizer.
N
ense steri
TIO
...
cond ...the
CAU ediately
The
!
, imm
steam
leaks
ect
k conn
quic
ce
the
servi
tact
...con
al.
ssion
M
IMU
MINLINE
FILL
profe
26
Bottle
N
M
IMU
MAXLINE
FILL
your
24
27
1
2
3
4
5
6
7
8
9
10
Description
STATIM
2000
STATIM
5000
Cassette Seal
Bubble Level
Cord Clip
Probe Bracket Gasket
Probe Bracket
Probe Bracket Kit
Microswitch Kit
Thermocouple
Copper Tubing Kit
Check Valve Kit
SCS001
SCL012
ADC058
SCG010
SCB039
SCK038
SCK007
SCT030
SCK048
SCK011
SCS029
SCL012
ADC058
SCG010
SCB042
SCK043
SCK007
SCT030
SCK049
SCK011
11
12
13
14
15
16
17
18
19
20
21
22
23
24
24
24
25
25
25
26
27
27
27
28
28
28
28
28
29
29
29
30
30
30
31
32
33
33
33
34
35
35
35
36
36
36
37
Description
Compressor Filter
Air Compressor Kit
Safety Valve (70 PSI)
Metering Tube (290)
Double Thermal Fuse Assembly
Screw (#6-32 X 1/4)
Biological Filter
Push-In Elbow Fitting
Leveler Leg
Solenoid - Coil
Solenoid - Plunger Kit
Screw (#8-32 X 1/2 - SEMS)
Power Switch
Power Cord Replacement
Power Cord
Condenser Waste Bottle Kit
Condenser Waste Bottle with Lid
Rubber Foot
Pump Kit (INVENSYS)
Pump Kit (ULKA)
Fuse (15A, 250V) - Time Delay
Fuse (2A, 250V)
Fuse (1/4A, 250V) - Time Delay
Fuse (1/2A, 250V) - Time Delay
Fuse (1A, 250V) - Time Delay
Drain Kit with Pump Filter
Cable Holder
Female Quick Connect Fitting (White)
Drain Tube Assembly Kit
Male Quick Connect Fitting (White)
Male Connector
Water Filter (In-Line)
Reservoir Cap & Filter
Reservoir Cap
Reservoir Filter
Fascia Gasket
Keypad (Old Style)
Keypad
Keypad (New Style)
LCD Kit
LCD Decal
Display Assembly
Mounting Pad
STATIM
2000
SCF002
SCK020
SCV004
SCT053
SCF006
ADS054
SCF0324
RPF363
RPF362
SCC005
SCK003
RPH817
SCS023
SCK0258
RPC291
SCK016
SCB0182
CAF011
SCP050
SCP051
RPF0711
RPF367
RPF368
RPF060
RPF0611
SCK037
RPC702
RPF428
RPK432
RPF429
RPF227
SCF034
SCK059
SCC060
SCF061
SCG009
SCK0155
STATIM
5000
SCV004
SCT053
SCF006
ADS054
SCF0324
RPF363
RPF362
SCC005
SCK003
RPH817
SCS023
RPC291
SCK016
SCB0182
CAF011
SCP050
SCP051
RPF367
RPF368
RPC702
RPF428
RPK432
RPF429
RPF227
SCF034
SCK059
SCC060
SCF061
SCG044
SCK0406
SCK0417
SCK0623
SCD0633
SCA022
RPP819
SCK0623
SCD0633
SCA022
RPP819
FOOTNOTES: 1. Older styles only 2. Models with RPI's Condenser Waste Bottle Kit (RPI Part #SCK016) 3. Model #01-121101 4. Serial #2101DK0274 and above
5. Model #101102 (Old Type, One Piece Style with S/N's ending with an 'A') 6. Model #01-201103 7. Model #01-121101 (New Style, Two Piece Style)
8. Includes 90˚ Liquid Tight Strain Relief with Locking Nut (RPI Part #RPB365).
16
17
4.0 - PLANNED MAINTENANCE (PM) CHECKLIST
Sterilizer PM Kit (RPI Part #SCK035)
For parts to fit the SciCan STATIM 2000
PART
Cassette Seal
RPI PART #
SCS001
Sterilizer PM Kit (RPI Part #SCK035)
For parts to fit the SciCan STATIM 2000 - continued
STERILIZER PM TIP
PART
Refer to the “Installation and Monthly Maintenance Guide” included with the
Cassette Seal, or see page 22.
Water Filter (In-Line)
or Pump Mesh Filters
RPI PART #
SCF034
Remove the old Cassette Seal. Clean the cassette groove and inspect the
cassette tray and lid for damage. Lubricate and install the new Cassette Seal.
SCF002
Remove the pump filter cover. Remove filter and clean out any dust or debris.
Replace filter and cover. If you find that the old Air Compressor Filter is wet
or shows signs of water staining, then the check valve is leaking and must be
replaced to protect the air compressor from damage. RPI offers a Check Valve
Kit (RPI Part #SCK011) which includes translucent tubing making it easy to see
a leaky check valve.
The OEM recommends replacing the Water Filter (In-Line) every 6 months or
500 cycles – whichever comes first.
If the autoclave you’re working on has the mesh filters, we recommend you
upgrade to the Drain Kit with Pump Filter (RPI Part #SCK037), making future
service much easier and providing a much better filtering system to protect
the pump (along with providing a quick & easy way to drain the reservoir
through the front of the autoclave).
The OEM recommends replacing the Air Compressor Filter every 6 months or
500 cycles – whichever comes first.
Biological Filter
SCF032
This Biological Filter fits STATIM 2000 models with serial numbers
2101DK0274 and up, or if the autoclave has been upgraded. (Note: If your
autoclave is not equipped with this filter set-up, then you will not need this
filter).
Note the flow arrow direction on the filter body (flow direction is from the air
compressor to the check valve). If you find that the old Biological Filter is wet
or shows signs of water staining, then the check valve is leaking and must be
replaced to protect the air compressor from damage. RPI offers a Check Valve
Kit (RPI Part #SCK011) which includes translucent tubing making it easy to see
a leaky check valve.
The OEM recommends replacing the Biological Filter every 6 months or 500
cycles – whichever comes first.
18
Debris is the #1 reason for pump failure, so before replacing this filter, be
sure to check the reservoir for dirt and debris. Inspect and clean or replace
the Reservoir Cap & Filter (RPI Part #SCK059). Drain, clean and flush the reservoir. Refill reservoir with distilled water after filter replacement.
If your autoclave comes equipped with an In-Line Water Filter, cut the cable
ties and remove the old filter. Note the flow arrow direction on the filter body
(flow direction is from the reservoir to the pump). Install the new filter using
the new cable ties included. Be sure to prime the pump in order to purge
trapped air before running a complete cycle. If your machine does not have
an In-Line Water Filter, then be sure to clean the pump mesh filters (located
inside the pump’s input and output port fittings). See page 6 and 7 - Figure
2.3 A and B.
The OEM recommends lubrication of Cassette Seal every 30 days and
replacement every 6 months or 500 cycles – whichever comes first. Clean the
outer edge of cassette tray and the exposed area of the Cassette Seal weekly.
Apply Sci-Dry™ (RPI Part #SCA054) every 10 cycles and after cleaning.
Compressor Filter
STERILIZER PM TIP
Other Routine
Maintenance
–
Apply Sci-Dry™ (RPI Part #SCA054) every 10 cycles and after cleaning. Coat
all internal surfaces of cassette. Sci-Dry™ minimizes spotting and allows instruments to dry more efficiently.
The OEM recommends the replacement of the Check Valve Kit (RPI Part
#SCK011) and the steam generator/boiler’s Safety Valve (70PSI) (RPI Part
#SCV004) every 2 years, and the use of the Reservoir Cap & Filter (RPI Part
#SCK059) on all versions of the STATIM autoclave.
To aid in proper cleaning and maintenance of autoclaves, RPI also offers a
Cleaning Kit (RPI Part #RPK791) which includes a variety of brushes, sponges
and cleaning pads assembled in a convenient carrying case.
19
4.0 - PLANNED MAINTENANCE (PM) CHECKLIST
Sterilizer PM Kit (RPI Part #SCK036)
For parts to fit the SciCan STATIM 5000
Sterilizer PM Kit (RPI Part #SCK036)
For parts to fit the SciCan STATIM 5000 - continued
PART
RPI PART #
STERILIZER PM TIP
PART
RPI PART #
STERILIZER PM TIP
Cassette Seal
SCS029
Refer to the “Installation and Monthly Maintenance Guide” included with the
cassette seal, or see page 22.
Water Filter (In-Line)
or Pump Filters
SCF034
Debris is the #1 reason for pump failure, so before replacing this filter, be
sure to check the reservoir for dirt and debris. Inspect and clean or replace
the Reservoir Cap & Filter (RPI Part #SCK059). Drain, clean and flush the reservoir. Refill reservoir with distilled water after filter replacement.
Remove the old Cassette Seal. Clean the cassette groove and inspect the
cassette tray and lid for damage. Lubricate and install the new Cassette Seal.
If your autoclave comes equipped with an In-Line Water Filter, cut the cable
ties and remove the old filter. Note the flow arrow direction on the filter body
(flow direction is from the reservoir to the pump). Install the new filter using
the new cable ties included. Be sure to prime the pump in order to purge
trapped air before running a complete cycle. If your machine does not have
an In-Line Water Filter, then be sure to clean the pump mesh filters (located
inside the pump’s input and output port fittings). See page 6 and 7 - Figure
2.3 A and B.
The OEM recommends lubrication of Cassette Seal every 30 days and
replacement every 6 months or 500 cycles – whichever comes first. Clean the
outer edge of cassette tray and the exposed area of the Cassette Seal weekly.
Apply Sci-Dry™ (RPI Part #SCA054) every 10 cycles and after cleaning.
Air Compressor Filter
SCF031
The Air Compressor Filter is used with the Medo air compressor only. (Note:
If your autoclave is not equipped with this type of air compressor, then you will
not need this filter).
The OEM recommends replacing the Water Filter (In-Line) every 6 months or
500 cycles – whichever comes first.
If you find that the old Air Compressor Filter is wet or shows signs of water
staining, then the check valve is leaking and must be replaced to protect the
air compressor from damage. RPI offers a Check Valve Kit (RPI Part #SCK011)
which includes translucent tubing making it easy to see a leaky check valve.
If the autoclave you’re working on has the mesh filters, we recommend you
upgrade to the Drain Kit with Pump Filter (RPI Part #SCK037), making future
service much easier and providing a much better filtering system to protect
the pump (along with providing a quick & easy way to drain the reservoir
through the front of the autoclave).
The OEM recommends replacing the Air Compressor Filter every 6 months or
500 cycles – whichever comes first.
Biological Filter
SCF032
Note the flow arrow direction on the filter body (flow direction is from the air
compressor to the check valve). If you find that the old Biological Filter is wet
or shows signs of water staining, then the check valve is leaking and must be
replaced to protect the air compressor from damage. RPI offers a Check Valve
Kit (RPI Part #SCK011) which includes translucent tubing making it easy to see
a leaky check valve.
The OEM recommends replacing the Biological Filter every 6 months or 500
cycles – whichever comes first.
Other Routine
Maintenance
–
Apply Sci-Dry™ (RPI Part #SCA054) every 10 cycles and after cleaning. Coat
all internal surfaces of cassette. Sci-Dry™ minimizes spotting and allows instruments to dry more efficiently.
The OEM recommends the replacement of the Check Valve Kit (RPI Part
#SCK011) and the steam generator/boiler’s Safety Valve (70PSI) (RPI Part
#SCV004) every 2 years, and the use of the Reservoir Cap & Filter (RPI Part
#SCK059) on all versions of the STATIM autoclave.
To aid in proper cleaning and maintenance of autoclaves, RPI also offers a
Cleaning Kit (RPI Part #RPK791) which includes a variety of brushes, sponges
and cleaning pads assembled in a convenient carrying case.
20
21
4.0 - INSTALLATION AND MONTHLY MAINTENANCE FOR CASSETTE SEAL
Cassette Seal (RPI Part #SCS001) to fit the SciCan STATIM 2000
Cassette Seal (RPI Part #SCS029) to fit the SciCan STATIM 5000
FIGURE A
FIGURE B
FIGURE C
FIGURE D
FIGURE E
FIGURE F
STEP #1 - The cassette must be opened and cooled before removing the cassette seal. See Figure A.
STEP #2 - Start with any of the (4) corners and begin prying the cassette seal loose using the RPI Cassette Seal Removal
Tool (RPI Part #RPT372) and by pulling down and out at the same time. See Figures B and C.
STEP #3 - Once the first corner is free, take hold of the cassette seal and pull down and out in order to remove it from the
cassette groove. Be careful not to tear the (2) locating tabs in each corner of the cassette seal. See Figures B
and C.
Locating
Tabs
STEP #4 - Once the cassette seal has been removed, it is important to inspect, clean and remove any residue and/or debris
from the cassette groove and outer edge. Check for dings and dents on both halves of the cassette; if present, a
proper seal may not occur. See Figure D.
Residue
and/or
Debris
STEP #5 - Using (1) package of RPI Liquid Soap (RPI Part #RPS287), lube the cassette seal completely. Note: It is not necessary to lube the inside of the cassette seal. See Figure E.
FIGURE G
STEP #6 - Now you are ready to install the cassette seal.
Port
Holes
FIGURE H
FIGURE I
STEP #7 - When installing the cassette seal, it is best to start in the back corner, nearest the port holes of the cassette.
Slip the cassette seal under and into the corner, placing the locating tabs at the edge of the open corner. Now
align the port holes and their locating tabs with the cassette. The locating tabs must protrude through the
square notches of the cassette lid. See Figure F.
STEP #8 - Install the other corners in the same manner. Now insert the cassette seal into the groove of the cassette – one
side at a time. See Figures G and H.
STEP #9 - As you move along installing the cassette seal, check the corners to ensure that the locating tabs stay in place.
Note: The sides should be inserted until smooth – without waves or bumps. See Figure I.
STEP #10 - After you have completely installed the cassette seal, make a final inspection of all corners and all locating
tabs. Remove excess soap from the port holes as the soap can cause a build up on the steam ports and in
turn cause a bad seal.
USAGE TIPS
✔
✔
STEP #11 - Run a few test cycles to check for steam leaks, then apply Sci-Dry™ (RPI Part #SCA054). Note: During the
test cycles, it is normal to hear a hissing sound at first. The sound is from the excess liquid soap expelling
and the cassette seal seating in place.
STEP #12 - After running the test cycles, if steam still leaks, reinstall the cassette seal and run additional test cycles. If
steam leaks still occur, it is possible that the problem was not a faulty cassette seal, but something else, so
refer to the operator’s manual or contact your service professional.
22
✔
Always note the position of the cassette when inserting
it into the unit – if the cassette is installed upside down,
the thermocouple will bend and the sterilizer will become
inoperative.
The OEM recommends lubrication of Cassette Seal every
30 days and replacement every 6 months or 500 cycles
– whichever comes first. Clean the outer edge of cassette tray and the exposed area of the Cassette Seal with
RPI Liquid Soap (RPI Part #RPS287) weekly. Apply SciDry™ (RPI Part #SCA054) every 10 cycles and after
cleaning.
✔
✔
✔
Always keep the inside of the cassette clean. Remove
residue and/or debris from the metal edge of the lower
half of the cassette on a regular basis.
23
Sci-Dry™ (RPI Part #SCA054) should be applied after
every 10 cycles and after cassette cleaning. Coat all internal surfaces of cassette. Sci-Dry™ minimizes spotting
and allows instruments to dry more efficiently.
Watch for steam leaks from the cassette bay as they can
cause damage to the microswitch and other internal components, thus rendering the sterilizer inoperative.
Refill the reservoir with distilled water only. At the same
time that the reservoir is refilled, the condenser waste
bottle should be emptied and refilled. Refill the condenser
waste bottle with tap water to the Minimum Fill Level as
shown on the bottle. (Note: Never operate sterilizer when
water level is above the Maximum Fill Line or below the
Minimum Fill Line.)
5.0 – SERVICE TIPS
NOTES
move the tubing from the fitting, cut off approximately
½” from the end of the tubing, then reinsert the tubing
into the fitting – that will usually remedy the problem.
IMPORTANT: The RPI Push-In Elbow Fitting will not
properly grip and retain the OEM’s Teflon® tubing. Only
use RPI’s Nylon® Tubing (RPI Part #RPT370) with the
RPI Push-In Elbow Fitting (RPI Part #RPF363).
• The Condenser Waste Bottle (RPI Part #SCK016) is a
major component in the exhaust path and must not be
allowed to fill up past the maximum line marked on the
bottle. The entire exhaust path (from the venturi plate in
the cassette through the solenoid valve to the waste bottle) must be free of kinks, pinch points or any restriction
or blockages. These conditions can cause malfunctions
and create error codes to be displayed.
• See associated error codes: Cycle Fault 6, 7, 8, 10, 11, 15
(see pages 29 thru 31) and LCD messages “SERVICE
NEEDED” and “CHECK CASSETTE” (see page 34). Also
consult Troubleshooting tips “wraps/instruments remain
wet after drying” (see page 37).
1. CASSETTE DIAGNOSTICS
If water is leaking at the drain from the cassette bay (underside of autoclave), then do the following:
• Inspect and clean cassette seal and cassette.
• Confirm that the cassette seal port holes are not damaged and that they are properly aligned within the cassette lid groove.
• Ensure that there is no debris or residue on outer edges
of cassette tray.
• Verify that outer edges of cassette tray are straight (not
nicked, dented, or damaged).
• Check the integrity of the hinge.
• Inspect and clean steam ports on probe bracket. If you
observe excess debris that is not easily removed or if the
steam ports appear to be worn or damaged, remove probe
bracket for proper evaluation. Replace probe bracket if
necessary. See pages 12 and 13 - Figures 2.10 A and B.
2. CHECK VALVE
A leaky check valve can cause moisture or steam to seep
inside the air compressor thus causing the compressor to
fail. The OEM recommends replacing the check valve and
safety valve on the steam generator/boiler every two
years. The RPI tubing in the Check Valve Kit (RPI Part
#SCK011) is translucent - making it easy to see a leaky
check valve. For your convenience, RPI includes a new
Check Valve at no extra cost in the Air Compressor Kit (RPI
Part #SCK020). It’s the RPI Advantage!
4. GFI (GROUND FAULT INTERRUPTER)
If Ground Fault Interrupter trips when the STATIM is turned
on or plugged into an AC outlet, then check for: A leaky
check valve (from the steam generator/boiler) which would
allow steam/water to enter the air compressor and could
create a short circuit (see Service Tip #2 Check Valve).
5. KEYPAD
• Verify that the keypad cable is properly seated in the
main PC board connector.
• If an RPI Keypad (RPI Part #SCK015, SCK040 or SCK041)
has been installed, be sure the small label on the cable
that reads “THIS SIDE UP” is facing up and away from
the PC board (see page 4 - Figure 2.1 A and C).
• Replace keypad if necessary.
3. CONDENSER WASTE BOTTLE
• If excessive steam is escaping through the vent holes in
the lid, verify that there is adequate water in the bottle
(must be filled to the minimum fill line).
• If an exhaust leak is detected at the fitting junction on
top of the lid, inspect and replace O-ring (RPI Part
#RPO343) on the Panel Mount Quick Disconnect Fitting
(RPI Part #RPF370).
• Inspect Tubing and replace if discolored or brittle (RPI
Part #RPT380). Also inspect the connection at the InLine Quick Disconnect Fitting (RPI Part #RPF371).
• When engaging the Quick Disconnect fittings, listen for
a “click” to ensure proper engagement & sealing.
• If steam is leaking from the Push-In Elbow Fitting (RPI
Part #RPF363) located at the rear of the autoclave, inspect the fitting and tubing connection. Service Tip: Re-
7. STEAM GENERATOR/BOILER DIAGNOSTICS
For older units with an aluminum steam generator/boiler,
run a new cycle and view the LCD display. After completion of the "Pressurization Stage", The "Sterilization
Stage" should begin within 10 seconds. If it takes longer
than 10 seconds, the steam generator/boiler needs cleaning - see page 39 - Figure 9.2 "Cleaning the Steam
Generator/Boiler". For Calibration Procedure see page
40 - Figure 9.3.
__________________________________________
8. CONTINUOUSLY RUNNING MAJOR
COMPONENT
If the air compressor, solenoid valve, pump or steam generator/boiler activates, but does not turn off at its appropriate time, the main PC board is bad and must be
replaced. See pages 46 and 47 - Figure 9.8 "Electrical
Diagram".
__________________________________________
__________________________________________
__________________________________________
__________________________________________
__________________________________________
__________________________________________
__________________________________________
__________________________________________
__________________________________________
__________________________________________
9. TEMPERATURE ADAPTER BOARD UPGRADE (ALEX BOILER KIT)
(AVAILABLE FROM THE OEM):
This upgrade kit adds a third “verification” thermocouple
(which monitors the cassette exhaust temperature between the cassette and the solenoid valve). This kit also includes an upgraded steam generator/boiler (also available
separately from the OEM), temperature adaptor board,
microprocessor kit and miscellaneous plumbing parts to
complete the upgrade. See page 33 - 6.0 Error Codes:
Cycle Fault 72 and 98
__________________________________________
__________________________________________
__________________________________________
__________________________________________
__________________________________________
__________________________________________
__________________________________________
__________________________________________
__________________________________________
__________________________________________
6. LEVELING
For proper operation (before servicing the autoclave), verify that the autoclave has been properly leveled. Note the
position of the bubble in the bull’s-eye Level (RPI Part
#SCL012) that is located on the top right of the autoclave.
A properly leveled autoclave would show the bubble in the
4 to 5 o’clock position. If leveling is improper, adjust the
feet until proper level is achieved.
24
__________________________________________
__________________________________________
__________________________________________
__________________________________________
25
6.0 – LCD ERROR CODES
(Note: Error Codes that are not currently used by SciCan are listed as "Not Currently In Use" or not listed
in this booklet.)
The key to STATIM error codes is to first identify which
model you are servicing because the terms used in the
error codes and operation messages may differ between
the earlier and later models.
Earlier
Models
STATIM 2000
Model 101102
Serial Number ends
with an "A"
Later
Models
STATIM 2000
Model 121101
STATIM 5000
Model 01-201103
It is important to know the software revision your STATIM
is running in order to properly troubleshoot and use these
error codes.
At the start up of the sterilization process, the earlier models display the operation message “Select Program” in the
LCD display panel, while the later models display “Select
A Cycle”. Both messages, while different, actually mean
the same thing – the user is being asked to select which
of the three cycles to begin.
6.0 – LCD ERROR CODES (continued)
Error codes and operation messages indicated on the LCD
panel differ on the earlier models versus the later models.
The earlier models display the phrase “Check Cassette”
followed by a number 1-8, while the later models display
“Cycle Fault” followed by a number 1-27. With both the
earlier and later models, each number represents a different type of error. (Note: Not all numbers are used, so
only those numbers that are used will be addressed in this
booklet.) In addition to error codes, an operation message
may also appear on the LCD display for both the earlier
and later models. Error codes and messages help to troubleshoot the exact cause of the problem. In addition, the
system on both the earlier and later models is designed to
abort when an error occurs.
LCD MESSAGE
CHECK CASSETTE #1 (CYCLE FAULT #1)
The steam generator/boiler did not heat up. The cassette
temperature (~95-102˚C) was not reached within ~3 minutes (or within the time out period).
During the sterilization process, there are six stages that
the machine goes through from start to finish and the LCD
displays each stage number as it occurs during the
process. The following sections describe each LCD error
code or message that might appear during any of the six
sterilization stages. In addition, this booklet includes troubleshooting tips and "Things to Check" for each error code
and message.
At power ON, the display will read:
STATIM 2000 S201R501
This display will report whether you have a model 2000 or
5000 and shows the autoclave software revision level. The
revision level in this example shows REV. “501”. This will
only be displayed for 5 seconds. Then it will switch to “select a cycle”.
• STATIM autoclaves manufactured from 1990 to 1994
may display “select a program” and the software revision may not be shown.
STAGE #1 – WARMING UP
During this stage, the distilled water heats up from room temperature to 95˚C in the steam generator/ boiler. The water is actually pumped from the reservoir and then heated in the steam generator/boiler.
LCD MESSAGE
CHECK CASSETTE #2 (CYCLE FAULT #2)
Cassette temperature (~95-100˚C) was not reached within
~1 minute and 20 seconds (or within the time out period).
THINGS TO CHECK
• Large steam leak is present.
• Over-loaded cassette tray.
• Clean and lubricate cassette seal – see page 10, 2.7 Liquid Soap (RPI Part #RPS287). Replace the Cassette
Seal if necessary (RPI Part #SCS001 fits model 2000),
and (RPI Part #SCS029 fits model 5000).
• Inspect and clean steam ports on probe bracket.
THINGS TO CHECK
• Check thermal fuse for continuity. Replace if necessary
– Thermal Fuse (RPI Part #SCF006) – see page 38,
Figure 9.1 - Steam Generator/Boiler.
• Large steam leak is present.
• Over-loaded cassette tray.
• Clean and lubricate cassette seal – see page 10, 2.7 Liquid Soap (RPI Part #RPS287). Replace the Cassette
Seal if necessary (RPI Part #SCS001 fits model 2000) or
(RPI Part #SCS029 fits model 5000).
• Inspect and clean steam ports on probe bracket.
• Check pump for proper operation – see page 6, 2.3 Pump Tester Bottle (RPI Part #SCK024).
• Check steam generator/boiler – see page 38, Figure
9.1 - Steam Generator/Boiler.
STAGE #2 – CONDITIONING
After initial warming stage, the steam is injected into the cassette; the steam temperature continues to rise from 95˚C. The vent
solenoid will open and close several times to maintain proper cassette steam temperature, expelling steam/air into the condenser waste bottle.
For LCD Messages and Things to Check, refer to Stage #1 - Warming Up: Check Cassette #1 (Cycle Fault #1) and Check Cassette #2 (Cycle Fault #2).
26
27
6.0 – LCD ERROR CODES (continued)
6.0 – LCD ERROR CODES (continued)
STAGE #3 – PRESSURIZING
STAGE #4 – STERILIZATION
The pressure increases as the cassette temperature rises to the factory set temperatures for the “Unwrapped”, “Wrapped” and
“Rubber & Plastic” cycles. The vent solenoid will open and close several times to maintain proper cassette steam temperature,
expelling steam/air into the condenser waste bottle.
LCD MESSAGE (For Model 2000 only)
CHECK CASSETTE #3 (CYCLE FAULT #3)
The cassette fails to pressurize or reach temperature
(~95˚ - 110˚C) within ~70 seconds (or within the time out
period).
LCD MESSAGE (For Model 2000 only)
CHECK CASSETTE #5
The steam generator/boiler may not be getting enough
water or steam generator/boiler is suspect.
THINGS TO CHECK
• A weak pump due to dirty mesh filters in the pump
fittings or dirty Water Filter (RPI Part #SCF034). Check
pump’s operation by using the Pump Tester Bottle Kit
(RPI Part #SCK024) – see pages 6 and 7, 2.3 - Pump
Tester Bottle (RPI Part #SCK024). If pump passes test,
boiler must be replaced.
• Clean or calibrate steam generator/boiler see page 39
Figure 9.2 or page 40 Figure 9.3.
THINGS TO CHECK
• Clean and lubricate the cassette seal – see page 10,
2.7 - Liquid Soap (RPI Part #RPS287). Replace the
Cassette Seal if necessary (RPI Part #SCS001 fits model
2000), and (RPI Part #SCS029 fits model 5000).
• Inspect and clean steam ports on probe bracket.
• Solenoid valve plunger may be compromised by debris
or may be worn. Check the plunger inside the flute/bonnet for proper movement. Replace Solenoid Plunger Kit
(RPI Part #SCK003) if necessary. See page 41, Figure
9.4 - Solenoid Valve.
LCD MESSAGE
CHECK CASSETTE #4 (CYCLE FAULT #4)
The "Sterilization Stage" fails to begin within specified
time noted in the chart below.
STATIM
2000
2000
Model #
101102
S/N "A"
121101
5000
01-201103
The temperature and pressure is maintained for the chosen cycle. Air/steam is being purged from the cassette as the vent
solenoid valve opens and closes several times to maintain optimum temperature. The pump continues to pump distilled water
into the steam generator/boiler which in turn pumps saturated steam into the cassette. The condenser waste bottle collects
and allows the steam to cool down safely.
LCD MESSAGE
CHECK CASSETTE #6
Applies to the STATIM 2000, Model 101102 only (with
serial number that end with an "A" – without a water
quality sensor).
LCD MESSAGE
CYCLE FAULT #6
Applies to STATIM 2000, model 121101, and STATIM
5000, model 01-201103
This “Cycle Fault #6” will appear only with a water quality sensor installed.
The steam generator/boiler may be contaminated. The
steam generator/boiler's temperature should be at least
5˚C higher than the cassette's temperature during the
Sterilization Stage.
Steam generator/boiler calibration is needed – see page
40, Figure 9.3 - Steam Generator/Boiler Calibration
Procedure. If problem (Error code) repeats, replace steam
generator/boiler.
THINGS TO CHECK
For earlier models only: The steam generator/boiler may
be contaminated by mineral deposits, calcium, etc., that
have accumulated over time. These deposits are caused
by using low quality water.
THINGS TO CHECK
• Water level in the waste bottle may be full, or the exhaust path may have a restriction or blockage.
• Check exhaust tubing for kinks or pinch points. Note: RPI
offers an Exhaust Tubing Kit (RPI Part #SCK017) or Exhaust Tubing sold by the foot (RPI Part #RPT380).
• Check the cassette tray venturi plate for blockage - see
page 42, Figure 9.5.
• Check for steam leaks.
• Solenoid valve plunger may be compromised by debris
or may be worn. Check the plunger inside the flute/bonnet for proper movement. Replace Solenoid-Plunger Kit
(RPI Part #SCK003) if necessary see page 41, Figure
9.4 - Solenoid Valve.
Drain the reservoir. Clean the steam generator/boiler using
Jelmar CLR® Cleaner (removes mineral deposits, calcium,
etc). Refill the reservoir using high quality distilled water.
See page 14, 2.11 - Water Quality Tester and page 39,
Figure 9.2 - Cleaning the Steam Generator/Boiler.
Should begin "Sterilization Stage"
Within ~ 10 minutes of reaching
temperature (~ 95˚-110˚C )
Within ~ 6 minutes of reaching
temperature (~ 95˚-110˚C )
Within ~ 6 minutes of reaching
temperature (~ 95˚-110˚C )
For later models only: Calibrate the steam generator/boiler
– see page 40, Figure 9.3 - Steam Generator/Boiler
Calibration Procedure.
Important Note: The later STATIM models have a built-in
water quality sensor. Do not try to clean the later STATIMs'
steam generator/boiler. If you use a lesser quality water,
the LCD on the later STATIM will display "Water Quality is
not Acceptable" or "Distilled H20 only". The sensor detects unacceptable levels of dissolved solids in the reservoir water. See page 14, 2.11 - Water Quality Tester.
THINGS TO CHECK
• Refer to Stage #3 - Pressurizing: "Check Cassette #3
(Cycle Fault #3)".
• Check Safety Valve (70 PSI) (RPI Part #SCV004) for leaks
and replace if necessary.
• Leaky check valve – see page 24, Service Tip #2. Inspect the compressor air filter. If it is wet, replace the
Check Valve Kit (RPI Part #SCK011), the Air Filter (RPI Part
#SCF002) and/or the Biological Filter (RPI Part #SCF032).
28
29
6.0 – LCD ERROR CODES (continued)
6.0 – LCD ERROR CODES (continued)
STAGE #4 – STERILIZATION (continued)
STAGE #5 – VENTING
CHECK CASSETTE #8 (CYCLE FAULT #8) (continued)
THINGS TO CHECK (continued)
• Solenoid valve plunger may be compromised by debris
or may be worn. Check the plunger inside the flute/bonnet for proper movement. Replace Solenoid-Plunger Kit
(RPI Part #SCK003) if necessary. See page 41, Figure
9.4 - Solenoid Valve.
• If problem repeats, clean or calibrate steam generator/
boiler - see page 39, Figure 9.2 or page 40, Figure
9.3.
LCD MESSAGE
CHECK CASSETTE #7 (CYCLE FAULT #7)
The steam generator/boiler or cassette temperature has
dropped below its set point due to a steam leak.
THINGS TO CHECK
• Clean and lubricate the cassette seal – see page 10,
Figure 2.7 - Liquid Soap (RPI Part #RPS287). Replace
the Cassette Seal if necessary, (RPI Part #SCS001 fits
model 2000), and (RPI Part #SCS029 fits model 5000).
• Inspect and clean steam ports on probe bracket.
• If the cassette is hard to remove after venting takes
place: Solenoid valve plunger may be compromised by
debris or may be worn. Check the plunger inside the
flute/bonnet for proper movement. Replace SolenoidPlunger Kit (RPI Part #SCK003), if necessary. See page
41, Figure 9.4 - Solenoid Valve.
• Water level in the waste bottle may be full, or the exhaust path may have a restriction or blockage.
• Check exhaust tubing for kinks or pinch points. Note: RPI
offers an Exhaust Tubing Kit (RPI Part #SCK017) or Exhaust Tubing sold by the foot (RPI Part #RPT380).
• Check the cassette tray venturi plate for blockage - see
page 42, Figure 9.5 - Cassette.
• Check steam generator/boiler – see page 38, Figure
9.1 - Steam Generator/Boiler.
LCD MESSAGE
CYCLE FAULT #9……Not Currently In Use
LCD MESSAGE
CYCLE FAULT #10
Temperature and pressure failing to decrease.
THINGS TO CHECK
• Water level in the bottle may be full, or the exhaust path
may have a restriction or blockage.
• Check exhaust tubing for kinks or pinch points. Note: RPI
offers an Exhaust Tubing Kit (RPI Part #SCK017) or Exhaust Tubing sold by the foot (RPI Part #RPT380).
• Check the cassette tray venturi plate for blockage –
see page 42, Figure 9.5 - Cassette.
• Check the solenoid valve coil’s electrical performance see page 41, Figure 9.4 - Solenoid Valve.
• Check for debris in the orifice and port holes of the solenoid valve.
• Solenoid valve plunger may be compromised by debris
or may be worn. Check the plunger inside the flute/bonnet for proper movement. Replace Solenoid-Plunger Kit
(RPI Part #SCK003) if necessary. See page 41, Figure
9.4 - Solenoid Valve.
LCD MESSAGE
CHECK CASSETTE #8 (CYCLE FAULT #8)
There is a 5˚C temperature difference between the steam
generator/boiler and the cassette.
THINGS TO CHECK
• Water level in the waste bottle may be full, or the exhaust path may have a restriction or blockage.
• Check exhaust tubing for kinks or pinch points. Note: RPI
offers an Exhaust Tubing Kit (RPI Part #SCK017) or Exhaust Tubing sold by the foot (RPI Part #RPT380).
• Check the cassette tray venturi plate for blockage – see
page 42, Figure 9.5 - Cassette.
• Check the solenoid valve coil’s electrical performance see page 41, Figure 9.4 - Solenoid Valve.
• Check for debris in the orifice and port holes of the
solenoid valve.
The sterilization cycle is completed and the vent solenoid valve opens to: 1) allow the pressure in the cassette to depressurize
via the exhaust path into the condenser waste bottle; and, 2) allow the steam to cool down safely.
LCD MESSAGE
CYCLE FAULT #14
Applies to STATIM 2xx software only.
LCD MESSAGE
CYCLE FAULT #11
Cassette temperature failed to drop within 60 seconds of
the end of a cycle during venting.
Steam generator/boiler temperature "ran away" (above
171˚C) in the Sterilization Stage.
THINGS TO CHECK
• Check exhaust tubing for kinks or pinch points. Note: RPI
offers an Exhaust Tubing Kit (RPI Part #SCK017) or Exhaust Tubing sold by the foot (RPI Part #RPT380).
• Check the cassette tray venturi plate for blockage – see
page 42, Figure 9.5 - Cassette.
• Check the solenoid valve coil’s electrical performance see page 41, Figure 9.4 - Solenoid Valve.
• Check for debris in the orifice and ports holes of the solenoid valve.
• Solenoid valve plunger may be compromised by debris
or may be worn. Check the plunger inside the flute/bonnet for proper movement. Replace Solenoid-Plunger Kit
(RPI Part #SCK003) if necessary. See page 41, Figure
9.4 - Solenoid Valve.
THINGS TO CHECK
• A weak pump due to dirty mesh filters in the pump fittings or dirty Water Filter (RPI Part #SCF034). Check
pump’s operation – see pages 6 and 7, 2.3 - Pump
Tester Bottle (RPI Part #SCK024). If pump passes test,
boiler must be replaced.
• Steam generator/boiler calibration is needed – see page
40, Figure 9.3 - Steam Generator/Boiler Calibration
Procedure.
LCD MESSAGE
CYCLE FAULT #15
The cassette temperature climbed ~3˚C above the set
point limit in the Sterilization Stage.
LCD MESSAGE
CYCLE FAULT #12
Failure to measure temperature. NOTE: This can happen at
any stage.
THINGS TO CHECK
• Water level in the waste bottle may be full, or the exhaust path may have a restriction or blockage.
• Check exhaust tubing for kinks or pinch points. Note: RPI
offers an Exhaust Tubing Kit (RPI Part #SCK017) or Exhaust Tubing sold by the foot (RPI Part #RPT380).
• Check the cassette tray venturi plate for blockage – see
page 42, Figure 9.5 - Cassette.
• Check for debris in the orifice and port holes of the
solenoid valve.
• Solenoid valve plunger may be compromised by debris
or may be worn. Check the plunger inside the flute/bonnet for proper movement. Replace Solenoid-Plunger Kit
(RPI Part #SCK003) if necessary. See page 41, Figure
9.4 - Solenoid Valve.
• Steam generator/boiler calibration is needed – see page
40, Figure 9.3 - Steam Generator/Boiler Calibration
Procedure.
THINGS TO CHECK
• Check for open thermocouple(s). At room temperature,
it should read ~10 Ω. Replace if necessary – Thermocouple (RPI Part #SCT030).
LCD MESSAGE
CYCLE FAULT #13……Not Currently In Use
For older units with an aluminum steam generator/boiler,
run a new cycle and view the LCD display. After completion of the "Pressurization Stage", The "Sterilization
Stage" should begin within 10 seconds. If it takes longer
than 10 seconds, the steam generator/boiler needs cleaning - see page 39 - Figure 9.2 "Cleaning the Steam
Generator/Boiler".
30
31
6.0 – LCD ERROR CODES (continued)
6.0 – LCD ERROR CODES (continued)
STAGE #5 – VENTING (continued)
STAGE #5 – VENTING (continued)
CYCLE FAULT #20 (continued)
THINGS TO CHECK (continued)
• Steam generator/boiler calibration is needed – see page
40, Figure 9.3 - Steam Generator/Boiler Calibration
Procedure.
LCD MESSAGE
CYCLE FAULT #16
Steam generator/boiler temperature "ran away" (above
171˚C) in the autoclave.
THINGS TO CHECK
• A weak pump due to dirty mesh filters in the pump fittings or dirty Water Filter (RPI Part #SCF034). Check
pump’s operation – see pages 6 and 7, 2.3 - Pump
Tester Bottle (RPI Part #SCK024). If pump passes test,
boiler must be replaced.
• Check for continuous power (non-pulsing) to steam generator/boiler. If continuous power is observed, replace
main PC board.
• Steam generator/boiler calibration is needed – see page
40, Figure 9.3 - Steam Generator/Boiler Calibration
Procedure.
LCD MESSAGE
CYCLE FAULT #21 thru #24……Not Currently In Use
LCD MESSAGE
CYCLE FAULT #25
Unable to power up the steam generator/boiler.
THINGS TO CHECK
• Check thermal fuse for continuity. If needed, replace the
Thermal Fuse (RPI Part #SCF006) – see page 38,
Figure 9.1 - Steam generator/boiler.
• A weak pump due to dirty mesh filters in the pump fittings or dirty Water Filter (RPI Part #SCF034). Check
pump’s operation – see pages 6 and 7, 2.3 - Pump
Tester Bottle (RPI Part #SCK024). If pump passes test,
boiler must be replaced.
• Steam generator/boiler calibration is needed – see page
40, Figure 9.3 - Steam Generator/Boiler Calibration
Procedure.
LCD MESSAGE
CYCLE FAULT #17 and #18……Not Currently In Use
LCD MESSAGE
CYCLE FAULT #19
Steam generator/boiler calibration invalid.
THINGS TO CHECK
• Steam generator/boiler calibration is needed – see page
40, Figure 9.3 - Steam Generator/Boiler Calibration
Procedure.
• If problem repeats, replace the microprocessor/eprom
(matched set) or main PC board, then recalibrate the
steam generator/boiler – see page 40, Figure 9.3 Steam Generator/Boiler Calibration Procedure.
LCD MESSAGE
CYCLE FAULT #26
The sterilization stage has failed ~3 minutes after the cassette reaching the sterilization temperature.
For 4xx and up software only: “Cycle Interrupted” is displayed 2 times, and “Cycle Fault #26” is displayed upon
the 3rd failure.
LCD MESSAGE
CYCLE FAULT #20
Pump failure.
THINGS TO CHECK
• Check for steam leaks.
• Solenoid valve plunger may be compromised by debris
or may be worn. Check the plunger inside the flute/bonnet for proper movement. Replace Solenoid-Plunger Kit
(RPI Part #SCK003) if necessary. See page 41, Figure
9.4 - Solenoid Valve.
• Steam generator/boiler calibration is needed – see page
40, Figure 9.3 - Steam Generator/Boiler Calibration
Procedure.
THINGS TO CHECK
• A weak pump due to dirty mesh filters in the pump fittings or dirty Water Filter (RPI Part #SCF034). Check
pump’s operation – see pages 6 and 7, 2.3 - Pump
Tester Bottle (RPI Part #SCK024). If pump passes test,
boiler must be replaced.
32
LCD MESSAGE
CYCLE FAULT #27
The steam generator/boiler temperature has exceeded
150˚C for 25 seconds (or a time out period).
LCD MESSAGE
CYCLE FAULT #72 and 98
Communication error between the microprocessor and the
temperature adapter board.
THINGS TO CHECK
• A weak pump due to dirty mesh filters in the pump fittings or dirty Water Filter (RPI Part #SCF034). Check
pump’s operation – see pages 6 and 7, 2.3 - Pump
Tester Bottle (RPI Part #SCK024). If pump passes test,
boiler must be replaced.
• Steam generator/boiler calibration is needed – see page
40, Figure 9.3 - Steam Generator/Boiler Calibration
Procedure.
If your autoclave is equipped with the temperature adapter
board (Alex Upgrade), the following two Cycle Faults may
apply – see page 25, Service Tip #9.
THINGS TO CHECK
• Check connection between the “square” microprocessor and the main PC board. Also check the connection
between the temperature adapter board and the main
PC board. Ensure there are no bent or shorted pins.
• Validation thermocouple supplied with this “Alex Boiler
Kit” may require calibration, which is not covered in this
booklet. Consult OEM for this calibration procedure.
STAGE #6 – DRYING
The air compressor forces air through the heated steam generator/boiler into the cassette, therefore drying the instruments.
The drying cycle will run for 60 minutes or until interrupted by pressing the Stop button. Keep in mind that when the Stop button is pressed, the following message is displayed: “Please Wait - Cycle Complete”. Remove cassette only when the message
displays: “Remove Cassette Cycle Complete".
There are no error codes applicable to this stage.
33
7.0 – LCD MESSAGES
7.0 – LCD MESSAGES (continued)
APPLIES TO ANY STAGE
APPLIES TO ANY STAGE (continued)
LCD MESSAGE
GARBLED OR NO READ-OUT ON THE LCD
SERVICE NEEDED (continued)
THINGS TO CHECK (continued)
• Check the cassette tray venturi plate for blockage – see
page 42, Figure 9.5 – Cassette.
• Check for debris in the orifice and port holes of the solenoid valve.
• Solenoid valve plunger may be compromised by debris
or may be worn. Check the plunger inside the flute/bonnet for proper movement. Replace Solenoid-Plunger Kit
(RPI Part #SCK003) if necessary. See page 41, Figure
9.4 - Solenoid Valve.
• The steam generator/boiler may need to be cleaned –
see page 39, Figure 9.2.
• Steam generator/boiler calibration is needed – see page
40, Figure 9.3.
THINGS TO CHECK
• Make sure that the cable from the LCD board (RPI Part
#SCA022 or Kit #SCK062) is properly seated at the main
PC board connector.
• If using the Extension Cable (RPI Part #SCT026), make
sure that the cables are connected properly – see page
4, 2.1 - Extension Test Cable.
• The microprocessor may need to be reseated in its
socket. CAUTION: Disconnect power to the autoclave
and discharge the static electricity from your body
before touching the microprocessor (by touching the
autoclave’s metal chassis with both hands). Failure to
properly discharge static electricity can damage the
microprocessor and make it unusable. Press firmly on
the microprocessor and retest.
NOTE: If none of the above solves the problem, replace
either the LCD PC Board (RPI Part #SCA022 or Kit
#SCK062) or the main PC board.
LCD MESSAGE
CHECK CASSETTE
(DOES NOT DISPLAY NUMBER ON LCD)
Applies to the original STATIM 2000 model 101102 only.
The temperature in the cassette has not dropped below
103˚C after the venting cycle.
LCD MESSAGE
SERVICE NEEDED
Applies to the original STATIM 2000 model 101102 only.
THINGS TO CHECK
• Water level in the bottle may be full, or the exhaust path
may have a restriction or blockage.
• Check exhaust tubing for kinks or pinch points. Note: RPI
offers an Exhaust Tubing Kit (RPI Part #SCK017) or Exhaust Tubing sold by the foot (RPI Part #RPT380).
• Check the cassette tray venturi plate for blockage – see
page 42, Figure 9.5 - Cassette.
• Check the solenoid valve coil’s electrical performance see page 41, Figure 9.4 - Solenoid Valve.
• Check for debris in the orifice and port holes of the solenoid valve.
• Solenoid valve plunger may be compromised by debris
or may be worn. Check the plunger inside the flute/bonnet for proper movement. Replace Solenoid-Plunger Kit
(RPI Part #SCK003) if necessary. See page 41, Figure
9.4 - Solenoid Valve.
Steam generator/boiler has exceeded 171˚C or cassette
temperature has exceeded 147˚C.
THINGS TO CHECK
• If this message appears BEFORE depressing the Start
button, then check continuity of thermocouples. Thermocouples should read ~ 10 Ω at room temperature or
main PC board may be faulty.
• If this message appears AFTER depressing the Start
button, check pump’s operation – see pages 6 and 7,
2.3 - Pump Tester Bottle (RPI Part #SCK024). If pump
passes test, boiler must be replaced.
• Water level in the waste bottle may be full, or the exhaust path may have a restriction or blockage.
• Check exhaust tubing for kinks or pinch points. Note: RPI
offers an Exhaust Tubing Kit (RPI Part #SCK017) or Exhaust Tubing sold by the foot (RPI Part #RPT380).
34
LCD MESSAGE
SELECT A CYCLE/PROGRAM OR INSERT CASSETTE
This can be displayed at any time before or during a
cycle/program.
LCD MESSAGE
REFILL RESERVOIR EMPTY WASTE BOTTLE
Reservoir water level may be below minimum level. Cycle
will not start.
THINGS TO CHECK
• The cassette thermocouple may be bent and stopping
the cassette from fully engaging the microswitch. For
additional information see the “Installation instructions”
for RPI Part #SCT030 available on RPI’s website,
www.rpiparts.com.
• The microswitch may have failed. The microswitch is a
N.O. type switch. Replace the Microswitch Kit (RPI Part
#SCK007) if necessary. See page 9, Figure 2.5.
THINGS TO CHECK
• Check reservoir water level and refill if necessary.
• Check condenser waste bottle water level and empty if
necessary.
• See page 36, 8.0 Troubleshooting Tips - "Water Quality Sensor Troubleshooting".
LCD MESSAGE
CYCLE INTERRUPTED/NOT STERILE
Applies to all later STATIMs.
LCD MESSAGE
PRESS STOP TO RESET
Applies to all later STATIMs.
THINGS TO CHECK
A power failure or a time out condition occurred during a
cycle. The error must be cleared by pressing the Stop button.
THINGS TO CHECK
• After an error fault occurs, the error must be cleared before shutting down by pressing the Stop button.
NOTE: If this message appears in three consecutive cycle
failures, Cycle Fault #26 will appear on the display. See
page 32 – Cycle Fault #26.
LCD MESSAGE
WATER QUALITY IS NOT ACCEPTABLE OR DISTILLED
H2O ONLY
The water placed in the reservoir is of low quality and has
been detected by reservoir’s water quality sensor.
Applies to the STATIM models with water quality sensor
only.
THINGS TO CHECK
• Test the quality of the water being used, See page 14,
2.11 - Water Quality Tester.
DO NOT TRY TO CLEAN THE STEAM GENERATOR/
BOILER WITH ANY TYPE OF CLEANERS.
• Simply drain the reservoir and refill using distilled water
only. Do not use deionized, demineralized , or specialty
filtered water. Tap water must never be used.
• See page 36, 8.0 Troubleshooting Tips - "Water Quality Sensor Troubleshooting".
35
8.0 – TROUBLESHOOTING TIPS
8.0 – TROUBLESHOOTING TIPS (continued)
CONDITION:
WATER QUALITY SENSOR TROUBLESHOOTING
Applies to the STATIM models with water quality sensor
only.
THINGS TO CHECK
Troubleshooting Procedure:
STEP #1 - Verify that the main PC board is operational.
Measure the voltage between P1-1 and P1-3. The reading
must be between – 8.4 and – 9.7 VDC. If not, the main
PC board is bad, see pages 46 and 47, Figure 9.8 Electrical Diagram.
CONDITION:
WILL NOT POWER UP
CONDITION:
WRAPS/INSTRUMENTS REMAIN WET AFTER DRYING
THINGS TO CHECK
• Check power source to power cord, AC receptacle to
power switch, and wiring to the main PCB.
• Check 15 amp ceramic fuse.
• Inspect, clean and adjust contacts of fuse holder if necessary.
• Main PC board is bad and must be replaced.
For all of the above see pages 46 and 47, Figure 9.8 Electrical Diagram.
THINGS TO CHECK
• Check air filters, and replace if necessary (RPI Part
#SCF002, SCF031 and SCF032).
• Check leveling of the STATIM – Note the position of the
bubble in the Bull’s-Eye Level (RPI Part #SCL012) that is
located on the top right of the autoclave. A properly leveled autoclave would show the bubble in the 4 to 5
o’clock position. If leveling is improper, adjust the feet
until proper level is achieved.
• Water level in the waste bottle may be full, or the exhaust path may have a restriction or blockage.
• Check exhaust tubing for kinks or pinch points. Note: RPI
offers an Exhaust Tubing Kit (RPI Part #SCK017) or Exhaust Tubing sold by the foot (RPI Part #RPT380).
• Check the cassette tray venturi plate for blockage - see
page 42, Figure 9.5 - Cassette.
• Check air compressor for proper operation - see pages
44 and 45, Figure 9.7 - Air Compressor.
• Check solenoid valve for proper operation - see page
41, Figure 9.4 - Solenoid Valve.
CONDITION:
WILL NOT PRINT
After an error fault occurs, the error must be cleared before shutting down by pressing the Stop button.
STEP #2 - Remove power from autoclave, disconnect the
water quality sensor from J4-3 and J4-4. Restore power
and begin an “unwrapped” cycle. If cycle starts with sensor disconnected, then the main PC board is bad. If “REFILL RESERVOIR EMPTY WASTE BOTTLE” error appears
on LCD proceed to the next step.
THINGS TO CHECK
• If the time and date are not displayed on the printer's
LCD, check power cable connections.
• Check the loading of printer paper, paper must roll out
from the top. Verify that the paper is not jammed.
• Replace printer if necessary.
STEP #3 - Short probe terminals J4-3 and J4-4 together
and start a cycle. If “WATER QUALITY NOT ACCEPTABLE”
displays on LCD proceed to Step #4; if not the main PC
board is bad.
CONDITION:
LEAKING STEAM:
PRV (PRESSURE RELIEF VALVE)
(Also known as Safety Valve)
STEP #4 - Remove the short from J4-3 and J4-4. Short
the float terminals together on the main PC board (J4-5 &
J4-6). If the cycle starts, the main PC board is good and the
water quality sensor is bad. If the LCD reads “WATER
QUALITY NOT ACCEPTABLE”, the main PC board is bad.
THINGS TO CHECK
• Check cassette seal port holes and steam ports on probe
bracket (look for obstruction). Clean and lubricate the
cassette seal – see page 10, Figure 2.7 - Liquid Soap
(RPI Part #RPS287). Replace the Cassette Seal (RPI Part
#SCS001 fits model 2000) or (RPI Part #SCS029 fits
model 5000) if necessary.
STEP #5 - To verify the water quality sensor, short the two
pins coming from the front of the sensor together. The sensor should read less than 1 Ω.
Upon verification or replacement of water quality sensor,
test the reservoir’s water quality using the Water Quality
Tester (RPI Part #RPT820). See page 14, Figure 2.11 Water Quality Tester.
• Check the plumbing from the steam generator/boiler to
the probe bracket fittings (look for obstruction). See
page 38, Figure 9.1 - Steam Generator/Boiler.
• If the problem repeats, replace the Safety Valve (70 psi)
(RPI Part #SCV004).
36
CONDITION:
IF "BUZZING NOISES" ARE HEARD
Sounds like the solenoid valve is buzzing with the cassette
inserted or at improper times during a cycle.
THINGS TO CHECK
• Solenoid valve plunger may be compromised by debris
or may be worn. Check operation of plunger inside the
flute/bonnet for proper movement. Replace SolenoidPlunger Kit (RPI Part #SCK003) if necessary. See page
41, Figure 9.4 - Solenoid Valve.
CONDITION:
IF "RATTLING NOISES" CAN BE HEARD
Sounds coming from air compressor during the drying
cycle or at improper times during a cycle.
THINGS TO CHECK
• Check the air compressor filter. If stains or moisture are
present, replace the Air Compressor Filter (RPI Part
#SCF002) and the Check Valve (RPI Part #SCK011).
Note: Once the air compressor filter shows signs of moisture, the check valve has failed and must be replaced.
Damage will occur with the air compressor if unattended.
This can lead to a costly repair.
CONDITION:
IF "CLICKING NOISES" ARE HEARD
Sounds like the solenoid valve is being activated without
the cassette inserted or at improper times during a cycle.
CONDITION:
IF MAJOR COMPONENT CONTINUOUSLY RUNS
Air compressor, solenoid valve, pump or steam generator/boiler activates and does not turn off at it's appropriate time.
THINGS TO CHECK
• The microswitch may have failed. One cause for this failure could be a cassette steam leak. Repair leak and
retest. If condition persists, replace the Microswitch Kit
(RPI Part #SCK007). See page 9, 2.5 - Hex Balldriver
(5/64") (RPI Part #RPT297), For Use When Replacing
the Microswitch.
THINGS TO CHECK
• Main PCB board is bad and must be replaced.
NOTE: This can also happen with the cassette installed
before or just after starting a cycle. The steam works its
way past the switch’s seal into the switch causing the N.O.
contacts to short out and become closed (or possibly an intermittent signal). The autoclave would then proceed as if
the microswitch had been activated.
37
9.0 – REFERENCE BLOCKS
9.0 – REFERENCE BLOCKS (continued)
FIGURE 9.1 - STEAM GENERATOR/BOILER
FIGURE 9.2 - CLEANING THE STEAM GENERATOR/BOILER
• To check steam generator/boiler heater, disconnect
fuse assembly at main PC board J1-3. Measure resistance between the two steam generator/boiler
terminals, resistance should read 11 Ω. If not, replace boiler. Reconnect wire at main PC board J1-3.
• Check line voltage at main PC board J1-3 and J1-4
during warm up cycle. If reading is correct, verify
voltage at steam generator/boiler terminals.
• Steam generator/boiler thermocouple should read ~
10 Ω at main PC board screw terminals (J6 Boiler).
• To check the thermal fuse continuity, disconnect fuse
assembly at main PC board J1-3. Measure resistance
of thermal fuse assembly. An “open” reading signifies
the fuse is bad and must be replaced. Reconnect wire
at main PC board J1-3. IMPORTANT NOTE: To avoid
damaging the new thermal fuse assembly try to identify the cause of the failure. There are a number of
causes for thermal fuse failure which include a weak
water pump, steam leaks, faulty thermocouple, and/or
malfunctioning steam generator/boiler (which may require cleaning or calibration).
Tubing (only) (Translucent)
(RPI Part #RPT373)
If moisture or steam is present
in this tube, replace Check Valve
Safety Valve (70 PSI) (RPI Part #SCV004)
OEM recommends replacing the Check
Valve and Safety Valve every two years
Check Valve Kit
(RPI Part #SCK011)
To Air Compressor
To Steam Injection Port
on Probe Bracket
To Metering Tube on Pump
Add CLR® here when cleaning
steam generator/boiler.
See page 39, Figure 9.2
Steam Generator/Boiler
To Main PC Board J1-4
Steam Generator/Boiler
Thermocouple
Screw (#6-32 x 1/4)
(RPI Part #ADS054)
Screw (#8-32 x 1/2-SEMS)
(RPI Part #RPH817)
3 places
For later models only: Calibrate the steam generator/
boiler – see page 40, Figure 9.3 – Steam Generator/
Boiler Calibration Procedure. IMPORTANT NOTE: The
later STATIM models have a built-in water quality sensor. Do not try to clean the later STATIM’s steam generator/boiler. If you use a lesser quality water, the LCD
on the later STATIM will display “Water Quality is not
Acceptable” or “Distilled H20 only.” The sensor detects
unacceptable dissolved solids over the limits in the
water. Verify water quality, See page 14, 2.11 - Water
Quality Tester.
STEP #4 - Now start an "Unwrapped Cycle". As soon
as you hear the pump begin running, quit the cycle by
pressing the Stop button. This step is to add water to
the steam generator/boiler and warm up the solution
inside the steam generator/boiler. Let the cleaner go to
work for about 15 minutes.
For earlier models only: The steam generator/boiler
may be contaminated by mineral deposits, calcium,
etc., that have accumulated over time. These deposits
are caused by using low quality water. Verify water
quality, See page 14, 2.11 - Water Quality Tester.
STEP #6 - Be sure the water reservoir is full and the
condenser waste bottle is at its minimum fill level.
Select a new “unwrapped cycle” then press and lock
the RPI Start Switch (RPI Part #SCS021). This will manually run the pump. Continue running the pump for ~3
minutes (to purge/flush all debris from the steam generator/boiler).
STEP #5 - Using the RPI Start Switch (RPI Part
#SCS021). Connect the smart switch to pin #'s 16 and
18 on the 20 pin connector (P1) on the main PC board.
See page 5, Figure 2.2.
The cleaning steps below apply to the STATIM 2000,
Model 101102 only (with serial number that ends with
an "A"), without a water quality sensor.
STEP #7 - Remove the start switch, drain the condenser waste bottle, refill the reservoir, and thoroughly
clean the cassette (removing debris purged/flushed
from steam generator/boiler cleaning). Run a new “unwrapped cycle” and view the LCD display. After completion of the "Pressurization Stage", The "Sterilization
Stage" should begin within 10 seconds. If it takes
longer than 10 seconds, repeat the cleaning procedure.
STEP #1 - Allow the steam generator/boiler to cool
down, then remove the safety valve from the top of the
steam generator/boiler, See page 38, Figure 9.1.
STEP #2 - Measure ~1 oz. of CLR® cleaner and pour it
into the steam generator. Clean up any spills or drips
from the steam generator/boiler immediately.
NOTE: If cleaning the steam generator/boiler repeatedly does not eliminate the problem, replace the steam
generator/boiler.
STEP #3 - Reinstall the safety valve into the steam
generator/boiler (use a thread sealer on the threads of
the safety valve).
Double Thermal
Fuse Assembly
(RPI Part #SCF006)
DATA CHART
• Steam Generator/Boiler Heater: ~11 Ω (J1-3 & J1-4)
• Thermocouple: ~10 Ω @ Room Temp. (J6 Boiler)
To Main PC Board J1-3
38
39
9.0 – REFERENCE BLOCKS (continued)
9.0 – REFERENCE BLOCKS (continued)
FIGURE 9.3 - STEAM GENERATOR/BOILER CALIBRATION PROCEDURE
FIGURE 9.4 - SOLENOID VALVE
STEP #8 - The calibration continues and it takes different paths depending on whether it is a new style or
old style main PC board.
Old Style: Calibration will take ~ 5 min’s. A long beep
will be heard upon completion. The “00” on the display
will change similar to Figure 3 below.
Now press the “STOP” button allowing the system to
vent. Display will read “PRESS STOP TO RESET” when
the venting is complete. Pressing the “STOP” button
again will reset the autoclave and the display will now
read ‘SELECT A CYCLE’ (SELECT A PROGRAM). Calibration is complete and the autoclave is ready for normal use.
New Style: When cycle reaches “STERILIZATION
PHASE” unit will beep twice. Autoclave will automatically vent after 3-1/2 minutes. The boiler calibration is
now complete and the LCD display should change similar to Figure 3 below.
STEP #7 - Begin calibration procedure by holding down
the “unwrapped” button and simultaneously pressing
the start button. The display should appear similar to
Figure 2 below.
After venting, press the “STOP” button to end calibration cycle. Autoclave is now ready for normal use.
Coil Bracket
Flute/Bonnet
Shading Disk
Spring
Plunger
FIGURE 1
FIGURE 2
OLD STYLE
F9>
CALIBRATION
+32.00˚C
FIGURE 3
OLD STYLE
<C8
65.00˚C
F6>
CALIBRATION
+32.00˚C
+2.00˚C
Valve Body
<C8
135.00˚C
Old Style: Upper Left corner will
change to "00" and an asterisk
will appear after CALIBRATION*
25.5 C8
24.1 F9
NEW STYLE
25.5 00*
24.1 F9
1.4
1.4
New Style: Unit will beep 3 times.
C8 will change to 00*
40
Push-in Elbow Fitting
(RPI Part #RPF362
Port #2
Copper Tubing Kit
(RPI Part #SCK048) &
(RPI Part #SCK049)
Male Connector
Port #1 (RPI Part #RPF227)
I
NEW STYLE
Solenoid Plunger Kit
(RPI Part #SCK003)
Orifice
OLD STYLE
00> CALIBRATION* <C8
65.00˚C
O-ring
Spanner Nut
(RPI Part #RPT364)
h
STEP #6 - Insert cassette.
2) Coil AC Line Voltage: 120V/60 Hz, 9W.
While in the Warming Stage, Line
Voltage should be present at terminals J1-7 and J1-8 on main PC
board. If not, main PC board is bad.
Ad
STEP #5 - The LCD display should appear similar to
Figure 1 below.
Coil
(RPI Part #SCC005)
LO5
STEP #4 - Plug in the power cord and turn the power
switch to "ON".
Nut
CT
STEP #3 - Push and slide the button on the Start
Switch to lock the switch in the “ON” position.
Solenoid Valve Electrical Data
1) Coil Resistance: 3.25- 3.96 Meg. Ω
NOTE: This Coil is a FWR Coil and the
resistance must be checked on both
leads. Then reverse the leads and
recheck. The resistance must be the
same in both directions or the coil is
bad.
4
STEP #2 - Connect your RPI Start Switch (RPI Part
#SCS021) to the pins marked W1 on the main PC board.
See pages 46 and 47, Figure 9.8 - Electrical Diagram.
SERVICE TIP
• Avoid crushing the flute/bonnet
(which would prevent the plunger
from moving up and down freely)
by using a Spanner Nut (RPI Part
#RPT364) or Spanner Wrench (RPI
Part #RPT501).
• Inspect and clean plunger rubber
seat, replace if necessary. Uneven
wear could indicate a problem.
• Lubricate the plunger (metal body
only) with a drop of 3-IN-ONE® oil.
This can also help reduce valve
noise.
• Inspect and clean valve body orifice
and ports, looking for damage and
debris.
• Check that the coil has been reinstalled in the proper orientation.
es 5
ive
Applies to STATIM 2000 and 5000
STEP #1 - Turn the autoclave off and remove the power
cord from the AC outlet. Remove the cover, refill the reservoir (with distilled water) and install the RPI Extension Test
Cable (RPI Part #SCT026). See page 4, Figure 2.1.
NEW STYLE
145.5 F3*
Thread Locker
(RPI Part #RPA369)
135.9 F9
9.6
Screw (#8-32 x 1/2 -SEMS)
(RPI Part #RPH817)
2 places
41
Mounting Bracket
(not included)
9.0 – REFERENCE BLOCKS (continued)
9.0 – REFERENCE BLOCKS (continued)
FIGURE 9.6 - PUMP
ULKA VERSION PUMP
with Autoclave Software R604 and above.
Use this clear protective tubing
to avoid water leakage onto AC
input wiring
ULKA Pump was introduced in conjunction
with Main PC Board Rev. 7 (Software version R604) and was never supplied with
mesh filter installed into inlet and outlet
fittings. NOTE: Ulka Pump can be used on
Main PCB Rev. 6.4 with upgraded software
to Rev. R604 and above.
2
1
Flow
● Verify that outer edges of cassette tray are straight
(not nicked, dented, or damaged).
● Check the integrity of the hinge.
● Check the cassette tray and lid for warpage.
Straighten or replace as necessary.
● Inspect and clean steam ports on probe bracket. If
you observe excess debris that is not easily removed,
or if the steam ports appear to be worn or damaged,
remove probe bracket for proper evaluation. Replace
probe bracket if necessary. See page 13, Figure
2.10B.
CASSETTE DIAGNOSTICS:
If water is leaking at the drain from the cassette bay
(underside of sterilizer), then do the following:
● Remove and clean cassette seal and groove. Reinstall cassette seal. Run a cycle and reinspect for leakage. See page 10, Figure 2.6.
● Confirm that the cassette seal port holes are not damaged and that they are properly aligned within the
cassette groove.
● Ensure that there is no debris or residue on outer
edges of cassette tray.
Flow
FIGURE 9.5 - CASSETTE
}
White (Neutral)
To Main PCB J1-6
1
Exhaust Steam Port
Cassette Lid Square Notches
(for cassette seal alignment)
Black (Line)
To Main PCB J1-5
Located on
Probe Bracket
2
Injection Steam Port
BACK REAR VIEW
Spring Clip
Tray
Check these
areas for debris
build up
42
Flow
Venturi Plate
Clean/Remove
Mesh Filter
Black (Line)
To Main PCB J1-5
White (Neutral)
To Main PCB J1-6
Spring Clip
(Ground Contact)
43
1
Lid
Over-Temp Switch
2
RPI Cassette Seal Part Number
is located in this approximate
location (inside Seal Channel)
Clean/Remove Mesh Filter
1
Cassette Seal
Locating Tabs
and Port Holes
Cassette Lid
Port Holes
• Effective March 2006, all pumps were
supplied with the spring clip (grounding)
to improve water conductivity circuitry.
• In early 2006, the OEM introduced the
Reservoir Cap & Filter (RPI Part #SCK059).
• Effective June 2007, the OEM stopped
using the mesh filter (installed inlet and
outlet fittings) and offered the In-Line
Water Filter (RPI Part #SCF034) to be installed between the reservoir and pump.
• The OEM now recommends the use of
the Reservoir Cap & Filter (RPI Part
#SCK059) along with the In-Line Water
Filter on all units. The mesh filters should
be removed and the autoclave should be
upgraded to the In-Line Water Filter (Drain
Kit with Pump Filter RPI Part #SCK037).
2
Steam Port
sealing
surfaces
Flow
INVENSYS VERSION PUMP
with Autoclave Software R603 and older.
Use this clear protective tubing
to avoid water leakage onto AC
input wiring
9.0 – REFERENCE BLOCKS (continued)
9.0 – REFERENCE BLOCKS (continued)
FIGURE 9.7 - AIR COMPRESSOR
FIGURE 9.7 - AIR COMPRESSOR (continued)
The OEM recommends replacing the compressor filters every 6 months or every 500 cycles (whichever comes first).
Output: 2.84 PSI
MEDO PUMP
STATIM 2000 (1990 to present )
Air Compressor Kit (RPI Part
#SCK020) - includes Check Valve
Kit (RPI Part #SCK011).
CAUTION:
NEVER OIL
UNITS WITHOUT BIOLOGICAL FILTER
Steam Generator/Boiler Fitting
- To avoid possible valve failure,
debris must be completely removed from the fitting before
installing new Check Valve (RPI
part #SCK011) using supplied
threadlocker on fitting threads.
The MEDO Pump draws air
through the Compressor Filter
(RPI Part #SCF002) located in the
front of the compressor. Air is
pushed through the Biological
Filter (RPI Part #SCF032), if the
unit has one. Then air passes
through the check valve into the
steam generator/boiler.
The OEM recommends replacing the compressor filters every 6 months or every 500 cycles (whichever comes first).
Output: ~ 4.28 PSI
THOMAS PUMP
STATIM 5000 (2003 thru 2011)
The THOMAS Pump draws unfiltered air into sterilizer. Air is then
pushed through the Biological
Filter (RPI Part #SCF032) and
through the check valve into the
steam generator/boiler
CAUTION:
NEVER OIL
Flo
w
Input
Biological Filter
(RPI Part #SCF032)
White (#10)
To Main PCB J1-10
UNITS WITH BIOLOGICAL FILTER
Steam Generator/Boiler Fitting
- To avoid possible valve failure,
debris must be completely removed from the fitting before
installing new Check Valve (RPI
part #SCK011) using supplied
threadlocker on fitting threads.
w
Input
44
Output: 4.28 PSI
MEDO PUMP
STATIM 5000 (1995 thru 2003 &
2011 to present )
The MEDO Pump draws air from
the Air Compressor Filter (RPI
Part #SCF031) mounted to the
outside of the rear chassis of the
sterilizer. Air is then pushed
through the Biological Filter (RPI
Part #SCF032) and through the
check valve into the steam generator/boiler.
Flo
Biological Filter
(RPI Part #SCF032)
If present
Compressor Filter
(RPI Part #SCF002)
Black (#9)
To Main PCB J1-9
CAUTION:
NEVER OIL
Flo
w
Input
w
Flo
White (#10)
To Main PCB J1-10
Black (#9)
To Main PCB J1-9
Air Compressor Filter
(RPI Part #SCF031)
Biological Filter
(RPI Part #SCF032)
45
White (#10)
To Main PCB J1-10
Black (#9)
To Main PCB J1-9
9.0 – REFERENCE BLOCKS (continued) FIGURE 9.8 - ELECTRICAL DIAGRAM
Data Chart
Water
Quality
Sensor
Wires used in this
terminal block need
to be solder tinned,
or an insulation
ferrule be used.
Blue
#14
AWG
Line
Neut.
F4
J5
CHAMBER
Shield
Replacement Fuse
P3
P1
Cycle
F1
P4
Power
F3
Line
Neut.
Over-Temp.
Switch
FWR
Air
Compressor
J6 BOILER
P2
#14 AWG
#14 AWG
Line
Neut.
CR5
Steam Generator/Boiler
CR6
Air Compressor
CR7
Solenoid Valve
CR10 Pump
If the Air Compressor, Solenoid Valve, Pump or Steam Generator/Boiler
activates, but does not turn off at the appropriate time, the Main PCB Board
is bad and must be replaced.
Fuse Chart
+- +-
W1
J1-1
Solenoid
Valve
J4-1
CR5
CR7
CR10
CR6
GND
J1-10
J1-9
J1-8
J1-7
J1-6
J1-5
J1-4
F2
#14
AWG
Green/Yellow
AC Receptical
Power
Switch
White
Black
White
White
White
Black
White
Black
Black
White
J3-1
J4-6
Chassis
Gnd
Float (Not Shown) Blue
Blue
J3-6
Green/Yellow
Line
Neut.
Red
Yellow
Red
Red
Diagnostic LED Reference
Diagnostic LED's will be illuminated when their corresponding
device is switched ON
White
20
18
16
14
12
10
8
6
4
2
19
17
15
13
11
9
7
5
3
1
P1
Double Thermal Fuse
Microswitch
Reservoir
Black
Shield
Yellow
Thermocouple
Steam Generator/Boiler Heater: -11 Ω (J1-3 & J1-4)
Solenoid Coil (FWR): 3.25 - 3.96 Meg Ω
Thermocouples: ~10 Ω @ Room Temp. J5 Cassette; J6 Boiler
Thermal Fuses: Open @ 216˚C
Steam
Generator/Boiler
RPI Part #RPF060 (1/2A)
1/4" x 1-1/4" Glass
2000 Only
RPI Part #RPF061 (1A)
1/4" x 1-1/4" Glass
2000 Only
RPI Part #RPF071 (15A)
1/4" x 1-1/4" Ceramic
F3 & F4
In-Line Pump
(Not Shown)
F1 & F2
Line Voltage
F2 & F3
Line Voltage
RPI Part #RPF367 (2A)
5mm x 20mm Glass
F1
RPI Part #RPF368
5mm x 20mm Glass
F2
Thermocouple
Heater
Invensys
Pump
Device Activation Chart (Jumpering)
Pump
Solenoid
Air Compressor
P1-16 to J3-5 (GND)
P1-18 to J3-5 (GND)
P1-20 to J3-5 (GND)
Keypad Chart Connect to P4
Pin #
1
2
3
4
Function Stop Start Hemostat Hand
Unmarked wires are #22 AWG
46
Earlier Style Later Style
2000 & 5000 2000 & 5000
47
5
Closed
Scissors
6
7
Open
Common
Scissors
9.0 – REFERENCE BLOCKS (continued)
FIGURE 9.9 - PLUMBING DIAGRAM
Female Quick Connect
Fitting (Drain Line)
Condenser Waste Bottle Kit
(RPI Part #SCK016)
Exhaust Tubing Kit
(RPI Part #SCK017)
In-Line
Quick Disconnect
(RPI Part #RPF371)
ADC058
(x5)
Steam
Exhaust Port
RPT380
Steam
Injection Port
Kit includes 8' of Tubing
(RPI Part #RPT380) and
(5 pieces) Cord Clip
(RPI Part #ADC058)
Panel Mount
Quick Disconnect
(RPI Part #RPF370)
Includes O-Ring
(RPI Part #RPO343)
Condensation Coil
(RPI Part #SCC019)
Reservoir
Thermocouple
Condenser Waste
Bottle With lid
(RPI Part #SCB018)
Pump
TIP - Upgrade to
RPI's "User-Friendly"
Condenser Waste Bottle
Kit (RPI Part #SCK016).
Our one-of-kind design
allows your customer to remove the Condenser Waste Bottle
from the exhaust tubing in one easy step.
Simply push and release the quick connect on the lid and the bottle is free from
the exhaust tube for easy maintenance.
Air
Compressor
Solenoid
Valve
Check
Valve
Steam
Generator/Boiler
In-Line
Water Filter
Biological
Filter
Condenser Waste Bottle
48
49
ADC058
CAF011
RPB365
RPB703
RPC288
RPC291
RPC701
RPC702
RPF060
RPF061
RPF071
RPF362
RPF363
RPF367
RPF368
RPF370
RPF371
RPF377
RPF379
RPF428
RPF429
RPH111
RPH817
RPK432
RPO244
RPO385
SCA022
SCB018
SCB039
SCB043
SCC005
SCC019
SCC060
OEM Part #
Description
No OEM Part # Available
No OEM Part # Available
CORD CLIP - 10/PKG
RUBBER FOOT - 4/PKG
90º LIQUID TIGHT STRAIN RELIEF WITH LOCKING NUT
BARB TEE - 5/PKG
POWER CORD
POWER CORD
CABLE CLAMP - 5/PKG
CABLE HOLDER - 5/PKG
FUSE (1/2A, 250V) - TIME DELAY - 5/PKG
FUSE (1A, 250V) - TIME DELAY - 5/PKG
FUSE (15A, 250V) - TIME DELAY - 5/PKG
LEVELER LEG - 4/PKG
PUSH-IN ELBOW FITTING
FUSE (2A, 250V) - 5/PKG
FUSE (1/4A, 250V) - TIME DELAY - 5/PKG
PANEL MOUNT QUICK DISCONNECT
IN-LINE QUICK DISCONNECT
PUSH-IN ELBOW FITTING
UNION FITTING (COMPRESS-ALIGN 1/8")
FEMALE QUICK CONNECT FITTING (WHITE)
MALE QUICK CONNECT FITTING (WHITE)
HEX NUT (#8-32) - 50/PKG
SCREW (#8-32 x .500" - SEMS) - 25/PKG
DRAIN TUBE ASSEMBLY KIT (SMALL)
O-RING - 6/PKG
O-RING - 12/PKG
DISPLAY ASSEMBLY
•
•
•
•
•
•
•
•
•
1
1
•
•
•
•
2
2
•
•
•
•
•
•
•
•
2
•
53-100518A
01-108152S (Kit)
No OEM Part # Available
01-101647S
01-108152S (Kit)
01-108152S (Kit)
No OEM Part # Available
No OEM Part # Available
01-103472S
01-101553S
01-100782S
01-103498S
01-103497S
No OEM Part # Available
No OEM Part # Available
No OEM Part # Available
No OEM Part # Available
No OEM Part # Available
No OEM Part # Available
No OEM Part # Available
No OEM Part # Available
No OEM Part # Available
No OEM Part # Available
No OEM Part # Available
01-104382S /
01-1043815 (Display only)
01-1094945 (Display only)
01-100724S
01-100570S (Complete Assy.)
01-101618S (Complete Assy.)
01-104303S
No OEM Part # Available
01-101783S
CONDENSER WASTE BOTTLE WITH LID
PROBE BRACKET
PROBE BRACKET
SOLENOID - COIL
CONDENSATION COIL
RESERVOIR CAP
2
•
LCD DECAL
COMPRESSOR FILTER
DOUBLE THERMAL FUSE ASSEMBLY
AIR COMPRESSOR FILTER
BIOLOGICAL FILTER
WATER FILTER (IN-LINE)
FILTER
FACIA GASKET
PROBE BRACKET GASKET
FACIA GASKET
3
•
•
•
•
•
•
•
•
•
•
•
•
•
2
2
•
•
•
•
•
•
•
•
2
•
2
•
•
•
•
(Reservoir Cap & Filter)
SCD063
SCF002
SCF006
SCF031
SCF032
SCF034
SCF061
SCG009
SCG010
SCG044
01-106950S
01-100207S
01-104461S / 10-106462S
01-101652S
01-102119S
01-106637S
01-109300S
01-100842S
01-100865S
01-101650S
4
•
•
•
•
10.0 - RPI PARTS LIST
(FOR PARTS TO FIT STATIM 2000 & 5000) (continued)
RPI
Part #
SCK003
SCK007
SCK011
SCK015
SCK016
SCK017
SCK020
SCK025
SCK035
SCK036
SCK037
SCK038
SCK040
SCK041
SCK042
SCK048
SCK049
SCK059
SCK062
SCL012
SCP050
SCP051
SCS001
SCS023
SCS029
SCT030
SCT053
SCV004
SCV027
OEM Part #
Description
ST
AT
IM
20
ST
00
AT
IM
50
00
RPI
Part #
ST
AT
IM
20
ST
00
AT
IM
50
00
10.0 - RPI PARTS LIST
(FOR PARTS TO FIT STATIM 2000 & 5000)
01-100998S
01-100571S (2000) /
01-101621S (5000)
01-100574S / 01-1016275
01-101707S
01-100812S
01-100204S
01-100560S
01-100572S
01-100028S (Gasket only)
01-101649S (Gasket only)
01-108152S (kit) &
01-106637S (kit)
01-100570S
01-109671
01-109680S
01-101618S
01-109128S
01-109129S
01-101783S /
01-109300S (Filter Only)
01-104381S / 01-109494S
01-100684S (Kit)
01-100568S (2000) /
01-101761S (5000)
01-110445S (2000) /
01-110446S (5000)
01-100028S
01-100573S
01-101649S
SOLENOID-PLUNGER KIT
MICROSWITCH KIT
•
•
•
•
CHECK VALVE KIT
KEYPAD
CONDENSER WASTE BOTTLE KIT
EXHAUST TUBING KIT
AIR COMPRESSOR KIT
POWER CORD REPLACEMENT
STERILIZER PM KIT
STERILIZER PM KIT
DRAIN KIT WITH PUMP FILTER
•
5
•
•
•
•
•
•
PROBE BRACKET KIT
KEYPAD
KEYPAD
PROBE BRACKET KIT
COPPER TUBING KIT
COPPER TUBING KIT
RESERVOIR CAP & FILTER
•
•
•
•
LCD KIT
BUBBLE LEVEL
PUMP KIT (INVENSYS PUMP)
3
•
•
•
•
PUMP KIT (ULKA PUMP)
•
•
CASSETTE SEAL
POWER SWITCH
CASSETTE SEAL
THERMOCOUPLE
METERING TUBE (290)
SAFETY VALVE (70 PSI)
SAFETY VALVE (38 PSI)
•
•
No OEM Part # Available
01-108816S
01-106787S / 74-100294A
No OEM Part # Available
•
•
6
7
•
•
•
•
•
•
•
•
•
•
•
•
FOOTNOTES: 1. Older styles only 2. Models with RPI's Condenser Waste Bottle Kit (RPI Part #SCK016) 3. Model #01-121101
4. Serial #2101DK0274 and above 5. Model #101102 (Old Type, One Piece Style with S/N's ending with an 'A') 6. Model #01-201103
7. Model #01-121101 (New Style, Two Piece Style)
•
•
•
•
•
•
•
FOOTNOTES: 1. Older styles only 2. Models with RPI's Condenser Waste Bottle Kit (RPI Part #SCK016) 3. Model #01-121101
4. Serial #2101DK0274 and above 5. Model #101102 (Old Type, One Piece Style with S/N's ending with an 'A') 6. Model #01-201103
7. Model #01-121101 (New Style, Two Piece Style)
continued on next page
50
•
•
51
RPI
Part #
RPA369
RPB792
RPB793
RPB794
RPB795
RPK791
RPP798
RPP819
RPS287
RPS381
RPS639
RPS797
RPS821
RPT083
RPT297
RPT364
RPT372
RPT373
RPT378
RPT380
RPT394
RPT480
RPT482
RPT501
RPT502
RPT647
RPT820
RPT836
RPW382
RPW805
RPW806
RPW813
RPW814
RPW815
SCA046
SCA047
SCA054
SCA055
SCK024
SCK028
SCS021
SCT026
SCT052
NOTES
ST
AT
IM
20
ST
00
AT
IM
50
00
11.0 - RPI TOOLS & ACCESSORIES LIST
(FOR PARTS TO FIT STATIM 2000 & 5000)
OEM Part #
Description
No OEM Part # Available
No OEM Part # Available
No OEM Part # Available
No OEM Part # Available
No OEM Part # Available
No OEM Part # Available
No OEM Part # Available
No OEM Part # Available
No OEM Part # Available
No OEM Part # Available
No OEM Part # Available
No OEM Part # Available
No OEM Part # Available
No OEM Part # Available
No OEM Part # Available
THREADLOCKER 545
LARGE DIA. BRUSH (1-3/4")
SMALL DIA. BRUSH (3/8")
SCRUB BRUSH
HANDLE BRUSH
CLEANING KIT
CLEANSING PAD - 3/PKG
MOUNTING PAD - 10/PKG
LIQUID SOAP - 4/PKG
HIGH TEMPERATURE SLEEVING
SILICONE GASKET MAKER 598
SPONGE (4-1/4" x 6")
CALIBRATION SOLUTION - 4/PKG
CABLE TIE (4" WHITE) - 25/PKG
HEX BALLDRIVER (5/64")
SPANNER NUT
CASSETTE SEAL REMOVAL TOOL
SILICONE TUBING
1/8” OD TEFLON TUBING
EXHAUST TUBING
INSULATED FERRULE
CABLE TIE (HIGH TEMP) - 25/PKG
TERMINAL CRIMP TOOL
DOUBLE ENDED SPANNER WRENCH
FUSE PULLER
TUBING (CLEAR 1/2" - ID PVC)
WATER QUALITY TESTER
HEX BALLDRIVER (9/64")
HOOK UP WIRE (BLACK)
HOOK UP WIRE (WHITE)
HOOK UP WIRE (GRN/YEL)
HOOK UP WIRE (BLACK)
HOOK UP WIRE (WHITE)
HOOK UP WIRE (GRN/YEL)
SCI-DRY™ (16 oz. REFILL)
•
•
•
•
•
•
•
•
•
•
•
•
•
•
•
•
•
•
•
•
•
•
•
•
•
•
•
•
•
•
•
•
•
•
•
•
•
•
•
•
•
•
•
•
•
•
•
•
•
•
•
•
•
•
•
•
•
•
•
•
•
•
•
•
•
•
•
•
•
SCI-DRY™ (16 oz. REFILL - CASE)
SCI-DRY™ (2 oz.)
•
•
•
•
SCI-DRY™ (2 oz. CASE)
PUMP TESTER BOTTLE KIT
FIELD SERVICE SMART KIT®
START SWITCH
EXTENSION TEST CABLE
ALIGNMENT TOOL
•
•
•
•
•
•
•
•
•
•
•
•
01-103471S
No OEM Part # Available
No OEM Part # Available
No OEM Part # Available
No OEM Part # Available
No OEM Part # Available
No OEM Part # Available
No OEM Part # Available
No OEM Part # Available
No OEM Part # Available
No OEM Part # Available
01-103139S
No OEM Part # Available
No OEM Part # Available
No OEM Part # Available
No OEM Part # Available
No OEM Part # Available
No OEM Part # Available
No OEM Part # Available
8OZPLUS (Stat-Dri Plus™) /
32OZPLUS (Stat-Dri Plus™)
No OEM Part # Available
2OZPLUS (Stat-Dri Plus™) /
8OZPLUST (Stat-Dri PlusT™)
No OEM Part # Available
01-100713S
No OEM Part # Available
No OEM Part # Available
No OEM Part # Available
01-106776S
(Probe Alignment Jig)
52
53
Parts mentioned in this booklet are manufactured by Replacement Parts Industries, Inc. to fit SciCan STATIM® Cassette Autoclave Models 2000 and 5000.
All product names used in this document are trademarks or registered trademarks of their respective holders. All rights reserved © RPI 2013.
SCK028INS REV - 03/13