1
WASHING MACHINE
STIRALXNAQ
MA{INA
FCS 720C
INSTRUCTION- A ND I N S TA LLA T I O N B O O K LET
RUKOWODSTWO PO USTANOWKE I |KSPLUATACII
822 90From
14-97
Downloaded
WashingMachine-Manual.com Manuals
Contents
For the User
For the Installer
Safety information
Description of the appliance
3
Technical specifications
13
4-5
Unpacking the machine
14
6-7
-If the machine is damaged
-When lifting the machine
-Transit locking devices
-Identification of materials
-Machine front, Machine rear
-Control panel
Programme chart
General washing information
8
Installation
-Detergent and fabric conditioner
-Textile care labelling
Using your appliance
Maintenance
-Levelling the machine
-Water intake
-Water discharge
-Power supply
9
-Loading the machine
-Adding detergent and fabric conditioner
-Starting the machine
Rukowodstwo po \kspluatacii
10-11
-The cabinet
-The detergent dispenser
-Inside the opening for the detergent dispenser
-Cleaning inside the machine
-Descaling
-Protecting the machine against freezing
If the machine is not working
12
Service
13
-Service and spare parts
This appliance complies with the following E.E.C. Directives:
-
73/23 EEC of 19.2.73 (Low Voltage Directive) and subsequent modifications;
-
89/336 EEC of 3.5.89 (Electromagnetic Compatibility Directive) and subsequent modifications.
Downloaded From WashingMachine-Manual.com Manuals
15-16
-2-
17
Safety information
Before installing and first using the washing machine, read the instruction booklet carefully, including its
hints and warnings. Doing so will ensure that your machine will perform properly and to best advantage.
Anyone using the machine should be thoroughly familiar with its instructions for use and safety features.
Save these instructions and make sure they remain with the machine if it is moved or sold, so that everyone
using it through its life can be properly informed on appliance use and safety.
Installation and servicing
Use
●
All packaging and transit locking devices must be
removed before the machine is first used. If they are
not, the result may be damage to the machine or other
property. See the section Transit locking devices.
●
This machine is intended only for normal domestic
washing and only in accordance with these instructions.
Using it for other purposes could lead to physical
injury or damage to property.
●
All installation and service work done on the product
must be carried out by a qualified technician. Work
performed by persons with inadequate knowledge may
adversely affect the satisfactory functioning of the
product and may cause personal injury or damage.
Before any work is carried out on the dishwasher, it
must be isolated from the electrical supply, by unplugging the power cord or removing the fuse.
●
Only machine-washable items should be washed in
the machine. If in doubt, contact the manufacturer or
retailer of the item.
●
Follow the recommendations of the care label and
make sure that pockets are empty and zips and
buttons are done up before washing.
●
Objects such as coins, safety pins, nails, screws and
other hard objects can cause serious damage to the
machine. Make sure that all pockets have been emptied
before putting garments into the machine.
●
Remove stains such as rust, dye, ink and grass
before machine-washing.
●
Avoid washing clothes which are frayed or excessively worn.
●
Wash small items such as thin socks, garment ties/laces,
lace items etc. in a special laundry net to prevent them
from getting between the inner and outer drums.
●
Items which have been treated with chemicals such
as stain removal products, liquid domestic cleaning
products and similar must be rinsed thoroughly by
hand before they can be washed in the machine.
●
Underwired bras, if washed in the machine at all,
should be washed in a laundry net.
●
Use only detergents which are intended for use in
automatic washing machines.
●
Always follow the recommendations of the manufacturers of detergent and fabric conditioner concerning
the quantities of these products to use. Using too much
can damage your laundry items.
●
Do not overload the drum. Overloading impairs the
machine's performance and can damage laundry items.
●
The washing machine should be used by adults only.
Do not allow children to play with it or touch its controls
and moving/movable parts.
Before opening the door always check that the water
has been pumped out of the machine.
●
Do not leave the premises while the machine is
operating.
●
Remember that the plastic bags included in the
packaging can be fatal playthings for small children.
●
●
Before loading the machine, check that there are
no foreign objects or pets inside the drum.
After using the machine, turn off its water supply and
disconnect it from the power supply. When removing
the electrical plug, grip the plug, not the lead.
●
Leave the door ajar when the machine is not in use,
to prevent any stale odour.
●
Make sure that the machine is disconnected from the
power supply during cleaning and maintenance work.
-3-
822 90 14-97
●
The machine is heavy, so take care when lifting it.
Never lift the machine by gripping its control panel,
door, or detergent dispenser.
●
Avoid installing the machine in a room where there is
no waste gully (floor drain) set into the floor.
●
The power cord must be plugged into an earthed
socket, which need to be easily accessible. Permanent
installation must only be carried out by an authorized
electrician.
●
If the power cord is damaged, it must be replaced
by a special cord or assembly available from the
manufacturer or its service agent.
●
Make sure that the power cord is not nipped or otherwise damaged and that its hoses do not get crushed
or kinked when moving the machine in connection
with installation or cleaning etc.
When the appliance location is on carpet floors,
attention must be paid so as to ensure that there is
no obstruction to the bottom vents.
Servicing and possible repairs must be carried out by
a service company authorized by the supplier. Use
only spare parts supplied by these. Never try to repair
the machine yourself.
●
●
Child Safety
●
●
When the machine is operating, the door glass will
get hot, so it should not be touched. Keep children
away from the machine when it is operating.
Downloaded From WashingMachine-Manual.com Manuals
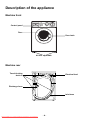
Description of the appliance
Machine front
Control panel
Door
Door latch
All feet adjustable
Machine rear
Transit locking
devices
Electrical lead
Discharge hose
Inlet hose
Downloaded From WashingMachine-Manual.com Manuals
-4-
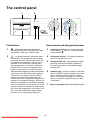
The control panel
7
6
5
1
2
3
Pushbuttons
4
Knob controls and detergent dispenser
1
– After selecting the wash programme
and temperature, push this button in to start
the machine. (See also, Indicator light).
3
Temperature control – For setting temperatures between
and 90°. Follow care label
recommendations.
2
– An optional function. When this button
is pressed in, the programme will halt at the
end of the last rinse, and the rinse water will
be retained in the machine. This function is
available for the Synthetics, Delicate and
Wool programmes, to minimise creasing in
synthetic fibres. Once the programme has
halted on rinse-hold, if you wish to end the
wash with both emptying of water and spinning
of the load, press the option button again so
it pops out. If you wish to end the wash by
emptying the water without spinning, you
have to advance the programme control knob
manually, to programme setting L. Before you
advance the programme control knob manually,
we recommend that you first press the On/Off
button to switch the machine off (button pops
out). Once the programme control knob is set
at L, press the On/Off button again (button
remains in) to complete the programme.
4
Programme control – For setting programme
type. See Programme Chart.
5
Detergent dispenser – With separate compartments for detergent and fabric conditioner.
Pre-wash detergent is to be added straight
into the drum.
6
Indicator light – Comes on approx. 5 seconds
after the ON/OFF button is pressed, when the
door is locked electrically and the machine
starts. The light goes out approx. 2-3 minutes
after the end of the programme and the door
is unlocked.
7
Space for program chart (Self-adhesive label)
Downloaded From WashingMachine-Manual.com Manuals
-5-
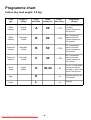
Programme chart
Cotton (dry load weight: 3.0 kg)
Load
type
Degree of
soiling
White
articles
Heavily
soiled
White
articles
Normally
soiled
Coloured
articles
Normally
soiled
Coloured
articles
Normally
soiled
Quick
wash
Lightly
soiled
Progr.
selection
Temp.
setting (C)
A
90
B
90
B
60
40
C
D
30-40
Progr.
time (min.)
Programme
content
~ 147
90° C programme with
pre-wash.
3 rinses and spin at
700 rpm/min.
~ 135
90° C programme
without pre-wash.
3 rinses and spin at
700 rpm/min.
~ 135
60° C programme
without pre-wash.
3 rinses and spin at
700 rpm/min.
~ 110
40° C programme
without pre-wash.
3 rinses and spin at
700 rpm/min.
~ 91
30°-40° C quick wash
programme without
pre-wash. 3 rinses and
spin at 700 rpm/min.
Spin
E
~8
Emptying and spin at
700 rpm/min.
Drain
L
~2
Draining
Downloaded From WashingMachine-Manual.com Manuals
-6-
Synthetics and Delicate (dry load weight: 1.5 kg)
Wool (dry load weight: 1.0 kg)
Load
type
Degree of
soiling
Synthetics
Normally
soiled
Synthetics
Lightly
soiled
Delicate
fabrics
Normally
soiled
Woollens
Lightly
soiled
Progr.
selection
Temp.
setting (C)
F
60
F
G
40
30 - 40
H
- 30
Progr.
time (min.)
Programme
content
~ 74
60° C programme
without pre-wash.
3 rinses and spin at
600 rpm/min.
~ 74
40° C programme
without pre-wash.
3 rinses and spin at
600 rpm/min.
~ 56
30°- 40° C programme
without pre-wash.
3 rinses and spin at
600 rpm/min.
~ 50
-30° C programme
without pre-wash.
3 rinses and spin at
600 rpm/min.
Spin
K
~8
Emptying and spin at
600 rpm/min.
Drain
L
~2
Draining
– Rinse-hold is an optional function available for the Synthetics, Delicate and Wool programmes.
To select rinse-hold, press the option button on the machine control panel. Rinse-hold means that the
programme halts and the water from the last rinse is retained in the machine to minimise creasing in
synthetic fibres.
Once the programme has stopped on rinse-hold, if you wish to end the wash with both emptying of water
and spinning of the load, press the option button again so it pops out.
If you wish to end the wash by emptying the water without spinning, you have to advance the programme
control knob manually, to programme setting L. Before you advance the programme control knob
manually, we recommend that you first press the On/Off button to switch the machine off (button pops
out). Once the programme control knob is set at L, press the On/Off button again (button remains in) to
complete the programme.
Downloaded From WashingMachine-Manual.com Manuals
-7-
General washing information
Detergent and fabric conditioner
Liquid detergent
The type and the quantity of detergent you use both
have an impact on the results you achieve with your
washing machine. Using too much detergent is
unnecessary and increases overall impact on the
environment quite needlessly. Even biodegradable
detergents contain substances which can disturb
the balance of the environment.
A suitable liquid detergent can be used instead of
powder detergent for programmes with low or medium
wash temperatures. In these cases you should select
a programme without pre-wash. Pour the liquid detergent into the detergent compartment immediately
before you start the programme.
Fabric conditioner
Use only good-quality detergents which are
intended for use in automatic washing
machines.
In determining exactly how much to use, follow the
detergent manufacturer's recommendations, taking
into account the size of the wash load, the degree of
soiling and the hardness of your water supply. If you
are unsure of exactly how hard the water is in your
area, the water company should be able to tell you.
If you are using fabric conditioner, pour it into the
right-hand compartment of the detergent dispenser.
Fabric conditioner is particularly useful if the load
will later be dried in a tumble dryer, as it counteracts
static electricity.
Detergent
Pour the detergent into the left-hand compartment
of the detergent dispenser before starting the programme. Special types of detergent are available
for coloureds, delicates and wool.
Textile care labelling
These are the commonest symbols used on garments and textiles, plus brief explanations.
normal wash
WASHING
wash 90°
wash 60°
wash 40°
wash 30°
BLEACHING
IRONING
DRY-CLEAN
can not wash
in water
hand wash
delicate wash
can be bleached in cold water
can not bleach
ironing max. 200°
ironing max. 150°
ironing max. 100°
A
P
F
The letters inside the dry-cleaning symbol provide information for the drycleaner, so that the correct solvents and cleaning procedures can be used.
can not iron
can not dry-cleans
normal temp.
low temp.
DRYING
flat dry
drip dry
Downloaded From WashingMachine-Manual.com Manuals
hang dry
-8-
can be tumble dried
can not tumble dry
Using your appliance
The very first time that the machine is used you should
run a wash programme with no load in the drum, to
clear any residues which may have been left by the
manufac-turing process. Pour approx. 100 ml of
detergent straight into the drum and run programme
G, 40° C. When the programme has ended the
machine will be ready for use.
1
Loading the machine
Pull the door latch gently to open the door. Put the
items to be washed inside the drum. Large and small
items can be mixed. Try always to wash full loads,
for maximum load weights see the programme charts.
You should only reduce the load weight for heavilysoiled items and sensitive fabrics.
One way of achieving the maximum load size is to
fill the drum with dry items, but without forcing them
in. Another way is to weigh the first loads you wash,
so you learn to estimate the right load size. Close
the machine door.
2
Adding detergent and fabric conditioner
The amount of detergent you use has an impact on
the performance of any washing machine. Both too
much and too little can cause problems. Use only
detergent for automatic washing machines and follow
the manufacturer's instructions when measuring the
quantity. Increase the quantity of detergent if the load
is heavily soiled or if you have a hard water supply.
Decrease the amount for lightly soiled items or less
than a full load. Excessive foaming may indicate you
have used too much detergent.
The detergent dispenser is used for fabric conditioner
and detergent for the main wash. Put the detergent
in the larger compartment on the left (Fig 1) and the
fabric conditioner in the smaller one on the right (Fig. 2).
Never fill the compartment for fabric conditioner higher
than the maximum level marked on it. If using pre-wash,
add the detergent for this straight into the drum.
Starting the machine
Before starting the programme, check:
• that the door is closed
• that the machine is plugged in and switched on at
the wall socket
• that the machine's water supply is turned on
Set the temperature (Fig. 3), select the programme
(Fig. 4) and press any option buttons you require.
Then press the ON/OFF button to start the wash.
The indicator light will come on and after 5 seconds
the door locks shut electrically and the machine starts
working.
Downloaded From WashingMachine-Manual.com Manuals
-9-
3
4
Maintenance
The cabinet
Clean the outside surfaces of the machine using a
mild (non-abrasive) household cleaning product.
Finish by removing remaining traces of the product
with a damp cloth.
1
Do not use cleaning products which contain
alcohol (spirits), thinners and similar substances.
The detergent dispenser
In time, residues of detergent and fabric conditioner
are likely to build up inside the detergent dispenser.
It should be cleaned at regular intervals by flushing
it out with water. If necessary, the whole dispenser
can be taken out of the machine for cleaning. You
need to pull it firmly outwards, so that it comes free
of a retaining stop (Fig. 1).
2
To remove the siphon (at the inside edge of the
dispenser) for cleaning, you need to press it inwards and pull it upwards at the same time (Fig. 2).
When you put it back, press it downwards until you
hear a distinct click.
Inside the opening for the detergent
dispenser
Detergent residues can also build up inside the
opening for the detergent dispenser. You can use
an old toothbrush for cleaning this area (Fig. 3).
When you have finished and put back the dispenser,
run a short programme with no wash load in the
machine to rinse it clean.
Cleaning inside the machine
If you mostly use your machine for low-temperature
washes, and/or if you use only very little detergent,
you should clean the inside of the machine about
once a month. This will prevent mould or stale odours
from developing. Use the full recommended quantity
of detergent and run a wash programme at the highest temperature with no wash load in the machine.
Downloaded From WashingMachine-Manual.com Manuals
- 10 -
3
Descaling
If your water supply is harder than 7° dH, you should
descale your washing machine at least once every
three months. Use approx. 150 ml of citric acid
instead of detergent and run a wash programme at
the highest temperature with no wash load in the
machine. Limescale deposits on components such
as the machine's heating element will reduce their
service life. (Contact your water company to find
out the hardness level of your local water supply).
Protecting the machine against
freezing
If the machine is kept in a place where the temperature
may sometimes fall below 0°C, there is a risk that
the small amount of water which remains inside
parts of the machine after normal use will freeze
and damage it.
To prevent this you should:
• Turn off the water supply to the machine and disconnect the water intake hose from the supply pipe.
• Select a wash programme, start the machine and
let the programme run for a short time.
• Lower the tap end of the intake hose to floor level.
Use a container such as a bowl to catch water
running out of it.
• Turn the programme control knob to an Emptying
programme, restart the machine and let that programme run for a short time.
• Release the discharge hose from the plastic clip
on the machine rear. Put the end of the hose down
low, into the waste gully (floor drain) set into the
floor, but make sure that the end of the hose does
not go below the water level in the gully's (drain's)
water trap.
When you begin using the machine again, you will
need to reconnect the water intake and discharge
hoses.
NOTE! The appliance is only to be used and stored
indoors at normal room temperature. The manufacture is not responsible for any frost damage.
Downloaded From WashingMachine-Manual.com Manuals
- 11 -
If the machine is not working
Symptom
Check
The machine will not start.
■
■
■
■
■
The machine is not filling with water.
■ Is the water tap turned on?
■ Has your domestic water supply been cut off
Have you pressed the ON/OFF button?
Is there power to the machine?
Has the fuse blow?
Is the door closed properly?
Have you set the programme control knob
properly?
■ Is the water tap turned on?
temporarily?
■ Is the water intake hose kinked or blocked?
■ Is the filter inside the intake hose blocked?
■ Is the water pressure too low?
The machine is discharging water at
the same time as filling.
■ Is the end of the discharge hose too low down?
(See Installation)
■ Is there a proper air gap between the end of the
discharge hose and the wall standpipe? (See
Installation)
If the machine needs to be emptied manually:
release the discharge hose from the plastic clip
on the machine rear. Lower the end of the hose
to floor level, letting it empty into a suitable
container.
The machine will not empty or spin.
■ Did you select a programme without drain and
spin?
■ Is the discharge hose kinked or blocked?
■ Is the discharge hose extension not correct?
(See Installation)
The machine is leaking or overflowing.
■ Have you used too much detergent?
■ Have you been using the detergent for automatic
machines?
■ Are the hoses correctly installed? (See Installation)
■ Is the detergent compartment blocked?
The machine is vibrating or noisy.
■ Have you removed all the transit locking devices?
■ Has the machine been installed on a suitable
surface and levelled?
■ Is the machine knocking against a wall?
■ Is the machine standing firmly on all four feet?
The machine door will not open.
■ Did you wait 2-3 minutes after the end of the
programme and has the indicator light gone out?
Read the section Loading the machine on door
opening. Never try to force the door open.
Contact service.
Downloaded From WashingMachine-Manual.com Manuals
- 12 -
Service
Service and spare parts
Servicing and possible repairs must be carried out
by a service company authorized by the supplier.
Use only spare parts supplied by these.
Before calling service, use the trouble shooting
table ”If the machine is not working” to try to attend
to the fault yourself. If service is called in to solve a
problem that is in this list, there is a risk that you
will be responsible for the cost. This is also true if
you have used the appliance for a purpose other
than it is intended for.
Note that electrical faults should always be rectified
by a certified electrician.
Give the appliance’s model designation, productand serial numbers according to the data plate.
You can record these details here:
TYPE
............................................................
MOD
............................................................
PROD.NO
............................................................
SER.NO
............................................................
Purchase date:............................................................
Technical specifications
DIMENSIONS
Height
Width
Depth
670 mm
495 mm
515 mm
WEIGHT
Net
54 kg
RECOMMENDED CAPACITY
(DRY WEIGHT)
Cotton
Synthetics/Delicate
Wool
3,0 kg
1,5 kg
1,0 kg
WATER PRESSURES
Minimum
Maximum
50 kPa (0.5 bar)
1000 kPa (10 bar)
DRUM VOLUME
27 litres
SPIN SPEED
Maximum
700 rpm/min.
ELECTRICAL DATA
Power supply
Fuse
Power rating
230 V - 50 Hz
10 A
1900 W
Downloaded From WashingMachine-Manual.com Manuals
- 13 -
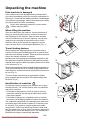
Unpacking the machine
If the machine is damaged
If the machine has been damaged during transportation,
you should immediately notify the company responsible for
delivering it. Check that the washing machine is undamaged.
If you discover any damage, faults or that anything is missing,
you should notify the seller immediately.
1
Never leave packaging material in a place where
children may play with it.
When lifting the machine
Take care when lifting the machine. Incorrect methods of
lifting can cause physical injuries, and also increase the
risk of damage to the machine. Open the door and take
hold of it inside the top of the door opening. You can also
grasp the rear overhang of the machine top to lift this
machine. Never lift the machine by gripping its control
panel, the door itself, or its detergent dispenser (Fig. 1).
2
Transit locking devices
When supplied the washing machine is packed using a
number of locking devices/packing pieces to prevent drum
and motor from damage in transit. These must all be removed
before the washing machine is installed.
Spread some of the polystyrene packaging materials on the
floor behind the machine and then lay the machine carefully
rearside down on them. Make sure that no hoses are crushed
in the process (Fig. 2).
3
Remove the polystyrene base the machine was transported on.
Then return the machine to its normal upright position and
undo the three screws and transit locking devices below on
its rear (Fig. 3).
The three holes must then be plugged with the plastic
plugs supplied with the machine in the plastic bag inside
the drum (Fig. 4).
Identification of materials
All materials used in packaging this machine are environmentally-friendly. The various plastics used are identified
and can be recycled:
• PE stands for polyethylene, which is used for the bag
around the machine and the bag in which these instructions were supplied.
• PS stands for polystyrene (moulded), which is used for
the sections of packaging needed to cushion the machine.
The cardboard components of the packaging are made from
recyclable paper and should be taken to a collection point
for recycling. The machine contains plastic and rubber
components. These have identifying marks to show what
they are made from, so they can be recycled or disposed of
properly at the end of the machine's life. The materials are
identified according to international standards.
Downloaded From WashingMachine-Manual.com Manuals
- 14 -
4
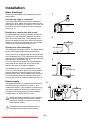
Installation
Levelling the machine
The machine must be installed on a sound and firm
surface and must not be touching walls or furniture.
Adjust the feet to level the machine. Make sure the
machine is resting on all four feet (Fig. 1).
1
Some vibration is normal and unavoidable when
the machine is spinning the load, particularly if
the floor is not a concrete one.
When the appliance location is on carpet
floors, attention must be paid so as to ensure
that there is no obstruction to the bottom vents.
Water inlet
2
Connect the inlet hose to a tap with a 3/4" pipe
thread. If necessary, use the restrictor (1/2”)
supplied (Fig. 2).
The inlet hose must not be joined onto any form
of extension hose. If it is too short, the entire hose
must be replaced with a longer high-pressure hose,
specially designed for the purpose.
The machine end of this hose can be turned in any
direction. Loosen the retaining nut, turn the hose,
then retighten the nut (Fig. 3).
3
Check that the nut is tightend before the
machine is moved into position.
Use only the inlet hose supplied with the
machine, do not reuse the old inlet hose.
Downloaded From WashingMachine-Manual.com Manuals
- 15 -
Installation
Water discharge
1
These three alternatives are possible for the discharge hose:
Over the top edge of a washtub:
If you intend the drain hose from the machine to
empty into a sink, make sure that the hose will not
move when the machine is emptying. The hose can
be fixed to the wall on a hook or tied to a tap with
string (Fig. 1).
Directly into a waste pipe with a trap:
The discharge pipe can be connected directly into
the pipe (e.g. one beneath a washtub or kitchen
sink), above the water trap. The discharge hose
must be arranged so that some part of its length is
routed up to a level corresponding to the top edge
of the tub and fixed in place there (Fig. 2).
2
450-800 mm
Directly into a wall standpipe:
This standpipe should be vertical. The height above
the floor should be between 450 and 800 mm.
There must be an air gap around and below the end
of the discharge hose. This means that the internal
diameter of the standpipe must be greater than the
outer diameter of the hose (Fig. 3).
The hose must not be sticked into the standpipe
more than 50 mm and it has to be fixed in this
position with help of the elbow supplied.
3
40 mm
450-800 mm
The discharge hose can be extended up to total
3,5 m. For the extension piece use a hose with an
internal diameter at least as large as that of the
machine's own hose. Use a suitable hose connector.
The hose should always be routed at floor level,
rising up only where it meets the waste pipe (Fig. 4).
Power supply
The washing machine is supplied with a lead and
electrical plug for connection to a 230 V, 10 A
earthed wall socket. If the machine is installed in a
"wet area" (bathroom, laundry) but without fixed
wiring to the electrical supply, an earth leakage
circuit breaker (or RCD) must be used.
4
Before any work is carried out on the machine,
it must be isolated from the electric mains
supply, for example by removing the plug
from the wall socket.
Permanent electrical installation must be
carried out by an authorised electrician.
Downloaded From WashingMachine-Manual.com Manuals
- 16 -
ON/OF ECO
Electrolux
EV 100C
Downloaded From WashingMachine-Manual.com Manuals