1
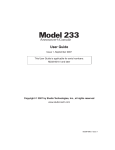
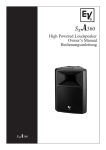
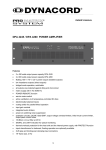
Table of contents
About Compact Disc Digital Audio… ....................................................... 2
Front panel ................................................................................................... 3
Display .......................................................................................................... 6
Remote Control ........................................................................................... 7
Rear panel, PCD 3 ....................................................................................... 8
Rear panel, PDT 3 ...................................................................................... 10
Unpacking ................................................................................................. 12
Set-up and installation .............................................................................. 13
Installing the spikes (optional) ................................................................ 13
Removing the transport screws ............................................................. 14
Location .................................................................................................... 15
A word about cables .............................................................................. 15
A word about balanced output ........................................................... 15
Audio connections, PCD 3 ..................................................................... 15
Audio connections, PDT 3 ...................................................................... 16
Power supply connection ...................................................................... 16
master power switch ............................................................................... 16
Installing batteries in the Remote Control ............................................ 16
Basic operation ......................................................................................... 17
Loading a CD .......................................................................................... 17
Playing all tracks on a CD ...................................................................... 17
Beginning play with a track other than the first track ......................... 17
Replaying a track .................................................................................... 18
Skipping to another track ....................................................................... 18
Searching for a passage on the CD ..................................................... 18
Beginning play in the middle of a track ............................................... 18
The "pause" function ............................................................................... 19
Repeating all tracks on the CD ............................................................. 19
Stopping play ........................................................................................... 19
Programming ............................................................................................. 20
Entering a program ................................................................................. 20
Replaying a selection in the program .................................................. 20
Skipping to another selection in the program ..................................... 21
Searching for a passage in the program ............................................. 21
The "pause" function ............................................................................... 21
Repeating all tracks in a program ......................................................... 21
Stopping play ........................................................................................... 21
Care and maintenance ........................................................................... 22
Cleaning the PCD 3/PDT 3 ..................................................................... 22
Caring for the Remote Control .............................................................. 22
Caring for Compact Discs ...................................................................... 22
Specifications, PCD 3 ................................................................................ 23
Pin assignments, male XLR balanced analog output ......................... 23
Specifications, PDT 3 ................................................................................. 24
Pin assignments, male XLR digital output ............................................. 24
Troubleshooting ......................................................................................... 25
Service ....................................................................................................... 27
1
About Compact Disc
Digital Audio…
To most people, a Compact Disc (CD) looks like a small, silver
phonograph record. In fact, there are some important differences
between records and CDs.
The information on a phonograph record is contained within its
grooves. This analog information is read by a stylus riding along in the
grooves and transmitted via a cartridge. The digital information on a
CD, though arranged in similar grooves, is read by a laser mechanism
(called a pickup). A phonograph's stylus
Direction the disc rotates
must be in contact with the record,
but a CD player's pickup never
Track 3
touches the CD. The information
Track 2
on the CD is transmitted via
complex decoder circuitry.
rack 1
T
The CD rotates
counterclockwise, and the laser
pickup reads the underside of the
CD (the side opposite the label)
beginning at the center and
travelling toward the outer edge. As
the pickup moves away from the
center, the speed of rotation gradually
decreases from 500 to 200 revolutions per minute.
Direction the laser
pickup travels
Programs on CDs are organized into tracks, usually corresponding to
songs or movements. This allows the user to easily and precisely select
a part of a program with virtually no wear and tear on the CD. There
may be as many
as 99 tracks on a
Lindsay's First Symphony
CD.
First Movement
Second Movement
Third Movement
On some CDs,
tracks are further
broken down into
Index Numbers from Track 2
indexes. These
01 02 03 04 05 06
94 95 96 97 98 99
"tracks within
tracks" allow even
more precise
selection and programming. A single track may have up to 99
indexes.
(Track 1)
2
(Track 2)
(Track 3)
Front panel
15
9
TRACK
INDEX
MIN
8
SEC
7
stop
play
12
pause
prev
progm repeat
prev
index
next
3
2
6
next
index
4
5
11
10
error
14
drawer
17
13
standby
16
1
1
standby
When the master power switch on the rear panel is in the "|" (on)
position, pressing this button takes the PCD 3/PDT 3 out of
“standby” mode, turns the Display on, and makes the PCD 3/PDT 3
ready to play a CD. Pressing the button again puts the
PCD 3/PDT 3 in standby mode and clears any previously
programmed sequence of selections. (See "Rear panel" and "Setup and installation.")
2
play
After a CD is loaded into the drawer, pressing this button begins
play with the first track on the CD (or the first track in a
programmed sequence).
If you press play while the drawer is open, the drawer closes and
play starts beginning with the first track on the CD.
Pressing play while a CD is playing suspends play, returns to the
beginning of the current track, and replays that track.
3
stop
Pressing this button while a CD is playing stops play and clears any
previously programmed sequence of selections.
Pressing play after pressing stop begins play again with the first
track on the CD.
3
4
pause
While a CD is playing, pressing this button suspends play; pressing it
again resumes play at the point where pause was first pressed.
The LED above the pause button lights while play is suspended.
5
next
Pressing this button while a CD is playing suspends play, “skips” to
the next track on the CD (or the next track in a programmed
sequence), and begins playing that track.
Pressing next before play begins skips to the beginning of the next
track; pressing play begins playing that track.
6
prev
Like the next button, pressing prev while a CD is playing suspends
play, “skips” to the previous track on the CD (or the previous track
in a programmed sequence), and begins playing that track.
Pressing prev before play begins skips to the beginning of the
previous track; pressing play begins playing that track.
7
progm
Pressing this button after making a selection (using next, prev, next
index, prev index, or the numbered buttons on the Remote
Control) enters it as part of a programmed sequence. (See
"Programming.")
The LED above the progm button will flash while you assemble a
program. This LED will remain lighted after an entry is made and
while a sequence is playing.
8
>>
Holding this button down during play moves the laser pickup
toward the end of the CD.
During search, the pickup moves at three different speeds,
increasing in speed the longer you hold down the >> button. At
the first two search speeds, the volume is reduced; at the fastest
search speed, the volume is muted completely.
When you release >>, play resumes.
9
<<
This button works in the same way as >>, except that it moves the
laser pickup toward the beginning of the CD.
10 next index
If the CD in play has indexes, pressing this button skips the laser
pickup to the next index on the CD, and the index number on the
Display will increase. (See "Display.")
11 prev index
This button works in the same way as next index, except that it
moves the laser pickup toward the beginning of the CD.
4
12 repeat
Pressing this button before or during play causes all tracks on the
CD (or all selections in a programmed sequence) to repeat
indefinitely. To cancel this function, press repeat again.
The LED above the repeat button lights while the repeat function is
active.
13 drawer
Pressing this button opens the drawer; pressing it again closes the
drawer.
Pressing drawer while a CD is playing stops play, clears any
previously programmed sequence of selections, and opens the
drawer.
PRECAUTION
NEVER hold onto the drawer while it's in motion (either opening or
closing). If you accidentally prevent the drawer from opening, wait
about three seconds, then press drawer twice to open it. If you
accidentally prevent the drawer from closing, it will open again
after about three seconds. Press drawer again to close it.
14 error
This LED will light when a function is entered incorrectly.
15 Display
This window displays information about track, index, and elapsed
time. (See "Display.")
16 Remote sensor window
This window receives the infrared signals from the Remote Control,
allowing remote operation. Make sure that this window is not
blocked. (See "Remote Control.")
17 Drawer
The drawer contains the tray that holds the CD during play. Its
operation is controlled by the drawer button.
5
Display
1
1
2
3
TRACK
INDEX
MIN
SEC
TRACK
Before play begins, this part of the Display shows the total number
of tracks on the CD.
During play, this part of the Display shows the number of the track
in play.
While play is suspended using pause, it shows the track that was
playing when play was suspended.
2
INDEX
Before play, this part of the Display is blank.
If the CD in play has indexes, this part of the Display shows the
index on the CD beginning with “01” and increasing as the CD
plays.
If the CD in play has no indexes, this part of the Display shows “01”
throughout play.
3
MIN
SEC
Before play, this part of the Display shows the total time for all
tracks on the CD.
During play, this part of the Display shows the elapsed time for the
track in play.
After you enter a selection into the memory (as part of a
program), the MIN part of the Display shows "P." (See
"Programming.")
TRACK
6
INDEX
Remote Control
11
5
PREV
NEXT
PLAY
1
STOP/CM
4
2
<<
>>
PAUSE
7
3
8
1
2
3
4
5
6
7
8
9
0
PROGR
10
6
REPEAT
9
1
2
3
4
5
PLAY
6 PROGR
STOP/CM (STOP)
7 <<
PAUSE
8 >>
NEXT
9 REPEAT
PREV
Each of these buttons (1 – 9) performs the same function as its
counterpart on the front panel. (See “Front panel.”)
10 Numbered buttons
These buttons may be used to select tracks when programming a
sequence of tracks.
The numbered buttons may also be used to select a particular
track (instead of using the NEXT or PREV buttons). Pressing a track
number before play, the pressing PLAY, begins play with that track
and continues playing tracks on the CD in order.
Pressing a track number during play, then pressing PLAY, skips to
that track and begins play, then continues playing tracks on the
CD in order.
11 Projection lens
Infrared (IR) commands from the Remote Control to the
PCD 3/PDT 3 are transmitted through this lens.
7
Rear panel, PCD 3
2
3
3
unbalanced
unbalanced
balanced
balanced
right-channel output
MADRIGAL AUDIO LABORATORIES, INC.
PROCEED® COMPACT DISC PLAYER
WARNING: TO REDUCE THE RISK OF FIRE OR ELECTRIC
SHOCK, DO NOT EXPOSE THIS APPLIANCE TO RAIN OR
MOISTURE.
CAUTION
RISK OF ELECTRIC SHOCK
DO NOT OPEN
MODEL NO:
CAUTION: TO REDUCE THE RISK OF ELECTRICAL
SHOCK, DO NOT REMOVE COVER. NO USERSERVICEABLE PARTS INSIDE. REFER SERVICING TO
QUALIFIED PERSONNEL.
SERIAL NO:
MANUFACTURED:
50-60 HZ
25 WATTS
left-channel output
VOLTS
CAUTION: FOR CONTINUED
PROTECTION AGAINST RISK OF
FIRE, REPLACE ONLY WITH THE
SAME TYPE OF FUSE:
A, 250V
4
PROCEED® PCD 3
made in u.s.a.
6
5
digital
output
master
power
1
1
NEVER operate the master power switch without first making sure
that power is turned off to your receiver, integrated amplifier, or
preamplifier/power amplifier.
PRECAUTION
8
master power
This switch turns the PCD 3 on and off. The switch must be in the "|"
(on) position for the PCD 3 to operate. (See "Set-up and
installation.")
2
unbalanced outputs
These outputs provide single-ended analog audio (via cables
equipped with RCA-type connectors) to a receiver, integrated
amplifier, or preamplifier equipped with single-ended inputs. Most
components accept this type of output. (See "Set-up and
installation.")
3
balanced outputs
These outputs provide balanced analog audio (via cables
equipped with XLR-type connectors) to a preamplifier, integrated
amplifier, or receiver equipped with balanced inputs. (See "Set-up
and installation.")
4
RCA (SPDIF) digital output
This output provides digital audio (via a cable equipped with RCAtype connectors) to the digital input of a receiver, integrated
amplifier, preamplifier, or digital processor. (See "Set-up and
installation.")
5
AC power cord
This cord supplies AC power to the PCD 3. (See "Set-up and
installation.")
6
Fuse
This holder contains the main fuse for the PCD 3. If the fuse ever
needs to be replaced, contact your Proceed dealer.
9
Rear panel, PDT 3
spdif
aes/ebu
st
eiaj
2
3
4
5
digital
outputs
WARNING: TO REDUCE THE RISK OF FIRE OR ELECTRIC
MADRIGAL AUDIO LABORATORIES, INC.
SHOCK, DO NOT EXPOSE THIS APPLIANCE TO RAIN OR
MOISTURE.
PROCEED® COMPACT DISC PLAYER
CAUTION
RISK OF ELECTRIC SHOCK
DO NOT OPEN
MODEL NO:
CAUTION:
TO REDUCE THE RISK OF ELECTRICAL
SHOCK, DO NOT REMOVE COVER. NO USERSERVICEABLE PARTS INSIDE. REFER SERVICING TO
QUALIFIED PERSONNEL.
SERIAL NO:
MANUFACTURED:
7
CAUTION: FOR CONTINUED
50-60 HZ
25 WATTS
PROCEED® PDT 3
made in u.s.a.
VOLTS
PROTECTION AGAINST RISK OF
FIRE, REPLACE ONLY WITH THE
SAME TYPE OF FUSE:
A, 250V
master
power
6
1
1
PRECAUTION
10
master power
This switch turns the PDT 3 on and off. The switch must be in the "|"
(on) position for the PDT 3 to function. (See "Set-up and
installation.")
NEVER operate the master power switch without first making sure
that power is turned off to your receiver, integrated amplifier, or
preamplifier/power amplifier.
2
spdif (RCA) digital output
This output provides digital audio (via a cable equipped with RCAtype connectors) to the digital input of a receiver, integrated
amplifier, preamplifier, or digital processor. (See "Set-up and
installation.")
3
aes/ebu (XLR) digital output
This output provides digital audio (via a cable equipped with XLRtype connectors) to the digital input of a receiver, integrated
amplifier, preamplifier, or digital processor. (See "Set-up and
installation.")
4
st (AT&T) digital output
This output provides digital audio (via an optical cable equipped
with ST-type connectors) to the optical digital input of a receiver,
integrated amplifier, preamplifier, or digital processor. (See "Set-up
and installation.")
5
eiaj (TOSLINK) digital output
This output provides digital audio (via an optical cable equipped
with TOSLINK-type connectors) to the optical digital input of a
receiver, integrated amplifier, preamplifier, or digital processor.
(See "Set-up and installation.")
6
AC power cord
This cord supplies AC power to the PDT 3. (See "Set-up and
installation.")
7
Fuse
This holder contains the main fuse for the PDT 3. If the fuse ever
needs to be replaced, contact your Proceed dealer.
11
Unpacking
Carefully open the shipping carton and remove the contents. You
should have:
■
■
■
■
■
Proceed PCD 3/PDT 3
Four spikes
Hex key
Remote control
Owner’s manual
Save the shipping carton and all packing material. Though it may be
inconvenient to store, it’ll come in handy for shipping if you move, or if
the unit needs to be shipped for service.
Locate the serial number (on the back panel), and record it here:
■ Serial Number:
Keep your sales receipt where you can find it. You’ll need to show it
for any service during the warranty period. Take a moment now to
record some information from the receipt:
■ Date of purchase:
■ Proceed dealer:
■ Dealer’s address:
■ Dealer’s telephone number:
12
Set-up and installation
To set up your Proceed PCD 3/PDT 3, you’ll need:
■
■
■
■
■
A soft cloth or towel (step 2)
A flat-bladed (standard) screwdriver (step 5)
A pair of audio cables (step 9), or
A single audio cable (step 10 or 11)
Three AAA batteries (step 16)
1. Make sure that the unit is unplugged from the AC power supply
and disconnected from your receiver, integrated amplifier, or
preamplifier.
2. Place the unit upright on a flat, stable surface. Carefully tip it so it
rests on its side; protect its finish with a soft cloth.
Installing the spikes
(optional)
3. The PCD 3/PDT 3 is shipped so that it rests solidly on two wide "feet,"
positioned under the front and back of the unit.
You may want to explore the potential sonic advantages of
installing the specially designed "spikes" supplied with the unit. One
arrangement is to install the spikes under the corners of the unit:
Four spikes,
mounted at the corners
13
You may choose instead to install the spikes in a triangular
arrangement:
Three spikes,
mounted in a
triangular pattern
Install the spikes one at a time. Using the supplied hex key, remove
the screw securing the foot to the base of the unit. Insert the
threaded end of the spike through the hole in the foot, then turn it
clockwise until it's hand-tight. (Be careful not to over-tighten it.)
Repeat this procedure for each spike you install.
Removing the
transport screws
4. Locate the two transport screws on the bottom of the unit.
Transport
screws
5. Using a flat-bladed screwdriver, remove both transport screws (by
turning them counterclockwise).
6. Save the transport screws with the packing material. If you ever
need to ship the unit, you must replace these screws.
14
Location
7. Turn the unit upright, and place it in the desired location.
The Proceed PCD 3/PDT 3 should be located on a level, stable
surface. Avoid placing it where it will be exposed to shocks or
vibration (such as on an unstable table or near large
loudspeakers). In general, place it as you would a turntable.
PRECAUTION
DON'T place the Proceed PCD 3/PDT 3 on top of another
component, since its base could block the other component’s
ventilation. Interfering with the PCD 3/PDT 3’s ventilation or that of
another component could cause either to overheat, resulting in
damage to your system.
8. Before making any audio connections, make sure that power is
turned off to both the PCD 3/PDT 3 and your receiver, integrated
amplifier, or preamplifier/power amplifier.
A word about cables
A word about
balanced output
■ The quality of the cables and connectors that you use with your
Proceed Proceed PCD 3/PDT 3 can noticeably affect the quality
of the sound that you hear from your speakers or headphones.
For the best performance, use the highest quality audio cables
available. Though there are many such cables to choose from,
we confidently recommend Madrigal HPC cables (for analog
signals) and Madrigal MDC (for electrical digital signals). See
your Proceed dealer for more information.
■ The Proceed PCD 3 provides balanced analog output by way
of standard three-pin XLR-type connectors. This provides the
highest quality connection and, therefore, the best sound.
Terminated with the proper connector, balanced input on an
amplifier or power amplifier minimizes the chance of
“coloration” of the sound due to cabling. If you’re unfamiliar
with balanced interconnection and how it works with your
audio system, see your Proceed dealer for more information.
For instructions on connecting the PCD 3's balanced or
unbalanced analog outputs to your audio system, see step 9.
For instructions on connecting the PCD 3's digital output to your
audio system, see step 10.
For instructions on connecting the PDT 3's digital outputs to your
audio system, see step 11.
Audio connections, PCD 3
9. Using a pair of high-quality audio cables, connect the left and right
outputs of the PCD 3 to the left and right “CD” inputs of your
receiver, integrated amplifier, or preamplifier. Make sure to
connect the left output of the PCD 3 to the left input of the
receiver, integrated amplifier, or preamplifier, and likewise for the
right channel.
If your receiver, integrated amplifier, or preamplifier doesn’t have
inputs specifically labelled “CD,” use the input labelled “AUX,” or
any other line-level input not being used by another component.
NEVER connect the PCD 3's balanced or unbalanced outputs to
PHONO inputs.
15
Audio connections, PCD 3
10. Using a high-quality audio cable, connect the digital output of the
PCD 3 to the digital input of your receiver, integrated amplifier,
preamplifier, or digital processor.
NEVER connect the PCD 3's digital output to PHONO inputs.
Audio connections, PDT 3
11. Using a high-quality audio cable, connect the digital output of the
PDT 3 to the digital input of your receiver, integrated amplifier,
preamplifier, or digital processor.
NEVER connect the PDT 3's digital output to PHONO inputs.
Power supply connection
12. Connect the power supply cord of the PCD 3/PDT 3 to an
unswitched convenience outlet (like those on the rear panel of
many audio components). If you connect the PCD 3/PDT 3 directly
to a wall outlet, make sure that the outlet has polarized sockets.
master power switch
13. Set the master power switch on the rear panel to the "|" (on)
position, and allow the PCD 3/PDT 3's circuitry to stabilize for several
minutes before operating it.
Note: The PCD 3/PDT 3 won't achieve its sonic potential right away
— sonic performance is close to the optimum after 350 hours (or
about two weeks of normal use). For the best performance, you
may leave it powered at all times, except when you won't be using
it for a long period (see "Important Safety Instructions").
The PCD 3/PDT 3 may be turned on and off without affecting its
longevity. When it is turned on after being left unpowered, allow
about one hour before expecting optimal sonic performance.
14. After making all connections and turning the master power switch
on, turn on the other components in your system.
PRECAUTION
Installing batteries
in the Remote Control
NEVER operate the master power switch without first making sure
that power is turned off to your receiver, integrated amplifier, or
preamplifier/power amplifier.
15. Remove the cover of the Remote Control’s battery compartment
by sliding it in the direction of the arrow.
16. Insert three AAA batteries according to the + and – symbols on the
bottom of the battery compartment. Replace the battery
compartment cover.
16
Basic operation
In this section, you’ll learn how to:
■
■
■
■
■
■
■
■
■
■
Loading a CD
Load a CD;
Play all tracks on a CD;
Begin play with a track other than the first track;
Replay a track;
Skip to another track;
Find a particular passage on the CD;
Begin play in the middle of a track;
Suspend play using pause;
Repeat an entire CD; and
Stop play.
To load a CD for play:
1. Turn the power on by pressing standby. The Display will light and
show " 0 0 0 00."
2. Press drawer to open the drawer.
PRECAUTION
NEVER hold onto the drawer while it’s in motion (either opening or
closing). If you accidentally prevent the drawer from opening, wait
about three seconds, then press drawer twice to open it.
3. Load a CD into the drawer, label side up. Handle the CD by the
outer edges only; if necessary, support it with your index finger at
the center hole.
4. Close the drawer by pressing drawer again.
Note: If you accidentally prevent the drawer from closing, it will
open again after about three seconds. Press drawer again to close
it.
In a few seconds, the Display will show the total number of tracks
and their total playing time. The CD is now ready for play.
Playing all tracks on a CD
Beginning play with a track
other than the first track
To play all tracks on a CD, press play. All tracks will play in order. Play
will stop automatically at the end of the CD.
To begin play with a track other than the first track:
1. Before pressing play, press next until the number of the desired
track shows on the Display. If you pass the track you want to play,
you can “back up” by pressing prev.
You may also select the track using the numbered buttons on the
Remote Control.
17
2. Press play to begin playing that track (followed by the remaining
tracks on the CD).
Replaying a track
To return to the beginning of a track while it is playing, press play. Play
will be suspended briefly, then that track will replay followed by the
remaining tracks on the CD.
Skipping to
another track
You may skip to another track any time while a CD is playing. To move
to another track, press next (to go forward) or prev (to go backward)
until the number of the track you want to play shows on the Display.
(You may also select the track using the numbered buttons on the
Remote Control.) Play will resume as soon as the pickup reaches that
track.
Searching for a passage
on the CD
You may search for a particular passage on the CD using >> and <<.
Scan the CD until the laser pickup reaches the passage you want to
hear. (If a CD has indexes, you may also press next index and use the
index numbers on the Display as a guide.) Remember that the search
speed increases the longer you hold down >> or <<. As soon as you
release the button, play resumes.
If you scan past the beginning or end of a track, the laser pickup will
move on to the previous (or next) track (unless a programmed
sequence is playing — see “Programming”).
If you try to scan forward past the end of the CD, the laser pickup will
stop five seconds before the end of the last track and the error LED will
flash. When you release >>, play will continue with the last track.
If you try to scan backward past the beginning of the CD, the laser
pickup will stop at the beginning of the first track and the error LED will
flash. When you release <<, the CD will play beginning with the first
track.
Beginning play in the
middle of a track
If a CD has indexes, you may begin play in the middle of a track:
1. Using next and prev (or using the numbered buttons on the
Remote Control), select a track number.
2. Press next index to move forward to the point in the track where
you want to begin play. Hold the button down to go forward
quickly; press and release it to go forward slowly.
3. Press play to begin play at the index you selected.
18
The "pause" function
To suspend play while a CD is playing, press pause. The LED above the
pause button will light while play is suspended. To resume play, press
pause again.
To hold play at the beginning of a CD or track (for faster cueing), press
pause before pressing play. The LED above the pause button will light
while play is suspended. To begin play, press pause again. (You may
also select another track or index while play is suspended.)
Repeating all tracks
on the CD
To repeat all tracks on a CD, press repeat before play or while a CD is
playing. The LED above the repeat button will light while this function is
active. The CD will continue to repeat until you press repeat again or
press stop.
Stopping play
To stop play before the end of the CD, press stop. The Display will show
the total number of tracks and their total playing time. You may also
stop play by pressing drawer. In this case, play will stop and the drawer
will open.
19
Programming
In “Basic operation,” you learned how to play tracks as ordered on the
CD. In this section, you’ll learn how to:
■ Enter and play a program of up to twenty tracks or indexes, in
any order;
■ Play a program;
■ Replay a selection;
■ Skip to another selection in a program;
■ Find a particular passage in the program;
■ Suspend play using the “pause” function;
■ Repeat an entire program;
■ Stop play; and
■ Erase the memory.
Rather than playing an entire CD, you may choose to play only
certain selections. To do this, you'll need to create a “program” and
store it in the PCD 3/PDT 3's memory. The memory will accept up to
twenty entries.
Entering a program is possible only before play begins.
Entering a program
To enter a program:
1. Load a CD into the drawer, and wait for the Display to show the
total number of tracks and their total playing time. (See “Basic
operation.")
2. Select the first track or index in your program using the next, prev,
next index, and prev index, or the numbered buttons on the
Remote Control. (See “Basic operation.") The LED above the
progm button will flash while you're making your selection.
3. Enter your selection into memory by pressing progm. The LED
above the progm button will light and the Display will show "P."
Note: You must press progm within five seconds after making a
selection, or the selection won’t be entered into the memory.
4. Select and enter the rest of the program (up to twenty selections)
by repeating steps 2 and 3, making sure to press progm after each
selection.
5. To begin playing the program, press play. The LED above the
progm button will light and the "P" will disappear from the Display.
Replaying a selection
in the program
20
To return to the beginning of a selection while it is playing, press play.
Play will be suspended briefly, then that selection will replay followed
by the rest of the selections in the program.
Skipping to another
selection in the program
next and prev function in the normal way, except that they move
forward and backward among the selections in the program. Tracks
that aren’t included in the program are skipped.
If you use the numbered buttons on the Remote Control to select a
track that isn’t part of the current program, the error LED will flash.
Searching for a passage
in the program
You may search for a particular passage in the program using the >>
and << buttons. Scan the program until the laser pickup reaches the
passage you want to hear. Remember that the search speed
increases the longer you hold down >> or <<. As soon as you release
the button, play resumes.
If you try to scan forward past the end of a selection, the laser pickup
will stop five seconds before the end of the track, the error LED will
flash. When you release the >> button, the program will continue.
If you scan past the beginning of a selection, the laser pickup will stop
at the beginning of the track and the error LED will flash. When you
release <<, the program will continue.
The "pause" function
To suspend play while a program is playing, press pause. The LED
above the pause button will flash while play is suspended. To resume
play, press pause again.
To hold play at the beginning of a program (for faster cueing), press
pause before pressing play. The LED above the pause button will flash
while play is suspended. To begin play, press pause again.
Repeating all tracks
in a program
Stopping play
To repeat all selections in a program, press repeat while the program is
playing. The LED above the repeat button will light while this function is
active. The program will continue to repeat until you press repeat
again or press stop.
To stop play before the end of the program, press stop. Pressing stop
erases the program from the memory. (If the program is allowed to
finish, it is retained in the memory.)
You may also stop play by pressing drawer. In this case, play will stop,
the program is erased from the memory, and the drawer will open.
To suspend play while a program is playing without erasing the
program from the memory, press pause.
21
Care and maintenance
Cleaning the PCD 3/PDT 3
To clean your PCD 3/PDT 3, use a soft cloth moistened with plain water.
Don’t apply water, dusting sprays, solvents, abrasives, or cleaning fluids
directly to the cabinet.
Make sure that the remote sensor window on the front panel of the
unit and the Remote Control’s projection lens are kept clean and dustfree.
Caring for the
Remote Control
Fluorescent lighting in the listening area may interfere with the
operation of the Remote Control. Avoid placing the PCD 3/PDT 3 near
fluorescent lamps.
When the Remote Control’s batteries need to be replaced, use only
1.5V AAA batteries; always replace all three batteries at the same
time. If you don’t plan to use the Remote Control often, remove the
batteries. When not used for an extended period, even “leak-proof”
batteries can leak corrosive acids that will damage the Remote
Control.
Caring for Compact Discs
A CD, handled carefully, will last indefinitely. A warped, dusty, or
scratched CD can cause playback problems or may sound noisy.
Handle a CD by the outer edges only; if necessary, support it with your
index finger at the center hole. Don’t touch the bottom (unprinted)
side of the CD, and never apply stickers or labels to either side of the
CD.
If a CD becomes dirty, use a silicone-treated cloth (like those made for
cleaning camera lenses) or a special CD cleaning kit. Don’t use
solvents, anti-static fluids, or cleaners made for cleaning phonograph
records.
When you’re finished playing a CD, always return it to its plastic case.
Store your CDs where they won’t be exposed to direct sunlight, high
humidity, or extremely high or low temperatures.
22
Specifications, PCD 3
■
■
■
■
■
■
■
■
■
■
■
■
■
Frequency response:
10 Hz – 20 kHz +0dB, -0.2dB
Total harmonic distortion (THD):
0.004% @ 1 kHz, 0dB
Dynamic range:
104dB (or better)
Signal-to-noise ratio:
107dB
Channel separation:
120dB
Intermodulation distortion (SMPTE IMD):
0.008%
Digital-to-analog conversion:
Two precision 20-bit DACs
Filtering:
8x oversampling digital filter
Analog filter, linear phase to 40 kHz
Low-level linearity:
Deviation unmeasurable to below -70dB,
approximately +1.0dB below -90dB
(undithered, ref 0dB @ 1kHz)
Output impedance:
<1 Ω
Mains voltage:
120 V U.S. service
Mains frequency:
50/60 Hz
Power consumption:
25W @ 120V, 60 Hz
■ Shipping weight:
■ Overall dimensions
■ Width:
■ Height:
■ Depth:
27 lbs/12.24 kg
8.4 in/214 mm
8.9 in/227 mm
13.25 in/337 mm
Madrigal Audio Laboratories, Inc., reserves the right to change this
product’s features and specifications without notice.
Pin assignments, male XLR
balanced analog output
2
1
3
Pin 1: Chassis ground
Pin 2: Signal + (non-inverted)
Pin 3: Signal – (inverted)
23
Specifications, PDT 3
■
■
■
■
■
■
■
Direct digital output, RCA:
Direct digital output, XLR:
Direct digital output, ST:
Direct digital output, TOSLINK:
Mains voltage:
Mains frequency:
Power consumption:
■ Shipping weight:
■ Overall dimensions
■ Width:
■ Height:
■ Depth:
SPDIF standard format
AES/EBU standard format
AT&T standard format
EIAJ standard format
120 V U.S. service
50/60 Hz
21W @ 120V, 60 Hz
25 lbs/11.34 kg
8.4 in/214 mm
8.9 in/227 mm
13.25 in/337 mm
Madrigal Audio Laboratories, Inc., reserves the right to change this
product’s features and specifications without notice.
Pin assignments, male XLR
digital output
2
1
3
24
Pin 1: Digital ground
Pin 2: DAS (Digital Audio Standard) output +
Pin 3: DAS output –
Troubleshooting
In general, refer any service problems to your Proceed dealer. Before
contacting your dealer, however, check to see if the problem is listed
here. If it is, try the suggested solutions. If none of these solves the
problem, contact your Proceed dealer.
1. The PCD 3/PDT 3 won’t function, and the display is dark.
■ The master power switch on the rear panel isn't turned on.
PRECAUTION
NEVER operate the master power switch without first making
sure that power is turned off to your receiver, integrated
amplifier, or preamplifier/power amplifier.
■ The standby button on the front panel isn't turned on.
■ The PCD 3/PDT 3 isn’t plugged into the power supply (either a
wall socket or a convenience outlet on your receiver,
integrated amplifier, or preamplifier).
■ The wall socket, adapter, extension cord, or convenience
outlet is faulty. Check all connections.
■ There’s a tripped circuit breaker or blown fuse in the wall
outlet’s circuit.
■ The PCD 3/PDT 3's fuse is blown (contact your Proceed dealer).
2. The PCD 3/PDT 3 won’t play a CD inserted in the player.
■ The CD is inserted upside down.
■ A track number has been programmed that doesn’t exist on
the CD.
■ There may be condensation (moisture) on the laser pickup. This
can happen if the PCD 3/PDT 3 is moved from a cold
environment to a warm one. Turn on the unit, and leave it on
for an hour before playing a CD.
■ The transport screws weren’t removed during set-up.
3. No sound comes out of the speakers or headphones.
■ The proper source isn’t selected on your receiver, integrated
amplifier, preamplifier and/or digital processor.
■ The audio cables are connected incorrectly.
25
4. When a CD is playing, the sound "skips."
■ The CD is scratched or dirty.
■ The PCD 3/PDT 3 is located on an unstable surface or is too
close to your speakers.
5. The sound from the speakers or headphones is distorted.
■ The PCD 3/PDT 3 is connected to the wrong inputs of your
receiver, integrated amplifier, or preamplifier. Check all
connections.
6. The Remote Control doesn’t work.
■ The Remote Control is at the wrong angle relative to the
PCD 3/PDT 3, and the PCD 3/PDT 3 can’t receive the signal.
■ The sensor window on the front panel of the PCD 3/PDT 3 is dirty
or blocked.
■ The Remote Control’s projection lens is dirty.
■ Fluorescent lighting in the listening area is interfering with the
operation of the Remote Control.
■ The Remote Control’s batteries are weak and need to be
replaced.
26
Service
If you have a service problem that you can’t solve by following the
suggestions in the “Troubleshooting” section, contact your Proceed
dealer. Your dealer will tell you what to do next.
It’s important that your Proceed product be serviced only by an
authorized Proceed service facility. This will ensure that proper repairs
are made, and that your Proceed warranty stays in effect throughout
the warranty period.
27
MADRIGAL AUDIO LABORATORIES, INC.
2081 South Main Street, P.O. Box 781
Middletown, Connecticut 06457 USA
Telephone: (203) 346-0896 or 344-9300
Fax: (203) 346-1540
630107
©1992 Madrigal Audio Laboratories, Inc. All rights reserved.
Printed in U.S.A