1
LTM1555
LTM1755
(For NTSCsystems)
TFT-LCDTV/Monitor
User_
Manual
ForBetter Display
I. Adjust computer resolution and screen injection rate (refresh rate) in the control panel of
your computer as described below to enjoy the picture quality,
• Resolution:15" 1024x 768
IT' 1280x 1024
• Veriicalfrequency(refreshrate):60 Hz
2. This[FT LCDpanelwas manufacturedbyusingadvancedprecisionsemiconductortechnology.
Still, differentcolorpixetsmaybe seen,This is normaland not a defect.
• Forexample,the numberof TFTLCDpixelsthat is containedin this productare
2,359,296(15"),3,932,160(1T'),
3. When you clean the outside of the monitor and panel, use a soft cloth with a small amount
of cleaner. Do not use excessive force as it can cause stains.
4, If youare not satisfiedwith the picturequality,
executethe "autoadjustmentfunction"in the displayscreenthat appearswhenwindow
terminationbutton is pressed,tf there'sstill picturenoiseafter performingautomaticadjustment
COARSE
adjustmentfunction,
VIRTUAL
6URROU#O
Manufacturedunderlicensefrom DolbyLaboratories"Dolby",andthe I11 aretrademarksof Dolby
Laboratories.
Informationin thisdocumentis subject to change without notice.
© 2001SamsungElectronicsCo., Ltd.All rightsreserved.
Reproductionin anymannerwhatsoeverwithout the written permissionof SamsungElectronicsCo.,
Ltd is strictly forbidden,
SamsungElectronicsCo,,Ltd,shahnot be liable for errorscontainedhereinor for incidentalor
consequentialdamagesin connectionwith the furnishing,performance,or useof this material,
TheSamsunglogoistheregisteredtrademarkofSamsungElectronicsCo,,Ltd,;Mrcrosofl; Windows_
and Wrbdows NTare registeredtrademarksof Microso[tCorporation;VESA,DPMSandDDCare
registeredtrademarksof VideoElectronicsStandardAssociation;the ENERGY
STAR
nameand logoare
registeredtrademarksof the U,S,EnvironmentalProtectionAgency(EPA),Asan EN[RGY
SU\RPartner,
SamsungElectronicsCo. Ltd,hasdeterminedthat this productmeetsthe ENERGY
STAR
guidelinesfor
energyefficiency,All other productnamesmentionedhereinmay be the trademarksor registered
trademarksof their respectiveowners,
....
OOi " iliiiii:,i i;:i:!i ,ii1 iiii: !!iT,
Safety Instructions ..........................................................
Unpacking Your TV/Monitor ...................................................
Setting up Your LCDTV/Monitor ..............................................
Setting up an Ergonomic Workstation .......................................
TV/Monitor Location .................................................
2
3
4
4
4
Workstation Height ..................................................
Viewing Angle ......................................................
Connecting Your LCDTV/Monitor ..........................................
Plug and Play ..........................................................
Installing the Video Driver ................................................
Self-Test Feature Check (STFC) .............................................
Getting Help ...........................................................
Warm-up Time .........................................................
Adjusting Your LCDTV/Monitor ..............................................
User Controls ..........................................................
Automatic Save .........................................................
Direct-Access Features .................................................
4
4
5
6
6
6
7
7
8
8
9
10
On Screen Display (OSD) .................................................
Accessing the Menu System ...........................................
PCFunctions and Adjustments ........................................
TV/Video Functions and Adjustments ...................................
DTV/DVD Functions and Adjustments ...................................
OSD Functions and Adjustments .......................................
Appendix ................................................................
V -Chip ...............................................................
Remote-Control ......................................................
PowerSaver ............................................................
11
11
12
16
21
22
23
23
Troubleshooting .......................................................
Specifications .........................................................
Pin Assignments .......................................................
Display Modes .........................................................
Attaching a Wall or Arm Mounting Device ...................................
Installing VESACompliant Mounting Devices ................................
Wall Mount Instructions ..............................................
Retractable Stand .......................................................
Maintenance of Your LCD TV/Monitor ......................................
Index ...................................................................
Regulatory Information ........................................
Customer Service / Technical Support ...................................
English
1
25
27
28
31
33
34
35
36
36
37
37
38
Inside back cover
Back cover
Beforeconnecting the AC power cord to the DCadapter outlet, makesure the voltage
designation of the DCadapter correspondsto the local electrical supply
2
Never insert anything metallic into the cabinet openingsof the liquid crystal display (LCD)
W/Monitor; doing so may createthe dangerof electric shock
3
1o avoid electric shock, never toudl the inside of the LCDW/Monitor Onlya qualified
technician should open the case of the LCDW/Monitor
Neveruse your LCDW/Monitor if the power cordhas been damaged,Donot allow
anything to rest on the power cord, and keepthe cord away from areas where people can
trip over it
5
Be sureto hold the plug,not the cord,when disconnectingthe LCDW/Monitor from an
electric socket,
6
7
8
Openingsin the LCDW/Monitor cabinet are provided for ventilation Toprevent
overheating, these openingsshould not be blockedor covered,Also, avoid using the LCD
W/Monitor on a bed, sofa, rug, or other soft surface Doingso may blockthe ventilation
openings in the bottom of the cabinet, If you put the LCDW/Monitor in a bookcaseor
some other enclosed space,be sure to provideadequateventilation.
Putyour LCDW/Monitor in a location with low humidity and a minimum of dust
Donot exposethe LCDW/Monitor to ram or use it nearwater (in kitchens, near swimming
pools,etc), It the LCDW/Monitor accidentally gets wet, unplug it and contact an
authorizeddealer immediately.Youcan clean the LCDW/Monitor with a damp cloth when
necessary,but be sure to unplug the LCDW/Monkor first
Placethe LCDW/Monitor on a soJidsurfaceand treat it carefully Thescreen is made of
thin glasswith a plastic front surfaceand can be damagedit dropped,hit or scratched.Do
not clean the front panel with keton type materials (eg, acetone),ethyl alcohol, toluene,
ethyl acid, methyl, or chloride these may damage the panel,
10
1
Locateyour LCDW/Monitor near an easily accessibleAC outlet.
If your LCDW/Monitor doesnot operate normally in particular, if there are any unusual
sounds or smells coming from it unplug it immediately and contact an authorizeddealer
or service center
12
Hightemperature can causeproblems, Don't use your LCDW/Monkor in direct sunlight,
and keepit away from heaters, stoves,fireplaces, and othersources of heat.
13
Unplugthe LCDW/Monitor when it is going to be left unusedfor an extended periodof
time,
4
Unplugyour LCDW/Monitor from the AC outlet before any serwce,
CAUTION
RISK OFELECTRICSHOCK
DO NOT OPEN
CAUTION:TO REDUCETHE RISK OFELECTRICSHOCK,DO NOT REMOVECOVER
(ORBACK).
NOUSER-SERVICEABLE
PARTSINSIDE.
REFERSERVICINGTO QUALIFIEDSERVICEPERSONNEL.
English
2
ii_,,_,_i!
_ii_'_
!_ii_,
_i!!;i!
,i_i!;;i_;
li,,,_;ii:
iiiil
_iiJi'_'iil
_iiiiii_
'_iiiii"
_!i:ili_i_
,ii_,_iii
iii'_'¸
"iiiiil
'_"_
i_iiii_i_J
Sliiii_iii#i
<::fill
_iii'_'iil
iiiili_i'_i_i;:
<ii:iiiill
iiii
¸''
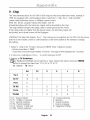
Pleasemake surethe following items are includedwith your TV/Monitor.If any items are
missing,contactyourdeater.
PowerCord
InstallationCD
(Notavailablein all locations)
DCAdapter
WarrantyCard
(Notavailablein all locations)
W/Monitor
15-pinDGub SignalCable
Manual
RemoteControl
English
3
Batteries
(AAAx 2)
:iii!i_ii_i:::!;ildiiii:i_i:iiiii_iilli_!_!iiii;
_i,_iii!ii::ii_,
'_!iiii_"'_!::i_i_,i,_,i,_iiiiii
,_,¸
iiiiLiiiil;_i_;:!iiiiiii_;_
_iiiii_`_l_ii_lSS_ii_i_i_ii_
,''
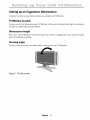
Setting up an ErgonomicWorkstation
Considerthe advicegivenbelowbeforeyouinstall yourTV/Monitor.
TV/Monitor
location
Choosea positionthat exposesyourTV/Monitorto theleastreflectionfrom lights orwindows,
usuallyat a rightangle to anywindow,
Workstation
height
PlaceyourLCDTV/Monitorsothat tire top of tirescreenisslightly belowyoureye levelwhen
youare comfor[ablyseated.
Viewing angle
Tilt tire screenuntil youfeel comfortableworkingwith yourTV/Monitor.
Figure 1.Tilt the screen
English
4
+i+iii+ii::iil, + iiiiii!++iiii i ;i!iiiiiii +
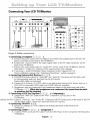
Connecting Your LCDTV/Monitor
r-
--
Figure 2. Cable connections
1.Connectinga ComputerC) @ @ )
A. Connectthe powercordto the DCAdaptorand connectthe adaptorjack to the DC14V
powerconnectoron the backof the TV/Monitor.
B.Connectthe 15-pinD-SUBof the video signalcableto the PCvideo connectoron the
backof the TV/Monitor,
C.Connectthe stereoaudio cableto "Audio(ST)"on the backd the W/Monitor andthe
otherend to" AudioOut" terminal of the soundcardon yourcomputer.
D. if necessary,install W/Monitor driver containedon the suppliedCD.For
driverinstallation,pleaserefer "InstallingVideo Driver"sectionon page6,
2. ConnectingExternalA/V Devices ( _ _ )
A. ConnectRCAaudiocablesto "Audio(R)"+'
and "Audio(L)"terminalsand the otherends
to correspondingaudiooutterminalson the A/V device.
(Stereo+RCA
Cablenot included)
B. ConnectRCA(Yellow)or S+VHScableto an appropriateexternal A/V devicesuchas a
VCR,DVDor camcorder.(RCAcableand S+VHScablenot included)
C. Headphonesmaybe connectedto the headphoneoutputon the right-handsideof the
TV/Monitor(_) ). While theheadphonesare connected,thesoundfrom thebuilt.
in speakers will be disabled.
3. Connectinga DTV Set-TopBox_) _) (_ ) - Component2
A. Connectthe YPbPrDTVCableto the YPbPrComponent2(DTV)jackson the
W/Monitor,
"onnectthe RCACableto "Audio (L)"and "Audio(R)"Component2(D+[V)Audiojacks on the backof the TV/M
andthe otherendto "Audioout" terminalof the Set+TopBox,
4. ConnectingTV/CATV ( _ )
A. Connectan antennaor CATVCableto the antennaterminal on the backof the
TV/Monitor.
5. Connectinga DVD_ _ _
) - Component1
A. ConnectYPbPrand AudioR/L Cablesflora the DVDPlayerto the Coerponentt(DVD)jackson
TV/Monitor.
English
5
:iii!i_ii_i:::!_ii_iiiii:i_i:iiiii_iilli_!_!iiii_
_i,_iii!ii::ii_,
'_!iiiii"_!:::i_i_'i'_'i,_iiiiii
'_'¸
iiiiiLiii:_i_::!iiii::_;_
"iiiii_`_"_l_iii_JS_ii_i_i_i
¸''
Plug and Play
Theadoptionof the newVESA
_ PlugandPtaysolutioneliminatescomplicatedand time
consumingsetup,it allowsyou to installyourW/Monitor in a Plugand Playcompatible
systemwithoutthe usualhasslesandconfusion.YourPCsystemcaneasily identifyand
configureitself for usewith yourdisplay,ThisTV/Monitorautomaticallytells the PCsystem
its ExtendedDisplayIdentificationData(DID) usingDisplayDataChannel(DDC)protocols.Thisway
the PCsystemcanautomaticallyconfigureitself to usethe LCD.if yourPCsystemneedsa
videodriver,follow the instructionsgivenbelowaccordingto the operatingsystemyour
computeruses.
Installing the Video Driver
TheCDthat accompaniesthis productcontainsthe necessarydriversfor installingyour
W/Monitor. Pleasereferto the driverinstallationinstructionsincludedwith yourCDpackage
for moreinformation.
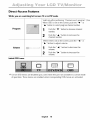
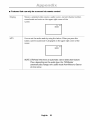
Self-Test Feature Check (STFC)
YourTV/Monitorprovidesa selfitestfeaturethatallowsyouto checkwhetheryourTV/Monitoris
functioningproperly,Makesurethat PCisselectedasa primaQ/source
bycheckingif the source
indicatorLEDlabeled"PC"ison,If yourTV/Monitorandcomputerareproperlyconnectedbutthe
TV/Monitorscreenremainsdarkandthepowerindicatorisblinking,runthe TV/Monitorself-test
byfollowingthestepsgivenbelow:
Power Indicator
l
Figure 3. Power Indicator
1 Turnoff bothyourcomputerandthe W/Monitor,
2
Unplugthe videocablefrom the backof the computer.
:3 Turnon the TV/Monitor.
English
6
if the TV/Monitoris functioningproperly,youwill seea white boxwith a largeblue oval
Samsunglogoand an error message"CheckSignal Cable."in red color.
Check
Signal
Cable
Figure 4. TV/Monitor self-test screen
This box alsoappearsduring normaloperationif the video cable becomesdisconnectedor
damaged.
4
Turnoff yourW/Monitor andreconnectthevideocable;thenturn on bothyourcomputer
and the W/Monitor.
if your W/Monitor screenremainsblankafter following the previousprocedure,checkyour
videocontrollerand computersystem;yourW/Monitor is functioningproperly.
Getting Help
if your W/Monitor doesnot display an image,checkyour cable connectionsand refer to
"Troubleshooting"on page28, If youexperiencedifficulties with the qualityof the displayed
image,pushAuto Button(seepage9) and referto "AdjustingYourLCDTV/Monitor"on page
8 or "Troubleshooting"on page28.
Warm-up Time
All LCD W/Monitors need time to becomethermally stable whenever you turn them
on. Therefore,to
achieve more accurateadjustmentsfor parameters,allow the LCDW/Monitor to warm
(beon)for at least 20 minutesbeforemakinganyscreenadjustments.
English
7
,ii!%_i_;:::_i,il,_;!iiii:!,jii_iiiitiiiiiiii'iii_!_!iiii;
Y"<i_i_,i'_'i,_iiiiii
'_'¸
iiiiiLO!ii!i;ii::_,
"iiiiii'_"_%ili!'?'liiii_),i_i_i_
¸'¸¸¸¸¸¸
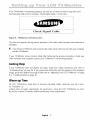
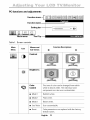
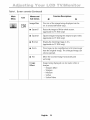
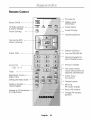
User Controls
Your LCD TV/Monitor allows you to easily adjust the characteristics of the image being
displayed. All of these adjustments are made using the control buttons on the top of the
TV/Monitor. While you use these buttons to adjust the controls, an OSD shows you their
numeric values as they change.
®
PC
PIP
TVIVIDEO
utrnE
®
Q
Q
®
_
_
AUTO
Q) POWER
CH •
Figure 5. User control locations
No.
Name
1
PC
Description
•
•
SelectsPCsource.
PlPwindow off,
•
ActivatesPIP(Picture-in-Picture)
window directlyin
PCmodeonly.
Setectsvideosourcesin PIP
(TV/DTV/DVD/VlDEO/S-VlDEO)
2
PIP
3
TVNIDEO
•
•
Activatesfull screenTV/Videowindow.
SelectsTV/Videosources.
(TV/DTV/DVD/VIDEO/S-VIDEO)
4
MUTE
•
Selectssoundmute.
5
MENU
•
Opensthe OSDandselectsthe highlighted
function,
CHV
•
•
Movesthe selectorup or downon the OSD.
Increasesor decreasesthe channelnumber.
6
•
•
English 8
,ii!% i ;:: i,il,;!iiii ! 'jiiiiiii%:::i
:iiitiiiiiiiili
iiiiiLQ!ii!i
i 'i'! 'i,!iiii;
iiiiii
"iiiiii'
iiiii "' %ili!'?'liiii i ¸''
i,i i i i i
No.
Name
Description
•
•
7
•
•
Exitsfrom menusandsub-menus.
•
Exitsfrom the OSDsystem,
•
"Auto" allows the TV/Monitorto self-adjustto the
incomingvideosignal,Thevaluesof fine, coarse
and positionare adjustedautomatically.
•
•
Turnsthe TV/MonitorON/OFF.
indicatesthe status of the TV/Moniton
VOL •
8
EXIT
9
AUTO
10
•
Movesthe selectorleft or right on the OSD,
increasesor decreasesthe valuesof the selected
function,
increasesor decreasesthe audiovolume,
POWER
- Green:Normaloperation,
- Green,Blinking:PowersavingModeor
DisconnectedSignatCable
Automatic Save
Wheneveryou openthe OSDand allow an adjustmentwindow to remainactivefor about3
secondswithout pressingotherbuttons,the W/Monitor automaticallysavesanyadjustment
youhavemade,Thesechangesare savedinto a userarea inthe W/Monitor,
TheW/Monitor can saveadjustmentsfor up to 5 usermodes,It has9 for LTM1555(11for
LTM1755)factorypresetor preloadmodes,one for eachsignalfrequencyas listed in table 10
on page34,
if you havemade no adjustments,the OSDdisappearsand the W/Monitor does not save
anything.
English 9
Ji!% i ;:: i,il,;!iiii ! 'jl;iiiii%::i
:iiitiiiiiiiili
iiiiib<
i 'i'!'i,!iiii;
i<ii!i
iiiiii iiiii '
¸''
Direct-Access Features
While you are watching full screenIV or in PIP mode
Validonlyafterperforming"ChanneIsearchprogram".(Seep
WhenOSDis not on the screen,pushthe" • "or
"• "buttonto selectprogramchannelnumber,
Program
Pushthe" •
number.
buttonto decreasechannel
r'
Pushthe
button to increasethe
channelnumber.
'r
•
I'
WhenOSDis not onthe screen,pushthe
buttonto adjust volume.
'r
•
'r
•
r'
or
'r
Volume
Pushthe
volume,
2
'r
•
r'
buttonto decreasethe
Pushthe" • r'button to increasethe
volume.
Initial OSDicons
C>CertainOSDmenusare disabled(graycolor)whenthey are notavailablein a certainmode
of operation.Thosemenusare enabledwhencorrespondingOSDmenusare activated.
English
10
,ii!%_i_;i::_i,il,_!iiii_!_jii_:iiitiiiiiiii'iii_!_!iiii;
Y"<i<i,_,i,_iiiiii
'_'¸
iiiiiLO!ii!i_iiiii_,
"iiiiii'_"_%ili!'?'liiii_i_i,i_i_
¸,¸¸¸¸¸¸
On Screen Display (OSD)
Accessing the menu system
1
With the OSDoff, push the MENU button to display the main OSD menu,
2
Usethe 'r • •
• • 'r butt°ns t° m°ve fr°m °ne functi°n t° an°ther' Press M[NU
to access the function sub-menu.
See Fable ] starting on the next page to view a
complete list of all of the functions available for the TV/Monitor.
3
Use" •"
and" •"
to select desired item.
After selecting item, use the"
• "and" • "buttons to make necessary
adjustments, The setting bar moves and the numeric value indicator changesto refect
your adjustments.
Pushthe EXIT button a couple of times to return to the main menu to select another
function or to exit from the OSD.
English
11
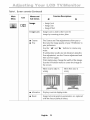
PC functions and adjustments
Functionname
I
Settingbar ---I--Iiiiiiiiiiiiiiiiiiiiiiii_
Main menu
Tool Tip
]-I-
!
501
J'R:_tLTd:ILlIII ,_=
Table1. Screen controls
Main
Menu
Menus and
Sub-menus
Icon
FunctionDescriptions
Contrast
®i
-:o,)
,14.
Brightness
® i
i
Color
Control
The tone of color can be changed from redish
white to bluish white. The individual color
components are also user customizabte.
•
Model
Reddishwhite.
•
Mode2
Plain white.
•
Mode3
Bluish white.
•
UserMode
User customizable.
•
Reset
Color parameters are replaced with the factory
default vatues.
English
12
¸ ' ;iiiii "Oiii,
iiLOil[=)====iiiil'
i!ii i
" " iii,Siii!: ,iill O
Table 1. Screen controls (Continued)
Main
Menu
Icon
Menusand
Sub-menus
FunctionDescriptions
•
•
Image
• imageLock
• imageSize
• imageEffect
Image Lock
ImageLockisusedto fine tunethe
imagebyremovingpicturejitter.
• Coarse
• Fine
TheCoarseand Fineadjustmentsallow youto
finetune the imagequality d yourTV/Monitorto
yourpreference,
Usethe" • "and" • "buttons to removeany
noise.
If satisfactoryresultsare not obtainedusingthe
Fineadjustment,usethe Coarseadjustmentand
then useFineagain.
Thisfunctionmaychangethe width d the image.
Usethe H-Positionmenuto centerthe imageon
the screen.
WhenCoarse
valueis
WhenFinevalueis
wrong,
wrong.
• Information Displayscurrentdisplaymode.
• Reset
Imagelockand position parametersare replaced
with the factory defaultvalues.
English
13
¸ ' ;iiiii "Oiii,
iiLOil[=)====iiiil'
i!ii; i
" iii,Siii!: ,#<); "
Table 1. Screen controls (Continued)
Main
Menu
Icon
Menusand
Sub-menus
FunctionDescriptions
•
•
ImageSize
Thesizeof the imagebeingdisplayedcanbe
set in severaldifferentways.
• Expandl
Resize
the imageto filI thewholescreen.
(applicableto PCRGBonly)
• Expand2
Expandimageskeepingthe original aspectratio.
(applicableto PCRGBonly)
• Normal
Displaythe incomingimageasit is.
(applicableto PCRGBonly)
• Zoom
Theimagecanbemagnifiedupto 64times larger
thanthe original image.Theenlargedimagecan
also be panned.
• Pan
Movethe zoomedimagehorizontallyand
ver[ically.
Image
Effect
Imagebeingdisplayedcan be madesofteror
sharper.
• SharpenMore
• Sharpen
• Medium
• Soften
• Soften More
English
14
=_i_i_,_::_i_,;_ii:_i_!!i,',fiiii::,iiiiii"li_,!!!ilii
¸ _'_;iiiii_"Oiii,_i!ii_i_
'_iiLOil[=)====iiiil'_"_iii,Siii!:_,iill_O
'_'
Table 1. Screen controls (Continued)
Main
Menu
Icon
Menusand
Sub-menus
FunctionDescriptions
•
•
H-position
<
•
V-position
lilliliiiiiliiii
i!iiiiiii//i!
iii !i
/1/
_J_
Sound
TheTV/Monitorhasa built-in high fidelitystereo
audioamplifier.Theaudiocircuit processesaudio
signalsfrom variousexternal inputsourcessuch
as DVD,VCR,TV,PCor DTV.
• Bass
Emphasizes
tow frequencyaudio.
• Treble
Emphasizes
highfrequencyaudio.
• Virtual
On,Off
Dolby
(Surround)
(_
PIP
(Pictureie- Picture}
WhenexternalA/V devicessuchas
VCR,
Componentl(DVD),
Component2(DTV)
or RF(TV)
cane are connectedto the W/Monitor, PIP
allows youto watchvideofrom suchdevicesin a
small window super-imposed
on the PCvideosign_
NOT£Applicatedto PIPmodein activity
• Size
ResizesPIPwindow.
• Position
ChangesPIPwindow position.
English
15
¸ ' ;iiiii roiii,iiLOil[=)====iiiil'
i!ii i
" iii,Siii!: ,iill O;
TVNideo
functions and adjustments
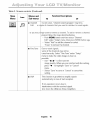
Function"
l=[_llll[
Functionname
I
Mode
Conwast
Brightness
Sharpness
Color
Setting bar--
Standard
47
62
43
40
Tint
Main menu
58
Tool Tip
Table 2. Screen controls
Main
Menu
Icon
[]
Menus and
Sub-menus
FunctionDescriptions
•
•
Picture
Thisfunction is active if youselect an inputsource
otherthan PC,
(TV/DTV/DVD/VIDEO/S-VIDEO)
• Mode
Displaysavailablepicturemodes.
(Standard,Natural,Mild, Custom)
• Contrast
Adjuststhe contrastof videoor TVwithout
affectingPCRGB'scontrast.
(Applicableto Custommodeonly)
• Brightness Adjuststhe brightnessdvideo or TVwithout
affectingPCRGB'sbrightness.
(Applicableto Custommodeonly)
• Sharpness Adjuststhe sharpnessof videoor TV image.
(Applicableto Custommodeonly)
• Color
Changesthe richnessof color,
(Applicableto Custommodeonly)
• Tint
Changesthe toneof color.
(Applicableto Custommodeonly)
English
16
= i i 4:: i ,; ii; is,',fiiii::iiiiis
¸ ' ;iiiii "Oiii:
iiL£,',',!lilil[=)====iiiil'
(!!ilii
i!ii; i
" iii,£i]i!: ,#
Table 2. Screen controls (Continued)
Main
Menu
Icon
Menus and
Sub-menus
FunctionDescriptions
•
•
Sound
TheTV/Monitorhasa built-in highfidelity stereo
audioamplifier.Theaudiocircuit processesaudio
signalsfrom variousexternalinputsourcessuchas
DVD,VCR,TV,DTV,or PC.
• Mode
Displaysavailablesoundmodes.
(Standard,Music,Movie,Speech,Custom)
• Bass
Emphasizeslowfrequencyaudio.
(Applicableto Custommodeonly)
• Treble
Emphasizes
high frequencyaudio.
(Applicableto Custommodeonly)
• Virtual
On,Off
Dolby
(Surround)
Setup
Thechannelsystemcanbe set in severaldifferent
ways.
• Channel
Selecta channelsystemthat is being usedin your
region,
(See"NTSCbroadcastingsystems"on page34)
• US-Air
• US-Cable
System
Select"US-Air" or "US-Cable"to performthe
"Channelsearchprogram".
(Seepage20 for "Channelsearchprogram".)
English
17
¸ ' ;iiiii "Oiii,
iiLOil[=)====iiiil'
i!ii i
" " iii,Siii!: ,iillO;
Table 2. Screen controls (Continued)
Main
Menu
Menusand
Sub-menus
FunctionDescriptions
•
•
• Channel
in rare cases,"Channelsearchprogram"maymiss
Edit a co oIe of channelsthat you want to adddue to weak signals,
or youmays_nply want to removea channel.Toadd or removea c
pleasefollow the stepsdescribedbelow,
• PushMEND buttonand thenselect"Channel
Edit"under"Setup"menu,then pressMENUbut1
• Select"Add"to add the channelor select
"Erase"to removethe channel.
• FineTune
Dueto weak signals,
someof the channelsmaynot be
tunedcorrectly,Select"Finerune"under"Setup"
menuto makethe videoimageasclearas
possible.
• Use" • •" to finetunethe
imagequality.Whenyouare satisfiedwith the s
press"V" to highlight "Save"or "Cancel"
menu.
• Select"Save"to saveor "Cancel"to cancelthe
setting.
•
LNA
Thisfunctionis providedto amplifysignals
automaticallyin cased bad reception.
If mis-operationoccursdueto
interferencewith the receivedsignal,
shut downthe [NA(LowNoiseAmplifier).
English
18
¸ ' ;iiiii "Oiii,
iiLOil[=)====iiiil'
i!ii i
" iii,Siii!: ,iill O;
Table 2. Screen controls (Continued)
Main
Menu
Icon
[]
Menus and
Sub-menus
FunctionDescriptions
•
•
Active Area
• Normal
• Wide
Timer
TheW/Monitor systemwill turn off automatically
if oneof threetime intervalsis selected.
• Off
• 30 min
• 60 min
• 120rain
Closed
Enableor disableclosedcaptionfeature and set
the appearanceof closedcaptiontext.
• Caption Off/On
• Mode
Caption/Text
• Channel 1 / 2
• Field
1/ 2
Caption
(US only)
• Display
V-Chip
Box/ Shadow
See"V-Chip"on pages23-24.
NOTE:if youforgot the V-ChipPassword:
• Pressand holdthe Exitbuttoonthe topof the
TV/Monitorfor 5 secondsin TVmode,
Thescreenwill blinkonceas the passwordis
resetto the original state(0000).
• Theinitial V-chippasswordis '0000',
English
19
=_ii_,_::_i_,;_ii;_i_!!i_',fiiii::,iiiiii"li_,!!!ilii
¸ _'_;iiiii_"Oiii,;!ii;_i_
'_ILOill]!i,====iiiil'_"_iii,Siii!:_,iill_o
,_'
* Channelsearchprogramusuallytakesaround5
minutesto scan125channels.Thescanningcan be longeror shorterdependingonthe
numberof channelsandthe videosource(whetherthe videosourceis from cableor air).
* Uponcompletionof "Channelsearchprogram",channelsare storedin
the internalmemory.
English
20
¸ ' ;iiiii roiii,iiLOil[=)====iiiil'
i!ii i
" iii,Siii!: ,iill O
DTV/DVD functions and adjustments
Functionicons--_
I,Erfil1-_
Functionname
I
Setting bar-i
Main menu
-
liiiiiiiiiiiiiiiiiiiiiiiiiiiiiiii_
_
I_
77
Tool Tip
Table 3. Screen controls
Main
Menu
Icon
0
Menusand
Sub-menus
FunctionDescriptions
•
•
Contrast
Adjuststhecontrastof videoor TVwithoutaffecting
PCRGB'scontrast.
Brightness
Adjuststhe brightnessof videoor TVwithout
affectingPCRGB'sbrightness.
Sound
TheTV/Monitorhasa built-in highfidelity stereo
audioamplifier.Theaudiocircuit processesaudio
signalsfrom variousexternalinputsourcessuchas
DVD,VCR,TV,PCor DTV,
• Bass: Emphasizes
low frequencyaudio,
• ]_eble: Emphasizes
highfrequencyaudio.
• Virtual Dolby(Surround): On,Off
d_
]
Cqll_colorcalbechangedwith the • •button.
Thecolorcomponentsare usercustomizabte.
Image Size
SelectDTV/DVDsize.
• Wide
• Full
NOTE:When a 480/s/_gnalis being used through the Component inputs, the TVmenu will be used
for setups.
English
21
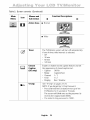
OSD functions and adjustments
Functionicons--C
Functionname
I
Settingbar --
Main menu
Tool Tip
English
Espa_ol
Fran_ais
Portugulls
--
J
FI'_'-FI lTl1:1L1111,__
Table 4. Screen controls
Main
Menu
Icon
Menus and
Sub-menus
Language
FunctionDescriptions
•
•
OSDlanguagecanbe changed.
English
Espahot
D
Frangais
Poriugues
Position
Movesthe OSDWindow to the verticaland
horizontaldirection.
Halftone
Changesthe opaquenessof the backgroundof the
OSD,
Duration
Q
[]
Thenumberof secondsthat the OSDwill remain
visible beforedisappearing.
Size/
Resizethe OSDWindow.
Melody
Turnsona Melodysoundthat canbe heardwhen
the unit is poweredon/off.
English
22
V - Chip
TheTelecommunications
Act of 1996 in USArequiresthat everytelevisionmade,starting in
1998,be equippedwith a technologicaldevicecalledtheV- Chip,TheV- Chipcanblock
certain rated televisionshows so childrencannotwatch,
With this device, program-ratinginformationwill be
transmittedalong with the televisionsignal,and be decodedby the chip,
Thechipwill then comparethe ratingcodesto valuespresetbythe viewer,
if the ratingcodesare higherthanthe presetvalues,the televisionsignatwill
be blocked,and a blankscreenwill be displayed,
LTM1555/1755havethis feature.TheV Chipsettingcanbe adjustedviathe OSD,Usethe arrow
buttonson the remotecontrolor control buttonson thefront cabinetof the monitorto change
the setting.
1. SelectV- Chipin the TVmenu,then pressMENU,Enter4 digit pin number,
- Initial pin numberis "0000"
- if youenteran incorrectpinnumber"Incorrect"messagewill be displayedfor 3 seconds.
2. V<hip lock is highlighted.Press+ to switch betweenOn/Off
3_ing
up TV Guidelines
_ise Up/Down/Left/Rightarrow buttons to move aroundthe matrix and pressMENU
_utton to changethe valuefrom "U"to "B"or "B"to "U"
- U:Unblock B:Btock
All
FV
V
S
L
D
U
TV-Y
B
TV-Y7
B
TV-G
U
TV-PG
U
U
U
U
TV-14
U
U
U
U
TV-MA
U
U
U
U
B
TV-Y: YoungChildren
TV-Y7: Children7 andover
TV-G: GeneratAudience
TV-PG: ParentGuidance
TV-14: Viewers14 andover
TV-MA: Matureaudience
FV: FantasyViotence
V : Violence
S : SexualSituation
L : CoarseLanguage
D : SuggestiveDialog
English
23
4. Settingup MPAAratingMode
- Use Up/Down/Left/Rightarrow buttonsto move aroundthe matrix and pressMENU
- MPAA: Motion PictureAssociation(08 America[movieradngorganization]
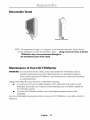
G
U
GeneralGuidance
PG
U
ParentalGuidanceSuggested
PG-13
U
ParentsStronglyCautioned
R
U
RestrictedUnder17 Requires
NC-17
U
No ChildrenUnder17 Admitted
X
U
Adult Only
NR
U
Not Rated
5. Enteringa new pin number
- Usenumberbuttonsto entera new pin number.Pinnumberconfirmmenuappears.
- Usethe numberbuttonsagainto enterthe pin numberyouenteredin the previousstep.
if the two pin numbersdo not match,"Incorrect"messagewill be displayedfor 3 seconds.
6. BlockingScreen
- If the incomingsignal'srating is higherthanthe onespecified,the screenwill be blanked
and "Excessiverating" messagewill be appeared,
NOTE:When the screen is blocked by the V-Chip,and you forgot the VoChippassword,
press the
EXITbutton within 5 seconds on the fi ont cabinet of the monitor and it
will return to the '0000' default value.
English
24
Remote Control
PCmodeOn
PowerOn/Off <
Displaysetup
information
TV/Videomodeon
& SourceChange
Screenpause
SoundSe_ings
PictureSettings
ChannelUp/Down
Turnon the OSD
Selecta function
VolumeUp/Down
Turnthe OSD/PIP
off
Sound mute
Numerickeypadsfor
direct channelaccess
Ex)CH125
:@+2+5
Previouschannel
<
Timer
Thevaluesof fine,
coarseandpositionare
adjustedautomatically
AdjustmentScreen
Aspectratio
Add or Erase
the channel
Setting the Audiomode
Channelsearch
Ena
closedCaption
PIPOn&
PlPsourcechange
ResizePiPwindow
Settingup _v
(V-Chipenable)
ChangePtPwindow
position
English
25
• Featuresthat can onlybe accessedvia remote control
Display
Showsa selectedvideosource,audiosource,currentchannelnumber,
soundmodeand muteon the upperright cornerof the
screen.
MTS
Youcanset theaudiomodebyusingthis button,Whenyoupressthis
button,currentsoundmodeisdisplayedonthe upperrightcornerd the
screen
_CFt7
NOTE."
LTM1555/1755
havean automatic stereo detection feature.
Thus,dependingon the audio type, the TV/Monitor
automaticallychanges the audio mode from Mono to Stereo
or vice versa.
English
26
PowerSaver
This TV/Monitorhas a built-in power managementsystemcalled PowerSaver.This system
savesenergybyswitchingyourTV/Monitorintoa low-powermodewhenit hasnot beenused
for a certainperiodd time.
PowerSaveroperateswith a VESADPMScompliantvideocardinstalled inyourcomputer,You
usea software utilit ' installedon yourcomputerto set upthis feature.SeeTable5 belowfor
details.
Table5. Power-savingmodes
State
Normal Operation
Power-offMode EPA/ENERGY20O0
Powerindicator
Green
Green,Blinking(1 secinterval)
Power
Consumption
LTM1555:38W(Max,)
LTM1755:58W(Max.)
Lessthan2W
NOTE:ThisTV/Monitorautomaticallyreturnstonormaloperationwhenhorizontaland
verticalsyncreturn, Thisoccurswhenyou movethecomputer'smouseel pressa key
on the keyboard
ThisTV/Monitoris EPAENERGY
STAR@ compliantand ENERGY2000
compliantwhenusedwith
a computerequippedwith VESADPMSfunctionality,
Forenergyconservation,turnyourW/Monitor OFFwhenyou are notusingit or when leaving
it unattendedfor longperiods,
English
27
Troubleshooting
if you havea problemsetting up or usingyour LCD]V/Monitor, you maybe able to solve it
yourself,Beforecontactingcustomerservice,try the suggestedactionsthat are appropriate
to yourproblem.
Table 6. Troubleshooting
Whatyousee.,.
Screenisblackand
powerindicatoris off.
Image
Suggested
Actions
Reference
• Ensurethat tire powercordis Connectingyour LDD
firmlyconnectedandthe LDD TV/Monitor,page5.
TV/Monitoris on.
"Check SignalCable" • Ensurethat the signalcable Connectingyour LDD
message,
is firmtyconnectedto the PC TV/Monitor,page5.
or videosources.
• Ensurethat the PCor video
sourcesare turnedon.
"Sync,Outof Range"
message.
• Checkthe maximum
DisplayModes,page34.
resolutionandthe frequency
of the videoadaptor,
Comparethesevalueswith
the datain the Display
ModesTimingChar[.
Theimageis too light
or too dark.
• Adjustthe Brightnessand
Contrast.
Brightness,page12.
Contrast,page12.
Horizontalbarsappear • Adjustthe Finefunction,
to flicker,jitter or
shimmeron the image.
imageLock,Fine,
page13.
Verticalbarsappearto • Adjustthe Coarsefunction
flicker,jitter or
andthen adjustthe Fine
shimmeron the image.
function,
imageLock,Coarse,page13.
imageLock,Fine,
page13.
English
28
Table 6. Troubleshooting
Whatyousee.,.
Image (Continued)
Suggested
Actions
Reference
Blinkseverysecondas • TheW/Monitor is usingits PowerSaver,page27,
longasthe power-safe powermanagementsystem.
modeindicator fight is • Movethe computer'smouse
on.
or pressa keyon the
keyboard.
Imageis not stable
and mayappearto
vibrate.
• Checkthat the display
DisplayModes,page34,
resolutionandfrequency
fromyour PCor videoboard
is an availablemodefor your
W/Monitor. Onyour
computercheck:Control
Panel,Display,Settings.
• If the settingis notcorrect,
useyourcomputerutility
programto changethe
displaysettings.
installingthe VideoDriver,
page6.
NOTE YourTV/Monitorsupportsmultiscandisplayfunctions
within the following frequencydomain:
• Horizontalfrequency:
LTM1555: 30 kHz- 69 kHz
LTM1755:30 kHz- 81kHz
• Verticalfrequency:
56 Hz_ 85 Hz
• Maximumrefreshrate:
LTM1555: 1024x 768@85Hz
LTM1755: 1280x 1024@76Hz
Imageis not centered • Adjustthe horizontaland
on the screen,
verticalposition.
English
29
H-Position,page 15.
V-Position,page15.
Table
7.Troubleshooting
AudioandTV
Problem
No sound,
SuggestedActions
Reference
• Ensurethat the audio cabte is firmly
connected to both the audio-in port
Connecting your LCD
TV/Monitor, page 5,
on your TV/Monitor and the
audio- out port on your sound card,
Sound level is
too low.
•
Checkthe volume level,
Sound Controls,
•
Checkthe volume level,
Sound Controls,
•
if the volume is still too low after
turning the control to its maximum,
check the volume control on the
Refer to your computer,
sound card or software
documentation,
computer sound card or software
program,
Sound is too high
pitched or too
low pitched.
• Adjust the Treble and Bass to
appropriate level.
English
30
Sound Controls, page 17.
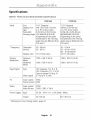
Specifications
Table 8. Technical and environmental specifications
LTM1555
LTM1755
Panel
Size
DisplaySize
Type
Pixelpitch
ViewingAngle
15.0"Diagonal
304.1(H)x 228.1(V)mm
a-si TFTactivematrix
0.297(H)x 0.297(V)mm
70/70/60/60(L/R/U/D)
(Dependingon the panel
manufacturer,
the viewing
angle maybe differentfrom
this spec.)
17.0" Diagonal
338 (H)x 270 (V)mm
a-siTFTactive matrix
0.264(H)x 0.264(V)mm
80/80/80/80(L/R/U/D)
(Dependingon the panel
manufacturer,the viewing
anglemaybe differentfrom
this spec.)
* Frequency
Horizontal
Vertical
30 - 69 kHz
56 - 85 Hz
Displaycolor
16,777,216colors
30 - 81 kHz
56 - 85 Hz(-XGA)
60 - 76 Hz(SXGA)
16,777,216colors
Optimum
Mode
Maximum
Mode
1024x 768@ 60 Hz
1280x 1024Ca60 Hz
1024x 768@85 Hz
1280x 1024Ca76 Hz
Sync.
H/V Separate,TTL R or N,
H/V Composite,TTL,Ror N.
Sync-on-green
0.3Vp-p,N.
0.7 Vp-p@75 ohm
Display
Resolution
Input Signal
Videosignal
TV
Colorsystem NTSC
Soundsystem M/N
Video
Colorsystem
Videoformat
PowerSupply Input
Output
NTSC
SVHS,CVBS,Y PbPr
AC90 - 264V,1.0_ 0.5A(50Hz/ 60Hz)
DC14V/3A
IDC14V/3.5A
* Referringto Presettiming modes,page34.
English
31
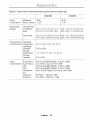
Table 8. Technical and environmental specifications (Continued)
LTM1555
Power
Maximum
38W
Consumption PowerSaving <2W
Dimensions/
Weight
LTM1755
58 W
< 2W
Unit (WxHxD):
W/Monitor
18,6x 12.4x 2.0inch/72 Ibs 208 x 14.4x 2.2 inch/93 Ibs
body
(474x 317x 51 mm/3,27kg) (530x 367x 57 mm/4,25kg)
Withstand
Environmental Operating
ConsiderationsTemperature
Operating
Humidity
Storage
Temperature
Storage
Humidity
Audio
Audio{nputl
CharacteristicsAudioinput 2
DTV
DVD
Headphone
18,6x 15,6x 8 0 inch/8,75 Ib_
_ 20 8 x 17,6x 8,0inch/109 Ibs
(474x 397x 204mm/3,97kg) (530x447x 204mm/4,95kg)
50 "Eto 104 _E(t0 Cto 40 D)
10% to 80%
-13 F to 113 F (-25 "Cto 45 "C)
5% to 95%
RCAJack Red(R)White(L),0.5Vrms(-9dB)
3.50StereoJack, O,5Vrms
(-9dB)
RCAJack Red(R)White(L),0.5Vrms(-9dB)
RCAJack Red(R)White(L),0.5Vrms(-9dB)
Max.lOmW Output(3.5eStereoJack32_)
out
Frequency
Response
RF:80Hz- 15kHz(at-3dB)
A/V: 80Hz- 20kHz(at- 3dB)
English
32
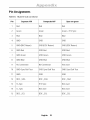
Pin Assignments
Table 9. 15 pin D-sub connector
Pin
SeparateHN
Composite
HN
Sync-on-green
1
Red
Red
Red
2
Green
Green
Green+ H/V Sync
3
Blue
Blue
Blue
4
GND
GND
GND
5
GND(DDCReturn)
GND(DDCReturn)
GND(DDCReturn)
6
GND-Red
GND-Red
GND-Red
7
GND-Green
GND-Green
GND-Green
8
GND-Bhe
GND-Blue
GND-Blue
9
No Connection
No Connection
Not used
10
GND-Sync/SelfTest
GND-Sync/SelfTest
GND-Sync/SelfTest
II
GND
GND
GND
12
DDCSDA
DDCSDA
DDCSDA
13
H Sync
H/V Sync
Not used
14
V Sync
Not used
Not used
15
DDCSCL
DDCSCL
DDCSCL
English
33
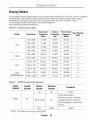
Display Modes
if the signal from the system equals the standard signal mode(1024 x768), the screen is adjusted
automatically. If the signal from the system doesn't equal the standard signal mode, adjust
the mode by refering to your Videocard user guide otherwise there may be no video,
For the display modes listed below, the screen image has
been optimized during nlanufacture.
Table 10. Presettiming modes
Horizontal Vertical PixelClock
Resolution Frequency Frequency Frequency SyncPolarity
(kHz)
(Hz)
(MHz)
(H/V)
Mode
720 x 400
31.469
70.087
28.322
-/+
640 x 480
31.469
59.940
25.175
-/-
640 x 480
37.500
75.000
31.500
-/-
640 x 480
43.269
85.008
36.000
-/-
800 x 600
46.875
75.000
49.500
+/+
800 x 600
53.674
85.06t
56.250
+/+
1024x 768
48.363
60.004
65.000
-/-
1024x 768
60.023
75.029
78.750
+/+
1024x 768
68.677
84.997
94.500
+/+
SXGA
1280x 1024
63.981
60.020
I08.000
+,-/+,-
(LTM1755only)
1280x I024
79.976
75,025
135,000
+/+
VGA
SVOA
XGA
Table 11. NTSCBroadcasting Systems
Color
System
NTSC
Sound
System
M
Stereo
System
Channel
System
Countries
A2
US
Korea
_BTSC(SAP)
US
USA,Canada,Chile,
Venezuela,Cuba,Colombia,
Jamaica,Mexico,Panama,
Peru,Philippines,Puerio-Rico,
Taiwan
EIAJ
Japan
Japan
_NOTE:ThisModel is set up fol BTSC(SAP),
English
34
Attaching a wall or Arm mounting device
TheTV/MonitorsupportsVESAmountingstandardfor usewith variousVESAmounting
devices. To installanyVESAmountingdevice,pleasefollow the instructionsgiven.
1
Laythe LCDTV/Monitorface-downon a flat surfacewith a cushionor othersoft
materialsto protectthe screen.
2
Removeall cablesconnectedonthe TV/Monitor.
3
Removethe four screwsandthen removethe Standfromthe LCDTV/Monitor.
(referto the picturesA&B)
4
Re-connectall cablesyouremovedin step 2.
5
Now youare readyto install Wall/Arm mountingdevice,
English
35
Installing VESA compliant mounting devices
Referto page35 to fold the base.
Rear cover
mountingpad
Align the mountinginterfacepadwith the holesin the rearcovermountingpad andsecureit
with the four screwsthat comewith the arm-typebase,wall mounthangeror other bases.
Wall Mount Instructions
Thefollowing instructionsapplyto a hollowsheet-rockwall only.Tools/Hardware
needed-Philipsscrewdriver,fourtogglebolts,5/8in dia.Drill bit anddrill. ContactErgotronat
(808)888-8458to purchasethe triple pivotdirect mountadapterand wall mountbracketkit.
• LTM1555(15"): No, 47- 007- 099 (Pivotdirect mountadapter)
No,97 - 101- 003(Wall mountbracketkit)
• LTM1755(1T'): No.47 - 007 - 099- 02 (Pivotdirect mountadapter)
No.97- 101- 003- OO(Wallmountbracketkit)
Align the wall mountbracketon the wall at the desiredheight, makingsurethat the bracket
will be mountedbetweenthe wall studs. Markthefour corneropeningsanddrill four5/8-dia.
holes,
Assemblethe wall mountkit accordingto the instructionsprovidedwith it,
Securelyattach Ergotron'sflat panel,triple pivot direct mountadapterto the backof the
TV/Monitorusingthe four 4ram,.7pitch x 18mmscrewsprovidedwith the arm.
Securethe assemblyto the wall usingfour 3/16 by3-inchlongtogglebolts.
English
36
Retractable Stand
NOTE: Themaximum tilt angle is 75 degrees in the backwal d direction. Please do not
tilt the TV/Monitor outside tire specified range.
Using excessive force to tilt the
TWMonitor may cause permanent damage to
the mechanical part of the stand.
Maintenance of Your LCDTV/Monitor
WARNING:Toavoidrisk of electricshock,do not disassemblethe W/Monitor cabinet
(exceptfor gainingaccessto the cableconnectorsasdescribedon page5),
UserscannotservicetheTV/Monitor.Usermaintenanceis restrictedto cleaning
as explainedbelow:
Unplugthe W/Monitor from the poweroutlet beforecleaning.
•
TocleanyourLCDscreen,lightly dampena soft, cleancloth with water or mild
detergent,If possible,usea special screencleaningtissueor solutionsuitablefor
the antistaticcoating,
•
Tocleanthe W/Monitor cabinet,usea cloth lightly dampenedwith a mild
detergent,
Neveruseflammablecleaningmaterialto cleanyourLCDW/Monitor or anyotherelectrical
apparatus.
English
37
A
0
Active Area 19
AUTO 9
Automatic Save 9
B
Bass 15, 17
Brightness 12, 16, 21
C
Cableconnections 5
ChannelEdit 18
ChannelSystem 17
ClosedCaption 19
Coarse 13
Color Control 12
Colour 16, 21
Contrast 12, 16, 21
D
On ScreenDisplay11
OSD Lock/Unlock10
P
Pan 14
PC 8
Picture16
PinAssignments33
PIP 8,15
PlugandPlay 6
Position 15, 22
POWER 9
Powerindicator 6
Powepsavingmodes 27
Program 10
R
RemoteControl
3, 25
Reset 12, 13
S
DCadapter 3
Display 26
Display Modes 34
Duration 22
E
EXiT 9
Expand 14
F
Fine 13
Fine Tune 18
H
Halftone 22
H position 15
|
Safety Instructions 2
SeIFtest feature check 6
Setup 17
Sharpness 16
Size 12, 15, 22
Sound 15, 17, 21
T
Tilt the screen 4
Tint 16
Timer 19
Treble15, 17
Troubleshooting 28
TV 8
U
Usercontrol locations 8
User Mode 12
V
VIDEO 8
Virtual Dolby 15, 17
Volume 10
VChip 19
V-position 15
Z
Zoom 14
ImageEffect 14
ImageLock 13
ImageSize 14
Information 13
Insta%tion CD 3
K
Kensington security slot 4
L
Language 22
LNA 18
M
Melody 22
MENU 8
Mode 12, 16, 17
MTS 26
MUTE 8
English
38
lii!iiliii:
ii d!!!!:iiili
iii,;l
iiili iiOll""'i!i
i i: ' iiil
iiiiiiliiiiiii
O lii' "ii'iii1
iiiii
iiii:
iiiii
O i "iil
FCC Information
Tile partyresponsiblefor productcompliance:
User Instructions
TrleFederalCommunicationsCommissionRadio
FrequencyInterferenceStatementincludesthe
fotowing warning:
Note: Thisequipmenthas beentested andfoundto
complywith the limits for a ClassB digital device,
pursuantto Part15 of the FCCRules Theselimits art
designedto provide reasonableprotectionagainst
harmfulinterferencein a residential insta/ation This
equipmentgenerates,uses,andcan radiateradio
frequencyenergyand, if not installedand usedhi
accordancewith the i11stf
uctiofls, maycauseharmful
interferenceto radio communicationsHoweve[,there
is noguaranteethat interferencewill not occur in a
particulal installation
If this equipmentdoescausehalmful interferenceto
radioor television receptions,which can bedetermined
byturningthe equipmentoff andon, the useris
encouragedto try to correctthe interferencebyoneor
moreof the following measures:
• Reorientor relocatethe receivingantenna
• Increasethe separationbetweenthe equipmentand
receiver
• Connectthe equipmentinto anoutlet on a circuit difi
ferent from that to which the receiver is connected
• Consultthe dealero/an experiencedradio/TVtech
nidan for help
User Information
Changesor modificationsnotexpresslyapprovedbythe
partyresponsiblefor compliancecouldvoid the user's
authorityto operatethe equipment
If necessary,consultyour dealeror an experienced
radio/televisiontechnicianfor additional suggestions
Youmay find the bookletcalled How to Identifyand
ResolveRadio/TVInterferenceProblemshelpful This
bookletwas preparedby the FederalCommunications
CommissionIt is availablefrom the US Government
PrhlthlgOffice,Washington,DC20402,StockNumber
004 000 003454
Warning
Usermust use shieldedsignal interfacecablesto
maintainFCCcornptancefor the product
Declaration of conformityfor products
Marked with FCCLogo
This devicecornpleswith Part15of the FCCRules
Operationis subJeCtto the following two conditions:(1)
this device may notcauseharmfulinterference,and(2)
this device must acceptany interferencereceived,
ilcluding interfere[Icethat may causeundesired
operation
85 West TasmanDrive
SanJose,CA 95134USA
Tel)408 544 5124
Fax)408 5445191
Providedwith this monitoris a detachablepower
supply cordwith IEC320style terminations It may be
suitable for connectionto any ULListedpersonal
computerwith similar configuration Beforemakingtilt
connection,make surethe voltagerating of the
computerconvenienceoutlet is the same asthe
monitorandthat the ampereratingof the computer
convenienceoutlet is equal to or exceedsthe monitor
voltagerating
For120Voltapplications,useonly ULListeddetachable
power cold with NEMA configuration5 15Ptype
(parallel blades)plug cap For240 Volt applicationsuse
only ULListed DetachaNepower supplycordwith
NEMA conRgu/ation6 15Ptype (tandemblades)plug
cap
IC Compliance Notice
This ClassB digital apparatusmeetsall requirements
of the CanadianInterferenceCausingEquipment
Regulationsof ICES003
Bet apparel Numedquede dasse Brespecteroutes les
exigencesdu ReglemontICES003 surles equipements
produisantdes interferencesau Canada
MPR II Compliance
This monitorcomplieswill SWEDAC(MPR
II)
r_commendationsfor reducedelectric and magnetic
fields
European Notice
Productswith the CEMarking complywith bothtile
EMCDirective (89/336/EEC),(92/31/EEC),(93/68/EEC)
andthe Low VoltageDirective(Z3/23/EEB)issuedby
the Commissionof the EuropeanCommunity
Compliancewith these directivesimpliescorlformity to
the following EuropeanNorms:
• EN55022:1998 RadioFrequencyhlterference
• EN55024:1998 Electromagneticlmmunity
• EN610003 2:1995+ A1 +A2 PowerLineHarmonics
• ENB100B
3 3:1995 VoltageFluctuations
• EN60950 ProductSafety
U.S.A.:
ESPAI_IA:
Fax : (9/3)601 6001
http://samsungmonito/corn/
CANADA:
]el : (93)26167 00
Fax : (93)26167 50
http://samsunges/
Sarrlsur_gE]ectro_licsCa_lada]r_c
703ZFinancialDrive
United Kingdom:
Fax : (905)542 1199
http://www samsungca
GERMANY:
TELEPLAN
Rheiu Main DrnbH
Feldstr 16
6433] Weiterstadt
T 06151/957 1306
F 06151/9671132
http://www samsungde/
AUSTRALIA:
Fax : (0208)397 9949
<EuropeanServiceCenter& NationalService>
Staffo/d Pa_k]2 Telford,Shropshire,T[3 3BJ
lel : (0870)2420303
Fax : (01962)292033
http://samsu%serviceco uk/
THAILAND:
THAISAMSUNGSERVICE
CENTER
MPACOMPLEXBUILDENG,Ist2ridFloor
175SOlSUEKSAVIDHAYASATHONSOl12
SFLOMROAD,SILOiVI,BANGRAK
BANGKOKI0600
TEL: 0 26352561
FAX: 0 2635 2556
Tel: 1300362603
http://www samsungcornau/
ITALY:
SOUTHAFRICA:
6 20063Cernuscosul Naviglio (Mi)
Tel : 167010740
http://www samsungRalia corn
PANAMA:
Panama
Tel : (507)210 1122,210 1133
Tel: B003278(FAST)
http://www samsunglatincorn/
MEXICO:
Fax: 002711 649 1629
http://www samsungco za
BRASIL:
%msu% EletronicadaAmazoniaLtda
R Prof Manoelitode Ornellas,303,TerroB
ChacaraSto Antonio,CEP: 04719040%o Paulo, SP
SAC: 0800124 421
http://www samsungcornbr/
SWEDENIDENMARKINORWAYIFINLAND:
SamsungElect/orficsAB
Box713
S 19427 UPPLANDS
VASBYSVERIGE
Del GustavoA MaderoCR 07700
Mexico DE
Tel 01 57 47 6100
Fax 01 5747 62 02
RFC:SEM950215S98
http://www samsungcornrex/
lel +468 59096600
Fax+468 590966 60
IMPORTADO
POR:SAMSUNG
ELECTRONICS
MEXICOSA DECV
SATURNO
44 COLNVA INDUSTRIALVALLEJC
DELGUSTAVO
A MADEROCR 01700
MEXICODE
TEL51475100
RED:SEM950215S98
EXPORTADO
POR:SAMSUNGELECTRONICS
CO,LTD
JOONGANG DAILYNEWSBLDG
7 SOONWHA DONGCHUNGKU,
CROBOX2775,1144SEOUL,KOREA
"AS al} ErJlRGYSb_,
Parlnen SAMSUNG/as
de_eR}lil_r_J that tl/i_ product meets tile
E_iRGyS IAI/_ _Liidelines fol el/e_y efficienc_
P/N : BN6&00183A-00
IIIIIIIIIIII
II
Printedon recyclable paper