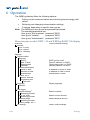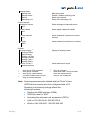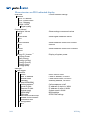
1
WEB'log LIGHT+ 20 | BASIC 100 | PRO unlimited Operating manual Version 20140624 meteocontrol GmbH Spicherer Str. 48 D-86157 Augsburg Ph.: +49 (0) 821 / 3 46 66-0 Web: www.meteocontrol.com Technical support: Ph.: +49 (0) 821 / 3 46 66-88 Fax: +49 (0) 821 / 3 46 66-11 E-mail: [email protected] © 2014 meteocontrol GmbH All rights reserved. All information in these operating instructions has been compiled and checked with the greatest care and diligence. Nevertheless, the possibility of errors cannot be entirely excluded. meteocontrol GmbH therefore cannot accept any liability for errors or any circumstances resulting from errors. Subject to technical alterations. WEB'log Contents WEB'log 1 Notes on using the Operating Instructions ...................................... 5 2 Safety instructions for operation ...................................................... 5 3 3.1 3.2 3.3 3.4 3.5 3.6 3.7 Device overview .............................................................................. 6 Device versions overview ................................................................ 6 Front WEB'log PRO Unlimited......................................................... 7 Front WEB'log LIGHT+ 20 and WEB'log BASIC 100 ...................... 8 Back WEB'log LIGHT+ 20, BASIC 100 and PRO unlimited ............ 9 Assignment of buttons and connections .......................................... 9 Default settings ............................................................................. 10 Status LEDs .................................................................................. 11 4 4.1 4.2 4.3 4.4 4.4.1 4.4.2 4.4.3 4.5 4.5.1 4.5.2 4.5.3 4.5.4 4.5.5 Installation ..................................................................................... 12 Safety instructions for installation .................................................. 12 Cables and wiring .......................................................................... 13 Installation ..................................................................................... 14 Interfaces ...................................................................................... 15 Analogue input .............................................................................. 17 Digital input ................................................................................... 17 Power supply................................................................................. 18 Communication with inverters ....................................................... 19 WEB'log RS485 connection .......................................................... 20 Connecting Modbus devices ......................................................... 21 i'catcher ......................................................................................... 22 i’checker Advanced current sensor ............................................... 23 RS485 hub .................................................................................... 24 5 5.1 5.2 5.3 5.4 5.4.1 5.4.2 5.5 5.6 5.6.1 Start-up, configuration ................................................................... 25 Preconditions ................................................................................ 25 WEB'log start-up ........................................................................... 25 Check the connections .................................................................. 25 Configuring the WEB'log using a Web browser ............................. 25 Installation assistant – guided configuration via web browser ....... 25 Expert pages – Professional configuration via web browser ......... 26 Configuring the WEB'log via the display........................................ 26 Configuring the WEB'log for the connection of Modbus devices ... 27 Using the correct Modbus interface ............................................... 27 1/92 2/92 5.6.2 5.7 5.7.1 5.7.2 5.7.3 5.8 Configuring the Modbus interface via the Web browser .................27 Configuring the WEB'log for Power Control ...................................28 Active power control (P(DI) internal) ..............................................28 Reactive Power Control cos φ (Fix) and Q (Fix) ............................29 WEB‘log Master and Slave ............................................................30 saferSun configuration via the web portal ......................................32 6 Operation .......................................................................................34 7 Troubleshooting .............................................................................38 8 8.1 8.1.1 8.1.2 8.1.3 8.1.4 8.1.5 8.1.6 8.1.7 8.1.8 8.1.9 8.1.10 8.1.11 8.1.12 8.1.13 8.1.14 8.1.15 8.1.16 8.1.17 8.1.18 8.1.19 8.1.20 8.1.21 8.1.22 8.1.23 8.1.24 8.1.25 8.1.26 Appendix ........................................................................................39 Inverter connections.......................................................................39 ABB central inverter (Modbus) .......................................................39 Advanced Energy AEI (Modbus) ....................................................41 Converteam inverter (Modbus) ......................................................42 Danfoss inverter .............................................................................43 Delta inverter .................................................................................44 Diehl AKO Platinum inverter ..........................................................46 Eltek Valere inverter (Modbus) ......................................................48 Emerson inverter (Modbus) ...........................................................49 Fronius inverter ..............................................................................50 Gefran inverter ...............................................................................51 Ingeteam inverter ...........................................................................53 Jema inverter .................................................................................55 Kaco inverter ..................................................................................56 Kostal inverter ................................................................................58 Mastervolt inverter .........................................................................59 Power One inverter ........................................................................60 Refusol inverter ..............................................................................62 Riello inverter .................................................................................63 Santerno inverter (Modbus) ...........................................................65 Satcon inverter (Modbus)...............................................................69 Siemens PVM inverter ...................................................................71 SMA inverter ..................................................................................72 SMA central inverter (Modbus) ......................................................75 Sputnik inverter ..............................................................................76 StecaGrid 3000 / 3600 / 8000 / 10000 ...........................................78 Sungrow (Modbus).........................................................................79 WEB'log 8.1.27 8.1.28 8.2 8.3 8.4 8.5 8.6 WEB'log Sunways inverter ........................................................................... 82 Xantrex inverter ............................................................................. 83 Grid feed-in management overview .............................................. 84 Configuration overview .................................................................. 85 CE certificates ............................................................................... 86 RoHS Statement ........................................................................... 87 List of figures ................................................................................. 88 3/92 4/92 WEB'log 1 Notes on using the Operating Instructions These Operating Instructions are intended for end customers and provide the basis for safe operation of the WEB‘logs. The personnel responsible for installation, operation and maintenance must have read and understood this operating manual The instructions are continually updated. The most current version of the Operating instructions can be found on our Internet site. www.meteocontrol.de meteocontrol GmbH ccepts no liability for personal injury, damage to property, or system malfunctions and their consequences, insofar as these result from non-observance of these Operating Instructions. 2 Safety instructions for operation WEB'log The memory card (Compact Flash) must not be removed while the WEB'log is in operation. The WEB'log may not be opened No modifications may be made to the WEB'log Damaged devices must be taken out of operation immediately and checked by a qualified electrician Local regulations must be observed when using WEB'log The safety of the WEB'log and the user cannot be guaranteed if the safety precautions described are violated 5/92 3 Device overview 3.1 Device versions overview WEB'log WEB'log WEB'log PRO Light+ 20 Basic 100 Unlimited Max. feed-in power in kW 20 100 Unlimited Modem GPRS or PSTN (analogue) GPRS, PSTN (analogue) or ISDN Display 2x16 characters 192x32 dots Grid feed-in management (meteocontrol PowerControl) simplified grid feed-in management complete grid feed-in management (supported processes in Appendix Chapter 8.2, grid feed-in management overview Modbus auxiliary equipment - active power P(DI)internal* - fixed reactive power Possible Modbus TCP and Modbus RTU (energy meter, sensors) * Internal digital inputs of the WEB'log are used for P(DI)internal. Note: You can find more information on grid feed-in management on the meteocontrol Internet site. 6/92 WEB'log 3.2 Front WEB'log PRO Unlimited Fig. 1: Device overview front WEB'log PRO unlimited – (1)– Display – (10)– – (2)– – (11)– – – – – – – – (3)– (4)– (5)– (6)– (7)– (8)– (9)– Buttons [Exit], [Down], [Up], [Enter] Power LED Status LED Modem LED Alarm LED Analogue or digital input Memory card (Compact Flash) Changeover switch RS232 / RS422 SIM card slot (only for WEB’log GPRS) Antenna socket (GPRS) – – – – – – – (12)– (13)– (14)– (15)– (16)– (17)– (18)– Digital output RS232 / RS422* RS485 Ethernet 24 V input/output Telephone socket (PSTN, ISDN) Power supply WEB'log * Can also be used as RS485 for Modbus devices (see chapter 4.5.2) Additional information on LEDs and buttons → Chapter 4, Assembly, Installation WEB'log 7/92 3.3 Front WEB'log LIGHT+ 20 and WEB'log BASIC 100 Fig. 2: Device overview front WEB'log LIGHT+ 20 WEB'log BASIC 100 (1) Power LED (2) (3) (4) (5) Status LED Modem LED Alarm LED Buttons [Exit], [Down], [Up], [Enter] Display Analogue or digital input Memory card (Compact Flash) (6) (7) (8) (9) (10) (11) (12) (13) Changeover switch RS422 / RS232 Digital output RS485 Ethernet 24 V input/output (14) (15) (16) Telephone socket (PSTN) Power supply WEB'log RS422 / RS232* * Can also be used as RS485 for Modbus devices (see chapter 4.5.2) Additional information on LEDs and buttons → Chapter 4, Assembly, Installation 8/92 WEB'log 3.4 Back WEB'log LIGHT+ 20, BASIC 100 and PRO unlimited Fig. 3: Device overview back 3.5 – – (1) – (2) – Digital input Reset button – – (4) – (5) – – (3) – Analogue input – (6) – Holder for wall installation Holder for installation on tophat rail Clamp Assignment of buttons and connections Buttons WEB'log Button Meaning EXIT Cancel input Back one menu level UP Select menu item above Increase selected number by 1 DOWN Select menu item below Decrease selected number by 1 ENTER One menu level further Confirm input Jump to the next number RESET Leads to restart of WEB'log 9/92 Direct access for setting language Briefly press UP and DOWN buttons simultaneously Then set the language in the menu Note: Direct access is possible only once. Assignment of connections WEB'log PRO unlimited, LIGHT+ 20 and BASIC 100 Pin PSTN ISDN* RS485 RS422** Ethernet RS-Changeover switch 1 — — +24 V DC — TX+ RS422 2 — — RS485 A TX+ TX- RS232 3 a2 (out) 2a RX+ — RX+ RX+ 4 a1 (in) 1a TX+ RS485 B TX- — 5 b1 (in) 1b TX- — RX- — 6 b2 (out) 2b RX- GND GND RX- 7.8 — — — — — *ISDN only with Pro Unlimited ** Can also be used as RS485 for Modbus devices (see chapter 4.5.2) 3.6 Default settings 10/92 Default setting for Ethernet connection: DHCP A manual network configuration is only necessary if no DHCP server is present. IP address 192.168.30.40 Subnet mask 255.255.255.0 Gateway 0.0.0.0 Default setting for modem connection: IP address 192.168.200.1 Remote IP 192.168.200.51 Subnet mask 255.255.255.255 WEB'log 3.7 Direct portal communication Transmission of alarm messages, daily data Time synchronisation Protocol http smtp (e-mail) SNTP or TIME Port 80, alternatively 8572 25 SNTP: 123 or TIME: 37 IP address 213.179.128.168 and 213.179.128.183 213.179.128.176 TIME: 132,163.4,102 Status LEDs Symbol LED Meaning Green: WEB'log is powered Green: WEB'log is in the start phase Off: Power supply fault Green: System loaded successfully, normal operation Off: System booting, boot phase Yellow: Connection to network established Yellow: Connection set-up Off: No connection to PSTN, ISDN, GPRS network Red: Alarm signal at configured output DO1 Red: Fault detected Off: Normal operation The Alarm LED flashes in the following cases: WEB'log System alarm, measured value alarm, status alarm Inverter alarm state detected Inverter Ini file missing Inverter or i'checker failure 11/92 4 Installation 4.1 Safety instructions for installation Warning Electric shock hazard! Danger to life and limb! There is a risk of electric shock when connecting the device to the power supply. This can result in life-threatening injuries. – De-energize the power cable and take measures to prevent it from being re-energized. Note Damage due to improperly connected cables! If cables are improperly connected, this can damage or destroy the measuring inputs and the device. – Connect cables only to the correct locations. – Ensure the correct polarity of the cables being connected. Note Damage due to overvoltage! Overvoltage or voltage peaks can damage or destroy the device. – Protect the power supply against overvoltage. Note Damage due to overvoltage! If voltages of more than 10 V DC are applied to the analogue inputs, or if currents of more than 20 mA flow, this can destroy the affected measuring inputs. – Ensure that only voltages of up to 10 V DC are applied and only currents of up to 20 mA flow. Note Damage due to overvoltage! If voltages of more than 24 V DC are applied to the digital inputs, this can destroy the affected measuring inputs. – 12/92 Ensure that only voltages of up to 24 V DC are applied. WEB'log Note Damage due to voltage input! If the 110 ... 230 V power supply and 24 V voltage input are connected at the same time, this will damage the device. – 4.2 Ensure that either the 110 ... 230 V power supply or the 24 V voltage input is used. Cables and wiring Cable types Bus cabling (inverters, current sensors) RS485, RS422 data cable, 2 1) twisted and shielded: Li2YCYv (TP) 2×2×0,5mm Network cable: CAT 6 Sensors (irradiance sensor, temperature sensor) 2 Sensor cable: LiYCY 2×2×0.5mm Meter (energy meter) Telephone cable: J-Y(ST)Y 2×0.6mm Ethernet network Network cable: CAT 5e / CAT 6 2 Maximum permissible cable lengths: Bus cabling (data cable RS485) 1200m Sensor (voltage signal 0V – 10V) 100m Sensor (current signal 4mA – 20mA) 600m Meter 10m Ethernet network 2) 3) 4) 100m 3) 1) ® We recommend using the cable type UNITRONIC Li2YCYv (TP) manufactured by Lapp Kabel, or an equivalent cable type. This cable is suitable for laying in soil. 2) For longer cable lengths, repeaters must be used. 3) Several, separate cables of this length require a Hub. 4) Power supply of 24 V DC is required. Note: Data cables must be separated of current cables according to EN 50174-2 using metallic cable carrier. WEB'log 13/92 Terminals meteocontrol recommends using terminal blocks to cable the devices. If a terminal block is used, the Connect cable can be cut off and used to connect the WEB'log to the terminal block. Shielding The cable shielding must be grounded at one end of the connection only. 4.3 Installation Mount the WEB'log on a top-hat rail; alternatively, the device can be mounted on a wall. Fig. 4: Installation on a top-hat rail (1) (2) (3) (4) 14/92 WEB'log Top-hat rail Upper edge of top-hat rail Pressing on the device (5) (6) (7) Screwdriver Releasing the clamp Removing the device WEB'log 4.4 Interfaces PSTN and ISDN connection 1. Test the PSTN telephone connection for outgoing and incoming calls (e.g. provider number; if necessary, include external dial prefix and ensure there are no dialing restrictions). Set the telephone system as described in the manufacturer’s instructions. 2. Test the ISDN telephone connection with an S0 tester before installation. Set the telephone system as described in the manufacturer’s instructions. 3. For PSTN or ISDN, connect the device and the telephone connection with the supplied cable. If the cable needs to be extended, ensure secure contact and correct polarity. 4. For a GSM/GPRS modem, connect the supplied mobile radio antenna to the antenna socket. 5. The GSM/GPRS data card must be set to the same PIN number as the WEB'log. To do this, set the PIN number of the data card using a cell phone. Insert the GSM/GPRS data card into the WEB'log until you feel it click into place. (1) (2) (3) SIM card slot SIM card Inserting the SIM card Fig. 5: Inserting the SIM card Note: The SIM card must be inserted and removed only when the device is switched off. WEB'log 15/92 Ethernet connection Direct connection from WEB'log and PC / laptop via crossed network cable (crossover). DSL versions of the device include the cable with delivery contents. Fig. 6: Crossed network cable (1) WEB'log (2) Crossed network cable (3) Computer / laptop Connection to a hub / switch via an uncrossed network cable. Fig. 7: Uncrossed network cable (1) WEB'log (2) Uncrossed network cable (3) Hub / switch (4) Computer / laptop Note: Hub / switch and network cable are not included with delivery contents. 16/92 WEB'log 4.4.1 Analogue input The analogue inputs can be configured as: - Voltage input (DC): 0...10 V - Current input 0...20 mA - Resistance measurement input for a PT1000 two-wire measurement Fig. 8: Irradiance Sensor SI-12TC example (1) Irradiance (orange) (2) + 24 V DC (red) 4.4.2 (3) GND (4) PE shield Digital input Digital inputs are pulse inputs according to DIN 43864 (S0); they are configured as: - Meter input - Status input - Power Control (see Chapter 5.7) Fig. 9: Energy meter example (1) S0 interface, minus (21) (2) S0 interface, plus (20) Note: For further information about configuration, see Appendix. WEB'log 17/92 4.4.3 Power supply Protect the power supply (230 V AC) with a fuse (e.g. B6A), or alternatively use the voltage input (24 V DC). Fig. 10: 230 V power supply (1) Neutral conductor (2) Phase with 6 A fuse Fig. 11: 24 V voltage input/output (1) 24 V DC (2) GND Note: The integrated power supply can provide sensors (e.g. i'checker) maximum current consumption of 100mA. Power is supplied through the RS485 socket in which +24V and GND are available. For sensor current consumption totalling more than 100mA, please use an external power supply. 18/92 WEB'log 4.5 Communication with inverters In order for the WEB'log to communicate with the inverter, the data logger must be equipped with the appropriate inverter driver. Note: The required driver is installed by the manufacturer before shipment. This section lists only the information necessary for connecting inverters and current sensors. Additional information is available in the Inverter / current sensor documents. Please note: Observe the maximum permissible number of bus devices WEB'log and connect the first bus device with the data cable or connect cable. The order of the bus devices on the bus is unimportant The use of a repeater is necessary for every 32nd bus device and for long cable lengths As a rule, no operating voltage may be connected to the communication interfaces of inverters The i'checker requires a power supply of 24 V DC The shield of the bus cable must be grounded at one end of the connection only. The data logger does not have its own grounding When routing the bus cabling, ensure as great a distance as possible from AC cables To prevent reflections, the bus must always be terminated with a parallel terminator “Connect cable” option meteocontrol offers a pre-assembled data cable (Connect cable) for connecting the WEB'log and the first bus device (inverter or current sensor). Please select the connect cable according to the inverter type or use the meteocontrol Connect Universal RS cable. WEB'log 19/92 4.5.1 WEB'log RS485 connection This interface serves as the default connection between the WEB'log and inverter. Connection information for the relevant inverter type can be found in Appendix Chapter 8.1. If the inverter type is not listed in the Appendix, the general connection diagram illustrated below must be used. Please also observe the additional information included with the inverter manufacturer documentation! Fig. 12: General connection diagram RS485 (1) RJ12 connector (WEB'log), RS485 (2) Signal names (3) Bus cable to the WEB'log (4) Inverter (5) Possible connection names Signal wires RS485 A and RS485 B must not be interchanged A twisted and shielded wire pair must be used for the bus cable Terminate RS485 bus after the last bus device (using resistor, switch, jumper ... depending on type) Note: This interface is not to be used to connect auxiliary Modbus devices! Please use the interface RS232/RS422 as described in 4.5.2 . 20/92 WEB'log 4.5.2 Connecting Modbus devices Not all inverters operated via the RS485 interface of the WEB'log use the Modbus communication protocol. Simultaneous operation of a Modbus device at the RS485 interface is thereby not possible. In these instances, the WEB'log allows Modbus devices to be operated via the second serial interface RS232/RS422. The interface needs to be configured accordingly with RS422 operation: 1. Turn off WEB'log power supply. 2. For switching to the RS422 move the right switch on the WEB'log (behind DO1 connection) to Position 1 (looking at the connection from the front: to the left). 3. Convert the serial cable according to the Pin assignment (see Fig. 13) or use meteocontrol Connect Universal RS (already includes modifications). 4. Connect the serial cable to the RS485 terminals of the auxiliary device and to the RS232/RS422 socket of the WEB'log. Auxiliary device is connected to the WEB'log via RS485. RJ12 socket changeover switch Pin assignment RS422 RS485 RS changeover switch 1 ---- + 24 V RS422 2 TX+ A RS232 3 RX+ 4 TX- 5 RX- 6 GND Pin 2 bridge B Pin 4 bridge GND Fig. 13: Pin assignment WEB'log 21/92 4.5.3 i'catcher Fig. 14: i'catcherconnection with Connect Universal, terminal connection (1) RJ12 connector (WEB'log), RS485/RS422 (2) Connect Universal RS assignment (3) Terminals (i'catcher) (4) First i'catcher (5) Last i'catcher (6) Terminating resistor 120 Ω (7) Bus cable Note: If a Modbus driver is used, the i'catcher must be connected via the first serial interface RS485. With proprietary drivers the connection via the second serial interface RS232/RS422 is provided. 22/92 WEB'log 4.5.4 i’checker Advanced current sensor Fig. 15: i'checker Advanced with Connect i'checker (1) RJ12 connector (WEB'log), RS485 (2) PIN / PIN assignment (3) RJ45 connector (i’checker) (4) Pin assignment, terminator (5) RJ45 terminator WEB'log (6) First and subsequent current sensors (7) Last current sensor (8) Connect i'checker (9) CAT 5 patch cable (10) 120 ohm terminator Maximum of 100 i’checkers per WEB'log If more than 3 Advanced i’checkers are connected, an external power supply of 24 V DC is required On the last current sensor, the data bus must be terminated with a terminating resistor of 120 ohm between RS485 A and RS485 B 23/92 4.5.5 RS485 hub The 6-way RS485 hub enables configuration of a star network. Fig. 16: i‘checker connection diagram Fig. 17: 6-way RS485 hub (1) RJ12 connector (WEB'log), RS485 (2) Pin assignment, bus cable (3) RJ12 connector (hub) (4) Data cable from hub to bus device, power supply from power unit (5) Assignment of connection set-up to i'checker (6) RJ45 connector at i‘checker (7) External power unit (8) Power supply 6 x RS485 bus (9) Data cables 6 x RS485 bus (10) First and subsequent bus devices (11) CAT6 patch cable (12) Last bus device (13) 120 ohm bus terminator (14) WEB'log (15) Bus cable (16) 6-way RS485 hub Note: The bus termination is pre-integrated in the WEB'log and in the RS485 hub (input/output). 24/92 WEB'log 5 Start-up, configuration 5.1 5.2 5.3 Preconditions WEB'log is installed All cable connections are correctly connected WEB'log start-up Switch on the power supply Wait until the WEB'log has completed the startup phase (Power LED is on and Status LED blinks) Check the connections Check the telephone connection PSTN: Dialling tone, dial test number, e.g. “0192658” with PSTN telephone. ISDN: ISDN: Check with S0 tester and ISDN telephone. Set MSN via the WEB'log display. Configuring of the WEB'log. 5.4 Configuring the WEB'log using a Web browser There are two ways of configuring the data logger using a Web browser. The installation wizard takes users through the key device configurations, while the expert pages enable all settings. For special applications, such as configuring Modbus devices, the expert pages must be used for configuration. 5.4.1 WEB'log Installation assistant – guided configuration via web browser Connect the computer to the WEB'log via Ethernet Address the home page of the WEB’log in the web browser Mode: Select "Installation wizard" Perform guided configuration Send a test message (e-mail, fax) 25/92 5.4.2 5.5 Expert pages – Professional configuration via web browser Connect the computer to the WEB'log via Ethernet Address the home page of the WEB’log in the web browser Mode: Select "Professional mode" Login to the admin area via the menu General > Login. The default password is: “ist02“ Carry out configuration via menu pages Send a test message (e-mail, fax) Configuring the WEB'log via the display If there is no PC available when configuring the WEB'log, key settings for the system's basic functions can also be made via the display in the menu "Settings". These include: Setting the language in the submenu Language Scan for bus devices using the submenu data logger - inverter scan, current sensor scan and Modbus scan Select predefined setting for analogue and digital inputs (only with PRO Unlimited) Setting the communication connection to the local network and Internet connection via the menu Communication - Ethernet or Modem/ISDN/GPRS Activation and testing of connection to the Web portal via Communication - Communi. HTTP For special applications, such as configuring Modbus devices, the expert pages must be used for configuration. 26/92 WEB'log 5.6 Configuring the WEB'log for the connection of Modbus devices 5.6.1 Using the correct Modbus interface 5.6.2 Configuring the Modbus interface via the Web browser Login to the admin area of the expert pages via the menu General > Login In the menu, select Admin measurement > Modbus devices > General configuration In the list, select the type of device connected and confirm your selection with "Save". If the device is not listed, the "Read" function can be used to reload the device type list currently available on the WEB'log. In addition, for Modbus RTU devices, the communication settings of the serial interface also need to be configured, and the selection confirmed with "Save". In the menu, select Admin measurement > Modbus devices > Device configuration The addresses of the connected Modbus devices are assigned to the device types on this page (multiple assignments are possible) Modbus RTU provides the option to automatically scan the bus according to address; the desired address area must be entered for this To check the measured values received, the Modbus device overview must be accessed via the menu Online values > Modbus devices WEB'log Devices that communicate via Modbus TCP are connected at the Ethernet interface Devices that communicate via Modbus RTU are connected at either the RS485 or RS422 interface, depending on the inverter used. Important information regarding the interface to be used is available on our Internet page www.meteocontrol.com in the section Downloads > Industrial Line > Driver data sheets WEB’log When using Modbus at the RS422 interface, it is to be operated as a RS485 interface. For more information, see Chapter 4.5.2. 27/92 5.7 Configuring the WEB'log for Power Control The necessity of active participation of PV system operators in the grid safety management increases with the rising share in the overall power production. This requires an option to reduce the feed-in power and participation in the compensation of the reactive power in the grid. Power control procedures provide a number of options for implementing these requirements. In the following, power control procedures are outlined that can only be performed with WEB'log and ripple control receivers. An overview of all possible procedures is available in Chapter 8.2. A detailed description of the procedures and how the configuration is to be performed can be found on our Internet page www.meteocontrol.com. 5.7.1 Active power control (P(DI) internal) With all data loggers, it is possible to carry out a reduction in active power for PV systems. The manipulated variables specified by the relevant energy supplier are transmitted to the WEB'logs using the ripple control receiver. Connecting the ripple control receiver to the digital interfaces Fig. 18 Ripple control receiver connection to WEB’log (1) Ripple control receiver (2) Digital input DI1 (Default 100%) (3) Digital input DI2 (Default 60%) 28/92 (4) Digital input DI3 (Default 30%) (5) Digital input DI4 (Default 0%) WEB'log Configuring the active power control via the Web browser Login to the admin area of the expert pages via the menu General > Login. In the menu, select Admin measurement > Power Control > General configuration Select active power procedure “P(DI) intern“ and configure the digital inputs according to their active power level "Data logger mode" can be used to specify whether the device should send the information received from the ripple control receiver to additional WEB'logs in the network In the section "Control values in fallback mode", the valid active power control value for a communication disruption to the ripple control receiver can be set. Power control is activated by checking the box "Power Control Active" and confirming with "Save" Note: The Power Control can be set to active or inactive on the display. Other Power Control configurations can only be made via the Web pages of the WEB'log. 5.7.2 Reactive Power Control cos φ (Fix) and Q (Fix) All WEB'logs also enable the setting of fixed reactive power values for PV systems. A power quality analyser and related accessories are required to carry out reactive power control at a grid connection point. The following configuration steps must be performed to set fixed reactive power values Login to the admin area of the expert pages via the menu General > Login In the menu, select Admin measurement > Power Control > General configuration Select reactive power procedures “cos φ (Fix)“ and “Q (Fix)“ and enter the fixed reactive power value specified by the energy supplier "Data logger mode" can be used to specify whether the device should send the information received from the ripple control receiver to additional WEB'logs in the network Power control is activated by checking the box "Power Control Active" and confirming with "Save" WEB'log 29/92 5.7.3 WEB‘log Master and Slave In large systems with multiple data loggers, Power Control can be managed by a WEB'log master. The control values are determined by the master and transmitted to the WEB'log slaves. They then forward the control values to the inverters. Fig. 19: Master-slave connection (1) WEB‘log-Master (2) WEB‘log-Slave (4) WEB‘log-Master connection with Ethernet switch (5) WEB‘log-Slave connection with Ethernet switch (3) Ethernet switch 30/92 All WEB'log devices must be in the same network (subnet mask). Every WEB'log must be assigned its own IP address. A maximum of two WEB'log devices may be directly connected via a cross cable. For more than two WEB'log devices, an Ethernet switch is required. WEB'log Defining the WEB'log as Master or Slave Master and slave configurations are set on the WEB'log Web pages. To do this, the computer must be connection with the WEB'log via Ethernet. The following steps are required for the configuration via Web browser: Login to the admin area of the expert pages via the menu General > Login. In the menu, select Admin measurement > Power Control > General configuration Select data logger mode Note: The data logger activated as the master sends information on active and reactive power values to slaves. Active and reactive power procedures can be set and configured on the master only. Note: If the Master is a WEB’log Pro Unlimited, also WEB’log Light + 20 and Basic 100 can be used as slaves for all power control procedures. The following list illustrates the options for Master and Slave settings: WEB'log Slave (general broadcast messages) Receives control value information from the master about the general broadcast Slave (Einzelmeldungen) [Slave (single messages)] Receives control value information from the master via single message Slave (Gruppen-Broadcast) [Slave (group broadcast)] Receives control value information from the master via group broadcast Master (keine) [Master (none)] Transfers no control value information to slaves Master (an alle Slaves) [Master (to all slaves)] Transfers control value information as a broadcast to all slaves available Master (Slavegruppe) [Master (slave group)] Transfers control value information as a broadcast to all slave groups 31/92 5.8 saferSun configuration via the web portal If required, fill out the registration form and send it off (fax, e-mail) This is followed by: 32/92 Set-up and configuration by portal administrator using the registration form Transmission of the configuration from the web portal to the data logger Sending of your access data to the web portal WEB'log WEB'log 33/92 6 Operation The WEB'log display offers the following options: Polling current measured values and retrieving stored energy yield values Retrieving and changing communication settings Functions depending on specific user groups Note: The WEB'log's user groups are password protected. The standard passwords are: User group "End customer" password "0030“ User group "Installer“ password "0020“ User group "Administrator“ password "0010“ Menu structure on the LIGHT+ 20 and WEB'log BASIC 100 display Overview* Ethernet Curr. IP Add. Curr. Subnet Curr. Gateway Settings** Communication Ethernet DHCP Stat. IP Add. Subnet mask Gateway Modem/ISDN/GSM Local IP Addr. Remote IP Addr. Subnet mask Comm. HTTP Comm. Activate Connection test Test start Language German … Data logger Inverter settings*3 Scanning process Curr. se. scan. Scanning process Modbus settgs. Scanning process Factory settgs. Set *** PC settings 34/92 Current network settings DHCP server on/off Fixed IP address, no DHCP Fixed subnet mask, no DHCP Gateway address, no DHCP IP address of device in WAN IP address of caller in WAN Subnet mask in WAN Display language Search inverters Search current sensors Search Modbus devices Power Control settings WEB'log Switch output Switch man. Switch autom. Switch Switching rule Manually switch Enable / disable switching rule State of the switch State of the switching rule Current values* Analogue Values AI 1 … Digital values DI 1 … Current sensors*2 IS 1 … Inverter*3 WR 1 … Show analogue measured values Show digital measured values Show measured values from current sensors Show measured values from inverters System* Inverter energy *3 Current Power Daily Energy Energy (ye.day) Energy (month) Energy (year) Energy (total) Alarms / Errors ** Communication * ** *** *1 *2 User group “End customer” User group “Installer” User group “Administrator” For devices with GSM / GPRS Only for current sensors Display of system power Show alarms and errors *3 *4 *5 *6 Only for inverters ISDN and GSM / GPRS modem Only with ISDN devices Only for PSTN devices Note: Scanning processes are initiated with the "Enter" button. GPRS device versions are to be configured with a PC. Resetting to the factory settings affects the following functions: WEB'log Deleting the MSN numbers (ISDN) GPRS pin reset to "4321" Activating the automatic call acceptance (PSTN) LAN on 192.168.30.40, 255.255.255.0 WAN on 192.168.200.1, 255.255.255.255 35/92 Menu structure on PRO unlimited display Overview* Network Curr. IP address Curr. Subnet mask Curr. Gateway GSM / GPRS*1 Signal quality Current values* Analogue Values AI 1 … Digital values DI 1 … Current sensors*2 IS 1 … Inverter*3 WR 1 … Energy DI / Inverter *3 Current Power Daily Energy Energy (ye.day) Energy (month) Energy (year) Energy (total) Settings** Data logger Network DHCP Stat. IP address Subnet mask Gateway Modem/ISDN/GSM Call acceptance*6 Local IP Addr. Remote IP Addr. Subnet mask ISDN MSN*5 PIN code*1 Portal communication http Enable communication Connection test AI configuration AI 1 … 36/92 Current network settings Show analogue measured values Show digital measured values Show measured values from current sensors Show measured values from inverters Display of system power DHCP server on/off Fixed IP address, no DHCP Fixed subnet mask, no DHCP Gateway address, no DHCP Call acceptance on/off IP address of device in WAN IP address of caller in WAN Subnet mask in WAN MSN settings GPRS PIN settings WEB'log DI configuration DI 1 … Language German … Set date Set time Display Contrast Brightness Reset Switch output Switch man. Switch autom. Switch Switching rule System Inverter scan*3 Scan current sensors*2 Scan Modbus Set protocol RTU ASCII Set baud rate Data bits / Parity Scan range: Lower limit Scan range: Upper limit Scan Modbus Scanning process PC settings *** Set factory defaults *** * ** *** *1 *2 User group “End customer” User group “Installer” User group “Administrator” For devices with GSM / GPRS Only for current sensors Display language Restart Manually switch Enable / disable switching rule State of the switch State of the switching rule Search inverters Search current sensors *3 *4 *5 *6 Only for inverters ISDN and GSM / GPRS modem Only with ISDN devices Only for PSTN devices Note: Scanning processes are initiated with the "Enter" button. Resetting to the factory settings affects the following functions: WEB'log Deleting MSN numbers (ISDN) GPRS pin reset to "4321" Activating automatic call acceptance (PSTN) LAN on 192.168.30.40, 255.255.255.0 WAN on 192.168.200.1, 255.255.255.255 37/92 7 Troubleshooting Fault Solution No display Power LED does not light up Status LED does not flash Check the power supply No IP address assigned to the device by the DHCP server Internet connection via cable does not work No inverter found Energy meter not detected No data or alarms sent via the telephone connection 38/92 No memory card (Compact Flash) inserted No data on the inserted memory card Check the network connection Start the WEB'log once a network connection has been established If there is no DHCP server in the network, use manual network settings The Internet connection must be via a router. Direct connection to a cable modem is not possible Inverters must be switched on for scanning Check the bus cabling. Suitable data cable used? Set the bus address in the inverter (manufacturerspecific) Check the terminating resistor to prevent signal reflections Connect the shield of the bus cabling Check the interfaces of the inverters Check the cabling (polarity) Check that the digital input is active Has the pulse constant been entered? Check the function of the telephone connection using a telephone Check that the connection is not subject to dialling restrictions (e.g. premium-rate numbers) Establish a test connection to an Internet provider (e.g. MSN 0193670) If necessary, cancel any dialing restrictions, or use a different Internet provider WEB'log 8 Appendix 8.1 Inverter connections 8.1.1 ABB central inverter (Modbus) RETA 01 control panel Fig. 20: RETA 01 control panel with ABB central inverter Connection via Ethernet Fig. 21: Connection via Ethernet with ABB central inverter (1) First and subsequent inverters (2) Last inverter (3) Switch or router WEB'log (4) Ethernet connection WEB'log (5) Ethernet patch cable Communication via Ethernet The WEB'log and the inverter must be in the same subnet (net mask) 39/92 RMBA control panel Fig. 22: RMBA control panel connection (1) (2) (3) (4) 40/92 RJ12 connector (5) Last inverter Connect Universal RS assignment (6) DIP switch terminating resistor RMBA control panel (Modbus RTU) (7) Bus cable First inverter WEB'log 8.1.2 Advanced Energy AEI (Modbus) Connection via Ethernet Fig. 23: Connection via Ethernet with Advanced Energy Inverter (1) First and subsequent inverters (2) Last inverter (4) Ethernet connection WEB'log (5) Ethernet patch cable T-568BStandard (3) Switch or router WEB'log Communication via Ethernet The WEB'log and the inverter must be in the same subnet (net mask) 41/92 8.1.3 Converteam inverter (Modbus) Connection via Ethernet Fig. 24: Connection via Ethernet with Converteam Inverter (1) First and subsequent inverters (2) Last inverter (3) Switch or router 42/92 (4) Ethernet connection WEB'log (5) Ethernet patch cable Communication via Ethernet The WEB'log and the inverter must be in the same subnet (net mask) WEB'log 8.1.4 Danfoss inverter Fig. 25: Danfoss inverter with Connect Danfoss Fig. 26: Danfoss inverter with Connect RS Fig. 27: Connection of additional inverters (1) RJ12 connector (WEB'log), RS485 (2) PIN assignment (Connect cable) (3a) RJ45 connector (inverter) (3b) Terminals (inverters) (4) Terminator assignment (5) RJ45 terminator WEB'log (6) First and subsequent inverters (7) (8) (9) (10) Last inverter Connect Danfoss Ethernet patch cable Terminator for last inverter Maximum of 31 inverters and 100 i'checkers per WEB'log Connect the cable shield to the ground terminal at the WEB'log end Set the inverter bus address (see inverter documentation) Terminate the RS485 bus after the last inverter with the terminator (10) 43/92 8.1.5 Delta inverter String inverter (SI) Fig. 28: Delta string inverter with Connect Delta (1) RJ12 connector (WEB'log), RS485 (2) Pin assignment, Connect cable (3) RJ45 connector (inverter) (4) Terminator assignment (5) RJ45 terminator 44/92 (6) First and subsequent inverters (7) (8) (9) (10) Last inverter Connect Delta Ethernet patch cable Terminator for last inverter Maximum of 31 inverters and 100 i'checkers per WEB'log Bus termination: Either connect terminator with 120 ohm to pin 6 and pin 7, or connect terminator with jumper between pins 5 and 6 Terminate the RS485 bus after the last inverter with the terminator (10) WEB'log Central inverter CI Fig. 29: Delta central inverter (1) WEB'log (2) RJ12 patch cable (3) X3 to the WEB'log (4) RS485 bus board (5) X1 to the system controller (6) Ethernet patch cable (7) Inverter cabinet (9) System controller (10) Communication with i’checkers in string combiner boxes (optional, see manufacturer’s instructions) (11) Bus cable (12) X4 to the i'checkers (optional) (13) X2 to the RS485 bus board (X3) of the next central inverter (14) RJ12 patch cable (15) RS485 bus board (X3) of the next central inverter (8) X3 to the RS485 bus board The inverters are grouped together in inverter cabinets (7). Current sensors, i'checkers, can be installed in the string combiner boxes to record measured values. WEB'log Maximum of 8 inverter cabinets and 9 string combiner boxes or 100 i'checkers per WEB'log The WEB'log is installed in the first inverter cabinet To supply power to the WEB'log and i'checkers (optional), a 24 V DC power supply with sufficient output must be installed in the inverter cabinet (WEB'log max. 3.5 W, i'checker max.1 W) The RS485 devices are connected to the RS485 bus via an RS485 bus board 45/92 8.1.6 Diehl AKO Platinum inverter Platinum 2100 S to Platinum 4601 S Fig. 30: Diehl AKO Platinum 2100 S... with Connect Universal RS (1) (2) (3) (4) (5) 46/92 RJ12 connector (WEB'log) PIN assignment (Connect cable) Wire end ferrules (inverter) First and subsequent inverters Last inverter (6) (7) (8) (9) (10) Terminal block RS485 Double socket RJ45, RS485 Connect Universal RS Ethernet patch cable Terminating jumper Maximum of 31 inverters and 100 i'checkers per WEB'log Terminate the RS485 bus on the last inverter (insert jumper (10) between terminals T and B) WEB'log Platinum 100 CS/CTL, 11000/17000/20000, 4300TL, 4800 TL, 5300TL, 6300TL, 7200TL The RS485 connections are situated inside the inverter on the rear of the display and control unit. Fig. 31: Diehl AKO Platinum 100 CS/CTL... with Connect Universal RS (1) (2) (3) (4) (5) RJ12 connector (WEB'log) PIN assignment (Connect cable) Wire end ferrules (inverter) RJ45 connection termination Pin assignment, connector termination (6) First and subsequent inverters (7) Last inverter WEB'log (8) (9) (10) (11) (12) Display and control unit Terminal block RS485 Double socket RJ45, RS485 Connect Universal RS Ethernet patch cable (13) Connection termination Maximum of 31 inverters and 100 i'checkers per WEB'log Do not terminate the RS485 bus on the first or subsequent inverters Terminate the RS485 bus on the last inverter (plug terminating connector (13) into RJ45 socket) 47/92 8.1.7 Eltek Valere inverter (Modbus) Fig. 32: Connection Eltek Valere inverter (1) RJ12 connector (WEB'log), RS485 (2) Connect Universal RS assignment (3) RJ45 connector (inverter) (4) First inverter 48/92 (5) Last inverter (6) Jumper for terminating resistor between T and B (7) Ethernet patch cable WEB'log 8.1.8 Emerson inverter (Modbus) Fig. 33: Connection Emerson inverter (1) (2) (3) (4) WEB'log RJ12 connector (WEB'log), RS485 Connect Universal RS assignment RJ45 connector (inverter) First inverter (5) Last inverter (6) Terminator (7) Ethernet patch cable 49/92 8.1.9 Fronius inverter Fig. 34: Fronius inverter with Connect Fronius (1) RJ12 connector (WEB'log), RS422 (2) PIN assignment (Connect cable) (3) RJ45 connector (inverter) (4) Terminator pin assignment (5) RJ45 terminator (6) First and subsequent inverters (7) (8) (9) (10) Last inverter Connect Fronius Ethernet patch cable Terminator for last inverter Maximum of 31 inverters and 100 i'checkers per WEB'log Install the Com Card network card in the inverter (see inverter documentation) Set the bus address in the inverter (see inverter documentation) Connect the cable shield to the ground terminal at the WEB'log end Set the protective relay switch to the “RS422” position. The relay switch must be switched only when de-energized (1) Left position (2) Right position RS422 RS232 Note: Modbus auxiliary devices cannot be connected. 50/92 WEB'log 8.1.10 Gefran inverter Fig. 35: Gefran inverter (1) RJ12 connector (WEB'log), RS485 (2) Pin assignment, bus cable (3) RJ12 connector (interface card) (4) RJ12 patch cable to the WEB’log (5) inverter WEB'log (6) Subsequent inverters / string boxes (7) RS485 interface card (8) Bus termination switch (9) Bus connection, next inverter or Gefran string box (10) Interface converter Maximum of 31 inverters and 19 Gefran string boxes per WEB'log 51/92 The data logger is connected to inverters and/or active string boxes (IBX COM) via the interface converter “RADIUS LOG-INT”. The interface converter RADIUS LOG-INT includes an RS485 hub and distributes the RS485 bus to the connected bus devices. Inverter connection Terminal block M1 can be used to connect a single inverter. The bus segment is terminated internally Switch off the RS485 bus termination in the inverter (S1 to “OFF”) Terminal block M2 can be used to connect a number of inverters Terminate the RS485 bus on the interface converter (S2 to “ON”) Terminate the RS485 bus on the last inverter (S2 to “ON”) Current sensor connection Gefran offers an active string box (IBX com) which includes the current sensors and a shared RS485 interface. A number of active string boxes can be connected in sequence to an RS485 bus segment. On the first and subsequent active string boxes, switch the bus termination off (JP7 to left) On the last active string box, switch the bus termination on (JP7 to right) Fig. 36: RS485 interface to the active string box (IBX com) (1) Bus termination JP7 (2) Terminal block J5, string box (3) Control module in active string box IBX com 52/92 (4) RS485 bus from previous device (5) RS485 bus to following device WEB'log 8.1.11 Ingeteam inverter Connection to RS485 Com card Fig. 37: Ingeteam inverter with Connect Universal RS, Terminal (1) RJ12 connector (WEB'log), RS485 (2) Pin assignment, Connect cable (3) Wire end ferrules (inverter) (4) Jumpers on first and subsequent inverters (5) Jumpers on last inverter WEB'log (6) First and subsequent inverters (7) Last inverter (8) RS485 Com card terminal block (9) Connect cable from WEB'log (10) Bus cable Maximum of 31 inverters and 100 i'checkers per WEB'log Terminate RS485 bus on last bus device with jumper JP3 / JP4 53/92 Connection to the inverter connector Fig. 38: Ingeteam inverter with Connect Universal RS, inverter connector (1) (2) (3) (4) RJ12 connector (WEB'log), RS485 (6) PIN / connector assignment (7) Wire end ferrules (inverter) (8) Jumpers on first and subsequent (9) inverters (5) Jumpers on last inverter (10) 54/92 First and subsequent inverters Last inverter Inverter housing connector Connect cable from WEB'log Bus cable Maximum of 31 inverters and 100 i'checkers per WEB'log Terminate RS485 bus on last bus device with jumper JP3 / JP4 WEB'log 8.1.12 Jema inverter Fig. 39: Jema inverter with Connect Universal RS (1) RJ12 connector (WEB'log), RS485 (2) PIN / connector assignment (3) Wire end ferrules (inverter) WEB'log (4) First inverter (5) Last inverter (6) Internal SPS bus Maximum of 31 inverters and 100 i'checkers per WEB'log 55/92 8.1.13 Kaco inverter Powador 2500xi - 5000xi Fig. 40: Kaco inverter with Connect Kaco (1) (2) (3) (4) 56/92 RJ12 connector (WEB'log), RS485 PIN / connector assignment Wire end ferrule (inverter) First and subsequent inverters (5) (6) (7) (8) Last inverter Connect Universal RS Bus cable Slide switch termination (2x) Maximum of 31 inverters per WEB'log Do not terminate the RS485 bus on the first or subsequent inverters (both slide switches (8) to “OFF” position) Terminate the RS485 bus on the last inverter (both slide switches (8) to “ON” position) WEB'log Powador 25000xi - 33000xi Fig. 41: Kaco inverter with Connect Kaco (1) (2) (3) (4) WEB'log RJ12 connector (WEB'log), RS485 PIN / connector assignment Wire end ferrule (inverter) First and subsequent inverters (5) (6) (7) (8) Last inverter Connect Universal RS Bus cable Terminating resistor Maximum of 31 inverters per WEB'log Do not terminate the RS485 bus on the first or subsequent inverters (do not activate terminating resistor (8) of inverter) Terminate RS485 bus on last inverter (activate terminating resistor (8) of inverter, see inverter manual for a description) 57/92 8.1.14 Kostal inverter Fig. 42: KOSTAL string inverter via RS485 (1) RJ12 connector (WEB'log), RS485 (2) PIN / connector assignment (3) Wire end ferrule (inverter) (4) First and subsequent inverters (5) Last inverter (6) DIP switch communication board I (7) DIP switch communication board I (8) Terminal assignment on communication board I and II (9) Bus cable Connect the cable shield to the ground terminal at the WEB’log end Set the bus address in the user menu of the inverter (see inverter documentation) Do not terminate the RS485 bus on the first or subsequent inverters (DIP switch (6) to “OFF” position). For inverters with communication board II, termination is set in the user menu (see inverter documentation) Terminate the RS485 bus on the last inverter using the DIP switch (DIP switch (6) to “OFF” position). For inverters with communication board II, termination is set in the user menu (see inverter documentation) Note: The +24V connection of the WEB'log may not be applied to the inverter terminals. 58/92 WEB'log 8.1.15 Mastervolt inverter Fig. 43: Mastervolt inverter with Connect Mastervolt (1) (2) (3) (4) RJ12 connector (WEB'log), RS485 PIN assignment RJ45 connector (inverter) First and subsequent inverters (5) Last inverter (6) Connect Mastervolt (7) Ethernet patch cable Maximum of 31 inverters and 100 i'checkers per WEB'log Note: According to Mastervolt, no bus termination is required. WEB'log 59/92 8.1.16 Power One inverter String inverter Fig. 44: Power One string inverter with Connect Universal RS (1) RJ12 connector (WEB'log), RS485 (2) (3) (4) (5) 60/92 PIN / connector assignment Wire end ferrules (inverter) First and subsequent inverters Last inverter (6) S1 on first and subsequent inverters (7) S1 on last inverter (8) Connect cable from WEB'log (9) Bus cable Maximum of 31 inverters per WEB'log Set the inverter bus address (see inverter documentation) Set switch S1 to OFF on the first and subsequent inverters On the last inverter, set switch S1 to ON WEB'log Central inverter Fig. 45: Connection Power One central inverter (1) (2) (3) (4) WEB'log RJ12 connector (WEB'log), RS485 Connect Universal RS assignment Terminals (inverters) First inverter (5) Last inverter (6) DIP switch terminating resistor (7) Bus cable 61/92 8.1.17 Refusol inverter Fig. 46: Refusol inverter with Connect Universal RS (1) (2) (3) (4) RJ12 connector (WEB'log), RS485 Connect Universal RS assignment Wire end ferrules (inverter) Connect cable from WEB'log (5) (6) (7) (8) First inverter Bus cable Last inverter Bus termination (2 jumpers) Maximum of 31 inverters per WEB'log To connect the inverters, use the supplied connectors After the last inverter, terminate the RS485 bus with two wire jumpers Make the following setting on each inverter: - Bus address: - Baud rate: 57,600 Bd - RS485 parity: "On" protocol: 3 Note: The settings only become active once the inverter is switched off and on again. 62/92 WEB'log 8.1.18 Riello inverter RS485 Interface Card (four-wire) Fig. 47: Riello inverter (1) (2) (3) (4) (5) WEB'log RJ12 connector (WEB'log), RS485 Connecting cable Input, first inverter Connecting cable from WEB'log First inverter (6) (7) (8) (9) RS485 Interface Card Bus cable Last inverter Bus termination Maximum of 31 inverters per WEB'log On the Interface Card, connect the Receive side (Rx) and Transmit side (Tx) with jumpers in each case After the last inverter, terminate the RS485 bus with a 120 ohm resistor 63/92 RS485 Interface Card (two-wire) Fig. 48: Riello inverter, Connect Universal RS (1) RJ12 connector (WEB'log), RS485 (2) Connect Universal RS assignment (3) RS485 Interface Card terminal block (4) RS485 Interface Card in slot 1 (5) RS485 Interface Card in slot 2 (6) Bus termination off 64/92 (7) Bus termination on (8) First / subsequent inverters (9) Last inverter (10) RS485 Interface Card (11) Connect Universal RS (12) Bus cable Maximum of 31 inverters per WEB'log Use a shielded twisted-pair cable (STP) as the intermediate cable On some central inverters: Depending on the planned installation position of the RS485 Interface Card (slot 1 or 2), set jumper 3 or 4. (Jumpers 1 ... 4 are not present on all models) On the first and subsequent inverters: Deactivate RS485 bus termination using jumper 6 On the last inverter: Activate RS485 bus termination using jumper 6 WEB'log 8.1.19 Santerno inverter (Modbus) Sunway M Plus Fig. 49: Connection with Santerno inverter Sunway M Plus (1) RJ12 connector (WEB'log), RS485 (2) Connect Universal RS assignment (3) DB9 connector (inverter) (4) First inverter WEB'log (5) Last inverter (6) Terminating resistor DIP switch for last inverter (7) Bus cable 65/92 Sunway M-XS 2200- 3000- 3800 Fig. 50: Connection with Sunway M-XS 2200, 3000 and 3800 (1) RJ12 connector (WEB'log), RS485 (2) Connect Universal RS assignment (3) DB9 connector (inverter) 66/92 (4) Inverters (5) Bus cable (6) Integrated terminating resistor WEB'log Sunway M-XS 4300- 5000- 6000- 7500 Fig. 51: Connection with Sunway M-XS 4300, 5000, 6000 and 7500 (1) (2) (3) (4) WEB'log RJ12 connector (WEB'log), RS485 Connect Universal RS assignment DB9 connector (inverter) First inverter (5) Last inverter (6) External terminating resistor (7) Bus cable 67/92 Sunway TG and TE Fig. 52: Connection with Sunway TG and TE (1) RJ12 connector (WEB'log), RS485 (2) Connect Universal RS assignment (3) Terminals on the terminal strip X4 (inverter) (4) First inverter 68/92 (5) Last inverter (6) DIP switch on the control board (terminating resistor) (7) Bus cable WEB'log 8.1.20 Satcon inverter (Modbus) Connection via RS485 Fig. 53: Connection Satcon inverter (1) (2) (3) (4) WEB'log RJ12 connector (WEB'log), RS485 Connect Universal RS assignment Wire end ferrules (inverter) First inverter (5) (6) (7) Last inverter Terminating resistor Bus cable 69/92 Connection via Ethernet Fig. 54: Connection via Ethernet with Satcon inverter (1) First and subsequent inverters (2) Last inverter (3) Switch or router 70/92 (4) WEB'log connection (5) Ethernet patch cable Communication via Ethernet The WEB'log and the inverter must be in the same subnet (net mask) The WEB'log requires an FTP connection (ports 20 and 21) to the Internet WEB'log 8.1.21 Siemens PVM inverter Fig. 55: Siemens PVM inverter with Connect Universal RS (1) (2) (3) (4) RJ12 connector (WEB'log), RS485 Connect Universal RS assignment Input, first inverter Connect cable from WEB'log First inverter Bus cable Last inverter Bus termination (2 jumpers) Maximum of 31 inverters per WEB'log To connect the inverters, use the supplied connectors After the last inverter, terminate the RS485 bus with two wire jumpers (8) WEB'log (5) (6) (7) (8) Make the following setting on each inverter: - Bus address - Baud rate: 57,600 Bd - RS485 parity: "On" protocol: 3 71/92 8.1.22 SMA inverter SMA string inverter piggy back Fig. 56: SMA inverter piggy back with Connect Universal RS (1) RJ12 connector (WEB'log), RS485 (2) (3) (4) (5) PIN / connector assignment Wire end ferrules (inverter) First and subsequent inverters Last inverter (6) Jumper position first and subsequent inverters (7) Jumper position on last inverter (8) Connect cable from WEB'log (9) Bus cable Maximum of 31 inverters per WEB'log Install the RS485 communication interface “piggy-back” on the SMA inverter (according to inverter instructions) On the last inverter, set the jumper to “A” Note: Please use only original piggyback boards from SMA. 72/92 WEB'log SMA string inverter RS485 Quick Module Fig. 57: SMA inverter RS485 Quick Module with Connect Universal RS (1) RJ12 plug (WEB'log), RS485 (2) PIN / connector assignment (3) Wire end ferrules (inverter) (4) First and subsequent inverters (5) Last inverter WEB'log (6) Terminal termination without terminating resistor (7) Terminal termination with terminating resistor (8) Connect cable from WEB’log (9) Bus cable Maximum of 31 inverters per device Install the RS485 communication interface “RS485 Quick Module” in the SMA inverter (see inverter documentation) Place the terminating resistor on the last inverter 73/92 SMA central inverter Fig. 58: SMA central inverter with switch or router (1) First and subsequent inverters (2) Last inverter (3) Switch or router 74/92 (4) Ethernet connection WEB'log (5) Ethernet patch cable Maximum of 12 inverters per WEB'log Communication between the WEB'log and the inverter is via Ethernet WEB'log and inverter must be in the same subnet (net mask) The WEB'log requires an FTP connection (ports 20 and 21) to the Internet Depending on the size of the system, the network connection must not be interrupted for up to one hour after an inverter scan If the inverters are accessed by the Sunny Data Control program from SMA, the WEB'log interrupts data logging and any scan running WEB'log 8.1.23 SMA central inverter (Modbus) Connection via Ethernet Fig. 59: SMA central inverter Modbus with switch or router (1) First inverter (2) Other inverters (3) Switch or router (4) Ethernet connection WEB'log (5) Ethernet patch cable Communication between the WEB'log and the inverter is via Ethernet The WEB'log and the SMA Webbox must be in the same subnet (net mask) The SMA Webbox represents a communications gateway to the inverters. It is needed to communicate with the connected inverters and SMUs Prerequisite for communication with multiple Webbox devices: Webbox Firmware Version 1.52 or higher The connected bus devices and unit IDs must be listed in the Webbox The unit IDs (client ID) must be recorded in the Webbox as follows: Webbox Gateway = ID1 Webbox system parameters = ID2 Inverter = ID3 Note: It is possible for one data logger to communicate with multiple Webbox devices. WEB'log 75/92 8.1.24 Sputnik inverter S series, MT series Fig. 60: Sputnik inverter (S Series) with Connect Sputnik S (1) (2) (3) (4) RJ12 connector (WEB'log), RS485 PIN assignment RJ45 connector (inverter) First and subsequent inverters (5) Last inverter (6) Connect Sputnik S (7) Ethernet patch cable Maximum of 31 inverters and 100 i'checkers per WEB'log Set the inverter bus address (see inverter documentation) C Series Fig. 61: Sputnik inverter (C Series) with Connect Sputnik (1) (2) (3) (4) RJ12 connector (WEB'log), RS485 PIN assignment RJ45 connector (inverter) First and subsequent inverters (5) Last inverter (6) Connect Sputnik (7) Ethernet patch cable Maximum of 31 inverters and 100 i'checkers per WEB'log Set the inverter bus address (see inverter documentation) Note: The communication interface of the inverters requires an external power supply (+15 V). 76/92 WEB'log Cx Series, E Series Fig. 62: Sputnik inverter (Cx and E Series) with Connect Sputnik (1) RJ12 connector (WEB'log), RS485 (2) PIN assignment (3) RJ45 connector (inverter) (4) Connect Sputnik (5) Ethernet patch cable (6) First and subsequent inverters (7) (8) (9) (10) Last inverter Jumper for RS485 on 1-2 Jumper for terminating resistor on 1-2 Jumper for terminating resistor on 2-3 Maximum of 31 inverters and 100 i'checkers per WEB'log Install the “MaxComm” interface card (see inverter documentation) Set the inverter bus address (see inverter documentation) Set the jumpers for RS485 and the terminating resistor Note: The communication interface of the inverters requires an external power supply (+15 V). WEB'log 77/92 8.1.25 StecaGrid 3000 / 3600 / 8000 / 10000 Fig. 63: StecaGrid 8000 / 10000 inverter (1) RJ12 connector (WEB'log), RS485 (2) PIN assignment (3) RJ45 connector (inverter) (4) Address switch, tens (S1) (5) Address switch, ones (S2) 78/92 (6) Bus termination switch (J1) (7) Interface card, first and subsequent inverters (8) Interface card, last inverter (9) Bus cable from the WEB'log (10) Ethernet patch cable Maximum of 31 inverters and 100 i'checkers per WEB'log Set inverter bus address: Rotary switches (4) and (5) on the interface card Turn off bus termination on the first and subsequent inverters: Switch (6) to "OFF“ Turn on bus termination on the last inverter: Switch (6) to "ON“ WEB'log 8.1.26 Sungrow (Modbus) Connect RS485 with string inverter Depending on the bus connector, the connection differs at the inverter (M12 or RJ45). Fig. 64: M12 Connection with Sungrow string inverter (1) (2) (3) (4) RJ12 connector (WEB'log), RS485 Connect Universal RS assignment Direct plug connection (inverter) Socket on first inverter (5) Socket on last inverter (6) Terminating resistor (7) Bus cable Fig. 65: RJ45 connection for Sungrow string inverter (1) RJ12 connector (WEB'log), RS485 (2) PIN assignment (Connect cable) (3) RJ45 connector (inverter) WEB'log (4) Terminator pin assignment (5) RJ45 terminator 79/92 Connection via Ethernet for Sungrow string and central inverter Fig. 66: Connection via Ethernet for Sungrow string and central inverter (1) First and subsequent inverters (2) Last inverter (3) Switch or router 80/92 (4) WEB'log connection (5) Ethernet patch cable Communication via Ethernet The WEB'log and the inverter must be in the same subnet (net mask) WEB'log Connect RS485 with central inverter Fig. 67: Connection Sungrow central inverter (1) (2) (3) (4) WEB'log RJ12 connector (WEB'log), RS485 Connect Universal RS assignment Wire end ferrules First inverter (5) Last inverter (6) Terminating resistor (7) Bus cable 81/92 8.1.27 Sunways inverter Fig. 68: Connection with Sunways inverter (1) (2) (3) (4) (5) 82/92 RJ12 connector (WEB'log), RS485 PIN / connector assignment Wire end ferrules (inverter) First and subsequent inverters Last inverter (6) (7) (8) (9) Jumper JP 400 open Jumper JP 400 closed Connect Universal RS Bus cable Maximum of 99 inverters per WEB'log Set the inverter bus address (see inverter documentation) Set jumper JP 400 on the last inverter WEB'log 8.1.28 Xantrex inverter For models GT100, GT250, GT500, GT630 Fig. 69: Xantrex inverter / opto-converter (1) (2) (3) (4) (5) (6) RJ12 connector (WEB'log), RS485 Connect Universal RS First opto-converter input First and subsequent inverters Last inverter Fiber-optic connecting cables (7) (8) (9) (10) (11) (12) First opto-converter Last opto-converter Terminator switches (both OFF) Terminator switches (both ON) Connect cable from WEB'log Bus cable On the first and subsequent inverters: Switch off the RS485 bus termination (both terminator switches to “OFF”) On the last inverter: Turn on the RS485 bus termination (both terminator switches to “ON”) Note: Handle the fiber-optic connecting cables with care! WEB'log 83/92 8.2 Grid feed-in management overview WEB’log LIGHT+ 20 WEB’log BASIC 100 WEB’log PRO unlimited Active power procedures P(DI)intern* X X X P(DI) X P(AI) X P(Fix) X X X Reactive power procedures cos φ (DI) X cos φ (AI) X cos φ (Fix) X X X cos φ (P) X cos φ (U) X Q(DI) X Q(AI) X Q(Fix) X X Q(U) X X Q(P) tanφ mix X Accessories PCU X Power quality analyzer X * P(DI)internal: Connection of ripple control receiver to the internal digital inputs of the WEB'log. For other processes, connection is via the PCU. 84/92 WEB'log WEB'log Current input Si-420TC-K (solar radiation) (4… 20mA) PHI_U0 Surrounding humidity Current input % r. F. m/s ° 0 1 1 0 0 W/m2 0 0 W/m2 W/m2 0 W/m2 W/m2 1 1 1 1 1 1 1 1 Decimal places °C °C °C °C °C °C °C °C Unit 6.25 5 36 100 130 75 120 120 15 1 5,625 10.869 10 1 10 6.25 Gradient Status Ripple control receiver E_Z_EVU refers to the feed-in meter of the energy supplier; Pulse input Status Note: x is a placeholder for a consecutive number; Pulse input Submeter with S0 interface Floating contact Digital input Meter with S0 interface Configuration data for digital inputs S_LMx E_Z_PVx S_0x E_Z_EVU Abbreviati on* submeters are named E_Z_PV1, E_Z_PV2, etc. Feed-in meter total energy Meter, subsystem x Status, input x Status grid feed-in management Description kWh kWh Unit 1 3 1 3 Decimal places 1 as per meter as per meter 1 Gradient *Each abbreviation may be configured only once. If more than one sensor of a given type is used, a consecutive number is used in the abbreviatio n. G_M0 is only used if there is only one irradiance sensor installed on the module level; otherwise numbering starts from G_M1. W_V0 W_R0 Wind speed Wind direction G_H0 G_H0 G_M0 Voltage input Voltage input Current input Pyranometer CMP11 (with converter) (4… 20mA) Wind sensors wind speed mc compact (0 … 10V) wind direction mc compact (0 … 10V) Humidity sensors Hygro Thermosensor mc compact (4… 20mA) Voltage input Pyranometer GSM 10.7 (0 … 10V) Irradiance in horizontal plane Irradiance in horizontal plane Voltage input Si-12TC-LC (solar radiation) (0 … 10V) Global irradiance sensors (pyranometer) G_M0 Irradiance on module level Irradiance on module level Irradiance on module level Voltage input G_M0 T_M0 T_M0 T_M0 T_M0 Module temperature Module temperature Module temperature Module temperature Voltage input Temperature input Current input Voltage input T_U0 T_U0 T_U0 T_U0 Abbreviati on* Ambient temperature Ambient temperature Ambient temperature Ambient temperature Description Voltage input Temperature input Voltage input Current input Analogue input Ambient temperature measurement PT100 mc compact (0… 10V) PT1000 sensor in enclosure (passive) PT1000 sensor with integrated converter (0 … 10V) Hygro Thermosensor mc compact (4… 20mA) Module temperature measurement PT100 self-adhesive sensor (0 … 10V) PT1000 adhesive sensor (passive) Si-420TC-T-K (module temperature) (4… 20mA) Si-12TC-T (module temperature) (0 … 10V) Irradiance sensors module level Si-12TC (solar radiation) (0 … 10V ) Configuration data for analogue inputs 1 60 1 60 Offset -25 0 0 -400 0 -300 0 0 -50 0 -42,5 -20 -30 0 -50 -55 Offset 8.3 Configuration overview 85/92 8.4 CE certificates 86/92 WEB'log 8.5 RoHS Statement WEB'log 87/92 8.6 List of figures Fig. 1: Device overview front WEB'log PRO unlimited .................................................... 7 Fig. 2: Device overview front WEB'log LIGHT+ 20 WEB'log BASIC 100 ........................ 8 Fig. 3: Device overview back .......................................................................................... 9 Fig. 4: Installation on a top-hat rail ............................................................................... 14 Fig. 5: Inserting the SIM card ....................................................................................... 15 Fig. 6: Crossed network cable ...................................................................................... 16 Fig. 7: Uncrossed network cable .................................................................................. 16 Fig. 8: Irradiance Sensor SI-12TC example ................................................................. 17 Fig. 9: Energy meter example ...................................................................................... 17 Fig. 10: 230 V power supply ......................................................................................... 18 Fig. 11: 24 V voltage input/output ................................................................................. 18 Fig. 12: General connection diagram RS485 ................................................................ 20 Fig. 13: Pin assignment ................................................................................................ 21 Fig. 14: i'catcherconnection with Connect Universal, terminal connection ................... 22 Fig. 15: i'checker Advanced with Connect i'checker ..................................................... 23 Fig. 16: i‘checker connection diagram .......................................................................... 24 Fig. 17: 6-way RS485 hub ............................................................................................ 24 Fig. 18 Ripple control receiver connection to WEB’log ................................................. 28 Fig. 19: Master-slave connection .................................................................................. 30 Fig. 20: RETA 01 control panel with ABB central inverter ............................................ 39 Fig. 21: Connection via Ethernet with ABB central inverter .......................................... 39 Fig. 22: RMBA control panel connection ...................................................................... 40 Fig. 23: Connection via Ethernet with Advanced Energy Inverter ................................. 41 Fig. 24: Connection via Ethernet with Converteam Inverter ......................................... 42 Fig. 25: Danfoss inverter with Connect Danfoss ........................................................... 43 Fig. 26: Danfoss inverter with Connect RS ................................................................... 43 Fig. 27: Connection of additional inverters ................................................................... 43 Fig. 28: Delta string inverter with Connect Delta .......................................................... 44 Fig. 29: Delta central inverter ....................................................................................... 45 Fig. 30: Diehl AKO Platinum 2100 S... with Connect Universal RS ............................. 46 Fig. 31: Diehl AKO Platinum 100 CS/CTL... with Connect Universal RS ..................... 47 Fig. 32: Connection Eltek Valere inverter ..................................................................... 48 Fig. 33: Connection Emerson inverter .......................................................................... 49 Fig. 34: Fronius inverter with Connect Fronius ............................................................. 50 Fig. 35: Gefran inverter................................................................................................. 51 88/92 WEB'log Fig. 36: RS485 interface to the active string box (IBX com).......................................... 52 Fig. 37: Ingeteam inverter with Connect Universal RS, Terminal .................................. 53 Fig. 38: Ingeteam inverter with Connect Universal RS, inverter connector ................... 54 Fig. 39: Jema inverter with Connect Universal RS ........................................................ 55 Fig. 40: Kaco inverter with Connect Kaco ..................................................................... 56 Fig. 41: Kaco inverter with Connect Kaco ..................................................................... 57 Fig. 42: KOSTAL string inverter via RS485................................................................... 58 Fig. 43: Mastervolt inverter with Connect Mastervolt .................................................... 59 Fig. 44: Power One string inverter with Connect Universal RS ..................................... 60 Fig. 45: Connection Power One central inverter ........................................................... 61 Fig. 46: Refusol inverter with Connect Universal RS .................................................... 62 Fig. 47: Riello inverter ................................................................................................... 63 Fig. 48: Riello inverter, Connect Universal RS .............................................................. 64 Fig. 49: Connection with Santerno inverter Sunway M Plus ......................................... 65 Fig. 50: Connection with Sunway M-XS 2200, 3000 and 3800 ..................................... 66 Fig. 51: Connection with Sunway M-XS 4300, 5000, 6000 and 7500 ........................... 67 Fig. 52: Connection with Sunway TG and TE ............................................................... 68 Fig. 53: Connection Satcon inverter .............................................................................. 69 Fig. 54: Connection via Ethernet with Satcon inverter .................................................. 70 Fig. 55: Siemens PVM inverter with Connect Universal RS .......................................... 71 Fig. 56: SMA inverter piggy back with Connect Universal RS....................................... 72 Fig. 57: SMA inverter RS485 Quick Module with Connect Universal RS ...................... 73 Fig. 58: SMA central inverter with switch or router........................................................ 74 Fig. 59: SMA central inverter Modbus with switch or router .......................................... 75 Fig. 60: Sputnik inverter (S Series) with Connect Sputnik S ......................................... 76 Fig. 61: Sputnik inverter (C Series) with Connect Sputnik ............................................ 76 Fig. 62: Sputnik inverter (Cx and E Series) with Connect Sputnik ................................ 77 Fig. 63: StecaGrid 8000 / 10000 inverter ...................................................................... 78 Fig. 64: M12 Connection with Sungrow string inverter .................................................. 79 Fig. 65: RJ45 connection for Sungrow string inverter ................................................... 79 Fig. 66: Connection via Ethernet for Sungrow string and central inverter ..................... 80 Fig. 67: Connection Sungrow central inverter ............................................................... 81 Fig. 68: Connection with Sunways inverter ................................................................... 82 Fig. 69: Xantrex inverter / opto-converter ..................................................................... 83 WEB'log 89/92 90/92 WEB'log WEB'log 91/92 92/92 WEB'log Spicherer Str. 48 D-86157 Augsburg Phone +49 (0) 821 / 3 46 66-88 Fax +49 (0) 821 / 3 46 66-11 [email protected] www.meteocontrol.com Text and illustrations represent state-of-the-art technology at the time of printing May be subject to technical updates We assume no liability for printing errors Item number 832037 Version 20140624