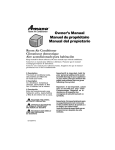
1
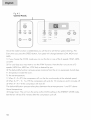
6 Comm
ON/OFF
MODE
SPEEE
TIMER
TEMP/TIME
...................................................................................
j
RADS-181A
Reedioetroctionebefore inetoling,
@! !-866-217-5782 for question_ en pnrts end _ervi_e_o
Life Ioe io_trection_evnnt de pro_6der_ Pinetdlotien.
Peer toute_que_tion__oncernontle_pi6_e_et lbntretien_ _ompo_ezb 1-866..217..5782.
Leolos Inetrocdone$antes de in$t_lnrel opnroto
0010555512
Lbme_oed 1-66_.2f7-5782
el tieneprelontes _obre repoeetoeo _ervidos
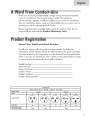
Thank you for buying a dependable, energy-saving and easyotoooperate
room air conditioner. This manual contains useful information for
you to maintain, operate, install and safely use your room air conditioner°
Your air conditioner cleans, cools and dehumidifies the air in your room to
provide you with the ultimate level of comfort.
Please read instructions carefully before using the product° Also, do not
forget to fiJJout and maiJ the Product Warranty Card.
Recerd Your MedeJ aad SerieJ Number°
For aJJyour service caJJsduring the warranty period,
the foJJowing
information wiJJ be needed. Attach the sales receipt to this guide and keep
for future reference° This information can be obtained from the seriaJ pJate,
which is on your air conditioner. This is either on the cabinet (side or back),
or you may have to remove the front griJJeto Jocate it.
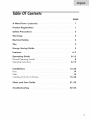
TABLE
RECEPTACLE
RATED VOLTS
AMPS
WALL OUTLET
AND
FUSE
TYPES
125/60
]5
250/60
20
15
20
3(}
] } The air conditioner must be connected to a proper
electricaloutletwith
the correct electrical supply. (see table)
2) Proper grounding
must be ensured to reduce the risk of shock and fire°
DO NOT CUT OR REMOVE THE GROUNDING PRONG. If you do
not have a threeoprong electric receptacle outlet in the wall, have a
certified electrician install the proper receptacle. The wall receptacle
MUST be properly grounded.
Do not use if the power cord is frayed or otherwise damaged.
Also, avoid using it if there are cracks or abrasion damage
amongthe length, plug or connector°
4} DO NOT USE AN ADAPTER OR AN EXTENSION CORD.
5) When
instaJJingyour air conditioner in a window, make sure the window
is strong enough to homdthe weight of the air conditionen You amsowant
to secure and instamlyour air conditioner properly to prevent it from
faJJing. Extra brackets andlor support may be required depending on
your window.
6} Do not bJockthe airfJow inside or outside the air conditioner
with Minds,
drapes, protectivecovers, shrubsor bushes.
7) Be carefumof sharp edges on the front and rear fins of the unit that couJd
cut and cause serious iniury.
8) Be carefuJ when Jiffing the air conditioner to instaJJor remove the unit.
AJways use two or more peopJe for this.
2
9} AJways unpJug the air conditioner before servicing it or moving it.
PAGE
A Word
Fro_
1
¢omfort°Aire
1
Product Registration
Safe,/Precautions
Warnings
4
EmectrlcamSafety
4
5
Energy
Saving
6_7
Features
Operating
8-12
Guide
Normal Operating
Operating
5
Guide
8
Sounds
Instructions
8-12
Parts
13_2G
14
Tools
14
installing Unit into A Window
15_2G
Clean and Care Gulde
21 _22
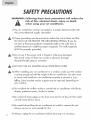
FoJJowingthe safety messages is very important.
These messages can save you from being iniured or kiJJed.
Warning
symboJs aJert you to be carefuJ and mean Danger°
AJways
foJJow instructions to be safe and reduce chances of iniury or death.
Warning
and Danger
signs wiJJprecede safety messages.
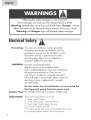
This room air conditioner must be grounded.
Grounding reduces the risk of electric shock by
providing an escape wire for the eJectriccurrent.
The power cord has a grounding wire with a
grounding pJugoPJugit into an outJetthat is
properJy instaJJedand grounded.
WARN|NG:
improper use of the grounding
pJug can resuJtin a risk of eJectric shock.
CaJJa quaJified eJectrician if you don't understand
the grounding instructions,or if you are not
sure if the air conditioner is properJy grounded°
if the waJJoutJet is not grounded, pJeasecontact an
eJectridan to have it repJaced with a properJy
grounded outJet.
Do not, under
any circumstances,
cut or remove
third (ground)
prong from the power
We strongJy advise against using an adapter
cord.
plug.
Test power pJug before each use:
1. Press "reset" button.
2 _ Press "test" button. Unit shouJd trip.
3. Press "reset" button again for use.
Do not use if above test faiJs.
Jf this device trips, the cause of the malfunction must
be corrected before further use of the device o
4
the
® Air conditioners are designed for use in a double hung "window or
through the waJJ installation only. (As applicable in your modal)
o While installing unit be sure to tilt air conditioner 5 degrees outward to
have the water drip outside the house.
install the unit on the north side,as that is normally the shaded side_This
wiJJenhance the operation of your unit.
The window has to be strong for instaJJationoExtra brackets and/or
support may be required depending on your window. (Brackets and
supports not included in aJJmodels_1
Measure the window before installing, if the window is too big for the
unit you may require professional installation°
o Use the correct electric voltage and proper ampere for the unit to run
effectively.
Only Jeta certified electrician modify your electrical outlet.
Use a dedicated line for the operation of your air conditioner to avoid
the possibility of an electrical surge°
When installing your air conditioner, make sure to seal aJJareas where
there is a possibility of air leakage°
The airflow should not be blocked, either inside by curtains, drapes or
furniture,or outside by shrubs or bushes.
Do not needlessly use an electrical light or other appliances that
produce heat.
Keep the vent dosed on the air conditioner when in the coding function.
o Keep the blinds and drapes drawn on aJJother windows.
While cooking, use an exhaust fan in the kitchen to remove the excess
heat.
Always use the correct BTUsize air conditioner to cod the room to
attain optimum efficiency.
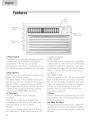
%ii
vent
controller
side
JOUV@FS
touch pad
easy-access
filters
1 .Thermostat
3 speeds as desired
This allows you to adjust the temperature
air--the
lower the setting,the
temperature
temperature
cooler the air
With this you can set the
to your desired comfort level You
can set the temperature
F
2°Fan
of the
between 61°F and 86 °
c) DEHUMIDIFY
This enables your air conditioner to operate as
a dehumidifier as well It will remove the excess
moisture from the air to keep your room at a
comfortable,
dry stage You can use this feature
alone in case you do not wish to use the air
condifionen
Speed
With this you can control the fan speed as well
as the A/C (cooling) speed
d) ENERGY SAVER
When this feature is "On",
You have 3 levels of A/C Speed to set at your
desired level LO will circulate air at the lowest
three minutes after the compressor
cycles off
This will reduce energy consumption
and noise
velocity, MED at medium velocity and HIGH
will circulate at the maximum, velocity You have
When the compressor turns back on, the fan
will turn on at the same time In the "Off"
3 levels of Fan Speed to set at your desired
comfort level: HIGH, MED and LOW
3. Functlon
position, the fan will not shut off when the
compressor cycles off
4.Timer
Your air conditioner
Your air conditioner
has 4 Functions
a) COOL
Here the air conditioner will operate the
compressor and the desired fan speed set to
give you cold air for your comfort
b) FAN
You can run the fan without
the A/C function
on cooler days The fan can be set to run at
6
the fan will shut off
can be set to go on or off
at your desire This can be programmed
24 hours in advance
up to
5.4-Way Air FJc_w
The air directional louvers Jet you control the
direction of the airflow to the desired direction
The airflow can be directed up-down-right
left side
side-
6°Vent
The Fresh Air vent allows the air conditioner
to recirculat inside air, draw fresh air into the
room and exhaust stale air to the outside.
7.Slide
Out
Chassis
Your air conditioner
becomes
more versatile
Control
Panel lets you set the temperature
the exact temperature
1 1 .Electrostatic
to
you desire_
IFJlter (not all models)
Being constructed of high efficiency purifying
substance, active carbon fabric, electrostatic
fabric, electrostatic active carbon net and other
with this feature. You have the option to install
the unit in a window or the wall.
materials,
this air conditioner
effectively.
Its wavy structure
8. Window
capability to filter dust and smoke effectively_
Due to the retention of active carbon, it has
Install
Kit
This kit enables you to install the air conditioner
in a double hung window. Extra brackets or
support may be needed, depending
window.
9oRemote
on your
increases the
a high purifying speed capable of strong airflow.
12. How Yhe Unit Drains
On humid days with the air conditioner
Control
This fully functional
purifies the air
in use,
moisture may collect on the pan or the bottom
wireless remote allows you
of the air conditioner.
If the unit is positioned
to operate your air conditioner from a distance.
You need not get up to change the settings or
the functions, or to turn the unit on or off.
properly, the moisture will gather towards the
back of the unit.This will not affect the operation
10.LED
time. OccasionaJy
Display
Electronic
Control
Panel
of the unit and the moisture will evaporate
in
the moisture will flow over
The 4-function LED displays Room Temperature,
Temperature Setting, Timer Setting and Time
the back of the pan, but this will not affect the
operation of the unit. Never drill holes in the
Remaining
pan under any circumstance.
to Stop/Start
the unit. Electronic
lllUe d
OllliSe tiH % Se Hds
The following
sounds
are normally
® Cool airflow
movement
heard
as dictated
during
the operation
of an air conditioner.
by the set fan speed.
® Water sounds. This is normal since your air conditioner
also acts as a dehumidifier.
Thus you will hear water sounds from water drops falling on the condenser.
® As the refrigerant
flows through
the inner sealed tubing,
a rushing noise may be
Occur.
® Rattling or vibrating
noises may be heard due to poor wall or window
® High pitch compressor
Open.tim
The foiowing
Remote
installation.
sound may be heard.
IHS'I d'iOHS
are the operating
control
instructions of your dectronic
and control
After installing
panel
your air conditioner,
operations
plug it into the proper electrical
wall. Keep the vent in the closed position.
comfort
level. This fully functional
conditioner
without
air conditioner.
outlet in the
Now set the air conditioner
at your
wireless remote allows you to operate
having to get up and go to the unit. The full function
your air
feature
allows you to change the settings and turn the unit on or off from the remote itself.
This control
pad works the same as the control
pad on the air conditioner.
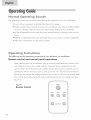
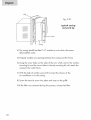
Fig. #1)
Fig. # 1
Remote ¢ontrd
ON/OFF
MODE
SPFFD
TIMER
i
8
(See
Afteryou plug inthe unit,ifwillperform a selftest.
Allthe displaylightswillturnon
for 3 seconds. The LED display will read"88"L If any display light fails to turn on you
may need service on the unit. After 3 seconds, the unit will automatically
stand by mode.
the On/Off
go to the
Now all lights will be off and you will have to turn"ON"
key. After pressing"On/Off",
by pressing
the unit starts to work and enters the status
of "Fan" with the low setting. You will have to press the (A) or (_) key on the Temp/Time
to set the temperature
at your desired comfort.
61°F and 86°E Once the temperature
(A) or {T) keys.The temperature
energy saver, or dehumidify
set the function
You can choose a temperature
between
is set you can raise or lower it by pressing the
setting can only be adjusted when the unit is in cooling,
mode.(See
Fig. #2) Having set the temperature,
you will
of the air conditionen
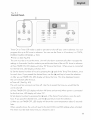
Fig, # 2
¢ontreJ Panel,
ON/OFF
MODE
SPEED
TIMER
MODE
Every time you press the MODE
SAVER and DEHUM.
(See fig.#3)
button,
SPEED
it will change
TmMER
TEMP/'liME
between FAN, COOL,
ENERGY
f
M(
coo[
SPEED
TIME_q
MED
EN_RG'
_AV_R
TEMP
/ TIME
DFF
_C
DEHUM
Once the mode function
is established,
you will have to set the fan speed. (See fig. #4)
Every time you press the SPEED button, fan speed will change
between LO\,% HIGH and
MED.
1) If you choose the COOL
mode you can run the fan in one of the 3 speeds: HIGH, MED,
or LOW.
2) For cool days you may want to run the "FAN" function.
Here the fan runs at one of 3
speeds (HIGH fan, MED fan, LOW fan) as desired by you.
3) The dehumidify
Tr: temperature
function
removes excess moisture from the air on excessively humid days.
inside the room.
Ts: the set temperature.
1) When Tr>Ts+3°F :, the compressor
2) When Ts-l°Fi
Tri
3) When Tr<Ts-I°F,
The dehumidification
will run the fan continuously
Ts+3°F, the compressor
the compressor
at the selected speed.
will cycle for 10 minutes on and 6 minutes off.
will shut off.
process takes place between the set temperature-1
and 3°F above
the set temperature.
4) Energy Saver: The unit runs the same as the COOL
But the fan will be off 3 minutes after the compressor
10
setting in the ENERGY SAVER mode.
cycle off.
Fig. # 4
¢on_roJ P_neJo
1
V_ODE
SPE ED
TIMER
FAN
HIGH
D['
CO0
MED
DFF
TEMP
/ TiME
_OW
SAVER
r)FHUM
Timer On or Timer Off mode is used to pre-start or shut off your unit in advance.
program
this up to 24 hours in advance.
ENERGY SAVER, DEHUMID
You can use the Timer in 4 functions,
You can
i.e. COOL,
or FAN.
® Timer on (See Fig.#5)
The unit must be on to set the timer. Unit will shut down automatically
after it accepts the
settings in 5 seconds. Use this mode to pre-set the start time of the unit 24 hours in advance.
a) Press TIMER ON. LED display will show "XX" (time set last time).
When power is connected
for the first time, LED display will show "01 ".
b) Set the desired number of hours by pressing the (,_) pad of the Temp/Time
buttons, once
for each hour. If you passed the desired time, use the (_) pad key to lower the selection.
c) After you set TIMER ON,
LED display will show the time. This time displayed
means:
the unit will starts after X hours.
® Timer off ( See Fig. #5)
The unit must be running to set time off. Use this to preset the time you would like the
unit to shut off.
a) Press TIMER OFF. LED display will show "XX" (time set last fime).When
power is connected
for the first time, LED display will show "01"
b) Set desired
number
by pressing the (A) pad of the Temp/Time
buttons, once for each
hour. If you pass the desired time, use the (_') pad key to lower the selection.
c) After you set TIMER OFF, LED display will show the room temperature
about 5 seconds
Jaten
When using the timer, the unit will revert to the last COOL
and FAN settings when activated.
The timer must be reset every time you choose to use it.
11
Fig. # 5
Cont.|
1
Pan÷|.
MODE
SPEE:D
TIE
TEMP
-_,N
lqG_
ON
COOL
MFD
OFF
=NERG
SAVFR
LO
/ TIME
_p ,,_/_ ¸
_LHU_
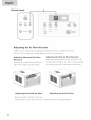
Adiusting
the Air
Airf!ovv' carl be adjusted
Flow
#irection
by changing
This can also increase the cooling
Adjusting
Horizontal
Air
the direction
efficiency
Flow
Direction
Adjusting
the vertical
Adjusting
Recommended
louvers left and
horizontal
Horizontal
orientation
airflow,
Air
louvers.
of the air conditioner,
Adjusting
Vertical
Adjusting
right will change
change
the horizontal
vertical
by nudging
Flow
airflow.
Air
Flow
#irection
vane up and down will
The vane can be adjusted
the back of the vane up and down.
Adjusting
VerticaJ
Air
Flow
of louvers:
Adjust louvers to face upwards when cooling
12
of the air conditioner's
to maximize
cooling
efficiency.
Before you install your air conditioner,
1) The unit is free of all obstructions
furniture,
check the following:
inside and outside the room, e.g. drapes, curtains,
plants, shrubs, bushes, trees, other structures
The air conditioner
must have a clear, unobstructed
like buildings,
airflow through
garage,
etc.
the condenser
to
remove heat.
2) The window is strong enough to hold the weight of the air conditioner.
or supports
provided
may be needed depending
on your windows.
Extra brackets
(Brackets or supports not
in all models)
3) The windowsill
and track are strong enough to hold the weigh of the air conditioner.
4) The wall is strong enough to hold the unit. Extra brackets or supports may be needed
depending
on the wall. (Brackets or supports
5) There is adequate
not provided
in all models).
and proper power supply near the air conditioner.
6) DO NOT use adapter
plugs.
7) DO NOT use extension cords.
8) DO NOT cut or remove the ground
prong.
9) DO NOT modify the plug or the electrical
fit the electrical
wall outlet in any way. Efplug does not
outlet have a certified electrician
10) DO NOT connect electrical
do the necessary change.
power to the unit before installation.
11) DO NOT use if power cord is worn out, frayed or otherwise damaged.
if there are cracks or abrasion
damage
Avoid using
along the length, plug or connection.
12) Be careful of exposed sharp edges of the cabinet
and sharp coils (fins) on the
back of the unit that could cut and cause serious injury.
13
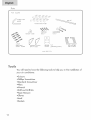
Parts
Parts Supplied
window seal
gasket
wood screws 31/32 _'
19/32' long
SCFeW
basepan
curtain
aHachment
screws ] 3/32"
angle
installation bracke_
(left and right)
and
[ocknut
Iocknut
Remote
control
_-_'_
left and right
side curtains
Model: RADS 181A
You wiJJneed to have the following tools to help you in the installation of
your air conditioner.
•Scissors
• Phillips Screwdriver
®Standard Screwdriver
®Pliers
_Wrench
_DriJJand Drill Bits
eTape Measure
eGJoves
®Level
_Sockets
14
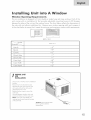
In;
Window
Opening
The air conditioner
Requirements
is designed to fit into double or single hung sash type windows= Each of the
units comes with an installation kit that provides adjustable mounting louvers to fill the gaps
between the sides of the unit and the window frame= The chart below reflects the dimensions of
the units with and without installation
kits= Measure your window opening width and compare it
to the chart below to ensure that it meets the minimum and maximum window width requirements=
iiiiiii'ii
¸¸¸ iii!ii'ii'iiiiii
i iii
D
RADS 181A
RADS-181A
A(inch)
B(inch)
C(inch)
20_"
D(inch) Max
40 "
D(inch) Min
30 "
Case High
Case Width
Case Depth
I
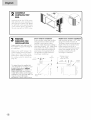
REPAREUNUT
FOR
iNSTALLATiON
Unpack unit on the floor next to installation
location.
Remove two front atiachment
screws.
Separate the outer case from the front
wiih a putty knife at the catch points
designated by the arrows
Remove the two screws on top of the
outer
CaSe,
Using the basepan handle, slowly and
evenly pull chassis out from outer case,
Note:
Cover pu¢_yknife blade with
masking tape to guard against damage
of the unii finish.
Caution:
Never expose plastic
front or grille to extreme
temperaiures.
15
ASSEMBLE
CURTAINS/TOP
RAIL
Inslall top rail with four ] 3/32 _screws.
Slide left-hand curtain assembly into
Jeff end of top and botlom rails. Repeat
for right-hand
currain assembly. Fasten
curtain retainer strips to the sides of
the outer case with six ] 3/32 _'screws.
Storm
PREPARE FOR
WINDOW
I NSTALLATION
inspect window
Measure
the
adequate
width
the weight
between
of
the
window moldings to ensure the instant
Mount will fit the window frame.
instant Mount
for windows
page
installation
clearance
(for details
16
frame.
Fasten wood strip to sill with a
minimum of three countersunk wood
with kit). This
air conditioner.
Must
be a minimum
of 1/2"
to dear
_
'_
I
The instant Mount kit supplied with
unit is designed for mounting in most
double-hung windows without
storm windows.For installation in
window frame with storm window,
modify sill by adding wood strips(not
of storm window
a
1/2"
Minimum
I 1/2"
sill
Thickness of wood strip should match
height of front lip on window frame.
provides a smooth surface for
mounting air conditioner.
JWood
interference
along entire width of window
screws (not supplied
Minimum
,
installation
wood screws (not supplied with kit).
This provides a smooth surface for
see
included) to inner and outer sills. This
raises the unit and eliminates
window
wood strip (at least 1 1/2 wide) along
entire width of sill Fasten wood strip
to sill with at least three countersunk
mounting
15)
home
Add wood strip (at least 1 1/2 _ wide)
below sill (1/2
models are designed
wide
Mobile
frame does not allow
required), remove storm window
frame or create clearance by adding
track, sash, and silt
for its ability to support
air conditioner.
window
If storm window
StormWindow
Frame
"
,,/_.
:
o
R
bottom
rail on unit
0
U
T
D
0
0
R
,_
mNSTALL OUYER
CASE mN WINDOW
Place outer case in window, Lower
sash until it rests behind front flange
of top raih Botlom rail must rest
behind window siih
Toprail
sash
About
5D
Expand both curtains to contact the
window frame, install four wood
screws 31/32 , Two in each upper right and
left of the curtains,
Inslall three wood screws 31/32 _ top mounting
Boltomrail
......
rail
screws,
Curtain assembly cut
away for clarity.
NOTE:
To make screws easier to
drive, drill a pilot hole into the sash
through clearance hole in curtains,
Use lwo wood screws 31/32
to fix the case to
windows sash, install left & right installation
and as shown in fig, install
bolt(2 ]/2
bolt and loci<nut) to the installation
bracket
long flat head
bracket and adiust
them to proper length ,then use 4 (19/32
_he bracket on the case,
)screws to fix
17
mNSTALL
SASH
B_CKET
& SEAL GASKET
hlstall sash bracket on top of indoor window sash
with one wood screw 31/32
to prevent raising of
window fl°om the outside, Screw the anchor directly
into the side of window frame. For hard wood or
metal window frames, drill a pilot hole to start the screw.
|mportant:Be
careful not to drill the pilot hole too deep,
Add a piece of Cape to the drill bit as a depth gauge,
Also stay clear of glass. Be careful not to damage the
function of the window,
Cut window seal gasket to width of window. Stuff window
seal strip between the outdoor
window glass and the top of
the indoor sash. This will stop air leakage which reduces
RETURN
CHASSISTO THE
OUTERCASE
Find someone €o help you replace
the chassis in ou¢er case. Replace
front panel and grille.
¢autiom
For security purposes, reins€all screws
at cabinets sides, removed in step
one.
IMPORTANT:
Because the window sash helps keep
the unit in window, make certain the
window sash contacis the outer case
before, reinstalling the chassis.
18
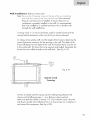
w mm
slide-out
chassis
only
Note: Remove the 2 shipping screws on the top of the air conditioner
that hold the chassis to the outer shell casing. Once removed,
these do not have to be reoinstaJJed.To ensure that your air
conditioner is properly installed in the wall, it is recommended
that it be installed by a certified technician who is familiar with
through the waJJinstaJJafionso
1) Using wood, 1" or more in thickness, build a wooden frame to fit the
casing/cabinet dimensions of the unit which you have purchased.
2) Measure the outside width and the height of the frame to determine the
cutout dimensions necessary for the opening in the wall. The depth of the
frame wiJJdepend on the depth of the walk The finished frame must be set
in the inside walk The frame has to be squared and leveled. Remember the
frame has to be nailed securely to the waJJstuds. (See Fig. # 19)
wall
stud _
_,
frame or
__
backoup
strip
Fig. # 19
3) Now to install, insert the casing into the waJJopening. (Remove the
chassis out first following steps 1 - 6 in Slide-out chassis section).
Make sure that the cabinet is at bast 1/2" inch inside the room. Also the
side louversshould not be blocked. This is to have proper air circulation in
and around the compressor. (See Fig. # 20)
19
wall
Fig. # 20
level
4) The casing should be tilted 1/4" outside so as to drain the excess
dehumidified water.
5) Properly insulate any opening between the casing and the frame.
6) Using the screw holes on the sides of the unit, which are for the window
mounting kit and the screw holes in the top mounting kit rail, attach the
casing to the wood frame°
7) With the help of another person lift and put the chassis of the
air conditioner in to the casing.
8) Screw the security screw into place and snap on the grille.
9) Jfthe filter was removed during this process, rdnsert the filter.
20
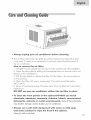
® The air filter behind the inlet grille should be checked
once every 2 weeks (or as necessary) to maintain
the air- conditioner.
How
to remove
the
and cleaned at bast
optimal
performance
of
air fiJter:
]. The grille may be opened from the top for easy maintenance
after installation.
2. Open the inlet grille by pulling off the exposed door on the top of the unit
(based on the installation}.
3. Puii the tab siightiy to release the fiiter. Puii the fiiter in the same direction
as the opening.
4. Clean the filter with warm, soapy waten The water should be below
40°C(104°F).
5. Rinse off and gently shake off excess water from the filter. Let it dry before
replacing
it.
DO NOT use your air conditioner
without the air filter in place.
. To dean the front panels ar the ¢ablnet DO NOT use harsh
chemicaJs, abrasives, ammonia, ¢hJorlne, bJeach, concentrated
detergents,
soJvents
or metaJ
scouring
pads°
Some of these chemicaJs
may dissoJve, damage and/or discoJor your air conditionen
• AJways use a soft cJoth dampened
and water
soJution
to wipe
Wipe dry with a soft cJotho
with water
the front
or _iJd
soap
if the cabinet.
21
• To store -your air conditioner, after the season, remove the unit from the
window as per the instaJJationguide. Repack the unit in its originaJ box
and store away. Jfyour unit is instaJJedin a wail or you do not intend to
remove it from the window then cover the outside with a winter coven
This can be purchased from the retaimerwhere you purchased your
air conditioner or from your mocaJhardware store.
o Before putting away your unit make sure any water left in the pan is
removed and drained away. Water left in the pan coumdmeadto rusting
or damage to the emectricam
connections.
|f air conditioner
does not operate:
o Check if unit is pJugged in. The plugmay have come
• Check if the unit is in the"Off" mode.
moose.
Air from air conditioner is warm:
The A/C setting may need to be raised.
ice formotion
on coding cdJs:
e The outside temperature too coidSet the unit on "fan onJy"
setting to defrost ice.
o Lower temperature setting. The temperature setting may be too coJdo
e The unit BTU may be too high for the room.
22
Air conditioner is working
but roo_ is not ¢ooJlng:
The room may have appliances that produce heat. Use an exhaust
fan to remove excess heat.
® Redirect the airflow. Remove any obstacles.
AIJ doors and windows need to be closed so cod air does
not escape the room°
® The air fiJter may need cleaning.
® The unit BTU may be too Jow for the required cooling area°
On extreme hot & humid days, air conditioners may take
a littlemonger
to cool.
® Vent may be in the open position. Vent has to be dosed for
optimum cooling.
Air conditioner
is making
noise when ¢ooJing:
You may hear sounds of air movement, water, compressor clickingon and
off or window vibrations. Pmeaseread Operating Guide - Normam
Operating Sounds° (see page 8)
Water
in the alr ¢ondi_iener
cabine_:
This is normaJ, as your air conditioner not onJy cooJs but also dehumidifies
the ain if there is water dripping inside the room, check the instaJJationof
the unit. The unit may need to be reinstammed.
(see page 17)
23