1
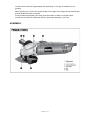
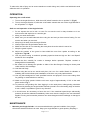
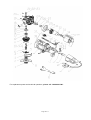
4IN. ANGLE GRINDER
OWNER’S MANUAL
WARNING:
Read carefully and understand all ASSEMBLY AND OPERATION
INSTRUCTIONS before operating. Failure to follow the safety rules and other
basic safety precautions may result in serious personal injury.
Item# 21403
Thank you very much for choosing a Wel-Bilt™ product! For future reference, please complete the
owner’s record below:
Model: _______________
Purchase Date: _______________
Save the receipt, warranty and these instructions. It is important that you read the entire manual to
become familiar with this product before you begin using it.
This machine is designed for certain applications only. The distributor cannot be responsible for
issues arising from modification. We strongly recommend this machine not be modified and/or used
for any application other than that for which it was designed. If you have any questions relative to a
particular application, DO NOT use the machine until you have first contacted the distributor to
determine if it can or should be performed on the product.
For technical questions please call 1-800-222-5381.
INTENDED USE:
This Angle Grinder is ideal for cutting and grinding metal, cutting masonry and rust removal.
TECHNICAL SPECIFICATIONS:
Disc diameter:
No load speed:
Input voltage:
Input current:
Spindle thread:
4in.
11,000 RPM
120V-60Hz
4.5A
M10
GENERAL SAFETY RULES
WARNING: Read and understand all instructions. Failure to follow all instructions listed
below may result in serious injury.
CAUTION: Do not allow persons to operate or assemble this Angle Grinder until they
have read this manual and have developed a thorough understanding of how the Angle
Grinder works.
WARNING: The warnings, cautions, and instructions discussed in this instruction
manual cannot cover all possible conditions or situations that could occur. It must be
understood by the operator that common sense and caution are factors which cannot be built into
this product, but must be supplied by the operator.
SAVE THESE INSTRUCTIONS
Page 2 of 11
IMPORTANT SAFETY CONSIDERATIONS
•
Stay alert, watch what you are doing and use common sense when operating the Angle
Grinder. Do not use the Angle Grinder while you are tired or under the influence of drugs,
alcohol or medication. A moment of inattention while operating the Angle Grinder may result
in serious personal injury.
•
Dress properly. Do not wear loose clothing, dangling objects, or jewelry. Keep your hair,
clothing and gloves away from moving parts. Loose clothes, jewelry or long hair can be
caught in moving parts. Air vents often cover moving parts and should be avoided.
•
Use safety apparel and equipment. Use ANSI-approved safety goggles or safety glasses
with side shields, or when needed, a face shield. Use as dust mask in dusty work conditions.
This applies to all persons in the work area. Also use non-skid safety shoes, hardhat, gloves,
dust collection systems, and hearing protection when appropriate.
•
Do not overreach. Keep proper footing and balance at all times.
•
Remove adjusting keys or wrenches before connecting to the power supply or turning on
the tool. A wrench or key that is left attached to a rotating part of the tool may result in
personal injury.
ANGLE GRINDER USE AND CARE
•
Do not modify the Angle Grinder in any way. Unauthorized modification may impair the
function and/or safety and could affect the life of the equipment. There are specific
applications for which Angle Grinder was designed.
•
Always check of damaged or worn out parts before using the Angle Grinder. Broken
parts will affect the Angle Grinder operation. Replace or repair damaged or worn parts
immediately.
•
Store idle Angle Grinder. When Angle Grinder is not in use, store it in a secure place out
of the reach of children. Inspect it for good working condition prior to storage and before
reuse.
•
When operating the tool
Check that the switch is in the off position “O” before connecting to the power supply. Switch
to the off position “O” immediately after completion of the task.
Keep the power cord away from any moving parts or accessories.
Never cover the ventilation slots in the tool.
Inspect the disc before use. Do not use a chipped, cracked or otherwise damaged product.
Always hold the body and auxiliary handle firmly. Otherwise, the counterforces produced
during use can cause inaccuracies or put the Angle Grinder out of control.
Do not use separate adaptors to try and fit a disc with a center hole larger than 5/8in.
Be aware that a disc will continue to turn for some seconds after it is switched off.
•
Use only wheel types that are recommended for your power tool and specific guard
designed for the selected wheel. Wheels for which the power tool was not designed
cannot be adequately guarded and are unsafe.
•
The guard must be securely attached to the power tool and positioned for maximum
safety, so the least amount of wheel is exposed towards the operator. The guard helps
to protect operator from broken wheel fragments and accidental contact with the wheel.
Page 3 of 11
•
Wheels must be used only for recommended applications. For example: do not grind
with the side of cut-off wheel. Abrasive cut-off wheels are intended for peripheral grinding;
side forces applied to these wheels may cause them to shatter.
•
Always use undamaged wheel flanges that are of correct size and shape for your
selected wheel. Proper wheel flanges support the wheel thus reducing the possibility of
wheel breakage. Flanges for cut-off wheels may be different from grinding wheel flanges.
•
Do not use worn down wheels from larger power tools. A wheel intended for a larger
power tool is not suitable for the higher speed of a smaller tool and may burst.
•
Do not “jam” the cut-off wheel or apply excessive pressure. Do not attempt to make
an excessive depth of cut. Overstressing the wheel increases the loading and
susceptibility to twisting or binding of the wheel in the cut and the possibility of kickback or
wheel breakage.
•
Do not position your body in line with and behind the rotating wheel. When the wheel,
at the point of operation, is moving away from your body, the possible kickback may propel
the spinning wheel and the power tool directly at you.
•
When wheel is binding or when interrupting a cut for any reason, switch off the power
tool and hold the power tool motionless until the wheel comes to a complete stop.
Never attempt to remove the cut-off wheel from the cut while the wheel is in motion
otherwise kickback may occur. Investigate and take corrective action to eliminate the cause
of wheel binding.
•
Do not restart the cutting operation in the work piece. Let the wheel reach full speed
and carefully reenter the cut. The wheel may bind, walk up or kickback if the power tool is
restarted in the work piece.
•
Support panels or any oversized work piece to minimize the risk of wheel pinching
and kickback. Large work pieces tend to sag under their own weight. Supports must be
placed under the work piece near the line of cut and near the edge of the work piece on
both sides of the wheel.
•
Use extra caution when making a “pocket cut” into existing walls or other blind areas.
The protruding wheel may cut gas or water pipe, electrical wiring or objects that can cause
kickback.
•
Do not use excessively oversized sanding disc paper. Follow manufacturer’s
recommendations when selecting sanding paper. Larger sanding paper extending beyond
the sanding pad presents a laceration hazard and may cause snagging, tearing of the disc
or kickback.
•
WARNING! Be sure to disconnect the Angle Grinder from the power supply
before attaching or removing the disc or attachment.
Make sure that a grinding disc is mounted with the label on top or facing the Angle Grinder.
If you are fitting any other kind of attachment, refer to attachment fitment Instructions. The
distributor will not be responsible for any damage or injury caused due to the incorrect
fitment of grinding discs or any other kind of attachment.
Incorrect attachments can cause the motor to burn out, generally damage the tool or cause
injury.
Your Angle Grinder has been designed to grind all types of material when used in a DIY (Do
It Yourself) context or for hobbyist purposes. It is not built for continuous daily use in a trade
of professional capacity.
Page 4 of 11
You will need to select the appropriate disc depending on the type of material you are
grinding.
When grinding, do not force the Angle Grinder. The weight of the Angle Grinder itself should
provide all the force that is required.
If the tool slows significantly, lift it away from the surface to allow it to regain speed.
Continuous use at lower speeds will result in permanent damage to your tool.
ASSEMBLY
Page 5 of 11
Attaching and removing the grinding disc provided
1. Inspect the grinding disc before fitting and during use to ensure it is not deformed or
cracked.
2. Ensure that the guard is fitted in a position which ensures it is between you and the grinding
disc.
The guard is there to protect you from flying objects that may be dislodged at the work piece
and from accidental contact of your hand, fingers or other part of your body with the disc.
3. Do not fit or use a grinding disc for cutting applications.
Grinding discs should be used for grinding metal only.
4. The grinding disc provided is not solid. It is made from grit which is bonded together with
reinforcement and adhesives. It is always possible that a part of the disc can dislodge and
fly away from the tool at high speed. This is why you must wear the appropriate safety
equipment (glasses, gloves and protective clothing) and follow all safety instructions
detailed in this manual.
5. Do not use any kind of attachment (discs or otherwise) that has a diameter greater than 4in.
6. Remove the outer flange by hand if loose.
Page 6 of 11
7. If the outer flange is tight, depress the spindle lock button at the top of the gear box housing
and rotate the spindle until it locks in position. Once the spindle is locked and cannot be
rotated, use the pin wrench supplied to loosen the outer flange. Fig A
8. Remove the grinding disc from its envelope.
9. Hold the Angle Grinder with the spindle facing upwards and make sure that the inner flange
is on the spindle and located correctly.
The two machined flat sections on one side of the inner flange must face the Angle Grinder
and locate in the appropriate position on the spindle. Fig B
10. Insert the grinding disc onto the Angle Grinder spindle with the disc label facing the Angle
Grinder. The hole in the disc should be located onto the spindle. Ensure that the hole in the
disc locates and fits firmly into the ring section of the inner flange. Fig C
11. Screw the outer flange onto the spindle with the protruding ring section facing the Angle
Grinder. This ring section must locate with the hole in the grinding disc. Fig D
12. Tighten the outer flange by locking the spindle and tighten with the pin wrench provided. Fig
E
13. To remove the disc, first lock the spindle and loosen the outer flange with the pin wrench.
Thereafter, remove the outer flange and the grinding disc. Fig E
14. Regularly check that the outer flange has not loosened during use.
Attaching a wire wheel
1. When fitting the wire wheel, the ring section on the outer flange should face into the wheel.
Similar to when fitting a grinding disc.
Attaching a sanding accessory
1. Remove the inner and outer flanges.
2. Screw the backing wheel of the sanding accessory onto the Angle Grinder spindle.
3. Select the sandpaper with the correct grit for the task.
4. Place the sandpaper on the backing wheel and then thread the paper retaining nut on and
tighten using the pin wrench whilst depressing the spindle lock.
Attaching the auxiliary handle
The auxiliary handle should be assembled to the Angle Grinder prior to use.
This is done by screwing the threaded end of the auxiliary handle firmly into the handle mounting
points on the alloy gear case of the Angle Grinder. Fig F
The auxiliary handle can be fitted to the left or right side of the Angle Grinder to maximize user
comfort according to the type of application being undertaken.
Choose the most appropriate position considering user comfort (preferred hand) and the task at
hand.
Page 7 of 11
To reduce the risk of injury and to ensure maximum control during use, hold the tool with both hands
while the tool is in operation.
OPERATION:
Operating the on/off switch
1. To turn the Angle Grinder on, slide the on/off switch forward to the on position”1” (Fig.X)
2. To turn the Angle Grinder off, slide the on/off switch towards the rear of the Angle Grinder to
the off position “0”. Fig G
Safe use and operation of the Angle Grinder
1. Do not expose the tool to rain or snow. Do not use the tool in damp locations or in an
environment with explosive or corrosive gas.
2. Keep your work area well lit.
3. Make sure you are well balanced when using the tool and you have secure footing. Do not
use the tool when you are tired.
4. Keep long hair away from the Angle Grinder.
5. Always inspect the Angle Grinder before use.
6. Make sure the disc is not contacting the work piece when the switch is turned on.
7. Keep the guard in place.
8. Adjust the position of the guard to best shield the user from sparks according to the
application. Fig H&I
9. Use only discs having a maximum operating speed at least as high as “No Load Speed”
marked on the nameplate.
10. Check the disc carefully for cracks or damage before operation. Replace cracked or
damaged discs immediately.
11. Be careful not to damage the spindle or either of the disc flanges. Damage to these parts
could result in disc breakage.
12. Hold the tool firmly.
13. Before using the tool on an actual work piece, let it run for a while. Watch for vibration or
wobbling that could indicate poor installation of the disc or a poorly balanced disc.
14. Use only discs designed for each specified function and purpose. Do not use cutting discs
for grinding or metal wheels on masonry.
15. Watch out for flying sparks. Hold the tool at an angle of approximately 15°-30° to the work
piece surface. Fig J
16. To prevent a new grinding disc from digging in to the work piece, initial grinding should be
conducted by drawing the Angle Grinder towards yourself. Once the leading edge of the disc
is worn a little, it’s possible to grind in any direction.
17. It should never be necessary to force the tool. If the rotational speed drops abnormally,
pressure should be released immediately. Little more than the weight of the tool should be
applied. Forcing and excessive pressure can cause dangerous disc breakage or damage to
the tool.
MAINTENANCE
•
Maintain your Angle Grinder. It is recommended that the general condition of any Angle
Grinder be examined before it is used. Keep your Angle Grinder in good repair by adopting a
Page 8 of 11
program of conscientious repair and maintenance. Have necessary repairs made by qualified
service personnel.
•
When not in use the Angle Grinder should be stored in a dry, frost free location not within the
reach of children.
•
Keep ventilation slots of the Angle Grinder clean at all times and prevent any foreign matter from
entering them.
•
•
If the Angle Grinder enclosure requires cleaning do not use solvents; use a moist soft cloth only.
•
Regularly check the carbon brushes. Brushes should be replaced before they wear out. Both
brushes should be replaced at the same time.
•
If the supply cord of this power tool is damaged, the tool should be disposed of properly and
replaced with a new tool.
The grease in the gearbox will require replacement/replenishment after extensive use of the
Angle Grinder. Please see your authorized service agent to provide this service.
Part list
Part#
Description
Part#
Description
1
Outer flange
28
Pinion
2
Inner flange
29
Wind shield ring
3
Guard
30
Spring baffle
4
Screw
31
Semicircle key
5
Bolt
32
Rotor
6
Output spindle
33
Bearing
7
Semicircle key
34
Bearing sheath
8
Screw
35
Screw
9
Spring washer
36
Stator
10
Flat washer
37
Pushing hinge of switch
11
Gear box cover
38
Housing
12
Bearing
39
Hand spike of switch
13
Washer
40
Brush holder
14
Gear
41
Carbon brush
15
Wave washer
42
Screw
16
Washer
43
Screw
17
Ball bearing
44
Cord clamping
18
Side handle
45
Label
19
Gear box
46
Switch
20
Screw
47
Contector
21
Self-lock button
48
Cord sleeve
22
Self-lock spring
49
Back cover
23
Washer
50
Cord
24
Bearing
51
Screw
25
Bearing cover
52
Wrench
26
Screw
53
Grinding wheel
27
Taper swasher
Page 9 of 11
For replacement parts and technical questions, please call 1-800-222-5381.
Page 10of 11
WARNING
Some dust created by power sanding, sawing, grinding, drilling, and other construction activities contains
chemicals known to the State of California to cause cancer, birth defects or other reproductive harm.
Some examples of these chemicals are:
• lead from lead-based paints,
• crystalline silica from bricks and cement and other masonry products, and
• arsenic and chromium from chemically treated lumber.
Your risk from these exposures varies, depending on how often you do this type of work. To reduce your
exposure to these chemicals: work in a well-ventilated area, and work with approved safety equipment,
such as those dust masks that are specially designed to filter out microscopic particles.
Distributed by
Northern Tool + Equipment Co., Inc.
Burnsville, Minnesota 55306-6936
Made in China
Page 11of 11