Transcript
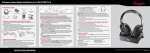
RF-WHP212-A 2.4 GHz Digital Wireless Stereo Headphones
Package contents
Television
Stereo system
5V
AAA rechargeable
batteries (2)
Headphones
5 00 mA
Optional
AC power adapter
Docking station
Note: If your audio device does not have RCA outputs, you can use the 3.5 mm-to-RCA adapter (included) to make
the connections. Your setup may differ from the example shown above.
Connecting the AC adapter to the docking station
RCA audio cable
3.5 mm-to-RCA
adapter cable
User Guide
Quick Setup Guide
Installing or replacing the headphone batteries
The headphones are powered by two AAA rechargeable batteries. Both batteries are housed in the
left earpiece.
Note: Make sure that the batteries are installed correctly.
1 Hold the left earpiece in one hand with the battery compartment facing up, then slide the battery
compartment latch to the right. The battery compartment opens.
2 Insert both AAA batteries into the battery compartment. Make sure to align the + and - symbols
on the batteries with the symbols in the battery compartment.
3 Close the battery compartment.
Caution: To avoid risk of fire and to prevent damage, only use the AC adapter supplied with your wireless
headphones. Make sure that the AC power outlet matches the AC adapter’s 120V before making the connection.
Plug the AC adapter into the power outlet only after all other connections are completed.
1 Connect the AC adapter connector to the docking station’s DC 5V jack.
2 Connect the AC adapter plug to an AC power outlet. Turn the Power switch on the back of the
docking station to “ON.” The PAIRING indicator begins to blink (blue).
Charging the headphones
Important: Before using the wireless headphones for the first time, make sure that the batteries are fully charged
for at least four hours. This will provide a longer operating lifetime for the batteries.
Place the headphones onto the docking station. Make sure that the headphone charging contacts
and the docking station charging pins make contact.
• The docking station CHARGING indicator turns red to indicate the headphones are charging.
• When the headphones are fully charged (which takes about four hours), the docking station
CHARGING indicator turns green.
• When the headphone battery charge is low, the CHARGING indicator on the headphones blinks red.
Notes:
• It can take about four hours to charge the batteries. The batteries will last up to ten hours with continuous use
(depending on the headphone volume level and distance from the docking station or other Rocketboost
sender).
• The headphones cannot be charged when the docking station is turned off.
Turning on the system
Connecting the headphones
Caution: To prevent damage to your system, make sure that all components are turned off before making the
connections. The following diagram shows a typical user installation.
In this example the docking station is connected to the audio output of a TV and the audio input of a
stereo system (optional). This optional connection is helpful if your audio source component only
has one audio output and you want to connect it to both the docking station and another
component, like an audio amplifier.
1 Slide the ON/OFF switch on the docking station to ON. The PAIRING indicator blinks (blue).
2 Slide the POWER switch on the left earpiece to turn on the headphones. The POWER/PAIRING
indicator on headphone blinks (blue).
Notes:
• Lights steadily if the headphones and docking station are paired.
• Blinks if the headphones and docking station are pairing.
3 When the POWER/PAIRING indicator on
headphones and PAIRING indicator on
docking station both light steadily blue,
an active link is established between
headphone and docking station. The
system is now on and ready to be used.
Note: Autopairing takes 5-10 seconds
Notes: If the charge on the headphone batteries is low, the POWER/PAIRING indicator on the headphones
blinks red. When this happens, you should charge the headphones.
Tip: If the power indicators on the headphones and docking station continue to blink after 30 seconds, they are
no longer paired to each other. If this happens, follow these steps:
• Make sure the headphones and docking station are within range of each other (ideally in the same room).
• Turn off the headphones and the docking station.
• Turn on both the headphones and the docking station. The lights will initially blink, then they should turn on
steady.
Listening to your digital wireless stereo headphones
1
2
3
4
Turn on the headphones and docking station.
Set the headphone volume level to the minimum.
Put your headphones on your head. Adjust the fit until you feel comfortable.
Turn on your audio source and begin playback. Depending on the audio source, you may need to
turn up the volume on the audio source.
5 Adjust the headphone volume to your normal listening level.
Caution: Continuous use at high volume may permanently damage your hearing.
Note: If the system is connected to a TV, you may want to turn off the TV sound to prevent hearing sound from
the TV speakers. Refer to your TV manual.
Turning off your headphones
• Slide the POWER switch located on the headphones’ left earpiece toward the arrow to turn OFF
the headphones.
• Slide the ON/OFF switch on the docking station to OFF to turn off the docking station.
Note: It’s important to turn the headphones off when not in use to conserve the battery, or if you prefer you
can leave them on as long as they are placed in the docking station.
Specifications
Input: AC 100-240V~ 50/60 Hz 0.2 A
Output: 5V, 500mA
One-year limited warranty
Visit www.rocketfishproducts.com for details.
Contact Rocketfish:
For customer service, call 1-800-620-2790 (U.S. and Canada) or 01-800-926-3010 (Mexico)
www.rocketfishproducts.com
Before using your new product, please read these instructions to prevent any damage.
QUICK SETUP GUIDE
© 2013 BBY Solutions, Inc., All Rights Reserved. Distributed by Best Buy Purchasing, LLC, 7601 Penn Avenue South, Richfield, MN USA 55423-3645
V2 ENGLISH 13-0613