1
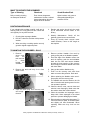
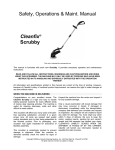
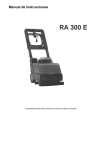
Safety, Operations & Maint. Manual
Cleanfix® Parrot
(RA 300 E)
This unit is intended for commercial use
This manual is furnished with each new Parrot (RA 300 E). It provides necessary operation and
maintenance instructions.
READ AND FOLLOW ALL INSTRUCTIONS, WARNINGS AND CAUTIONS BEFORE AND WHEN
USING THIS AUTO-SCRUBBER.
All information and specifications printed in this manual are current at the time of printing. However,
because of Cleanfix’s policy of continual product improvement, we reserve the right to make changes at
any time without notice.
Copyright ©2006 by Cleanfix Cleaning Systems, Inc., 465 West Main St., Wyckoff, NJ 07481.
All rights reserved. Content is subject to change. Version V1.2
WHEN THE MACHINE IS DELIVERED
This scrubber will afford you many years of troublefree operating satisfaction, provided it is given
proper care. All parts are passed rigid quality
control standards prior to their being assembled to
the finished product. Prior to packaging, your
scrubber was again inspected for assurance of
flawless assembly.
This automatic scrubber is protectively packed to
prevent damage in shipment. When the machine is
delivered carefully check the carton for signs of
damage. Unpack the machine from the carton and
inspect it for any possible damage.
Only a visual examination will reveal damage that
may have occurred in transit. If damage is
discovered, immediately notify the transportation
company that delivered your scrubber and request
an inspection. As a shipper we are unable to report
any claim for damage. You must origin any claim
within 5 days of delivery. Be sure to keep the
carton, packing inserts, packing list and carrier's
receipt until the inspector has verified your claim.
CLEANFIX’S LIABILITY CEASES WHEN THE
SHIPMENT IS PICKED UP BY THE CARRIER.
Cleanfix will furnish any information needed to
expedite the claim process.
GENERAL PRECAUTIONS
FAILURE TO FOLLOW PRECAUTIONS AND WARNINGS MAY CAUSE SERIOUS INJURY TO
THE OPERATOR AND CAUSE DAMAGE TO MACHINE, WHICH CAN VOID WARRANTY.
TO REDUCE RISK OF FIRE, ELECTRIC SHOCK OR INJURY: READ ALL INSTRUCTIONS
BEFORE AND WHEN USING THIS SCRUBBER.
WARNING
To Avoid Electric Shock, Do Not Expose to Rain. Store Indoors.
•
For 120 volt grounded outlet models. The unit
must be plugged into a properly grounded
outlet. Do not operate the machine with a
broken/missing grounding pin. Have a qualified
service person replace the plug immediately.
•
Do not pull or carry scrubber by the cord, use
cord as a handle, close a door on cord or pull
cord around sharp edges and corners. Do not
run scrubber over cord. Keep cord away from
heated surfaces.
•
Do not leave the electric scrubber when
plugged in. Unplug from outlet when not in use
and before servicing.
•
Do not unplug the scrubber by pulling on the
cord. To unplug, grasp the plug, not the cord.
•
•
Turn OFF all the controls before unplugging the
scrubber.
Do not handle the plug of the electric scrubber
with wet hands.
•
•
This is NOT a toy. Close attention is necessary
when used around or near children.
Store scrubber indoors in a dry area. Do not
expose to freezing temperatures.
•
•
Use only as described in this safety/operations
manual.
Use
only
manufacturer’s
recommended attachments and accessories.
Do not use this scrubber for dry vacuuming.
This scrubber is not fitted with a fine dust filter.
•
Do not use the scrubber to pick up flammable
or combustible liquids such as gasoline or use
in areas where they may be present.
•
Do not use this scrubber to clean surfaces that
have dust or substances that are flammable,
poisonous, caustic, or irritants and represents a
health hazard.
•
Do not use where anesthetics or oxygen is
used.
•
Do not use this electric scrubber with
damaged cord or plug. If the scrubber is not
working as it should, because it has been
dropped, damaged, left outdoors or dropped
into water, contact authorized service center or
factory.
Safety, Operation and Maintenance Manual for Parrot (RA 300 E); Version 1.2
2
GENERAL PRECAUTIONS (continued)
•
•
Do not use an extension cord unless
absolutely necessary. If an extension cord is
used, the wire size must be 14 ga. or larger and
should not exceed 50 feet in length. The
extension cord must be three-wire type to
insure grounding protection.
Replace damaged or worn parts immediately
with genuine original equipment parts to
maintain safety and to protect your limited
warranty.
•
Do not run pump dry. When solution tank is
empty, turn off the pump.
•
Do not put any objects into openings. Do not
use with any opening blocked; keep free of
anything that may reduce air flow.
•
Keep hair, loose clothing, fingers, and all parts
of body away from openings and moving parts.
•
NEVER drive scrubber over steps.
CARE OF THE SCRUBBER
This scrubber is designed to be safe when used to
perform cleaning functions as specified. Should
damage occur to electrical parts, the unit should
NOT be used until the damage is repaired by the
manufacturer of an authorized service center. This
will avoid further damage to the scrubber or injury
to the user.
These instructions are for your protection and
information.
PLEASE READ CAREFULLY! Failure to follow
instructions or precautions could result in injury or
damage to the user and/or the scrubber.
SAVE THESE INSTRUCTIONS!
GROUNDING INSTRUCTIONS - 120 VOLT
Electrical equipment must be grounded. If it should
malfunction or breakdown, grounding provides a
path of least resistance for electrical current to
reduce the risk of electric shock.
The scrubber is equipped with a cord having
equipment grounding conductor and grounding
plug.
The plug must be inserted into an appropriate outlet
that is properly installed and grounded in
accordance with all local codes and ordinances.
If repair or replacement of the cord or plug is
necessary, DO NOT connect the grounded wire to
either flat blade terminal. The wire with insulation
having an outer surface that is green with or without
yellow stripes is the grounding wire.
WARNING
Improper connection of the equipment-grounding conductor can result in a risk of electric shock.
Check with a qualified electrician or service person if you are in doubt as to whether the outlet is
properly grounded.
Do not modify the plug provided with the equipment. If it will not fit the outlet, have a proper
outlet installed by a qualified electrician.
Note: In Canada, the use of a temporary adapter is not permitted by the
Canadian Electrical Code.
Safety, Operation and Maintenance Manual for Parrot (RA 300 E); Version 1.2
3
GROUNDING METHODS
This electric equipment is for use on a nominal
120-volt circuit, and has a grounded plug that looks
like the plug illustrated in (Fig. A). A temporary
adaptor that looks like the adaptor illustrated in
(Fig. B & C) may be used to connect this plug to a
2-pole receptacle as shown in (Fig. B) if a properly
grounded outlet is not available.
The temporary adaptor should be used only until a
properly grounded outlet (Fig. A) can be installed
by a qualified electrician. The green color rigid ear,
lug or the like extending from the adaptor must be
connected to a permanent ground such as a
properly grounded outlet box cover. Whenever the
adaptor is used, it must be held in place by a metal
screw (Fig. C).
DANGER:
Improper use of the
grounding plug can
result in a risk of
electrical shock.
SAFETY & CHEMICAL INFORMATION
Operation Safety
Chemicals
1. DO NOT run the brushes when the
scrubber is stationary as it may cause
damage to the surface being cleaned.
2. Tilt scrubber back when moving, especially
over thresholds or sills to prevent damage
to the brushes.
3. When transporting in elevators, their safety
regulations and precautions are to be
respected as well as maximum load
capacity of the elevator.
1. Always consult the correct use and safety
precautions as detailed on the chemicals
manufacturers’ label. If required, wear
appropriate recommended clothing and
safety glasses.
2. Only use low foaming and non-flammable
chemicals which DO NOT include
hazardous components.
3. DO NOT use flammable, poisonous,
hazardous or explosive chemicals.
SCRUBBER OPERATION
1. This scrubber is designed for wet cleaning
on waterproof surfaces inside buildings. All
other usage is improper.
2. The manufacturer takes no responsibility
for damage due to improper use of the
scrubber. The user takes the entire risk for
damage due to improper use.
3. Following the operating, maintenance and
repair instructions is required.
4. The appropriate accident prevention rules,
as well as other known regulations for
health and safety in operation must be
followed.
5. Any changes to the scrubber will void the
warranty. Any damage that may occur as a
result of those changes will be the sole
responsibility of the owner.
6. Check the suitability of the floor surface
before using the scrubber.
7. Check that the wheels and brushes will not
damage any surface to be cleaned,
especially gymnasium floors.
8. If the scrubber is misused, the
manufacturer will not be responsible for
any form of warranty.
Safety, Operation and Maintenance Manual for Parrot (RA 300 E); Version 1.2
4
FUNCTIONAL PARTS AND ACCESSORIES
Intermittent Solution Lever
Vacuum Switch
Brush / Solution Switch
Cord & Cord Wrap
Adjustable / Folding Handle
Sight Dome
Solution / Recovery Tank
Grip Handle
Disc Brushes
Squeegees (front & rear)
COMPACT FOLD-UP
QUICK RELEASE BRUSH
REMOVABLE TANK FOR
EASY FILL & DRAIN
Safety, Operation and Maintenance Manual for Parrot (RA 300 E); Version 1.2
5
TO OPERATE AS A SCRUBBER
1. Prepare the floor surface by sweeping or
vacuuming before using the scrubber.
2. Make sure all the switches are OFF.
3. Select the proper floor brushes or pad
drivers and floor pads for the cleaning
operations.
10. Plug in the power cord, turn on the
vacuum switch, and then the brush switch.
Solution
Lever
Handle Height
Adjustment
Handle Angle
Adjustment
4. Adjust the handle to the best position for
comfortable operation.
5. Fill a clean bucket with clean water, and
pour it into the solution tank opening,
maximum capacity 2.5 gallons.
6. Add the chemical required. Check the
label for dilution rates.
Gasket
Short
Solution Hose
Rear Rim
7. Place the solution hose to the far side of
the tank making sure the hose is not bent.
Place the dome to the rear rim of the tank
and press the dome gasket gently into the
front rim.
8. Check to make sure the short solution
hose located at the bottom right on the
scrubber is plugged into the female QDC
connector.
9. When using an external cleaning tool
unplug the hose and plug in the solution
hose to the attachment you are going to
use.
11. Start cleaning by squeezing the solution
lever and push the scrubber forward and
reverse.
Squeegee
Lever
12. If the floor is very dirty, turn OFF the
vacuum switch. Using the squeegee lever,
lift the squeegee off the floor. Squeeze the
solution lever to add more cleaning
solution to the floor. Scrub the floor
thoroughly.
13. Turn ON the vacuum switch, lower the
squeegee to the floor, and vacuum up the
dirty solution.
14. While cleaning, monitor foam level in the
recovery tank. If heavy foam is building,
pour a quality defoamer into the recovery
tank.
15. Periodically check the solution level in the
tank. NEVER allow brushes or pads to run
dry, otherwise both the pump and the floor
may be damaged.
16. Periodically inspect the squeegee blades
for obstructions (sand, cigarette butts,
paper, etc.), clear, then continue cleaning.
17. Before refilling the solution tank, flush the
recovery tank with clean water.
IMPORTANT
DO NOT leave solution in the
bladder. After each use thoroughly
wash out the bladder. This will help
extent the bladder’s life.
Safety, Operation and Maintenance Manual for Parrot (RA 300 E); Version 1.2
6
WHAT TO USE WITH THE SCRUBBER
Type of Cleaning
Chemicals
Scrub Brushes/Pads
Daily or weekly cleaning
on waterproof surfaces.
Floor cleaner, degreaser,
maintenance cleaner, scented
cleaner depending upon the
degree of dirt on surface.
Nylon brushes, red, green or
white pads depending on
condition of floor.
ROUTINE MAINTENANCE
If you maintain this scrubber carefully it will stay in
working order for a long period of time. Check the
unit regularly for any wear and tear.
1. Check rubber squeegee blades.
2. DO NOT clean the scrubber with pressure
washer.
3. When servicing or making repairs use only
genuine original equipment parts.
4. Repairs and service should only be made
by an authorized service center or the
factory.
5. Monthly Maintenance: Check all
gaskets, tighten loose nuts and bolts.
the
6. Every (6) months check vacuum motor
carbon brushes, if worn to 3/8” length or
less replace.
TO MAINTAIN THE SCRUBBER – DAILY
1. Remove
dome cover
from
the
tank and set
it
down
behind the
scrubber.
4. Remove solution bladder from tank by
gently pulling tab on the bladder upwards.
2. Remove the tank and carry it to a floor
drain or sink.
Drain
Plug
6. Hang up the solution bladder to dry.
5. Once the edge of the bladder comes over
tank rim opening, push the entire bladder
back into the tank and remove bladder
through the large opening of the recovery
tank. Empty the solution bladder and rinse
with clean water.
7. Flush out the recovery tank with clean
water to remove dirty solution. Drain tank.
8. When replacing the bladder make sure it
fits properly into the recovery tank.
9. The bladder tab must be fitted on the left
side of solution tank opening seen from the
rear operator’s position.
3. Open the drain plug from recovery tank
and empty
the tank.
10. Clean the dome, cover, vacuum hose and
solution hose thoroughly. Make sure that
the solution hose filter is also cleaned.
11. Clean the scrubber and squeegee with a
damp cloth. Store squeegee in the raised
position to prevent damaging the blades.
12. Rinse brushes or pads with clean water. To
remove brushes or pads, tilt scrubber back
and slightly pull them downward. When
replacing make sure they lock into the
groves.
Safety, Operation and Maintenance Manual for Parrot (RA 300 E); Version 1.2
7
CAUTION
Before working on the scrubber
disconnect the power cord.
TROUBLESHOOTING
Symptom:
Scrubber does not run! No power to the machine!
Problem:
Blown fuse/circuit breaker in the building / room has tripped.
Solution:
Replace fuse with the same rating. Reset circuit breaker. Make sure no other appliances
are connected on the same circuit as the machine. The machine requires a dedicated 15
amp circuit.
Problem:
Frayed cord, damaged plug or loose internal wiring.
Solution:
Have an authorized service technician check cord and replace if necessary. Have an
authorized service technician open switch panel and check for loose wire connection.
Symptom:
Insufficient vacuuming power!
Problem:
Debris caught under squeegee blades.
Solution:
Remove debris and wipe blades with clean cloth.
Problem:
Vacuum hose not connected.
Solution:
Connect hose.
Problem:
Tank cover not properly seated or gasket on dome cover is damaged.
Solution:
Reseat tank cover correctly or replace gasket.
Problem:
Filter in tank cover blocked.
Solution:
Clean filter with water.
Problem:
Drain plug or recovery tank not properly placed.
Solution:
Check drain plug and replace properly.
Problem:
Defective vacuum motor (noisy bearing, carbon brush sparking burn out armature and
worn out carbon brush)
Solution:
Have an authorized service technician replace vacuum motor and motor gasket.
Symptom:
Little or no water flow going to brushes.
Problem:
Solution line blocked.
Solution:
Flush out solution tank and lines with clean water.
Problem:
Solution tank filter clogged.
Solution:
Unclog filter.
Problem:
Solution tank empty.
Solution:
Refill solution tank.
Safety, Operation and Maintenance Manual for Parrot (RA 300 E); Version 1.2
8
TROUBLESHOOTING (cont.)
Symptom:
Squeegee not picking up water!
Problem:
Rubber blades on squeegee dirty or worn-out.
Solution:
Clean or replace blades.
Problem:
Squeegee not in contact with floor.
Solution:
Check blades and replace if necessary.
Problem:
Recovery tank full.
Solution:
Empty recovery tank.
Problem:
Vacuum hose loose or hose is damaged.
Solution:
Reinstall or replace hose.
Problem:
Squeegee blades not lowered to the floor.
Solution:
Lower squeegee blades to the floor using the squeegee lever in the rear of the machine.
WARNING
Service and repairs should only be performed
by an authorized service center.
Safety, Operation and Maintenance Manual for Parrot (RA 300 E); Version 1.2
9
New Machine Warranty
1. Limited Warranty. These terms and conditions of the New
Machine Warranty are a material part of the agreement
between Buyer and Cleanfix Cleaning Systems Inc., a New
Jersey-based corporation (hereinafter “Cleanfix”), and
supersede warranty terms and conditions in documentation
submitted by Buyer to Cleanfix. Cleanfix warrants new
machines of its manufacture against defects in material and
workmanship under normal use and service to the original enduser purchaser. No person, agent, representative or distributor
is authorized to give any warranties on behalf of Cleanfix, or to
assume any other liability for Cleanfix in connection with any
Cleanfix machine. Cleanfix reserves the right to make changes
to its equipment without notice. The warranty coverage is
subject to the conditions below.
2. Registration of Warranty. The warranty commences on the
date of purchase by the original end-user from an authorized
Cleanfix distributor or agent, subject to proof of purchase. The
warranty commences latest, however, after six (6) months of
the purchase date by the authorized distributor or agent of
Cleanfix. Any new Cleanfix machine must be registered
immediately with Cleanfix by the original end-user customer by
fully completing and returning the warranty registration form to
Cleanfix. If proof of purchase cannot be identified through a
completed and returned warranty registration form, the warranty
commences from the date of sale to the authorized Cleanfix
distributor.
3. Warranty Coverage. Subject to conditions outlined below,
Cleanfix warrants rotationally molded PE housings and tanks on
all of its machines to be free from defects in material and
workmanship, under normal use and service for ten (10) years
to the original end-user.
Subject to conditions outlined below, Cleanfix warrants
fiberglass housings and tanks on all of its machines to be free
from defects in material and workmanship, under normal use
and service for three (3) years to the original end-user.
Under this warranty Cleanfix warrants the performance of nonpolyethylene and non-fiberglass components to be free from
defects and workmanship for up to one (1) year to the original
end-user. Parts replaced or repaired under this warranty are
warranted for the remainder of the original warranty period.
(See table below)
Rotationally molded PE housings and tanks
10
years
Fiberglass housings and tanks
3
years
Vacuum motors, brush motors, pump motors,
boards and electronics
1
year
Battery and battery charger*
1
year
* The 1 year period warranty commences with the purchase date by the
authorized distributor or agent of Cleanfix.
Service labor charges are covered for up to one (1) year from
the date of purchase through an authorized Cleanfix service
provider. A total maximum of one (1) hour travel time - equal to
one (1) hour labor rate - is covered for large machines, namely
Falcon, Raven, Eagle and larger for 90 days. No coverage is
extended for diagnosis time.
4. Product Exceptions and Exclusions. ALL vacuum cleaners
and air movers are warranted for one (1) year. No warranty is
extended for wear items, accessories and attachments
including, but not limited to, belts, brushes, pad holders,
capacitors, carbon brushes, wheels, casters, glides, clutches,
cords, filters, filter bags, gaskets, hoses, rectifiers, switches,
float switches, valves, squeegees, bearings, pulleys, relays,
actuating cables, wheels, tires, vacuum cleaner attachments.
The purchaser is assured that meticulous care has been
exercised in the selection, assembling and testing of these parts
and components before shipping. No warranty is extended for
machine finish, labels and other cosmetic parts or features.
5. Stated Warranties. Stated warranties are in lieu of all other
warranties, expressed or implied. Any statutory implied
warranties, including any warranty of merchantability or fitness
for a particular purpose, are expressly limited to the duration of
the written warranty. Cleanfix will not be liable for any other
damages, including but not limited to incidental, indirect or
special consequential damages arising out of or in connection
with the furnishing, performance, use or inability to use the
machine, including damages to persons or property. This
remedy shall be the exclusive remedy of the buyer. The
warranty is limited to the warranty.
6. Warranty is null and void for the following.
• Damage, defects, malfunction or other failures caused by
not using the electric current indicated on the spec plate,
including the use of improper extension cords.
• Damage or defect caused by accident, misuse, neglect,
abuse, fire etc., including use of incompatible or corrosive
chemicals or overloading of capacity.
• Failure caused by lack of proper maintenance and care,
including proper machine clean-up after use, proper
charging procedures for batteries.
• Failure caused by loss, damage or removal of protective
components, including, but not limited to, filters and filter
screens, tank covers and lids, skirts and bumpers, float
shut-off assemblies.
• Freezing of any water or chemical related components
(this will void all warranties on water or chemical related
components, internal or external, of the product).
• Deposits and buildup in any water or chemical related
systems due to hardness in water (this will void all
warranties on affected systems).
• Any design alterations, adjustments and/or repairs
performed on the equipment by an organization not
authorized or specified by Cleanfix.
• Use of any parts not approved by Cleanfix, including, but
not limited to, batteries, battery charger, filter bags, belts,
electric components, motors.
• Use of machine for a purpose other than which it was
designed and intended, and use of machine in excess of
design duration.
• Damage in transit.
7. Warranty Claim Procedure. If a difficulty develops during
the specified warranty period, contact the authorized Cleanfix
distributor/partner from whom the machine was originally
purchased. Do not return any products to Cleanfix unless
explicitly authorized by Cleanfix. Cleanfix may elect to require
the return of the machine or component(s) to validate the claim.
Any defective machine or component to be returned must be
shipped freight pre-paid to an authorized Cleanfix
distributor/service center.
Cleanfix will provide and charge for replacement parts, including
shipping and handling, to the original purchaser through an
authorized service center. If the part is returned within 30 days
and is found defective, the purchaser will be credited for the
cost of the replacement part including shipping and handling.
8. Term. This warranty is valid for all products sold after
January 1, 2006. A product sold before that date will be covered
by the limited warranty in effect at the date of sale to the original
purchaser.
Copyright ©2007 Cleanfix Cleaning Systems Inc.
All rights reserved. Content is subject to change without notice. Version 5.1.