1
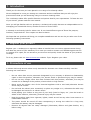
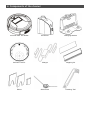
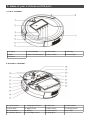
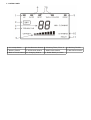
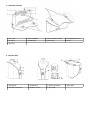
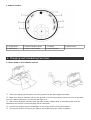
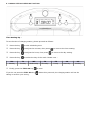
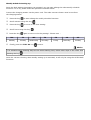
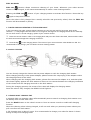
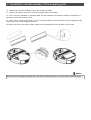
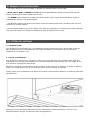
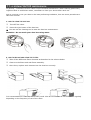
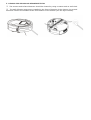
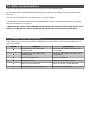
Robot Vacuum e.ziclean VAC 100 ® User's Manual Welcome to E.ZICOM Summary 1. Introduction.....................................................................................4 2. Register your product.......................................................................... 4 3. Precautions of use.............................................................................. 4 4. Components of the cleaner...................................................................5 5. Name of your e.ziclean vac100 parts........................................................ 6 A. TOP OF THE ROBOT......................................................................................................................... 6 B. BOTTOM OF THE ROBOT.................................................................................................................... 6 C. CONTROL PANEL .............................................................................................................................7 D. CHARGING STATION......................................................................................................................... 8 E. VIRTUAL WALL................................................................................................................................8 E. REMOTE CONTROL...........................................................................................................................9 6. Charging and Scheduling Functions..........................................................9 A. INSTALLATION OF THE CHARGING STATION.............................................................................................. 9 B. CHARGING STATION SCHEDULING FUNCTIONS......................................................................................... 10 C. FORCED-CHARGING OPERATION OF THE VACUUM ROBOT............................................................................ 12 D. MANUAL CHARGING........................................................................................................................ 12 E. CLEANING ROBOT CHARGING TIME...................................................................................................... 12 7. Installation and dissasembly of the mopping parts....................................... 13 8. e.ziclean® vacuum robot functions........................................................14 A. HOW TO TURN IT ON.......................................................................................................................14 B. DESCRIPTION OF THE DIFFERENT CLEANING MODES ................................................................................. 15 C. DIRT DETECT FUNCTION...................................................................................................................15 D. DESCRIPTION OF THE DIGITS DISPLAY ON THE LCD SCREEN......................................................................... 15 9. Remote Control Function..................................................................... 16 10. IR Barrier settings............................................................................ 16 A. IR BARRIER POWER.........................................................................................................................16 B. USE AND CONFIGURATION.................................................................................................................16 11. e.ziclean VAC100 maintenance............................................................17 A. HOW TO CLEAN THE DUST BOX ..........................................................................................................17 B. HOW TO REPLACE AND CLEAN THE FILTERS ........................................................................................... 17 C. SIDE BRUSH..................................................................................................................................18 D. MAIN BRUSH.................................................................................................................................18 E. CLEANING STAIR SENSORS AND INFRARED DETECTOR................................................................................. 19 12. Other recommendations.................................................................... 20 13. ERROR Codes instructions................................................................... 20 14. FAQ............................................................................................. 21 15. Certificates................................................................................... 22 1. Introduction Thank you for the trust you have placed in our range of e.ziclean® robots. We are delighted to count you among our customers and are confident that you will enjoy the precious time that you will be saving using our vacuum cleaning robot. The e.ziclean® robots offer specific features and options that fit your expectations. To fease the use of your device, please read this user manual. Once you will get familiar with our products, e.ziclean® will quickly become an indispensable tool in managing your household chores, whether at home or at the office. e.ziclean® is exclusively built for indoor use. It can clean different types of floors like parquet, linoleum, carpet and tile. Thin carpets can also be drawn. We hope that our products will bring you complete satisfaction and we now let you take note of the following operating instructions. 2. Register your product Register your e.ziclean® or e.zigreen® robots to benefit from our service responsiveness during and after the period of your warranty. So in case you need to contact our E.ZICOM support service or request for a repair, we can access to your account and quickly check the status of your product coverage. To do so, please visit our www.e-zicom.com website. Topic: Register your robot. 3. Precautions of use e.ziclean VAC100® vacuum robot is only intended for domestic use. Please carefully read the following use instructions: • No one other than service personnel designated by our company is allowed to disassemble, repair or alter this product, otherwise, fire, electric shock or personnel injury may be caused. • Do not use any charger other than that enclosed with this product, otherwise, fire may be caused due to damage of the product, electric shock or high tension. • Never touch the electric wire of the electrical appliance with a wet hand,otherwise electric shock may be caused. • Do not bend the electric wire excessively or place any weight on it, otherwise the cable may be damaged and cause fire or electric shock. • Avoid putting your clothes or any part of your body (head or finger, etc.) into the brush or wheel of the machine, otherwise, personal injury may be caused. • Keep the product away from cigarette, lighter, match as well as any other heat resource or inflammable material. • The power should be turned off when transporting or storing the robot for a long time, otherwise the battery may be damaged. • Remove all objects that are easily damaged (illuminants, fabrics and glass bottles, etc.) before using. 4. Components of the cleaner e.ziclean VAC 100 Robot IR Barrier Charging Station Remote Control Charger Mopping kit Filters Side Brush Cleaning Tool 5. Name of your e.ziclean vac100 parts A. TOP OF THE ROBOT 1. IR Signal 2. Screen display 3. UV Function 4. Selecting 5. Mode 6. Back to Dock Function 7. Start / Pause 8. Front bumper 9. Dust box B. BOTTOM OF THE ROBOT 10. Stairs Sensors 11. Charging Contactors 12. Side brush 13. Stairs Sensors 14. Main brush 15. Rubber brush 16. Power switch 17. Charging socket 18. Front wheel 19. Battery 20. Stairs Sensors 21. UV Lamp 22. Auxiliary wheels 23. Left/Right wheels 24. Mopping Kit C. CONTROL PANEL 1. UV Lamp Status 2. Dirt Detector Status 3. Cleaning Time / Error # 4. Working Trouble 5. Battery Status 6. AUTO Mode Status 8. Wall Follow Status 9. Back to Dock Status 10. Charging Status 7. SPOT Mode Status 11. Robot Ready to Clean D. CHARGING STATION 1. ON / OFF 2. FULL GO Mode 3. Power adapter socket 4. Charging Contactors 5. IR Signal 6. Scheduling 7. Selecting 8. Clock 9. Anti-Slip E. VIRTUAL WALL 1. IR Signal 2. IR Emitter 3. Working Status 5. Distance Selector 6. Bottom Cover 6. Anti-Slip 4. ON / OFF E. REMOTE CONTROL 1. AUTO Mode 2. WALL FOLLOW Mode 3. UV Mode 5. SPOT Mode 6. Back to Dock Mode 7. Speed adjuster 4. Robot Power 6. Charging and Scheduling Functions A. INSTALLATION OF THE CHARGING STATION arging Dock station Place the charging dock station on level ground with the back against the wall. Make sure that no obstacle and uneven ground is in the area within 3 meters in front of the base and 0,5 meters respectively on the left and right of it. Ensure that IR Signal window from the base is clean without dust or something else covered. Otherwise the function of self-charging will be influenced. Connect the output plug of the adapter to the Power socket of the Dock Station. Tidy up the electric wire along the wall to avoid obstructing the robot navigation. B. CHARGING STATION SCHEDULING FUNCTIONS Time Setting-Up : To set the time of charging station, please proceed as follows: Press the key to edit scheduling time. Press the key to adjust the minutes, then press Press the key to adjust the hours, then press Press the key to select the day of the week. Please note : to move to the hour setting. to move to the day setting. MO TU WE TH FR SA SU Monday Tuesday Wednesday Thursday Friday Saturday Sunday Finally, press the FULL GO key If you do not press the FULL GO key taking in account your saving. to save. within thirty seconds, the charging station will not be Weekly Schedule Setting-up: Once the dock station time setting-up operated, you can start editing the robot weekly schedule functions. To do so, please follow the procedure outlined below: Connect the charging station via the power cord. The robot vacuum cleaner must be out from the charging station. Press the key Scroll minutes using this key Press the key Scroll hours using this key to start editing the weekly schedule functions. to move to the hour setting. Press the key . again to move to the day setting*. Please note : MO TU WE TH FR SA SU Monday Tuesday Wednesday Thursday Friday Saturday Sunday Finally, press the FULL GO key to save. Advise * To schedule other cleaning days at the same starting hour, select other days of the week now pressing the key . Once the vacuum cleaning robot weekly setting up is activated, it will only be using the AUTO Mode functions. FULL GO Mode: FULL GO function allows continuous cleaning of your home. Whenever your robot vacuum cleaner is fully charged, it will restart automatically to make a new cleaning mission. Pressing the FULL GO button of your charging station to activate this function. Press this key again to Stop this function. When the robot is fully charged but a weekly schedule was previously edited, then the FULL GO function will be activated in priority. C. FORCED-CHARGING OPERATION OF THE VACUUM ROBOT In the case where the robot vacuum cleaner batteries are very low (not used for long time, stuck under furniture...) it may happen that the robot can no longer be recharged on its charging station dock or manually. You can then use the “forced-charging” option of your vacuum cleaner. Place the vacuum cleaner robot on its charging dock and put it ON. Ensure that both, station and the robot are well connected through their charging contactors. Press the key on the charging station. The screen of your vacuum cleaner robot should turn ON. It is recommened to fully charge your unit before its next cleaning mission. D. MANUAL CHARGING You can directly charge the cleaner with its power adapter or with the charging dock station. When charging directly via the power adaptor, please connect the output plug of the adapter within the charging socket of the robot. When charging with the charging dock station, please first connect the adapter to it, and then place the cleaner tightly against the dock station to ensure a nice contact between the charging contactors of the cleaner and the charging terminal on the dock station. During the charging process, the screen of the robot will display the charging status. Once the robot is fully charged, the READY led will light-on. E. CLEANING ROBOT CHARGING TIME e.ziclean® VAC 100 cleaning robot will automatically start to search its charging dock station once its battery level is lower than 15% Press the DOCK button on the robot's screen or from its remote control to enable self-charging function. When the cleaning robot is being charged, it will not work when you press any button unless your pull it out from its dock station. A full charging time is about 3 hours. It is recommanded to charge your robot for about 12 hours during its very first charging times. 7. Installation and dissasembly of the mopping parts Attach the enclosed mopping rag to the mopping holder. Refer to the below scheme to lock the mopping kit to the robot. Once correctly installed, e.ziclean® VAC 100 will optimized its cleaning efficieny especially on hard floors such as linoleum, tiles... After using, just pull the holder out. It’s recommended to wash and twist dry the mopping cloth before each use of the mopping function. In case of not using the mop, simply detach the compartment from the back of the robot. Advise We advise you to slightly moisten the mop with a cleaning solution to get a better cleaning result. 8. e.ziclean® vacuum robot functions A. HOW TO TURN IT ON Press the ON button on the side switch. The default modes will be displayed. Make sure the cleaning robot is fully charged before operating. Just like while using a traditional vacuum cleaner, please clear-out all ground obstacles such as cables but also carpet fringe, such as the robot navigation can be eased. e.ziclean® VAC 100 can use 3 differents cleaning modes. Each of them can be activated pressing the key button from the robot's screen or from its remote control. B. DESCRIPTION OF THE DIFFERENT CLEANING MODES AUTO: Enable automatic cleaning mode the robot vacuum cleaner. It will clean for about 60 minutes before returning automatically to its dock station and recharge its battery. Mode 1: e.ziclean® VAC 100 robot will clean until its battery is empty and automatically start searching for its station to be charged. Mode 2: Working time 30 min Mode 3: Working time 15 min SPOT: The robot vacuum cleaner concentrates its cleaning navigaiton on a restricted working area. This mode is suitable for relatively small areas and particularly encrusted in dirt. Mode 1: spiral navigation (1-4 min) Mode 2: zigzag navigation (1-4 min) WALL FOLLOW: The robot will follow the walls so that it concentrates its cleaning along plinths and corners (1-4min). DOCKING: The robot will search for its station to get recharged. Press DOCK button on the screen or from the remote control to activate docking function. n UV: Press the UV button on the screen or from the remote control to activate this function. Once activated, the robot will disinfect floors thanks to the UV sterilizing technology. Press this button again to disable this function. Press the MODE button to scroll through the main different cleanings methods described as above (AUTO, SPOT, WALL FOLLOW). Then press PROGRAM button to reach the under-selection Modes described as above (Mode 1, Mode 2, Mode 3). Finally press the START button from the robot screen to launch the selected cleaning mode. C. DIRT DETECT FUNCTION The e.ziclean® VAC 100 is equipped with a dust sensor. The DIRTY Led from its screen display will blink while the robot detects dusty areas. It will target and intensify its navigation on the area until its gets fully cleaned. D. DESCRIPTION OF THE DIGITS DISPLAY ON THE LCD SCREEN The LCD screen of e.ziclean® VAC 100 vacuum robot gives a continuous status of its running functions. It also allow to know how many minutes the robot has been cleaning or charging since its starting process. While cleaning, the digits display on the LCD increase of 1 digit per minute. During charging, the digits display on the LCD increase of 1 digit every 10 minutes. 9. Remote Control Function · The power button is used to enable or disable the standby status of the robot. · AUTO, SPOT, WALL, CHARGE and UV buttons enable different operating modes and options whose functions have been detailed previously. · The SPEED button allows to increase the wheels speed of the robot. Press this button again to automatically return to its default speed. · The ll button pauses the tasks of the robot. Press this button again and e.ziclean® VAC 100 will continue its current mission. The directional buttons Up, Down, Right, Left, offer the possibility of controlling the robot manually. The robot will continue to adjust its direction in case of obstacles on his way. • 10. IR Barrier settings A. IR BARRIER POWER The IR Barrier is powered by two 1.5V batteries. Simply unscrew the cover at the base of the IR Barrier and close it once the batteries are properly installed in accordance with the direction indicated on the bottom cover. B. USE AND CONFIGURATION The IR Barrier accessory can be used to restrict the robot entering into a specific area. Once the robot gets close enough to the IR Barrier, it will automatically avoid crossing the non-visible IR line and continue cleaning the other areas. IR Barrier generally must be placed at the entrance of the room to be cleaned. It is also possible to place it on a spot where you do not want the robot vacuum cleaner to operate. Finally make sure no obstacles may block the infrared communication between e.ziclean® robot and the IR Barrier. Now just turn the IR Barrier ON and select the appropriate operating distance. The more the selected distance is high, the less the robot will approach it. 11. e.ziclean VAC100 maintenance In general, e.ziclean® vacuum robots require minimal maintenance. When cleaning particularly ingrained dust or animal hair areas, remember to clean your device after each use. And to continue to use you robot in the best performing conditions, here are some procedures to take into account: A. HOW TO CLEAN THE DUST BOX Turn OFF the robot. Press the eject button of the dust box. You can use the cleaning tool to ease the dust box maintenance. Attention : Do not wash your dust box using water. B. HOW TO REPLACE AND CLEAN THE FILTERS Take off the differents filters elements as described in the scheme below. Clean-out the filters and and filters-assembly. Once done, replace each element into the dust box correctly. It is recommanded to clean the filters every week. Also do not hesitate to use new filters regularly depending on the frequency of use of the robot. C. SIDE BRUSH Steps for assemble and disassemble the side brush. Take out the screwdriver supplied with your product. Put the upper cover downward. Put the side brush into the shaft tightly, and lock the side brush using the screwdriver. If need to replace the side brush for a new one, unscrew the screw fixing the side brush, and repeat the above instructions. D. MAIN BRUSH Steps for disassemble the main brush. Put the upper cover downward and use the screwdriver to take out the screw which is located in the left side of the main brush. Take out the main brush. Separate the clutch upper cover and main brush. Steps for assemble the main brush. Put the clutch upper cover on the shaft of main brush Insert the square side of main brush to the metal square port, then pack the main brush and clutch into the other side. Finally lock the clutch with the screwdriver and screw tightly. E. CLEANING STAIR SENSORS AND INFRARED DETECTOR The sensors and infrared detector should be cleaned by using a cotton swab or soft cloth. The wall-following sensors are installed in the front of bumper of the cleaner, the ground detection sensors are installed at the front bottom of the cleaner (see the figure below). 12. Other recommendations • Remove any small objects that may be on the road of the cleaning robot. •If the robot turns off automatically after bipping, it means that its battery is not charged enough any more. •Do not use e.ziclean® vacuum robot on thick or fringe carpets. • Avoid using the robot in particularly congested cables areas or anything else likely to get bogged down in the brush of your device. • Make sure the robot is fully charged before starting its cleaning work. If the device is not used for a long period, remove the battery from the unit and store it in a safe place. 13. ERROR Codes instructions If the LED screen on the robot display an ERROR code, please refer to the following instructions to solve the problem. ERROR REASON SOLUTIONS 0 Foreign body in the left wheel, excessive load. Check the left wheel and remove the foreign body. 1 Foreign body in the right wheel, excessive load. Check the right wheel and remove the foreign body. 2 Fault of the main brush. Excessive load on it. 3 Front wheel issue. Check the front wheel status. 4 Fault of ground detectors. Check and clean ground detectors. 6 Fault of bumper impact detectors. Check the bumper status. 14. FAQ A. The Robot Stops while operating Check if the selected cleaning time is over. Check if there’s any error information on the LED display and refer to the following explanations to solve it. B. The cleaner fail to work or the cleaning ability is weakened Check the battery status. Check whether the dustbin, the filter and the inlet of suction are cleaned; whether the side brush is working. Check whether the cleaner is turned on. C. The Remote Control does not work properly Check the battery status of the remote control. Check the battery status of the cleaner. Wipe the IR sensor or the beam sensor of the controller using clean and dry cloth. Keep proper distance between the cleaner and the remote control and then operate the control ler functions targeting the IR receiver located on your robot cover. To ensure a more effective cleaning of this robot, please clean the sensors regularly. D. The robot fails to fulfill self-charging Check whether the power supply is normally connected with the adapter and charging dock station. Check the battery power, if it’s too low, please manually charge it with the adapter. Check whether the dock station is located in a place where the robot can easily get back to. E. Increased noise when cleaning Clean the dust box and the filter. Check whether the brushes are too dirty. 15. Certificates e.ziclean® VAC 100 warranty is 2 years. Accessories for 6 months. Please check on our www.ezicom.com website to know further about After Sales Conditions. For more information: . Warranty and After Sale Service Please contact us through our official website: http://www.e-zicom.com . How to use e.ziclean® vacuum robot cleaner Contact with your retailer or visit our website . Discover all accessories to equip e.ziclean® VAC 100 robot All e.ziclean® accessories are available on our website : http://www.e-zicom.com