1
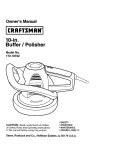
Owner's Manual
7-in.
Buffer / Polisher
Model No.
172.10721
CAUTION:
Read, understand and follow
all Safety Rules and Operating Instructions
in this manual before using this product.
• SAFETY
• OPERATION
• MAINTENANCE
• ESPANOL, PAGE 13
Seam, Roebuck and Co., Hoffman Estates, IL 60179 U.S.A.
Warranty .............................................................
Page
2
Safety Instructions ...........................................
Description .........................................................
Page
Page
3- 5
6
Operation .......................................................
Pages 7-10
Maintenance ......................................................
Accessories .......................................................
Page
Page
FULL ONE YEAR WARRANTY
BUFFER/POLISHER
11
11
ON CRAFTSMAN
If this CRAFTSMAN Buffer/Polisher fails to give complete satisfaction
within one years from the date of purchase, RETURN ITTOTHE
NEAREST SEARS STORE IN THE UNITED STATES, and Sears will
replace it, free of charge.
If this CRAFTSMAN Buffer/Polisher is used for commercial or rental
purposes, this warranty applies for only 90 days from the date
of purchase.
This warranty gives you specific legal rights, and you may also
have other rights which vary from state to state.
Sears, Roebuck and Co., Dept. 817WA, Hoffman Estates, IL 60179
SAVETHESE INSTRUCTIONS!
READ ALL INSTRUCTIONS!
2
to follow all instructions
I serious
/_ WARNING:
BE
personal injury.
WORK
I
listed below may result in electric shock, fire and/or
SURE to read and understand all instructions. Failure
I
AREA SAFETY
1. ALWAYS keep your work area clean and well lit. Cluttered
invite accidents.
and dark areas
2. DO NOT operate power tools in explosive atmospheres,
such as in the
presence of flammable
liquids, gases, or dust. Power tools create sparks
which may ignite the dust or fumes.
3. ALWAYS keep bystanders,
children and visitors away while operating
power tool. Distractions can cause you to lose control.
ELECTRICAL
a
SAFETY
1. Double insulated tools are equipped with a polarized plug (one blade is
wider than the other).This plug will fit in a polarized outlet only one way.
If the plug does not fit fully into the outlet reverse the plug. If it still
does not fit, contact a qualif ed electrician to install a polarized outlet.
DO NOT change or alter the plug in any way.
2. Double insulation [] eliminates the need for the three wire
grounded power cord and grounded power supply
system. Applicable only to Class II (double insulated) tools.
3. ALWAYS avoid body contact with grounded surfaces, such as pipes,
radiators, ranges and refrigerators. There is an increased risk of electric
shock if your body is grounded.
4. DO NOT expose power tools to rain or wet conditions. Water entering a
power tool will increase the risk of electric shock.
5. DO NOT abuse the cord. NEVER use the cord to carry the tools or pu
the plug from the outlet. Keep cord away from heat, oil, sharp edges or
moving parts. Replace damaged cords immediately. Damaged cords
increase the risk of electric shock.
6. When operating a power tool outside, ALWAYS use an outdoor
extension cord marked "W-A" or "W". These cords are rated for outdoor
use and reduce the risk of electric shock.
7. ALWAYS make sure that your extension cord is in good condition.When
using an exmnsion cord be sure to use one that is heavy enough to
carry the current that your tool will draw. A wire gauge (AWG) of at least
14 is recommended for an extension cord 25 feet or less in length. When
working outdoors ALWAYS use an extension cord that is suitable for outdoor
use.The cord's jacket will be marked WA, Smaller gauge wires have
greater capacity (16 gauge wlre has more capamty than 18 gauge wire).
An undersized cord will cause a drop in line voltage, resulting in loss of
power and overheating.
3
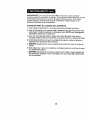
PERSONALSAFETY
1. ALWAYS stay alert, watch what you are doing and use common sense
when operating a power tool. DO NOT use tool while tired or under the
influence of drugs, alcohol or medication.
A moment of inattention while
operating power tools may result in serious personal injury.
2. ALWAYS dress properly.
DO NOT wear loose clothing or jewelry. Pull
back long hair. Keep your hair, clothing
and gloves away from moving
parts. Loose clothing, jewelry or long hair can be caught in moving parts.
3. ALWAYS avoid accidental
starting.
BE SURE switch is in the "Off"
position
before plugging
in. Carrying tools with your finger on the switch or
plugging in tools that have the switch in the "On" position invites accidents.
4. DO NOT overreach.
ALWAYS keep proper footing and balance at all
times. Proper footing and balance enables better control of the tool in
unexpected situations.
5. ALWAYS
use safety
equipment,
Always
WARNING:
shields
wear eye protection.
ALWAYS wear safety glasses
when operating power tools.
4
or eye
I
I
TOOL USE AND CARE SAFETY
1. DO NOT force the toot. Use the correct tool for your application.
The correct tool will do the job better and safer at the rate for which it is
designed.
2. DO NOT use the tool if the switch does not turn it "On" or "Off".
Any tool that cannot be controlled with the switch is dangerous
must be repaired.
and
3. ALWAYS disconnect
the plug from the power source before making
any adjustments,
changing accessories
or storing the tool. Such
preventive safety measures reduce the risk of starting the tool accidentally.
4. ALWAYS store idle tools out of the reach of children and other
untrained persons. Tools are dangerous in the hands of untrained users.
5. ALWAYS check for misalignment
or binding
of moving
parts, breakage
of parts, and any other condition that may affect the tool's operation.
If damaged,
have the tool serviced before using. Many accidents are
caused by poorly maintained tools.
FOR USE WITH THISUSE
TOOL
CREATE A HAZARDOUSNOTCONDITION.
I Z_WARNING:
OF MAY
ACCESSORIESTHATARE
RECOMMENDED
6, ALWAYS use only the Craftsman accessories
that are recommended
this tool, Accessories that may be suitable for one tool can become
hazardous when used on another tool.
SERVICE
for
SAFETY
1. Tool service MUST BE performed only by a Sears Parts and Repair Center.
Service or maintenance performed by unqualified personnel could result in a
risk of injury.
2. When servicing a tool, ALWAYS use only identical replacement parts.
Follow instructions in the maintenance section of this manual. Use of
unauthorized parts may create a risk of electric shock or injury.
IMPORTANT!
READ ALL INSTRUCTIONS
5
I
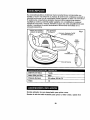
Your Craftsman Buffer/Polisher
has built-in features to make your job easier
and more efficient. The precision-tuned
counterweight
system matches with
the orbital motion for a "swir!-free shine. The perimeter handle system provides
maximum balance, control and gripping comfort on any horizontal or vertical
surface. It also includes a hook and _oop strip to help keep extension cord
securely plugged into buffer/polisher.
Pad Diameter
7 in.
Motor OPM
3800
Rating
120 volts, 60 Hz AC
Amps
1.0
Disposable Wax Applicator Bonnet for applying waxes
Reusable Terry Cloth Bonnet for applying and removing waxes,
and for polishing
6
BEFORE
YOU BEGIN TO WAX, BUFF AND POLISH
YOUR CAR:
1. Wash, clean and dry your vehicle.
2. Remove all road tar, excess
general-purpose
cleaner.
grease
spots and bug stains with a
3. Make sure the work area is dry.
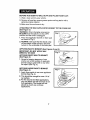
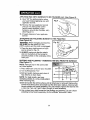
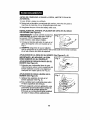
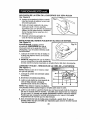
ATTACHING THE WAX APPLICATOR
(See Figure 2)
BONNET
WARNING: When changing accessories,
BE SURE that the switch is in the (OFF)
position and the cord is unplugged.
1. Place wax applicator
as shown in Fig. 2.
bonnet
TO THE
FOAM PAD
._ j/
-_
Fig.
on foam pad
2. ALWAYS make sure that the elastic strip
on the bottom of the bonnet is securely
tucked on the underside of the foam pad.
APPLYING WAXTO BONNET (See Figures
IMPORTANT:
DO NOT APPLY WAX
DIRECTLY ON CAR!
3 and 4)
Fig. 3
_
APPLYING PASTE WAX TO BONNET
(See Figure 3)
1. Spread a heaping teaspoon of wax
evenly over entire surface of applicator
bonnet using a putty knife or any other
flat object (See Fig. 3).
APPLYING LIQUID WAXTO BONNET
(See Figure 4)
1. Apply three swirls of wax over applicator
bonnet (See Fig. 4).
2. This should be enough to cover 1/4 of
car surface.
3. For the second and third applications,
only use about one half as much as on
first application. The bonnet will not
absorb as much wax on these
applications.
7
____j/°
Fig. 4
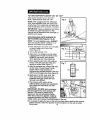
TO TURN
BUFFER/POLISHER
"ON"
OR "OFF"
Slide switch forward to turn tool "On",
slide it backwards to shut tool "Off".
NOTE: After plugging tool into extension
cord, loop extension cord over tool's stub
length plug.Then wrap hook and loop strip
around extension cord to secure it in place.
IMPORTANT:
Read, understand and follow
all safety and user instructions in this
manual and all directions and warnings on
polishes and waxes.
APPLYING WAX ONTO SURFACE TO
BE POLISHED (See Figures 5 to 8)
NOTE: To avoid splashing wax, ALWAYS
start and stop the buffer / polisher on or
against the surface to be polished.
1. Place extension cord over your shoulder
to keep it safely out of your way
(See Figure 5).
2. Turn buffer/polisher
"On".
3. Apply wax in a straight line with either
a side-to-side or back-and-forth
motion.
ALWAYS use broad, even strokes
when applying wax. (See Figure 6).
4. Start applying wax to the flat surfaces
(hood, trunk and roof) first, Wax one
Fig. 7
section at a time (See Figure 7).
5. After flat surfaces are covered with wax,
do the sides, The perimeter handle
system allows easy polishing of
horizontal and vertical surfaces. Hold tool
with the cord hanging free (See Figure 8),
6. Apply wax in a thin, even coat. Too
much wax does not add any more
protection and only makes the wax
removal more difficult.
7. The random orbit motion of the
buffer/polisher
provides wax application
that cannot be duplicated, not even
"by hand".
IMPORTANT: DO NOT apply excessive
pressure against the work surface with
this tool. The random orbital motion
feature on this tool will perform better
when less pressure is applied. Applying
excessive pressure will slow the random
orbital motion and reduce the effectiveness of the tool.
1'.3
LEFT
RIGHT
2_4
iii;:!!
iiilii
8. It is easiest to apply the wax to the entire surface before starting the removal
phase; however, follow the specific recommendations
of the wax or polish
being used.
8
APPLYING
WAX ONTO SURFACE
TO BE POLISHED
cont. (See Figure
9)
9. Shut "Off" the buffer/poisher
when
you have finished applying wax with
applicator bonnet.
10, Remove the wax applicator bonnet
and use it to hand polish all the
hard-to-reach
surfaces (under
bumpers, around door handles, etc.).
(See Figure 9.)
11. Properly
bonnet.
ATTACHING
(See Figure
dispose
of wax applicator
THE POLISHING
10)
BONNETTOTHE
FOAM PAD
WARNING: When changing accessories,
BE SURE that the switch is in the
(OFF) position and the cord is unplugged,
1. Place the terry cloth bonnet on foam
pad as shown in Fig. 10.
2. ALWAYS make sure that the elastic
strip on the bottom of the bonnet is
securely tucked on the underside of the
foam pad,
BUFFING AND POLISHING
(See Figure 11)
- REMOVING
NOTE; Remove wax in the same order
as it was applied.
1. Place extension
THE WAX FROM THE SURFACE
_> <Ej;£-iiiiiiiiii:.:.
cord over your shoulder.
2. Turn buffer/polisher
"On".
3. Buff and polish (remove wax) when it
has dried to an even haze.
NOTE; For best results, use long,
sweeping strokes in a criss--cross pattern
when removing wax.
4. Buff and polish the entire surface until all dried wax is removed, Remove the
bonnet from time to time and shake out the dried wax residue. A bonnet with
excess residue will cause streaking. You may need to replace the bonnet with
a new one if you can't get it clean enough to avoid streaking.
5. Use a clean terry cloth bonnet for final buffing and polishing. Or use a foam
polishing bonnet (sold separately) for the ultimate "showroom shine
9
IMPORTANT:
DO NOT apply excessive pressure against the work surface with
this tool. The random orbital motion feature on this tool will perform better when
less pressure is applied. Applying excessive pressure will slew the random
orbiting motion and reduce the effectiveness
of the tool.
CAR CARE TIPS
1. Wash and polish
the car 3 to 4 times a year to help ensure
paint protection.
2. Wash the car at least every 2 weeks with a car wash solution which will not
harm the finish or strip the wax. AVOID washing with household detergents.
3. Wash with a clean sponge and dry with a terry cloth towel to help prevent
dirt from scratching the paint. Start on the top and work down.
4. Remove bugs, bird droppings,
daily basis.
5. ALWAYS
tree sap and tar from the car's surface on a
make sure that the car's surface
6. Avoid parking
near sprinklers,
because
is cool before washing.
water spots are difficult to remove.
7. ALWAYS keep glass cleaner chemicals away from painted surfaces.
Spray the cleaner onto a towel, NOT directly on the windows.
10
1. Terry cloth bonnets can be machined washed in cold water, using a small
amount of detergent. Then machine dried at medium temperature.
HOWEVER, we recommend
hand washing and air drying for longer
bonnet life,
2. Wax applicator
of properly.
bonnets
should only be used once, and then disposed
3. To prolong the life of the foam pad, ALWAYS
the pad face up.
store the buffer/polisher
4. Remove the bonnet from the foam pad when the buffer/polisher
so the pad can dry out and retain its original shape.
5. DO NOT USE ABRASIVE
COMPOUNDS
WITH THIS TOOL.
with
is not in use,
6. DO NOT apply too much wax to the bonnet. Applying too much wax causes
the bonnet to become saturated and it will not last as long. THIS MAKES
POLISHING MORE DIFFICULT AND ITTAKES LONGER.
7. If the bonnet
is continually coming off the pad, you may be using too much
wax.
8. If buffing
seems
difficult,
you have used too much wax.
9. ONLY USE a mild soap solution
buffer / polisher.
and a damp sponge
to clean the
10. DO NOT immerse any part of the buffer / polisher in liquid,
Look for these Craftsman accessories,
they are specially designed to make
your 7-in. Buffer/Polisher
more efficient to use. Accessories
are available at
your local Sears store or other Craftsman outlet.
Wax Applicator Bonnets
For applying waxes and polishes
Terry Cloth Bonnets
Use for removing wax and for buffing and polishing
Polishing Bonnets
For final buffing and polishing to a "showroom shine"
Quality Waxes
For the finest protection and appearance
CAUTION: ALWAYS remove accessories from tool before washing them.
11
NOTES
12
Manual del Usuario
Enceradora / Pulidora
de 7 pulgadas.
Modelo No.
172.10721
ATENClON:
Antes de usar este producto, lea,
comprenda y siga todas las reglas de seguridad
y las instrucciones de funcionamiento incluidas
en este manual.
• SEGURIDAD
• FUNCIONAMIENTO
• MANTENIMIENTO
Sears, Roebuck and Co., Hoffman Estates, IL 60179 U.S.A.
Garantia ................................................................
Instrucciones de Seguridad ................................
Descripci6n ............................................................
Page
Page
Page
14
15-17
18
Funcionamiento .................................................
Mantenimiento .......................................................
Pages 19-22
Page
23
Accesorios .............................................................
Page
23
GARANTIA COMPLETA DE UN ANO DE LA
ENCERADORA/PULIDORA
CRAFTSMAN
Siesta enceradora/pulidora
CRAFTSMAN no le otorga completa
satisfaccion dentro de un aSo de la fecha de compra,
DEVUELVALA AL ALMAGEN SEARS MAS CERCANO EN LOS
ESTADOS UNIDOS y Sears ta reemptazard gratuitamente.
Siesta enceradora/pulidora CRAFTSMAN se usa para propositos
comerciales o de arriendo, esta garantia es v_.lida solamente durante
90 d(as desde la fecha de compra.
Esta garantfa le otorga derechos leg,ales especificos y usted ademC_s
puede tener otros derechos que varian de un estado a otro.
Sears, Roebuck and Co., Dept. 817 WA, Hoffman Estates, IL 60179
iCONSERVE ESTAS INSTRUCCIONES!
iLEA TODAS LAS INSTRUCCIONES!
14
I
instrucciones. El Lncumplimiento de todas las instrucciones indicadas a
z_ ADVERTENCIA:
ASEGURESE de leer y comprender todas las
J
continuaci6n puede resultar en choque el_ctrico, incendio y/o lesi6n personal grave.
SEGURIDAD
1. SlEMPRE
de trabajo
EN EL LUGAR
DE TRABAJO
mantenga el lugar de trabajo limpio y bien iluminado. Los bancos
desordenados
y la falta de iluminaclon favorecen los accidentes.
2. NO utilice las herramientas
el_ctricas
en atm6sferas
explosivas,
tal como
en presencia de l/quidos inflamables, gases o polvo. Las herramientas
electricas crean chispas que pueden inflamar el polvo o los vapores
3. SIEMPRE mantenga a los espectadores,
nifios o visitantes a una
distancia prudente cuando estd utilizando una herramienta
eldctrica.
Las distracciones
pueden hacerle perder el control.
SEGURIDAD
ELECTRICA
1. Las herramientas
con aislamiento doble estdn equlpadas con un
enchufe polarizado (una hoja de contacto es mds ancha que la otrao)
Este enchufe puede colocarse en un tomacorriente
polarizado en una
sola direccibn. Si el enchufe no calza bien en el tomacorriente,
invierta
el enchufe. Si todavia no calza, p6ngase en contacto con un electricista
calificado para que instale un tomacorriente
polarizado. NO modifique
el enchufe de ninguna manera.
2. El [] de aislamiento doble elimina la necesidad del cord6n electrico trifilar
puesto a tierra y del sistema de alimentaci6n de energfa puesto a tierra.
Aplicable solamente a las herramientas de la Clase II (con aislamiento doble).
3. SIEMPRE evite contacto del cuerpo con las superficies puestas a tierra,
tal como tuber,as, radiadores, estufas y refrigeradores.
Existe mayor
nesgo de sufrir choque el_ctrico si su cuerpo est_ a tierra.
4. No exponga tas herramientas
eldctricas a la Iluvla ni a ambientes
hdmedos.
Si penetra agua a una herramienta el_ctrica, se aumenta el
riesgo de sufrir un choque el_ctrico.
5. NO abuse del cord6n el6ctrico. NUNCA tire del cord6n para transportar
ni para desenchufar
las herramientas.
Mantenga el cordon alejado del
calor, del aceite, bordes afilados o plezas m6vlles. Reemplace
inmediatamente
los cordones que est_n dafiados. Los co'rdones da_ados
aumentan el riesgo de sufrir un choque electrico.
6. Cuando utilice una herramlenta eldctrica al aire libre, SIEMPRE use un
cord6n de extensibn marcado "W-A" o "W". Estos cordones estan
aprobados para uso al aire libre y reducen el riesgo de choque electrico.
7. SIEMPRE asegtirese de que el cord6n de extensi6n estd en buen estado.
Cuando use u.n..cordon de extensi6n asegdrese de usar uno cuyo
caliore sea suric,ente para portar la corriente que necesita su
herramlenta. Se recomienda un cord6n de extensibn de pot Io menos calibre
14 (AWG) para un cord6n de extensi6n de 25 pies o menos de largo. Cuando
trabaje al aire libre SIEMPRE use un cordbn de extension adecuado para uso
al aire libre. El forro del cord6n estard marcado WA. Mientras mds pequefio
es el numero del calibre, mayor es la capacidad del cordon (un cord6n
de calibre 16 tlene mayor capacldad que un cord6n de calibre 18).
Un cordbn de calibre inferior causard una pdrdida en el voltaje de ffnea
resultando en perdida de potencia y sobrecalentamiento.
15
SEGURIDADPERSONAL
1. SIEMPRE mant_ngase
alerta, observe Io que est_ haciendo y use
sentido com_n cuando est6 usando una herramienta
el6ctrica. NO use
la herramienta
cuando est6 cansado o bajo la influencia de drogas,
alcohol o medicinas.
Un momento de distracci6n cuando esta trabajando
con las herramientas el_ctricas, puede ocasionar una lesi6n personal grave.
2. SIEMPRE use vestimenta
adecuada. NO use ropas sueltas nl joyas.
Atese el cabeUo largo. Mantenga su cabello, ropas y guantes alejados
de las piezas m6viles. Las ropas sueltas, las joyas o el cabello largo pueden
quedar atrapados en las piezas m6viles.
3. SIEMPRE evite la puesta en marcha accidental.
ASEGURESE
de que el
interruptor est_ en la posici6n "Off" (apagado) antes de enchufar la
herramlenta.
Si transporta la herramienta con su dedo en el interruptor o si
enchufa la herramienta
con el interruptor en la posici6n "On" (encendido)
causar_ alg=3n accidente.
4. NO use la herramienta
a una distancia
demasiado
alejada. SlEMPRE
mantenga
un buen equilibrio y una posici6n firme. El buen equilibrio y
una posici6n firme permiten controlar mejor la herramienta
en situaciones
inesperadas.
5. SIEMPRE
use equipo
de seguridad.
Siempre
use lentes
protectores.
protectores o gafas con protecci6n lateral cuando trabaje
/_k ADVERTENCIA:
SIEMPRE use lentes
I
con
herramientas et_ctricas.
16
USO Y CUIDADO
DE LAS HERRAMIENTAS
1. NO fuerce la herramienta.
Use la herramienta
correcta para et trabajo
que est_ realizando.
La herramienta
correcta reali7ara el trabajo mejor y de
manera m,_s segura si se usa a la velocidad para la cual ha side dise_ada.
2. NO use la herramienta
si el interruptor
no funciona
Es peligroso si la herramienta
no puede ser controlada
per Io tanto debe ser reparada.
debidamente.
con el interruptor y
3. SIEMPRE desenchufe
la herramienta
antes de hacer alg_n ajuste,
cambiar accesorios
o guardarla. Estas medidas preventivas de seguridad
reducen el riesgo de que la herramienta
se ponga en marcha accidentalmente.
4. SIEMPRE guarde las herramientas
que no use lejos del alcance de los
nl_os y de otras personas
inexpertas.
Las herramientas
son peligrosas en
manos de personas inexpertas.
5. SIEMPRE verlflque
el alineamiento
de las piezas mbviles, sl est=tn
atascadas o si hay rotura de plezas y cualquier
otro estado que pueda
afectar su funcionamiento.
Si se da_a, haga reparar la herramienta
antes de usarla. Muchos accidentes
son causados por herramientas
mantenidas en mal estado.
ADVERTENCIA:
EL USO DE ACCESORIOS QUE NO HAN SIDO
RECOMENDADOS PARA USAR CON ESTA HERRAMIENTA PUEDE CREAR
UNA SITUACION DE PELIGRO.
6. SIEMPRE use solamente los accesorios
Craftsman que se recomiendan
para esta herramienta.
Los accesorios que pueden ser adecuados para una
herramienta pueden ser peligrosos cuando se usan en otra herramienta.
SEGURIDAD
SOBRE LAS REPARACIONES
1. La reparaci6n de las herramientas
DEBE SER efectuada solamente por un
Centre de Repuestos y Reparaci6n Sears. La reparaci6n o mantenimiento
efectuado por personal no especializado
puede causar una lesi6n.
2. Cuando efectde reparaciones
en una herramienta,
SIEMPRE use
solamente repuestos legftimos.
Siga las instrucciones
indicadas en la
secci6n Mantenimlento
de este manual. El uso de repuestos no autorizados
puede crear un riesgo de cheque electrico e lesi6n
ilMPORTANTE!
LEATODAS
LAS INSTRUCCIONES
17
Su enceradoraJpulidora
Craftsman tiene caracterfsticas
incorporadas
que
facilitan y hacen m&s eficiente su trabajo. El sistema de contrapeso ajustado a
precisi6n armoniza con el movimiento
orbital Iogrando un brillo "sin remolinos".
El sistema de empuSadura
alrededor del perfmetro proporciona
m_ximo
equilibrio y control, y permite poder sujetarla con comodidad
en cualquier
superficie horizontal o vertical. Tambi_n incluye una cinta autoadherente
para
ayudar a mantener el cord6n de extensi6n firmemente
enchufado en la
enceradora/pulidora.
[_y_e]l_e]P!_e_.
" i •.
Didmetm
7 pulg.
del Disco
•
Motor (Orb. pot Min.)
3800
Potencia Nominal
120 voltios, 60 Hz CA
Amps
1,0
Bonete
aplicador
de cera desechable
Bonete
de tela de toalla reusable
para aplicar
para aplicar
18
ceras
y retirar ceras y pulido final
ANTES DE COMENZAR
AUTOMOVIL:
A PASAR
LA CERA,
LUSTRE
Y PULA SU
1. Lave, limpie y seque su vehfculo.
2. Retire todo el alquitr,_n proveniente del ¢amino, manchas
manchas de insectos con un limpiador para todo uso.
3, Aseg0rese
de que el __rea de trabajo
INSTALACION
DEL BONETE
DE ESPUMA (Ver Figura 2)
de grasa y
est6 seca.
APLICADOR
ADVERTENCIA"
Cuando cambie accesorios,
ASEGURESE
de que el interruptor est_ en
la posici6n ('OFF') (Apagado) y que el
cord6n el_ctrico est_ desenchufado,
DE CERA
EN EL DISCO
Fig.2/
1. Coloque el bonete aplicador de cera en el
disco de espuma como se muestra en la
Fig. 2,
2. SIEMPRE
aseg0rese
de que el elastico
que se encuentra en la parte inferior del bonete est6 firmemente insertado
en el lado inferior del disco de espuma.
APLICACION DE LA CERA EN EL BONETE (Ver Figuras 3 y 4)
IMPORTANTE: iNO APLIQUE LA CERA
DIRECTAMENTE EN EL VEHICULOI
APLICACION DE CERA EN PASTA EN EL
BONETE (Vet Figura 3)
1. Extienda una cucharadita Ilena de cera
uniformemente sobre toda la superficie del
bonete aplicador usando una espdtula o
cualquier otto objeto piano (Ver Fig. 3).
APLICACION DE CERA LIQUIDA EN EL
BONETE (Vet Figura 4)
1. Aplique tres espirales de cera en el
bonete aplicador (Ver Fig. 4),
2. Esta cantidad ser_a suficiente para cubdr
1/4 de la superficie del vehiculo.
3. Para la segunda y tercera aplicacibn, use
solamente aproximadamente la mitad de
Io que us6 en la primera aplicacibn.
El bonete ya no absorberd tanta cantidad
de cera en estas ultimas aplicaciones.
19
PARA ENCENDER ("ON") O APAGAR ("OFF") LA ENCERADORA/PULIDORA
Deslice el interruptor hacia adelante a la posicion
Fig, 5
"On" para encender la herramienta, deslicelo
hacia atr_s la posici6n "Off" para apagar la
herramienta.
NOTA: Despues de enchufar la herramienta en
el cord6n de extensi6n, entrelace el cord6n de
extensi6n en el enchufe del cable el_ctrico corto
de la herramienta. Luego enrolle la cinta
autoadherente alrededor del cord6n de extensi6n
para asegurarlo en su lugar,
IMPORTANTE: Lea, comprenda y siga todas las
instrucciones de seguridad y del usuario
indicadas en este manual y todas las
instrucciones de uso y advertencias sobre los
putidores y ceras.
APLICACION DE LA CERA EN LA SUPERFICE
QUE VA A SER PULIDA (Ver Figuras 5 a 8)
NOTA: A fin de evitar salpicaduras de cera,
SIEMPRE encienda y apague la
enceradora/pulidora
manteni_ndola sobre o
contra la superficie que est& siendo pulida.
t. Coloque el cord6n de extension sobre su
hombro (Ver Figura 5).
2. Encienda ta enceradoraJpulidora.
3. Aplique la cera en tfnea recta con movimiento
ya sea de lado a lade o de atr._s hacia adelante.
Cuando aplique la cera SIEMPRE use pasadas
amplias y uniformes (Ver Figura 6).
4. Comience aplicando pdmero cera en las
superficies planas (cap6, portaequipajes
y techo). Encere de una secci6n a la vez
(Ver Figura 7).
Figo6 .<--_ _
_,
I
t"
5. Despu_s de que todas las superficies planas
estOn cubiertas con cera, siga con los costados.
El sistema de empufiadura alrededor del
perfmetro le permite pulir con facilidad las
superficies horizontales y verticales. Sostenga
la herramienta de ando colgar el cord6n
el_ctrico. (Ver F gura 8).
6. Aplique la cera en forma de una capa delgada
y uniforme. Si coloca demasiada cera no est&
agregando mds protecci6n y ademds despuds es mds diffcil retirarla
7. El movimiento orbital aleatorio de la enceradoraJpulidora perm te una perfecta
apUcaci6n de la cera, Io cua no Iograna ni alan si la aplicara "a mano".
IMPORTANTE: Con esta herramienta NO es necesado aplicar presi6n excesiva
contra la superficie de trabajo. El movimiento orbital aleatorlo de esta herramienta
!unc.iona mejor cuando se aplica menos presi6n. Si se aplica presi6n exces vase
nara mds lento el movimiento orbital aleatorlo y se reducird la eflcacia de la
herramlenta.
8. Es preferible aplicar la cera sobre toda la superficie antes de comenzar lafase
de remoci6n; sin embargo siga las recomendaciones espec|ficas de a cera o
pu idor que estd siendo usada.
20
r
,
APLICACIONDE LA CERA EN LA SUPERFICIEQUESERA PULIDA
(Ver Figura 9)
9. Apague la lustradora/pulidora cuando
haya terminado de aplicar
el bonete aplicador.
la cera con
10. Retire el bonete aplicador de cera y
uselo para pulir a mano aquellas
superficies que son dificiles de alcanzar
(debajo de los parachoques,
alrededor
de las manijas de las puertas, etc.).
(Vet Figura 9.)
11. Descarte el bonete aplicador
cera de manera apropriada.
de
INSTALACION
DEL BONETE PULIDOR EN EL DISCO
(Ver Figura 10)
ADVERTENCIA:
Cuando cambie
accesorios,
ASEGURESE
de que el
interrupter este en la posici6n ('OFF')
(Apagado) y que el cordon eleetrico est_
desenchufado.
DE ESPUMA
1. Coloque el bonete de tela de toalla en
el disco de espuma como se muestra
en la Fig. 10,
2. SlEMPRE asegurese de que el elastico
que se encuentra en la parte inferior del
bonete est_ firmemente
insertado en el lado inferior
del disco de espuma.
LUSTRADO Y PULIDO - REMOCION DE LA CERA DE LA SUPERFICIE
(Ver Figura 11)
NOTA: Retire la cera en el mismo orden
en que fu_ aplicada.
1. Coloque el cord6n de extensi6n sobre
su hombro.
2. Encienda
la enceradora/pulidora.
3. Lustre y pula (retire la cera) cuando la
cera se haya secado y tenga la
apariencia de una bruma uniforme,
NOTA: Para obtener mejores resultados,
use pasadas entrecruzadas
largas y amplias
para sacar la cera.
4. Lustre y pula toda la superficie hasta que se haya sacado toda la cera seca.
De vez en cuando retire el bonete y sacOdalo para desprender
los residuos
de cera seca. Un bonete que tenga demasiados
residuos causar& veteado.
Puede que sea necesario cambiar el bonete pot uno nuevo si no puede
limpiarlo bien de manera que no deje mamas.
5. Use un bonete de tela de toaUa para el lustrado y pulido final. O use un
bonete pulidor de cera (vendido por separado) para obtener el brillo final de
"sala de exposici6n".
21
IMPORTANTE:Con esta herramientaNO es necesarioaplicar
presion
excesiva contra la superficie de trabajo. El movimiento
orbital aleatorio de esta
herramienta funciona mejor cuando se aplica menos presi6n. Si se aplica
presion excesiva se bar& m_s lento el movimiento
orbital aleatorio y se
reducir& la eficacia de la herramienta.
CONSEJOS
PARA EL CUIDADO
DEL AUTOMOVIL
1. Lave y pula el autom6vil 3 a 4 veces al afio para proteger la pintura.
2. Lave el automovil por Io menos cada 2 semanaa con una solucion de lavar
autos que no dafie el acabado ni extraiga la cera. EVITE usar detergentes
dom_sticos para lavar el autom6vil.
3. Lave con una esponja limpia y seque con una toalla para evitar que la
suciedad raspe la pintura. Comience en la parte superior y siga hacia abajo.
4. Limpie diariamente
los insectos, suciedad de pajaros,
alquitr_.n de la superficie del autom6vil.
5. SIEMPRE
lavarlo.
aseg_rese
de que la superficie
6. Evite estacionar cerca de rociadores
son dificiles de quitaro.
del autom6vil
de c6sped
sabia de arboles
y
este fria antes de
pues las manchas
de agua
7. SIEMPRE mantenga los productos quimicos de limpiar vidrios alejados de
las superficies pintadas. Rocle el limpiador en una toalla, NO directamente
en las ventanas,
22
1. Los bonetes de tela de toalla pueden ser lavados en la lavadora en agua
fria, usando una pequeSa cantidad de detergente.
Despues s_quelos en la
secadora usando temperatura
mediana. SIN EMBARGO,
recomendamos
que se laven a mano y se sequen al aire para prolongar la vida Qtil del
bonete.
2. Los bonetes aplicadores
de cera deben ser usados
luego descartarlos
de manera apropiada.
solamente
3. Para prolongar la duraci6n del disco de esp.uma, SlEMPRE
enceradora/pulidora
con el disco hacia arr_ba.
una vez y
guarde la
4. Retire el bonete del disco de espuma cuando la enceradora/pulidora
no
este en uso, de manera que el disco se pueda secar y retener su forma
original.
5. NO USE COMPUESTOS
ABRASIVOS
CON ESTA HERRAMIENTA.
6. NO aplique demasiada cera en el bonete. Si aplica demasiada cera el
bonete puede saturarse y no durara mucho. ESTO HARA MAS DIFICIL
PULIDOY
DEMORARA
MASTIEMPO
EN HACERLO.
7. Si el bonete se sale a menudo
demasiada cera.
del disco, puede que est_ usando
8. Si es dificil lustrar la superficie
puede
9. USE SOLAMENTE
una soluci6n
para limpiar la enceradora/pulidora.
10. NO sumerja
ninguna
que haya usado demasiada
con jab6n suave y una esponja
pieza de la enceradora/pulidora
en ning6n
EL
cera,
mojada
Ifquido.
Busque estos accesorios
Craftsman; han sido diseSados especialmente
para
aumentar la eficiencia de su enceradoraJpulidora
de 7 pulg. Los accesorios
estan disponibles
en su Almac_n Sears local o en cualquier otro almac6n que
distribuya productos Craftsman.
Bonetes Aplicadores de Cera
Para apUcar cera y pulidores
Bonetes de Tela deToalla
Para retirar la cera, lustrar y pulir
Bonetes Pulidores
Para el lustrado y pulido final y obtener un brillo de "sala de exposici6n"
Ceras de Calidad
Para una meier proteccibn y apariencia
ATENCION:
SIEMPRE
retire los accesorios
23
de la herramienta
antes de lavarlos.
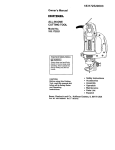
Your Home
_x,>:+:+
::::::::
For repair in your home of all major brand appliances,
lawn and garden equipment,
or heating and cooling systems,
no matter who made it, no matter who sold itl
'iiiiiiiiili_
',
For the replacement parts, accessories and
:+>>>>_:
owner's
_x+:+>
+:_>:<x
:iiiiiiZiiiiiiii!iiiii_
¸
manuals
that you need to do-it-yourself.
For Sears professional
installation of home appliances
and items like garage
door openers
and water heaters.
H_
1-800-4-MY-HOME ®
H
Anytime, day or night
(1-800-469-4663)
www.sears.corn
::+>>x_
(U.S.A. and Canada)
www.sears.ca
x>:+::<
Our Home
:+:.:.>>:_:
_:+:+:<<
+>:.>::::
k;:k::::::_:k
For repair of carry-in products like vacuums, lawn equipment,
and electronics, call or go on-line for the nearest
Sears Parts and Repair Center.
mm_:
x+:+:<:
>_>>:+::
1-800-488-1222
Anytime, day or night (U.S.A. only)
_mx
www.sears.com
_::::m
:+>x_:
To purchase
agreement
:
a protection agreement (U.S.A.) or maintenance
(Canada)
1-800-827-6655
iii
:
on a product
(u • sJ_)
serviced
by Sears:
1-800-361-6665
_i;_ii!iil
iiiiiiiiiiii
(Canada)
:::::
::::::::
:_:::,_,_,:,_::::::::::
Para pedir servicio de reparaci6n
......... a domicilio y para ordenar piezas:
.............
1-888-SU-HOGAR
::;:kk::::::
::::t:::::::::::
::::kkk::::::
:_:_:_:_.
_-;;s3:_:_:_-_:_.
11-888-784-6427)
Au Canada pour serviceen fran_:ais: ::;_;:::::::::,_
1-800-LE-FOYER
........
(1-800.533,6937)
.................
:::::kk:::::
MC
www. sears, ca
::...................
:::-:::::
...w......
.........
_..
=.................
:iliiiii!iii!il
====================================================================
©Seas,_a_d
....
::.::::::
:_:_:_:_i:i:[:_'_::_:_:[_:_:_:_:???_::::_:::_N::::::::_:_::::'"
Co.
® Registered Trademark/'ra
Trademark I s_ Service Mark o/Sears. Roebuck and Co.
® Mama Reglstrada / _'u Mama de F. brica / sa Marca de Senticio de Seam. Roebuck and Co.
ac Marque de commerce / _ Marque depos_e de Sears. Roebuck and Co.